Interacoustics ASSR Instructions For Use Manual
- Tip
- Instructions For Use Manual

Instructions for Use
Interacoustics ASSR
- for the Eclipse
Valid from software version 1.00
80701304 -10/2010
Instructions for Use GB
Manual de instrucciones ES
Instrucções para a utilização PT
GR
Brugsanvisning DK
Gebruiksaanwijzing NL
PL
IT
Gebrauchsanweisung DE
FR
Bruksanvisning SE
Upute za uporabu HR
Navadila za uporabo SL
Instructiuni de utilizare - RO
Bruksanvisning S


Instructions for Use - GB
Interacoustics ASSR
- for the Eclipse
Valid from software version 1.00


ASSR Instructions for Use English
Date: 2009-09-01 Page 1/10
Intended use of the Interacoustics ASSR
The Interacoustics ASSR is indicated for use in the recording and analysis of human physiological data
used for the diagnosis of auditory and hearing-related disorders.
This product, Interacoustics ASSR is a diagnostic device intended to be used as part of a set of
audiometric test protocols. It is especially indicated for use in defining the configuration of the hearing
loss particularly for individuals whose behavioral audiometric results are deemed unreliable. It allows
for the estimation of hearing threshold at various frequencies, through the use of ASSR (Auditory
Steady-State Response) test protocols. It is designed to be used as a diagnostic test procedure by
individuals who are trained in the performance and interpretation of evoked potentials such as
audiologists and physicians. The results of the test will be used by trained hearing health care
professionals to make recommendations regarding appropriate intervention strategies.
The use of the Interacoustics ASSR is to be performed under the prescription and supervision of a
physician or other trained health care professional.
The patient group includes all ages and sexes.
Precautions
1. Be sure to use only stimulation intensities, which will be acceptable for the patient.
2. The transducers (headphones, bone conductor, etc.) supplied with the device are calibrated to
this device - exchange of transducers require a new calibration.
3. It is recommended that parts which are in direct contact with the patient (e.g. earphone
cushions) are subjected to standard disinfecting procedure between patients. This includes
physically cleaning and use of a recognized disinfectant. Individual manufacturer's instruction
should be followed for use of this disinfecting agent to provide an appropriate level of
cleanliness.
4. Please note that if connection is made to standard equipment like printers and network, special
precautions must be taken in order to maintain medical safety. Optical isolation unit for USB is
available from your supplier.
5. Although the instrument fulfils the relevant EMC requirements precautions should be taken to
avoid unnecessary exposure to electromagnetic fields, e.g. from mobile phones etc. If the
device is used adjacent to other equipment it must be observed that no mutual disturbance
appears.
6. The specification for the instrument is valid if the instrument is operated within the following
environmental limits:
WARNING indicates a hazardous situation which, if not avoided, could
result in death or serious injury.
CAUTION, used with the safety alert symbol, indicates a hazardous
situation which, if not avoided, could result in minor or moderate injury.
NOTICE is used to address practices not related to personal injury.

ASSR Instructions for Use English
Date: 2009-09-01 Page 2/10
Temperature: 15°C to 35 °C.
Humidity: 30 %RH to 90 %RH
Supply voltage:100 240 Vac
Supply frequency: 50 60 Hz
If this device is connected to one or more other devices with medical CE marking, to
make up a system or pack, the CE marking is only valid also for the combination if the
supplier has issued a declaration stating that the requirements in the Medical Device
Directive article 12 are fulfilled for the combination.

ASSR Instructions for Use English
Date: 2009-09-01 Page 3/10
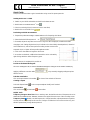
Operation Instruction
Preparations prior to the ASSR Test
For obtaining reliable and valid test results it is most important that the patient is well prepared for the
test.
Preparation of the Skin
It is very important to clean the skin where the electrodes are to be placed in order to obtain an
acceptable low skin impedance.
1. Clean the skin thoroughly with the skin preparation gel.
2. Wash off the gel with alcohol before applying the electrodes.
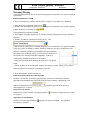
Placement of Electrodes
Place an electrode on each mastoid or earlobe, one at vertex (or hair-line) (for white connector) and
one on the cheek (for black connector). Connect all four electrode leads.
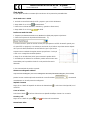
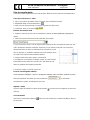
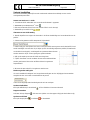
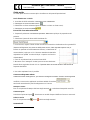
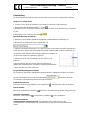
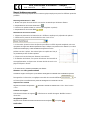
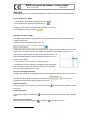
Insertion of the insert earphones
Make sure that the end of the black tube is not occluded by the yellow foam when you roll the insert
earphone tip into the smallest diameter possible.
Insert the tip well into the ear canal. The correct insertion depth into the ear canal is obtained when the
rear edge of the insert earphone is 1-2 mm inside the entrance of the ear canal.
Hold the insert earphone in the ear canal until expanded.
Use a new pair of ear tips for each patient.
Impedance Check
After having attached the electrodes to the patient it is crucial to check the skin impedance. For best
results, impedance at each electrode should be as low as possible, preferably 3 k or less.
Return to ERA mode by clicking IMP button.

ASSR Instructions for Use English
Date: 2009-09-01 Page 4/10
Quick Guide
The Quick Guide describes a typical examination using one of the preset protocols.
Starting OtoAccess: ASSR
1. Switch on your ASSR workstation and wait for windows® to start.
2. Double
1
Icon
3. Choose an existing client (or enter and save a new client)
4. Double click on the ASSR icon .
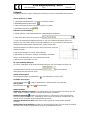
Performing an ASSR measurement
1. Prepare the patienence for Preparing the Patien
2. Select desired ASSR test protocol. ex.
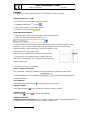
3. If needed, adjust the rejection level to have a large size EEG displayed, but without the EEG
changing to red. Settings higher than 20 µV indicates a less than ideally relaxed patient (or electrical
noise interference), and less than perfect recording results are thus to be
expected. 80 µV or higher will not provide optimum results.
4. Click on the Start button to begin the ASSR test.
5. As results are obtained, additional test intensities can be selected by
right clicking within the desired frequency pane.
6. When the test is completed it is possible to:
Provide an Estimated Audiogram
applying a different correction table or by manually dragging audiogram points
with the mouse.
Print the examination
Click on the print button in the toolbar or choose Print under the File menu.
Creating a Report
Select the Report button . Select a report template. Modify text if needed.
Save and Exit
Click on the save and exit button in the toolbar.
Helpful tools:
Temporary change to Auto Test: Prior to starting a test, the default selection of frequenencies to be
he upper left hand corner of the recording screen.
Temporary Setup disable or enable frequencies, change intensities, adjust parameters to patient
arousal state etc, temporarily for this session. Changes are effective in the current session only, and
will NOT permanently change the test protocol.

ASSR Instructions for Use English
Date: 2009-09-01 Page 5/10
O
Browse between historical sessions: use the PgUp and PgDn keys to toggle between historical
sessions.
Additional controls during testing : Right click in desired frequency pane, to be able to select
extension of test time or to stop an ongoing test on that frequency.
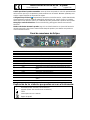
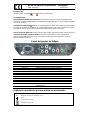
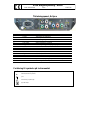
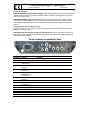
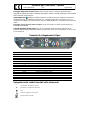
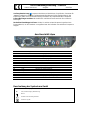
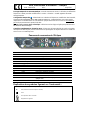
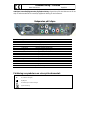
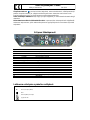
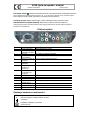
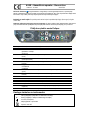
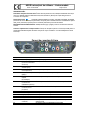
Connection Panel Eclipse
Position:
Symbol:
Function:
1
Power
Turns power on/off
2
Mains 50-60 Hz
Plug for mains cable
3
Aux Out
For future use
4
Preamp.
Plug for preamplifier
5
Pat. Resp.
Plug for patient response knob
6
Trigger In/Out
Connector for trigger input/output
7
Talk Back
Connector for talk back microphone
8
Talk Forward
Connector for talk forward microphone
9
OAE
Plug for the eight pin OAE probe
10
Left
Plug for left phone
11
Right
Plug for right phone
12
Bone
Plug for bone conductor
13
USB/PC
Plug for USB cable or PC
14
DC
Plug for power supply for optical USB extension cable
15
Connection for functional ground
Explanation to symbols which can be found on the instrument:
I
On (Power: connection to the mains)
Off (Power: disconnection from the mains)
Ground
!
See explanation in manual
Type BF equipment

ASSR Instructions for Use English
Date: 2009-09-01 Page 6/10
Technical Specifications
The technical specifications provided here cover the general aspects of the instrument, while more
specific details can be found in the Operation Manual in english.
Standards:
IEC 60601-1 (General safety) Class I, Type BF
IEC 60601-1-1 (Safety of systems) Class I, Type BF
IEC 60601-1-2 (EMC)
IEC 60601-2-26 (Electroencephalographs)
IEC 60645-1/ANSI S3.6 (Audiometers)
IEC 60645-3 (Auditory test signals)
Medical CE-mark:
Interacoustics A/S meets the requirements of Annex II of the Medical Device Directive 93/42/EEC.
Approval of the quality system is made by TÜV identification no. 0123.
PC Requirements (PC not included):
Operating System: Windows XP©, Windows 98se, Windows 2000, Vista
Processor: Pentium III, 800Mhz or better
RAM: 256MB
Hard disk: 1GB
Display Resolution: 1024 x 768 or better
USB: 1.1 or higher
System:
Eclipse Black box to connect to your own PC
Safety:
Medical Safety transformer built-in
Optical isolation to PreAmplifier
Optical USB Isolation to PC (optional)
PreAmplifier:
2 channels.
Gain: 80 dB/60 dB.
Frequency Response: 0.5-5 k Hz
Noise:422µV RMS (0-3kHz))
CMR ratio: Minimum >118 dB. Typical 130 dB <100 Hz
Power: From main unit
Anti Aliasing Filter:
Analogue 5kHz 24dB / octave (30kHz Sampling rate)

ASSR Instructions for Use English
Date: 2009-09-01 Page 7/10
Impedance Check:
33Hz rectangle.
Impedance information for each individual electrode.
No unplugging of electrode leads required.
Readout directly on Amplifier.
Measuring Current: 19uA.
-
Transducers:
Ear-Tone ABR insert phones included.
Independent calibration for TDH39 (TDH29 not included).
Number of Channels:
2 channel response detection. (EPA3: 1 channel).
8 channels for stimulus control
Test Protocols:
Test protocols included for children and for awake adults.
Customized protocols can be created by user.
Stimuli:
500Hz, 1kHz, 2kHz, 4kHz
Bandwidth: +/- ½ octave -3dB. Very steep roll offs.
Compensation for cochlear delays
Simultaneous stimuli: 8 (4 frequencies in each Ear)
Modulation Rates:
90Hz and 40Hz.
Can be changed within the same session.
Masking:
White noise
0 100dB HL
Stimulus Control:
Independent control of up to 8 simultaneous stimuli (max. 4 per ear).
Independent stimulus level control for each of the 8 stimuli, with dynamic range assistance
Independent start / stop control for each of the 8 stimuli
Data Acquisition:
2 channels
Separate Detection Algorithm for each Channel
A/D resolution: 16bit
Manual Start and Stop: Global as well as for each Stimulus
Time out limits:
Max 15min. (Default: 6min.)
Manual change in +/- 1 min. steps.
False Pass Probability Settings: 1% and 5%

ASSR Instructions for Use English
Date: 2009-09-01 Page 8/10
Gain:
Manual: 6dB steps from 74dB to 110dB (5µV to 3200µV input).
Rejection system:
Manual increase and decrease of rejection limits during data acquisition.
Raw EEG:
Online display for each channel simultaneously.
Refresh rate: 10Hz typical.
Printout:
Customized printouts.
Hardcopy or as pdf file for EMR
Patient communication:
Talk back (built in loudspeaker).
OtoAccess Database:
Included
Database: SQL
Data format: XML
Unlimited storage. Patient Journal.
analyzers.
Easy back-up function.
Interacoustics ASSR may alternatively run without a database.
NOAH:
NOAH compatible (NOAH 3.6 or higher)
(Estimated Audiogram available for other NOAH modules)
Networks:
May connect to a network.
Subsequent sessions viewing from reader stations.
With optional software, even tests in progress may be monitored and controlled from any reader
station in the network.
Dimensions:
Eclipse: (L x W x H) 28 x 32 x 5,5 cm / 11 x 12.5 x 6 inches.
Weight:
Eclipse: 2,5 kg / 5,5 lbs excluding accessories
Other modules available for the Eclipse black box:
ening (ABRIS)

ASSR Instructions for Use English
Date: 2009-09-01 Page 9/10
Detachable Parts
Included Parts (Complete System):
ECLIPSE
EPA Preamplifier
ETB Standard electrode cable with buttons
ETU Universal electrode cable
ETR Electrode cable with re-usable electrodes
PEG15 Set of 25 single use pre-gelled
electrodes
20 pcs. of Infant eartip (2 x 10)
EarTone ABR Insert ear phones w/foam tips
SPG15 Tube of skin preparation gel
Electrode gel
Alcohol pads (100 pcs.)
USB cable 2m
Power cable
Software CD
Database Software
Operation Manual
CE Manual
Optional Parts:
TDH39 Headset
UCO15 Optical USB extension cable for Eclipse
Black Box (can be delivered with 1 or 5 metres
USB cable).
Concerning Repair
1. Interacoustics is only considered to be responsible for the validity of the CE marking, effects on
safety, reliability and performance of the equipment if:
assembly operations, extensions, readjustments, modifications or repairs are carried out
by authorized persons,
a 1 year service interval is maintained
the electrical installation of the relevant room complies with the appropriate requirements,
and
the equipment is used by authorized personnel in accordance with the documentation
supplied by Interacoustics.
2. Should a problem with the device arise, please contact your local distributor. The RETURN
REPORT located in the back of the operational manual must also be sent to Interacoustics,
Drejervanget 8, DK-5610 Assens in connection with reporting of problems, incidents, etc.
3. When instrument fuses need renewal, the correct type as stated on the instrument shall be used.

ASSR Instructions for Use English
Date: 2009-09-01 Page 10/10
General Maintenance Procedures
The performance and safety of the instrument will be kept if the following recommendations for care
and maintenance are observed:
It is recommended to let the instrument go through at least one annual evaluation, to ensure that the
acoustical, electrical and mechanical properties are correct. This should be made by an experienced
workshop in order to guarantee proper service and repair.
Before the connection to the mains, be sure that the local mains voltage corresponds to the voltage
labelled on the instrument.
Observe that no damage is present on the insulation of the mains cable or the connectors and that it is
not exposed to any kind of mechanical load, which could involve damage.
For maximum electrical safety, turn off the power from a mains powered instrument when it is left
unused.
Do not place the instrument next to a heat source of any kind, and allow sufficient space around the
instrument to ensure proper ventilation.
To ensure the reliability of the instrument, periodic biological measurements should be performed on a
person with known data. This person could be the operator him/herself.
If the surface of the instrument or parts of it is dirty, it can be cleaned using a soft cloth moistened with
a mild solution of water and dish washing cleaner or similar. The use of organic solvents and aromatic
oils must be avoided. Always disconnect the mains plug during the cleaning process, and be careful
that no fluid is entering the inside of the instrument or the accessories.
After each examination of a patient, proper cleaning must ensure that there is no contamination on the
parts in connection with patients. General precautions must be observed to prevent transmission of
disease from one patient to another. If the ear cushions or ear tips are contaminated, it is strongly
recommended to remove them from the transducer before they are cleaned. Frequent cleaning using
water may be used, but periodic use of a mild disinfectant may also be used. The use of organic
solvents and aromatic oils must be avoided.
Great care should be exercised by the handling of earphones and other transducers, as mechanical
shock may cause change of calibration.

Instrucciones de uso - ES
Interacoustics ASSR
- para Eclipse
Válido a partir de la versión de software 1.00


Instrucciones de uso de ASSR - Español
Fecha: 2009-09-01 Rev.: Página 1/10
Aplicación de ASSR Interacoustics
ASSR Interacoustics está indicado para usarse en el registro y análisis de datos psicológicos humanos
para el diagnóstico de trastornos auditivos y relacionados con el oído.
Este producto, Interacoustics ASSR, es un dispositivo de diagnóstico previsto para formar parte de un
conjunto de protocolos de pruebas audiométricas. Su uso está especialmente indicado para definir la
configuración de pérdida de capacidad auditiva, en concreto la de aquellas personas cuyos resultados
audiométricos de conducta se estimen poco fiables. Permite la estimación del umbral de audición a
diversas frecuencias, mediante el empleo de protocolos de pruebas ASSR (respuestas auditivas de
estado estable). Está diseñado para que lo utilicen personas con la preparación adecuada que sepan
obtener e interpretar potenciales evocados, como audiólogos y médicos. Los resultados de la prueba
serán examinados por profesionales sanitarios especializados en audición que deberán recomendar
las estrategias de intervención pertinentes.
El empleo de ASSR Interacoustics debe realizarse bajo la prescripción y supervisión de un médico u
otro profesional sanitario con la formación apropiada.
El grupo de pacientes abarca todas las edades y ambos sexos.
Precauciones
1. cerciorarse de usar solamente intensidades de estimulación que sean aceptables para el
paciente
2. los transductores (auriculares, conductores óseos, etc.) suministrados con el dispositivo van
calibrados para dicho dispositivo; si se cambian los transductores, hará falta una nueva
calibración.
3. se recomienda someter al procedimiento habitual de desinfección entre pacientes las piezas
que estén en contacto directo con el paciente (ej., almohadillas de los auriculares). Dicho
procedimiento incluye la limpieza física y empleo de un desinfectante homologado. Al usar
dicho producto desinfectante, deben seguirse las instrucciones del fabricante para garantizar
un nivel de limpieza apropiado.
4. téngase en cuenta que si el dispositivo se conecta a equipos habituales, como impresoras o
redes, deben tomarse precauciones especiales con el fin de mantener la seguridad médica.
Su proveedor puede ofrecerle una unidad de aislamiento óptico para USB.
5. aunque el instrumento cumple los requisitos de compatibilidad electromagnética (CEM),
deben tomarse precauciones para evitar una exposición innecesaria a campos
electromagnéticos, p. ej., de teléfonos móviles, etc. Si se pone el dispositivo junto a otro
aparato, hay que asegurarse de que no se perturben mutuamente.
ADVERTENCIA indica una situación peligrosa que, de no evitarse,
podría ocasionar heridas graves o muerte.
PRECAUCIÓN, utilizado junto con el símbolo de alerta de seguridad,
indica una situación peligrosa que, de no evitarse, podría ocasionar
heridas leves o moderadas.
AVISO se utiliza para hacer referencia a prácticas que no ocasionan
lesiones personales.

Instrucciones de uso de ASSR - Español
Fecha: 2009-09-01 Rev.: Página 2/10
6. Las características del equipo son válidas sólo en el caso de que el equipo funcione bajo los
siguientes límites ambientales:
Temperatura: 15°C a 35°C.
Humedad: 30% RH a 90% RH
Voltaje de alimentación: 100 240 Vac
Frecuencia de alimentación: 50 60 Hz
Si este aparato se conecta a uno o varios dispositivos con el marcado CE médico para
componer un sistema o paquete, el marcado CE sólo será válido para esa
combinación si el proveedor ha proporcionado una declaración que constate que dicha
combinación cumple el artículo 12 de la Directiva sobre dispositivos médicos.

Instrucciones de uso de ASSR - Español
Fecha: 2009-09-01 Rev.: Página 3/10
Instrucciones de funcionamiento
Preparativos previos para la prueba ASSR
Con el fin de obtener unos resultados válidos y fiables, es de suma importancia que el paciente esté
bien preparado para la prueba.
Preparación de la piel
Es muy importante limpiar la piel donde se vayan a colocar los electrodos a fin de conseguir una
impedancia baja de la piel aceptable.
3. Limpie la piel a conciencia con el gel de preparación.
4. Lave el gel con alcohol antes de colocar los electrodos.
Colocación de los electrodos
Ponga un electrodo en cada mastoides o lóbulo de oreja, uno en el vértice (o nacimiento del pelo)
(para el conector blanco) y otro en la mejilla (para el conector negro). Conecte los cuatro cables de los
electrodos.
Colocación de los auriculares de inserción
Asegúrese de que el extremo del tubo negro no quede concluido por la espuma amarilla al introducir la
punta del auricular de inserción hasta el diámetro mínimo posible.
Introduzca bien la punta en el canal auditivo. Se alcanza la profundidad correcta de inserción en el
canal auditivo cuando el borde trasero del auricular de inserción está 1-2 mm dentro de la entrada de
dicho canal.
Mantenga la auricular de inserción en el canal auditivo hasta que se expanda.
Use un par de puntas nuevas para cada paciente.
Comprobación de impedancia
Una vez fijados los electrodos al paciente, es fundamental comprobar la impedancia de la piel. Para
obtener los mejores resultados, la impedancia de cada electrodo debe ser lo más baja posible,
preferiblemenenos.
Para volver a ERA haga clic en el icono IMP.

Instrucciones de uso de ASSR - Español
Fecha: 2009-09-01 Rev.: Página 4/10
Guía rápida
La guía rápida describe un examen típico usando uno de los protocolos preestablecidos.
Iniciar OtoAccess: ASSR
1. encienda su estación de trabajo ASSR y espere a que se inicie Windows®.
2. Haga doble clic en el icono
2
3. Seleccione un cliente existente (o introduzca y guarde un cliente nuevo).
4. Haga doble clic en el icono de ASSR.
Realizar una medición ASSR
1. Prepare al pacienencia rápida para preparar al pacien
2. Seleccione el protocolo de prueba ASSR deseado. Ej.
3. Si fuera necesario, ajuste el nivel de rechazo para que aparezca un EEG de tamaño grande, pero
sin que el EEG se ponga rojo. Los valores por encima de 20 µV indican un paciente menos relajado
de lo que sería ideal (interferencia de ruido eléctrico) por lo que han de
esperarse unos resultados de registro menos que perfectos. Con 80 µV
o más no se conseguirán resultados óptimos.
4. Haga clic en el botón Start (inicio) para comenzar la prueba ASSR.
5. A medida que se obtienen los resultados, pueden seleccionarse otras
intensidades para la prueba haciendo clic en el panel de frecuencia
0deseado.
6. Una vez terminada la prueba, se puede:
Obtener un audiograma estimado
pueden hacerse cambios aplicando una tabla de corrección distinta o arrastrando
manualmente con el ratón puntos de audiograma.
Imprimir el examen
Haga clic en el botón de impresión de la barra de herramientas o seleccione Print (Imprimir) en el
menú File.
Crear un informe
Seleccione el botón de informe. Seleccione una plantilla. Modifique el texto si es necesario.
Guardar y salir
Haga clic en el botón de guardar y salir de la barra de herramientas.
Herramientas útiles:
Pagina se încarcă...
Pagina se încarcă...
Pagina se încarcă...
Pagina se încarcă...
Pagina se încarcă...
Pagina se încarcă...
Pagina se încarcă...
Pagina se încarcă...
Pagina se încarcă...
Pagina se încarcă...
Pagina se încarcă...
Pagina se încarcă...
Pagina se încarcă...
Pagina se încarcă...
Pagina se încarcă...
Pagina se încarcă...
Pagina se încarcă...
Pagina se încarcă...
Pagina se încarcă...
Pagina se încarcă...
Pagina se încarcă...
Pagina se încarcă...
Pagina se încarcă...
Pagina se încarcă...
Pagina se încarcă...
Pagina se încarcă...
Pagina se încarcă...
Pagina se încarcă...
Pagina se încarcă...
Pagina se încarcă...
Pagina se încarcă...
Pagina se încarcă...
Pagina se încarcă...
Pagina se încarcă...
Pagina se încarcă...
Pagina se încarcă...
Pagina se încarcă...
Pagina se încarcă...
Pagina se încarcă...
Pagina se încarcă...
Pagina se încarcă...
Pagina se încarcă...
Pagina se încarcă...
Pagina se încarcă...
Pagina se încarcă...
Pagina se încarcă...
Pagina se încarcă...
Pagina se încarcă...
Pagina se încarcă...
Pagina se încarcă...
Pagina se încarcă...
Pagina se încarcă...
Pagina se încarcă...
Pagina se încarcă...
Pagina se încarcă...
Pagina se încarcă...
Pagina se încarcă...
Pagina se încarcă...
Pagina se încarcă...
Pagina se încarcă...
Pagina se încarcă...
Pagina se încarcă...
Pagina se încarcă...
Pagina se încarcă...
Pagina se încarcă...
Pagina se încarcă...
Pagina se încarcă...
Pagina se încarcă...
Pagina se încarcă...
Pagina se încarcă...
Pagina se încarcă...
Pagina se încarcă...
Pagina se încarcă...
Pagina se încarcă...
Pagina se încarcă...
Pagina se încarcă...
Pagina se încarcă...
Pagina se încarcă...
Pagina se încarcă...
Pagina se încarcă...
Pagina se încarcă...
Pagina se încarcă...
Pagina se încarcă...
Pagina se încarcă...
Pagina se încarcă...
Pagina se încarcă...
Pagina se încarcă...
Pagina se încarcă...
Pagina se încarcă...
Pagina se încarcă...
Pagina se încarcă...
Pagina se încarcă...
Pagina se încarcă...
Pagina se încarcă...
Pagina se încarcă...
Pagina se încarcă...
Pagina se încarcă...
Pagina se încarcă...
Pagina se încarcă...
Pagina se încarcă...
Pagina se încarcă...
Pagina se încarcă...
Pagina se încarcă...
Pagina se încarcă...
Pagina se încarcă...
Pagina se încarcă...
Pagina se încarcă...
Pagina se încarcă...
Pagina se încarcă...
Pagina se încarcă...
Pagina se încarcă...
Pagina se încarcă...
Pagina se încarcă...
Pagina se încarcă...
Pagina se încarcă...
Pagina se încarcă...
Pagina se încarcă...
Pagina se încarcă...
Pagina se încarcă...
Pagina se încarcă...
Pagina se încarcă...
Pagina se încarcă...
Pagina se încarcă...
Pagina se încarcă...
Pagina se încarcă...
Pagina se încarcă...
Pagina se încarcă...
Pagina se încarcă...
Pagina se încarcă...
Pagina se încarcă...
Pagina se încarcă...
Pagina se încarcă...
Pagina se încarcă...
Pagina se încarcă...
Pagina se încarcă...
Pagina se încarcă...
Pagina se încarcă...
Pagina se încarcă...
Pagina se încarcă...
Pagina se încarcă...
Pagina se încarcă...
Pagina se încarcă...
Pagina se încarcă...
Pagina se încarcă...
Pagina se încarcă...
Pagina se încarcă...
Pagina se încarcă...
Pagina se încarcă...
Pagina se încarcă...
Pagina se încarcă...
Pagina se încarcă...
Pagina se încarcă...
Pagina se încarcă...
Pagina se încarcă...
Pagina se încarcă...
Pagina se încarcă...
Pagina se încarcă...
Pagina se încarcă...
Pagina se încarcă...
Pagina se încarcă...
Pagina se încarcă...
Pagina se încarcă...
Pagina se încarcă...
-
 1
1
-
 2
2
-
 3
3
-
 4
4
-
 5
5
-
 6
6
-
 7
7
-
 8
8
-
 9
9
-
 10
10
-
 11
11
-
 12
12
-
 13
13
-
 14
14
-
 15
15
-
 16
16
-
 17
17
-
 18
18
-
 19
19
-
 20
20
-
 21
21
-
 22
22
-
 23
23
-
 24
24
-
 25
25
-
 26
26
-
 27
27
-
 28
28
-
 29
29
-
 30
30
-
 31
31
-
 32
32
-
 33
33
-
 34
34
-
 35
35
-
 36
36
-
 37
37
-
 38
38
-
 39
39
-
 40
40
-
 41
41
-
 42
42
-
 43
43
-
 44
44
-
 45
45
-
 46
46
-
 47
47
-
 48
48
-
 49
49
-
 50
50
-
 51
51
-
 52
52
-
 53
53
-
 54
54
-
 55
55
-
 56
56
-
 57
57
-
 58
58
-
 59
59
-
 60
60
-
 61
61
-
 62
62
-
 63
63
-
 64
64
-
 65
65
-
 66
66
-
 67
67
-
 68
68
-
 69
69
-
 70
70
-
 71
71
-
 72
72
-
 73
73
-
 74
74
-
 75
75
-
 76
76
-
 77
77
-
 78
78
-
 79
79
-
 80
80
-
 81
81
-
 82
82
-
 83
83
-
 84
84
-
 85
85
-
 86
86
-
 87
87
-
 88
88
-
 89
89
-
 90
90
-
 91
91
-
 92
92
-
 93
93
-
 94
94
-
 95
95
-
 96
96
-
 97
97
-
 98
98
-
 99
99
-
 100
100
-
 101
101
-
 102
102
-
 103
103
-
 104
104
-
 105
105
-
 106
106
-
 107
107
-
 108
108
-
 109
109
-
 110
110
-
 111
111
-
 112
112
-
 113
113
-
 114
114
-
 115
115
-
 116
116
-
 117
117
-
 118
118
-
 119
119
-
 120
120
-
 121
121
-
 122
122
-
 123
123
-
 124
124
-
 125
125
-
 126
126
-
 127
127
-
 128
128
-
 129
129
-
 130
130
-
 131
131
-
 132
132
-
 133
133
-
 134
134
-
 135
135
-
 136
136
-
 137
137
-
 138
138
-
 139
139
-
 140
140
-
 141
141
-
 142
142
-
 143
143
-
 144
144
-
 145
145
-
 146
146
-
 147
147
-
 148
148
-
 149
149
-
 150
150
-
 151
151
-
 152
152
-
 153
153
-
 154
154
-
 155
155
-
 156
156
-
 157
157
-
 158
158
-
 159
159
-
 160
160
-
 161
161
-
 162
162
-
 163
163
-
 164
164
-
 165
165
-
 166
166
-
 167
167
-
 168
168
-
 169
169
-
 170
170
-
 171
171
-
 172
172
-
 173
173
-
 174
174
-
 175
175
-
 176
176
-
 177
177
-
 178
178
-
 179
179
-
 180
180
-
 181
181
-
 182
182
-
 183
183


Interacoustics ASSR Instructions For Use Manual
- Tip
- Instructions For Use Manual
în alte limbi
- français: Interacoustics ASSR
- English: Interacoustics ASSR
- suomi: Interacoustics ASSR
- polski: Interacoustics ASSR
- Deutsch: Interacoustics ASSR
- italiano: Interacoustics ASSR
- español: Interacoustics ASSR
- svenska: Interacoustics ASSR
- dansk: Interacoustics ASSR
- português: Interacoustics ASSR
- Nederlands: Interacoustics ASSR
Lucrări înrudite
-
 Interacoustics Eclipse Instrucțiuni de utilizare
-
Interacoustics affinity 2.0 Instrucțiuni de utilizare
-
 Interacoustics Callisto™ Instrucțiuni de utilizare
-
 Interacoustics Sera™ Instrucțiuni de utilizare
-
 Interacoustics Diagnostic Suite Instrucțiuni de utilizare
-
Interacoustics Affinity Compact Instrucțiuni de utilizare
-
 Interacoustics AD226 Instrucțiuni de utilizare
-
 Interacoustics AT235 Instrucțiuni de utilizare


Alte documente
-
Gima 33557 Manualul proprietarului
-
 Signia Connexx 9.7 Manualul utilizatorului
-
König HC-SM10 Manual de utilizare
-
 Signia Connexx 9.9 Manualul utilizatorului
-
 Car audio systems SE 4120 Manualul proprietarului
-
Mediashop 26199 Instrucțiuni de utilizare
-
Boston Scientific WaveWriter Alpha Information For Prescribers
-
 Johnson & Johnson Biosense Webster ThermoCool SmartTouch Instructions For Use Manual
-
 SPORT ELEC Multisport Pro Manual de utilizare
-
Laserliner DampExtension Compact Set Manualul proprietarului


