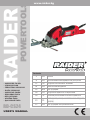
Raider Power Tools RD-CS24 Manual de utilizare
- Categorie
- Accesorii mixer / robot de bucătărie
- Tip
- Manual de utilizare

USER’S MANUAL
RD-CS24
○ ЦИРКУЛЯР РЪЧЕН
○ CIRCULAR SAW
○ FERASTRAU CIRCULAR
○ RUČNI CIRKULAR
○ ЦИРКУЛАР РАЧЕН
○ ДИСКОВАЯ ПИЛА
○ ΔΙΣΚ ОΠΡΙΟΝΟ
○ KROŽNA ŽAGA
○ ДИСКОВАЯ ПИЛА
www.raider.bg
Contents
2 BG схема
6 BG оригинална инструкция за употреба
12 EN original instructions’ manual
18 RO instructiuni originale
24 MK инструкции
30 SR originalno uputstvo za upotrebu
35 SL preklad pôvodného návodu na použitie
41 EL μετάφραση του πρωτοτύπου των οδηγιών
χρήσης
47 RU инструкции по применению
RAIDER
power tools

2www.raider.bg
3 4 5 6 7 821
1415 910111213
Fig.1
Fig.2
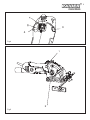
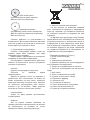
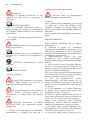
Изобразени елементи (Фиг.1)
1. Отвор за вентилация
2. Ръкохватка
3. Пусков прекъсвач.
4. Червен светлинен индикатор за
претоварване или блокиране на
циркуляра
5. Регулатор на дълбочината на
рязане.
6. Бутон за освобождаване на
защитния капак
7. Режещ диск
8. Приложение за паралелна
употреба
9. Стрелка за рязане по линия
10. Успореден водач
11. Защитно покритие
12. Спирачка на шпиндела
13. Зелен индикатор за мрежово
захранване
14. Тръба на прахоуловителя.
15. Адаптер на прахоуловителя.

3
Ferm 03
D
NL
F
E
P
I
S
SF
N
DK
90 Ferm
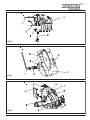
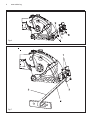
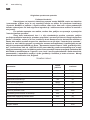
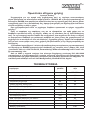
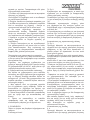
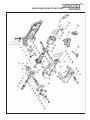
Spare parts list
No. Description Position
402645 Lock button 1 till 3
402646 Main switch 4
402647 Guard locking 6 till 10
402648 Spindel lock 11 till 15
800606 Bearing 606ZZ 17
402649 Gears set 19, 20, 24
800606 Bearing 606ZZ 21
800606 Bearing 606ZZ 23
800606 Bearing 606ZZ 25
402650 Flange set 29 till 32
800608 Bearing 608ZZ 33
402651 Carbon brush 38
402652 Micro switch complete 40 till 44
800607 Bearing 607ZZ 46
402653 Mounting set guard 57, 59 till 61
402654 Guard with flat base 58
402655 Guard with V base 63
402656 Guide 64
UK
D
NL
F
E
P
I
S
SF
N
DK
5
Fig.3
Fig.5
6
Fig.4

4www.raider.bg
Fig.6
Fig.7

5
3
4
Fig.8
1
2
Fig.9

6www.raider.bg
Оригинална инструкция за употреба
Уважаеми потребители,
Поздравления за покупката на машина от най-бързоразвиващата се марка за
електрически и пневматични инструменти - RAIDER. При правилно инсталиране и експлоатация,
RAIDER са сигурни и надеждни машини и работата с тях ще Ви достави истинско удоволствие.
За Вашето удобство е изградена и отлична сервизна мрежа с 32 сервиза в цялата страна.
Преди да използвате тази машина, моля, внимателно се запознайте с настоящата
“Инструкция за употреба”.
В интерес на Вашата безопасност и с цел осигуряване на правилната й употреба,
прочетете настоящите инструкции внимателно, включително препоръките и предупрежденията
в тях. За избягване на ненужни грешки и инциденти, важно е тези инструкции да останат на
разположение за бъдещи справки на всички, които ще ползват машината. Ако я продадете
на нов собственик то “Инструкцията за употреба” трябва да се предаде заедно с нея, за да
може новия ползвател да се запознае със съответните мерки за безопасност и инструкциите за
работа.
“Евромастер Импорт Експорт” ООД е упълномощен представител на производителя
и собственик на търговската марка RAIDER. Адресът на управление на фирмата е гр. София
1231, бул. “Ломско шосе” 246, тел. +359 700 44 155, www.raider.bg; www.euromasterbg.com;
e-mail: info@ euromasterbg.com.
От 2006 година във фирмата е въведена системата за управление на качеството ISO
9001:2008 с обхват на сертификацията: Търговия, внос, износ и сервиз на професионални и
хоби електрически, пневматични и механични инструменти и обща железария. Сертификатът е
издаден от Moody International Certication Ltd, England.
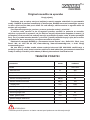
ТЕХНИЧЕСКИ ДАННИ
параметър мерна
единица стойност
Модел -RD-CS24
Консумирана мощност W480
Номинално напрежение V230
Номинална честота Hz 50
Ниво на звуково налягане LpA dB(А) 90
Ниво на звукова мощност LwA dB(А) 104
Ниво на вибрации m/s21.081
Обороти на празен ход min-1 4000
Вътр. диаметър на диска mm 10
Макс. външен диаметър на диска mm 85
Максималнa дълбочина на рязане mm 0-27
Клас на защита на електроизолацията - II
Степен на защита - IP20
BG

7
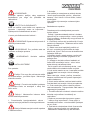
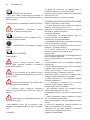
ВНИМАНИЕ!
Прочетете ръководство за употреба
внимателно, за Ваша собствена безопасност,
преди да пристъпите към експлоатация на
машината!
ИНСТРУКЦИИ ЗА БЕЗОПАСНОСТ
При работа с машината винаги спазвайте
настоящите инструкции за употреба, както
и приложените към окомплектовката на
инструмента «Общи правила за безопасност
на труда».
В това ръководство са използвани
следните символи:
ВНИМАНИЕ! Съществува риск от
нараняване или повреда на инструмента.
ВНИМАНИЕ! Преди започване
на работа с инструмента се запознайте с
инструкцията за експлоатация.
ВНИМАНИЕ! Използвайте защитни
очила.
НАЧИН НА УПОТРЕБА
Преди употреба
Внимание! Преди да пристъпите към
започване на работа с циркуляра, проверете
волтажа и честотата на ел. мрежа.
Внимание! Проверете предпазния
капак дали се движи нормално, без да пречи
по някакав начин на режещия диск.
Внимание! Поставете режещия диск,
като изберете диск с оказаните технически
параметри.
1. Проверете режещият диск да отговаря
на следните изисквания: Скоростта му да е
равна или по-голяма от тази на циркуляра.
Внимание! Никога не използвайте
напукан или увреден режещ диск.
2. УПОТРЕБА
Тази машина е предназначена за рязане на
дървен материал и изделия от дърво-подобни
материали, плочки, керамика и камък, както и
ламарина и тръби от стомана, мед и алуминий.
Тази машина не е предназначена за
търговска употреба.
УКАЗАНИЯ ЗА БЕЗОПАСНА РАБОТА
Специални правила за безопасност за
преносими циркулярни триони
а. Внимание! Използването на допълнителни
части или допълнително оборудване,
различно от това, която се препоръчва в
това ръководство или съдържащото се в
доставката, може да доведе до сериозни
наранявания.
b. Използването на режещи дискове, които
са деформирани или имат пукнатини е
забранено. Повреден режещ диск трябва да
се смени незабавно.
c. Режещия диск трябва да е с външен
диаметър 85 мм, а вътрешния отвор трябва
да е с диаметър от 10 мм и острието трябва
да бъде за скорост на въртене на малко 4000
оборота в минута.
По отношение на дървени и метални триони
се уверете, че зъбите са оборудвани с
твърдосплавни пластини и са подходящи за
рязане на дърва.
d. Никога не използвайте режещи дискове,
изработени от HSS стомана за рязане на
плочи от дървесни частици; върховете
на зъбите трябва да бъдат изработени от
карбидна стомана.
е. За да се предотврати риска от глухота,
винаги носете антифони, когато използвате
този инструмент.
f. Винаги носете маска за носа и устата,
когато използвате този инструмент, за да се
намали риска от вдишването на прах.
Някои видове бои, дърво, фаянс, керамика и
камък могат да доведат до опасни изпарения
или прах, когато са нарязани с трион.
g. Винаги носете защитни очила, когато
използвате този инструмент, за да се намали
риска от нараняване на очите.

8www.raider.bg
h. Винаги носете стабилни работни ръкавици
при работа с циркуляри. Tранспортирайте
триона само в подходяща опаковка.
i. Свържете прахосмукачка за изпускателната
дюза на машината.
Работете с тази машина Само в комбинация
с прахосмукачка.
j. Редовно проверявайте съоръженията
за безопасност, както и режещия диск на
вашия инструмент. Редовно почиствайте
стърготините от вътрешността на машината -
отворете защитния капак за тази цел.
k. При никакви обстоятелства не махайте
предпазителя на циркуляра. Моля, приемете
това неудобството, защитен механизъм,
който предпазва от сериозни наранявания.
l. Дръжте ръцете си далеч от зоната на
рязане. Закрепете работната част със
скобите.
m. Проверете детайла за определяне на
характеристиките на материала, от който
е направен. В случай на дървен материал,
да се отстранят всички пирони, винтове или
други чужди тела.
ПРЕДИ ДА ЗАПОЧНЕТЕ ДА ИЗПОЛЗВАТЕ
ИНСТРУМЕНТА
а. Винаги проверявайте, дали мрежовото
напрежение е същото, което е посочено на
табелката на вашия инструмент.
Забележка: машина, предназначена за
използване с 230 V мрежово захранване
също може да бъде използвана с 220 V; но
това намалява производителността с около
10%.
b. Използване на удължителен кабел.
Вие трябва да използвате само удължителни
кабели, които са предназначени за вашата
машина. Минималното напречно сечение на
кабела трябва да възлиза до 1,0 mm2. Ако се
използва кабел на макара, кабелът трябва
винаги да се развива напълно.
c. Никога не позволявайте на електрически
инструменти да работят без надзор. Винаги
изключвайте машината и я оставете в
легнало положение след като машината спре
напълно.
d. Винаги изключвайте захранващия кабел от
мрежата, преди да смените диск.
е. Винаги изключвайте захранващия кабел
от мрежата, преди да правите корекции на
вашия инструмент.
3. СГЛОБЯВАНЕ
Вземете инструмента и спомагателните части
от опаковката.
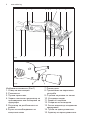
Свързване към Прахосмукачка
Фиг. 2
Инсталирайте адаптера, който е
предназначен за свързване към различни
видове прахосмукачки.
Поставете върха на заключващия щик (1) към
отворите (2) на тръбата за прахоулавяне (3).
Вкарайтете адаптера докрай в машината
и след това го завъртете надясно, докато
адаптера щракне на мястото си.
Адаптерът за свързване към прахосмукачка
има конусна форма, така че могат да се
използват маркучи за прахосмукачка с
различни диаметри.
Подмяна на защитната планка
Фиг. 3
Внимание! Трябва да изключите инструмента
от захранващото напрежение чрез
издърпване на щепсела. Бъдете внимателни.
Острието все още може да бъде много
горещо след употреба.
Острието може да има изключително остри
ръбове.
Използвайте защитни ръкавици, ако е
необходимо.
Шестограмният ключ 5 mm се съхранява
в анти-прегънатата втулка в края на
устройството.
• Поставете шестограмния ключ 5 мм (1) в
щифта на планката (2) и отворете капачката
- дясна резба, въртенето по посока на ляво
отваря и в посока надясно затваря (вж фиг.
3).
• Махнете щифта на пантата (3); може да
се наложи да се използва отвертка, за да го
избута навън.
• Сега можете да премахнете защитния капак
(4) и да го замените с нов.
Сглобяване протича в обратна посока; моля,
уверете се, че ключът за употреба (5) е
вкаран в жлеба за спиране на острието.
Тази машина се доставя с две различни
защитни планки:
Една с плоско дъно, за рязане на гладки
повърхности; И една с вдлъбнатина, за
рязане на кръгли детайли, като тръби.
Никога не работете с инструмента без
защитната планка.
СМЯНА НА РЕЖЕЩИЯ ДИСК
Ил. 4
Внимание! Трябва да изключите
инструмента от захранващото напрежение
чрез издърпване на щепсела. Бъдете
внимателни. Острието все още може да бъде

9
много горещо след употреба.
Острието може да има изключително остри
ръбове.
Използвайте защитни ръкавици, ако е
необходимо.
• Поставете шестограмния ключ 5 мм (1),
който се съхранява в анти-прегънатата втулка
в края на инструмента, оста на винта (2) в
лявата страна на машината.
Вижте Ил. 4.
• Натиснете бутона (3) на дясната страна
на машината, за блокиране на шпиндела.
Въртете шестограмния ключ, докато
чувствате, че вретеното е в заключено
положение.
• Отворете винта за вретеното, като го
завъртите по посока на стрелката, както
е показано от стрелка върху корпуса на
машината, която показва посоката на
въртене. Внимание! Лява резба - отворете
чрез завъртане надясно (по часовниковата
стрелка) и затегнете като завъртите наляво
(обратно на часовниковата стрелка).
Сега можете да махнете диска (5) заедно
с фланеца (4).
Внимание! Посоката на острието на триона
трябва да бъде същата като на стрелката
върху корпуса на машината, която показва
посоката на въртене.
Монтаж на циркулярния диск
Внимание! Трябва да изключите
инструмента от захранващото напрежение
чрез издърпване на щепсела. Бъдете
внимателни. Острието може да бъде много
горещо след употреба.
Острието може да има изключително остри
ръбове.
Използвайте защитни ръкавици, ако е
необходимо.
Използвайте обратния ред на
последователност от стъпки за смяна
(премахване) на диска, за да го инсталирайте
отново.
Вдлъбнатината на фланеца (4) трябва да
сочи към диска. Не забравяйте и не губете
фланеца, тъй като в противен случай острието
на триона няма да може да се затегне.
НАСТРОЙКА НА ДЪЛБОЧИНАТА НА
РЯЗАНЕ
Ил. 5
Внимание! Трябва да изключите
инструмент от захранващото напрежение чрез
издърпване на щепсела. Бъдете внимателни.
Острието може да бъде много горещо след
употреба.
Острието може да има изключително остри
ръбове.
Използвайте защитни ръкавици, ако е
необходимо.
Съвет: Задайте дълбочината на рязане
около 3 см по-дълга от дебелината на детайла.
Максималната дълбочина на рязане е 0-27
мм.
Скалата на дълбочината на рязане на
корпуса на машината е само ориентировъчно.
Моля, използвайте шублер за прецизна
настройка на дълбочината на рязане.
• Разхлабете Регулатора на дълбочината
на рязане (1) за избиране на дълбочина на
рязане, като го завъртите на ляво; (дясна
резба) завъртете обратно на часовниковата
стрелка, за да се отвори и в посока на
часовниковата стрелка посока на затягане.
• Натиснете бутона за освобождаване
(3) за защитния капак (4) и преместете
защитния капак в положение, така че диска
(5) да се подава достатъчно за предвидената
дълбочината на среза.
След това затегнете Регулатора
на дълбочината на рязане. След
освобождаването на защитния капак, той се
връща в първоначалното си положение.
Държач за паралелна употреба
Ил. 6
• Натиснете държача (1) в слота (2) на
предната страна на защитния капак, до
закрепващия винт (3) и гайката (4), така че да
са подравнени.
• Използвайте шестограмния ключ, който
се съхранява в края на машината, за затягане
на винта (3).
Внимание! Да не се използва сила, за да
затегнете винта (3), тъй като пластмасовата
кутия може счупи.
Поставяне на паралелен водач
Ил. 7
Паралелния водач може да се използва
за рязане на детайли с еднаква дължина до
около 200 мм.
• Разхлабете двата винта за закрепване (1).
• Поставете паралелния водач (2) в слота
на подпората (3).
• След като зададете желаната ширина на
рязане, затегнете винтовете за закрепване (1).
• Скалата (4) служи като ориентация; моля
да се определи точната дължина на рязане от

10 www.raider.bg
измерване или чрез намаляване на мостра.
• В случай на много къси дължини на
рязане, когато паралелният водач идва много
близо до режещия диск, моля, уверете се, че
той не докосва диска.
4. УПОТРЕБА
Внимание! Всеки път, преди да пуснете
машината в експлоатация:
Запитайте се дали сте прочели
инструкциите за безопасност.
Прочетете инструкциите още веднъж и не
забравяйте да ги спазвате.
Пусков прекъсвач
Ил. 8
Този превключвател е предвиден
със заключващо устройство, така че да
се предотврати неволно стартиране на
машината.
• За да стартирате машината, натиснете
заключващия бутон (1) и след това издърпайте
ключа (2) в посока на стрелката.
Сега машината ще започне да работи.
• Индикаторната лампа (3) се намира
отстрани и свети в зелено, когато машината
е свързана към електрическата мрежа и може
да се задейства.
• Когато отпуснете ключа, той се връща в
първоначалното си положение и машината
спира.
Съвет: Лампата, която свети в червено
(4) от другата страна светва в случай на
претоварване или блокиране на циркуляра.
Ако машината е претоварена, червената
предупредителна лампа светва и машината
се изключва.
В случай на претоварване, изключете
устройството и го издърпайте назад, така
че трион да може да бъде рестартиран.
Продължете рязането с понижен натиск в
посока на рязане.
Ако острието на триона заседне, проверете
каква е причината острието да се задръсти и
отстранете причината за тази ситуация, преди
да продължите с рязането.
Рязане с машината
Ил. 9
• Поставете машината върху детайла и
я приведете в съответствие с маркираната
линия за рязане.
Позиционирайте паралелния водач на
ръба на детайла.
• След включване на устройството с
ключа използвайки палеца си (1), трябва да
натиснете бутон (2) с показалеца си, за да
отключите защитния капак.
• Сега можете да освободите циркуляра и
да започнете рязане.
Моля, уверете се, че острието на триона
е на разстояние от ръба на детайла - не
започвайте да режете, докато са в пряк
контакт.
Инструкции за рязане
• Никога не използвайте сила; нека
машината работи за вас.
• Намалете натиска по посока на рязане,
когато въртенето на машината забавя или ако
лампичката за претоварване свети.
• Здраво дръжте машината с две ръце.
• Поставете детайла на работна маса
с подходящи винтови скоби или подобни
закрепващи средства.
• Не дърпайте машината назад, докато
работи и реже; движете машината само
напред, докато не отрежете детайла, тъй като
има значителна опасност от откат.
• оттеглете циркуляра от разреза Едва
след като машината е напълно спряла;
освободете пусковия прекъсвач преди да
се опитате да дръпнете триона.
• Преди започване на работа, моля,
проверете следното:
• Дали диска е подходящ за материала.
• Дали диска е достатъчно остър.
• Дали диска е повреден; дали не липсват
зъби или не е изкривен.
• Дали диска е правилно монтиран.
• Особено при рязане на дървесни
отпадъци, строителен дървен материал и т.н.,
се уверете, че няма скрити пирони или други
чужди материали в дървото. Премахнете
всички чужди обекти, преди да започнете да
режете.
• Използвайте защитен капак.
Данни за дисковете и материалите
Диск за рязане със зъбци
Подходящ за следните материали
Стомана
Ø85 мм х Ø10 mm

11
Режещ диск с твърдосплавни
пластини
За дърво, ламинат, MDF ПДЧ
Ø85 мм х Ø10 mm х 36 зъба
Ø85 мм х Ø10 mm х 24 зъба
HSS режещ диск
За цветни метали, дърво, ПДЧ,
Ø85 мм х Ø10 мм пластмаса
Диамантени връхчета
За керамика, гранитогрес, камък,
фибростъкло
Ø85 мм х Ø10 мм подсилена пластмаса
Ø50 мм х Ø10 mm
Винаги работете с повишено внимание и
предпазливост. Моля, не забравяйте, че това
ръководство за работа не може да опише
всички възможни работни ситуации с трион.
5. ОБСЛУЖВАНЕ И ПОДДРЪЖКА
Винаги дърпайте захранващия кабел
преди да правите каквито и да било корекции,
или преди поддръжка или ремонт.
Това оборудване е произведено за
дългосрочни операции с минимална
поддръжка.
Непрекъснатото и удовлетворително
опериране зависят от правилните грижи и
редовното почистване на оборудването.
ПОЧИСТВАНЕ
Редовно отстранявайте стърготините.
Работете с прикрепена към триона
прахосмукачка.
Дръжте дръжката чиста от прах и
мръсотия. Ако замърсяванията не могат да
бъдат отстранени по този начин, използвайте
мека кърпа, напоена с вода и сапун. Никога
не използвайте разтворители като бензин,
алкохол и т.н. за почистване. Такива
почистващи препарати могат да повредят
пластмасовите части.
СМАЗВАНЕ
Устройството не изисква никакво
допълнително смазване.
НЕИЗПРАВНОСТИ
Ако се появят някакви неизправности,
например износване и скъсване на компонент,
моля да се свържете с центъра за услуги,
посочен на вашата гаранционна карта.
6. Опазване на околната среда.
С оглед опазване на околната среда
електроинструментът, допълнителните
приспособления и опаковката трябва да
бъдат подложени на подходяща преработка
за повторното използване на съдържащите се
в тях суровини.
Не изхвърляйте електроинструменти при
битовите отпадъци! Съгласно Директивата на
ЕС 2002/96/EG относно излезлите от употреба
електрически и електронни устройства и
утвърждаването и като национален закон
електроинструментите, които не могат
да се използват повече, трябва да се
събират отделно и да бъдат подлагани на
подходяща преработка за оползотворяване
на съдържащите се в тях вторични суровини.

12 www.raider.bg
Original instructions for use
EN
Dear Customer,
Congratulations on the purchase of machinery from the fastest growing brand of electric
and pneumatic tools - RAIDER. When properly installed and operating, RAIDER are safe and
reliable machines and work with them will deliver a real pleasure. For your convenience has
been built and excellent service network of 32 service station across the country.
Before using this machine, please carefully acquainted with these “instructions for use.
In the interest of your safety and to ensure proper use and read these instructions carefully,
including the recommendations and warnings in them. To avoid unnecessary errors and
accidents, it is important that these instructions will remain available for future reference
to all who will use the machine. If you sell it to a new owner “Instructions for Use” must
be submitted along with it to enable new users to become familiar with relevant safety and
operating instructions.
Euromaster Import Export Ltd. is an authorized representative of the manufacturer and
owner of the trademark RAIDER.
Adress: Soa City 1231, Bulgaria “Lomsko shausse” Blvd. 246, tel +359 700 44 155, www.
raider.bg; www.euromasterbg.com; e-mail: [email protected].
Since 2006 the company introduced the system of quality management ISO 9001:2008
with scope of certication: Trade, import, export and servicing of hobby and professional
electrical, mechanical and pneumatic tools and general hardware. The certicate was issued
by Moody International Certication Ltd, England.
TECHNICAL DATA
parameter unit value
Model -RD-CS24
Rated power W480
Current V230
Frequency Hz 50
Sound pressure dB(А) 90
Sound power dB(А) 104
Vibrations m/s21.081
No-load speed min-14000
Inside diameter of the disc mm 10
Max diameter of the disc mm 85
Max. cutting depth mm 0-27
Protection class - II
Level of protection - IP20

13
WARNING!
Read the manual carefully for your own safety
before attempting to operate the machine!
SAFETY INSTRUCTIONS
When the machine always follow these
instructions for use and supplied attached to
the instrument “General rules for occupational
safety.”
In this manual the following symbols are used:
WARNING! Risk of injury or damage to
the instrument.
WARNING! Before starting work with the
tool to read the instructions.
WARNING! Use safety googles.
METHOD OF USE
BEFORE USE
Attention! Before you start working with
circular saw, check the voltage and frequency of
the electrical network.
Attention! Check whether the protective
cover is moving normally, without interfering in
some sort of way blade.
Attention! Place the blade by selecting
disk rendered technical parameters.
1. Check the blade meets the following
requirements: its speed is equal to or greater
than that of the circular.
Attention! Never use cracked or damaged
saw blade.
2. Before placing the blade make sure saw is
disconnected from the power cord. And the key is
in position “OFF”.
2. USE
This machine is designed for sawing wood and
wood-like materials, tiles, ceramics and stone,
as well as sheet metal and pipes made of steel,
copper and aluminium.
This machine is not intended for commercial use.
SAFETY INSTRUCTIONS
Special safety regulations for handheld
circular saws
a. Caution! The use of accessory parts or
accessory equipment, other than that
which is recommended in this operating
manual or contained in the delivery, can lead to
serious injuries.
b. The use of saw blades that are deformed
or display cracks is prohibited. A damaged saw
blade must be exchanged immediately.
c. A saw blade must have an outer diameter of
85 mm, the inner hole must have a diameter of 10
mm, and the blade must be rated for a rotational
speed of at least 4000 rpm.
With regard to wood and metal saw blades,
make sure that the teeth are tted with carbide
tips and are suitable for sawing wood.
d. Never use saw blades made of HSS steel
for sawing particle boards; the tips of the teeth
must be made of carbide steel.
e. To prevent the risk of deafness, always
wear ear protectors when using this tool.
f. Always wear a nose and mouth mask when
using this tool, to reduce the risk of inhaling dust.
Certain types of paint, wood, tiles, ceramics
and stone can lead to hazardous vapours or dust,
when these are sawn.
g. Always wear protective goggles when using
this tool, to reduce the risk of eye injury.
h. Always wear robust work gloves when
handling saw blades. Only transport saw blades
in suitable packaging.
i. Connect a vacuum cleaner to the exhaust
nozzle of the machine.
Only operate this machine in conjunction with
a vacuum cleaner.
j. Regularly inspect the safety facilities and
the saw blade of your tool. Regularly remove
sawdust from the inside of the machine - open
the protective screen for this purpose.

14 www.raider.bg
k. You may under no circumstances remove
the saw blade guard. Please accept the
occasional inconvenience of this protective
facility, as it prevents serious injuries.
l. Keep your hands away from the cutting
area. Secure the working piece with clamps.
m. Inspect the workpiece to determine the
characteristics of the material that it is made of.
In the case of wood, remove any nails, screws or
other foreign bodies. Be especially careful when
sawing branch knots.
BEFORE STARTING TO USE THE TOOL
a. Always check that the mains voltage is the
same as indicated on the type plate of your tool.
Note: A machine intended for use with 230 V
mains power supply can also be operated with
220 V; this lowers performance by approximately
10%.
b. Use of an extension cable.
You should only use extension cables that are
designed for the specied machine output. The
minimum cross-section of the wire must amount
to 1.0 mm2. If a cable drum is used, then the
cable must always be unrolled completely.
c. Never let electric tools run unattended.
Always switch o the machine, and only lay it
down or leave it after the machine has come to a
complete standstill.
d. Always pull the mains plug before changing
the saw blade.
e. Always pull the mains plug before making
adjustments on your tool.
3. ASSEMBLY
Take the tool and accessory parts out of the
packaging.
Vacuum cleaner connection
Illus. 1
Install the adapter, which is designed for the
connection of dierent types of vacuum cleaners.
Position the tips of the bayonet lock (1)
towards the openings (2) on the dust channel (3).
Insert the adapter completely in the machine
and then turn it to the right, until the adapter
snaps into position.
The adapter for connecting a vacuum cleaner
has a conical shape, so that vacuum cleaner
hoses of dierent diameters can be used.
EXCHANGING THE PROTECTIVE SCREEN
Illus. 2
Warning! You must disconnect your tool from
mains voltage by pulling the plug. Be careful.
Asaw blade may still be a very hot after use.
Asaw blade can have extremely sharp edges.
Use protective gloves, if necessary.
The 5 mm hexagonal key is stored in an anti-
kink sleeve at the end of the machine.
• Insert the 5 mm hexagonal key (1) in the cap
(2) of the hinge pin and open the cap - right-hand
thread, turning direction towards the left opens
and towards the right closes (see Illus. 2).
• Remove the hinge pin (3); a screwdriver
may have to be used to push it out.
• You can now remove the protective cover (4)
and replace it with a new one.
Reassembly proceeds in the reverse
direction; please make sure that the guide key
(5) is inserted in the groove for the blade stop.
This machine is delivered with two dierent
protective covers:
One with a at bottom plate for cutting on
even surfaces;
And one with a recess, for cutting round
stock, such as pipes or tubes.
Never operate the tool without the protective
cover.
EXCHANGING THE SAW BLADE
Illus. 3
Warning! You must disconnect your tool from
mains voltage by pulling the plug. Be careful.
Asaw blade may still be a very hot after use.
Asaw blade can have extremely sharp edges.
Use protective gloves, if necessary.
• Insert the 5 mm hexagonal key (1), which
is stored in the anti-kink sleeve at the end of the
tool, into the spindle screw (2) at the left-hand
side of the machine.
See Illus. 3.
• Push the button (3) on the right-hand side of
the machine, for blocking the spindle.
Turn the hexagonal key until you can feel that
the spindle locks in position.
• Open the spindle screw by turning it in the
direction of the arrow, as shown by the arrow on
the machine housing that indicates the direction
of rotation. Caution! Lefthand machine thread
- Open by turning to the right (clockwise), and
tighten by turning to the left (counter-clockwise).
Now you can remove the saw blade (5)
together with the ange (4).
Warning! The turning direction of the saw
blade must be the same as the arrow on the
machine housing, which indicates the direction
of rotation.
Installation of the saw blade Warning! You
must disconnect your tool from mains voltage by

15
pulling the plug. Be careful. Asaw blade may still
be a very hot after use.
Asaw blade can have extremely sharp edges.
Use protective gloves, if necessary.
Use the reverses of the sequence of steps for
exchanging (removing) the saw blade to reinstall
it.
The recess at the ange (4) must point in the
direction of the saw blade. Do not forget or lose
the ange, since the saw blade can otherwise not
be tightened.
SETTING THE CUTTING DEPTH
Illus. 4
Warning! You must disconnect your tool from
mains voltage by pulling the plug. Be careful.
Asaw blade may still be a very hot after use.
Asaw blade can have extremely sharp edges.
Use protective gloves, if necessary.
Tip: Set the cutting depth approximately 3 mm
deeper than the thickness of the workpiece.
The maximum cutting depth is 0-27 mm.
The cutting depth scale on the machine
housing is only indicative. Please use a sliding
calliper for a precise setting of the cutting depth.
• Loosen the adjustment knob (1) for the
cutting depth stop by turning it to the left; (right-
hand thread) turned in a counter-clockwise
direction to open and in a clockwise direction to
tighten.
• Press the release button (3) for the protective
cover (4) and move the protective cover to a
position, so that the saw blade (5) still protrdes
enough for the intended depth of the cut.
After this, retighten the knob for the cutting-
depth stop adjustment. After releasing the
protective cover, it returns to its initial position.
Holder for parallel guide
Illus. 5
• Push the holder (1) into the slot (2) at
the front side of the protective cover, until the
attachment screw (3) and the nut (4) are aligned.
• Use the hexagonal key, which is stored in
the ant-kink sleeve at the end of the machine, for
tightening the screw (3).
Warning! Do not use force to tighten the screw
(3), as the plastic housing may break.
Inserting the parallel guide
Illus. 6
The parallel guide can be used for cutting
workpieces to a uniform length of up to
approximately 200 mm.
• Loosen both attachment screws (1).
• Insert the parallel guide (2) into the retaining
slot (3).
• After setting the desired cutting width, tighten
the attachment screws (1).
• The scale (4) serves as an orientation;
please determine the exact cutting length by
measurement or by cutting a sample.
• In case of very short cutting lengths, where
the parallel guide comes very close to the saw
blade, please make sure that it does not touch
the saw blade.
4. USE
Warning! Each time before taking the machine
into operation:
Ask yourself whether you have read the safety
instructions.
Read the instructions once more and be sure
to observe them.
On/O switch
Illus. 7
This switch is foreseen with a locking device,
so that an unintended start-up of the machine is
prevented.
• To start up the machine, push the lock button
(1) and then pull the switch (2) in the direction of
the arrow.
The machine will now start up.
• An indicator lamp (3) is located at the side,
which lights up green when the machine is
connected to mains power and is operable.
• When you release the switch, it comes back
into its initial position and the machine comes to
a stop.
Tip: The red indicator lamp (4) at the other
side lights up in case of overload or jamming of
the saw blade.
If the machine is overloaded, the red alarm
lamp lights up and the machine switches o.
In case of overload, switch o the machine
and pull it back a little from the cut, until the saw
can be restarted. Continue sawing with reduced
pressure in the cutting direction.
If the saw blade should become jammed,
check what causes the blade to jam and remedy
this situation before continuing with sawing.
Sawing and cutting with the machine
Illus. 8
• Position the machine on your workpiece and
align it with the marked cutting line.
Position the parallel guide at the edge of the
workpiece.
• After switching on the machine with the
thumb switch (1), you must push button (2) with
your index nger to unlock the protective cover.

16 www.raider.bg
• You can now release the saw blade and start
cutting.
Please make sure that the saw blade can start
up freely at the edge of the workpiece - do not
start the saw blade while in direct contact with the
workpiece material.
Instructions for sawing and cutting
• Never use force; let the machine do the work
for you.
• Reduce the pressure in the cutting direction,
whenever the rotation of the machine slows
down, or if the overload alarm lamp lights up.
• Firmly hold the machine with both hands.
• Attach your workpiece to a working table with
suitable screw clamps or similar fastening tools.
• Do not pull the machine backwards while
it is running; only move the machine forwards
while sawing or cutting, as there is a substantial
kickback hazard.
• Only withdraw the saw blade from the cut
after the machine has come to a halt; simply
release the operating switch before attempting to
withdraw the saw.
• Before starting to work, please check the
following:
• Is the saw blade suitable for the material.
• Is the saw blade still sharp enough.
• Is the saw blade undamaged; no missing
teeth, not bent.
• Is the saw blade properly attached.
• Especially when cutting waste wood,
construction lumber etc., make sure to check
for hidden nails or other foreign materials in the
wood. Remove all foreign objects before starting
to saw.
• Use the protective cover with the recess for
sawing or cutting thin, round material.
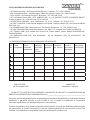
Data for the saw blade and materials
Toothing Suitable for the following materials
Cutting disk Steel
Ø85 mm x Ø10 mm corundum disc
Saw blade with carbide tips Wood,
laminate, MDF chipboard
Ø85 mm x Ø10 mm x 36-tooth
Ø85 mm x Ø10 mm x 24-tooth
HSS Saw blade Nonferrous
metals, wood, chipboards,
Ø85 mm x Ø10 mm plastic
Diamond-tipped Ceramics, tiles,
stone, breglass
Ø85 mm x Ø10 mm reinforced plastics
Ø50 mm x Ø10 mm
Always work with care and caution. Please
remember that this operating manual cannot
describe all possible working situations with a
circular handsaw.
5. SERVICE AND MAINTENANCE
Always pull the mains plug before making any
adjustments, or before any maintenance or repair
works.
This equipment was manufactured for long-
term operations with minimal maintenance.
Continuous and satisfactory operations
depend on a correct care and regular cleaning of
your equipment.
Cleaning
Regularly remove sawdust.
Operate the saw with an attached vacuum
cleaner.
Keep the handle is free of dust and dirt. If dirt
cannot be removed in this way, then use a soft
cloth that has been moistened with soap water.
Never use solvents such as petrol, alcohol etc.
for cleaning. Such cleaning agents can damage
plastic parts.
Lubrication
The machine does not require any additional
lubrication.
Malfunctions
If any malfunctions should occur, for instance
through wear and tear of a component, then
please take up contact with the service centre
indicated on your guarantee card. This manual
contains a detailed overview of those components
that can be ordered.

17
6. Preservation of the environment.
In view of environmental power, additional
accessories and packaging must be subjected
to appropriate processing for reuse of the
information contained in these materials.
Do not dispose of electric household waste!
Under the EU Directive 2002/96/EC on waste
electrical and electronic devices and validation
and as a national law power which can be used
more, must be collected separately and be
subjected to appropriate processing for recovery
of contained they scrap.
Parts description
1. Ventilation opening
2. Handgrip
3. On/O switch
4. Red indicator light for overload or blockage
of the saw blade
5. Control knob for cutting depth
6. Pushbutton for releasing the protective
cover
7. Saw blade
8. Attachment for parallel guide
9. Arrow for cutting line
10. parallel guide
11. Protective cover
12. Spindle brake
13. Green indicator light for mains power
14. Dust channel
15. Vacuum cleaner adapter

18 www.raider.bg
RO
Originale instructiuni de siguranta
Stimate prieten,
Felicitări pentru achiziţionarea unei maşini a marca cea mai rapidă creştere de electrice
şi scule pneumatice - Raider. Cu instalarea corectă şi funcţionarea, Raider sunt echipamente
sigure şi abile şi să lucreze cu ei vă va oferi adevarata placere. Pentru confort, servicii
excelente si a construit o reţea de 36 de servicii pe întreg teritoriul ţării.
Înainte de a utiliza acest aparat, vă rugăm să citiţi cu atenţie actual “manualul de utilizare”.
În interesul siguranţei şi pentru a asigura utilizarea corectă şi citiţi cu atenţie aceste
instrucţiuni, inclusiv recomandări şi avertismente pentru a le. Pentru a evita greşeli inutile
şi accidentele, este important ca aceste instrucţiuni să rămână disponibile pentru referinţe
viitoare tuturor celor care vor utiliza aparatul. Dacă-l vinzi la un “manual de utilizare”, noul
proprietar trebuie să e prezentate împreună cu ea, pentru a permite noilor utilizatori să se
familiarizeze cu instrucţiunile de siguranţă şi de exploatare.
“Euromaster Import Export” SRL este un reprezentant autorizat al producătorului şi
proprietar al marcii Raider. Adresa companiei este Soa 1231, B-dul “Lom Road” 246, tel +359
700 44 155, www.raider.bg; www.euromasterbg.com, e-mail: info @ euromasterbg. com
Începând cu anul 2006, compania a introdus un sistem de management al calităţii ISO
9001:2008 de certicare cu domeniul de aplicare: instrumente de comerţ, import, export şi
de servicii profesionale si hobby electrice, pneumatice şi de putere şi hardware-ul general.
Certicatul a fost emis de catre Moody International de Certicare Ltd, Anglia.
DATE TEHNICE
parametru unitate valoare
Model -RD-CS24
Putere W480
Tensiune V230
Frecvenţă Hz 50
de presiune acustică dB(А) 90
Putere de sunet dB(А) 104
Vibraţii m/s21.081
Rotatii / minut min-14000
Diametrul interior al discului mm 10
Max. Diametrul discului mm 85
Tăiate maximă mm 0-27
Clasa de protectie - II
Gradul de protecţie - IP20

19
ATENŢIE!
Citiţi cu atenţie manualul pentru siguranţa
dumneavoastră înainte de a încerca să lucreze
în maşină!
INSTRUCŢIUNI DE SIGURANŢĂ
Când aparatul respectaţi întotdeauna aceste
instrucţiuni de utilizare şi a furnizat ataşat la
instrumentul “Reguli generale de securitate în
muncă.”
În acest manual sunt utilizate următoarele
simboluri:
ATENŢIE! Risc de accidentare sau de
deteriorare a instrumentului.
ATENŢIE! Înainte de a începe lucrul cu
instrumentul pentru a citi instructiunile.
ATENŢIE! Foloseste ochelari de
protecţie.
MOD DE UTILIZARE
înainte de utilizare
Atenţie! Înainte de a începe de lucru
cu un erastrau circular, verica tensiunea şi
frecvenţa reţelei electrice.
Atenţie! Vericaţi dacă capacul de
protecţie este în mişcare în mod normal, fără a
interfera cu un fel de lama drum.
Atenţie! Publicaţi lama prin selectarea
disc parametrilor prestate tehnice.
1. Vericaţi lama îndeplinească următoarele
cerinţe: viteza este egală sau mai mare decât
cea a circulare.
Atenţie! Nu folosiţi niciodată surate sau
deteriorate ferăstrău.
2. Aplicare
Aparatul este prevăzut pentru a tăia lemn,
materiale asemănătoare lemnului, gresie,
ceramică, piatră, tavă şi ţevi din oţel, cupru şi
aluminiu.
Aparatul nu este destinat pentru folosinţa
profesională.
Prescripţii speciale de siguranţă pentru ferăstraie
circulare ţinute de mână
a. Atenţie! Folosirea altor accesorii sau
aparatelor adăugate decât cele recomandate în
aceste instrucţiuni sau care sunt incluse în marfa
furnizată poate însemna un pericol de rănire.
b. Pânze deformate sau cu suri nu trebuiesc
folosite. În cazul vătămării înlocuiţi imediat pânza.
c. Folosiţi o pânză cu un diametru exterior de 85
mm şi 10 mm diametru al găuririi
interioare, admis pentru minim 4000/min. La
pânze pentru lemn şi metal, ţi atenţi ca zimţii
să e înzestraţi cu metal dur şi că sunt potriviti
pentru a tăia lemne.
d. Nu folosiţi pânze din oţel tip HSS pentru a tăia
plăci refăcute din surcele, zimţii trebuie să e
înzestrati cu metal dur.
e. Purtaţi o protecţie auditivă pentru a micşora
riscul de a asurzi.
f. Purtaţi o mască de protecţie a respirării pentru
a micşora riscul de a inspira praf periculos.
Ţineţi cont de faptul că poate să se producă
aburi periculoşi şi praf periculos la prelucrarea
zugrăvirilor cu culoare, la unele soiuri de lemn, la
gresie ceramica şi piatra.
g. Purtaţi o protecţie pentru ochi pentru a micşora
riscul unor răniri de ochi periculoase.
h. Purtaţi mănuşi când umblaţi cu pânze şi
materiale de lucru aspre. Tranportaţi pânzele
numai în ambalaj.
i. Conectaţi un aspirator de ştuţul deschiderii de
aspirat. Folosiţi maşina numai împreuna cu un
aspirator.
j. Controlaţi regulat dispozitivele de protecţie şi
pânza. Înlăturaţi regulat rumeguşul din interiorul
maşinii - în acest scop deschideţi casca de
protecţie.
k. Nu înlăturaţi în nici un caz dispozitivul de
protecţie al pânzei. Acceptaţi incomoditatea
ocazională pe care o poate cauza dispozitivul de
protecţie - altfel riscaţi răniri grave.

20 www.raider.bg
l. Ţineţi-vă mâinile la distanţă de domeniul de
tăiere. Asiguraţi piesa lucrată cu dispozitevele de
întindere.
m. Controlaţi piesa lucrată în ceea ce priveşte
constituţia materialului. Înlăturaţi de la lemne
cuie, şuruburi sau alte corpuri străine. Fiţi
deosebit de atent când tăiaţi ramuri.
Înaintea pornirii lucrului
a. Controlaţi întotdeauna dacă corespunde
tensiunea reţelei cu cea indicată pe tăbliţa tipului.
Notă: Un aparat pentru o tensiune de reţea de
230 V poate folosit şi la o tensiune de reţea de
220 V, pierderea capacităţii: aprx. 10%.
b. Folosirea prelungitoarelor.
Folosiţi în excusivitate prelungitoare care sunt
concepute pentru capacitatea maşinii.
Diametrul minim al arterei trebuie să e 1,0 mm2.
La folosirea unui tambur pentru cablu, cablul
trebuie să e întotdeauna derulat complet.
c. Nu lăsaţi uneltele electrice să funcţioneze
nesupravegheat. Opriţi întotdeauna aparatul şi
puneţi-l jos numai când aparatul a ajuns să se
oprească de tot.
d. Trageţi ştecherul din priză înaintea schimbării
pânzei.
e. Trageţi ştecherul mereu înainte de lucrări de
reglare.
Siguranţă electrică
Vericaţi întotdeauna dacă tensiunea dv. De
reţea corespunde cu tăbliţa care indică tipul.
Schimbarea cablurilor şi a ştecerilor Dacă
conducta de legătură este vătămată, trebuie să
e înlocuită de o conductă de legătură specială
care este disponibilă la producător sau la service-
ul său.
Folosirea prelungitoarelor
Nu folosiţi decât un prelugitor care corespunde
cu capacitatea maşinii. Arteriile trebuie să aibă
un diametru minim de 1,5 mm2. Dacă se aă
cablul pe un cilindru, cablul trebuie să e derulat
complet.
3. MONTARE
Scoateţi aparatul şi piesele-accesorii din ambalaj.
Conecţia aspiratorului
Ilustr. 2
Introduceţi în aparat adaptorul pentru conecţia
diferitelor aspiratoare.
Direcţionaţi nodurile închizătorului de baionetă
(1) spre deschiderile (2) de pe canalul pentru
praf (3).
Introduceţi complet în maşină adaptorul şi
învârtiţi apoi spre dreapta până când adaptorul
se aşază simţitor la locul lui.
Adaptorul pentru conecţia aspiratorului este conic
pentru ca să se poată folosi diferite diametre de
furtun al aspiratoarelor.
Schimbarea cascăi de protecţie
Ilustr. 3
Atenţie! Mai înainte, trageţi neapărat ştecherul
din priză. După folosinţă, pânza mai poate
foarte erbinte.
Pânza poate cu muchii foarte ascuţite, evtl.
Folosiţi mănuşi.
Cheia hexagonală de 5 mm este băgat în bucşa
protecţie de ambaj la capătul aparatului.
• Introduceţi cheia hexagonală de 5 mm (1) în
capa (2) pentru arborele letat şi deschideţi
capa - let spre dreapta, deschideţi spre stânga
direcţia de învârtire, închideţi (cea) spre dreapta.
• Înlăturaţi arborele letat (3) evtl. scoateţi-o prin
apăsare cu o maşină de deschis şuruburi.
• Acum puteţi lua jos casca de protecţie (4) şi s-o
înlocuiţi prin alta.
Montarea are loc în succesiunea inversă, ţi atent
la faptul ca nodul de conducere (5) să e introdus
mai întâi în nutul pentru tamponul adâncimii.
Aparatul este livrat întotdeauna cu două diferite
căşt de protecţie.
Cu placă de fund netedă pentru tăieturi la
suprafeţe netede.
Cu adâncime pentru tăieturi la material rotund,
spre ex. ţevi.
Nu folosiţi aparatul în nici un caz fără cască de
protecţie.
Schimbarea pânzei
Ilustr. 4
Atenţie! Mai înainte, trageţi neapărat ştecherul
din priză. După folosinţă, pânza mai poate
foarte erbinte.
Pânza poate cu muchii foarte ascuţite, evtl.
Folosiţi mănuşi.
• Introduceţi cheia hexagonală de 5 mm (1),
care se aă în apărătoare împotriva înnodării
la capătul uneltei, în şurubul axului (2) în partea
stângă a maşinii.
• Apăsaţi butonul (3) pe partea dreaptă a maşinii,
pentru a bloca axul. Rotiţi cheia hexagonală până
ce simţiţi că axul s-a poziţionat.
• Slăbiţi şurubul axului prin rotirea în direcţia
săgeţii, după cum este arătat cu ajutorul săgeţii
de pe carcasa maşinii care indică direcţia de
rotaţie. Avertizare! Filetul la maşina este stâng.
– Deschideţi prin rotirea spre dreaptă (sensul
acelor de ceas), şi strângeţi prin rotirea spre
stângă (sensul retrograd).
Pagina se încarcă ...
Pagina se încarcă ...
Pagina se încarcă ...
Pagina se încarcă ...
Pagina se încarcă ...
Pagina se încarcă ...
Pagina se încarcă ...
Pagina se încarcă ...
Pagina se încarcă ...
Pagina se încarcă ...
Pagina se încarcă ...
Pagina se încarcă ...
Pagina se încarcă ...
Pagina se încarcă ...
Pagina se încarcă ...
Pagina se încarcă ...
Pagina se încarcă ...
Pagina se încarcă ...
Pagina se încarcă ...
Pagina se încarcă ...
Pagina se încarcă ...
Pagina se încarcă ...
Pagina se încarcă ...
Pagina se încarcă ...
Pagina se încarcă ...
Pagina se încarcă ...
Pagina se încarcă ...
Pagina se încarcă ...
Pagina se încarcă ...
Pagina se încarcă ...
Pagina se încarcă ...
Pagina se încarcă ...
Pagina se încarcă ...
Pagina se încarcă ...
Pagina se încarcă ...
Pagina se încarcă ...
Pagina se încarcă ...
Pagina se încarcă ...
Pagina se încarcă ...
Pagina se încarcă ...
Pagina se încarcă ...
Pagina se încarcă ...
Pagina se încarcă ...
Pagina se încarcă ...
Pagina se încarcă ...
Pagina se încarcă ...
Pagina se încarcă ...
Pagina se încarcă ...
Pagina se încarcă ...
Pagina se încarcă ...
Pagina se încarcă ...
Pagina se încarcă ...
Pagina se încarcă ...
Pagina se încarcă ...
-
 1
1
-
 2
2
-
 3
3
-
 4
4
-
 5
5
-
 6
6
-
 7
7
-
 8
8
-
 9
9
-
 10
10
-
 11
11
-
 12
12
-
 13
13
-
 14
14
-
 15
15
-
 16
16
-
 17
17
-
 18
18
-
 19
19
-
 20
20
-
 21
21
-
 22
22
-
 23
23
-
 24
24
-
 25
25
-
 26
26
-
 27
27
-
 28
28
-
 29
29
-
 30
30
-
 31
31
-
 32
32
-
 33
33
-
 34
34
-
 35
35
-
 36
36
-
 37
37
-
 38
38
-
 39
39
-
 40
40
-
 41
41
-
 42
42
-
 43
43
-
 44
44
-
 45
45
-
 46
46
-
 47
47
-
 48
48
-
 49
49
-
 50
50
-
 51
51
-
 52
52
-
 53
53
-
 54
54
-
 55
55
-
 56
56
-
 57
57
-
 58
58
-
 59
59
-
 60
60
-
 61
61
-
 62
62
-
 63
63
-
 64
64
-
 65
65
-
 66
66
-
 67
67
-
 68
68
-
 69
69
-
 70
70
-
 71
71
-
 72
72
-
 73
73
-
 74
74


Raider Power Tools RD-CS24 Manual de utilizare
- Categorie
- Accesorii mixer / robot de bucătărie
- Tip
- Manual de utilizare
Lucrări conexe
-
 Raider Power Tools RD-MS06 Manual de utilizare
-
 Raider Power Tools RD-MS06 Manual de utilizare
-
 Raider Power Tools RD-RS29 Manual de utilizare
-
 Raider Power Tools RD-TS20 Manual de utilizare
-
 Raider Power Tools RD-HG18 Manual de utilizare
-
 Raider Power Tools RD-RS31 Manual de utilizare
-
 Raider Power Tools RD-CSL01 Manual de utilizare
-
 Raider Power Tools RD-ЕTC25 Manual de utilizare
-
 Raider Power Tools RD-CS25 Manual de utilizare
-
 Raider Power Tools Table Saw Manual de utilizare


Alte documente
-
Raider RDP-MS11 Manual de utilizare
-
RAIDER Pro RDP-CS26X Manual de utilizare
-
 Raider Industrial RDI-RS30 Manual de utilizare
-
-
-
-
Worx WU433 Fișa cu date
-
Parkside PTS 500 A1 Translation Of The Original Instructions
-
Parkside PHKS 1350 B2 Original Instructions Manual
-
