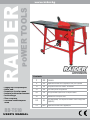
Raider Power Tools Table Saw Manual de utilizare
- Categorie
- Accesorii mixer / robot de bucătărie
- Tip
- Manual de utilizare

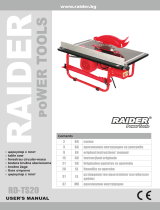
RAIDER
RD-TS10
www.raider.bg
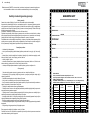
Contents
2 BG схема
5 BG оригинална инструкция за употреба
15 EN original instructions’ manual
27 RO Instrucţiuni originale
39 SR Originalno uputstvo za upotrebu
51 SL Navodila za uporabo
63 EL μετάφραση του πρωτοτύπου των οδηγιών
χρήσης
75 MK оригинални инструкции
○ циркуляр стационарен
○ table saw
○ ferestrau circular-masa
○ testera kružna stacionarna
○ krožne žage
○ δισκ оπριονο
○ потезна-комбинирана
пила

23
www.raider.bg
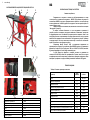
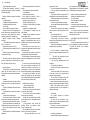
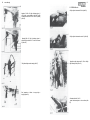
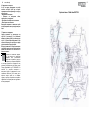
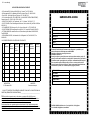
1. Пусков прекъсвач вкл. / изкл 9. Електромотор
2. Паралелен Ограничител 10. Скала
3. Предпазен капак на диска 11. Ръкохватка за регулиране на ъгъла
4. Смукателен маркуч 12. Транспортир
5. Плот 13. Скала
6. Крака 14. Лост за регул. височината на диска
7. Колелца 15. Ръкохватка за регул. ъгъла на рязане
8. Бутон за рестарт 16. Скала
СЪСТАВНИ ЕЛЕМЕНТИ НА ЦИРКУЛЯР СТАЦИОНАРЕН RD-TS10
ОРИГИНАЛНА ИНСТРУКЦИЯ ЗА УПОТРЕБА
Уважаеми потребители,
Поздравления за покупката на машина от най-бързоразвиващата се марка
за електрически и пневматични инструменти - RAIDER. При правилно инсталиране и
експлоатация, RAIDER са сигурни и надеждни машини и работата с тях ще Ви достави
истинско удоволствие. За Вашето удобство е изградена и отлична сервизна мрежа с 32
сервиза в цялата страна.
Преди да използвате тази машина, моля, внимателно се запознайте с настоящата
“Инструкция за употреба”.
В интерес на Вашата безопасност и с цел осигуряване на правилната й
употреба, прочетете настоящите инструкции внимателно, включително препоръките
и предупрежденията в тях. За избягване на ненужни грешки и инциденти, важно е тези
инструкции да останат на разположение за бъдещи справки на всички, които ще ползват
машината. Ако я продадете на нов собственик то “Инструкцията за употреба” трябва да
се предаде заедно с нея, за да може новия ползвател да се запознае със съответните
мерки за безопасност и инструкциите за работа.
“Евромастер Импорт Експорт” ООД е упълномощен представител на
производителя и собственик на търговската марка RAIDER. Адресът на управление на
фирмата е гр. София 1231, бул. “Ломско шосе” 246, тел. 02 934 33 33, 934 10 10, www.raider.
bg; www.euromasterbg.com; e-mail: info@ euromasterbg.com.
От 2006 година във фирмата е въведена системата за управление на
качеството ISO 9001:2008 с обхват на сертификацията: Търговия, внос, износ и сервиз
на професионални и хоби електрически, пневматични и механични инструменти и обща
железария. Сертификатът е издаден от Moody International Certication Ltd, England.
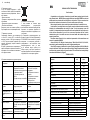
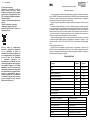
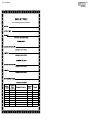
ТЕХНИЧЕСКИ ДАННИ
Таблица 1 Основни параметри на машината
параметър мерна
единица стойност
Модел -RD-TS10
Номинално напрежение V 230
Номинална честота Hz 50
Номинална консумирана мощност W 2000
Обороти на празен ход min-1 2950
Размер на плота mm 800x550
Диаметър на ножа mm 315x30x2.8 36T
Дълбочина на рязане mm 90
Регулиране на наклона °0-45
Ниво на звуково налягане LpA Неопределеност K=4dB dB(А) 98
Ниво на звукова мощност LwA Неопределеност K=4dB dB(А) 109
Клас на защита на електроизолацията - I
BG
6
7
15
2345
8 9
13
14
16
10 11
12
1

45
www.raider.bg
1. Обща информация на машината
Стационарният циркуляр (наричан по-
нататък - машина), е предназначен за
рязане на дърво, алуминий и пластмаси (със
специален режещ диск).
Машината е предназначена за извършване
на следните операции:
• надлъжно рязане с трион;
• надлъжно рязане с паралелен ограничител
• надлъжно рязане под ъгъл
• Междусекторни
• Кръстосано-рязане под ъгъл (с нарез).
Електрическото захранване да се задава
от еднофазен източник на променлив ток със
защитна (заземяване).
Машината е предназначена да работи в
следните условия:
• Околната температура на въздуха да е в
диапазон от плюс 5°C до плюс 40°C;
• Височина над морското равнище до 1000
m;
• Относителна влажност на въздуха да не
надвишава 80% при +20 ° C.
Трионът трябва да се свърже с изпускателна
система за вентилация или устройство за
премахване на частици и прах. Минимален
поток на въздуха - 20 m/s.
2. Указания за безопасност
Внимание: Преди експлоатация на
машината, моля, прочетете внимателно
упътването. Трябва да се съобразявате с
всички изисквания на този наръчник, когато се
работи.
Забранява се:
• работа с машината под въздействието
на капки и пръски, както и открити площи по
време на сняг или дъжд;
• Да се оставя машината, свързана към
електрическата мрежа, без надзор;
• Работа с машината от лица, които не
могат да оперират с нея;
• използване на машината за други цели.
Машината трябва да се изключва, когато
спре внезапно (в случай, спиране на движещи
се части и др.).
По време на паузата, пусковият прекъсвач
трябва да бъде покрит.
Номиналния ток да не е по-малко от 16 А.
Циркулярът трябва да бъде изключен от
електрическата мрежа, при следните случаи:
• При смяна на инструмент, монтаж на
детайл и регулиране;
• При преместване на машината от едно
място на друго;
• По време на пауза или след като работата
е завършена;
• За профилактика и почистване;
• При премахване на дървени стърготини
Никога не работете с машината в случай на
възникване на една от следните грешки:
• Повреда на щепсел или електрически
кабел;
• Повреда на заземителната верига;
• Появата на миризма от видимо запалена
изолация на кабели или дим;
• Неправилната работа на автоматичен
прекъсвач;
• Появата на повишен шум и вибрация;
• Повреда или поява на пукнатини в частите
на тялото ограничителят.
Кабелът трябва да бъде защитен от
случайна повреда (препоръчително е да го
закачите). Забранено е да държите кабела на
близко разстояние до места с мръсна и мазна
повърхност.
Когато се работи върху открити площи,
трябва да се използва само определен и
подходящ за целта удължителен кабел.
Винаги се уверете, че няма пирони
или други неща, заседнали в третираните
материали.
Преди включване на машината махнете
гаечни ключове и инструменти за настройка,
за да изчистите пространството за работа.
Не носете много широки дрехи и бижута. Те
могат да бъдат заловени от движещи се части
на машината. При работа на открита площ се
препоръчва носенето на ръкавици и обувки с
противоплъзгаща подметка. Носете предпазни
очила и шапки.
За качество и безопасна работа, частите
на работните инструменти трябва да бъдат
заточени и чисти. Подмяната на аксесоари да
се извършва в съответствие с инструкциите.
Поддържайте машината чиста.
Допълнителни мерки за сигурност:
• Дръжте чисто работното място;
• Работното място, трябва да е добре
осветено;
• Не работете в взривоопасна или химически
активна среда;
• Не позволявайте на деца и неоторизирани
лица да присъстват в работната зона;
• Работете с машината в стабилна позиция
и не се опитвайте да достигне обекти, които са
далеч от обсега ви;
• По време на работа, избягвайте контакт
със заземени устройства (напр. тръбопроводи,
електрически готварски печки, хладилници и
др.);
• Не стойте в зоната на работа на режещото
острие! Застанете от ляво или от дясно от него
• Бъдете концентрирани, следете
внимателно това, което правите, не работете
с триона ако сте уморени;
• Не използвайте повредени или
деформирани остриета;
• Използвайте само циркулярни дискове,
препоръчани от производителя;
• Обърнете внимание на факта, че изборът
на нож зависи от това какъв материал ще се
реже.
• Използвайте регулиращ нож и го
регулирате правилно;
• Използвайте предпазител за ножа и го
коригирайте в правилна позиция;
• Не насилвайте машината по време на
работа и в никакъв случай не натискайте
острието странично;
• Избягвайте претоварването на триона;
• Не се опитвайте да се намалите твърде
малък детайл;
• При рязане с трион, не във всички
случаи да се прилага прекомерна сила за
задвижването на машината, не използвайте
сила при производствения процес;
• Дръжте чисто работно пространство,
разхвърляното работното място може да
причини наранявания.
Дори ако машината се управлява правилно,
могат да възникнат опасности, като например:
• Риск от вреда, причинена от непокрити
части на въртящия се режещ диск.
• Риск от нараняване причинен от разпадане
на детайла;
• Риск от шум и прах;
• Опасност от токов удар, ако електрическия
кабел не е правилно инсталиран.
За да се намали въздействието на шума
от работата на триона, не забравяйте да
използвате лични предпазни средства за
защита на слуха (тапи за уши, включени в
комплекта).
Общото време на работа без шум ЛПС не
трябва да надвишава 4,8 часа на смяна.
Уверете се, че машината се съхранява на
сигурно място. Съхранявайте я на сухо място
и недостъпно за деца.
Ремонт на машината трябва да се извършва
само от квалифициран техник с оригинални
или заместващи резервни части.
3. Описание
Машината представя Електрическо
механично устройство
Устройството използва асинхронен
двигател. Въртенето на двигателя към отр.
лента се предава чрез ремък.
Мощността да се задава от еднофазен
източник на променлив ток със защита
(заземяване).
4. Монтаж и настройка
Безопасността на ножа зависи от
правилното му използване и монтиране, както
своевременното фиксиране на недостатъци.
Подготовката на машината за работа, трябва
да бъде последвана от следните процедури:
• Разопаковайте машината и основните й
части;
• Сглобете частите;
• Позиционирайте машината;
• Проверете и регулирайте машината;
• Стартиране на машината.
4.1 Разопаковане на машината и основните
й части
• Отворете кутията и извадете устройството
и основните му части.
• Всички повърхности, покрити с предпазна
смазка, трябва да се избършат с кърпа,
напоена в минерален терпентин и след това
да се изсушат.
4.2 Сглобяване и инсталация на основните
части
От гледна точка на компактността на новата
машина, тя трябва да бъде сглобена в позиция
режим циркуляр с плот. За да работи, на
машината трябва да бъде инсталиран и диска.

67
www.raider.bg
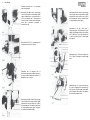
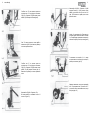
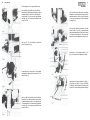
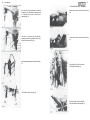
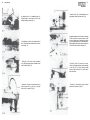
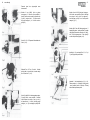
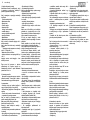
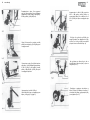
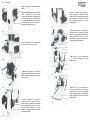
Поставете основната част 1 на подходяща
маса за инструменти.
Използвайте 2бр M6x16 винт с шестостенна
глава, 2 бр. M6 големи, плоски шайби, 2бр M6
големи, секретни болта, за да сглобите част 2
(с № 3) за основната част 1. В позицията на
3 винта не може да бъде затегнат прекалено
силно. (фиг. 1 винтовете се монтират в
позицията на A, B).
Използвайте 2 бр ST 1,2 х 13 пасватели, за да
монтирате част 6 към част 2 (фиг. 2).
Разхлабете част 12, завъртете част 13.
Използвайте приложената кабелна връзка, за
да затегнете кабела, завъртете отново част 13,
фиксирайте част 12, (фиг. 3).
Използвайте 3 бр M6 х 16 винта с шестостенна
глава, 3 бр M6 големи, плоски шайби, 3 бр M6
секретни болта, за да сглобите част 3 (с No. 4)
към основната част 1. В позиция 4, винта да не
се затяга прекалено силно. (фиг. 1 винтовете
са сглобени в позицията на ABC).
Използвайте 4 бр M6 x16 винта с шестостенна
глава, 4 бр M6 големи, плоски шайби, 4 бр M6
секретни болта, за да сглобите част 4 (с № 5)
към основната част 1, винтът в позиция 5 да не
се затяга прекалено силно (фиг.5)
Използвайте 5 бр M6 х M16 винта с
шестостенна глава, 5 бр M6 гголеми, плоски
шайби, 5 бр M6 секретни болта, за да сглобите
част 5 (с № 6), част 7, част 8 на основната част
1. винтът в позиция 6 да не се затяга твърде
силно (фиг. 6).
Използвайте част 9, 10, за да се свържете част
2, 3, 4, 5 (фиг. 7), винта да не се затяга твърде
силно.
Използвайте част 11, за да се свържете част
9, 8, (фиг. 8). В процеса да се използват, 4 бр
M6 × 16 винта, 4 бр M6 гголеми, плоски шайби,
4 бр M6 секретни болта. Винтът не трябва да
бъде затегнат прекалено силно.

89
www.raider.bg
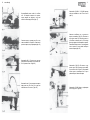
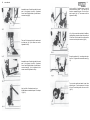
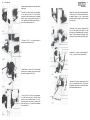
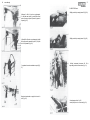
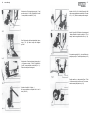
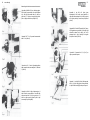
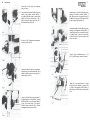
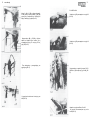
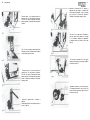
Сглобете част 15 към лицевата страна на
основната част 1. В този процес се използват,
2 бр. M6 х 16 винтове, 2 бр M6 големи, плоски
шайби, 2 бр M6 секретни болтове (фиг. 9).
Част 33 е между големите, плоски шайби и
главната част. (фиг. 10) винтовете не трябва да
се затягат прекалено силно.
Сглобете част 15 от дясната страна на
основната част 1. В този процес се използват,
2 бр. M6 х 16 винтове, 2 бр M6 големи, плоски
шайби, 2 бр M6 секретни болтове (фиг. 11).
Винтовете не трябва да се затягат прекалено
силно.
Използвайте 4 бр М4 х 12 винтове, 4 бр
M4 плоски шайби, за сглобяване на част 14
към част 13 (фиг.12)
Използвайте 4 бр M6 х 16 винтове, 4 бр M6
секретни болтове, 4 бр M6 големи, плоски
шайби, за да сглобите част 16 към част 4 и 5
(фиг. 13). Винтовете не трябва да се затягат
прекалено силно.
На фиг. 14, в позицията на А и B винтовете са
затегнати здраво. Когато винтовете в позиция
C и D са фиксирани, краищата на винтовете и
гайките могат да бъдат на същото ниво (фиг.14)
С изключение на позицийте H и I, всички
останали винтове от позиция А до позиция G,
трябва да се затегнат (фиг. 15)
Изправете машината, след което коригирайте
част 17 на резервната част 16, така че част 17
да достигне земята, използвайте винта, за да
настроите (фиг. 16)

10 11
www.raider.bg
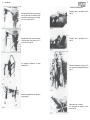
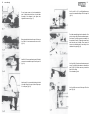
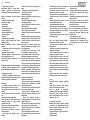
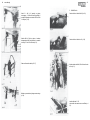
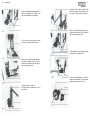
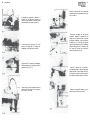
Не разхлабвайте винта с гайка А, и сглобете
част 18. Настройте позицията от острието,
според мярката на фигурата, след това
затегнете гайката върху винта А (фиг. 17)
Смъкнете острието, поставете част 19, а след
това използвайте 6-те броя M6 х 16 винтове за
кръстата отвертка, за да го фиксирате (фиг. 18)
Използвайте M6 х 25 винтове за кръстата
отвертка, M6 контра гайка, за да сглобите част
20 от страната на част 18 (фиг. 19).
Използвайте част 21, за да свържете отвора на
маркуча към част 20 и в част 14, а след това
закопчайте част 21 към част 7 (фиг. 20).
Използвайте 2 бр M6 х 16, 2 бр M6 крилчати
гайки за сглобяване на част 23 към част 24
(фиг. 21)
Натиснете сглобената част в процепа на
водача, използвайте 2 бр M6 х 30 винтове с
полу-кръгла глава, 2 бр M6 гайка на винт, за
да сглобите в позицията на А и Б. Затегнете
винтовете здраво и стабилизирайте страна 24.
Разхлабете гайката на винта, за да направите
така че страна 24 да се движи свободно в
канала на водача (фиг. 22)
Използвайте 2 бр M6 х 30 винтове с полу-
кръгла глава, 2 бр. M6 големи, плоски шайби,
за да сглобите част 22 (фиг. 23). Използвайте
същия начин за да накарате част 24 да се
движи свободно в канала на водача
Използвайте 2 бр M6 гайки, за да фиксирате
част 25 върху част 3 (фиг. 24).

12 13
www.raider.bg
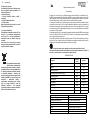
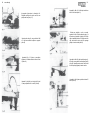
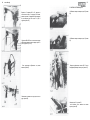
Използвайте 2 бр M6 х 16 винта със шестостенна
глава, 2 бр M6 големи, плоски шайби, 2 бр M6
секретни болта, за да монтирате част 26 върху
част 2 и част 3 отделно (Фиг. 25).
Използвайте M8 х 45 болт с шестостенна глава
и M8 контра гайка, за да сглобите част 27 и
част 28 към част 26 (фиг. 26).
Сега довършете сглобяването на цялата
машина (фиг. 27)
Машината се придвижва лесно от едно място
на друго (фиг. 28).
5. СМЯНА НА РЕЖЕЩИЯ ДИСК
Разхлабете винта и демонтирайте част 20
(фиг. 29)
Разхлабете винта и демонтирайте част 19
(фиг. 30)
Използвайте определения инструмент 29, 30
за да отвиете винта фиксиращ режещия диск
(фиг. 31).
Демонтирайте част 31 и диска 32,
след това можете да подмените с новото
острие (фиг. 32).

14 15
www.raider.bg
6. Поддържане и ремонт
За да се поддържа циркулярът в добро
техническо състояние, трябва да се извършват
периодични месечни профилактики - всяка от
която включва:
• Външно изпитване;
• Проверка на електрически кабели, щепсели
и заземяване;
• Проверка на сигурността на машината.
• Почистване на машината.
Евентуален ремонт на машината трябва да
бъде направен само от специализирани лица.
7. Правила за съхранение
Съхранявайте машината при температура
от плюс 40°C до минус 50°C с относителна
влажност по-малко от 80% (при температура
от 20°C). При дългогодишно съхранение при
минусови температури, загрейте машината
преди употреба.
В случай, че машината ще се съхранява дълго
време е необходимо старателно почистване на
корозирали части на машината и намазването
им с предпазна смазка.
8. Опазване на околната среда.
С оглед опазване на околната среда
електроинструментът, допълнителните
приспособления и опаковката трябва да бъдат
подложени на подходяща преработка за
повторното използване на съдържащите се в
тях суровини.
Не изхвърляйте електроинструменти при
битовите отпадъци! Съгласно Директивата на
ЕС 2002/96/EС относно излезлите от употреба
електрическ и и електронни устройства и
утвърждаването и като национален закон
електроинструментите, които не могат
да се използват повече, трябва да се
събират отделно и да бъдат подлагани на
подходяща преработка за оползотворяване на
съдържащите се в тях вторични суровини.
ORIGINAL INSTRUCTIONS MANUAL
Dear Customer,
Congratulations on the purchase of machinery from the fastest growing brand of electric
and pneumatic tools - RAIDER. When properly installed and operating, RAIDER are safe and
reliable machines and work with them will deliver a real pleasure. For your convenience has
been built and excellent service network of 32 service station across the country.
Before using this machine, please carefully acquainted with these “instructions for use.
In the interest of your safety and to ensure proper use and read these instructions carefully,
including the recommendations and warnings in them. To avoid unnecessary errors and
accidents, it is important that these instructions will remain available for future reference to
all who will use the machine. If you sell it to a new owner “Instructions for Use” must be
submitted along with it to enable new users to become familiar with relevant safety and
operating instructions.
Euromaster Import Export Ltd. is an authorized representative of the manufacturer and
owner of the trademark RAIDER.
Adress: Soa City 1231, Bulgaria “Lomsko shausse” Blvd. 246, tel 02 934 33 33, 934 10 10,
www.raider.bg; www.euromasterbg.com; e-mail: [email protected].
Since 2006 the company introduced the system of quality management ISO 9001:2008 with
scope of certication: Trade, import, export and servicing of hobby and professional electrical,
mechanical and pneumatic tools and general hardware. The certicate was issued by Moody
International Certication Ltd, England.
TECHNICAL DATA
parameter unit value
Model -RD-TS10
Voltage V 230
Frequency Hz 50
Power W 2000
No-load speed min-1 2950
Dimensions of table mm 800x550
Blade diameter mm 315x30x36T
Cutting depth mm 90
Bevel adjustment °0-45
Sound pressure level LpA Uncertainty K=4dB dB(А) 98
Sound power level LwA Uncertainty K=4dB dB(А) 109
Protection class - I
1. Switch on / o 9. Electric motor
2. Parallel Fence 10. Scale
3. Protective cover of the disc 11. Handle for angle adjustment
4. Suction hose 12. Protractor
5. Table 13. Scale
6. Feet 14. Lever Regulus. height of the disc
7. Wheels 15. Handle Regulus. cutting angle
8. Button to restart 16. Scale
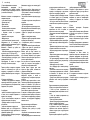
9. Възможни неизправности и начини на ремонт
Име / описание на
неизправност
Причини Метод на поправка
Машината не тръгва a) Няма захранващо
напрежения в източника
b) Няма контакт между щепсела
и захранващия кабел.
c) Пусковия прекъсвач не
работи
d) Дефектен мотор, ключ, кабел
а) Проверетре напрежението
в контакта с подходящо
оборудване
b) Поправете или сменете
щепсела;
c) Поправете или сменете
пусковия прекъсвач.
d) Свържете се с
квалифициран електротехник
Електрическият мотор
прегрява
а) Машината е претоварена с
твърде голям детайл
a) Намалете големината на
детайла
Моторът работи, но
режещият диск не се
върти
a) Ремъкът е скъсан
b) Ремъкът е износен
Подменете ремъкът
Силни вибрации при
работа
a) Машината е поставена на
неравна повърхност
a) Нивелирайте машината
Внезапно спиране a) Спиране на ел. напрежение
b) Дефект в мотора, ключа или
кабела
a) Проверете напрежението
b) Свържете се с оторизиран
сервиз
Обработваната
повърхност изглежда зле
а) заготовката е набраздена
б) заготовката е влажна
Сменете заготовката
Ниска ефективност на
рязане
a) Ремъкът преплъзва a) Сменете ремъкът

16 17
www.raider.bg
1. General information of machine
The Table Saw (hereinafter - machine) is
designed for cutting wood, aluminum and plastics
(for special saw blade).
Machine is designed to perform the following
operations:
• Lengthwise sawing;
• Lengthwise sawing with parallel fence
• Lengthwise sawing with an angle
• Cross-cutting
• Cross-cutting at an angle (with a bevel).
The power saw is set from single-phase AC
source with protective (grounding) wire. Electric
power source, electric power source must be
protected, designated for 16A power input.
Machine is designed to work in following
conditions:
• The ambient air temperature is range from
plus 5 ° C to plus 40 ° C;
• Height above sea level to 1000 m;
• Relative humidity not exceeding 80% at +20
° C.
Execution as per water protection category –
no protection from water
Saw should connect the exhaust ventilation
system or exhaust device to remove chips and
dust. The minimum air ow is 20 m / s.
2. Safety instruction
Caution: Before you operation the machine,
please read the manual carefully. You must
comply with all requirements of this manual when
operating.
Forbidden:
• operate machine under the impact of drops
and sprays, as well as open areas during snow
or rain;
• To leave a saw attached to the mains, without
supervision;
• Transfer machine to a person who unable to
operate it;
• use machine for other purposes.
The machine should be o when a sudden
stops (in case a jamming of moving parts etc.).
During a pause, the switch must be covered.
To prevent the machine’s fuse automatic fuse,
the operation rated current is not less than 16 A.
Saw must be disconnected from the mains
power plug:
• When replace the tool, installing xtures and
adjustment;
• When carrying machine from one location to
another;
• During a pause or after work is nished;
• For maintenance;
• When removing the sawdust
Never operate the machine in case of
occurence of one of the following faults:
• Damage of plug or electric cord;
• Damage to the grounding circuit;
• Occurrence of smell evidencing of isolation
burn or smoke;
• Improper work of automatic switch;
• The emergence of increased noise, the
rattle, vibration;
• Damage to or the appearance of cracks in
the body parts, a fence.
The cable must be protected from accidental
damage (it is recommended to hang it up). It is
forbidden to place the cable close range with dirty
and oily surface.
When working on the open areas, only a
designated and appropriately labeled extension
cable must be used.
Always make sure that there are no nails or
other things stuck in the treated materials.
Before switching on the machine put away the
spanners and adjustment tools to clear the work
space.
Do not wear very loose clothing and jewelry.
They can be captured by moving parts of the
machine. When working on an open area it is
recommended wear gloves and slip-resistant
footwear. Wear protective goggles and headgear.
For quality and safe operation, the cutting
portion of the working tools must be sharp and
clean. To replace the accessories comply with the
instructions. Keep the machine clean.
Additional security measures:
• Keep a clean work place;
• Workplace should be well lit;
• do not work in environments with explosive
or chemically active medium;
• Do not allow children and unauthorized
persons stay at the work area;
• Working with the machine keeps a stable
position and do not try to reach objects that are
out of reach;
• During operation, avoid contact with
grounded devices (e.g. pipelines, electric
cookers, refrigerators, etc.);
• Do not stand in the work area of saw- blade!
Position you to the left or to right from it
• Stay alert, watch what you do, do not
operate a saw, if tired;
• Do not use damaged or deformed blades;
• Use only saw-discs recommended by the
manufacturer;
• Pay attention to the fact that the choice of
blade depends on what material will be treated.
• Pushing the material under the saw-blade, a
push stick must be used.
• Use the riving knife and adjust it properly;
• Use the upper saw blade guard and adjust its
position correctly;
• Do not force the machine during operation,
and in any case not take a lateral push on the
blade;
• Avoid overloading the saw;
• Do not attempt to cut too short workpiece;
• When sawing, in any case not to apply
excessive force to machine drive, do not force the
manufacturing process;
• Keep a clean workspace, the disorder in the
workplace can be cause injuries.
Even if the machine is operated correctly,
there may be the below dangers take place such
as:
• The risk of injury caused by uncovered
parts of the rotating saw blade.
• The risk of injury breakdown parts of the
workpiece;
• The risk from noise and dust;
• Electric shock hazard if not properly laying
electric cord.
To reduce the impact of noise from the work
of the saw, be sure to Use personal hearing
protection (earplug supplied).
The overall time of operation without PPE
noise should not exceed 4.8 hours per shift.
Make sure that the machine storage securely.
Keep it in a dry place and inaccessible to children.
Repair of the machine should be done by
a qualied technician with the designated or
substituted spare parts
3. Description
The machine presents an Electrical
mechanical device
The drive uses an asynchronous motor.
Rotation of engine to the cutting blade is passed
through a belt transmission.
Power saw is set from the single-phase AC
source with protective (grounding) wire.
4. Assembly and adjustment
Trouble-free blade depends on the proper use
and treatment and timely xing shortcomings.
During preparation of the machine for operation
the following procedures must be followed:
• Unpack the machine and its basic parts;
• Assembly and installation the parts
• Set up the machine;
• Check and adjust the machine
• Start the machine.
4.1 Unpacking machine and basic parts
• Open the box and unplug the machine and
its basic parts.
• All surfaces, covered with conservation
lubricant, must be wiped with cloth soaked in
white spirit and then dried.
4.2 ASSEMBLY AND INSTALLATION THE
BASIC PARTS
In order to compactness the new machine, it
must be packaged in saw bench mode position.
To operate the machine must be installed
supports and the blade.

18 19
www.raider.bg
Put the main part 1 on the proper table for tools.
Use 2pcs M6x16 hex head screw, 2 pcs M6 big
at washer, 2pcs M6 protective-loosening screw to
assemble the part 2 (with No.3 on the main part 1.
In the position of 3, the screw can’t be tightened
too rmly. (g. 1 the screws are assembled in the
position of A, B).
Use 2 pcs ST 1,2 x 13 self-driving to mount the
part 6 on the part 2 (g. 2).
Loosen the part 12, turn the part 13, use supplied
cable binder to tighten cable, turn the part 13, x
the part 12 (g. 3).
Use 3 pcs M6 x 16 Sex-head screw, 3 pcs M6 big
at washer, 3 pcs M6 protective-loosening screw
to assemble the part 3 (with no. 4 on the main part
1) In the position of 4, the screw can’t be tightened
too rmly. (g. 1 the screws are assembled in the
position of A.B.C).
Use 4 pcs M6 x16 sex head screw, 4 pcs M6 big
at washer, 4 pcs M6 protective-loosing screw to
assemble the part 4 (with No. 5) on the main part
1, the screw in the position of 5 can’t be tightened
too rmly (g.5)
Use 5 pcs M6 x M16 sex hand screw, 5 pcs M6
big at washer, 5 pcs M6 protective-loosing
screw to assemble the part 5 (with No. 6), the part
7, the part 8 on the main part 1. the screw in the
position of 6 can’t be tightened too rmly (g. 6).
Use the part 9, 10 to connect the part 2, 3, 4, 5
(g. 7), the screw can’t be tightened too rmly.
Use the part 11 to connect the part 9, 8, (g. 8). In
the process, 4 pcs M6 x 16 screw, 4 pcs M6 big
at washer, 4 pcs M6 protective-loosening screw
are used. The screw can’t be tightened too rmly.

20 21
www.raider.bg
Assemble the part 15 on the front side of the main
part 1. In the process, 2 pcs M6 x 16 sex-head
screw, 2 pcs M6 big at washer, 2 pcs M6 locked-
screw are used (g. 9).
The part 33 is between the big at washer and
the main part. (g. 10) the screws can not be
tightened too rmly.
Assemble the part 15 on the right side of the main
part 1. In the process, 2 pcs M6 x 16 sex-head
screw, 2 pcs M6 big at washer, 2 pcs M6 locked-
screw are used (g. 11). In the position of A, the
screws can not be tightened too rmly.
Use 4 pcs M4 x 12 sex-head screw, 4 pcs
M4 at washer to assemble the part 14 on the part
13 (g.12)
Use 4 pcs M6 x 16 sex-head screw, 4 pcs M6
protective-loosening screw, 4 pcs M6 big at
washer to assemble the part 16 on the part 4
and the part 5 (g. 13). The screws can not be
tightened too rmly.
In g. 14, the screws in the position of A and B are
tightened rmly, when the screws in the position of
C and D are xed, the end of the screws and the
screw nuts can be qt the same level (g.14)
Except the position of H, I, according to the order
from A to G, tighten all the unmouted screws (g.
15)
Turn over the machine and make it stand, then
adjust the part 17 on the spare part 16 to make
the part 17 reach the ground, use screw to x it
(g. 16)

22 23
www.raider.bg
Do not loosen screw nut A, and assemble the
part 18. Adjust the position from it to the blade
according to the measure in the gure, then
tighten the screw nut A (fug. 17)
Bring down the blade, insert the part 19, then use
6 pcs M6 x 16 cross-counter-sunk screw to x it
(g. 18)
Use M6 x 25 cross round head screw, M6 locked
screw nut to assemble the part 20 on the part 18
(g. 19).
Use the part 21 to connect the blowing-wind hole
in the part 20 and in the part 14, then clip the part
21 on the part 7 (g. 20).
Use 2 pcs M6 x 16, 2 pcs M6 papilionaceous
screw nut to assemble the part 23 on the part 24
(g. 21)
Push the assembled part into the chamfer of the
guide, use 2 pcs M6 x 30 semi-round head square-
neck screw. 2 pcs M6 screw nut to assemble it in
the position of A and B. Tighten the screws rmly
and make the part 24 stable. Then loosen the
screw nut to make the part 24 move freely in the
chamber of the guide (g. 22)
Use 2 pcs M6 x 30 semi-round head square-neck
screw, 2 pcs M6 big at washer to assemble the
part 22 (g. 23). Use the same way to make the
part 24 move freely
in the chamber of guide.
Use 2 pcs M6 screw nut to x the part 25 on the
part 3 (g. 24).

24 25
www.raider.bg
Use 2 pcs M6 x 16 sex-head screw, 2 pcs M6 big
at washer, 2 pcs M6 protective-loosening screw
to x the part 26 on the part 2 and the part 3
separately (g. 25).
Use M8 x 45 sex-head bolt, M8 protective-
loosening screw nut to assemble the part 27 and
the part 28 on the part 26 (g. 26).
Now nishing assembling the whole machine (g.
27)
The machine is easy to move (g. 28).
5. CHANGING THE BLADE
Loosen the screw and dismount the part 20 (g.
29)
Loosen the screw and dismount the part 19 (g.
30)
Use specied tool 29, 30 to loosen the
screw xing the blade (g. 31).
Dismount the part 31 and the blade 32,
then can change the new blade (g. 32).

26 27
www.raider.bg
6. Maintenance and repair
In order to maintain the blade in constant repair
and technical readiness work, the following
technical month service should be carried out -
ETO. ETO - every shift Maintenance includes:
• External examination;
• Check the electrical cords, plugs and grounding;
• Check the presence of guard.
• Cleaning (rubbing) the machine.
Repairs saws must be made by specialized
persons.
7. Rules of storage
Storage the machine should be at a temperature
of plus 40 ° C to minus 50 ° C with relative humidity
less than 80% (at a temperature of 20 ° C).
Under longtime storage at subzero temperatures,
connecting to the machine to get to warm, when
you use.
In case the machine is being stored for a long
time it is necessary to thoroughly clean the
corroded parts of the machine and coat them with
conservation lubrication of К-17 GOST 10877-76
or other similar lubrication.
8. ENVIRONMENTAL
PROTECTION.
The machine should be operated
with an external exhaust ventilation
or external dust extraction unit.
The aluminum and plastics parts are
labeled, which allows them to sort and recycle.
In view of environmental power tools, additional
accessories and packaging must be subjected
to appropriate processing for reuse of the
information contained in these materials.
Do not dispose of household waste power tools!
Under the EU Directive 2002/96/EC on scrapped
electrical and electronic equipment and promoting
law and national power tools, which can not be
used more, must be collected separately and be
subjected to appropriate processing for recovery
of contained therein scrap.
Table 9 POSSIBLE MALFUNCTIONS AND WAYS OF REPAIR
Name description of
malfunction
Pretention reasons Method of the repair
The machine does not start a) No voltage in power source
b) No contact in the plug with the
connection cable
c) The button “Start “ of the switch
doe not function
d) Defects of motor, switch, cable
а) Check the voltage in the
electric socket using any
properly functioning other
household appliance;
b) Fix or replace the plug ;
c) Fix or replace the switch.
d) Contact certied electrician
Electric motor gets
overheated
а) The machine is overloaded with
too much feeding of the material
a) Reduce the ow of the
material
The motor is run, but saw
blade is not rotate
a)Belt is torn
b)Belt is worn
Replace the belt
Strong vibration when
operating
a) The machine is based on the
uneven surface
a) Even up the position of the
machine
Sudden stop a)Voltage’s gone
b)The defects of motor, switch,
cable
a)Check the voltage
b)Contact the service center
The treated surface looks
bad
a) The billet is knurled
b) The billet is damp
Replace the billet
Low cutting ecient a) The belt slips a) Replace the belt
Instrucţiuni originale
Dragi utilizatori,
Felicitări pentru achiziţionarea unui suantă de aer cald marca cu cel mai mare
succes de pe piaţă - Raider. Atunci când sunt instalate şi gata de operare, RAIDER sunt cele
mai sigure şi abile maşini şi lucrand cu ele va o adevarata placere. Pentru confortul dvs. a
fost construita şi elaborata o reţea de servicii excelente si centre de service din întreaga ţară.
Înainte de a utiliza suantă de aer cald, vă rugăm să va familiarizati cu atenţiein legatura cu
aceste instrucţiuni “pentru utilizare.
În interesul siguranţei dumneavoastră şi pentru a asigura utilizarea corespunzătoare
a acestuia, citiţi cu atenţie aceste instrucţiuni, inclusiv recomandările şi avertizările din ele.
Pentru a evita erorile de folosire inutile şi accidentele, este important ca aceste instrucţiuni sa
rămâna disponibile pentru referinţe ulterioare tuturor celor care vor utiliza cricul. Dacă revindeti
unui nou proprietar “Instrucţiunile de utilizare”, trebuie să e prezentate împreună cu el pentru
a permite utilizatorilor noi să se familiarizeze cu instructiunile de siguranţă şi instrucţiunile de
operare.
RAIDER marca exclusiva a societăţii EUROMASTER Import Export SRL, Soa 1231,
“Lomsko shosse 246, tel 02 934 33 33, 934 10 10, www.raider.bg; www.euromasterbg.com,
e-mail: info @ euromasterbg. com.
Din anul 2006, compania a introdus sistemul de management al calitatii ISO
9001:2008, cu domeniul de aplicare al certicare: Comert, importul, exportul şi service-hobby şi
profesionale unelte electrice, mecanice şi pneumatice şi hardware-ul în general. A fost eliberat
certicatul de Moody International Certication Ltd., England.
Detalii tehnice
Parametrii Unitate Valoare
modelul -RD-TS10
voltaj V 230
frecvenţa nominală a Hz 50
Nominală consumul de energie W 2000
Inactiv min-1 2950
Dimensiuni de masă mm 800x550
diametru disc mm 315x30x36T
adâncime de tăiere mm 90
conice ajustare °0-45
nivel presiune sonoră LpA dB(А) 98
nivel putere sonoră LwA dB(А) 109
clasa de protecţie - I
1. Pornirea / oprirea 9. Motor electric
2. paralel gard 10. scară
3. Capacul de protecţie a discului 11. Mâner pentru reglarea unghiului
4. furtun de aspiraţie 12. raportor
5. tabel 13. scară
6. picioare 14. Maneta Regulus. înălţimea de disc
7. roţi 15. Manevraţi Regulus. unghiul de taiere
8. Butonul pentru a reporni 16. scară

28 29
www.raider.bg
1. Informaţii generale despre aparat
Circulara Combinată (denumit în continuare
- maşină) este proiectat pentru tăierea lemnu-
lui, aluminiu şi materiale plastice (cu o lama
speciala).
Aparatul este proiectat pentru a efectua
următoarele operaţiuni:
• Crucea unghiul de tăiere;
• Unghiul de taiere;
• Dreptul de tăiere;
Compuse • Saw
De tăiere în modul desktop
• tăierea longitudinală;
• taiere Limitator paralel
• taiere unghi
• transversale
• Cross-unghiul de tăiere (cu let).
Puterea este setat la o singură fază-sursă de
alimentare de curent alternativ, cu o protecţie
(pământ).
Aparatul este proiectat să funcţioneze în
următoarele condiţii:
• Temperatura aerului ambiant este în inter-
valul de plus 5 ° C până la plus 40 ° C;
• Inaltimea deasupra nivelului mării la 1000 m;
• Umiditatea relativă nu trebuie să depăşească
80% la +20 ° C.
Punerea în aplicare din categoria de protecţie
a apei - nici o protecţie de la apă
Au văzut trebuie să e conectat la aparatul de
ventilaţie de evacuare sau de evacuare pentru
a indeparta particulele de praf şi. Fluxului de
aer de cel puţin - 20 m / s.
2. Instrucţiuni de siguranţă
Atenţie: Înainte de a utiliza aparatul, vă
rugăm să citiţi cu atenţie. Trebuie să respecte
toate cerinţele din acest manual atunci când
lucrează.
Se interzice:
• funcţionare a maşinii sub inuenţa de pica-
turi si spray, şi zone deschise în timpul nin-
soare sau ploaie;
• Nu lăsaţi aparatul conectat la reţea fără su-
praveghere;
• maşină de transfer pentru o persoană care
nu poate funcţiona;
• utilizarea aparatului în alte scopuri.
Maşina ar trebui să e oprit atunci când o
oprire bruscă (în cazul de bruiaj piese în
mişcare, etc) ..
În timpul pauzei, schimbarea trebuie să e
acoperite.
Evaluat la curent nu mai puţin de 16 A.
De tăiere trebuie să e deconectat de la reţea
în următorul caz:
• La schimbarea de asamblare instrument de
detaliu şi de control;
• Atunci când mutaţi aparatul de la un loc la
altul;
• În timpul pauzei sau după locul de muncă
este nalizată;
• Pentru întreţinerea şi curăţarea;
• Când scoateţi rumegus
Nu utilizaţi niciodată aparatul în cazul în care
una dintre următoarele erori:
• Deteriorarea la priza sau cablul de alimen-
tare;
• Deteriorarea circuitul de sol;
• Aspectul de miros vizibile de ardere izolaţiei
pe cabluri sau fum;
• funcţionarea necorespunzătoare a intrerup-
torului;
• Aspectul de zgomot şi vibraţii a crescut;
• Deteriorarea sau apariţia unor crăpături în
unele părţi ale corpului limitatorului.
Cablul trebuie să e protejate împotriva
deteriorării accidentale (este recomandabil
să-l blocheze). Este interzis de a păstra cab-
lul la o distanţă scurtă de locuri cu suprafaţă
murdare şi gras.
Atunci când se lucrează pe zone deschise
ar trebui să e denite şi utilizate în mod
corespunzător în acest scop, un cablu
prelungitor.
Întotdeauna asiguraţi-vă că nu cuie sau alte
lucruri blocat în materialele tratate.
Înainte de a conecta aparatul scoateţi chei şi
reglaj pentru a elibera spaţiu pentru a lucra.
Nu purtaţi haine foarte largi si bijuterii. Ele
pot prinse de către părţi în mişcare maşina.
În zona în aer liber se recomandă să poarte
mănuşi şi panto cu talpa antiderapante.
Purtaţi mănuşi de protecţie şi pălării.
Calitate şi siguranţă, de lucru părţi de in-
strumente trebuie să e ascuţite şi curate.
Înlocuirea de accesorii care urmează să e
efectuată în conformitate cu instrucţiunile.
Păstraţi maşina curată.
Măsuri suplimentare de securitate:
• Păstraţi un loc de muncă curat;
• la locul de muncă trebuie să e bine lumi-
nate;
• Nu folosiţi în mediul activ explozive sau
chimic;
• Nu lăsaţi copii sau persoane neautorizate să
e prezente în zona de lucru;
• Operarea maşina într-o poziţie stabilă şi
încercarea de a ajunge la obiectele care sunt
la îndemâna dumneavoastră;
• În timpul funcţionării, să evite contactul cu
dispozitive de pământ (de exemplu, conducte,
maşini de gătit electrice, frigidere, etc.)
• Nu staţi în zona de lucru de avangarda!
Stand la stânga sau la dreapta de ea
• Fiţi întotdeauna atenţi la ceea ce nu
funcţionează văzut dacă sunteţi obosit;
• Nu folosiţi lame deteriorate sau deformate;
• Folosiţi doar pânze de erăstrău recomandată
de către constructor;
• Acordaţi atenţie faptului că alegerea pânzei
de depinde de ceea ce materialul va tăiat.
• prezentarea de material pentru a lama trebuie
să e făcută cu scopul propus de acest piston.
• Folosiţi lamă reglabilă şi să o ajusteze în
mod corespunzător;
• Folosiţi garda lama si corecta-l în poziţia
corectă;
• Nu forţaţi maşina la locul de muncă şi în nici
un fel Apasă partea lama;
• Evitaţi supraîncărcarea văzut;
• Nu încercaţi să taie detaliu prea puţin;
• Atunci când ferăstrăul nu, în toate cazurile
să se aplice forta excesiva de a conduce masi-
na, nu forţaţi procesul de producţie;
• Păstraţi un spaţiu de lucru curat, lucru murd-
ar poate provoca leziuni.
Chiar dacă maşina este gestionată
corespunzător şi pericole pot apărea, cum ar
:
• Riscul de daune cauzate de către partea de-
scoperit de rotaţie a văzut lama.
• Riscul de prejudiciul cauzat de descompu-
nere a piesei;
• Riscul de zgomot şi praf;
• Risc de şoc electric în cazul în care cablul de
alimentare nu este instalat corect.
Pentru a reduce impactul zgomotului din
funcţionarea de văzut, să e sigur de a utiliza
echipamentul individual de protecţie pentru
protejarea auzului (ureche prize inclus în kit).
Timpul total de lucru fara zgomot EIP nu
trebuie să depăşească 4.8 oră pe schimb.
Asiguraţi-vă că aparatul este ţinut într-un loc
sigur. Se păstra într-un loc uscat ferit de copii.
Repararea maşinilor trebuie să e efectuată
de către un tehnician calicat pentru a stabili
piese sau înlocuieşte
3. Descriere
Maşină electrică prezintă un dispozitiv
mecanic
Aparatul utilizează un motor asincron. Rotaţie
a motorului la lama de taiere este transmis
prin curea.
Puterea este setat de la o singură fază de
protecţie sursa de putere de curent alternativ
(de legare la pământ).
Conexiune electrică este prezentată în gura
1. Lista ansamblurilor principale şi piese de
schimb, după cum se arată în gura 2, 3
4. De instalare şi congurare
Cuţit de siguranţă depinde de utilizarea
corectă şi instalarea ca stabilirea la timp a
defectelor. Pregătirea maşinii pentru lucru
trebuie să e urmată de următoarele proce-
duri:
• Despachetaţi aparatul şi a părţilor sale prin-
cipale;
• Asamblati piese;
• Poziţia de masini;
• Vericaţi şi reglaţi aparatul;
• Porniţi aparatul.
4.1 Despachetarea maşinii şi a părţilor sale
principale
• Deschideţi cutia şi scoateţi dispozitivul şi
părţile sale principale.
• Pentru a identica părţile componente ale
maşinii utilizând Tabelul 4 şi Figura 2, 3
• Toate suprafeţele sunt acoperite cu unsoare
de protecţie ar trebui să ştergeţi cu o cârpă
înmuiată în spirit alb şi apoi uscate.
4.2 Adunarea şi instalarea de piese principale
În ceea ce priveşte compact al maşinii noi,
acesta trebuie să e asamblate în modul de
poziţie de top cu un circular. Pentru a lu-
cra, aparatul trebuie să e instalate şi lama.

30 31
www.raider.bg
Aşezaţi partea principală a unei mase adecvat de
instrumente.
Foloseste 2 buc M6x16 Şurub cu cap hexagonal,
2. M6 şaibe mari, plate, 2 buc M6 şuruburi
îngropate de mari dimensiuni pentru a asambla
partea 2 (în № 3) pentru partea principală 1. În
cele 3 şuruburi nu pot strânse prea mult. (Fig. 1
şurub este montat în poziţia A, B).
Foloseste 2 x ST 1,2 x 13 pasvatel pentru a
instala Partea 6 Partea 2 (Fig. 2).
Slăbiţi Partea 12, Partea 13 roti. Utilizaţi cablul
ataşat, pentru a strânge cablul, întoarce partea
din spate 13, partea xă 12 (Fig. 3).
Folosiţi 3 x M6 x 16 şurub cu cap hexagonal,
3 buc M6 şaibe mari, plate, 3 buc M6 secrete
şurubul pentru a asambla Partea 3 (cu nr 4),
partea principală 1. La punctul 4, şurubul nu este
strâns prea mult. (g. 1 şuruburi sunt asamblate
în poziţia de ABC).
Utilizaţi 4 buc suruburi M6 x16 cap hexagonal M6,
4 inele mari, plate, 4 suruburi M6 secrete pentru
a asambla o parte 4 (cu № 5) pentru partea
principală 1 şurub în poziţia 5 nu poate strânse
prea mult (g.5)
Utilizaţi M6 x 5 buc şuruburi hexagonale M16
cap, 5 buc M6 ggolemi, şaibe plate, 5 buc M6
secret de şurub de asamblare partea 5 (cu № 6),
Partea 7 Partea 8, din partea principală 1. şurub
în poziţia 6 nu pot strânse prea puternic (g. 6).
Utilizarea de 9, 10, pentru a conecta partea 2, 3,
4, 5 (g. 7), şurubul nu este strâns prea tare.
Utilizarea de 11 pentru a contacta porţiune 9 8
(Fig. 8). În timpul utilizării, 4 M6 × 16, 4 şuruburi
M6 ggolemi, şaibe plate, 4 suruburi M6 secrete.
Şurub trebuie strâns prea mult.

32 33
www.raider.bg
Asamblarea parte 15 la partea din faţă a corpului
principal 1. Acest proces este folosit, 2. M6 x 16
x 2 şuruburi, şaibe M6 mari, plate, 2 şuruburi M6
(Fig. 9).
Partea 33 este între şaibe mari, plate, iar partea
principală. (g. 10) şuruburile trebuie strânse
prea mult.
Asamblati partea 15 pe partea dreaptă a părţii
principale 1. Acest proces este folosit, 2. M6 x 16
x 2 şuruburi, şaibe M6 mari, plate, 2 şuruburi M6
(g. 11). Şuruburi nu ar trebui să e strânse prea
mult.
Utilizaţi 4 buc şuruburi M4 x 12, 4
M4 şaibe plate de asamblare din partea 14 la
partea 13 (gura 12)
Utilizaţi 4 x M6 x 16 şuruburi, buloane, 4 M6 M6 4
şaibe plate de dimensiuni mari, pentru a asambla
Partea 16 la partea 4 şi 5 (g. 13). Şuruburi nu ar
trebui să e strânse prea mult.
În Fig. 14 în poziţia A şi B şuruburile sunt strânse
ferm. Atunci când şuruburile în poziţia C şi D
sunt stabilite, toate şuruburile şi piuliţele pot la
acelaşi nivel (g. 14)
Cu excepţia poziţiilor H şi I, toate alte şuruburi
de la poziţia de la A la poziţia G, trebuie să e
strânse (Fig. 15)
Stand maşină, apoi ajustaţi Partea 17 Partea 16
de rezervă, astfel încât aproximativ 17 pentru a
ajunge la sol, folosiţi şuruburi pentru a xa (g.
16)

34 35
www.raider.bg
Nu slăbiţi piulita A, şi să asambleze parte 18.
Reglaţi poziţia a lamei, măsura de cifra, apoi
strângeţi piuliţa pe şurub A (g. 17)
Coborâţi lama, set de 19, apoi utilizaţi numărul 6
M6 x 16 şuruburi pentru surubelnita cruce pentru
a se xa (g. 18)
Utilizaţi M6 x 25 şuruburi pentru surubelnita
cruce, M6 piuliţă contra pentru a asambla o parte
a ţării 20 partea 18 (g. 19).
Utilizarea de 21 pentru a conecta furtunul de la
partea de gaura 20 şi o parte 14, şi apoi xaţi
piesa de la 21 la partea 7 (g. 20).
Foloseste 2 x M6 x 16, 2 x M6 ansambluri de nuci
aripa pentru Partea 23 la partea 24 (g. 21)
Apăsaţi de asamblare în slotul şoferului, utilizează
2 x M6 x 30 şuruburi cu cap semi-circular, 2 x M6
de nuci pe şurub pentru a asambla în poziţia de
A şi B. Strângeţi şuruburile şi a stabiliza ţara 24.
Slăbiţi piuliţa pe şurub pentru a face tara, astfel ca
24 să circule liber în driverul canal (g. 22)
Foloseste 2 x M6 x 30 şuruburi cu cap semi-
circular, 2. M6 şaibe mari, plate, pentru a asambla
o parte 22 (g. 23). Folosiţi aceeaşi metodă
pentru a obţine o parte 24 de a circula liber în
driverul de canal
Foloseste 2 x M6 şuruburi pentru a asigura
partea de 25 la partea a 3 (g. 24).

36 37
www.raider.bg
Utilizarea 2 x M6 x 16 şurub cu cap hexagonal,
2 x M6 şaibe mari, plate, 2 şuruburi M6 secrete
pentru a monta pe o parte 26 partea 2 şi partea 3
separat (g. 25).
Utilizaţi M8 x 45 şurub cu cap hexagonal şi piuliţă
M8 contra pentru a asambla o parte 27 şi o parte
de la 28 la partea 26 (g. 26).
Completează acum de asamblare a maşinii (Fig.
27)
Maşina se deplasează cu uşurinţă de la un loc în
altul (Fig. 28).
5. MODIFICĂRI lama
Slăbiţi şuruburile şi scoateţi partea 20 (Fig. 29)
Slăbiţi şuruburile şi scoateţi partea 19 (g. 30)
Utilizaţi instrumentul desemnat 29, 30 la
deşurubaţi şurubul de xare a lamei (g. 31).
Scoateţi partea discul 31 şi 32
atunci puteţi înlocui cu o lamă nouă (g. 32).

38 39
www.raider.bg
Originalno uputstvo za upotrebu
Poštovani kupci,
Hvala što ste kupili mašinu marke RAIDER, marka koja se naj brže razvija u oblasti
električnih i pneumatskih instrumenata. Pri pravilnom instaliranju i korišćenju, RAIDER su
sigurne i stabilne mašine, tako da će Vam rad s njima, predstavljati zadovoljstvo. Zbog Vaše
sigurnosti izgrađena je i odlična servisna mreža, s 36 servisa u celoj zemlji.
Pre početka korišćenja pištolja za vreli vazduh, molimo Vas, pažljivo pročitajte postojeće
‘’Instrukcije za upotrebu’’.
Zbog Vaše bezbednosti i u cilju pravilne upotrebe, pažljivo pročitajte postojeće
instrukcije, posebno preporuke i upozorenja. Da bi izbegli nepotrebne greške i incidente, važno
je da ove instrukcije budu na raspolaganju svim korisnicima mašine. Ako mašinu prodate
drugom licu, obavezno mu dostavite, uz nju i ‘’Instrukcije za upotrebu’’, kako bi se novi korisnik
upoznao s postojećim merama za bezbednost, kao i s instrukcijama za rad.
Isključivi predstavnik RAIDER-a je rma ‘’Euromaster Import Eksport’’ OOD, grad Soja 1231,
bul. ‘’Lomsko šose’’ 246, tel. 02 934 33 33, 934 10 10, www.raider.bg; www.euromasterbg.com;
e-mail: info@ euromasterbg.com.
Od 2006-te godine rma poseduje sertikat za upravljanje kvalitetom ISO 9001:2008
sa sertikatima za: Trgovinu, uvoz, izvoz i servis profesionalnih i malih električnih, pneumatskih
i mehaničkih instrumenata i opšte gvožđurije. Sertikat je izdat od strane Moody International
Certication Ltd, England.
TEHNIČKE KARAKTERISTIKE
parametar jedinica vrednost
modelu -RD-TS10
Napetost V 230
Nazivna frekvenca Hz 50
Nominalna poraba Električne energije W 2000
Stanja nedejavnosti min-1 2950
Dimenzije stola mm 800x550
Prečnik noža mm 315x30x36T
Dubina sečenja mm 90
bevel podešavanje °0-45
Klasa zaštite - I
1. Uključivanje / isključivanje 9 . električni motor
2. Paralelno Ograda 10 . skala
3. Zaštitni poklopac diska 11 . Handle za podešavanje ugla
4. Usisno crevo 12 . uglomer
5. Tabela 13 . skala
6. Šape 14 . Ručica Regulus . visina diska
7. Točkovi 15 . Ručka Regulus . Ugao sečenja
8. Dugme za restart 16 . skala
6. Întreţinerea şi repararea
Pentru a menţine un erastrau circular în
stare bună trebuie să e prolaxia periodice
lunare - ecare dintre care include:
• externe de testare;
• Vericaţi cablurile electrice, prize si impa-
mantare;
• Vericaţi de securitate a maşinii.
• Curăţarea maşinii.
O reparaţie posibilă a maşinii trebuie să e
făcută numai de către persoane zice de spe-
cialitate.
7. Reguli pentru depozitare
Păstraţi aparatul la o temperatură de plus 40
° C la minus 50 ° C, cu umiditate relativă mai
mică de 80% (la 20 ° C). Pentru a păstrate
mult timp la temperaturi de îngheţ, de căldură
maşina înainte de utilizare.
În cazul în care aparatul va păstrat pentru o
lungă perioadă de timp este nevoie de
curăţare intensă a părţilor corodate de maşini
şi colorarea lor cu un lubriant de protecţie.
Având în vedere maşini de protecţie a me-
diului, accesoriile şi ambalajele trebuie să
e supuse unei prelucrări adecvate în ve-
derea reutilizării conţinute în aceste materi-
ale. Pentru a facilita reciclarea componente
fabricate din materiale sintetice sunt marcate
corespunzător. Nu aruncaţi de maşini în gu-
noi! În conformitate cu Directiva 2002/96/CE
privind sfârşitul termenului de dispozitive de
viaţă electrice şi electronice, precum şi stabil-
irea unei legi naţionale şi maşinile care nu pot
utilizate, trebuie să e colectate separat şi
să e supuse unei prelucrări adecvate pentru
recuperarea acesta conţinea valoroase ma-
terii prime secundare.
Pagina se încarcă...
Pagina se încarcă...
Pagina se încarcă...
Pagina se încarcă...
Pagina se încarcă...
Pagina se încarcă...
Pagina se încarcă...
Pagina se încarcă...
Pagina se încarcă...
Pagina se încarcă...
Pagina se încarcă...
Pagina se încarcă...
Pagina se încarcă...
Pagina se încarcă...
Pagina se încarcă...
Pagina se încarcă...
Pagina se încarcă...
Pagina se încarcă...
Pagina se încarcă...
Pagina se încarcă...
Pagina se încarcă...
Pagina se încarcă...
Pagina se încarcă...
Pagina se încarcă...
Pagina se încarcă...
Pagina se încarcă...
Pagina se încarcă...
Pagina se încarcă...
Pagina se încarcă...
Pagina se încarcă...
Pagina se încarcă...
Pagina se încarcă...
Pagina se încarcă...
Pagina se încarcă...
Pagina se încarcă...
Pagina se încarcă...
-
 1
1
-
 2
2
-
 3
3
-
 4
4
-
 5
5
-
 6
6
-
 7
7
-
 8
8
-
 9
9
-
 10
10
-
 11
11
-
 12
12
-
 13
13
-
 14
14
-
 15
15
-
 16
16
-
 17
17
-
 18
18
-
 19
19
-
 20
20
-
 21
21
-
 22
22
-
 23
23
-
 24
24
-
 25
25
-
 26
26
-
 27
27
-
 28
28
-
 29
29
-
 30
30
-
 31
31
-
 32
32
-
 33
33
-
 34
34
-
 35
35
-
 36
36
-
 37
37
-
 38
38
-
 39
39
-
 40
40
-
 41
41
-
 42
42
-
 43
43
-
 44
44
-
 45
45
-
 46
46
-
 47
47
-
 48
48
-
 49
49
-
 50
50
-
 51
51
-
 52
52
-
 53
53
-
 54
54
-
 55
55
-
 56
56


Raider Power Tools Table Saw Manual de utilizare
- Categorie
- Accesorii mixer / robot de bucătărie
- Tip
- Manual de utilizare
Lucrări înrudite
-
 Raider Power Tools Reciprocating Saw 500W tool-free saw blade Manual de utilizare
-
 Raider Power Tools RD-TS20 Manual de utilizare
-
 Raider Power Tools RD-MS06 Manual de utilizare
-
 Raider Power Tools RD-BSW18 Manual de utilizare
-
 Raider Power Tools RD-CS24 Manual de utilizare
-
 Raider Power Tools RD-CSS01 Manual de utilizare
-
 Raider Power Tools RD-OMT01 Manual de utilizare


