
USER’S MANUAL
RDP-SMWC20
solo
www.raider.bg
Contents
7 BG оригинална инструкция за употреба
13 EN original instructions’ manual
19 RO instructiuni de folosire
25 MK упатство за работа
32 EL πρωτότυπο οδηγιες χρησεως
39 SR izvirno novodila za uporabo
45 HR izvorna upute za rad
RAIDER
○ Акумулаторна прахосмукачка за
сухо почистване без батерия и
зарядно
○ Соrdless dry vacuum cleaner
without battery and charger
○ Usisavač za suvo čišćenje bez
baterie i punjac
○Aspirator uscat-umed fără baterie și
încărcător
○ Правосмукалка за суво без
батерија и полнач
○ Σκουπάκι 20V Επαναφορτιζόμενο
○ Sesalnika za suho sesanje
bez baterije i štetnije
○ Usisavača za suho čišćenje

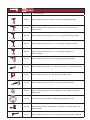
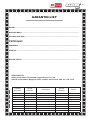
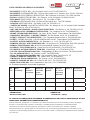
Art. No. Item Description
030130 R20 Cordless Drill Li-ion 2 speed 13 mm 44 Nm Solo RDP-SCD20
030131 R20 Cordless Hammer Drill-Driver Li-ion 2 speed 13 mm 50Nm Solo
RDP-SCDI20
030132 R20 Cordless Hex Impact Driver Li-ion 1/4" 180 Nm Solo RDP-SHID20
030133 R20 Cordless Impact Wrench Li-ion 1/2" 250 Nm Solo RDP-SCIW20
030134 R20 Cordless Impact Wrench Li-ion 1/2" 400 Nm 5 speed Solo
RDP-SCIW20-5
030135 R20 Cordless Rotary Hammer Li-ion SDS-plus Solo RDP-SRH20
030136 R20 Cordless Angle Grinder Li-ion Ø125mm 10000min-1 Solo RDP-SAG20
030137 R20 Cordless Jig Saw Li-ion quick 80mm Solo RDP-SJS20
030138 R20 Cordless Reciprocating Saw Li-ion quick Solo RDP-SRS20
030139 R20 Cordless Circular Saw Li-ion Ø165x20 mm 24T 4200 min-1 laser Solo
RDP-SCS20
163143 Circular Saw Blade Tungsten Carbide Tipped Ø165x20 mm 24T
030140 R20 Cordless Random Orbit Sander Li-ion Ø125 mm variable speed Solo
RDP-SRSA20
030141 R20 Cordless Multi-Tool Li-ion 3° variable speed quick Solo RDP-SOMT20

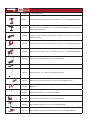
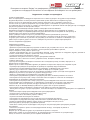
Art. No. Item Description
030211 Cordless Drill Li-ion 2 speed 13 mm 44 Nm 20 V 1.5 Ah 1 h RDP-SCD20 Set
030208 Cordless Hammer Drill-Driver Li-ion 2 speed 13mm 50Nm 20 V 2x2 Ah 1 h in
Case RDP-SCDI20 Set
030209 Cordless Angle Grinder Li-ion Ø125mm 10000min-1 20 V 2 Ah 1 h in Case
RDP-SAG20 Set
030210 Cordless Jig Saw Li-ion quick 80mm 20 V 2 Ah 1 h in Case RDP-SJS20 Set
074202 R20 Пистолет за боя акум. Li-ion Ø1.5 1.8 2.2 mm 1 L Solo RDP-SSGC20
075328 R20 Косачка Li-ion 360 mm 35L Solo RDP-SLM20
110287 Нож за акумулаторна косачка R20 360 mm RDP-SLM20
075545 R20 Коса акум. Li-ion 300 mm Solo RDP-SCBC20
075707 R20 Резачка за храсти акум Li-ion 510 mm Solo RDP-SCHT20
030151
R20 Cordless Rotary Hammer Brushless Li-ion SDS-plus Solo RDP-
SBRH20
030152 R20 Cordless Mixer Li-ion Solo RDP-SHM20
030153 R20 Cordless stapler comb Li-ion Solo RDP-SST20
030154 R20 Cordless Glue gun Li-ion ø11 Solo RDP-SGLG20
030155 R20 Cordless chain saw brushless 350 mm (14") Solo RDR-SBCS20

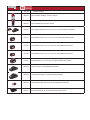
Art. No. Item Description
090319 R20 Cordless wet&dry vacuum cleaner
090315 R20 Cordless ash vacuum cleaner
032120 R20 System Starter Kit Li-ion 2 Ah 1h for series RDP-R20 System
131110 R20 Battery Pack Li-ion 20 V 1.5 Ah for series RDP-R20 System
131152 R20 Battery Pack Li-ion 20 V 2 Ah for series RDP-R20 System
131153 R20 Battery Pack Li-ion 20 V 4 Ah for series RDP-R20 System
131157 R20 Батерия Li-ion 20 V 6 Ah за серията RDP-R20 System
039703 R20 Charger for series RDP-R20 System
039704 R20 Rapid Charger for series RDP-R20 System
039706 R20 Adapter USD with lamp for series RDP-R20 System
039707 R20 Dual Charger for series RDP-R20 System 2x3 A

5
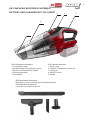
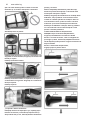
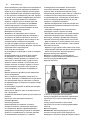
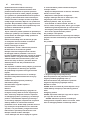
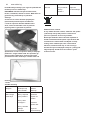
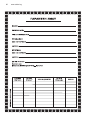
BG/ Изобразени елементи
1.Смукателен отвор
2.Капак/Прозрачна смукателна кутия
3.Бутон за заключване на капака
4.Пусков прекъсвач
5.Ръкохватка
EN/ Depicted elements
1.Suction inlet
2.Capsule/ Transparent suction box
3.Lock knob
4.ON/OFF switch
5.Handle
4
2
35
1
НЕ СЪДЪРЖА БАТЕРИЯ И ЗАРЯДНО!
BATTERY AND CHARGER NOT INCLUDED!
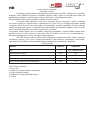
BG/Приложими аксесоари/
Възможно е да не са включени в окомплектовката
EN/ Applicable accessories /
It may not be included in the set

6www.raider.bg
BG
Акумулаторната машина се доставя без батерия и зарядно. Използвайте само
батерия и зарядно от серията R20 System.
Battery and charger information
The cordless machine is delivered without battery and charger. Use only the battery and charger
of the R20 System series.
Прочетете ръководството преди употреба!
Refer to instruction manual booklet!
BG Снимките са с илюстративна цел. Изобразеният модел може да не е напълно идентичен със
закупената от вас машина.
EN The pictures are for illustration purpose. The pattern shown may not be exactly the same as the
machine you purchased.

7
Оригинална инструкция за употреба
Уважаеми потребители,
Поздравления за покупката на машина от най-бързоразвиващата се марка за
електрически, бензинови и пневматични машини - RAIDER. При правилно инсталиране
и експлоатация, RAIDER са сигурни и надеждни машини и работата с тях ще Ви достави
истинско удоволствие. За Вашето удобство е изградена и отлична сервизна мрежа с 45
сервиза в цялата страна.
Преди да използвате тази машина, моля, внимателно се запознайте с настоящата
“Инструкцията за употреба”.
В интерес на Вашата безопасност и с цел осигуряване на правилната и
употреба, прочетете настоящите инструкции внимателно, включително препоръките и
предупрежденията в тях. За избягване на ненужни грешки и инциденти, важно е тези
инструкции да останат на разположение за бъдещи справки на всички, които ще ползват
машината. Ако я продадете на нов собственик то “Инструкцията за употреба” трябва да
се предаде заедно с нея, за да може новия ползвател да се запознае със съответните
мерки за безопасност и инструкциите за работа.
“Евромастер Импорт Експорт” ООД е упълномощен представител на
производителя и собственик на търговската марка RAIDER. Адресът на управление на
фирмата е гр. София 1231, бул. “Ломско шосе” 246, тел. 0700 44 155, www.raider.bg; www.
euromasterbg.com; e-mail: info@ euromasterbg.com.
От 2006 година във фирмата е въведена системата за управление на
качеството ISO 9001:2008 с обхват на сертификацията: Търговия, внос, износ и сервиз
на професионални и хоби електрически, пневматични и механични инструменти и обща
железария. Сертификатът е издаден от Moody International Certication Ltd, England.
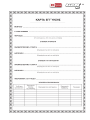
ТЕХНИЧЕСКИ ДАННИ
параметър мерна
единица стойност
Модел -RDP-SMWC20 solo
Номинално захранващо напрежение V AC 20
Обем на контейнера за отпадъци L 0.5
Максимален вакуум kPa 3.8
Продължителност на употреба с 2 Ah батерия min ~15
BG

8www.raider.bg
Обща безопасност.
При използването на уредите трябва се
спазят някои предпазни мерки, свързани
с безопасността, за да се предотвратят
наранявания и щети. За целта внимателно
прочетете това упътване за употреба / указанията
за безопасност. Пазете го добре, за да разполагате
с информацията по всяко време. В случай, че
трябва да предадете уреда на други лица, моля,
предайте им това упътване за употреба. Ние не
поемаме отговорност за злополуки или щети,
които възникват вследствие на несъблюдаването
на това упътване и на указанията за безопасност.
Указания за безопасност
Внимание: Преди монтажа и пускането в
експлоатация задължително съблюдавайте
инструкцията за употреба. Никога не почиствайте
уреда с разтворители. Не оставяйте готов за
експлоатация уред без надзор.
Пазете от достъп на деца. Да не се употребява от
хора с намалени сензорни, физични и умствени
възприятия както и от необучени.
Не излагайте на дъжд. Съхранявайте на закрито.
Не позволявайте да се използва като играчка.
Не дръжте уреда с мокри ръце.
Не поставяйте никакви предмети в отворите. Не
използвайте с блокиран отвор; пазете от прах,
мъх, косми и всичко, което може да намали
въздушния поток. Дръжте косата, широките
дрехи, пръстите и всички части на тялото далеч
от отвори и движещи се части.
Спрете работата незабавно, ако забележите
нещо необичайно.
Ако изпуснете или ударите уреда за почистване,
проверете го внимателно за пукнатини или
повреди преди работа.
Не доближавайте до печки или други източници
на топлина.
Не блокирайте всмукателния или
вентилационния отвор.В никакъв случай не
засмуквайте: горящи кибритени клечки, тлееща
пепел и цигарени угарки, възпламеняеми,
разяждащи, огнеопасни или експлозивни
вещества, пари и течности.
Този уред не е подходящ за изсмукване на опасни
за здравето прахове.
Съхранявайте уреда в сухи помещения.
Не пускайте в експлоатация повреден уред.
Използвайте уреда само за дейностите, за които
е бил конструиран.
При почистване на стълби се изисква максимално
внимание.
Използвайте само оригинално оборудване и
резервни части.
Употреба по предназначение
Прахосмукачката за сухо почистване е
подходяща за сухо почистване при използване
на съответния филтър. Прахосмукачката е
предназначена за домашна употреба за събиране
на прах, приложима е за почистване на прах
в автомобили. Уредът не е предназначен за
засмукване на възпламеняеми, експлозивни или
опасни за здравето вещества. Машината трябва
да се използва само по предназначението й.
Всяка по-нататъшна извън това употреба не е по
предназначение. За предизвикани от това щети
или наранявания от всякакъв вид отговорност
носи потребителят/обслужващото лице, а не
производителят.
Не засмуквайте следните материали:
- Горещи материали като запалени цигари или
искра/метален прах, генериран от шлайфане/
рязане на метал
- Запалими материали като бензин, разредител,
бензин, керосин или боя
- Експлозивни материали като нитроглицерин
-Запалими материали като алуминий, цинк,
магнезий, титан, фосфор или целулоид
-Влажни материали, вода, масло или други
подобни
- Твърди парчета с остри ръбове, като дървени
стърготини, метали, камъни, очила, пирони,
щифтове или бръсначи
- Прах за съсирване, като цимент или тонер
- Провеждащ прах като метал или въглерод
- Фини частици като бетонен прах
Преди пускане в експлоатация
Акумулаторната машина се доставя без
батерия и зарядно. Използвайте само батерия и
зарядно от серията R20 System.
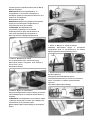
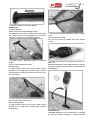
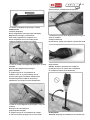
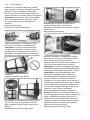
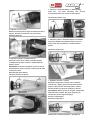
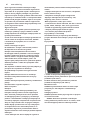
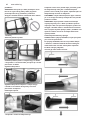
Пускане в експлоатация.
1. Бутон за включване/изключване
За да стартирате инструмента, просто натиснете
бутона за превключване (вижте фиг.1).
За да спрете инструмента, просто натиснете

отново бутона за превключване (вижте Фиг.2).
Монтаж на уреда.
ВНИМАНИЕ: Винаги се уверявайте, че
инструментът е изключен и батерията е
извадена, преди да извършвате каквато и да е
работа по инструмента.
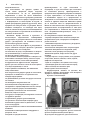
Изхвърляне на прах
ВНИМАНИЕ: Изпразнете уреда за почистване,
преди да се е напълнил твърде много и
смукателната сила да отслабне.
ВНИМАНИЕ: Не забравяйте да
изпразните вътрешността на самата
прахосмукачка от прах. Неспазването на
това може да доведе до запушване на
филтъра или до повреда на двигателя.
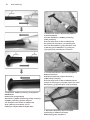
1. Капак 2. Всмукателен отвор
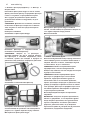
За да премахнете прах, полепнал върху
филтъра в капака, почукайте леко капака 4
или 5 пъти с ръка.
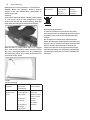
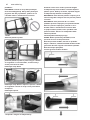
Разглобете капака
1. Капак 2. Бутон за заключване
Насочете всмукателния отвор надолу, Натиснете
заключващия бутон и извадете капака бавно и
направо.
ЗАБЕЛЕЖКА: Не забравяйте да поставите торба
за боклук под капака тъй като при отваряне на
капака може да се разпилее прах.
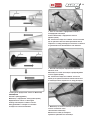
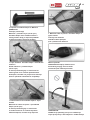
Демонтирайте филтърния модул и изхвърлете
праха.
1. Капак 2. Филтър 3. Торба за боклук
Извадете филтърния модул и отстранете
натрупания прах от вътрешността на капака.
Демонтирайте пластмасовия пръстен.
1. Пластмасов пръстен 2. Пластмасов обтегач 3.
Външен филтър
Завъртете външния филтър извън
пластмасовия обтегач по посока на стрелката,
както е показано, и свалете пластмасовия
пръстен.
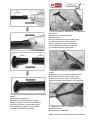
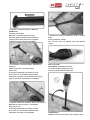
Разглобете филтърния модул

10 www.raider.bg
1. Външен филтър/предфилтър 2. Филтър 3.
Опора/стойка
Разглобете филтърния модул на части: стойка,
филтър и външен филтър. издърпайте филтъра
и леко го почукайте, за да премахнете праха.
Ако е трудно да премахнете праха, можете
да използвате машина за издухване, за да го
премахнете.
ЗАБЕЛЕЖКА: Доколкото е възможно, избегнете
почистване на филтъра с вода. Ако не можете
така, изсушете го напълно преди повторното
сглобяване.
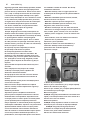
Повторно сглобяване
Сглобяване на филтърния модул
Поставете филтъра и опората/стойката на
позицията на външния филтър.
ЗАБЕЛЕЖКА: Уверете се, че филтърът е
поставен направо, без да се подгъва обратно.
Ако филтърът е поставен неправилно, както
е показано, прахът ще попадне в корпуса на
двигателя и ще доведе до повреда на двигателя.
1. Филтър
Сглобяване на пластмасовия филтър
монтирайте пластмасовия пръстен в посока,
съответстваща на оригинала. По това време се
уверете, че е здраво закрепен върху стойката.
Монтиране на филтърния модул
Монтирайте филтърния модул в капака в
посока, съответстваща на оригинала. Уверете се,
че е здраво закрепен върху капака.
Монтаж на капака
1. Капак 2. Заключващ бутон
Насочете всмукателния отвор надолу, Натиснете
заключващия бутон и поставете капака бавно и
направо. Когато е на място, освободете бутона
за заключване, за да го заключите.
ЗАБЕЛЕЖКА: Винаги отстранявайте праха
предварително, тъй като всмукателната
мощност ще намалее, ако има твърде много прах
в уреда за почистване.
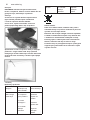
ЗАБЕЛЕЖКА: Винаги проверявайте дали
филтърът и предфилтърът са поставени
правилно, преди да използвате уреда за
почистване. Ако не са поставени правилно,
прахът ще попадне в корпуса на двигателя и ще
доведе до повреда на двигателя. Ако се появят
тези примери, филтърът и предфилтърът не са
поставени правилно. Монтирайте ги правилно,
за да отстраните проблема.
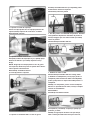
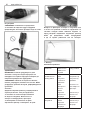
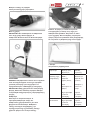
Инсталиране/деинсталиране на приставка/
накрайник
ВНИМАНИЕ: След като свържете приставките,
винаги се уверявайте, че са закрепени здраво.
За да свържете приставки, като удължителна
пръчка и накрайник, поставете приставката
директно, доколкото може, за да закрепите
връзката по време на употреба. За да разкачите
приставките, издърпайте ги директно.

11
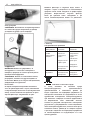
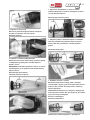
1. Корпус 2. Удължение/права тръба 3. Накрайник
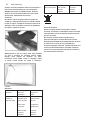
Работа
Почистване (изсмукване)
Накрайник + удължение (Права тръба)
Правата тръба се поставя в накрайника и
смукателния отвор на прахосмукачката.
Тази подредба е удобна за почистване
на пода в изправено положение.
1. Тяло на уреда 2. Удължение 3. Стандартен
накрайник
Накрайник за ъгъл+Удължение
(Права тръба)
В тесни помещения, където самият уред
не може да достигне, или на високи
места, трудно достъпни, използвайте
тази подредба за почистване на ъгли
и ъгли на автомобил или мебели.
1. Накрайник за ъгъл 2. Удължение 3. Тяло на
уреда;
Накрайник четка +удължение (права тръба)
В тесни помещения, където самият уред
не може да достигне, или на високи места,
трудно достъпни, използвайте тази подредба.
1. Накрайник четка 2. Удължение 3. Тяло на
прахосмукачката
Почистване без накрайник
Можете също да събирате прах и без накрайник.

12 www.raider.bg
След употреба
ЗАБЕЛЕЖКА: Поставянето на прахосмукачката
на стената без друга опора може да доведе
до падане на уреда и да се повреди.
ПОДДРЪЖКА
ВНИМАНИЕ: Винаги се уверявайте, че
инструментът е изключен и батерията е
извадена, преди да се опитате да извършите
проверка или поддръжка.
ЗАБЕЛЕЖКА: Никога не използвайте бензин,
разредител, алкохол или други подобни за
почистване. Може да се получи обезцветяване,
деформация или пукнатини.
Почистване
От време на време избърсвайте външната
част на прахосмукачката с кърпа, навлажнена
в сапунена вода. Почистете също смукателния
отвор, зоната за монтаж на торбичка за прах/
хартиен филтър и запушалката за прах.
Измийте филтъра в сапунена вода, когато е
запушен с прах и мощността на почистващото
средство стане слаба. Изсушете го добре преди
употреба. Недостатъчно изсушен филтър
може да причини лошо засмукване и да
скъси експлоатационния живот на двигателя.
1. Филтър
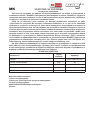
Отстраняване на проблеми
Неизправност описание Решение
Слаба
всмукателна
мощност
Пълен ли
е корпуса с
прах?
Задръстен ли
е филтъра?
Изтощена ли е
батерията?
Изпразнете
корпуса от
прах.
Почистете
филтъра.
Заредете
батерията.
Не работи Изтощена ли е
батерията?
Заредете
батерията.
Опазване на околната среда.
С оглед опазване на околната среда
електроинструментът, допълнителните
приспособления и опаковката трябва да
бъдат подложени на подходяща преработка за
повторното използване на съдържащите се в тях
суровини.Не изхвърляйте електроинструменти
при битовите отпадъци! Съгласно Директивата
на Европейския съюз 2012/19/EC относно
излезли от употреба електрически и електронни
устройства и утвърждаването и като национален
закон електроинструментите, които не могат да се
използват повече, трябва да се събират отделно
и да бъдат подлагани на подходяща преработка
за оползотворяване на съдържащите се в тях
ценни суровини.

13
EN
Original instruction manual
Dear Customer,
Congratulations on the purchase of machinery from the fastest growing brand of electric,
gasoline and pneumatic machines - RAIDER. When properly installed and operating, RAIDER
are safe and reliable machines and work with them will deliver a real pleasure. For your
convenience has been built and excellent service network of 45 service station across the
country.
Before using this machine, please carefully acquainted with these “instructions for use.
In the interest of your safety and to ensure proper use and read these instructions carefully,
including the recommendations and warnings in them. To avoid unnecessary errors and
accidents, it is important that these instructions will remain available for future reference to
all who will use the machine. If you sell it to a new owner “Instructions for Use” must be
submitted along with it to enable new users to become familiar with relevant safety and
operating instructions.
Euromaster Import Export Ltd. is an authorized representative of the manufacturer and
owner of the trademark RAIDER.
Adress: Soa City 1231, Bulgaria “Lomsko shausse” Blvd. 246, tel +359 700 44 155, www.
raider.bg; www.euromasterbg.com; e-mail: [email protected] 2006 the company
introduced the system of quality management ISO 9001:2008 with scope of certication: Trade,
import, export and servicing of hobby and professional electrical, mechanical and pneumatic
tools and general hardware. The certicate was issued by Moody International Certication
Ltd, England.
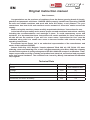
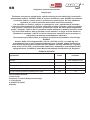
Technical Data
Parameter Unit value
Model -RDP-SMWC20 solo
Voltage V AC 20
Tank capacity L 0.5
Vacuum max. kPa 3.8
Continious use with 2 Ah battery min ~15

14 www.raider.bg
General safety: When using the appliances,
certain safety precautions must be observed to
prevent injuries and damage. To do this, read this
instruction manual / safety instructions carefully.
Keep it well so that you have the information at all
times. In case you need to hand over the appliance
to other people, please give them this instruction
manual. We accept no liability for accidents or
damage resulting from non-observance of these
instructions and safety instructions.
Safety instructions
Caution: Be sure to follow the instructions for use
before installation and commissioning. Never clean
the appliance with solvents. Do not leave a ready-
to-use appliance unattended.
Keep out of reach of children. Do not use by
people with reduced sensory, physical and mental
perceptions as well as by the untrained.
Пазете от достъп на деца.
Do not expose to rain. Store indoors.
Do not allow to be used as a toy.
Do not handle appliance with wet hands.
Do not put any object into openings. Do not use with
any opening blocked; keep free of dust, lint, hair,
and anything that may reduce air ow. Keep hair,
loose clothing, ngers, and all parts of body away
from openings and moving parts.
Stop operation immediately if you notice any-thing
abnormal.
If you drop or strike the cleaner, check it care- fully
for cracks or damage before operation.
Do not bring close to stoves or other heat sources.
Do not block the intake hole or vent holes.
Use the appliance only for the activities for which it
was designed.
Maximum care is required when cleaning stairs.
Use only original equipment and
spare parts.
Intended use
The vacuum cleaner for dry cleaning is suitable for
dry cleaning when using the appropriate lter. The
vacuum cleaner is designed for home use to collect
dust and is applicable for cleaning dust in cars. The
appliance is not intended for suction of ammable,
explosive or hazardous substances. The machine
must only be used for its intended purpose. Any
further use other than this is not intended for its
intended purpose. The user / operator, not the
manufacturer, is responsible for any damage or
injury caused by this.Do not pick up the following
materials:
- Hot materials such as lit cigarettes or spark/metal
dust generated by grinding/ cutting metal
- Flammable materials such as gasoline, thinner,
benzine, kerosene or paint
- Explosive materials like nitroglycerin
-Ignitable materials such as Aluminum, zinc,
magnesium, titanium, phosphorus or celluloid
-Wet dirt, water, oil or the like
- Hard pieces with sharp edges, such as wood chips,
metals, stones, glasses, nails, pins or razors
- Powder to clot such as cement or toner
- Conductive dust such as metal or carbon
- Fine particle like concrete dust
Before starting the appliances
The battery machine is delivered without battery
and charger. Use only the battery and charger of
the R20 System series.
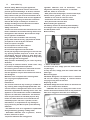
Before starting
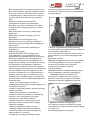
1. Switch on/o button
To start or the tool, simply push the switch button
on (See Fig1) .
To stop the tool, simply push the switch button o
(See Fig2) .
Монтаж на уреда.
CAUTION: Always be sure that the tool is switched
o and the battery cartridge is removed before
carrying out any work on the tool.
Disposing of dust
CAUTION: Empty the cleaner before it becomes too
full, or the suction force weakens.
CAUTION: Be sure to empty the inside of the
cleaner itself of dust. Failure to do so may cause the
lter to be clogged or the motor to be damaged.
1. Capsule 2. Suction inlet

15
In order to drop dust sticking on the lter in the
capsule, tap the capsule 4 or 5 times with your hand.
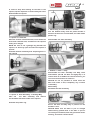
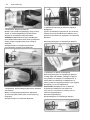
Disassemble the capsule
1. Capsule 2. Lock Knob
Point the suction inlet downwards, Press down the
lock knob a little bit hard, and take out the capsule
slowly and straight.
NOTE: Be sure to set a garbage bag beneath the
capsule, as dust may spill out when the capsule is
opened.
Uninstall the lter assembly and disposing dust in
the capsule
1. Capsule 2. Filter Assembly 3. Garbage Bag
Take out the lter assembly and remove
accumulated dust from inside of the capsule.
Uninstall the plastic ring
1. Plastic Ring 2. Plastic Buckle 3. Prelter
turn the Prelter away from the plastic buckle in
direction of the arrow as illustrated, and take o the
plastic ring.
Disassemble the lter assembly
1. Prelter 2. Filter 3. Stay
Disassemble the lter assembly into Stay, Filter
and Prelter. pull o the lter and lightly tap it to
remove dust. If it’s dicult to remove the dust, you
can use a blow machine to remove it.
NOTICE: As far as possible to avoid clean the
lter with water. If did, Completely dry it before
reassembly.
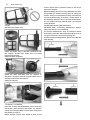
Reassembly
Assemble the lter assembly
Put on the lter and Stay fully in position on the
Prelter in turn.
NOTICE: Make sure the lter is put on straight
without being peeled back. If the lter is put on
incorrectly as illustrated, dust will get into the motor
housing, and cause a motor failure.

16 www.raider.bg
1. Filter
Assemble the plastic ring
install the plastic ring in direction consistent with
the original. At this time, make sure it is rmly
locked onto the stay.
Install the lter assembly
Install the lter assembly into the capsule in
direction Consistent with the original. Make sure it
is rmly locked onto the capsule.
Install the capsule
1. Capsule 2. Lock Knob
Point the suction inlet downwards, Press down the
lock knob a little bit hard, and insert the capsule
slowly and straight. When in place then release the
lock button to lock on.
NOTE: Always remove dust ahead of time, as the
suction power will be reduced if there is too much
dust in the cleaner.
NOTICE: Always be sure to check that both the lter
and prelter are loaded correctly prior to using the
cleaner. If they are not loaded correctly, dust will get
into the motor housing, and cause a motor failure. If
the following examples occur, the lter and prelter
are not loaded correctly. Reload them correctly to
rectify problem.
Installing/Uninstalling the attachment
CAUTION: After connecting attachments, always
make sure that it is secured rmly.
To connect attachments, such as extension wand
and nozzle, insert the attachment directly as far as it
can go to secure the connection during use.
To disconnect the attachments, pull it out a little bit
hard directly.

17
1. Capsule 2. Extension wand 3. Nozzle
OPERATION
Cleaning (Suction)
Nozzle + Extension wand (Straight pipe)
The extension wand ts in between the nozzle and
the cleaner itself. This arrangement is convenient
for clean- ing a oor in a standing position.
1. Cleaner body 2. Extension wand 3. Standard
Nozzle
Corner nozzle +Extension wand
(Straight pipe)
In tight quarters where the cleaner itself cannot
squeeze in, or in high places hard to reach, use this
arrangement for cleaning corners and crevices of a
car or furniture.
1. Corner nozzle 2. Extension wand 3. Cleaner body
Shelf brush nozzle +Extension
wand (Straight pipe)
In tight quarters where the cleaner itself cannot
squeeze in, or in high places hard to reach, use this
arrangement.
1. Shelf brush nozzle 2. Extension wand 3. Cleaner
body
Cleaning without nozzle
You can also pick up powder and dust without
nozzle.
After use
NOTICE: Putting the cleaner against the wall without
any other support cause the cleaner to fall down and
be damaged.
MAINTENANCE
CAUTION: Always be sure that the tool is switched
o and the battery cartridge is removed before

18 www.raider.bg
attempting to perform inspection or maintenance.
NOTICE: Never use gasoline, benzine, thinner,
alcohol or the like. Discoloration, deformation or
cracks may result.
Cleaning
From time to time wipe o the outside (cleaner body)
of the cleaner using a cloth dampened in soapy
water. Clean out also the suction opening, dust bag/
paper lter mounting area and the dust stopper.
Wash the lter in soapy water when it is clogged
with dust and the cleaner power becomes weak.
Dry it out thoroughly before use. An insuciently
dried lter may cause poor suction and shorten the
service life of the motor.
1. Filter
Trouble shooting
Symptom Area to be
investigated
Fixing method
Weak suction
power
Is the capsule
full of dust?
Is lter the
clogged?
Is the battery
cartridge
exhausted ?
Empty the
capsule of dust.
Clean or wash
the lter.
Charge
the battery
cartridge.
Not working Is the battery
cartridge
exhausted ?
Charge
the battery
cartridge.
Environmental protection.
In order to protect the environment, the power
tool, accessories and packaging must be properly
recycled for the reuse of the raw materials they
contain.
Do not dispose of power tools with household
waste! According to the European Union Directive
2012/19 / EC on end-of-life electrical and electronic
devices and the approval and as national law,
power tools that can no longer be used must be
collected separately and subjected to appropriate
processing to utilize the are in them valuable raw
materials.

19
Originale instrucţiuni de utilizare
Stimate prieten,
Felicitări pentru achiziţionarea unei maşini a marca cea mai rapidă creştere de electrice şi
scule pneumatice - Raider. Cu instalarea corectă şi funcţionarea, Raider sunt echipamente sigure şi
abile şi să lucreze cu ei vă va oferi adevarata placere. Pentru confort, servicii excelente şi a construit
o reţea.
Înainte de a utiliza acest aparat, vă rugăm să citiţi cu atenţie actual “Manualul de instrucţiuni”.
În interesul siguranţei şi pentru a asigura utilizarea corectă a acestuia, citiţi cu atenţie aceste
instrucţiuni, inclusiv recomandări şi avertismente pentru a le. Pentru a evita greşeli inutile şi acciden-
tele, este important ca aceste instrucţiuni să rămână disponibile pentru referinţe viitoare tuturor celor
care vor utiliza aparatul. Dacă-l vinzi la un “manual de utilizare”, noul proprietar trebuie să e prezen-
tate împreună cu ea, pentru a permite noilor utilizatori să se familiarizeze cu instrucţiunile de siguranţă
şi de exploatare.
“Euromaster Import Export” SRL este reprezentantul un producător şi proprietar al marcii
Raider. Adresa companiei este Soa 1231, B-dul “Lom Road” 246, tel +359 700 44 155, www.raider.
bg; www.euromasterbg.com, e-mail: info @ euromasterbg. com.
Începând cu anul 2006, compania a introdus un sistem de management al calităţii ISO 9001:2008 de certicare
cu domeniul de aplicare: instrumente de comerţ, import, export şi de servicii profesionale si hobby
electrice, pneumatice şi de putere şi hardware-ul general. Certicatul a fost emis de catre Moody
International de Certicare Ltd, Anglia.
DATE TEHNICE
Caracteristici tehnice : Unitate de
masura
Valoare
Model -RDP-SMWC20 solo
Voltaj V AC 20
Capacitatea rezervorului L 0.5
Vacuum kPa 3.8
Lucru continuu cu baterie de 2 Ah min ~15
Elemente ilustrate
1. Priză de aspirație
2.Capsula/Cutie de aspiratie transparenta
3. Buton de blocare
4. Comutator ON/OFF
5.Mâner

20 www.raider.bg
Siguranța generală: Când utilizați aparatele, trebuie
respectate anumite măsuri de siguranță pentru a
preveni rănirea și deteriorarea. Pentru a face acest
lucru, citiți cu atenție acest manual de instrucțiuni
/ instrucțiuni de siguranță. Păstrați-l bine, astfel
încât să aveți informațiile în orice moment. În cazul
în care trebuie să predați aparatul altor persoane,
vă rugăm să le oferiți acest manual de instrucțiuni.
Nu ne asumăm răspunderea pentru accidente
sau daune rezultate din nerespectarea acestor
instrucțiuni și instrucțiuni de siguranță.
Instructiuni de siguranta
Atenție: Asigurați-vă că urmați instrucțiunile de
utilizare înainte de instalare și punere în funcțiune.
Nu curățați niciodată aparatul cu solvenți. Nu lăsați
un aparat gata de utilizare nesupravegheat.
A nu se lăsa la îndemâna copiilor. A nu se utiliza
de către persoane cu percepții senzoriale, zice și
mentale reduse, precum și de către cei neantrenați.
Пазете от достъп на деца.
Nu expuneți la ploaie. Depozitați în interior.
Nu permiteți să e folosit ca jucărie.
Nu manipulați aparatul cu mâinile ude.
Nu introduceți niciun obiect în deschideri. Nu
utilizați cu orice deschidere blocată; feriți-vă de
praf, scame, păr și orice ar putea reduce uxul de
aer. Țineți părul, hainele largi, degetele și toate
părțile corpului departe de deschideri și părți în
mișcare.
Opriți imediat funcționarea dacă observați ceva
anormal.
Dacă scăpați sau loviți mașina de curățat,
vericați-l cu atenție pentru crăpături sau
deteriorare înainte de utilizare.
Nu apropiați de sobe sau alte surse de căldură.
Nu blocați oriciul de admisie sau oriciile de
aerisire.
Utilizați aparatul numai pentru activitățile pentru
care a fost conceput.
Este necesară o atenție maximă la curățarea
scărilor. Folosiți numai echipamentul original și
piese de schimb.
Utilizarea prevăzută
Aspiratorul pentru curățătorie chimică este
potrivit pentru curățarea chimică atunci când se
utilizează ltrul corespunzător. Aspiratorul este
conceput pentru uz casnic pentru a colecta praful
și este aplicabil pentru curățarea prafului din
mașini. Aparatul nu este destinat pentru aspirarea
substanțelor inamabile, explozive sau periculoase.
Aparatul trebuie utilizat numai în scopul pentru
care a fost destinat. Orice utilizare ulterioară în
afară de aceasta nu este destinată scopului pentru
care a fost prevăzut. Utilizatorul/operatorul, nu
producătorul, este responsabil pentru orice daune
sau vătămări cauzate de aceasta. Nu ridicați
următoarele materiale:
- Materiale erbinți, cum ar țigări aprinse sau
scânteie/praf de metal generat de șlefuirea/tăierea
metalului
- Materiale inamabile precum benzină, diluant,
benzină, kerosen sau vopsea
- Materiale explozive precum nitroglicerina
- Materiale inamabile precum aluminiu, zinc,
magneziu, titan, fosfor sau celuloid
- Murdărie umedă, apă, ulei sau altele asemenea
- Piese dure cu margini ascuțite, cum ar așchii de
lemn, metale, pietre, ochelari, cuie, ace sau brici
- Pulbere pentru coagulare, cum ar cimentul sau
tonerul
- Praf conductiv, cum ar metalul sau carbonul
- Particule ne ca praful de beton
Înainte de a porni aparatele
Aparatul cu baterii este livrat fără baterie și
încărcător. Utilizați numai acumulatorul și
încărcătorul din seria R20 System.
Înainte de a începe
1. Buton de pornire/oprire
Pentru a porni instrumentul, pur și simplu apăsați
butonul de comutare (vezi Fig1).
Pentru a opri unealta, pur și simplu apăsați butonul
de comutare oprit (vezi Fig2).
Монтаж на уреда.
ATENȚIE: Asigurați-vă întotdeauna că unealta este
oprită și că cartușul bateriei este scos înainte de a
efectua orice lucru la unealta.
Eliminarea prafului
ATENȚIE: Goliți aspiratorul înainte ca acesta să
devină prea plin sau forța de aspirație slăbește.
ATENȚIE: Asigurați-vă că goliți interiorul
aparatului de curățare de praf. Nerespectarea
acestui lucru poate cauza înfundarea
ltrului sau deteriorarea motorului.
Pagina se încarcă...
Pagina se încarcă...
Pagina se încarcă...
Pagina se încarcă...
Pagina se încarcă...
Pagina se încarcă...
Pagina se încarcă...
Pagina se încarcă...
Pagina se încarcă...
Pagina se încarcă...
Pagina se încarcă...
Pagina se încarcă...
Pagina se încarcă...
Pagina se încarcă...
Pagina se încarcă...
Pagina se încarcă...
Pagina se încarcă...
Pagina se încarcă...
Pagina se încarcă...
Pagina se încarcă...
Pagina se încarcă...
Pagina se încarcă...
Pagina se încarcă...
Pagina se încarcă...
Pagina se încarcă...
Pagina se încarcă...
Pagina se încarcă...
Pagina se încarcă...
Pagina se încarcă...
Pagina se încarcă...
Pagina se încarcă...
Pagina se încarcă...
Pagina se încarcă...
Pagina se încarcă...
Pagina se încarcă...
Pagina se încarcă...
Pagina se încarcă...
Pagina se încarcă...
Pagina se încarcă...
Pagina se încarcă...
Pagina se încarcă...
Pagina se încarcă...
Pagina se încarcă...
Pagina se încarcă...
Pagina se încarcă...
Pagina se încarcă...
Pagina se încarcă...
Pagina se încarcă...
Pagina se încarcă...
Pagina se încarcă...
Pagina se încarcă...
Pagina se încarcă...
-
 1
1
-
 2
2
-
 3
3
-
 4
4
-
 5
5
-
 6
6
-
 7
7
-
 8
8
-
 9
9
-
 10
10
-
 11
11
-
 12
12
-
 13
13
-
 14
14
-
 15
15
-
 16
16
-
 17
17
-
 18
18
-
 19
19
-
 20
20
-
 21
21
-
 22
22
-
 23
23
-
 24
24
-
 25
25
-
 26
26
-
 27
27
-
 28
28
-
 29
29
-
 30
30
-
 31
31
-
 32
32
-
 33
33
-
 34
34
-
 35
35
-
 36
36
-
 37
37
-
 38
38
-
 39
39
-
 40
40
-
 41
41
-
 42
42
-
 43
43
-
 44
44
-
 45
45
-
 46
46
-
 47
47
-
 48
48
-
 49
49
-
 50
50
-
 51
51
-
 52
52
-
 53
53
-
 54
54
-
 55
55
-
 56
56
-
 57
57
-
 58
58
-
 59
59
-
 60
60
-
 61
61
-
 62
62
-
 63
63
-
 64
64
-
 65
65
-
 66
66
-
 67
67
-
 68
68
-
 69
69
-
 70
70
-
 71
71
-
 72
72


Lucrări înrudite
-
RAIDER Pro RDP-SDWCH20 Manual de utilizare
-
Raider RDP-WC04 Manual de utilizare
-
-
-
-
-
-
-


