Silvercrest Z28414 Operation and Safety Notes
- Tip
- Operation and Safety Notes

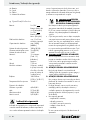
Body AnAlyser scAle
Operation and Safety Notes
KörperfettwAAge
Bedienungs- und Sicherheitshinweise
VAgA zA mjerenje mAsnoće tijelA
Upute za posluživanje i za Vašu sigurnost
Ζυγαρια λιπομέτρησησ
Υποδείξεις χειρισμού και ασφαλείας
cântAr personAl cu AfişAreA
procentului de grăsime
Instrucţiuni de utilizare şi de siguranţă
Кантар
Инструкции за обслужване и безопасност
7
Z28414

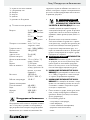
GB / CY Operation and Safety Notes Page 5
HR Upute za posluživanje i za Vašu sigurnost Stranica 13
RO Instrucţiuni de utilizare şi de siguranţă Pagina 22
BG Инструкции за обслужване и безопасност Cтраница 31
GR / CY Υποδείξεις χειρισμού και ασφαλείας Σελίδα 41
DE / AT / CH Bedienungs- und Sicherheitshinweise Seite 50

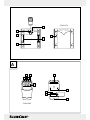
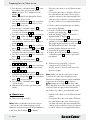
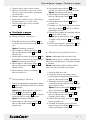
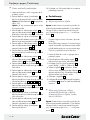
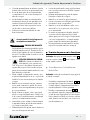
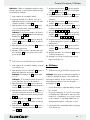
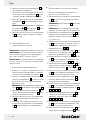
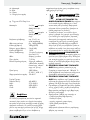
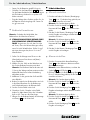
A
3
6
SET WT START
2
1
5
3
4
12
15
16
14
13
SET WT START
7
8
9
10
11
Z28414-TX
Z28414-RX

4
B
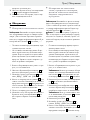
2628 2730
17 19
20
21
24
25
31
32
33
34
35
36
37
38
22
23
18
29

5 GB/CY
Table of Contents
Introduction
Proper use ...................................................................................................................... Page 6
Parts list ..........................................................................................................................Page 6
Included items ...............................................................................................................Page 6
Technical information ....................................................................................................Page 7
Safety advice .........................................................................................................Page 7
Before getting started
Inserting / replacing the batteries .................................................................................Page 8
Mounting the control unit..............................................................................................Page 8
Preparing for use
Setting the time ..............................................................................................................Page 9
Setting the alarm ...........................................................................................................Page 9
Setting the unit of weight ..............................................................................................Page 9
Entering personal details ..............................................................................................Page 9
How to use
Measuring weight .........................................................................................................Page 10
Measuring weight, calorie requirement, body fat,
body water, bone and muscle percentages ................................................................Page 10
Retrieving last recorded values ....................................................................................Page 11
What the interpreted readings mean ...............................................Page 11
Trouble-shooting .................................................................................................Page 11
Cleaning .....................................................................................................................Page 12
Disposal ......................................................................................................................Page 12

6 GB/CY
Introduction
Body Analyser Scale
Q
Introduction
Familiarise yourself with the product be-
fore using it for the first time. In addition
please refer carefully to the operating
instructions below and the safety advice. Use the
product only as described and for the indicated
purpose. Keep these instructions in a safe place.
If you pass the product on to anyone else, please
ensure that you also pass on all the documentation.
Q
Proper use
These scales are intended for measuring the weight
of people. The scales have a weighing range of up
to 180 kg. The scales are also suitable for measuring
body fat, body water, muscle and bone mass. Further-
more, it is possible to determine your daily calorie
requirement by entering your gender, age, height
and weight. Any other use or modification of the
device constitute improper use and may result in
injury and / or damage to the device. The manufac-
turer is not liable for damage caused by improper
use. The device is not intended for commercial use.
Q
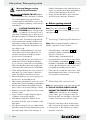
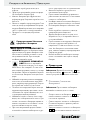
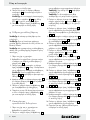
Parts list
Scales
1
Inlet for control unit
2
Electrodes
3
Platform
4
Metal contact
5
Infrared transmitter
6
Battery compartment
Removable control unit
7
Time / confirmation button
8
Alarm setting / count-up button
9
Button to set the weight units / count-down button
10
Start button
11
LC display
12
Mounting device
13
Metal contact
14
Infrared receiver
15
Battery compartment lid clip
16
Battery compartment
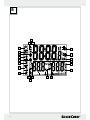
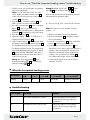
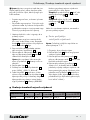
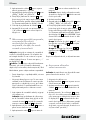
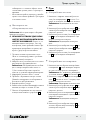
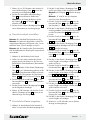
Pictograms in the LC display
11
17
AM – Symbol for “mornings”
18
– Alarm activated / alarm settings
19
PM – Symbol for “afternoons”
20
st:lb – Weight in “stones:pounds”
lb – Weight in “pounds”
21
kg – Weight in kilograms
22
KCAL – Recommended daily calorie
requirement
23
’ “ – Height in feet and inches
24
cm – Height in cm
25
% – Percentages (of body fat, muscles,
body water, bone)
26
– Body water percentage
27
– Bone mass
28
– Body fat percentage
29
– Age group between 7 - 17 years of
age (children mode)
30
– Muscle mass
31
– Age group between 18 - 99 years of
age (adult mode)
32
– Does a lot of sport
33
– Physically demanding work
34
– Woman
35
– Standing job
36
– Man
37
– Sedentary work
38
– Does no sport
Q
Included items
Check that all the items are present and that the
device is in perfect condition immediately after
unpacking.
1 x Body fat scales
1 x Control unit
4 x Battery
2 x Screw
2 x Dowel
1 x Operating instructions

7 GB/CY
Introduction / Safety advice
Q
Technical information
Battery: 2 x 1.5 V battery
(AAA) Micro (transmitter)
2 x 1.5 V
battery
(AAA) Micro (receiver)
Platform: 31 x 31 cm, safety glass
Load capacity: max. 180 kg (400 lbs)
Weight increment: 100 g (0.2 lb)
Minimum starting weight: 3 kg (6.6 lb)
Calorie increment: 1 kcal
Memory capacity: 12 + guest (total: 13)
Gender: male / female
Age range: 7 - 99 years of age
Activity level: 5 (recumbent, sedentary,
standing, physical effort,
sports)
Height range: 100 - 250 cm
(3’30 ½“ - 8’02 ½“)
Operating temperature: 10 - 40 °C
Measuring range:
Body fat: 4.0 - 60.0 %
Body water: 27.5 - 66.0 %
Muscles: 20.0 - 56.0 %
Bones: 2.0 - 20.0 %
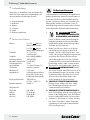
Safety advice
This safety advice is an important part of these
operating instructions and must be observed every
time electrical devices are used. The advice and
instructions will help you to avoid risk of loss of life,
accidents and damage. Therefore you must read
carefully through the following information concern-
ing safety and proper use.
J
WARNING!
RISK OF LOSS
OF LIFE OR ACCIDENT TO IN-
FANTS AND CHILDREN! Never
leave children unsupervised with the packaging
materials or the device. Otherwise there is a
risk to life from suffocation. Always keep
children away from the device.
J Children or persons who lack the knowledge
or experience to use the device or whose
physical, sensory or intellectual capacities are
limited must never be allowed to use the device
without supervision or instruction by a person
responsible for their safety. Children must never
be allowed to play with the device. The product
is not a toy.
WARNING!
DANGER TO LIFE! Never use
the product if you have a pacemaker. Never
use the product near people that have a
pacemaker or use other medical devices.
m CAUTION! DANGER OF INJURY! Do not
load the scales beyond 180 kg. The safety
glass could break and cause cut injuries
m CAUTION! DANGER OF INJURY!
Do not step on to the scales with wet feet and
do not use the scales if the platform is moist.
You might slip.
J Protect your scales from impact, moisture, dust,
chemicals and sudden changes in temperature
and keep them away from sources of heat
(ovens, heating radiators).
J Do not expose the device to:
- extreme temperatures,
- strong vibrations,
- high mechanical loads,
- direct solar radiation,
- moisture.
Failure to observe this advice may result in
damage to the device.
J Check the device for damage before bringing it
into use. If the device is damaged do not use it.
J Remove the battery if the device breaks down
or is defective. Otherwise the battery is more
likely to leak.
J Never open the device housing. This could result
in personal injury or damage to the device.
Always have any repairs carried out at the ser-
vice centre or by an electrical equipment
repair specialist.
J The product is not suitable for pregnant women.

8 GB/CY
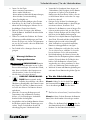
Safety advice / Before getting started
Warning! Dangers arising
from the use of batteries
WARNING!
DANGER TO LIFE! Batteries
are not intended to be in the hands of children.
Do not leave batteries lying around. They
could be swallowed by children or pets. In the
event of swallowing a battery, contact a doctor
immediately!
J
CAUTION! DANGER OF EX-
PLOSION! Never recharge single-
use batteries. Do not short-circuit or
open them. Overheating, fire or destruction of
the batteries might result. Never throw batteries
into fire or water. The batteries might explode.
J Avoid extreme environmental conditions and
temperatures as they may affect batteries e.g.
above radiators. Otherwise the batteries are
more likely to leak.
J Exhausted or damaged batteries can cause
caustic burns upon contact with the skin. To
avoid this, always wear suitable protective
gloves in these circumstances!
J Avoid contact with the skin, eyes and mucous
membranes if fluid is leaking from a battery.
If you come into contact with corrosive battery
fluids, flush the affected area thoroughly with
clean water and contact a doctor immediately.
J Clean any light dirt deposits on the contacts of
the batteries or on the contacts of the device
with a dry, fluff-free cloth before insertion.
J Remove the battery if you are not going to use
the device for an extended period.
J When inserting the batteries, ensure the correct
polarity! This is shown in the battery compartment.
J Remove spent batteries immediately from the
device. There is an increased danger of leaks!
J Batteries must not be disposed of in the normal
domestic waste!
J Every consumer is legally obliged to dispose
of batteries in the proper manner!
J Keep batteries away from children; do not
throw them in the fire, short-circuit them or take
them apart.
J If the above instructions are not complied with,
the batteries may discharge themselves beyond
their end voltage. There is then a danger of
leaking. If the batteries have leaked inside your
device, you should remove them immediately in
order to prevent damage to the device!
J Always replace all batteries at the same time
and only use the same type of batteries.
Q
Before getting started
Note: Press the count-up button
8
or the count-
down-button
9
down to speed up the process of
setting the values.
Q
Inserting / replacing the batteries
Note: When inserting the batteries, make sure
that the contacts do not become bent.
j Open the battery compartment
6
,
16
, by
pushing the battery compartment lid in the
direction of the arrows.
j Take the battery compartment lid off.
j Insert the batteries in accordance with polarity.
j Close the battery compartment
6
,
16
by placing
the battery compartment lid back on and pushing
it in the opposite direction to the arrows until it
perceptibly and audibly clicks into place.
j If the scales do not indicate any function, check
that the batteries have been correctly inserted.
You may have to reinsert them.
Q
Mounting the control unit
Note: You can mount the control unit onto the wall.
m RISK OF ELECTRIC SHOCK! RISK OF
DAMAGE TO PROPERTY! RISK OF IN-
JURY! Make sure that you do not damage
power cables, gas or water pipes when you
drill into the wall. You may have to check with
a cable locator before you drill into a wall.
1. Place the scales about 10 cm away from the
wall on a level and (scratch-) resistant surface.
2. Select a place on the wall where you wish to
mount the control unit.

9 GB/CY
Before getting started / Preparing for use
Note: The control unit must not be mounted
more than 1.5 m away from the scales. Other-
wise no infrared connection can be established.
3. Mark the selected position with a pencil.
4. Use a drill to drill a hole in the wall. Please comply
with the operating and safety instructions of the
drill.
5. Place the dowel into the hole.
6. Screw the screw into the dowel. Make sure that
the head of the screw sticks out of the wall by
5 - 7 mm.
7. Hang the control unit onto the wall using the
mounting device
12
.
Q
Preparing for use
Q
Setting the time
1. Press the time / confirmation button
7
down for
about 3 seconds to be able to set the hours.
Note: The hour display will flash.
2. Press the count-up button
8
or the count-down
button
9
to set the hours.
3. Press the time / confirmation button
7
to confirm
the entry and to be able to set the minutes.
Note: The minute display will flash.
4. Press the count-up button
8
or the count-down
button
9
to set the minutes.
5. Press the time / confirmation button
7
to confirm
your entry.
Q
Setting the alarm
1. Press the alarm-setting button
8
twice to activate
the alarm and to display the alarm time.
Note: When the alarm is activated, the symbol
18
will appear in the LC display
11
.
2. Press the confirmation button
7
down for
about 3 seconds to be able to set the hours.
Note: The hour display will flash.
3. Press the count-up button
8
or the count-down
button
9
to set the hours.
4. Press the confirmation button
7
to confirm the
entry and to be able to set the minutes.
Note: The minute display will flash.
5. Press the count-up button
8
or the count-down
button
9
to set the minutes.
6. Press the confirmation button
7
to confirm the
entry.
7. Wait for about 30 seconds or press the confir-
mation button
7
again in order to get back to
time display.
8. Press the alarm-setting button
8
twice to
deactivate the alarm.
Note: When the alarm is deactivated, the
symbol
18
in the LC display
11
will go out.
The alarm time will go out.
9. Press the time / confirmation button
7
in order
to get back to time display.
Q
Setting the unit of weight
Note: the legal weight unit is kg.
Note: You can choose to display the units of weight in
either kilogrammes or “stones and pounds” or pound.
Note: When the unit of weight is changed, the unit
of measurement for height also changes.
1. Pick the control unit up.
2. Make sure that the time is being displayed and
press the button to set the units of weight /
count-down button
9
.
3. Press the time / confirmation button
7
down
for about 3 seconds to be able to set the units
of weight you wish to have.
Note: The pictograms of the units of weight
20
,
21
will flash on the right-hand side of the
LC display
11
.
4. Press the count-up button
8
or the count-down
button
9
to set the unit of weight.
5. Press the time / confirmation button
7
to
confirm your entry.
6. Wait for about 30 seconds or press the time /
confirmation button
7
again in order to get
back to time display.
Q
Entering personal details
1. Pick the control unit up and make sure that the
time is being displayed.

10 GB/CY
Preparing for use / How to use
2. Press the time / confirmation button
7
in order
to be able to enter your personal details.
Note: The letters “P - X“ will flash in the LC
display
11
.
Note: “X“ stands for the data profile of a per-
son from the group of users.
3. Press the count-up button
8
or the count-down
button
9
, to select the data profile (1 - 12 or
guest) you wish to have.
4. Press the time / confirmation button
7
, to
confirm the data profile you have selected and
to set the unit of weight
20
,
21
.
5. Press the count-up button
8
or the count-down
button
9
to set the unit of weight
20
,
21
.
6. Press the time / confirmation button
7
to
confirm the entry and to be able to select your
gender
34
,
36
.
7. Press the count-up button
8
or the count-down
button
9
to select either male
36
or female
34
.
8. Press the time / confirmation button
7
to
confirm the entry and to be able to set your age.
9. Press the count-up button
8
or the count-down
button
9
to set your age.
10. Press the time / confirmation button
7
, to
confirm the entry and to set your activity level
32
,
33
,
35
,
37
,
38
.
11. Press the count-up button
8
or the count-down
button
9
to set the appropriate activity level
32
,
33
,
35
,
37
,
38
.
12. Press the time / confirmation button
7
to
confirm the entry and to be able to set your height.
13. Press the count-up button
8
or the count-down
button
9
to set your height.
14. Press the time / confirmation button
7
to
confirm the entry.
15. Wait about 30 seconds to get back to time
display.
Q
How to use
Q
Measuring weight
Note: Make sure that the control unit is at most
1.5 m from the scales when weighing yourself.
Otherwise no infrared connection can be established.
In this event, the LC display
11
will display “- - - -“.
j Place the scales down on a solid, flat horizontal
surface.
j Do not place the scales on a carpet. Otherwise
this could influence the result. If necessary you
can place a board on the carpet and place the
scales upon this. A solid floor covering is required
in order to achieve correct weight measurements.
1. Pick the control unit up and make sure that the
time is being displayed.
2. Press the count-down button
9
to be able to
measure your weight only.
3. Wait until “0,0 kg“, “0,0 lb“ or “0:0o st:lb“ is
displayed in the LC display
11
.
4. Step onto the platform
3
and stand still. Make
sure that you are standing on both electrodes
2
.
The weight measurement process will now start.
The display will blink 3 times. The weight
measured will be displayed and stored.
5. Step down off the platform
3
.
6. Wait for about 30 seconds or press the time /
confirmation button
7
in order to get back to
time display.
Q
Measuring weight, calorie
requirement, body fat,
body water, bone and muscle
percentages
Note: Make sure that the control unit is at most
1.5 m from the scales when weighing yourself.
Otherwise no infrared connection can be established.
In this event, the LC display
11
will display “- - - -“.
Tip: Always try to weigh yourself at the same
time of day (best done in the morning), after going
to the toilet, with an empty stomach and without
any clothes on in order to get comparable results.
j Place the scales down on a solid, flat horizontal
surface.
j Do not place the scales on a carpet. Otherwise
this could influence the result. If necessary you
can place a board on the carpet and place the
scales upon this. A solid floor covering is required
in order to achieve correct weight measurements.

11 GB/CY
How to use / What the interpreted readings mean / Trouble-shooting
1. Pick the control unit up and make sure that the
time is being displayed.
Note: You can leave the control unit in the
scales. Make sure that the metal contact
13
of the control unit lies precisely on the metal
contact
4
of the scales.
2. Press the time / confirmation button
7
to be
able to get the stored personal data.
3. Press the count-up button
8
or the count-down
button
9
to get your profile memory.
Note: When your data profile is displayed, the
LC display
11
will display all your personal settings.
4. Press the start button
10
.
5. Wait until “0,0 kg“, “0,0 lb“ or “0:0o st:lb“ is
displayed in the LC display
11
.
6. Step onto the platform
3
and stand still. Make
sure that you are standing on both electrodes
2
.
The weight measurement process will now start.
The display will blink 3 times. The weight meas-
ured will be displayed and stored. The LC display
11
will then display “00.0 000“. After that, it
will display the measured value three times in
rotation in two groups.
Group 1: Calorie requirement
22
“kcal“,
body fat percentage
28
in % and body
water percentage
26
in %.
Group 2: Weight “kg / lb / st:lb“
20
,
21
, muscle
mass
30
in % and bone mass
27
in %.
After the values have been displayed, the time will
automatically be displayed again.
Q
Retrieving last recorded values
Note: This function is only available for data
profiles 1 - 12.
1. Make sure that the time is being displayed.
2. Press the start button
10
to be able to retrieve
the stored readings.
3. Press the count-up button
8
or the count-down
button
9
to select your data profile.
4. Press the time / confirmation button
7
and
wait about 3 - 4 seconds to allow the last stored
readings of the selected profile memory to be
displayed. The readings will be displayed in
rotation in two groups in the LC display
11
(see “Measuring weight, calorie requirement,
body fat, body water, bone and muscle per-
centages”, Point 6.).
Q
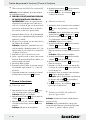
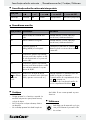
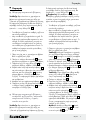
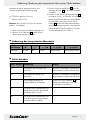
What the interpreted readings mean
LCD display
Meaning too thin thin normal overweight extremely overweight
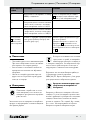
Q
Trouble-shooting
Error display Meaning Solution
h-Lo The control unit batteries are flat. Change the batteries in line with the
section called “Inserting / replacing
the batteries”.
b-Lo The batteries in the scales are flat. Change the batteries in line with the
section called “Inserting / replacing
the batteries”.

12 GB/CY
Trouble-shooting / Cleaning / Disposal
Q
Cleaning
j Clean the device using a slightly moist cloth.
For more stubborn dirt you can also apply a
weak soap solution to the cloth.
j Do not use chemical cleaners or scouring
agents for cleaning the device.
j Never immerse the device in water or other
liquids. Ignoring this advice may damage the
device.
Q
Disposal
The packaging is made entirely of recy-
clable materials, which you may dispose
of at local recycling facilities.
Contact your local refuse disposal authority for more
details of how to dispose of your worn-out product.
To help protect the environment, please
dispose of the product properly when it
has reached the end of its useful life and
not in the household waste. Information
on collection points and their opening
hours can be obtained from your local
authority.
Faulty or used batteries must be recycled in accord-
ance with Directive 2006 / 66 / EC. Please return
the batteries and / or the device to the available
collection points.
Environmental damage through
incorrect disposal of the batteries!
Batteries may not be disposed of with the usual
domestic waste. They may contain toxic heavy metals
and are subject to hazardous waste treatment rules
and regulations. The chemical symbols for heavy
metals are as follows: Cd = cadmium, Hg = mercury,
Pb = lead. That is why you should dispose of used
rechargeable batteries at a local collection point.
EMC
Product description:
Body Analyser Scale
Model No.: Z28414
Version: 10 / 2010
Error display Meaning Solution
Err The maximum load of 180 kg (400 lb)
has been exceeded.
Step off the platform
3
of the scales
in order to avoid injuries or damage
to property.
ErrL The body fat percentage measured
is too low or is below the minimum
measurable value of 4.0 %.
–
Errh The body fat percentage measured
it too high or is above the maximum
measurable value of 60.0 %.
–
Various error mes-
sages appear in
the LC display
11
.
Radio transmission devices (mobile
phones, microwave ovens, etc.) interfere
with the operation of the scale.
- Remove the radio transmission devices
from proximity of the scale.
- Remove the batteries from the battery
compartment
6
and wait for about
10 seconds, then insert the battery
back to the battery compartment
6
.

13 HR
Popis sadržaja
Uvod
Odgovarajuća uporaba .........................................................................................Stranica 14
Opis dijelova ...........................................................................................................Stranica 14
Opseg dostave ........................................................................................................Stranica 14
Tehnički podaci ....................................................................................................... Stranica 15
Sigurnost .............................................................................................................Stranica 15
Prije stavljanja u pogon
Postavljanje / zamjena baterija ..............................................................................Stranica 16
Montiranje poslužnog dijela .................................................................................. Stranica 16
Stavljanje u pogon
Namještanje vremena .............................................................................................Stranica 17
Namještanje alarma ...............................................................................................Stranica 17
Namještanje jedinice težine ................................................................................... Stranica 17
Unos osobnih podataka .........................................................................................Stranica 18
Posluživanje
Mjerenje težine tijela ..............................................................................................Stranica 18
Mjerenje tjelesne težine, potrebnih kalorija, udjela
masnog tkiva u tijelu, vode, kosti i mišića ..............................................................Stranica 18
Poziv posljednje snimljenih vrijednosti ................................................................... Stranica 19
Značenje tumačenih mjernih vrijednosti .................................Stranica 19
Otklanjanje pogreški ...............................................................................Stranica 20
Čišćenje ................................................................................................................. Stranica 20
Zbrinjavanje otpada .................................................................................Stranica 20

14 HR
Uvod
Vaga za mjerenje masnoće tijela
Q
Uvod
Upoznajte se sa uređajem, prije prvog
stavljanja u pogon. Za to pomno pročitajte
slijedeće upute za uporabu i sigurnost.
Rabite uređaj isključivo sukladno opisu i za navedena
područja primjene. Dobro sačuvajte ove upute za
uporabu. U slučaju prosljeđivanja uređaja trećim
osobama, predajte također svu pripadajuću doku-
mentaciju.
Q
Odgovarajuća uporaba
Ova vaga služi za vaganje ljudi. Vaga raspolaže
područjem vaganja do 180 kg. Nadalje, moguće
je odrediti dnevno potrebne kalorije unosom spola,
starosti, visine i težine tijela. Druga uporaba ili pro-
mjene na uređaju smatrat će se nenamijenskim i mogu
prouzročiti opasnost od ozljeda i / ili oštećenje ure-
đaja. Proizvođač ne preuzima nikakvu odgovornost
za štete nastale od nenamjenske uporabe. Uređaj
nije namijenjen za komercijalne svrhe.
Q
Opis dijelova
Vaga
1
udubljenje za poslužni dio
2
elektrode
3
gazište
4
metalni kontakt
5
infracrveni odašiljač
6
baterijsko kućište
Poslužni dio koji se može skinuti
7
vrijeme / tipka za potvrđivanje
8
tipka za namještanje alarma / tipka za
odbrojavanje naviše
9
tipka za namještanje jedinica težine / tipka
za odbrojavanje naniže
10
tipka Start
11
LC-pokazivač
12
montažna naprava
13
metalni kontakt
14
infracrveni prijemnik
15
sprega baterijskog kućišta
16
baterijsko kućište
Znakovi na LC-pokazivaču
11
17
AM – znak „prijepodne“
18
– alarm uključen / namještanje alarma
19
PM – znak „poslijepodne“
20
st:lb – jedinica težine u „Stones-ima:funtama“
lb – jedinica težine u „funtama“
21
kg – jedinica težine u kilogramima
22
KCAL – preporučena količina kalorija na dan
23
’ “ – visina tijela u stopama i inch-ima
24
cm – visina tijela u cm-ima
25
% – postotni udio (tjelesne masti, mišića,
vode, kostiju)
26
– udio vode
27
– koštana masa
28
– udio masnog tkiva u tijelu
29
– starosna skupina između 7 - 17 godina
(modus za djecu)
30
– mišićna masa
31
– starosna skupina između 18 - 99 godina
(modus za odrasle)
32
– sportski aktivan / na
33
– tjelesno naporna aktivnost
34
– žena
35
– aktivnost u stojećem položaju
36
– muškarac
37
– aktivnost u sjedećem položaju
38
– sportski neaktivan / na
Q
Opseg dostave
Neposredno nakon otvaranja provjerite da li imate
sve dijelove i da li je uređaj besprijekornom stanju.
1 x vaga za mjerenje masnog tkiva u tijelu
1 x poslužni dio
4 x baterija
2 x vijak
2 x usadica
1 x upute za uporabu

15 HR
Uvod / Sigurnost
Q
Tehnički podaci
Baterija: 2 x 1,5 V baterija
(AAA), mikro (odašiljač)
2 x 1,5 V
baterija
(AAA), mikro (prijemnik)
Gazište: cca. 31 x 31 cm,
sigurnosno staklo
Nosivost: najviše 180 kg (400 lbs)
Podjela težine: 100 g (0,2 lb)
Najmanja početna
težina: 3 kg (6,6 lb)
Podjela kalorija: 1 kcal
Memorijska mjesta: 12 + gost (ukupno: 13)
Spol: muški / ženski
Područje starosti: 7 - 99 godina
Stupanj aktivnosti: 5 (mirujući, sjedeći, stojeći,
tjelesni napor, kondicijski
napor)
Područje visine tijela: 100 - 250 cm
(3’30 ½“ - 8’02 ½“)
Pogonska temperatura: 10 - 40 °C
Područje mjerenja:
Masno tkivo u tijelu: 4,0 - 60,0 %
Voda: 27,5 - 66,0 %
Mišići: 20,0 - 56,0 %
Kosti: 2,0 - 20,0 %
Sigurnost
Sigurnosne upute su sastavni dio ovih uputa za
uporabu te se kod uporabe električnih uređaja na
njih u svakom slučaju mora obratiti pozornost. Upute
služe za sprječavanje opasnosti po život, nezgoda
i oštećenja. Stoga pažljivo pročitajte slijedeće infor-
macije koje se odnose na sigurnost i odgovarajuće
korištenje uređaja.
J
UPOZORENJE! OPASNO-
STI PO ŽIVOT I OPASNOSTI OD
NEZGODA ZA DJECU! Djecu
nikada ne ostavljajte bez nadzora s materijalom
ambalaže i uređajem. Postoji opasnost od gu-
šenja. Držite djecu stalno podalje od uređaja.
J Djeci ili osobama, koje nemaju dostatno znanje
ili iskustvo u uporabi uređaja, ili kojima su ograni-
čene tijelesne, senzoričke ili mentalne sposobnosti,
zabranjeno je korištenje uređaja bez nadzora
ili nadgledanja osobe koja je odgovorna za
njihovu sigurnost. Potrebno je nadzirati djecu,
kako se nebi igrala sa uređajem. Proizvod nije
igračka.
UPOZORENJE! OPASNOST PO ŽIVOT!
Ne rabite proizvod ni u kojem slučaju ako nosite
aparat koji regulira rad srčanog mišića. Ne rabi-
te proizvod ni u kojem slučaju u blizini osoba,
koje nose aparat koji regulira rad srčanog mišića
ili druge medicinske uređaje.
m PAŽNJA! OPASNOST OD OZLJEĐIVA-
NJA! Ne preopterećujte vagu preko 180 kg.
Može doći do pucanja sigurnosnog stakla, te
se na njega možete porezati.
m PAŽNJA! OPASNOST OD OZLJEĐIVA-
NJA! Nemojte stati na vagu ako imate mokre
noge, i ne upotrebljavajte vagu ukoliko je pod-
nožak vage mokri. Možete se poskliznuti.
J Štitite vagu od udaraca, vlage, prašine, kemi-
kalija, velikih temperaturnih razlika i izvora
topline (peći, grijalice).
J Ne izlažite uređaj
- ekstremnim temperaturama,
- snažnim vibracijama,
- snažnim mehaničkim naprezanjima,
- izravno sunčevoj svjetlosti,
- vlazi.
U protivnom može doći do oštećenja uređaja.
J Prije prvog korištenja provjerite uređaj na
moguća oštećenja. Oštećeni uređaj ne puštajte
u pogon.
J Ukoliko dođe do smetnji ili oštećenja uređaja,
izvadite baterije. U protivnom može doći do
istjecanja baterija.
J Nikada ne otvarajte kućište uređaja. Kao po-
sljedica toga može doći do ozljeđivanja osobe
ili oštećenja na uređaju. Radove održavanja i
popravaka neka izvodi samo navedeno servisno
mjesto.
J Proizvod nije prikladan za trudnice.

16 HR
Sigurnost / Prije stavljanja u pogon
Upozorenje! Opasnosti kod
rukovanja s baterijama
UPOZORENJE! OPASNO PO ŽIVOT!
Baterije ne spadaju u dječje ruke. Ne ostavljajte
baterije uokolo. Postoji opasnost da ih djeca ili
kućne životinje progutaju. U slučaju gutanja
odmah potražite liječničku pomoć.
J
PAŽNJA! OPASNOST OD
EKSPLOZIJE! Baterije nikada
nemojte ponovno puniti, kratko
spajati ili otvarati. Kao posljedica toga može
doći do pregrijavanja, požara ili rasprsnuća
baterija. Baterije nikada ne bacajte u vatru ili
vodu. Baterije mogu eksplodirati.
J Spriječite da na baterije djeluju ekstremni uvjeti
i temperature, npr. grijača tijela. U protivnom
postoji velika opasnost od istjecanja baterija.
J Oštećene ili baterije koje istječu mogu izazvati
iritaciju kože; stoga u tom slučaju obavezno
koristite odgovarajuće zaštitne rukavice!
J Ukoliko dođe do isticanja tekućine iz baterije,
spriječite dodir s kožom, očima i sluznicama.
Kod dodira s baterijskom kiselinom, dotična
mjesta isperite s puno čiste vode i potražite
odmah liječnika.
J U slučaju neznatnog onečišćenja, čistite baterije
i kontakte uređaja prije postavljanja suhom krpom
bez sitnih vlakanaca.
J Izvucite bateriju iz uređaja, ako ju se dulje
vrijeme nije rabilo.
J Pri postavljanju baterije, vodite računa o
ispravnoj polarizaciji. Ista je prikazana u
baterijskom kućištu.
J Istrošene baterije smjesta otklonite iz uređaja.
Inače prijeti povećana opasnost od iscurivanja!
J Baterije ne pripadaju u kućni otpad!
J Svaki potrošač je zakonski obvezan stručno
ukloniti baterije!
J Držite baterije podalje od djece, ne bacajte ih
u vatru, ne spajajte ih kratko i ne rastavljajte ih.
J U slučaju nepridržavanja, baterije bi se mogle
isprazniti preko napona na kraju pražnjenja.
Tad prijeti opasnost da iscure. Ako su baterije
iscurjele u Vašem uređaju, smjesta ih izvadite,
kako bi spriječili oštećenje uređaja!
J Zamijenite uvijek sve baterije istovremeno i
umetnite samo baterije istoga tipa.
Q
Prije stavljanja u pogon
Uputa: Držite tipku za odbrojavanje naviše
8
tj.
tipku za odbrojavanja naniže
9
pritisnutom. Na
taj način postižete ubrzano namještanje vrijednosti.
Q
Postavljanje / zamjena baterija
Uputa: Pri postavljanju baterija, vodite računa o
tome da se kontakti ne saviju.
j Otvorite baterijsko kućište
6
,
16
guranjem
poklopca baterijskog kućišta u smjeru strijelice.
j Otklonite poklopac baterijskog kućišta.
j Umetnite baterije sukladno ispravnoj polarizaciji.
j Zatvorite baterijsko kućište
6
,
16
na način da
postavite poklopac baterijskog kućišta i da ga
gurate u suprotnom smjeru strijelice sve dok
osjetno i zvučno zaglavi.
j Ako vaga ne pokazuje funkciju, provjerite da li
su baterije ispravno umetnute. Eventualno ih
ponovno umetnite.
Q
Montiranje poslužnog dijela
Uputa: Imate mogućnost montirati poslužni dio
na zid.
m OPASNOST OD STRUJNOG UDARA!
OPASNOST OD MATERIJALNE ŠTETE!
OPASNOST OD OZLJEDA! Osigurajte da
ne zahvatite vod struje, plina ili vode tijekom
bušenja zida. Prije bušenja ispitajte zid pomo-
ću tragača vodova.
1. Postavite vagu otprilike 10 cm dalje od zida na
ravnu, čvrstu površinu, otpornu na ogrebotine.
2. Odaberite mjesto na zidu, na kojemu želite
montirati poslužni dio.
Uputa: Poslužni dio nesmije se montirati dalje
od 1,5 m od vage. Inače se nemože uspostaviti
infracrveni spoj.

17 HR
Prije stavljanja u pogon / Stavljanje u pogon
3. Označite željeno mjesto suhom olovkom.
4. Izbušite pomoću bušilice rupu u zidu. Vodite
računa o sigurnosnim uputama i uputama za
uporabu bušilice.
5. Umetnite usadicu u rupu.
6. Zavijte vijak u usadicu. Pri tome vodite računa,
da glava vijka viri još 5 - 7 mm iz zida.
7. Ovjesite poslužni dio pomoću montažne
naprave
12
na zid.
Q
Stavljanje u pogon
Q
Namještanje vremena
1. Držite tipku za vrijeme / potvrđivanje
7
cca.
3 sekunde pritisnutom, kako bi mogli namjestiti
sate.
Uputa: Pokazivanje sati žmiga.
2. Pritisnite tipku za odbrojavanje naviše
8
tj.
tipku za odbrojavanje naniže
9
, kako bi
namjestili sate.
3. Pritisnite tipku za vrijeme / potvrđivanje
7
, kako
bi potvrdili unos i kako bi mogli namjestiti minute.
Uputa: Pokazivanje minuta žmiga.
4. Pritisnite tipku za odbrojavanje naviše
8
tj.
tipku za odbrojavanje naniže
9
, kako bi
namjestili minute.
5. Pritisnite tipku za vrijeme / potvrđivanje
7
,
kako bi potvrdili unos.
Q
Namještanje alarma
1. Pritisnite dva puta tipku za namještanje alarma
8
, kako bi uključili alarm i kako bi se pokazalo
vrijeme alarma.
Uputa: Ako je alarm uključen, pojavit će se
znak
18
na LC-pokazivaču
11
.
2. Držite tipku za potvrđivanje
7
cca. 3 sekunde
pritisnutom, kako bi mogli namjestiti sate.
Uputa: Pokazivanje sati žmiga.
3. Pritisnite tipku za odbrojavanje naviše
8
tj.
tipku za odbrojavanje naniže
9
, kako bi
namjestili sate.
4. Pritisnite tipku za potvrđivanje
7
, kako bi
potvrdili unos i kako bi mogli namjestiti minute.
Uputa: Pokazivanje minuta žmiga.
5. Pritisnite tipku za odbrojavanje naviše
8
tj.
tipku za odbrojavanje naniže
9
, kako bi
namjestili minute.
6. Pritisnite tipku za potvrđivanje
7
, kako bi
potvrdili unos.
7. Pričekajte cca. 30 sekundi ili ponovno pritisnite
tipku za potvrđivanje
7
, kako bi se vratili na
pokazivanje vremena.
8. Pritisnite dva puta tipku za namještanje alarma
8
, kako bi isključili alarm.
Uputa: Ako je alarm isključen, znak
18
će
se izgasiti na LC-pokazivaču
11
. Vrijeme alarma
se izgasi.
9. Pritisnite tipku za vrijeme / potvrđivanje
7
, kako
bi se ponovno vratili na pokazivanje vremena.
Q
Namještanje jedinice težine
Uputa: Standardna jedinica za težinu je kg.
Uputa: Imate mogućnost odabira pokazivanja je-
dinice težine u kilogramima ili „Stones-ima i funtama“
tj. „funtama“.
Uputa: Namještanjem jedinice težine, jedinica
mjere visine tijela se prema tome promjeni.
1. Uzmite poslužni dio u ruku.
2. Osigurajte, da se prvo pokazuje vrijeme i
pritisnite tipku za namještanje jedinice težine /
tipku za odbrojavanje naniže
9
.
3. Držite tipku za vrijeme / potvrđivanje
7
cca.
3 sekunde pritisnutom, kako bi mogli namjestiti
željenu jedinicu težine.
Uputa: Znakovi jedinica težine
20
,
21
žmigaju
desno na LC-pokazivaču
11
.
4. Pritisnite tipku za odbrojavanje naviše
8
tj.
tipku za odbrojavanje naniže
9
, kako bi
namjestili jedinicu težine.
5. Pritisnite tipku za vrijeme / potvrđivanje
7
,
kako bi potvrdili unos.
6. Pričekajte 30 sekundi ili ponovno pritisnite
tipku za vrijeme / potvrđivanje
7
, kako bi se
vratili na pokazivanje vremena.

18 HR
Stavljanje u pogon / Posluživanje
Q
Unos osobnih podataka
1. Uzmite poslužni dio u ruku i osigurajte, da se
pokazuje vrijeme.
2. Pritisnite tipku za vrijeme / potvrđivanje
7
,
kako bi mogli namjestiti Vaše osobne podatke.
Uputa: Na LC-pokazivaču
11
žmiga pokazi-
vanje „P - X“.
Uputa: „X“ stoji za memorijsko mjesto osobe
iz kruga korisnika.
3. Pritisnite tipku za odbrojavanje naviše
8
tj.
tipku za odbrojavanje naniže
9
, kako bi oda-
brali željeno memorijsko mjesto (1 - 12 ili gost).
4. Pritisnite tipku za vrijeme / potvrđivanje
7
,
kako bi potvrdili odabrano memorijsko mjesto i
kako bi mogli namjestiti jedinicu težine
20
,
21
.
5. Pritisnite tipku za odbrojavanje naviše
8
tj.
tipku za odbrojavanje naniže
9
, kako bi
namjestili jedinicu težine
20
,
21
.
6. Pritisnite tipku za vrijeme / potvrđivanje
7
,
kako bi potvrdili unos i kako bi mogli namjestiti
spol
34
,
36
.
7. Pritisnite tipku za odbrojavanje naviše
8
tj.
tipku za odbrojavanje naniže
9
, kako bi birali
između muškog
36
i ženskog spola
34
.
8. Pritisnite tipku za vrijeme / potvrđivanje
7
,
kako bi potvrdili unos i kako bi mogli namjestiti
Vašu starost.
9. Pritisnite tipku za odbrojavanje naviše
8
tj.
tipku za odbrojavanje naniže
9
, kako bi
namjestili Vašu starost.
10. Pritisnite tipku za vrijeme / potvrđivanje
7
,
kako bi potvrdili unos i kako bi mogli namjestiti
Vaš stupanj aktivnosti
32
,
33
,
35
,
37
,
38
.
11. Pritisnite tipku za odbrojavanje naviše
8
tj.
tipku za odbrojavanje naniže
9
, kako bi
namjestili odgovarajući stupanj aktivnosti
32
,
33
,
35
,
37
,
38
.
12. Pritisnite tipku za vrijeme / potvrđivanje
7
,
kako bi potvrdili unos i kako bi mogli namjestiti
Vašu visinu tijela.
13. Pritisnite tipku za odbrojavanje naviše
8
tj.
tipku za odbrojavanje naniže
9
, kako bi
namjestili odgovarajuću visinu tijela.
14. Pritisnite tipku za vrijeme / potvrđivanje
7
,
kako bi potvrdili unos.
15. Pričekajte cca. 30 sekundi, kako bi se vratili na
pokazivanje vremena.
Q
Posluživanje
Q
Mjerenje težine tijela
Uputa: Vodite računa o tome, da se poslužni dio
tijekom mjerenja nalazi maksimalno 1,5 m udaljeno
od vage. Inače se nemože uspostaviti infracrveni
spoj. U tom slučaju pojavit će se „- - - -“ na LC-poka-
zivaču
11
.
j Postavite vagu na čvrstu, vodoravnu i plosnatu
podlogu.
j Ne polažite vagu na tepison. To bi inače moglo
utjecati na rezultat. U posebnom slučaju možete
položiti dasku na tepison i na nju postaviti vagu.
Čvrsto tlo je preduvjet za točno mjerenje.
1. Uzmite poslužni dio u ruku i osigurajte, da se
pokazuje vrijeme.
2. Pritisnite tipku za odbrojavanje naniže
9
,
kako bi mogli samo mjeriti Vašu težinu tijela.
3. Pričekajte sve dok se na LC-pokazivaču
11
pojavi „0,0 kg“, „0,0 lb“ ili „0:0o st:lb“.
4. Stanite na gazište
3
i stojte mirno. Vodite
računa o tome, da stanete na obje elektrode
2
.
Mjerenje težine počinje. Pokazivanje žmiga 3 x.
Mjerena težina se pokazuje i snima.
5. Odstupite od gazišta
3
.
6. Pričekajte 30 sekundi ili pritisnite tipku za vrijeme /
potvrđivanje
7
, kako bi se vratili na pokazivanje
vremena.
Q
Mjerenje tjelesne težine,
potrebnih kalorija, udjela
masnog tkiva u tijelu, vode,
kosti i mišića
Uputa: Vodite računa o tome, da se poslužni dio
tijekom mjerenja nalazi maksimalno 1,5 m udaljeno
od vage. Inače se nemože uspostaviti infracrveni
spoj. U tom slučaju pojavit će se „- - - -“ na LC-poka-
zivaču
11
.

19 HR
Posluživanje / Značenje tumačenih mjernih vrijednosti
Uputa: Mjerite po mogućnosti svaki dan u isto
vrijeme (najbolje ujutro), nakon obavljene nužde,
prije jela i pića i bez odjeće, kako bi postigli uspo-
redive rezultate.
j Postavite vagu na čvrstu, vodoravnu i plosnatu
podlogu.
j Ne polažite vagu na tepison. To bi inače moglo
utjecati na rezultat. U posebnom slučaju možete
položiti dasku na tepison i na nju postaviti vagu.
Čvrsto tlo je preduvjet za točno mjerenje.
1. Uzmite poslužni dio u ruku i osigurajte, da se
pokazuje vrijeme.
Uputa: Imate mogućnost ostaviti poslužni
dio u vagi. Vodite računa o tome, da metalni
kontakt
13
poslužnog dijela točno priliježe na
metalnom kontaktu
4
vage.
2. Za poziv Vaših osobnih podataka, pritisnite
tipku za vrijeme / potvrđivanje
7
.
3. Pritisnite tipku za odbrojavanje naviše
8
tj.
tipku za odbrojavanje naniže
9
, kako bi
odabrali Vaše memorijsko mjesto.
Uputa: Ako se pokazuje Vaše memorijsko
mjesto, LC-pokazivač
11
pokazuje sve što ste
namjestili.
4. Pritisnite tipku Start
10
.
5. Pričekajte sve dok se na LC-pokazivaču
11
pojavi „0,0 kg“, „0,0 lb“ ili „0:0o st:lb“.
6. Stanite na gazište
3
i stojte mirno. Vodite
računa o tome, da stanete na obje elektrode
2
.
Mjerenje težine počinje. Pokazivanje žmiga 3 x.
Mjerena težina se pokazuje i snima. Nakon
toga LC-pokazivač
11
pokazuje „00.0 000“.
Nakon toga pokazuje mjerene vrijednosti tri
puta izmjenično u dvije skupine.
Skupina 1: potrebne kalorije
22
„kcal“, udio
masnog tkiva u tijelu
28
u % i udio vode
26
u %.
Skupina 2: težina „kg / lb / st:lb“
20
,
21
,
mišićna masa
30
u % i koštana masa
27
u %.
Nakon što su pokazane vrijednosti, automatski se
ponovno pokazuje vrijeme.
Q
Poziv posljednje
snimljenih vrijednosti
Uputa: Ta funkcija je isključivo raspoloživa za
memorijska mjesta 1 - 12.
1. Osigurajte, da se pokazuje vrijeme.
2. Pritisnite tipku Start
10
, kako bi mogli pozvati
snimljene vrijednosti.
3. Pritisnite tipku za odbrojavanje naviše
8
tj.
tipku za odbrojavanje naniže
9
, kako bi oda-
brali Vaše memorijsko mjesto.
4. Pritisnite tipku vremena / potvrđivanja
7
i
čekajte cca. 3 - 4 sekunde, kako bi Vam se
pokazalo posljednje snimljene vrijednosti oda-
branog memorijskog mjesta. Vrijednosti će biti
pokazane na LC-pokazivaču
11
izmjenično u
dvije skupine (vidite „Mjerenje tjelesne težine,
potrebnih kalorija, udjela masnog tkiva u tijelu,
kosti i mišića“ točka 6.).
Q
Značenje tumačenih mjernih vrijednosti
LCD-pokazivanje
Značenje pre mršav / a mršav / a normalan / na pretil / a ekstremno pretil / a

20 HR
Otklanjanje pogreški / Čišćenje / Zbrinjavanje otpada
Q
Otklanjanje pogreški
Pokazivanje
pogreški
Značenje Rješenje
h-Lo Baterije poslužnog dijela su istrošene. Zamjenite baterije sukladno članku
„Postavljanje / zamjena baterija“.
b-Lo Baterije vage su istrošene. Zamjenite baterije sukladno članku
„Postavljanje / zamjena baterija“.
Err Maksimalno opterećenje od 180 kg
(400 lb) je prekoračeno.
Odstupite od gazišta
3
vage, kako bi
spriječili ozljede i / ili materijalnu štetu.
ErrL Mjereni udio masnog tkiva u tijelu je
prenizak, tj. leži ispod minimalne mjerive
vrijednosti od 4,0 %.
–
Errh Mjereni udio masnog tkiva u tijelu je
previsok, tj. leži iznad minimalne mjerive
vrijednosti od 60,0 %.
–
Na LC-pokazivaču
11
se pojave različi-
te dojave pogreški.
Vaga je ometana kroz uređaje radiopri-
jenosa (mobilni telefon, mikrovalni uređaj,
itd.).
- Odmaknite uređaje radioprijenosa iz
područja vage.
- Izvucite baterije iz baterijskog kućišta
6
i pričekajte cca. 10 sekundi. Nakon toga
ponovno umetnite baterije u baterijsko
kućište
6
.
Q
Čišćenje
j Uređaj čistite vlažnom krpom. Kod jačih
nečistoća možete koristiti blagu sapunicu.
j Za čišćenje ne koristite nikakva kemijska
sredstva ili sredstva koja grebu.
j Uređaj nikada nemojte uranjati u vodu. U
protivnom može doći do oštećivanja uređaja.
Q
Zbrinjavanje otpada
Pakiranje se sastoji od ekološki prihvatlji-
vog materijala, kojeg možete odložiti
preko lokalnih reciklažnih mjesta.
O mogućnostima zbrinjavanja dotrajalog proizvoda
možete se informirati pri vašem općinskom ili grad-
skom komunalnom uredu.
Ne bacajte dotrajali proizvod u smeće
iz kućanstva, zbog zaštite okoline, već
ga predajte na mjestu za stručno odla-
ganje otpada. Informacije o mjestima za
sakupljanje otpada i njihovom radnom
vremenu možete dobiti pri Vašem nad-
ležnom općinskom uredu.
Oštećene ili istrošene baterije potrebno je sukladno
smjernici 2006 / 66 / EC predati sustavu reciklaže.
Vratite baterije i / ili uređaj preko ponuđenih sabirnih
ustanova.
Ugrožavanje okoliša kroz
pogrešno uklanjanje baterija!
Baterije se ne smije uklanjati zajedno s kućnim ot-
padom. Iste mogu sadržavati otrovne teške metale
i obvezno ih je uklanjati sukladno odredbama za
Pagina se încarcă...
Pagina se încarcă...
Pagina se încarcă...
Pagina se încarcă...
Pagina se încarcă...
Pagina se încarcă...
Pagina se încarcă...
Pagina se încarcă...
Pagina se încarcă...
Pagina se încarcă...
Pagina se încarcă...
Pagina se încarcă...
Pagina se încarcă...
Pagina se încarcă...
Pagina se încarcă...
Pagina se încarcă...
Pagina se încarcă...
Pagina se încarcă...
Pagina se încarcă...
Pagina se încarcă...
Pagina se încarcă...
Pagina se încarcă...
Pagina se încarcă...
Pagina se încarcă...
Pagina se încarcă...
Pagina se încarcă...
Pagina se încarcă...
Pagina se încarcă...
Pagina se încarcă...
Pagina se încarcă...
Pagina se încarcă...
Pagina se încarcă...
Pagina se încarcă...
Pagina se încarcă...
Pagina se încarcă...
Pagina se încarcă...
Pagina se încarcă...
Pagina se încarcă...
Pagina se încarcă...
-
 1
1
-
 2
2
-
 3
3
-
 4
4
-
 5
5
-
 6
6
-
 7
7
-
 8
8
-
 9
9
-
 10
10
-
 11
11
-
 12
12
-
 13
13
-
 14
14
-
 15
15
-
 16
16
-
 17
17
-
 18
18
-
 19
19
-
 20
20
-
 21
21
-
 22
22
-
 23
23
-
 24
24
-
 25
25
-
 26
26
-
 27
27
-
 28
28
-
 29
29
-
 30
30
-
 31
31
-
 32
32
-
 33
33
-
 34
34
-
 35
35
-
 36
36
-
 37
37
-
 38
38
-
 39
39
-
 40
40
-
 41
41
-
 42
42
-
 43
43
-
 44
44
-
 45
45
-
 46
46
-
 47
47
-
 48
48
-
 49
49
-
 50
50
-
 51
51
-
 52
52
-
 53
53
-
 54
54
-
 55
55
-
 56
56
-
 57
57
-
 58
58
-
 59
59


Silvercrest Z28414 Operation and Safety Notes
- Tip
- Operation and Safety Notes
Lucrări înrudite
-
Silvercrest 66593 Operation and Safety Notes
-
Silvercrest SPWD 180 H1 Operating Instructions And Safety Instructions
-
-
-
-
-
Silvercrest SBF 76 Operation and Safety Notes
Alte documente
-
 Adler Europe AD 8165 Manual de utilizare
-
Domyos VE 590 Operating Instructions Manual
-
-
Yamaha BF-1 Manualul proprietarului
-
Yamaha BODIBEAT Manualul proprietarului
-
-
Solac PD7632 Instructions For Use Manual
-
Joycare JC-1419 Manual de utilizare
-
Camry CR 8162 Instrucțiuni de utilizare
-
Ecomed BS-70E Manual de utilizare
