Philips hr 7755 essence Manual de utilizare
- Categorie
- Procesatoare de alimente
- Tip
- Manual de utilizare
Acest manual este potrivit și pentru

Essence HR7755
Recipes & Directions for use
Przepisy i instrukcja obsługi
Reţete şi Instrucţiuni de utilizare
Рецепты и Инструкции по эксплуатации
Recepty & Návod k použití
Recepti in navodila za uporabo
Рецепти та інструкції з використання приладу
Pечепти и инструкчии за употреба
Recepti i uputstvo za upotrebu

2

B
D
C
H
G
L
N
O
P
Q
M
A
S
V
T
b
a
Y
Z
W
X
R
c
U
E
F
K
I
J
3

4


ENGLISH6
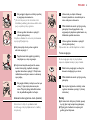
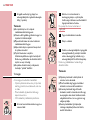
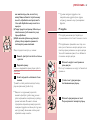
Introduction
This appliance is equipped with an automatic
thermal cut-out system.This system will
automatically cut off the power supply to the
appliance in case of overheating.
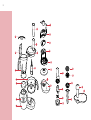
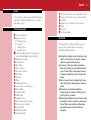
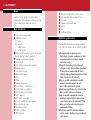
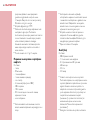
General description
A Motor unit
B Speed control
- P= pulse
- 0 = off
- 1 = lowest speed
- 2 = highest speed
C Screw cap (must be placed to be able to use
food-processing functions)
D Food processing bowl
E Tool holder
F Lid of food processing bowl
G Blender jar
H Blender jar lid
I Feed tube
J Pusher
K Stopper
L Kneading accessory
M Metal blade + protective cover
N Slicing insert medium
O Shredding insert medium
P Insert holder
Q Emulsifying disc
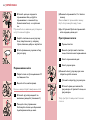
R Gear housing meat mincer
S Cutter housing meat mincer
T Worm shaft
U Screw ring
V Cutter unit
W Medium grinding disc, 4 mm dia.
X Coarse grinding disc, 8 mm dia.
Y Separator
Z Sausage horn
a Tr ay
b Pusher
c Release lever
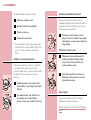
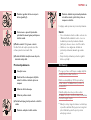
Important
Read these instructions for use carefully before
using the appliance and save them for future
reference.
◗ Check if the voltage indicated on the
appliance corresponds to the local mains
voltage before you connect the appliance.
◗ Never use any accessories or parts from
other manufacturers or that have not been
specifically advised by Philips.Your guarantee
will become invalid if such accessories or
parts have been used.
◗ In order to avoid a hazardous situation, this
appliance must never be connected to a timer
switch.
◗ Do not use the appliance if the mains cord,
the plug or other parts are damaged.
◗ If the mains cord is damaged, it must be
replaced by Philips, a service centre
authorised by Philips or similarly qualified
persons in order to avoid a hazard.

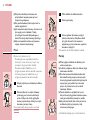
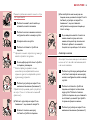
ENGLISH 7
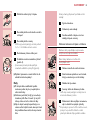
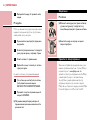
◗ Thoroughly clean the parts that will come
into contact with food before you use the
appliance for the first time.
◗ Do not exceed the quantities and preparation
times indicated in the table.
◗ Do not exceed the maximum content
indicated on the food-processing bowl or
blender jar., i.e. do not fill beyond the top
graduation.
◗ Unplug the appliance immediately after use.
◗ Never use your fingers or an object (e.g. a
spatula) to push ingredients down the feed
tube while the appliance is running. Only the
pusher is to be used for this purpose.
◗ Always unplug the appliance before reaching
into the blender jar with your fingers or an
object (e.g. a spatula).
◗ Keep the appliance out of the reach of
children.
◗ Never let the appliance run unattended.
◗ The food-processing functions only work if
the dot on the screw cap is opposite the dot
on the motor unit, the dot on the bowl is
opposite the dot on the motor unit and the
line on the lid is opposite the line on the
bowl. If this is the case, the built-in safety lock
will be deblocked and the appliance can be
switched on.
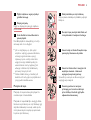
◗ Switch the appliance off before detaching any
accessory.
◗ Always switch the appliance off by setting the
speed control to position 0.
◗ Wait until moving parts have stopped running
before you remove the lid of the appliance.
◗ Never immerse the motor unit in water or any
other liquid, nor rinse it under the tap. Use
only a moist cloth to clean the motor unit.
◗ Remove the protective cover from the blade
before use.
◗ Never use the cutter unit in combination with
the separator and sausage horn.
◗ Do not attempt to grind bones, nuts or other
hard items.
◗ Never reach into the tray with your fingers.
Always use the pusher.
◗ Let hot ingredients cool down before
processing them in the blender jar (max.
temperature 80cC/175cF).
◗ If you are processing a liquid that tends to
foam, do not put more than 1 litre in the
blender jar to avoid spillage.
◗ For quantities and preparation times, please
consult the tables in these instructions for
use.
◗ Note that it is not possible to use the food-
processing bowl when the blender jar is
mounted on the motor unit.
◗ Noise level: Lc= 89 dB [A]
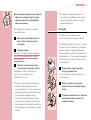
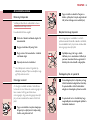
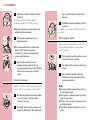
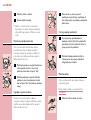
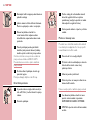
Using the appliance
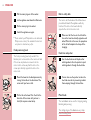
Thermal safety cut-out
In order to avoid a hazardous situation, this
appliance must never be connected to a timer
switch.
If your appliance suddenly stops running:

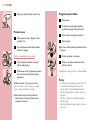
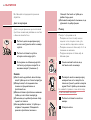
ENGLISH8
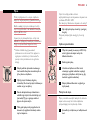
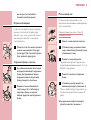
1 Pull the mains plug out of the socket.
2 Let the appliance cool down for 60 minutes.
3 Put the mains plug in the socket.
4 Switch the appliance on again.
B
Please contact your Philips dealer or an authorised
Philips service centre if the automatic thermal cut-
out system is activated very often.
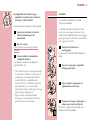
Food-processing bowl
The food-processing bowl only works if the
blender jar is not mounted on the motor unit and
if the screw cap has been screwed onto the
motor unit in such a way that the dot on the
screw cap is directly opposite the dot on the
motor unit.
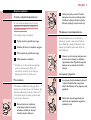
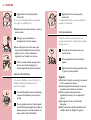
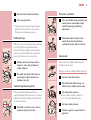
C
1 Mount the bowl on the food processor by
turning the handle in the direction of the
arrow until you hear a click.
C
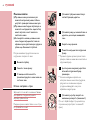
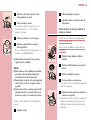
2 Put the lid on the bowl.Turn the lid in the
direction of the arrow until you hear a
click (this requires some force).
1
CLICK
2
1
2
CLICK
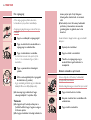
Built-in safety lock
The motor unit, the bowl and the lid have been
provided with marks.The appliance will only
function if the dot on the bowl is directly
opposite the dot on the motor unit.
C
1 Make sure that the line on the lid and the
line on the bowl are directly opposite each
other.When this is the case, the projection
of the lid will complete the shape of the
handgrip.
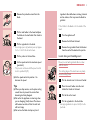
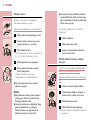
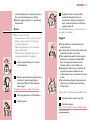
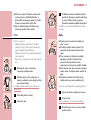
Feed tube and pusher
C
1 Use the feed tube to add liquid and/or
solid ingredients. Use the pusher to push
solid ingredients through the feed tube.
C
2 You can also use the pusher to close the
feed tube in order to prevent ingredients
from escaping through the feed tube.
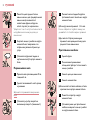
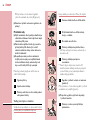
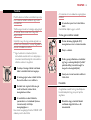
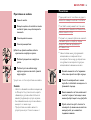
Metal blade
The metal blade can be used for chopping, mixing,
blending and pureeing.
The cutting edges of the blade are very sharp
Avoid touching them!
CLICK

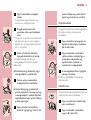
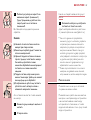
ENGLISH 9
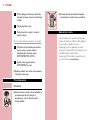
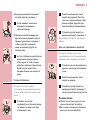
C
1 Remove the protective cover from the
blade.
C
2 Put the tool holder in the bowl and place
the blade on the tool holder that stands in
the bowl.
3 Put the ingredients in the bowl.
B
Pre-cut large pieces of food into pieces of approx.
3 x 3 x 3 cm. Put the lid on the bowl.
4 Put the pusher in the feed tube.
C
5 Set the speed control to maximum speed
(position 2).
- The process continues until the speed control
is set to position 0 (off).
◗ Set the speed control to position 1 to
decrease the speed.
Tips
◗ When you chop onions, use the pulse setting
several times to prevent the onions from
becoming too finely chopped.
◗ Do not let the appliance run too long when
you are chopping (hard) cheese.The cheese
will become too hot, will start to melt and
will turn lumpy.
◗ Do not use the blade to chop very hard
ingredients like coffee beans, nutmeg, turmeric
and ice cubes, as this may cause the blade to
get blunt.
If food sticks to the blade or to the inside of the
bowl:
1 Turn the appliance off.
2 Remove the lid from the bowl.
3 Remove the ingredients from the blade or
from the wall of the bowl with a spatula.
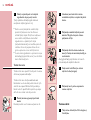
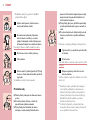
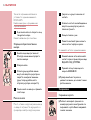
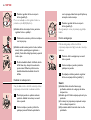
Inserts: slicing and shredding insert
Never process hard ingredients like ice cubes
with the inserts.
The cutting edges of the inserts are very sharp
Avoid touching them!
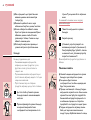
C
1 Put the desired insert in the insert holder.
C
2 Place the insert holder onto the tool
holder that stands in the bowl.
3 Put the lid on the bowl.
4 Put the ingredients in the feed tube.
B
Cut large ingredients into pieces that fit into the
feed tube.
1
2
CLICK

ENGLISH10
C
5 Fill the feed tube evenly for the best
results.
B
When you have to slice or shred large amounts of
food, process only small batches at a time and
empty the bowl regularly between the batches.
C
6 Set the speed control to maximum speed
(position 2).
The process continues until the speed control is
set to position 0 (off).
◗ Set the speed control to position 1 to
decrease the speed.
C
7 Press the pusher lightly onto the
ingredients in the feed tube.
◗ If you are shredding soft vegetables or fruits,
you can decrease the speed by setting the
speed control to position 1 to prevent the
shredded vegetables and fruits from turning
into puree.
C
8 To remove the insert from the insert
holder, take the insert holder in your
hands with its back pointing towards you.
Push the edges of the insert with your
thumbs to make the insert fall out of the
holder.
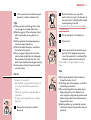
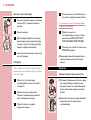
Kneading accessory
The kneading accessory can be used for kneading
bread dough and for mixing batters and cake
mixtures.
C
1 Put the bowl on the motor unit and place
the kneading accessory onto the tool
holder that stands in the bowl.
2 Put the ingredients in the bowl and fasten
the lid onto the bowl. Place the pusher in
the feed tube to prevent ingredients from
escaping through the feed tube during the
kneading process.
C
3 Set the speed control to maximum speed
(position 2).
See the table for the appropriate processing
times.
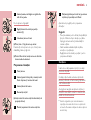
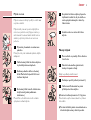
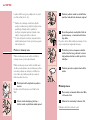
Emulsifying disc
You can use the emulsifying disc to prepare
mayonnaise, to whip cream and to whisk egg
whites.
C
1 Put the emulsifying disc onto the tool
holder that stands in the bowl.
2 Put the ingredients in the bowl and put the
lid on the bowl.

ENGLISH 11
3 Set the speed control to minimum speed
(position 1) to obtain optimal results.
Tips
◗ When you want to whisk egg whites, make
sure the eggs are at room temperature.
◗ Take the eggs out of the refrigerator at least
half an hour before you are going to use
them.
◗ All the ingredients for making mayonnaise
must be at room temperature.
◗ Oil can be added through the small hole in
the bottom of the pusher.
◗ If you are going to whip cream, the cream
must be taken straight from the refrigerator.
Please observe the preparation time in the
table. Cream should not be whipped too long.
◗ Use the pulse setting to have more control
over the process.
Blender
The blender is intended for:
- Blending fluids, e.g. dairy products, sauces, fruit
juices, soups, mixed drinks, sweat teas and
shakes.
- Mixing soft ingredients, e.g. pancake batter or
mayonnaise.
- Pureeing cooked ingredients, e.g. for making
baby food.
C
1 Remove the screw cap to attach the
blender jar.
1
2
C
2 Mount the blender jar on top of the
motor unit by turning it in the direction of
the arrow until it is firmly fixed.The handle
must be pointing to the left.
Do not exert too much pressure on the handle
of the blender jar.
3 Put the ingredients in the blender jar.
C
4 Close the lid.
C
5 Set the speed control to maximum speed
(position 2).The appliance continues to
run at this speed until it is switched off by
setting the speed control to position 0.
See the table for the appropriate processing
times.
Tips
C
◗ Pour liquid ingredients into the blender jar
through the hole in the lid.
◗ The longer you let the appliance run, the finer
the blending result will be.
◗ Pre-cut solid ingredients into smaller pieces
before putting them in the blender. If you
want to prepare a large quantity, process small
batches of ingredients instead of processing a
large quantity at once.
◗ Hard ingredients, e.g. soy beans for soy bean
milk, must be soaked in water before they are
processed.
1
2

ENGLISH12
C
◗ To crush ice cubes, place the ice cubes in the
jar, close the lid and use the pulse setting.
If ingredients stick to the wall of the blender jar:
1 Switch the appliance off and unplug it.
2 Open the lid.
Never open the lid while the appliance is still
running.
3 Use a spatula to remove the ingredients
from the wall of the jar.
Keep the spatula at a safe distance from the
cutting edges of the blade (approx. 2 cm).
B
If you are not satisfied with the results, switch off
the appliance and let it run briefly a number of
times by turning the speed control to pulse
position.You can also try to get a better result by
stirring the ingredients with a spatula (not while
the blender is running!) or by pouring some of the
contents out in order to process a smaller amount.
B
In some cases the ingredients are easier to blend
if you add some liquid, e.g. lemon juice when
blending fruit.
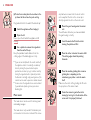
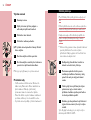
Meat mincer
The meat mincer can be used for mincing meat
and making sausages.
The meat mincer only works if the blender jar is
not mounted on the motor unit and if the screw
cap has been screwed onto the motor unit in
such a way that the dot on the screw cap is
directly opposite the dot on the motor unit.
C
1 Mount the gear housing onto the motor
unit.
You will hear a click when you have assembled
the gear housing correctly.
C
2 Insert the worm shaft into the cutter
housing, the plastic end first.
C
3 Place the cutter unit onto the worm shaft.
The cutting edges should be pointing
forwards.
C
4 Place the medium grinding disc or coarse
grinding disc - depending on the
consistency you prefer - onto the worm
shaft.
Make sure the notch of the grinding disc fits onto
the projection of the mincer head.
C
5 Fasten the screw ring onto the cutter
housing by turning it in the direction of the
arrow until it is properly fastened.

13ENGLISH
C
6 Place the tray on the upright part of the
cutter housing.
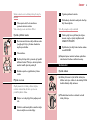
Mincing meat
1 Cut the meat into 10cm-long, 2cm-thick
strips.
2 Remove bones, pieces of gristle and sinews
as much as possible.
Never use frozen meat!
C
3 Set the speed control to maximum speed
(position 2).
C
4 Put the meat in the tray. Use the pusher to
gently push the meat into the cutter
housing.
◗ You can mince 1.3 kg meat per minute.
If you want to mince pork, use lean pork without
fat and sinews.
◗ For steak tartare, mince the meat with the
medium grinding disc twice.
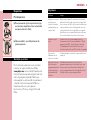
Making sausages
1 Mince the meat.
2 Unplug the appliance and remove the
screw ring after you have finished mincing.
3 Remove the grinding disc.
4 Remove the cutter unit.
◗ Leave the worm shaft in the cutter housing
when you are going to make sausages.
C
5 Place the separator in the cutter housing.
C
6 Place the sausage horn on the cutter
housing and screw the ring onto the cutter
housing.
The appliance is now ready for making sausages.
Tips
- Put the sausage skin in lukewarm water for
10 minutes.Then slide the wet skin onto the
sausage horn. Push the (seasoned) minced
meat into the cutter housing.
- If the skin gets stuck on the sausage horn, wet it
with some water.
- Set the speed control to position 1 to make
sausages.

ENGLISH14
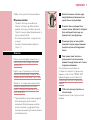
Cleaning
Before you start cleaning the appliance, switch the
appliance off and remove the plug from the wall
socket.
Clean the metal blade, the blade unit of the
blender and the inserts very carefully.Their cutting
edges are very sharp!
Make sure that the cutting edges of the blades
and the inserts do not come into contact with
hard objects.This could cause them to become
blunt.
B
Certain ingredients may cause discolourations on
the surface of the accessories.This does not have
a negative effect on the accessories.The
discolourations usually disappear after some time.
C
1 Wind excess mains cord around the reel
on the back of the appliance.
2 Clean the motor unit with a damp cloth.
Do not immerse the motor unit in water
and do not rinse it either.
3 Always clean the parts that have come into
contact with food in hot water with
washing-up liquid immediately after use.
4 The bowl, the lid of the bowl, the pusher
and the accessories (except for the
blender jar) can also be cleaned in a
dishwasher.
These parts have been tested for dishwasher
resistance based on DIN EN 12875.
The blender jar is not dishwasher-proof!
5 To remove the lid, open it and then pull it
upwards.
Only remove the lid for cleaning purposes.
Blender quick-clean operation
C
1 Pour lukewarm water (not more than
0.5 litres) and some washing-up liquid into
the blender jar.
2 Close the lid.
C
3 Let the appliance run for a few moments
by turning the speed control to pulse
position (the appliance stops running when
you release the speed control).
4 Detach the blender jar and rinse it with
clean water.
Meat mincer
Meat left behind in the cutter housing can be
removed from the inside of the appliance by
passing a slice of bread through the cutter
housing.
1 Make sure the appliance is unplugged.

ENGLISH 15
2 Press the release lever and turn the whole
cutter housing in the direction of the
arrow.
3 Remove the pusher and the tray.
4 Unscrew the screw ring and remove all
parts of the cutter housing.
Do not clean the parts in the dishwasher!
5 Wash all parts that have come into contact
with meat in hot soapy water
IMMEDIATELY AFTER USE.
6 Rinse them with clear hot water and dry
them IMMEDIATELY.
◗ We advise you to lubricate the cutter unit and
the grinding discs with some vegetable oil.
Storage
MicroStore
C
◗ Put the accessories (blade, insert holder) on
the tool holder and store them in the bowl.
Always end with the insert holder.
C
◗ Wind the mains cord around the reel on the
back of the appliance.
Guarantee & service
If you need information or if you have a problem,
please visit the Philips Web site at
www.philips.com
or contact the Philips Customer Care Centre in
your country (you will find its phone number in
the worldwide guarantee leaflet). If there is no
Customer Care Centre in your country, turn to
your local Philips dealer or contact the Service
Department of Philips Domestic Appliances and
Personal Care BV.

ENGLISH16
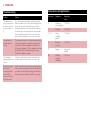
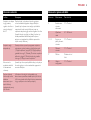
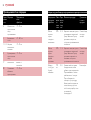
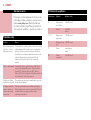
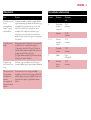
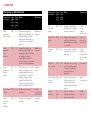
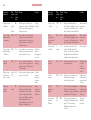
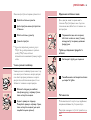
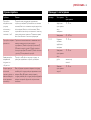
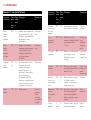
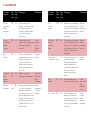
Solution
Turn the bowl and lid clockwise until you hear a click.
Make sure that the dot on the bowl is directly opposite
the dot on the motor unit and the line on the lid is
directly opposite the line on the bowl.Also make sure
the blender jar is not mounted and the screw cap has
been assembled properly.The dot on the screw cap
must be directly opposite the dot on the motor unit.
The automatic thermal cut-out system has probably cut
off the power supply to the appliance because it has
overheated. 1) Switch the appliance off (position 0).
2) Unplug the appliance. 3) Let the appliance cool down
for 60 minutes. 4) Put the mains plug in the socket.
5) Switch the appliance on again.
Check if you have really turned the bowl and the lid
clockwise as far as the point where you hear a click.
If both the blender and the food-processing bowl have
been mounted correctly, only the blender will function. If
you want to use the food-processing bowl, detach the
blender and close the fixing hole with the screw cap.
Problem
The appliance does
not go on when I turn
the speed control to
pulse or position 1 or
2.
The appliance has
suddenly stopped
running.
The kneading or
mixing accessory does
not turn
Both the blender jar
and the food-
processing bowl are
mounted on the
motor unit, but only
the blender works.
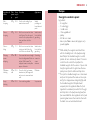
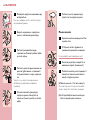
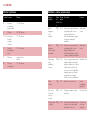
Troubleshooting
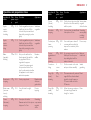
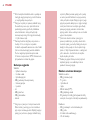
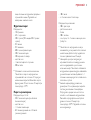
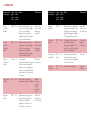
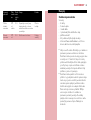
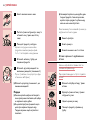
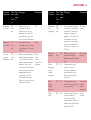
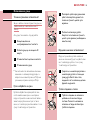
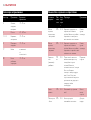
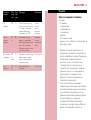
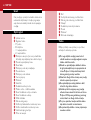
Application
times
10 - 60 sec.
60 - 180 sec.
10 - 60 sec.
10 - 60 sec.
depends on
quantity
10 - 60 sec.
Application
Chopping,
pureeing, mixing
Kneading
Slicing,
shredding,
grating
Blending,
pureeing
Mincing
Whisking,
whipping,
emulsifying
Accessory
P
{
gh k
D
Å
å
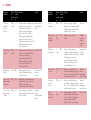
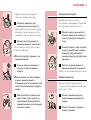
Accessories and applications

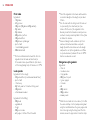
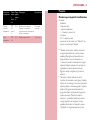
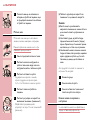
ENGLISH 17
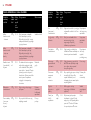
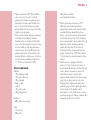
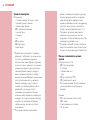
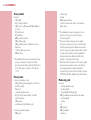
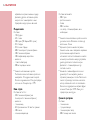
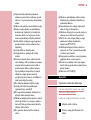
Applications
Salads, raw
vegetables
Salads, raw
vegetables
Pancakes,
waffles
Breadcrumbed
dishes, au
gratin dishes
Deserts,
toppings
Garnishing,
soups, sauces,
au gratin
dishes
Procedure
Cut the vegetables into pieces
that fit into the tube. Fill the
tube with the pieces and shred
them while pressing the pusher
lightly.
Cut the vegetables into pieces
that fit into the tube. Fill the
tube with the pieces and slice
them while pressing the pusher
lightly.
First pour the milk into the
blender jar and then add the
dry ingredients. Mix the
ingredients for approx.
1 minute. If necessary, repeat
this procedure 2 times.Then
stop for a few minutes to allow
the appliance to cool down to
ambient temperature.
Use dry, crispy bread.
Use soft butter for a light
result.
Use a piece of rindless
Parmesan and cut it into pieces
of approx. 3 x 3 cm.
Acces
sory/s
peed
h / 2
g / 2
D / 2
P / 2
D / 2
P / 2
Max.
quanti
ty
500g
500g
750ml
100g
300g
200g
Ingredients &
results
Apples,
carrots,
celeriac -
shredding
Apples,
carrots,
celeriac -
slicing
Batter
(pancake) -
whisking
Breadcrumbs -
chopping
Butter cream
(creme au
beurre) -
whisking
Cheese
(Parmesan) -
chopping
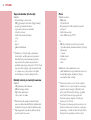
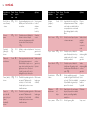
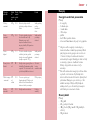
Quantities and preparation times
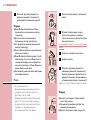
Applications
Sauces, pizzas,
au gratin
dishes, fondues
Garnishing,
sauces, pastry,
puddings,
mousses
Purees, soups
Baby and
infant food
Salads,
garnishing
Bread
Pizza
Procedure
Cut the cheese into pieces that
fit into the tube. Press carefully
with the pusher.
Use hard, plain chocolate. Break
it into pieces of 2 cm.
Use cooked peas or beans. If
necessary, add some liquid to
improve the consistency of the
mixture.
For a coarse puree, add only a
little liquid. For a fine puree,
keep adding liquid until the
mixture is smooth.
Put the cucumber in the tube
and press it down carefully.
Mix warm water with yeast and
sugar. Add flour, oil and salt and
knead the dough for approx.
90 seconds. Leave to rise for
30 minutes.
Follow the same procedure as
for bread dough. Knead the
dough for 1 minute.
Acces
sory/s
peed
h/ 2
P / 2
PD/
2
PD / 2
g / 1
{ / 2
{ / 2
Max.
quanti
ty
200g
200g
250g
500g
2
cucum
bers
500g
flour
750g
flour
Ingredients &
results
Cheese
(Gouda) -
shredding
Chocolate -
chopping
Cooked peas,
beans -
pureeing
Cooked
vegetables and
meats -
pureeing
Cucumbers -
slicing
Dough (for
bread) -
kneading
Dough (for
pizzas) -
kneading

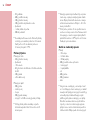
ENGLISH18
Applications
Apple pies,
sweet biscuits,
open fruit flans
Luxury bread
Puddings,
soufflees,
meringues
Sauces, jams,
puddings, baby
food
Procedure
Use cold margarine. Cut the
margarine into cubes of 2 cm.
Put the flour in the bowl and
add the margarine. Knead until
the dough has become
crumbly.Then add cold water
while kneading. Stop as soon as
the dough starts to turn into a
ball. Allow the dough to cool
before further processing.
First mix yeast, warm water
and some sugar in a separate
bowl. Put all ingredients in the
bowl and knead the dough
until it is smooth and does not
stick to the bowl (takes approx.
1 minute). Leave it to rise for
30 minutes.
Use egg whites at room
temperature. Note: use at least
2 egg whites.
Tip: add a little lemon juice to
prevent the fruit from
discolouring. Add some liquid
to obtain a smooth puree.
Tip: add a little lemon juice to
prevent the fruit from
discolouring.
Acces
sory/s
peed
{ / 2
{ / 2
å / 1
D / 2
P / 2
Max.
quanti
ty
300g
flour
500g
flour
4 egg
whites
500g
500g
Ingredients &
results
Dough
(shortcrust
pastry) -
kneading
Dough (yeast)
- kneading
Egg whites -
whisking
Fruit (e.g.
apples,
bananas) -
blending
Fruit (e.g.
apples,
bananas) -
chopping
Applications
Garnishing,
dips
Sauces, soups,
garnishing,
herb butter
Salads,
garnishing and
barbecue
sauces
Steaks tartare,
hamburgers,
meatballs
Steaks tartare,
hamburgers,
meatballs
Various cakes.
Procedure
Peel the garlic.Turn the speed
control to pulse position
several times to avoid chopping
the garlic too fine. Use at least
150g.
Wash and dry the herbs before
chopping.
All the ingredients must be at
room temperature. Note: use
at least one large egg, two small
eggs or two egg yolks. Put the
egg(s) or egg yolks and a little
vinegar in the bowl and add
the oil drop by drop.
First remove any sinews or
bones. Cut the meat into cubes
of 3 cm. Set the speed control
to pulse position to get a
coarser chopping result.
First remove any sinews or
bones. Cut the meat into cubes
of 3 cm. Set the speed control
to pulse position to get a
coarser chopping result.
The ingredients must be at
room temperature. Mix the
softened butter and the sugar
until the mixture is smooth and
creamy.Then add milk, eggs and
flour.
Acces
sory/s
peed
P / 2
P / 2
å / 1
Å / 2
P / 2
{ / 2
Max.
quanti
ty
300g
Min.
50g
3 eggs
1000g
400g
4 eggs
Ingredients &
results
Garlic -
chopping
Herbs (e.g.
parsley) -
chopping
Mayonnaise -
emulsifying
Meats (lean) -
mincing
Meats, fish,
poultry
(streaky) -
mincing
Mixture (cake)
- mixing

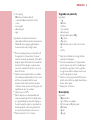
ENGLISH 19
Applications
Salads,
puddings, nut
bread, almond
paste
Salad, cooked
food, stir-fries,
garnishing
Salad, cooked
food, stir-fries,
garnishing
Garnishing,
cream, ice-
cream
mixtures
Milkshake
Soups, sauces
Procedure
Use the pulse setting if you
want a coarse result.
Peel the onions and cut them
into 4 pieces.Turn the speed
control to the pulse position 2
times and then check the
result.
Peel the onions and cut them
into pieces that fit into the
tube. Note: use at least 100g.
Use cream that comes straight
from the refrigerator. Note: use
at least 125ml cream.The
whipped cream is ready after
approx. 2 minutes.
Puree the fruit (e.g. bananas,
strawberries) with sugar, milk
and some ice cream and mix
well.
Use cooked vegetables
Acces
sory/s
peed
P / 2
P / 2
g / 1
å / 1
D / 2
D / 2
Max.
quanti
ty
250g
500g
300g
500ml
500ml
milk
500ml
Ingredients &
results
Nuts -
chopping
Onions -
chopping
Onions -
slicing
Whipping
cream -
whipping
Milkshakes -
blending
Soups -
blending
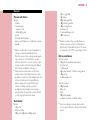
Recipes
Courgette sandwich spread
Ingredients:
- 2 courgettes
- 3 cooked eggs
- 1 small onion
- 1 tbs vegetable oil
- parsley
- 2-3 tbs sour cream
- lemon juice,Tabasco sauce, salt, pepper, curry
powder, paprika
B
Wash and dry the courgettes and shred them
with the shredding insert in the food-processing
bowl.Transfer the shredded courgette to a dish,
sprinkle salt on it and leave for about 15 minutes
so that the salt extracts the liquid from the
shredded courgette. Cut the onion in 4 pieces and
chop fine together with the garlic clove. Remove
parsley leaves from the stalks and chop them.
B
Then put the shredded courgette on a clean towel
and press the liquid out. Pour some oil into a pan
and fry the chopped onion and garlic lightly, add
the shredded courgettes. All liquids should
evaporate from the ingredients. Allow the fried
ingredients to cool down for a while. Peel the eggs
and chop them in the food processing bowl for a
few seconds. Add the other ingredients to the food
processing bowl, season them and mix them with
the blade. Serve on toasted white bread.

ENGLISH20
Fruit cake
Ingredients:
- 150g dates
- 225g prunes
- 100g nuts (50g almonds/50g walnuts)
- 50g raisins
- 50g sultanas
- 200g whole rye flour
- 100g wheat flour
- 100g brown crystal sugar
- pinch of salt
- 1 sachet baking powder
- 300ml buttermilk
B
Put the metal blade into the bowl. Put all in the
ingredients into the bowl and mix them for
30 seconds at max. speed. Bake the fruit cake in
a 30 cm long baking tin for 40 minutes at 170cC.
Leek quiche
Ingredients for the dough:
- 250g wheat flour (or wholemeal wheat flour)
- pinch of salt
- 1 tbs honey
- 20g fresh yeast or 1/2 sachet of dry yeast
- 100g butter
- 6 tbs lukewarm water
Ingredients for the filling:
- 500g leeks
- vegetable oil
- 4 eggs
- 500g sour cream
- salt, pepper, 1-2 tbs of flour if needed
B
Put all the ingredients in the bowl and knead into
a consistent dough. Let the dough rise for about
30 min.
B
Slice the leeks with the slicing insert. Put some oil
in a pan and fry the sliced leeks for a few
minutes. Put the rest of the ingredients in the
blender jar and let the blender run until you have
reached a creamy consistency. Add 1-2 tbs of flour
to thicken the mixture.
B
Grease a baking tin with a diameter of 24 cm
and cover the bottom and sides evenly with
dough. Spread the leek mixture onto the dough
and pour the rest of the ingredients over it. Bake
in a preheated oven for about 40 min at 180cC.
Can be served warm or cold.
Hungarian-style goulash
Ingredients:
- 1 tbs oil
- 1 medium onion
- 1 tsp paprika
- 400 g beef or pork
- 1 green pepper
- 1 tomato
-salt
- 200g carrots
- 300g potatoes
- caraway seeds
B
Wash the meat and cut it into cubes of 2 cm. Peel
the onion and chop it in the food processing bowl
using the metal blade. Core the green pepper and
slice it into rings using the slicing insert. Peel the
tomato, remove the pips and cut it into thin strips.
Pagina se încarcă...
Pagina se încarcă...
Pagina se încarcă...
Pagina se încarcă...
Pagina se încarcă...
Pagina se încarcă...
Pagina se încarcă...
Pagina se încarcă...
Pagina se încarcă...
Pagina se încarcă...
Pagina se încarcă...
Pagina se încarcă...
Pagina se încarcă...
Pagina se încarcă...
Pagina se încarcă...
Pagina se încarcă...
Pagina se încarcă...
Pagina se încarcă...
Pagina se încarcă...
Pagina se încarcă...
Pagina se încarcă...
Pagina se încarcă...
Pagina se încarcă...
Pagina se încarcă...
Pagina se încarcă...
Pagina se încarcă...
Pagina se încarcă...
Pagina se încarcă...
Pagina se încarcă...
Pagina se încarcă...
Pagina se încarcă...
Pagina se încarcă...
Pagina se încarcă...
Pagina se încarcă...
Pagina se încarcă...
Pagina se încarcă...
Pagina se încarcă...
Pagina se încarcă...
Pagina se încarcă...
Pagina se încarcă...
Pagina se încarcă...
Pagina se încarcă...
Pagina se încarcă...
Pagina se încarcă...
Pagina se încarcă...
Pagina se încarcă...
Pagina se încarcă...
Pagina se încarcă...
Pagina se încarcă...
Pagina se încarcă...
Pagina se încarcă...
Pagina se încarcă...
Pagina se încarcă...
Pagina se încarcă...
Pagina se încarcă...
Pagina se încarcă...
Pagina se încarcă...
Pagina se încarcă...
Pagina se încarcă...
Pagina se încarcă...
Pagina se încarcă...
Pagina se încarcă...
Pagina se încarcă...
Pagina se încarcă...
Pagina se încarcă...
Pagina se încarcă...
Pagina se încarcă...
Pagina se încarcă...
Pagina se încarcă...
Pagina se încarcă...
Pagina se încarcă...
Pagina se încarcă...
Pagina se încarcă...
Pagina se încarcă...
Pagina se încarcă...
Pagina se încarcă...
Pagina se încarcă...
Pagina se încarcă...
Pagina se încarcă...
Pagina se încarcă...
Pagina se încarcă...
Pagina se încarcă...
Pagina se încarcă...
Pagina se încarcă...
Pagina se încarcă...
Pagina se încarcă...
Pagina se încarcă...
Pagina se încarcă...
Pagina se încarcă...
Pagina se încarcă...
Pagina se încarcă...
Pagina se încarcă...
Pagina se încarcă...
Pagina se încarcă...
Pagina se încarcă...
Pagina se încarcă...
Pagina se încarcă...
Pagina se încarcă...
Pagina se încarcă...
Pagina se încarcă...
Pagina se încarcă...
Pagina se încarcă...
Pagina se încarcă...
Pagina se încarcă...
Pagina se încarcă...
Pagina se încarcă...
Pagina se încarcă...
Pagina se încarcă...
Pagina se încarcă...
Pagina se încarcă...
Pagina se încarcă...
Pagina se încarcă...
Pagina se încarcă...
Pagina se încarcă...
Pagina se încarcă...
Pagina se încarcă...
Pagina se încarcă...
Pagina se încarcă...
Pagina se încarcă...
Pagina se încarcă...
Pagina se încarcă...
Pagina se încarcă...
Pagina se încarcă...
Pagina se încarcă...
Pagina se încarcă...
Pagina se încarcă...
Pagina se încarcă...
Pagina se încarcă...
Pagina se încarcă...
Pagina se încarcă...
Pagina se încarcă...
Pagina se încarcă...
Pagina se încarcă...
Pagina se încarcă...
Pagina se încarcă...
Pagina se încarcă...
Pagina se încarcă...
Pagina se încarcă...
Pagina se încarcă...
Pagina se încarcă...
Pagina se încarcă...
Pagina se încarcă...
Pagina se încarcă...
Pagina se încarcă...
Pagina se încarcă...
Pagina se încarcă...
Pagina se încarcă...
Pagina se încarcă...
Pagina se încarcă...
Pagina se încarcă...
Pagina se încarcă...
Pagina se încarcă...
Pagina se încarcă...
Pagina se încarcă...
Pagina se încarcă...
Pagina se încarcă...
Pagina se încarcă...
Pagina se încarcă...
Pagina se încarcă...
Pagina se încarcă...
Pagina se încarcă...
Pagina se încarcă...
Pagina se încarcă...
Pagina se încarcă...
Pagina se încarcă...
Pagina se încarcă...
Pagina se încarcă...
Pagina se încarcă...
Pagina se încarcă...
Pagina se încarcă...
Pagina se încarcă...
Pagina se încarcă...
Pagina se încarcă...
Pagina se încarcă...
Pagina se încarcă...
Pagina se încarcă...
Pagina se încarcă...
Pagina se încarcă...
Pagina se încarcă...
Pagina se încarcă...
Pagina se încarcă...
Pagina se încarcă...
-
 1
1
-
 2
2
-
 3
3
-
 4
4
-
 5
5
-
 6
6
-
 7
7
-
 8
8
-
 9
9
-
 10
10
-
 11
11
-
 12
12
-
 13
13
-
 14
14
-
 15
15
-
 16
16
-
 17
17
-
 18
18
-
 19
19
-
 20
20
-
 21
21
-
 22
22
-
 23
23
-
 24
24
-
 25
25
-
 26
26
-
 27
27
-
 28
28
-
 29
29
-
 30
30
-
 31
31
-
 32
32
-
 33
33
-
 34
34
-
 35
35
-
 36
36
-
 37
37
-
 38
38
-
 39
39
-
 40
40
-
 41
41
-
 42
42
-
 43
43
-
 44
44
-
 45
45
-
 46
46
-
 47
47
-
 48
48
-
 49
49
-
 50
50
-
 51
51
-
 52
52
-
 53
53
-
 54
54
-
 55
55
-
 56
56
-
 57
57
-
 58
58
-
 59
59
-
 60
60
-
 61
61
-
 62
62
-
 63
63
-
 64
64
-
 65
65
-
 66
66
-
 67
67
-
 68
68
-
 69
69
-
 70
70
-
 71
71
-
 72
72
-
 73
73
-
 74
74
-
 75
75
-
 76
76
-
 77
77
-
 78
78
-
 79
79
-
 80
80
-
 81
81
-
 82
82
-
 83
83
-
 84
84
-
 85
85
-
 86
86
-
 87
87
-
 88
88
-
 89
89
-
 90
90
-
 91
91
-
 92
92
-
 93
93
-
 94
94
-
 95
95
-
 96
96
-
 97
97
-
 98
98
-
 99
99
-
 100
100
-
 101
101
-
 102
102
-
 103
103
-
 104
104
-
 105
105
-
 106
106
-
 107
107
-
 108
108
-
 109
109
-
 110
110
-
 111
111
-
 112
112
-
 113
113
-
 114
114
-
 115
115
-
 116
116
-
 117
117
-
 118
118
-
 119
119
-
 120
120
-
 121
121
-
 122
122
-
 123
123
-
 124
124
-
 125
125
-
 126
126
-
 127
127
-
 128
128
-
 129
129
-
 130
130
-
 131
131
-
 132
132
-
 133
133
-
 134
134
-
 135
135
-
 136
136
-
 137
137
-
 138
138
-
 139
139
-
 140
140
-
 141
141
-
 142
142
-
 143
143
-
 144
144
-
 145
145
-
 146
146
-
 147
147
-
 148
148
-
 149
149
-
 150
150
-
 151
151
-
 152
152
-
 153
153
-
 154
154
-
 155
155
-
 156
156
-
 157
157
-
 158
158
-
 159
159
-
 160
160
-
 161
161
-
 162
162
-
 163
163
-
 164
164
-
 165
165
-
 166
166
-
 167
167
-
 168
168
-
 169
169
-
 170
170
-
 171
171
-
 172
172
-
 173
173
-
 174
174
-
 175
175
-
 176
176
-
 177
177
-
 178
178
-
 179
179
-
 180
180
-
 181
181
-
 182
182
-
 183
183
-
 184
184
-
 185
185
-
 186
186
-
 187
187
-
 188
188
-
 189
189
-
 190
190
-
 191
191
-
 192
192
-
 193
193
-
 194
194
-
 195
195
-
 196
196
-
 197
197
-
 198
198
-
 199
199
-
 200
200
-
 201
201
-
 202
202


Philips hr 7755 essence Manual de utilizare
- Categorie
- Procesatoare de alimente
- Tip
- Manual de utilizare
- Acest manual este potrivit și pentru
în alte limbi
- slovenčina: Philips hr 7755 essence Používateľská príručka
Lucrări înrudite
-
Philips HR7750/01 Manual de utilizare
-
-
Philips HR7768/13 Manual de utilizare
-
-
-
-
Philips HR7766/13 Manual de utilizare
-
-
-
Philips HR7974/00 Manual de utilizare
Alte documente
-
Tefal QB504G38 Manual de utilizare
-
-
-
-
Moulinex Store'inn FP320F32 Manual de utilizare
-
Clatronic ICM 3581 Manual de utilizare
-
-
-
-
Braun K700-K700 BLACK Manualul proprietarului