
1
GB
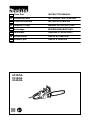
Chain Saw INSTRUCTION MANUAL
UA
Ланцюгова пила ІНСТРУКЦІЯ З ЕКСПЛУАТАЦІЇ
PL
Pilarka łańcuchowa INSTRUKCJA OBSŁUGI
RO
Ferăstrău cu lanţ MANUAL DE INSTRUCŢIUNI
DE
Kettensäge BEDIENUNGSANLEITUNG
HU
Láncfűrész HASZNÁLATI KÉZIKÖNYV
SK
Reťazová píla NÁVOD NA OBSLUHU
CZ
Řetězová pila NÁVOD K OBSLUZE
UC3020A
UC3520A
UC4020A

2
1
2
1 006910
2 010373
1
2
3
4
3 010567
1
4 006939
1
5 006940
1
2
3
6 006941
1
2
3
7 006942
1
8 006933
1
2
9 006934
1
2
3
4
5
2-4mm
10 006935
1
2
11 006936
12 006937
Reclaimend
oil
13 006921
1
14 006922
1
2
3
4
5
2-4mm
15 006935

3
1
2
16 006910
1
23
17 006911
1
18 006912
1
19 006913
20 006914
A
B
A
B
21 006915
22 006916
45
o
2
1
/
2
45
o
1
23 006917
24 006918
25 006923
1
2
2
3
3
26 009202
27 006924
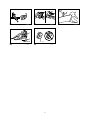
a
a
a
0.5 mm
0.5 mm
min.
3 mm
28 006925
80
80
29 006926
30 006927

4
30
31 006928 32 006929 33 006930
1
2
34 006931
1
35 006932

5
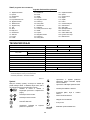
ENGLISH (Original instructions)
Explanation of general view
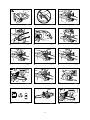
1-1. Lock-off button
1-2. Switch trigger
3-1. Press in
3-2. Loosen
3-3. Sprocket cover
3-4. Adjusting dial
4-1. Sprocket
5-1. Adjusting pin
6-1. Hook
6-2. Hole
6-3. Small hole
7-1. Press in
7-2. Tighten
7-3. Loosen
8-1. Lever
9-1. Press in.
9-2. Loosen
10-1. Low
10-2. High
10-3. Adjusting dial
10-4. Guide bar
10-5. Saw chain
11-1. Press in
11-2. Tighten
14-1. Oil filler cap
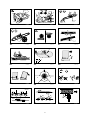
15-1. Low
15-2. High
15-3. Adjusting dial
15-4. Guide bar
15-5. Saw chain
16-1. Lock-off button
16-2. Switch trigger
17-1. Hand guard
17-2. Lock
17-3. Unlock
18-1. Sight glass
19-1. Serrated rail
23-1. Felling area
26-1. Felling direction
26-2. Danger zone
26-3. Escape route
34-1. Oil guide groove
34-2. Oil feed hole
35-1. Sprocket
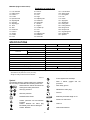
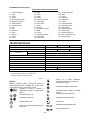
SPECIFICATIONS
Model UC3020A UC3520A UC4020A
Max. chain speed (m/s) 13.3
Cutting length 300 mm 350 mm 400 mm
Type 90SG
Saw chain
Pitch 3/8"
Oil pump Automatic
Oil tank capacity (l) 0.20
Power transmission Direct
Chain brake Manual
Run-down brake Mechanical
Overall length (without guide bar) 436 mm
Net weight 4.3 kg 4.4 kg
Extension cable (optional) DIN 57282/HO 7RN -F L=30 m max.,3x1.5 mm
2
• Due to our continuing program of research and development, the specifications herein are subject to change without notice.
• Specifications may differ from country to country.
• Weight according to EPTA-Procedure 01/2003
END218-5
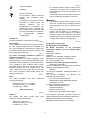
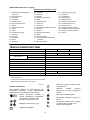
Symbol
The following show the symbols used for the equipment.
Be sure that you understand their meaning before use.
・ Read instruction manual and follow the
warnings and safety instructions.
・ Wear eye protection.
・ Wear ear protection.
・ DOUBLE INSULATION
・ Caution: particular care and attention
required!
・ Caution: withdraw the mains plug
immediately if the cable is damaged!
・ Caution: kickback!
・ Protect against rain and damp!
・ Wear a helmet, goggles and ear
protection!
・ Wear safety gloves!
・ Withdraw the mains plug!
・ First aid
・ Maximum permissible length of cut
・ Direction of chain travel
・ Chain oil
・ Chain brake released

6
・ Chain brake applied
・ Prohibited!
・ Only for EU countries
Do not dispose of electric equipment
together with household waste
material!
In observance of European Directive
2012/19/EU on waste electric and
electronic equipment and its
implementation in accordance with
national law, electric equipment that
have reached the end of their life must
be collected separately and returned to
an environmentally compatible
recycling facility.
ENE031-1
Intended use
The tool is intended for cutting lumbers and logs.
ENF002-2
Power supply
The tool should be connected only to a power supply of
the same voltage as indicated on the nameplate, and
can only be operated on single-phase AC supply. They
are double-insulated and can, therefore, also be used
from sockets without earth wire.
ENF100-1
For public low-voltage distribution systems of
between 220 V and 250 V.
Switching operations of electric apparatus cause
voltage fluctuations. The operation of this device under
unfavorable mains conditions can have adverse effects
to the operation of other equipment. With a mains
impedance equal or less than 0.35 Ohms it can be
presumed that there will be no negative effects. The
mains socket used for this device must be protected
with a fuse or protective circuit breaker having slow
tripping characteristics.
ENG905-1
Noise
The typical A-weighted noise level determined
according to EN60745:
Sound pressure level (L
pA
) : 89 dB(A)
Sound power level (L
WA
) : 100 dB(A)
Uncertainty (K) : 1 dB(A)
Wear ear protection
ENG900-1
Vibration
The vibration total value (tri-axial vector sum)
determined according to EN60745:
Work mode : cutting wood
Vibration emission (a
h
) : 3.8 m/s
2
Uncertainty (K) : 1.5 m/s
2
ENG901-1
•
The declared vibration emission value has been
measured in accordance with the standard test
method and may be used for comparing one tool
with another.
• The declared vibration emission value may also be
used in a preliminary assessment of exposure.
WARNING:
• The vibration emission during actual use of the
power tool can differ from the declared emission
value depending on the ways in which the tool is
used.
• Be sure to identify safety measures to protect the
operator that are based on an estimation of
exposure in the actual conditions of use (taking
account of all parts of the operating cycle such as
the times when the tool is switched off and when it
is running idle in addition to the trigger time).
ENH026-6
For European countries only
EC Declaration of Conformity
We Makita Corporation as the responsible
manufacturer declare that the following Makita
machine(s):
Designation of Machine:
Chain Saw
Model No./ Type: UC3020A, UC3520A, UC4020A
Specifications: see "SPECIFICATIONS" table.
are of series production and
Conforms to the following European Directives:
2000/14/EC, 2006/42/EC
And are manufactured in accordance with the following
standards or standardised documents:
EN60745
The EC-Type Examination Certificate No.M6A 12 10
26932 045
The EC-Type Examination per 98/37/EC and
2006/42/EC was performed by:
TÜV SÜD Product Service GmbH,
Ridlerstraße 65, 80339 MÜNCHEN, Germany
Identification No. 0123
The technical documentation is kept by:
Makita International Europe Ltd.
Technical Department,
Michigan Drive, Tongwell,
Milton Keynes, Bucks MK15 8JD, England
The conformity assessment procedure required by
Directive 2000/14/EC was in Accordance with annex V.
Measured Sound Power Level: 100.0dB (A)
Guaranteed Sound Power Level: 101.0dB (A)

7
7.11.2012
000230
Tomoyasu Kato
Director
Makita Corporation
3-11-8, Sumiyoshi-cho,
Anjo, Aichi, 446-8502, JAPAN
GEA010-1
General Power Tool Safety
Warnings
WARNING Read all safety warnings and all
instructions. Failure to follow the warnings and
instructions may result in electric shock, fire and/or
serious injury.
Save all warnings and instructions for
future reference.
GEB037-6
Chain saw safety warnings
1. Keep all parts of the body away from the saw
chain when the chain saw is operating. Before
you start the chain saw, make sure the saw
chain is not contacting anything. A moment of
inattention while operating chain saws may cause
entanglement of your clothing or body with the
saw chain.
2. Always hold the chain saw with your right
hand on the rear handle and your left hand on
the front handle. Holding the chain saw with a
reversed hand configuration increases the risk of
personal injury and should never be done.
3. Hold the power tool by insulated gripping
surfaces only, because the saw chain may
contact hidden wiring or its own cord. Saw
chains contacting a "live" wire may make
exposed metal parts of the power tool "live" and
could give the operator an electric shock.
4. Wear safety glasses and hearing protection.
Further protective equipment for head, hands,
legs and feet is recommended. Adequate
protective clothing will reduce personal injury by
flying debris or accidental contact with the saw
chain.
5. Do not operate a chain saw in a tree. Operation
of a chain saw while up in a tree may result in
personal injury.
6. Always keep proper footing and operate the
chain saw only when standing on fixed,
secure and level surface. Slippery or unstable
surfaces such as ladders may cause a loss of
balance or control of the chain saw.
7. When cutting a limb that is under tension be
alert for spring back. When the tension in the
wood fibres is released the spring loaded limb
may strike the operator and/or throw the chain
saw out of control.
8. Use extreme caution when cutting brush and
saplings. The slender material may catch the
saw chain and be whipped toward you or pull you
off balance.
9. Carry the chain saw by the front handle with
the chain saw switched off and away from
your body. When transporting or storing the
chain saw always fit the guide bar cover.
Proper handling of the chain saw will reduce the
likelihood of accidental contact with the moving
saw chain.
10. Follow instructions for lubricating, chain
tensioning and changing accessories.
Improperly tensioned or lubricated chain may
either break or increase the chance for kickback.
11. Keep handles dry, clean, and free from oil and
grease. Greasy, oily handles are slippery causing
loss of control.
12. Cut wood only. Do not use chain saw for
purposes not intended. For example: do not
use chain saw for cutting plastic, masonry or
non-wood building materials. Use of the chain
saw for operations different than intended could
result in a hazardous situation.
13. Causes and Operator Prevention of Kickback:
Kickback may occur when the nose or tip of the
guide bar touches an object, or when the wood
closes in and pinches the saw chain in the cut.
Tip contact in some cases may cause a sudden
reverse reaction, kicking the guide bar up and
back towards the operator.
Pinching the saw chain along the top of the guide
bar may push the guide bar rapidly back towards
the operator.
Either of these reactions may cause you to lose
control of the saw which could result in serious
personal injury. Do not rely exclusively upon the
safety devices built into your saw. As a chain saw
user, you should take several steps to keep your
cutting jobs free from accident or injury.
Kickback is the result of tool misuse and/or
incorrect operating procedures or conditions and
can be avoided by taking proper precautions as
given below:
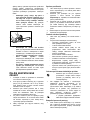
− Maintain a firm grip, with thumbs and
fingers encircling the chain saw handles,
with both hands on the saw and position
your body and arm to allow you to resist
kickback forces. Kickback forces can be
controlled by the operator, if proper
precautions are taken. Do not let go of the
chain saw.

8
006908
− Do not overreach and do not cut above
shoulder height. This helps prevent
unintended tip contact and enables better
control of the chain saw in unexpected
situations.
− Only use replacement bars and chains
specified by the manufacturer. Incorrect
replacement bars and chains may cause
chain breakage and/or kickback.
− Follow the manufacturer’s sharpening
and maintenance instructions for the saw
chain. Decreasing the depth gauge height
can lead to increased kickback.
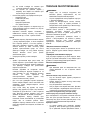
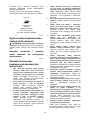
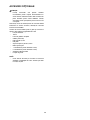
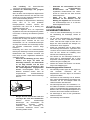
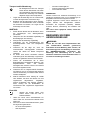
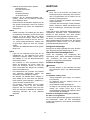
ADDITIONAL SAFETY RULES
1. Read the instruction manual in order to familiarize
yourself with operation of the chain saw.
2. Before using the chain saw for the first time,
arrange to have instruction in its operation. If this
is not possible, at least practice cutting round
timber on a trestle before beginning work.
3. The chain saw must not be used by children or
young persons under 18 years of age. Young
persons over 16 years of age may be exempted
from this restriction if they are undergoing training
under the supervision of an expert.
4. Working with the chain saw requires a high level
of concentration. Do not work with the saw if you
are not feeling fit and well. Carry out all work
calmly and carefully.
5. Never work under the influence of alcohol, drugs
or medication.
Proper use
1. The chain saw is intended solely for cutting wood.
Do not use it for example to cut plastic or porous
concrete.
2. Only use the chain saw for operations described
in this instruction manual. Do not, for example,
use it to trim hedges or for similar purposes.
3. The chain saw must not be used for forestry work,
i.e. for felling and limbing standing timber. The
chain saw cable does not provide the operator
with the mobility and safety required for such
work.
4. The chain saw is not intended for commercial use.
5. Do not overload the chain saw.
Personal protective equipment
1. Clothing must be close-fitting, but must not
obstruct mobility.
2. Wear the following protective clothing during
work:
• A tested safety helmet, if a hazard is
presented by falling branches or similar;
• A face mask or goggles;
• Suitable ear protection (ear muffs, custom or
mouldable ear plugs). Octave brand analysis
upon request.
• Firm leather safety gloves;
• Long trousers manufactured from strong
fabric;
• Protective dungarees of cut-resistant fabric;
• Safety shoes or boots with non-slip soles,
steel toes, and cut-resistant fabric lining;
• A breathing mask, when carrying out work
which produces dust (e.g. sawing dry wood).
Protection against electric shock
・ The chain saw must not be used in wet
weather or damp environments, as the
electric motor is not waterproof.
1. Only plug the saw into sockets in tested electrical
circuits. Check that the system voltage matches
that on the rating plate. Ensure that a 16 A line
fuse is fitted. Saws used in the open air must be
connected to a residual current-operated circuit-
breaker with an operating current no higher than
30 mA.
・ Should the connecting cable be
damaged, withdraw the mains plug
immediately.
Safe working practices
1. Before starting work, check that the chain saw is
in proper working order and that its condition
complies with the safety regulations. Check in
particular that:
• The chain brake is working properly;
• The run-down brake is working properly;
• The bar and the sprocket cover are fitted
correctly;
• The chain has been sharpened and tensioned
in accordance with the regulations;
• The mains cable and mains plug are
undamaged;
Refer to the "CHECKS " section.
2. Always ensure in particular that the extension
cable used is of adequate cross-section (see
"SPECIFICATIONS"). When using a cable reel,
wind the cable completely off the reel. When
using the saw in the open air, ensure that the
cable employed is intended for open-air use and
is rated accordingly.

9
3. Keep the cord away from the cutting area and to
position cord so that it will not be caught on
branches, and the like, during cutting.
4. Do not operate the chain saw in the vicinity of
flammable dust or gases, as the motor generates
sparks and presents a risk of explosion.
5. Work only on firm ground and with a good footing.
Pay particular attention to obstacles (e.g. the
cable) in the working area. Take particular care
where moisture, ice, snow, freshly cut wood or
bark may make surfaces slippery. Do not stand
on ladders or trees when using the saw.
6. Take particular care when working on sloping
ground; rolling trunks and branches pose a
potential hazard.
7. Never cut above shoulder height.
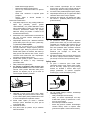
8. Hold the chain saw with both hands when
switching it on and using it. Hold the rear
handle with your right hand and the front handle
with your left. Hold the handles firmly with your
thumbs. The bar and the chain must not be in
contact with any objects when the saw is
switched on.
006908
9. Clean the area to be cut of foreign objects such
as sand, stones, nails, wire, etc. Foreign objects
damage the bar and chain, and can lead to
dangerous kickback.
10. Take particular care when cutting in the vicinity of
wire fences. Do nut cut into the fence, as the saw
may kick back.
11. Do not cut into the ground.
12. Cut pieces of wood singly, not in bunches or
stacks.
13. Avoid using the saw to cut thin branches and
roots, as these can become entangled in the
chain saw. Loss of balance presents a hazard.
14. Use a secure support (trestle) when cutting sawn
timber.
15. Do not use the chain saw to prise off or brush
away pieces of wood and other objects.
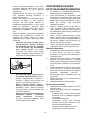
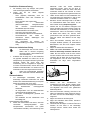
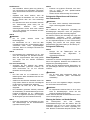
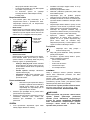
16. Guide the chain saw such that no part of your
body is within the extended path of the saw chain
(see figure).
006909
17. When moving around between sawing operations,
apply the chain brake in order to prevent the
chain from being operated unintentionally. Hold
the chain saw by the front handle when carrying it,
and do not keep your finger on the switch.
Withdraw the mains plug when taking breaks or
leaving the chain saw unattended. Leave the
chain saw where it cannot present a hazard.
18. Withdraw the mains plug when taking breaks or
leaving the chain saw unattended. Leave the
chain saw where it cannot present a hazard.
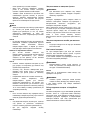
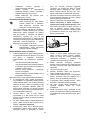
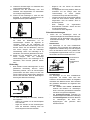
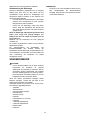
Kickback
1. Hazardous kickback may arise during work with
the chain saw. Kickback arises when the tip of the
bar (in particular the upper quarter) comes into
contact with wood or another solid object. This
causes the chainsaw to be deflected in the
direction of the operator.
006919
2. In order to avoid kickback, observe the following:
• Never begin the cut with the tip of the bar.
• Never use the tip of the bar for cutting. Take
particular care when resuming cuts which
have already been started.
• Start the cut with the chain running.
• Always sharpen the chain correctly. In
particular, set the depth gauge to the correct
height (refer to "Sharpening the chain " for
details).
• Never saw through several branches at a time.
• When limbing, take care to prevent the bar
from coming into contact with other branches.
• When bucking, keep clear of adjacent trunks.
Always observe the bar tip.
• Use a trestle.

10
Safety features
1. Always check that that the safety features are in
working order before starting work. Do not use
the chain saw if the safety features are not
working properly.
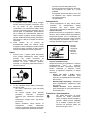
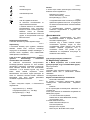
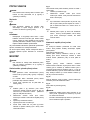
− Chain brake:
The chain saw is fitted with a chain brake which
brings the saw chain to a standstill within a fraction
of a second. It is activated when the hand guard is
pushed forwards. The saw chain then stops within
0.15 s, and the power supply to the motor is
interrupted.
12
006920
− Run-down brake:
The chain saw is equipped with an run down brake
which brings the saw chain to an immediate stop
when the ON/OFF switch is released. This
prevents the saw chain from running on when
switched off, and thus presenting a hazard.
− The front and rear hand guards protect the
user against injury from pieces of wood
which may be thrown backwards, or a
broken saw chain.
− The trigger lockout prevents the chain saw
from being switched on accidentally.
− The chain catcher protects the user against
injury should the chain jump or break.
Transport and storage
・ When the chain saw is not in use or is
being transported, withdraw the mains
plug and fit the scabbard supplied with
the saw. Never carry or transport the
saw with the saw chain running.
1. Carry the chain saw by the front handle only, with
the bar pointing backwards.
2. Keep the chain saw in a secure, dry and locked
room out of the reach of children. Do not store the
chain saw outdoors.
MAINTENANCE
1. Withdraw the plug from the socket before carrying
out any adjustments or maintenance.
2. Check the power cable regularly for damage to
the insulation.
3. Clean the chain saw regularly.
4. Have any damage to the plastic housing repaired
properly and immediately.
5. Do not use the saw if the switch trigger is not
working properly. Have it properly repaired.
6. Under no circumstances should any modifications
be made to the chain saw. Your safety is at risk.
7. Do not carry out maintenance or repair work other
than that described in this instruction manual. Any
other work must be carried out by MAKITA
Service.
8. Only use original MAKITA replacement parts and
accessories intended for your model of saw. The
use of other parts increases the risk of accident.
9. MAKITA accepts no responsibility for accidents or
damage should non-approved bars, saw chains
or other replacement parts or accessories be
used. Refer to the "Extract from the spare parts
list " for approved saw bars and chains.
First aid
・ Do not work alone. Always work within
shouting distance of a second person.
1. Always keep a first-aid box to hand. Replace any
items taken from it immediately.
2. Should you request assistance in the event of an
accident, state the following:
• Where did the accident happen?
• What happened?
• How many persons are injured?
• What injuries do they have?
• Who is reporting the accident?
NOTE:
Individuals with poor circulation who are exposed to
excessive vibration may experience injury to blood
vessels or the nervous system.
Vibration may cause the following symptoms to occur in
the fingers, hands or wrists: "Falling asleep
"(numbness), tingling, pain, stabbing sensation,
alteration of skin colour or of the skin.
If any of these symptoms occur, see a physician!
SAVE THESE INSTRUCTIONS.
WARNING:
DO NOT let comfort or familiarity with product
(gained from repeated use) replace strict adherence
to safety rules for the subject product. MISUSE or
failure to follow the safety rules stated in this
instruction manual may cause serious personal
injury.
1. Chain brake
applied
2. Chain brake
released

11
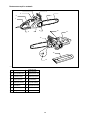
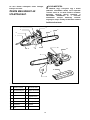
Parts supplied
1
2
3
4
5
6
7
14
10
8
9
11
13
15
12
006907
1
2
3
4
5
6
7
8
9
10
11
12
13
14
15
Rear handle
Switch trigger
Oil filter cap
Front handle
Front hand guard
Guide bar
Saw chain
Lever
Sprocket cover
Oil level sight
Rear hand guard
Lock-off button
Chain catcher
Scabbard
Serrated rail
(claw stop)
006996

12
FUNCTIONAL DESCRIPTION
CAUTION:
• Always be sure that the tool is switched off and
unplugged before adjusting or checking function
on the tool.
Switch action
Fig.1
CAUTION:
• Before plugging in the tool, always check to see
that the switch trigger actuates properly and
returns to the "OFF" position when released.
Fig.2
NOTE:
• Do not turn on and off too often within a short time
(five seconds or less). The temperature inside the
tool will rise and may cause the tool damage. The
time varies by atmosphere temperature and other
conditions.
To prevent the switch trigger from being accidentally
pulled, a lock-off button is provided.
To start the tool, depress the lock-off button and pull the
switch trigger. Release the switch trigger to stop.
ASSEMBLY
CAUTION:
• Always be sure that the tool is switched off and
unplugged before carrying out any work on the
tool.
Installing or removing saw chain
CAUTION:
• Always be sure that the tool is switched off and
unplugged before installing or removing the saw
chain.
• Always wear gloves when installing or removing
the saw chain.
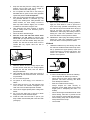
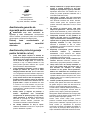
1. To remove the saw chain, move the lever in the
upright position.
Fig.3
2. Press the lever and with the lever pressed in, turn
it counterclockwise to loosen the nut until
sprocket cover comes off. (Pressing in the lever
leads to the fitting of lever into the nut.)
3. Turn the adjusting dial counterclockwise to
release the saw chain tension.
4. Remove the sprocket cover.
5. Remove the saw chain and guide bar from the
chain saw.
6. To install the saw chain, fit in one end of the saw
chain on the top of the guide bar and the other
end of it around the sprocket.
Fig.4
At this time, fit the saw chain as shown in the figure
because it rotates in the direction of arrow.
7. Rest the guide bar in place on the chain saw
8. Turn the adjusting dial counterclockwise to slide
the adjusting pin in the direction of arrow.
Fig.5
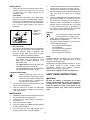
9. Place the sprocket cover on the chain saw so that
the hook at its back cover is inserted into a hole
in the chain saw and the adjusting pin is
positioned in a small hole in the guide bar.
Fig.6
10. Press in the lever and with the lever depressed
turn it fully clockwise to tighten the nut. Then
make it about a quarter turn counterclockwise to
loosen the nut lightly.
Fig.7
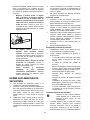
Adjusting saw chain tension
Fig.8
The saw chain may become loose after many hours of
use. From time to time check the saw chain tension
before use.
Move the lever in the upright position.
Press in the lever. With the lever depressed, make a
quarter turn on it counterclockwise to loosen the nut
lightly. (Pressing in the lever leads to the fitting of lever
into the nut.)
Fig.9
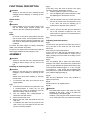
Turn the adjusting dial to adjust saw chain tension.
Grasp the saw chain in the middle of the guide bar and
lift up. The gap between the guide bar and the tie strap
of the saw chain should be approx. 2 - 4 mm. If the gap
is not approx. 2 - 4 mm, slightly turn the adjusting dial
which secures the guide bar. At this time, adjust with the
tip of guide bar slightly pointing up.
Fig.10
With the lever depressed, turn it fully clockwise to
tighten the nut firmly.
Fig.11
Return the lever to its original position.
Fig.12
CAUTION:
• Excessively high tension of saw chain may cause
breakage of saw chain, wear of the guide bar
and breakage of the adjusting dial.
• Installing or removing saw chain should be carried
out in a clean place free from sawdust and the like.

13
OPERATION
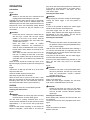
Lubrication
Fig.13
CAUTION:
• Always be sure that the tool is switched off and
unplugged before lubricating the saw chain.
Lubricate the saw chain and bar using a biologically
degradable saw chain oil with an adhesion agent. The
adhesion agent in the saw chain oil prevents the oil from
being thrown off the saw excessively quickly. Mineral
oils must not be used, as they are harmful to the
environment.
CAUTION:
• Prevent the oil from coming into contact with the
skin and eyes. Contact with the eyes causes
irritation. In the event of eye contact, flush the
affected eye immediately with clear water, then
consult a doctor at once.
• Never use waste oil. Waste oil contains
carcinogenic substances. The contaminants in
waste oil cause accelerated wear of the oil pump,
the bar and the chain. Waste oil is harmful to the
environment.
• When filling the chain saw with chain oil for the
first time, or refilling the tank after it has been
completely emptied, add oil up to the bottom edge
of the filler neck. The oil delivery may otherwise be
impaired.
Clean the area around the oil filler cap shown in the
figure thoroughly to prevent any dirt from entering the oil
tank.
Fig.14
Unscrew the oil filler cap and add oil up to the lower
edge of the filler neck.
Screw the oil filler cap firmly back in place.
Wipe away any spilt chain oil carefully.
When the chain saw is used for the first time, it may
take up to two minutes for the saw chain oil to begin its
lubricating effect upon the saw mechanism. Run the
saw without load until it does so (see "CHECKS ").
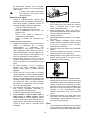
CHECKS
Before starting work, carry out the following checks:
Checking the chain tension
Fig.15
WARNING:
• Always withdraw the mains plug before checking
the chain tension, and wear safety gloves.
The saw chain is correctly tensioned when it is in
contact with the underside of the bar and can be raised
approximately 2 - 4 mm from the bar by light finger
pressure.
Check the chain tension frequently, as new chains are
subject to elongation. A chain which is too slack can
jump off the bar, and therefore presents an accident risk.
If the chain is too slack: Refer to the section titled "
Adjusting saw chain tension " and adjust the saw
chain tension again.
Checking the switch action
CAUTION:
Always unplug the tool before testing the switch trigger.
Locking the switch trigger in the ON position is
prohibited.
Fig.16
It must not be possible to depress the switch trigger
unless the lock-off button is first depressed.
The switch trigger must not jam in the depressed
position. When released, the switch trigger must return
automatically to the OFF position, and the lock-off
button must return to its original position.
Checking the chain brake
NOTE:
• If the chain saw fails to start, the chain brake must
be released. Pull the hand guard backwards firmly
until you feel it engage.
Hold the chain saw with both hands when switching it
on. Hold the rear handle with your right hand, the front
handle with your left. The bar and the chain must not be
in contact with any object.
First press the lock-off button, then the switch trigger.
The saw chain starts immediately.
Press the hand guard forwards using the back of your
hand. The saw chain must come to an immediate
standstill.
Fig.17
CAUTION:
• Should the saw chain not stop immediately when
this test is performed, the saw may not be used
under any circumstances. Consult a MAKITA
specialist repair shop.
Checking the run-down brake
Switch on the chain saw.
Release the switch trigger completely. The saw chain
must come to a standstill within one second.
CAUTION:
• Should the saw chain not come to a stop within
one second when this test is performed, the saw
must not be used. Consult a MAKITA specialist
repair shop.
Checking the chain oiler
Before starting work, check the oil level in the tank, and
the oil delivery.
The oil level can be seen in the sight glass shown in the
figure.
Fig.18
Check the oil delivery as follows:
Start the chain saw.

14
With the saw running, hold the saw chain approximately
15 cm above a tree trunk or the ground. If lubrication is
adequate, the oil spray will produce a light oil trace.
Observe the wind direction, and do not expose yourself
to the oil spray unnecessarily.
CAUTION:
• If an oil trace is not formed, do not use the saw.
The lifespan of the chain will otherwise be reduced.
Check the oil level. Clean the oil feed groove and
the oil feed hole in the bar (refer to
"MAINTENANCE ").
WORKING WITH THE CHAIN SAW
Bucking
Fig.19
For bucking cuts, rest the serrated rail shown in the
figure on the wood to be cut.
With the saw chain running, saw into the wood, using
the rear handle to raise the saw and the front one to
guide it. Use the serrated rail as a pivot.
Continue the cut by applying slight pressure to the front
handle, easing the saw back slightly. Move the serrated
rail further down the timber and raise the front handle
again.
When making several cuts, switch the chain saw off
between cuts.
CAUTION:
• If the upper edge of the bar is used for cutting, the
chain saw may be deflected in your direction if the
chain becomes trapped. For this reason, cut with
the lower edge, so that the saw will be deflected
away from your body.
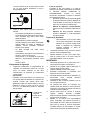
Fig.20
Cut wood under tension on the pressure side (A )first.
Then make the final cut on the tension side (B ). This
prevents the bar from becoming trapped.
Fig.21
Limbing
CAUTION:
• Limbing may only be performed by trained
persons. A hazard is presented by the risk of kick-
back.
When limbing, support the chain saw on the trunk if
possible. Do not cut with the tip of the bar, as this
presents a risk of kickback.
Pay particular attention to branches under tension. Do
not cut unsupported branches from below.
Do not stand on the felled trunk when limbing.
Burrowing and parallel-to-grain cuts
CAUTION:
• Burrowing and parallel-to-grain cuts may only be
carried out by persons with special training. The
possibility of kickback presents a risk of injury.
Fig.22
Perform parallel-to-grain cuts at as shallow an angle as
possible. Carry out the cut as carefully as possible, as
the serrated rail cannot be used.
Felling
CAUTION:
• Felling work may only be performed by trained
persons. The work is hazardous.
Observe local regulations if you wish to fell a tree.
Fig.23
− Before starting felling work, ensure that:
(1) Only persons involved in the felling operation
are in the vicinity;
(2)
Any person involved has an unhindered path of
retreat through a range of approximately 45 °
either side of the felling axis. Consider the
additional risk of tripping over electrical cables;
(3) The base of the trunk is free of foreign
objects, roots and ranches;
(4) No persons or objects are present over a
distance of 2 1/2 tree lengths in the direction
in which the tree will fall.
− Consider the following with respect to each tree:
• Direction of lean;
• Loose or dry branches;
• Height of the tree;
• Natural overhang;
• Whether or not the tree is rotten.
− Consider the wind speed and direction. Do not
carry out felling work if the wind is gusting strongly.
− Trimming of root swellings: Begin with the largest
swellings. Make the vertical cut first, then the
horizontal cut.
Fig.24
− Cut a scarf: The scarf determines the direction in
which the tree will fall, and guides it. It is made on
the side towards which the tree is to fall. Cut the
scarf as close to the ground as possible. First
make the horizontal cut to a depth of 1/5 -1/3 of
the trunk diameter. Do not make the scarf too
large. Then make the diagonal cut.
− Cut any corrections to the scarf across its entire
width.
Fig.25
− Make the back cut a little higher than the base cut
of the scarf. The back cut must be exactly
horizontal. Leave approximately 1/10 of the trunk
diameter between the back cut and the scarf.
The wood fibers in the uncut trunk portion act as a
hinge. Do not cut right through the fibers under
any circumstances, as the tree will otherwise fall
unchecked. Insert wedges into the back cut in time.
− Only plastic or aluminum wedges may be used to
keep the back cut open. The use of iron wedges is
prohibited.

15
− Stand to the side of the falling tree. Keep an area
clear to the rear of the falling tree up to an angle of
45 ° either side of the tree axis (refer to the "
felling area " figure). Pay attention to falling
branches.
− An escape path should be planned and cleared as
necessary before cuts are started. The escape
path should extend back and diagonally to the rear
of the expected line of fall as illustrated in figure.
Fig.26
MAINTENANCE
CAUTION:
• Always be sure that the tool is switched off and
unplugged before attempting to perform inspection
or maintenance.
• Always wear gloves when performing any
inspection or maintenance.
• Never use gasoline, benzine, thinner, alcohol or
the like. Discoloration, deformation or cracks may
result.
Carry out the maintenance work described below at
regular intervals. Warranty claims will be accepted only
if these operations have been performed regularly and
properly.
Only maintenance work described in this instruction
manual may be performed by the user. Any other work
must be carried out by a MAKITA specialist repair shop.
Cleaning the chain saw
Clean the saw regularly with a clean rag. The handles,
in particular, must be kept free of oil.
Checking the plastic housing
Carry out regular visual inspections of all parts of the
housing. Should any parts be damaged, have them
repaired immediately and properly in a MAKITA
specialist repair shop.
Sharpening the saw chain
CAUTION:
• Always withdraw the mains plug and wear safety
gloves when performing work on the saw chain.
Fig.27
Sharpen the saw chain when:
− Mealy sawdust is produced when damp wood is
cut;
− The chain penetrates the wood with difficulty, even
when heavy pressure is applied;
− The cutting edge is obviously damaged;
− The saw pulls to the left or right in the wood. The
reason for this behaviour is uneven sharpening of
the saw chain, or damage to one side only.
Sharpen the saw chain frequently, but remove only
a little material each time.
Two or three strokes with a file are usually sufficient for
routine resharpening. When the saw chain has been
resharpened several times, have it sharpened in a
MAKITA specialist repair shop.
Sharpening criteria:
− All cutters must be of equal length (dimension a).
Cutters of differing length prevent the chain from
running smoothly, and may cause the chain to
break.
− Do not sharpen the chain once a minimum cutter
length of 3 mm has been reached. A new chain
must then be fitted.
− The chip thickness is determined by the distance
between the depth gauge (round nose) and the
cutting edge. The best cutting results are obtained
with a distance of 0.5 mm between cutting edge
and depth gauge.
Fig.28
WARNING:
• An excessive distance increases the risk of kick-
back.
− The sharpening angle of 30 ° distance must be the
same on all cutters. Differences in angle cause the
chain to run roughly and unevenly, accelerate
wear, and lead to chain breaks.
Fig.29
− The side plate angle of the cutter of 80 ° is
determined by the depth of penetration of the
round file. If the specified file is used properly, the
correct side plate angle is produced automatically.
File and file guiding
− Use a special round file (optional accessory) for
saw chains, with a diameter of 4.5 mm, to sharpen
the chain. Normal round files are not suitable.
Fig.30
− The file should only engage the material on the
forward stroke. Lift the file off the material on the
return stroke.
− Sharpen the shortest cutter first. The length of this
cutter is then the gauge dimension for all other
cutters on the saw chain.
− Guide the file as shown in the figure.
− The file can be guided more easily if a file holder
(optional accessory) is employed. The file holder
has markings for the correct sharpening angle of
30 ° (align the markings parallel to the saw chain)
and limits the depth of penetration (to 4/5 of the
file diameter).
Fig.31
− After sharpening the chain, check the height of the
depth gauge using the chain gauge tool (optional
accessory).
Fig.32
− Remove any projecting material, however small,
with a special flat file (optional accessory).
− Round off the front of the depth gauge again.

16
Cleaning the guide bar and lubricating the
return sprocket
CAUTION:
• Always wear safety gloves for this task. Burrs
present a risk of injury.
Fig.33
Check the running surfaces of the bar regularly for
damage. Clean using a suitable tool, and remove burrs
if necessary.
If the chain saw receives frequent use, lubricate the
return sprocket bearing at least once a week. Before
adding new fresh grease, carefully clean the 2 mm hole
on the tip of the guide bar, then force a small quantity of
multi-purpose grease (optional accessory) into the hole.
Cleaning the oil guide
Fig.34
− Clean the oil guide groove and the oil feed hole in
the bar at regular intervals.
New saw chains
Use two or three saw chains alternately, so that the saw
chain, sprocket and running surfaces of the bar wear
evenly.
Turn the bar over when changing the chain so that the
bar groove wears evenly.
CAUTION:
• Only use chains and bars which are approved for
this model of saw (refer to " SPECIFICATIONS ").
Fig.35
Before fitting a new saw chain, check the condition of
the sprocket.
CAUTION:
• A worn sprocket will damage a new saw chain.
Have the sprocket replaced in this case.
Always fit a new locking ring when replacing the
sprocket.
Maintaining the chain and run-down brakes
The braking systems are very important safety features.
Like any other component of the chain saw, they are
subject to a certain degree of wear. They must be
inspected regularly by a MAKITA specialist repair shop.
This measure is for your own safety.
Storing tool
Biologically degradable saw chain oil can only be kept
for a limited period. Beyond two years after manufacture,
biological oils begin to acquire an adhesive quality, and
cause damage to the oil pump and components in the
lubricating system.
− Before taking the chain saw out of service for a
longer period, empty the oil tank and fill it with a
small quantity of engine oil (SAE 30).
− Run the chain saw briefly to flush all residue of the
biological oil out of the tank, lubricating system
and saw mechanism.
When the chain saw is taken out of service, small
quantities of chain oil will leak from it for some time
afterwards. This is normal, and is not a sign of a
fault.
Store the chain saw on a suitable surface.
Before returning the chain saw to service, fill up with
fresh BIOTOP saw chain oil.
To maintain product SAFETY and RELIABILITY, repairs,
any other maintenance or adjustment should be
performed by Makita Authorized Service Centers,
always using Makita replacement parts.
OPTIONAL ACCESSORIES
CAUTION:
• These accessories or attachments are
recommended for use with your Makita tool
specified in this manual. The use of any other
accessories or attachments might present a risk of
injury to persons. Only use accessory or
attachment for its stated purpose.
If you need any assistance for more details regarding
these accessories, ask your local Makita Service Center.
Makita Service Center can be found on the Internet
at:www:makita.co.jp/global/index .html
• Saw chain
• Scabbard
• Guide bar complete
• Chain gauge
• Round file 4.5 mm
• Flat file
• File holder with 4.5 mm file
• File handle
• 1 I BIOTOP chainsaw oil
• 5 I BIOTOP chainsaw oil
• Multi-purpose grease
• Grease gun
NOTE:
• Some items in the list may be included in the tool
package as standard accessories. They may differ
from country to country.

17
УКРАЇНСЬКА (Оригінальні інструкції)
Пояснення до загального виду
1-1. Кнопка блокування вимкненого
положення
1-2. Кнопка вимикача
3-1. Натиснути
3-2. Послабити
3-3. Кришка зірочки
3-4. Диск для регулювання
4-1. Зірочка
5-1. Регулююча шпилька
6-1. Скоба
6-2. Отвір
6-3. Отвір малого розміру
7-1. Натиснути
7-2. Затягнути
7-3. Послабити
8-1. Важіль
9-1. Натиснути
9-2. Послабити
10-1. Повільно
10-2. Швидко
10-3. Диск для регулювання
10-4. Шина
10-5. Ланцюгова пила
11-1. Натиснути
11-2. Затягнути
14-1. Кришка
для заливання мастила
15-1. Повільно
15-2. Швидко
15-3. Диск для регулювання
15-4. Шина
15-5. Ланцюгова пила
16-1. Кнопка блокування вимкненого
положення
16-2. Кнопка вимикача
17-1. Захисна огорожа для рук
17-2. Блокувати
17-3. Розблокувати
18-1. Оглядове скло
19-1. Зубчаста планка
23-1. Дільниця пиляння дерев
26-1. Напрямок ваління лісу
26-2. Зона небезпеки
26-3. Маршрут аварійного відходу
34-1. Напрямний жолоб для мастила
34-2. Отвір для заливання мастила
35-1. Зірочка
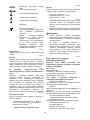
ТЕХНІЧНІ ХАРАКТЕРИСТИКИ
Модель UC3020A UC3520A UC4020A
Максимальна швидкість ланцюга (м/с) 13,3
Довжина різання 300 мм 350 мм 400 мм
Тип 90SG
Ланцюгова пила
Крок 3/8"
Мастильний насос Автоматичний
Об'єм бака для мастила (л) 0,20
Електропостачання Прямо
Гальма ланцюга Ручний
Інерційне гальмо Механічний
Загальна довжина (без шини) 436 мм
Чиста вага 4,3 кг 4,4 кг
Подовжувач (додатково) DIN 57282/HO 7RN -F L=30 м макс., 3x1,5 мм
2
• Через те, що ми не припиняємо програми досліджень і розвитку, наведені тут технічні характеристики можуть бути змінені
без попередження.
• У різних країнах технічні характеристики можуть бути різними.
• Вага відповідно до EPTA-Procedure 01/2003
END218-5
Умовне позначення
Далі наведені символи, які застосовуються для
позначення обладнання. Перед користуванням
переконайтеся, що Ви розумієте їхнє значення.
・ Уважно прочитайте посібник та
завжди дотримуйтесь попереджень
та інструкцій з техніки безпеки..
・ Вдягайте засоби захисту очей.
・ Вдягайте засоби захисту слуху.
・ ПОДВІЙНА ІЗОЛЯЦІЯ
・ Обережно: потребує особливої уваги
та обережності!
・
обережно: негайно витягніть
штепсель із сіті у разі пошкодження
кабелю.
・ Обережно: можлива віддача!
・ Обов'язково захищайте від дощу та
вологи!
・ Обов'язково одягай шолом, окуляри
та засоби захисту органів слуху!
・ Одягни захисні рукавиці!

18
・ Вимкніть штепсель із сіті!
・ Перша допомога
・ Максимальна допустима довжина
прорізу
・ Напрямок пересування ланцюга
・ Мастило для ланцюга
・ Гальмо ланцюга відпущено
・ Гальмо ланцюга натиснуто
・ Заборонено!
・ Тільки для країн ЄС
Не викидайте електроприлади разом
із побутовим сміттям!
Згідно з Європейською директивою
2012/19/EU про утилізацію
електричного
та електронного
обладнання і з її використанням із
дотриманням національних законів,
електричне обладнання, термін
служби якого закінчився, слід
збирати в окремо відведених місцях і
повертати на відповідні підприємства
з його переробки.
ENE031-1
Призначення
Інструмент призначено для різання пиломатеріалу та
колод.
ENF002-2
Джерело живлення
Інструмент можна підключати лише до джерела
живлення, що має напругу, зазначену в табличці із
заводськими характеристиками, і він може
працювати лише від однофазного джерела змінного
струму. Він має подвійну ізоляцію, а отже може також
підключатися до розеток без дроту заземлення.
ENF100-1
Для використання від низьковольтної мережі від
220В до 250 В.
Увімкнення та вимкнення електричного приладу
спричиняє до коливання напруги. Експлуатація цього
пристрою за несприятливих умов мережі може
погано вплинути на роботу іншого обладнання.
Можна припустити, що при опорі мережі 0,35 Ом або
нижче, ніякого негативного впливу не буде. Мережна
розетка, до якої
буде підключатися пристрій,
повинна буди захищена запобіжником або захисним
автоматичним вимикачем плавного розчіплювання.
ENG905-1
Шум
Рівень шуму за шкалою А у типовому виконанні,
визначений відповідно до EN60745:
Рівень звукового тиску (L
pA
): 89 дБ(A)
Рівень акустичної потужності (L
WA
): 100 дБ(A)
Похибка (K) : 1 дБ(A)
Користуйтеся засобами захисту слуху
ENG900-1
Вібрація
Загальна величина вібрації (сума трьох векторів)
визначена згідно з EN60745:
Режим роботи: пиляння деревини
Вібрація (a
h
) : 3,8 м/с
2
Похибка (К): 1,5 м/с
2
ENG901-1
•
Заявлене значення вібрації було виміряно у
відповідності до стандартних методів
тестування та може використовуватися для
порівняння одного інструмента з іншим.
• Заявлене значення вібрації може також
використовуватися для попередньої оцінки
впливу.
УВАГА:
• Залежно від умов використання вібрація під час
фактичної роботи інструмента може
відрізнятися від заявленого значення вібрації.
• Забезпечте належні запобіжні заходи для
захисту оператора, що відповідатимуть умовам
використання інструмента (слід брати до уваги
всі складові робочого циклу, такі як час, коли
інструмент вимкнено та коли він починає
працювати на холостому ході під час запуску).
ENH026-6
Тільки для країн Європи
Декларація про відповідність стандартам
ЄС
Наша компанія, Makita Corporation, як
відповідальний виробник, наголошує на тому, що
обладнання Makita:
Позначення обладнання:
Ланцюгова пила
№ моделі / тип: UC3020A, UC3520A, UC4020A
Технічні характеристики: див. Таблицю "ТЕХНІЧНІ
ХАРАКТЕРИСТИКИ".
є серійним виробництвом та
Відповідає таким Європейським Директивам:
2000/14/EC, 2006/42/EC
Та вироблені у відповідності до таких стандартів та
стандартизованих документів:
EN60745

19
№ сертифіката ЄС на проведення типових
випробувань.M6A 12 10 26932 045
Огляд за вимогами ЄС на відповідність 98/37/EC та
2006/42/EC був проведений:
TÜV SÜD Product Service GmbH,
Ridlerstraße 65, 80339 MÜNCHEN, Germany
Ідентифікаційний № 0123
Технічна документація ведеться:
Makita International Europe Ltd.
Technical Department,
Michigan Drive, Tongwell,
Milton Keynes, Bucks MK15 8JD, Англія
Процедура оцінки відповідності, яка вимагається
Директивою 2000/14/EC, відбулася згідно з додатком
додатку V.
Виміряний рівень акустичної потужності: 100,0дБ (A)
Гарантований рівень акустичної потужності: 101,0дБ
(A)
7.11.2012
000230
Tomoyasu Kato
Директор
Makita Corporation
3-11-8, Sumiyoshi-cho,
Anjo, Aichi, 446-8502, ЯПОНІЯ
GEA010-1
Застереження стосовно техніки
безпеки при роботі з
електроприладами
УВАГА! Прочитайте усі застереження
стосовно техніки безпеки та всі інструкції.
Недотримання даних застережень та інструкцій
може призвести до ураження струмом та виникнення
пожежі та/або серйозних травм.
Збережіть усі інструкції з техніки
безпеки та експлуатації на майбутнє.
GEB037-6
Попередження про необхідну
обережність під час роботи з
ланцюговою пилою
1. Коли ланцюгова пила працює, слід забрати
усі частини тіла від пильного ланцюга.
Перед тим, як запускати ланцюгову пилу
слід перевірити, щоб пильний ланцюг
нічого не торкався. Відволікання на короткий
час під час роботи пили може призвести до
того, що одяг буде затягнено пильним
ланцюгом.
2. Слід завжди тримати ланцюгову пилу
правою рукою за задню ручку, а лівою – за
передню. Якщо пилу тримати по-іншому, то це
підвищує ризик травм, тому цього ніколи
неможна робити.
3. Електроінструмент слід тримати тільки за
ізольовані поверхні держака, оскільки
ланцюг пили може зачепити сховану
електропроводку або шнур пили. Торкання
ланцюгом пили струмоведучої проводки може
призвести
до передання напруги до оголених
металевих частин електроінструмента та до
ураження оператора електричним струмом.
4. Слід одягати засоби захисту органів зору
та слуху. Також рекомендується
використовувати засоби захисту голови,
рук, ніг та ступнів. Належний захисний одяг
знижує кількість травм від сміття. Що
розлітається, або від випадкового контакту з
пильним ланцюгом.
5.
Заборонено користуватись пилою,
знаходячись на дереві. Робота із пилою на
дереві може призвести до травм.
6. Слід завжди твердо стояти на ногах, та
працювати пилою стоячи на стійкій,
надійній та рівній поверхні. Робота на
слизьких або нестійких поверхнях, таких як
драбини, може призвести до втрати рівноваги
та контролю над пилою.
7.
Під час різання гілки, що знаходиться під на
тяжінням, слід остерігатись відскоку.
Коли
натяг волокон деревини знімається, то
натягнута гілка може вдарити оператора та/або
відкинути пилу із втратою контролю над нею.
8. Слід бути дуже обережнім під час
обрізання кущів та порості. Гнучкі гілки
можуть бути затягнені в пильний ланцюг та їх
може потягнути у напрямку до оператора, або
оператора може потягнути, і він втратить
рівновагу.
9. Ланцюгову пилу слід переносити за
передню ручку у вимкненому стані,
відвернувши її від тіла. Під
час
перевезення або зберігання пили на неї
слід завжди встановлювати кожух для
шини. Вірне поводження із ланцюговою пилою
знизить вірогідність випадкового контакту із
пильним ланцюгом, що рухається.
10. Виконуйте вимоги інструкцій щодо
змащування, натягу ланцюга та заміни
приналежностей. Невірно натягнута або
змащена пила може або зламатись, або буде
підвищено ризик
віддачі.
11. Ручки повинні бути сухими, чистими та не
бути забрудненими мастило або жиром.
Жирні або забруднені мастилом ручки є
слизькими, що призводить до втрати контролю
над інструментом.

20
12. Можна різати тільки деревину. Пильний
ланцюг слід застосовувати тільки за їх
призначенням. Наприклад: Заборонено
використовувати ланцюгову пилу для
різання пластика або не дерев’яні
будівельні матеріали. Використання
ланцюгової пили не за призначенням може
призвести до створення небезпечної ситуації.
13. Причини та заходи запобігання віддачі:
Якщо кінець шини торкається якогось предмета
,
або коли дерев’яна деталь закривається та
защипає ланцюг в пропилі, може трапитись
віддача.
Торкання кінцем в деяких випадках може
призвести до раптової зворотної реакції, коли
шину буде підкинуто догори та назад в
напрямку оператора.
Затискання пильного ланцюга у верхній частині
шини може призвести то різкого штовхання
шини в напрямку
оператора.
Будь-яка з цих реакцій може призвести до
втрати контролю над пилою, що в свою чергу
може призвести до серйозних травм. Не слід
суцільно покладатись на засоби безпеки,
встановлені на пилі. Як користувач ланцюгової
пили, ви повинні вжити декілька заходів, щоб
захиститись від нещасних випадків або
поранень під час пиляння
.
Причинами віддачі є неправильне користування
інструментом та/або неправильний порядок
експлуатації або умови експлуатації, але їх
можна уникнути дотримуючись запобіжних
заходів, що наведені нижче:
− Слід міцно тримати інструмент обома
руками таким чином, щоб великий
палець та інші пальці руки обгортали
ручки ланцюгової пили, та
розташовувати своє тіло та руки
так,
щоб була можливість утриматись у разі
віддачі. Силу віддачі може контролювати
користувач, за умови, що було вжито
належних запобіжних заходів. Заборонено
відпускати ланцюгову пилу.
006908
− Ніколи не слід тягнутися інструментом
до робочої деталі та різати вище рівня
плеча. Дотримання цих правил допоможе
уникнути непередбачуваного контакту з
ріжучою частиною пили та дозволить
краще контролювати ланцюгову пилу у
непередбачуваних ситуаціях.
− Використовувати слід тільки запасні
шини та ланцюги, вказані виробником.
Використання невідповідних запасних шин
та ланцюгів
може призвести до поломки
ланцюга та/або віддачі.
− Слід дотримуватись інструкцій
виробника щодо заточування та
обслуговування пили. Зменшення
висоти калібру глибини може призвести до
посилення віддачі.
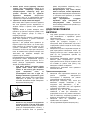
ДОДАТКОВІ ПРАВИЛА
БЕЗПЕКИ
1. Слід уважно прочитати ці інструкції для того,
щоб ознайомитись з принципом роботи
ланцюгової пили.
2. Перед користуванням ланцюгової пили у
перший раз, здобудьте інструкції з її
експлуатації. Якщо це неможливо, слід хоча б
потренуватися різати колоди на козлах перед
початком роботи.
3. Забороняється дітям та підліткам молодше 18
років користуватися ланцюговою пилою.
Цю
заборону може бути знято з юнаків старше 16
років під час проходження практики під
наглядом майстра.
4. Користування ланцюговою пилою потребує
високого рівня зосередженості. Не слід
користуватися пилою, якщо ви почуваєте себе
не готовими до роботи. Всю роботу слід
виконувати спокійно та обережно.
5. Забороняється працювати після прийняття
алкоголю або ліків.
Правильне використання
1. Ланцюгова пила призначена виключно для
різання деревини. Забороняється
застосовувати її наприклад для різання
пластмаси або пористого бетону.
2. Використовуй ланцюгову пилу тільки для
виконання операцій, зазначених у цих
інструкціях. Слід здійснювати , а не ,
наприклад, користайся нею для підрізання
огорожі або для подібної мети.
3. Ланцюгову пилу не слід використовувати у
лісівництві, а саме для звалювання та
розрізування стоячого лісу. Кабель ланцюгової
пили не забезпечує оператора рухливістю та
безпекою, які необхідні для такої роботи.
4. Ланцюгова пила не призначена для
промислового застосування.
5. Не слід перенавантажувати ланцюгову пилу.
Pagina se încarcă...
Pagina se încarcă...
Pagina se încarcă...
Pagina se încarcă...
Pagina se încarcă...
Pagina se încarcă...
Pagina se încarcă...
Pagina se încarcă...
Pagina se încarcă...
Pagina se încarcă...
Pagina se încarcă...
Pagina se încarcă...
Pagina se încarcă...
Pagina se încarcă...
Pagina se încarcă...
Pagina se încarcă...
Pagina se încarcă...
Pagina se încarcă...
Pagina se încarcă...
Pagina se încarcă...
Pagina se încarcă...
Pagina se încarcă...
Pagina se încarcă...
Pagina se încarcă...
Pagina se încarcă...
Pagina se încarcă...
Pagina se încarcă...
Pagina se încarcă...
Pagina se încarcă...
Pagina se încarcă...
Pagina se încarcă...
Pagina se încarcă...
Pagina se încarcă...
Pagina se încarcă...
Pagina se încarcă...
Pagina se încarcă...
Pagina se încarcă...
Pagina se încarcă...
Pagina se încarcă...
Pagina se încarcă...
Pagina se încarcă...
Pagina se încarcă...
Pagina se încarcă...
Pagina se încarcă...
Pagina se încarcă...
Pagina se încarcă...
Pagina se încarcă...
Pagina se încarcă...
Pagina se încarcă...
Pagina se încarcă...
Pagina se încarcă...
Pagina se încarcă...
Pagina se încarcă...
Pagina se încarcă...
Pagina se încarcă...
Pagina se încarcă...
Pagina se încarcă...
Pagina se încarcă...
Pagina se încarcă...
Pagina se încarcă...
Pagina se încarcă...
Pagina se încarcă...
Pagina se încarcă...
Pagina se încarcă...
Pagina se încarcă...
Pagina se încarcă...
Pagina se încarcă...
Pagina se încarcă...
Pagina se încarcă...
Pagina se încarcă...
Pagina se încarcă...
Pagina se încarcă...
Pagina se încarcă...
Pagina se încarcă...
Pagina se încarcă...
Pagina se încarcă...
Pagina se încarcă...
Pagina se încarcă...
Pagina se încarcă...
Pagina se încarcă...
Pagina se încarcă...
Pagina se încarcă...
Pagina se încarcă...
Pagina se încarcă...
Pagina se încarcă...
Pagina se încarcă...
Pagina se încarcă...
Pagina se încarcă...
Pagina se încarcă...
Pagina se încarcă...
Pagina se încarcă...
Pagina se încarcă...
-
 1
1
-
 2
2
-
 3
3
-
 4
4
-
 5
5
-
 6
6
-
 7
7
-
 8
8
-
 9
9
-
 10
10
-
 11
11
-
 12
12
-
 13
13
-
 14
14
-
 15
15
-
 16
16
-
 17
17
-
 18
18
-
 19
19
-
 20
20
-
 21
21
-
 22
22
-
 23
23
-
 24
24
-
 25
25
-
 26
26
-
 27
27
-
 28
28
-
 29
29
-
 30
30
-
 31
31
-
 32
32
-
 33
33
-
 34
34
-
 35
35
-
 36
36
-
 37
37
-
 38
38
-
 39
39
-
 40
40
-
 41
41
-
 42
42
-
 43
43
-
 44
44
-
 45
45
-
 46
46
-
 47
47
-
 48
48
-
 49
49
-
 50
50
-
 51
51
-
 52
52
-
 53
53
-
 54
54
-
 55
55
-
 56
56
-
 57
57
-
 58
58
-
 59
59
-
 60
60
-
 61
61
-
 62
62
-
 63
63
-
 64
64
-
 65
65
-
 66
66
-
 67
67
-
 68
68
-
 69
69
-
 70
70
-
 71
71
-
 72
72
-
 73
73
-
 74
74
-
 75
75
-
 76
76
-
 77
77
-
 78
78
-
 79
79
-
 80
80
-
 81
81
-
 82
82
-
 83
83
-
 84
84
-
 85
85
-
 86
86
-
 87
87
-
 88
88
-
 89
89
-
 90
90
-
 91
91
-
 92
92
-
 93
93
-
 94
94
-
 95
95
-
 96
96
-
 97
97
-
 98
98
-
 99
99
-
 100
100
-
 101
101
-
 102
102
-
 103
103
-
 104
104
-
 105
105
-
 106
106
-
 107
107
-
 108
108
-
 109
109
-
 110
110
-
 111
111
-
 112
112


Makita UC3020A Manual de utilizare
- Categorie
- Ferăstraie cu lanț electric
- Tip
- Manual de utilizare
în alte limbi
- slovenčina: Makita UC3020A Používateľská príručka
- polski: Makita UC3020A Instrukcja obsługi
Lucrări înrudite
Alte documente
-
Skil 0780 AT Manual de utilizare
-
Hikoki DH 36DL Manual de utilizare
-
Graphite 58G034 Manualul proprietarului
-
Ryobi 5133001250 Manual de utilizare
-
 EGO Power CS1610E Manual de utilizare
-
GGP ITALY CS 24 Li Instrucțiuni de utilizare
-
Defort DEC-2046N Manual de utilizare
-
Defort DEC-1646N Manualul proprietarului
-
-
Alpina Garden AC38 Instrucțiuni de utilizare
