Makita BUC122 Manual de utilizare
- Categorie
- Ferăstraie cu lanț electric
- Tip
- Manual de utilizare

1
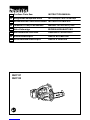
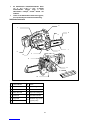
GB Cordless Chain Saw INSTRUCTION MANUAL
UA Бездротова ланцюгова пила ІНСТРУКЦІЯ З ЕКСПЛУАТАЦІЇ
PL
Akumulatorowa Pilarka Łańcuchowa
INSTRUKCJA OBSŁUGI
RO Ferăstrău cu lanţ cu acumulator MANUAL DE INSTRUCŢIUNI
DE Akku-Kettensäge BEDIENUNGSANLEITUNG
HU Akkumulátoros láncfűrész HASZNÁLATI KÉZIKÖNYV
SK Ručná reťazová píla NÁVOD NA OBSLUHU
CZ Akumulátorová řetězová pila NÁVOD K OBSLUZE
BUC121
BUC122


5
ENGLISH (Original instructions)
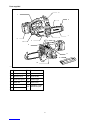
Explanation of general view
1-1. Red indicator
1-2. Button
1-3. Battery cartridge
2-1. Star marking
3-1. Lock-off button
3-2. Switch trigger
4-1. Sprocket cover
4-2. Knob
5-1. Cutter
5-2. Guide bar
5-3. Arrow
6-1. Spring
6-2. Sprocket
7-1. Spring
7-2. Guide bar
8-1. Sprocket cover
8-2. Hook
8-3. Hole
12-1. Oil tank cap
12-2. Oil inspection window
12-3. Oil tank opening
13-1. Tip guide
14-1. Lower guide
18-1. Battery cartridge
18-2. Scabbard (chain cover)
23-1. Push nut
23-2. Slotted bit screwdriver
24-1. Filter
26-1. Filter
27-1. Push nut
28-1. Sprocket
28-2. Locking ring
29-1. Locking ring
29-2. Sprocket
29-3. Washer
30-1. Limit mark
31-1. Brush holder cap
31-2. Screwdriver
SPECIFICATIONS
Model BUC121 BUC122
Chain speed per minute (min-1) 4.8 m/s (290 m/min) 5.0 m/s (300 m/min)
Length of guide bar 115 mm
Type 25 AP
Pitch 1/4"
Saw chain
No. of drive links 42
Overall length 422 mm 422 mm
Net weight 2.5 kg 2.6 kg
Rated voltage D.C. 14.4 V D.C. 18 V
• Due to our continuing program of research and development, the specifications herein are subject to change without notice.
• Specifications and battery cartridge may differ from country to country.
• Weight, with battery cartridge, according to EPTA-Procedure 01/2003
END015-2
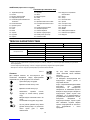
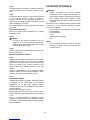
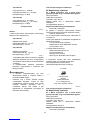
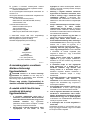
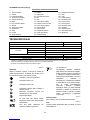
Symbols
The following show the symbols used for the equipment.
Be sure that you understand their meaning before use.
・ Read instruction manual.
・ Wear eye protection.
・ Wear ear protection.
・ Wear a helmet, goggles and ear
protection.
・ Use appropriate protection for foot-leg
and hand-arm.
・ Do not expose to rain.
・ Hold the saw with both hands while
working! One-handed use is extremely
hazardous!
・ This saw is to be used by properly
trained operators only.
・ Only for EU countries
Do not dispose of electric equipment or
battery pack together with household
waste material!
In observance of European Directive
2012/19/EU on waste electric and
electronic equipment, 2006/66/EC on
batteries and accumulators and waste
batteries and accumulators and their
implementation in accordance with
national laws, electric equipment and
battery pack that have reached the end
of their life must be collected separately
and returned to an environmentally
compatible recycling facility.
ENE031-2
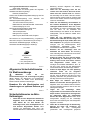
Intended use
The tool is intended for cutting branches.
ENG905-1
Noise
The typical A-weighted noise level determined
according to EN60745:
Model BUC121
Sound pressure level (LpA) : 84 dB(A)
Sound power level (LWA) : 92 dB(A)
Uncertainty (K) : 2 dB(A)
Cd
Ni-MH
Li-ion

6
Model BUC122
Sound pressure level (LpA) : 84.6 dB(A)
Sound power level (LWA) : 92.7 dB(A)
Uncertainty (K) : 2 dB(A)
Wear ear protection
ENG900-1
Vibration
The vibration total value (tri-axial vector sum)
determined according to EN60745:
Model BUC121
Work mode : cutting wood
Vibration emission (ah) : 4.2 m/s2
Uncertainty (K) : 1.5 m/s2
Model BUC122
Work mode : cutting wood
Vibration emission (ah) : 4.3 m/s2
Uncertainty (K) : 1.5 m/s2
ENG901-1
• The declared vibration emission value has been
measured in accordance with the standard test
method and may be used for comparing one tool
with another.
• The declared vibration emission value may also be
used in a preliminary assessment of exposure.
WARNING:
• The vibration emission during actual use of the
power tool can differ from the declared emission
value depending on the ways in which the tool is
used.
• Be sure to identify safety measures to protect the
operator that are based on an estimation of
exposure in the actual conditions of use (taking
account of all parts of the operating cycle such as
the times when the tool is switched off and when it
is running idle in addition to the trigger time).
ENH026-6
For European countries only
EC Declaration of Conformity
We Makita Corporation as the responsible
manufacturer declare that the following Makita
machine(s):
Designation of Machine:
Cordless Chain Saw
Model No./ Type: BUC121
Specifications: see "SPECIFICATIONS" table.
are of series production and
Conforms to the following European Directives:
2000/14/EC, 2006/42/EC
And are manufactured in accordance with the following
standards or standardised documents:
EN60745, EN/ISO11681
The EC-Type Examination Certificate No.M6T 09 10
24243 110
The EC-Type Examination per 98/37/EC and
2006/42/EC was performed by:
TÜV SÜD Product Service GmbH,
Ridlerstraße 65, 80339 MÜNCHEN, Germany
Identification No. 0123
The technical documentation is kept by:
Makita International Europe Ltd.
Technical Department,
Michigan Drive, Tongwell,
Milton Keynes, Bucks MK15 8JD, England
The conformity assessment procedure required by
Directive 2000/14/EC was in Accordance with annex V.
Measured Sound Power Level: 92.0dB (A)
Guaranteed Sound Power Level: 94.0dB (A)
4.11.2009
000230
Tomoyasu Kato
Director
Makita Corporation
3-11-8, Sumiyoshi-cho,
Anjo, Aichi, 446-8502, JAPAN
ENH026-6
For European countries only
EC Declaration of Conformity
We Makita Corporation as the responsible
manufacturer declare that the following Makita
machine(s):
Designation of Machine:
Cordless Chain Saw
Model No./ Type: BUC122
Specifications: see "SPECIFICATIONS" table.
are of series production and
Conforms to the following European Directives:
2000/14/EC, 2006/42/EC
And are manufactured in accordance with the following
standards or standardised documents:
EN60745, EN/ISO11681
The EC-Type Examination Certificate No.M6T 09 10
24243 110
The EC-Type Examination per 98/37/EC and
2006/42/EC was performed by:
TÜV SÜD Product Service GmbH,
Ridlerstraße 65, 80339 MÜNCHEN, Germany
Identification No. 0123
The technical documentation is kept by:
Makita International Europe Ltd.
Technical Department,
Michigan Drive, Tongwell,
Milton Keynes, Bucks MK15 8JD, England

7
The conformity assessment procedure required by
Directive 2000/14/EC was in Accordance with annex V.
Measured Sound Power Level: 93.0dB (A)
Guaranteed Sound Power Level: 95.0dB (A)
4.11.2009
000230
Tomoyasu Kato
Director
Makita Corporation
3-11-8, Sumiyoshi-cho,
Anjo, Aichi, 446-8502, JAPAN
GEA010-1
General Power Tool Safety
Warnings
WARNING Read all safety warnings and all
instructions. Failure to follow the warnings and
instructions may result in electric shock, fire and/or
serious injury.
Save all warnings and instructions for
future reference.
GEB039-2
Cordless Chain saw safety
warnings:
1. Keep all parts of the body away from the saw
chain when the chain saw is operating. Before
you start the chain saw, make sure the saw
chain is not contacting anything. A moment of
inattention while operating chain saws may cause
entanglement of your clothing or body with the
saw chain.
2. Always hold the chain saw with your right
hand on the rear handle and your left hand on
the front handle. Holding the chain saw with a
reversed hand configuration increases the risk of
personal injury and should never be done.
3. Hold the power tool by insulated gripping
surfaces only, because the saw chain may
contact hidden wiring. Saw chains contacting a
"live" wire may make exposed metal parts of the
power tool "live" and could give the operator an
electric shock.
4. Wear safety glasses and hearing protection.
Further protective equipment for head, hands,
legs and feet is recommended. Adequate
protective clothing will reduce personal injury by
flying debris or accidental contact with the saw
chain.
5. Do not operate a chain saw in a tree. Operation
of a chain saw while up in a tree may result in
personal injury.
6. Always keep proper footing and operate the
chain saw only when standing on fixed,
secure and level surface. Slippery or unstable
surfaces such as ladders may cause a loss of
balance or control of the chain saw.
7. When cutting a limb that is under tension be
alert for spring back. When the tension in the
wood fibres is released the spring loaded limb
may strike the operator and/or throw the chain
saw out of control.
8. Use extreme caution when cutting brush and
saplings. The slender material may catch the
saw chain and be whipped toward you or pull you
off balance.
9. Carry the chain saw by the front handle with
the chain saw switched off and away from
your body. When transporting or storing the
chain saw always fit the guide bar cover.
Proper handling of the chain saw will reduce the
likelihood of accidental contact with the moving
saw chain.
10. Follow instructions for lubricating, chain
tensioning and changing accessories.
Improperly tensioned or lubricated chain may
either break or increase the chance for kickback.
11. Keep handles dry, clean, and free from oil and
grease. Greasy, oily handles are slippery causing
loss of control.
12. Cut wood only. Do not use chain saw for
purposes not intended. For example: do not
use chain saw for cutting plastic, masonry or
non-wood building materials. Use of the chain
saw for operations different than intended could
result in a hazardous situation.
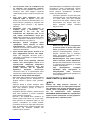
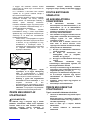
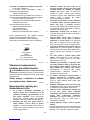
13. Causes and Operator Prevention of Kickback:
Kickback may occur when the nose or tip of the
guide bar touches an object, or when the wood
closes in and pinches the saw chain in the cut.
Tip contact in some cases may cause a sudden
reverse reaction, kicking the guide bar up and
back towards the operator.
Pinching the saw chain along the top of the guide
bar may push the guide bar rapidly back towards
the operator.
Either of these reactions may cause you to lose
control of the saw which could result in serious
personal injury. Do not rely exclusively upon the
safety devices built into your saw. As a chain saw
user, you should take several steps to keep your
cutting jobs free from accident or injury.
Kickback is the result of tool misuse and/or
incorrect operating procedures or conditions and
can be avoided by taking proper precautions as
given below:
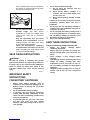
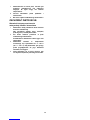
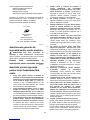
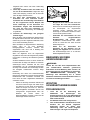
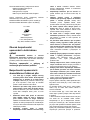
− Maintain a firm grip, with thumbs and fingers
encircling the chain saw handles, with both
hands on the saw and position your body
and arm to allow you to resist kickback

8
forces. Kickback forces can be controlled by
the operator, if proper precautions are taken.
Do not let go of the chain saw.
001743
− Do not overreach and do not cut above
shoulder height. This helps prevent
unintended tip contact and enables better
control of the chain saw in unexpected
situations.
− Only use replacement bars and chains
specified by the manufacturer. Incorrect
replacement bars and chains may cause
chain breakage and/or kickback.
− Follow the manufacturer’s sharpening
and maintenance instructions for the saw
chain. Decreasing the depth gauge height
can lead to increased kickback.
SAVE THESE INSTRUCTIONS.
WARNING:
DO NOT let comfort or familiarity with product
(gained from repeated use) replace strict adherence
to safety rules for the subject product. MISUSE or
failure to follow the safety rules stated in this
instruction manual may cause serious personal
injury.
ENC007-7
IMPORTANT SAFETY
INSTRUCTIONS
FOR BATTERY CARTRIDGE
1. Before using battery cartridge, read all
instructions and cautionary markings on (1)
battery charger, (2) battery, and (3) product
using battery.
2. Do not disassemble battery cartridge.
3. If operating time has become excessively
shorter, stop operating immediately. It may
result in a risk of overheating, possible burns
and even an explosion.
4. If electrolyte gets into your eyes, rinse them
out with clear water and seek medical
attention right away. It may result in loss of
your eyesight.
5. Do not short the battery cartridge:
(1) Do not touch the terminals with any
conductive material.
(2) Avoid storing battery cartridge in a
container with other metal objects such
as nails, coins, etc.
(3) Do not expose battery cartridge to water
or rain.
A battery short can cause a large current flow,
overheating, possible burns and even a
breakdown.
6. Do not store the tool and battery cartridge in
locations where the temperature may reach or
exceed 50 ゚C (122 ゚F).
7. Do not incinerate the battery cartridge even if
it is severely damaged or is completely worn
out. The battery cartridge can explode in a fire.
8. Be careful not to drop or strike battery.
9. Do not use a damaged battery.
SAVE THESE INSTRUCTIONS.
Tips for maintaining maximum battery life
1. Charge the battery cartridge before
completely discharged.
Always stop tool operation and charge the
battery cartridge when you notice less tool
power.
2. Never recharge a fully charged battery
cartridge.
Overcharging shortens the battery service life.
3. Charge the battery cartridge with room
temperature at 10 ゚C - 40 ゚C (50 ゚F - 104 ゚F).
Let a hot battery cartridge cool down before
charging it.
4. Charge the battery cartridge once in every six
months if you do not use it for a long period
of time.


10
FUNCTIONAL DESCRIPTION
CAUTION:
• Always be sure that the tool is switched off and the
battery cartridge is removed before adjusting or
checking function on the tool.
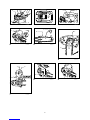
Installing or removing battery cartridge
Fig.1
CAUTION:
• Always switch off the tool before installing or
removing of the battery cartridge.
•
Hold the tool and the battery cartridge firmly when
installing or removing battery cartridge.
Failure to
hold the tool and the battery cartridge firmly may cause
them to slip off your hands and result in damage to the
tool and battery cartridge and a personal injury.
To remove the battery cartridge, slide it from the tool
while sliding the button on the front of the cartridge.
To install the battery cartridge, align the tongue on the
battery cartridge with the groove in the housing and slip
it into place. Insert it all the way until it locks in place
with a little click. If you can see the red indicator on the
upper side of the button, it is not locked completely.
CAUTION:
• Always install the battery cartridge fully until the
red indicator cannot be seen. If not, it may
accidentally fall out of the tool, causing injury to
you or someone around you.
• Do not install the battery cartridge forcibly. If the
cartridge does not slide in easily, it is not being
inserted correctly.
Battery protection system (Lithium-ion
battery with star marking)
Fig.2
Lithium-ion batteries with a star marking are equipped
with a protection system. This system automatically cuts
off power to the tool to extend battery life.
The tool will automatically stop during operation if the
tool and/or battery are placed under one of the following
conditions:
• Overloaded:
The tool is operated in a manner that causes
it to draw an abnormally high current.
In this situation, release the trigger switch on
the tool and stop the application that caused
the tool to become overloaded. Then pull the
trigger switch again to restart.
If the tool does not start, the battery is
overheated. In this situation, let the battery
cool before pulling the trigger switch again.
• Low battery voltage:
The remaining battery capacity is too low
and the tool will not operate. In this situation,
remove and recharge the battery.
Switch action
CAUTION:
• Before inserting the battery cartridge into the tool,
always check to see that the switch trigger
actuates properly and returns to the "OFF"
position when released.
Fig.3
To prevent the switch trigger from being accidentally
pulled, a lock-off button is provided.
To start the tool, depress the lock-off button and pull the
switch trigger. Release the switch trigger to stop.
ASSEMBLY
CAUTION:
• Always be sure that the tool is switched off and the
battery cartridge is removed before carrying out
any work on the tool.
Installing or removing saw chain
CAUTION:
• Always be sure that the tool is switched off and the
battery cartridge is removed before installing or
removing the saw chain.
• Always wear gloves when installing or removing
the saw chain.
• Use only saw chain and guide bar with bar tip
designed for this chain saw (see the Extract from
the spare parts list).
• In order to prevent kickback, do not remove the
bar tip or replace the guide bar with one without a
bar tip.
Fig.4
Loosen the screw by turning counterclockwise the knob
until the sprocket cover comes off.
Remove the sprocket cover.
Remove saw chain and guide bar from the tool.
Fig.5
Fit in one end of the saw chain on the top of guide bar.
At this time, fit the saw chain as shown in the figure
because it rotates in the direction of arrow.
Fig.6
Place the saw chain so that the spring is positioned
inside it and fit in the other end of saw chain around the
sprocket as shown in the figure.
Fig.7
While turning the guide bar counterclockwise, install it
so that the end of guide bar contacts the spring.
Fig.8
Insert the hook of sprocket cover into the hole in the tool
and then place the sprocket cover on the tool.
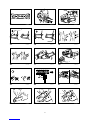
Fig.9
Turn the knob clockwise to tighten the screw firmly.

11
Adjusting saw chain tension
Fig.10
Just a slight loosening of the screw allows the saw
chain tension to be adjusted. After adjusting, retighten
the screw firmly.
Fig.11
CAUTION:
• For a while after a new saw chain is installed, it
tends to become loosened. From time to time
check the saw chain tension before use.
• Low tension of saw chain may cause coming out
of place.
• Installing or removing saw chain should be carried
out in a clean place free from sawdust and the like.
OPERATION
Lubrication
Fig.12
Saw chain is automatically lubricated when the tool is in
operation.
Check the amount of remaining oil in the oil tank
through the oil inspection window.
To refill the tank, remove the cap from the oil tank
opening. The oil tank capacity is 80 ml.
After refilling the tank, always screw the provided oil
tank cap on the chain saw.
CAUTION:
• When filling the chain saw with chain oil for the
first time, or refilling the tank after it has been
completely emptied, add oil up to the bottom edge
of the filler neck. The oil delivery may otherwise be
impaired.
• As a saw chain oil, use oil exclusively for Makita
chain saws or oil available in market.
• Never use oil including dust and particles or
volatile oil.
• When pruning trees, use botanical oil. Mineral oil
may harm trees.
• Never force the chain saw when pruning trees.
• Before cutting out, make sure that the provided oil
tank cap is screwed in place.
Hold the chain saw away from the tree. Start it and wait
until lubrication on saw chain is adequate.
Bring the tip guide/lower guide into contact with the
branch to be cut before switching on. Cutting without
bringing the tip guide/lower guide into contact with the
branch may cause the guide bar to wobble, resulting in
injury to operator.
Saw the wood to be cut by just moving it down.
Pruning trees
Fig.13
Fig.14
CAUTION:
• Keep all parts of the body away from the saw
chain when the motor is operating.
• Hold the chain saw firmly with both hands when
the motor is running.
• Do not overreach. Keep proper footing and
balance at all times.
Bring the tip guide/lower guide into contact with the
branch to be cut before switching on. Cutting without
bringing the tip guide/lower guide into contact with the
branch may cause the guide bar to wobble, resulting in
injury to operator.
When cutting thick branches, first make a shallow
undercut and then make the finish cut from the top.
Fig.15
If you try to cut off thick branches from the bottom, the
branch may close in and pinch the saw chain in the cut.
If you try to cut off thick branches from the top without a
shallow undercut, the branch may splinter.
Fig.16
If you cannot cut the timber right through with a single
stroke:
Apply light pressure to the handle and continue sawing
and draw the chain saw back a little; then apply the
spike a little lower and finish the cut by raising the
handle.
Fig.17
Carrying tool
Fig.18
Always remove the battery cartridge from the tool and
overlap the guide bar with the scabbard before carrying
the tool. Also cover the battery cartridge with the battery
cover.
MAINTENANCE
CAUTION:
• Always be sure that the tool is switched off and the
battery cartridge is removed before attempting to
perform inspection or maintenance.
• Always wear gloves when performing any
inspection or maintenance.
• Never use gasoline, benzine, thinner, alcohol or
the like. Discoloration, deformation or cracks may
result.
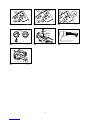
Sharpening the saw chain
CAUTION:
•
Always remove the battery cartridge and wear safety
gloves when performing work on the saw chain.
Fig.19

12
Sharpen the saw chain when:
− Mealy sawdust is produced when damp wood is
cut;
− The chain penetrates the wood with difficulty, even
when heavy pressure is applied;
− The cutting edge is obviously damaged;
− The saw pulls to the left or right in the wood. The
reason for this behaviour is uneven sharpening of
the saw chain, or damage to one side only.
Sharpen the saw chain frequently, but remove only
a little material each time.
Two or three strokes with a file are usually sufficient for
routine resharpening. When the saw chain has been
resharpened several times, have it sharpened in a
MAKITA specialist repair shop.
File and file guiding
− Use a special round file (optional accessory) for
saw chains, with a diameter of 4 mm, to sharpen
the chain. Normal round files are not suitable.
Fig.20
− The file should only engage the material on the
forward stroke. Lift the file off the material on the
return stroke.
− Sharpen the shortest cutter first. The length of this
cutter is then the gauge dimension for all other
cutters on the saw chain.
− Guide the file as shown in the figure.
− The file can be guided more easily if a file holder
(accessory) is employed. The file holder has
markings for the correct sharpening angle of 30 °
(align the markings parallel to the saw chain) and
limits the depth of penetration (to 4/5 of the file
diameter).
Guide the file as shown in the figure.
− After sharpening the chain, check the height of the
depth gauge using the chain gauge tool (optional
accessory).
Fig.21
− Remove any projecting material, however small,
with a special flat file (optional accessory).
− Round off the front of the depth gauge again.
− Wash away dust and particles from saw chain
after adjusting the height of depth gauge.
Cleaning guide bar
Fig.22
Chips and sawdust will build up in the guide bar groove,
clogging it and impairing oil flow. Always clean out the
chips and sawdust when sharpening or replacing the
saw chain.
Cleaning the oil filter at the oil discharge hole
Small dust or particles may be built up in the oil filter at
the oil discharge hole during operation.
Small dust or particles built up in the oil filter may impair
the oil discharge flow and cause an insufficient
lubrication on the whole saw chain.
When a poor chain oil delivery occurs at the top of
guide bar, clean the filter as follows.
Remove the battery cartridge from the tool.
Remove the sprocket cover and saw chain from the tool.
(Refer to the section titled " Installing or removing saw
chain ".)
Fig.23
Remove the push nut using a slotted bit screwdriver
with a slender shaft or the like.
Fig.24
Take the filter out of the chain saw and remove small
dust or particles from it. When the filter is too dirty,
replace it with a new one.
Insert the battery cartridge into the tool.
Fig.25
Pull the switch trigger to flow built-up dust or particles
off the oil discharge hole by discharging chain oil.
Remove the battery cartridge from the tool.
Fig.26
Insert the cleaned oil filter into the oil discharge hole.
When the filter is too dirty, replace it with a new one.
Fig.27
Insert the push nut with its correct side facing up as
shown in the figure into the oil discharge hole to secure
the filter. When the filter cannot be secured with a
disfigured push nut, replace the push nut with a new
one.
Reinstall the sprocket cover and saw chain on the tool.
Replacing the sprocket
Before fitting a new saw chain, check the condition of
the sprocket.
Fig.28
CAUTION:
• A worn sprocket will damage a new saw chain.
Have the sprocket replaced in this case. The
sprocket need to be installed so that it always
faces as shown in the figure.
Fig.29
Always fit a new locking ring when replacing the
sprocket.
Replacing carbon brushes
Fig.30
Remove and check the carbon brushes regularly.
Replace when they wear down to the limit mark. Keep
the carbon brushes clean and free to slip in the holders.
Both carbon brushes should be replaced at the same
time. Use only identical carbon brushes.
Use a screwdriver to remove the brush holder caps.
Take out the worn carbon brushes, insert the new ones
and secure the brush holder caps.
Fig.31

13
Storing tool
Clean the tool before storing. Remove any chips and
sawdust from the tool after removing the sprocket cover.
After cleaning the tool, run it under no load to lubricate
the saw chain and guide bar.
Cover the guide bar with the scabbard.
Remove oil from the oil tank to empty it and place the
chain saw with the tank cap facing upward.
To maintain product SAFETY and RELIABILITY, repairs,
any other maintenance or adjustment should be
performed by Makita Authorized Service Centers,
always using Makita replacement parts.
OPTIONAL ACCESSORIES
CAUTION:
• These accessories or attachments are
recommended for use with your Makita tool
specified in this manual. The use of any other
accessories or attachments might present a risk of
injury to persons. Only use accessory or
attachment for its stated purpose.
If you need any assistance for more details regarding
these accessories, ask your local Makita Service Center.
• Various type of Makita genuine batteries and
chargers
• Saw chain
• Scabbard
• Guide bar complete
• File
NOTE:
• Some items in the list may be included in the tool
package as standard accessories. They may differ
from country to country.

14
УКРАЇНСЬКА (Оригінальні інструкції)
Пояснення до загального виду
1-1. Червоний індикатор
1-2. Кнопка
1-3. Касета з акумулятором
2-1. Маркувальна зірочка
3-1. Кнопка блокування вимкненого
положення
3-2. Кнопка вимикача
4-1. Кришка зірочки
4-2. Ручка
5-1. Різак
5-2. Шина
5-3. Стрілка
6-1. Пружина
6-2. Зірочка
7-1. Пружина
7-2. Шина
8-1. Кришка зірочки
8-2. Скоба
8-3. Отвір
12-1. Кришечка мастильного бака
12-2. Оглядове вікно мастильного
бака
12-3. Отвір мастильного бака
13-1. Кінцева напрямна
14-1. Нижня напрямна
18-1. Касета з акумулятором
18-2. Піхви (чохол для пили)
23-1. Натискна гайка
23-2. Викрутка із шліцованим
наконечником
24-1. Фільтр
26-1. Фільтр
27-1. Натискна гайка
28-1. Зірочка
28-2. Стопорне кільце
29-1. Стопорне кільце
29-2. Зірочка
29-3. Шайба
30-1. Обмежувальна відмітка
31-1. Ковпачок щіткотримача
31-2. Викрутка
ТЕХНІЧНІ ХАРАКТЕРИСТИКИ
Модель BUC121 BUC122
Швидкість ланцюга за хвилину (хв.-1) 4,8 м/с (290 м/хв.) 5,0 м/с (300 м/хв.)
Довжина шини 115 мм
Тип 25 AP
Крок 1/4"
Ланцюгова пила
Кількість приводних ланок 42
Загальна довжина 422 мм 422 мм
Чиста вага 2,5 кг 2,6 кг
Номінальна напруга 14,4 В пост. Тока 18 В пост. Тока
• Через те, що ми не припиняємо програми досліджень і розвитку, наведені тут технічні характеристики можуть бути змінені
без попередження.
• Технічні характеристики приладу та касета з акумулятором можуть відрізнятися в різних країнах.
• Вага разом з касетою з акумулятором відповідно до EPTA-Procedure 01/2003
END015-2
Символи
Далі наведені символи, які застосовуються для
позначення обладнання. Перед користуванням
переконайтеся, що Ви розумієте їхнє значення.
・ Прочитайте дану інструкцію.
・ Вдягайте засоби захисту очей.
・ Вдягайте засоби захисту вух.
・ Обов'язково одягайте шолом,
окуляри та засоби захисту органів
слуху.
・ Використовуйте належний захист ніг
та рук.
・ Не залишайте інструмент під дощем.
・ Під час роботи тримайте пилу обома
руками! Експлуатація за допомогою
тільки однієї руки є вкрай
небезпечною!
・ Цю пилу може використовувати
тільки належним чином навчений
персонал.
・ Тільки для країн ЄС
Не викидайте електроприлади або
акумуляторні батареї разом із
побутовим сміттям!
Згідно з Європейськими директивами
2012/19/EU про утилізацію
електричного та електронного
обладнання та 2006/66/EC відносно
батарей та акумуляторів і батарей та
акумуляторів, термін служби яких
закінчився, та їх використанням із
дотриманням національних законів,
електричне обладнання та
акумуляторні батареї, термін служби
яких закінчився, потрібно збирати
окремо та відправляти на екологічно
чисті підприємства з їхньої
переробки.
Cd
Ni-MH
Li-ion

15
ENE031-2
Цільове використання
Інструмент призначено для обрізання гілок.
ENG905-1
Шум
Рівень шуму за шкалою А у типовому виконанні,
визначений відповідно до EN60745:
Модель BUC121
Рівень звукового тиску (LpA): 84 дБ(A)
Рівень акустичної потужності (LWA): 92 дБ(A)
Похибка (K) : 2 дБ(A)
Модель BUC122
Рівень звукового тиску (LpA): 84,6 дБ(A)
Рівень акустичної потужності (LWA): 92,7 дБ(A)
Похибка (K) : 2 дБ(A)
Користуйтеся засобами захисту слуху
ENG900-1
Вібрація
Загальна величина вібрації (сума трьох векторів)
визначена згідно з EN60745:
Модель BUC121
Режим роботи: пиляння деревини
Вібрація (ah) : 4,2 м/с2
Похибка (К): 1,5 м/с2
Модель BUC122
Режим роботи: пиляння деревини
Вібрація (ah) : 4,3 м/с2
Похибка (К): 1,5 м/с2
ENG901-1
• Заявлене значення вібрації було виміряно у
відповідності до стандартних методів
тестування та може використовуватися для
порівняння одного інструмента з іншим.
• Заявлене значення вібрації може також
використовуватися для попередньої оцінки
впливу.
УВАГА:
• Залежно від умов використання вібрація під час
фактичної роботи інструмента може
відрізнятися від заявленого значення вібрації.
• Забезпечте належні запобіжні заходи для
захисту оператора, що відповідатимуть умовам
використання інструмента (слід брати до уваги
всі складові робочого циклу, такі як час, коли
інструмент вимкнено та коли він починає
працювати на холостому ході під час запуску).
ENH026-6
Тільки для країн Європи
Декларація про відповідність стандартам
ЄС
Наша компанія, Makita Corporation, як
відповідальний виробник, наголошує на тому, що
обладнання Makita:
Позначення обладнання:
Бездротова ланцюгова пила
№ моделі / тип: BUC121
Технічні характеристики: див. Таблицю "ТЕХНІЧНІ
ХАРАКТЕРИСТИКИ".
є серійним виробництвом та
Відповідає таким Європейським Директивам:
2000/14/EC, 2006/42/EC
Та вироблені у відповідності до таких стандартів та
стандартизованих документів:
EN60745, EN/ISO11681
№ сертифіката ЄС на проведення типових
випробувань.M6T 09 10 24243 110
Огляд за вимогами ЄС на відповідність 98/37/EC та
2006/42/EC був проведений:
TÜV SÜD Product Service GmbH,
Ridlerstraße 65, 80339 MÜNCHEN, Germany
Ідентифікаційний № 0123
Технічна документація ведеться:
Makita International Europe Ltd.
Technical Department,
Michigan Drive, Tongwell,
Milton Keynes, Bucks MK15 8JD, Англія
Процедура оцінки відповідності, яка вимагається
Директивою 2000/14/EC, відбулася згідно з додатком
додатку V.
Виміряний рівень акустичної потужності: 92,0дБ (A)
Гарантований рівень акустичної потужності: 94,0дБ
(A)
4.11.2009
000230
Tomoyasu Kato
Директор
Makita Corporation
3-11-8, Sumiyoshi-cho,
Anjo, Aichi, 446-8502, ЯПОНІЯ

16
ENH026-6
Тільки для країн Європи
Декларація про відповідність стандартам
ЄС
Наша компанія, Makita Corporation, як
відповідальний виробник, наголошує на тому, що
обладнання Makita:
Позначення обладнання:
Бездротова ланцюгова пила
№ моделі / тип: BUC122
Технічні характеристики: див. Таблицю "ТЕХНІЧНІ
ХАРАКТЕРИСТИКИ".
є серійним виробництвом та
Відповідає таким Європейським Директивам:
2000/14/EC, 2006/42/EC
Та вироблені у відповідності до таких стандартів та
стандартизованих документів:
EN60745, EN/ISO11681
№ сертифіката ЄС на проведення типових
випробувань.M6T 09 10 24243 110
Огляд за вимогами ЄС на відповідність 98/37/EC та
2006/42/EC був проведений:
TÜV SÜD Product Service GmbH,
Ridlerstraße 65, 80339 MÜNCHEN, Germany
Ідентифікаційний № 0123
Технічна документація ведеться:
Makita International Europe Ltd.
Technical Department,
Michigan Drive, Tongwell,
Milton Keynes, Bucks MK15 8JD, Англія
Процедура оцінки відповідності, яка вимагається
Директивою 2000/14/EC, відбулася згідно з додатком
додатку V.
Виміряний рівень акустичної потужності: 93,0дБ (A)
Гарантований рівень акустичної потужності: 95,0дБ (A)
4.11.2009
000230
Tomoyasu Kato
Директор
Makita Corporation
3-11-8, Sumiyoshi-cho,
Anjo, Aichi, 446-8502, ЯПОНІЯ
GEA010-1
Застереження стосовно техніки
безпеки при роботі з
електроприладами
УВАГА! Прочитайте усі застереження
стосовно техніки безпеки та всі інструкції.
Недотримання даних застережень та інструкцій
може призвести до ураження струмом та виникнення
пожежі та/або серйозних травм.
Збережіть усі інструкції з техніки
безпеки та експлуатації на майбутнє.
GEB039-2
Попередження про необхідну
обережність під час роботи з
акумуляторною ланцюговою
пилою:
1. Коли ланцюгова пила працює, слід забрати
усі частини тіла від пильного ланцюга.
Перед тим, як запускати ланцюгову пилу
слід перевірити, щоб пильний ланцюг
нічого не торкався. Відволікання на короткий
час під час роботи пили може призвести до
того, що одяг буде затягнено пильним
ланцюгом.
2. Слід завжди тримати ланцюгову пилу
правою рукою за задню ручку, а лівою – за
передню. Якщо пилу тримати по-іншому, то це
підвищує ризик травм, тому цього ніколи
неможна робити.
3. Електроінструмент слід тримати тільки за
ізольовані поверхні держака, оскільки
ланцюг пили може зачепити сховану
електропроводку. Торкання ланцюгом пили
струмоведучої проводки може призвести до
передання напруги до оголених металевих
частин електроінструмента та до ураження
оператора електричним струмом.
4. Слід одягати засоби захисту органів зору
та слуху. Також рекомендується
використовувати засоби захисту голови,
рук, ніг та ступнів. Належний захисний одяг
знижує кількість травм від сміття. Що
розлітається, або від випадкового контакту з
пильним ланцюгом.
5. Заборонено користуватись пилою,
знаходячись на дереві. Робота із пилою на
дереві може призвести до травм.
6. Слід завжди твердо стояти на ногах, та
працювати пилою стоячи на стійкій,
надійній та рівній поверхні. Робота на
слизьких або нестійких поверхнях, таких як
драбини, може призвести до втрати рівноваги
та контролю над пилою.

17
7. Під час різання гілки, що знаходиться під
на тяжінням, слід остерігатись відскоку.
Коли натяг волокон деревини знімається, то
натягнута гілка може вдарити оператора
та/або відкинути пилу із втратою контролю над
нею.
8. Слід бути дуже обережнім під час
обрізання кущів та порості. Гнучкі гілки
можуть бути затягнені в пильний ланцюг та їх
може потягнути у напрямку до оператора, або
оператора може потягнути, і він втратить
рівновагу.
9. Ланцюгову пилу слід переносити за
передню ручку у вимкненому стані,
відвернувши її від тіла. Під час
перевезення або зберігання пили на неї
слід завжди встановлювати кожух для
шини. Вірне поводження із ланцюговою пилою
знизить вірогідність випадкового контакту із
пильним ланцюгом, що рухається.
10. Виконуйте вимоги інструкцій щодо
змащування, натягу ланцюга та заміни
приналежностей. Невірно натягнута або
змащена пила може або зламатись, або буде
підвищено ризик віддачі.
11. Ручки повинні бути сухими, чистими та не
бути забрудненими мастило або жиром.
Жирні або забруднені мастилом ручки є
слизькими, що призводить до втрати контролю
над інструментом.
12. Можна різати тільки деревину. Пильний
ланцюг слід застосовувати тільки за їх
призначенням. Наприклад: Заборонено
використовувати ланцюгову пилу для
різання пластика або не дерев’яні
будівельні матеріали. Використання
ланцюгової пили не за призначенням може
призвести до створення небезпечної ситуації.
13. Причини та заходи запобігання віддачі:
Якщо кінець шини торкається якогось предмета,
або коли дерев’яна деталь закривається та
защипає ланцюг в пропилі, може трапитись
віддача.
Торкання кінцем в деяких випадках може
призвести до раптової зворотної реакції, коли
шину буде підкинуто догори та назад в
напрямку оператора.
Затискання пильного ланцюга у верхній частині
шини може призвести то різкого штовхання
шини в напрямку оператора.
Будь-яка з цих реакцій може призвести до
втрати контролю над пилою, що в свою чергу
може призвести до серйозних травм. Не слід
суцільно покладатись на засоби безпеки,
встановлені на пилі. Як користувач ланцюгової
пили, ви повинні вжити декілька заходів, щоб
захиститись від нещасних випадків або
поранень під час пиляння.
Причинами віддачі є неправильне користування
інструментом та/або неправильний порядок
експлуатації або умови експлуатації, але їх
можна уникнути дотримуючись запобіжних
заходів, що наведені нижче:
− Слід міцно триматись за ручки пили усіма
пальцями обох рук, та розташовувати своє
тіло таким чином, щоб було можливо
протистояти силі віддачі. Оператор може
контролювати силу віддачі, якщо було
вжито належних заходів. Неможна
відпускати пилу.
001743
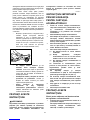
− Ніколи не слід тягнутися інструментом
до робочої деталі та різати вище рівня
плеча. Дотримання цих правил допоможе
уникнути непередбачуваного контакту з
ріжучою частиною пили та дозволить
краще контролювати ланцюгову пилу у
непередбачуваних ситуаціях.
− Використовувати слід тільки запасні
шини та ланцюги, вказані виробником.
Використання невідповідних запасних шин
та ланцюгів може призвести до поломки
ланцюга та/або віддачі.
− Слід дотримуватись інструкцій
виробника щодо заточування та
обслуговування пили. Зменшення
висоти калібру глибини може призвести до
посилення віддачі.
ЗБЕРІГАЙТЕ ЦІ ВКАЗІВКИ.
УВАГА:
НІКОЛИ НЕ СЛІД втрачати пильності та
розслаблюватися під час користування виробом
(що приходить при частому використанні); слід
завжди строго дотримуватися правил безпеки
під час використання цього пристрою.
НЕНАЛЕЖНЕ ВИКОРИСТАННЯ або недотримання
правил безпеки, викладених в цьому документі,
може призвести до серйозних травм.

18
ENC007-7
ВАЖЛИВІ ІНСТРУКЦІЇ БЕЗПЕКИ
ДЛЯ КАСЕТИ АКУМУЛЯТОРА
1. Перед тим як користуватися касетою
акумулятора, слід прочитати усі інструкції
та попереджуючі відмітки щодо (1)
зарядний пристрій акумулятора, (2)
акумулятор та (3) вироби, що працюють від
акумулятора.
2. Не слід розбирати касету акумулятора.
3. Якщо період роботи дуже покоротшав, слід
негайно припинити користування. Це може
призвести до ризику перегріву, опіку та
навіть вибуху.
4. Якщо електроліт потрапив до очей, слід
промити їх чистою водою та негайно
звернутися за медичного закладу. Це може
призвести до втрати зору.
5. Не замкніть касету акумулятора.
(1) Не слід торкатися клем будь яким
струмопровідним матеріалом.
(2) Не слід зберігати касету акумулятора в
ємності з іншими металевими
предметами, такими як цвяхи, монети і
т.д.
(3) Не виставляйте касету з батареєю під
дощ чи сніг.
Коротке замикання може призвести до
появи значного струму, перегріву та
можливим опікам та навіть поломки.
6. Не слід зберігати інструмент та касету з
акумулятором в містах, де температура
може сягнути та перевищити 50гр.゚C (122 ゚
F).
7. Не слід спалювати касету з акумулятором
навіть, якщо вона була неодноразово
пошкоджена або повністю спрацьована.
Касета з акумулятором може вибухнути в
огні.
8. Не слід кидати або ударяти акумулятор.
9. Не слід використовувати пошкоджений
акумулятор.
ЗБЕРІГАЙТЕ ЦІ ВКАЗІВКИ.
Поради по забезпеченню максимального
строку експлуатації акумулятора
1. Касету з акумулятором слід заряджати до
того, як він розрядиться повністю.
Завжди слід зупинити роботу інструменту
та зарядити акумулятор, якщо ви помітили
зменшення потужності інструменту.
2. Ніколи не слід заряджати повторно
повністю заряджену касету з акумулятором.
Перезарядження скорочує строк
експлуатації акумулятора.
3. Касету з акумулятором слід заряджати при
кімнатній температурі 10 ゚C - 40 ゚C (50 ゚F -
104 ゚F). Перед тим як заряджати касету з
акумулятором слід залишити її доки вона
не остигне.
4. Заряджайте касету з акумулятором кожні
шість місяців, якщо не використовуєте її
протягом тривалого часу.

19
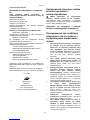
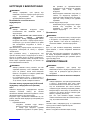
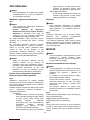
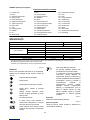
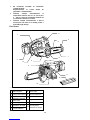
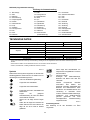
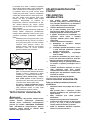
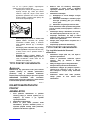
Запчастини, що поставляються
1
2
3
4
56
7
8
9
10
11
12
13
008588
1
2
3
4
5
7
8
9
10
11
12
6
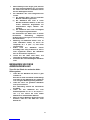
Верхня ручка
Касета з акумулятором
Кришка зірочки
Передня захисна
огорожа для рук
Шина
Кожух наконечника
Ланцюгова пила
Ручка
Кнопка блокування
вимкненого положення
Кнопка вимикача
Передня ручка
Кришка ланцюга
13
Місце для закріплення
карабіна або мотузки
008589

20
ІНСТРУКЦІЯ З ВИКОРИСТАННЯ
ОБЕРЕЖНО:
• Завжди перевіряйте, щоб прилад був
вимкнений, а касета з акумулятором була знята,
перед регулюванням або перевіркою
функціонування інструмента.
Встановлення та зняття касети з
акумулятором.
мал.1
ОБЕРЕЖНО:
• Завжди вимикайте інструмент перед
встановленням або зніманням касети з
акумулятором.
• Під час встановлення або зняття касети з
акумулятором надійно утримуйте
інструмент і касету з акумулятором. Інакше
інструмент або касета з акумулятором можуть
вислизнути з рук, що може призвести до травм
або пошкодження інструмента й касети з
акумулятором.
Щоб зняти касету з акумулятором, слід витягнути її з
інструмента, натиснувши на кнопку в передній
частині касети.
Щоб установити касету з акумулятором, слід
сумістити шпонку касети з акумулятором із пазом у
корпусі та вставити касету на місце. Уставляйте її,
доки не почуєте клацання. Якщо на верхній частині
кнопки видно червоний індикатор, це означає, що
вона заблокована не повністю.
ОБЕРЕЖНО:
• Завжди уставляйте касету повністю, аж поки
червоний індикатор стане невидимим. Якщо
цього не зробити, касета може випадково
випасти з інструмента та завдати травми вам
або людям, що знаходяться поруч.
• Не встановлюйте касету з акумулятором із
зусиллям. Якщо касета не вставляється легко,
то це означає, що Ви її невірно вставляєте.
Система захисту акумулятора (літій-іонний
акумулятор з маркувальною зірочкою)
мал.2
Літій-іонні акумулятори з маркувальною зірочкою
оснащені системою захисту. Ця система
автоматично вимикає живлення інструмента з метою
збільшення робочого часу акумулятора.
Інструмент буде автоматично вимкнений під час
роботи, якщо він та/або акумулятор знаходитимуться
в таких умовах:
• Перенавантаження:
Інструмент споживає струм занадто
високої потужності під час роботи.
У такому разі відпустіть курковий
перемикач інструмента та зупиніть роботу,
яка призвела до перенавантаження
інструмента. Потім натисніть на курковий
перемикач, щоб знову запустити
інструмент.
Якщо інструмент неможливо запустити, це
означає, що акумулятор перегрівся. У
такому разі дайте акумулятору охолонути,
перш ніж знову натиснути на курковий
перемикач.
• Низька напруга акумулятора:
Залишковий ресурс акумулятора занадто
низький, тому інструмент не буде
працювати. У такому разі зніміть та
зарядіть акумулятор.
Дія вимикача.
ОБЕРЕЖНО:
• Перед тим, як вставляти касету з акумулятором
в інструмент, слід перевірити належну роботу
курка вмикача, тобто щоб він повертався у
положення "ВИМК.", коли його відпускають.
мал.3
Для того, щоб запобігти випадковому натисканню
курка вмикача, є кнопка блокування вимкненого
положення.
Для того, щоб запустити інструмент, слід натиснути
на кнопку блокування вимкненого положення та
натиснути на курок вмикача. Для зупинення роботи
курок слід відпустити.
КОМПЛЕКТУВАННЯ
ОБЕРЕЖНО:
• Завжди перевіряйте, щоб прилад був
вимкнений, а касета з акумулятором була знята,
перед тим, як проводити будь-які роботи на
інструменті.
Встановлення та зняття пильного ланцюга
ОБЕРЕЖНО:
•
Завжди перевіряйте, щоб прилад був вимкнений,
а касета з акумулятором була знята, перед
встановленням або зняттям пильного ланцюга.
• Під час встановлення або зняття пильного
ланцюга на руки повинні бути вдягнені рукавиці.
• Використовуйте тільки шину та наконечник, які
підходять для даного пильного ланцюга (див.
виписку з переліку запчастин).
• Для того, щоб запобігти віддачі, неможна
знімати наконечник шини, або заміняти шину на
таку, що не має наконечника.
мал.4
Послабте гвинт, повернувши ручку по годинниковій
стрілці, доки не зніметься кришка зірочки.
Зніміть кришку зірочки.
Зніміть з інструмента пильний ланцюг та шину.
Pagina se încarcă...
Pagina se încarcă...
Pagina se încarcă...
Pagina se încarcă...
Pagina se încarcă...
Pagina se încarcă...
Pagina se încarcă...
Pagina se încarcă...
Pagina se încarcă...
Pagina se încarcă...
Pagina se încarcă...
Pagina se încarcă...
Pagina se încarcă...
Pagina se încarcă...
Pagina se încarcă...
Pagina se încarcă...
Pagina se încarcă...
Pagina se încarcă...
Pagina se încarcă...
Pagina se încarcă...
Pagina se încarcă...
Pagina se încarcă...
Pagina se încarcă...
Pagina se încarcă...
Pagina se încarcă...
Pagina se încarcă...
Pagina se încarcă...
Pagina se încarcă...
Pagina se încarcă...
Pagina se încarcă...
Pagina se încarcă...
Pagina se încarcă...
Pagina se încarcă...
Pagina se încarcă...
Pagina se încarcă...
Pagina se încarcă...
Pagina se încarcă...
Pagina se încarcă...
Pagina se încarcă...
Pagina se încarcă...
Pagina se încarcă...
Pagina se încarcă...
Pagina se încarcă...
Pagina se încarcă...
Pagina se încarcă...
Pagina se încarcă...
Pagina se încarcă...
Pagina se încarcă...
Pagina se încarcă...
Pagina se încarcă...
Pagina se încarcă...
Pagina se încarcă...
Pagina se încarcă...
Pagina se încarcă...
Pagina se încarcă...
Pagina se încarcă...
Pagina se încarcă...
Pagina se încarcă...
Pagina se încarcă...
Pagina se încarcă...
-
 1
1
-
 2
2
-
 3
3
-
 4
4
-
 5
5
-
 6
6
-
 7
7
-
 8
8
-
 9
9
-
 10
10
-
 11
11
-
 12
12
-
 13
13
-
 14
14
-
 15
15
-
 16
16
-
 17
17
-
 18
18
-
 19
19
-
 20
20
-
 21
21
-
 22
22
-
 23
23
-
 24
24
-
 25
25
-
 26
26
-
 27
27
-
 28
28
-
 29
29
-
 30
30
-
 31
31
-
 32
32
-
 33
33
-
 34
34
-
 35
35
-
 36
36
-
 37
37
-
 38
38
-
 39
39
-
 40
40
-
 41
41
-
 42
42
-
 43
43
-
 44
44
-
 45
45
-
 46
46
-
 47
47
-
 48
48
-
 49
49
-
 50
50
-
 51
51
-
 52
52
-
 53
53
-
 54
54
-
 55
55
-
 56
56
-
 57
57
-
 58
58
-
 59
59
-
 60
60
-
 61
61
-
 62
62
-
 63
63
-
 64
64
-
 65
65
-
 66
66
-
 67
67
-
 68
68
-
 69
69
-
 70
70
-
 71
71
-
 72
72
-
 73
73
-
 74
74
-
 75
75
-
 76
76
-
 77
77
-
 78
78
-
 79
79
-
 80
80


Makita BUC122 Manual de utilizare
- Categorie
- Ferăstraie cu lanț electric
- Tip
- Manual de utilizare
în alte limbi
- slovenčina: Makita BUC122 Používateľská príručka
- polski: Makita BUC122 Instrukcja obsługi
Lucrări înrudite
-
Makita UC010G Cordless Chain Saw Manual de utilizare
-
Makita DUC305 Manual de utilizare
-
-
Makita DUC306 Manual de utilizare
-
Makita UC4020A Manual de utilizare
-
-
-
-
Makita EA3201S Original Instruction Manual
-
Makita DCS232T Manual de utilizare
Alte documente
-
Hikoki CS3630DC Manual de utilizare
-
GGP ITALY CS 24 Li Instrucțiuni de utilizare
-
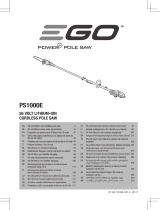 EGO Power PS1000E Manual de utilizare
-
Alpina Garden MT24Li Instrucțiuni de utilizare
-
Worx EC-P115 Manualul proprietarului
-
-
Powerworks PD60PS Manualul proprietarului
-
 EDELRID Switch Adjust Sling Instrucțiuni de utilizare

