Graphite 58G034 Manualul proprietarului
- Categorie
- Ferăstraie cu lanț fără fir
- Tip
- Manualul proprietarului

0

1
INSTRUKCJA OBSŁUGI ...................................................................................................................... 4
INSTRUCTION MANUAL ................................................................................................................... 12
BETRIEBSANLEITUNG ..................................................................................................................... 16
РУКОВОДСТВО ПО ЭКСПЛУАТАЦИИ........................................................................................... 21
ІНСТРУКЦІЯ З ЕКСПЛУАТАЦІЇ ........................................................................................................ 27
HASZNÁLATI UTASÍTÁS .................................................................................................................. 32
INSTRUCTIUNI DE DESERVIRE ....................................................................................................... 36
INSTRUKCE K OBSLUZE .................................................................................................................. 41
NÁVOD NA OBSLUHU ...................................................................................................................... 45
NAVODILA ZA UPORABO ................................................................................................................ 50
APTARNAVIMO INSTRUKCIJA......................................................................................................... 54
LIETOŠANAS INSTRUKCIJA ............................................................................................................ 59
KASUTUSJUHENDI ........................................................................................................................... 63
ИНСТРУКЦИЯ ЗА ОБСЛУЖВАНЕ ................................................................................................... 67
UPUTE ZA UPOTREBU ..................................................................................................................... 73
UPUTSTVO ZA UPOTREBU .............................................................................................................. 77
ΟΔΗΓΙΕΣ ΧΡΗΣΗΣ ............................................................................................................................. 81
INSTRUCCIONES DE USO ................................................................................................................ 87
MANUALE PER L’USO ...................................................................................................................... 92
GEBRUIKSAANWIJZING ................................................................................................................... 97

2

3

4
ORYGINALNA
INSTRUKCJA OBSŁUGI
(TŁUMACZENIE)
PILARKA ŁAŃCUCHOWA AKUMULATOROWA
58G034
UWAGA! PRZED PRZYSTĄPIENIEM DO UŻYTKOWANIA
ELEKTRONARZĘDZIA NALEŻY UWAŻNIE PRZECZYTAĆ
NINIEJSZĄ INSTRUKCJĘ I ZACHOWAĆ JĄ DO DALSZEGO
WYKORZYSTANIA.
SZCZEGÓŁOWE PRZEPISY BEZPIECZEŃSTWA
SZCZEGÓŁOWE WARUNKI BEZPIECZEŃSTWA DLA
AKUMULATOROWYCH PILAREK ŁAŃCUCHOWYCH
OSTRZEŻENIE! Podczas używania pilarki należy przestrzegać
przepisów bezpieczeństwa. Dla bezpieczeństwa własnego i
osób postronnych prosi się o przeczytanie niniejszej instrukcji
przed rozpoczęciem pracy pilarką. Prosi się o zachowanie
instrukcji w celu późniejszego wykorzystania.
Ostrzeżenia bezpieczeństwa dla pilarki łańcuchowej:
• Podczas pracy pilarki nie wolno zbliżać żadnej części ciała do
łańcucha pilarki. Przed uruchomieniem pilarki upewnij się, że
łańcuch nie dotyka żadnego przedmiotu. Chwila nieuwagi podczas
pracy pilarki może być przyczyną zaczepienia łańcuchem o odzież
lub części ciała.
• Pilarkę należy zawsze trzymać w taki sposób, aby prawa dłoń
znajdowała się na uchwycie tylnym a lewa - na uchwycie przednim.
Trzymanie pilarki łańcuchowej z odwrotnym ułożeniem dłoni
powoduje ryzyko obrażeń ciała i jest niedopuszczalne.
• Należy stosować okulary ochronne i środki ochrony słuchu.
Zaleca się stosowanie dodatkowego sprzętu zabezpieczającego
głowę, dłonie, nogi i stopy. Odpowiednia odzież ochronna ogranicza
ryzyko obrażeń ciała na skutek latających fragmentów materiału lub
przypadkowego dotknięcia łańcucha pilarki.
• Nie wolno używać pilarki łańcuchowej na drzewie. Użycie pilarki
łańcuchowej przez operatora znajdującego się na drzewie może
być przyczyną obrażeń ciała.
• Operator musi zawsze stać stabilnie na podłożu i może używać
pilarki tylko wtedy, gdy stoi na nieruchomej, bezpiecznej i równej
powierzchni. Stojąc na śliskim lub niestabilnym podłożu, na
przykład na drabinie, operator może utracić równowagę lub kontrolę
nad pilarką.
• Podczas cięcia gałęzi, w których występują naprężenia, należy
uważać na możliwość ich odbicia. W chwili uwolnienia naprężenia
we włóknach drewna, gałąź może uderzyć operatora lub
spowodować utratę kontroli nad pilarką.
• Szczególną ostrożność należy zachować podczas cięcia krzewów
oraz młodych drzewek. Giętkie elementy mogą zawadzić o pilarkę i
uderzyć operatora, powodując utratę równowagi.
• Pilarkę należy przenosić po jej wyłączeniu, trzymając ją za przedni
uchwyt i z daleka od ciała. Podczas transportu i przechowywania
pilarki łańcuchowej należy zawsze zamontować pokrywę
prowadnicy. Prawidłowe obchodzenie się z pilarką umożliwia
ograniczenie prawdopodobieństwa przypadkowego kontaktu
z poruszającym się łańcuchem.
• Należy postępować zgodnie z instrukcjami smarowania,
naciągania łańcucha i wymiany akcesoriów. Nieprawidłowo
naciągnięty lub nasmarowany łańcuch może zerwać się lub
podnieść ryzyko odrzutu.
• Uchwyty pilarki powinny być suche, czyste i niezanieczyszczone
olejem lub smarem. Tłuste i zanieczyszczone olejem uchwyty mogą
być przyczyną utraty kontroli nad pilarką.
• Pilarka służy wyłącznie do cięcia drewna. Nie wolno używać
pilarki niezgodnie z jej przeznaczeniem. Na przykład nie wolno
używać pilarki do cięcia plastiku oraz materiałów budowlanych
wykonanych z innych materiałów niż drewno. Użycie pilarki
łańcuchowej do celów niezgodnych z jej przeznaczeniem może być
przyczyną niebezpiecznych sytuacji.
Przyczyny i sposoby zapobiegania odrzutu:
Odrzut może wystąpić w czasie zaciśnięcia i zakleszczenia
łańcucha w wycięciu.
Bezpieczeństwo użycia zwiększa osłona zabezpieczająca przed
odrzutem znajdująca się na czubku prowadnicy, ograniczając
możliwość dotknięcia czubkiem prowadnicy ciętego materiału, co
zabezpiecza przed odrzutem.
Zakleszczenie łańcucha pilarki po górnej stronie prowadnicy może
spowodować szybki odrzut prowadnicy w stronę operatora.
Może nastąpić utrata kontroli nad pilarką co może prowadzić do
poważnych obrażeń ciała. Nie należy polegać wyłącznie na
urządzeniach zabezpieczających pilarki. Użytkownik ma obowiązek
wykonania kilku działań w celu uniknięcia wypadków i obrażeń ciała
podczas pracy.
Odrzut jest wynikiem nieprawidłowego używania pilarki lub
nieprawidłowych procedur lub warunków pracy i można go uniknąć
przez podjęcie następujących działań:
• Pilarkę należy trzymać mocno dłońmi, z kciukami i palcami
mocno zaciśniętymi na uchwytach pilarki, trzymając
urządzenie obiema rękami i ustawiając ciało i ręce tak, aby
ograniczyć działanie siły odrzutu. Siła odrzutu może być
kontrolowana przez operatora pod warunkiem wykonanie
odpowiednich działań zaradczych. Pilarki łańcuchowej nie wolno
wypuszczać.
• Nie należy sięgać pilarką zbyt daleko, ani wykonywać cięcia
na wysokości wyższej niż wysokość ramion. Dzięki temu
możliwe jest uniknięcie niezamierzonego dotknięcia końcem pilarki
oraz lepsza kontrola pilarki w niespodziewanych sytuacjach.
• Należy stosować wyłącznie prowadnice i łańcuchy określone
przez producenta. Wymiana prowadnic i łańcuchów na
nieodpowiednie może prowadzić do zerwania łańcucha lub odrzutu.
• Należy postępować zgodnie z instrukcjami producenta
dotyczącymi ostrzenia i obsługi technicznej pilarki
łańcuchowej.
Dodatkowe wskazówki dotyczące bezpieczeństwa:
• Trzymaj pilarkę wyłącznie za izolowane uchwyty ze względu na
to, że łańcuch pilarki może dotknąć niewidocznego przewodu
elektrycznego. Dotknięcie łańcuchem pilarki do przewodu pod
napięciem może spowodować pojawienie się napięcia na
odsłoniętych częściach narzędzia i porażenie operatora prądem
elektrycznym.
• Pilarka służy do wykonywania cięć pielęgnacyjnych w
przydomowym ogrodzie. Przeznaczona jest do obcinania lub
przeżynania gałęzi. Urządzenie nie jest przeznaczone do ścinki
drzew.
Praca
• Należy zachować szczególną ostrożność pod koniec przecinania
gdyż pilarka nie mając oporu w postaci materiału ciętego opada siłą
bezwładności, co może być przyczyną urazów.
• Podczas długotrwałej pracy u operatora może wystąpić zjawisko
mrowienia bądź odrętwienia palców i dłoni. Należy wówczas
zaprzestać pracy gdyż odrętwienie zmniejsza precyzję
w posługiwaniu się pilarką.
• W czasie pracy pilarka znacznie się nagrzewa, należy być
ostrożnym i nie dotykać nieosłoniętymi częściami ciała gorących
elementów pilarki.
• Pilarkę może obsługiwać jednocześnie wyłącznie jedna osoba.
Wszystkie inne osoby i zwierzęta powinny znajdować się z dala od
obszaru działania pilarki łańcuchowej.
• Podczas uruchamiania pilarki łańcuch tnący nie może być oparty
o materiał przeznaczony do cięcia.
• Pilarką nie mogą posługiwać się dzieci lub osoby młodociane.
Pilarkę można powierzać wyłącznie osobom dorosłym, które
wiedzą jak się nią posługiwać. Udostępniając pilarkę łańcuchową
należy udostępniać także niniejszą instrukcję obsługi.
• Jeśli pojawią się objawy zmęczenia, należy natychmiast
zaprzestać pracy pilarką łańcuchową.
• Przy cięciu tarcicy lub cienkich konarów należy stosować podporę
(koziołek).
• Nie wolno ciąć kilku desek jednocześnie (ułożonych jedna na
drugiej), materiału trzymanego przez drugą osobę czy też
przytrzymywanego nogą.

5
• Długie elementy przecinane powinny być odpowiednio
unieruchomione.
• W terenie pochyłym zawsze należy wykonywać cięcie stojąc
zwróconym w kierunku wierzchołka wzniesienia.
• Podczas przecinania na wskroś zawsze należy wykorzystywać
szpon przypory jako punkt podparcia. Trzymając pilarkę za uchwyt
tylny prowadzić za pomocą uchwytu przedniego.
• W przypadku braku możliwości wykonania cięcia za jednym
razem należy wysunąć pilarkę, przystawić szpon przypory i
kontynuować cięcie unosząc uchwyt tylny pilarki.
• Przy przecinaniu poziomym należy ustawić się pod kątem
najmniej odbiegającym od 90º względem linii cięcia. Przecinanie w
poziomie wymaga od operatora pilarki, dużej koncentracji.
• W przypadku zakleszczenia się łańcucha podczas przecinania
górną częścią łańcucha może wystąpić tzw. odrzut skierowany w
kierunku operatora. Z tego powodu tam gdzie to jest możliwe należy
dążyć do przecinania dolną częścią łańcucha gdyż wówczas przy
zakleszczeniu łańcucha efekt odrzutu zostanie skierowany w
kierunku od ciała operatora.
• Należy zachować szczególną uwagę przy przecinaniu drewna
rozłupującego się. Odcięte kawałki drewna mogą być odrzucane w
dowolnym kierunku (ryzyko uszkodzenia ciała!).
• Obcinanie gałęzi drzew powinno być wykonywane przez osoby
przeszkolone! Niekontrolowany upadek ściętej gałęzi drzewa
grozi ryzykiem uszkodzenia ciała!
• Uważać na pnie, które mogą staczać się ku operatorowi.
Odskoczyć!
• W czasie odrzutu pilarka zachowuje się w sposób
niekontrolowany, następuje poluzowanie łańcucha.
• Łańcuch niewłaściwie naostrzony zwiększa ryzyko wystąpienia
odrzutu.
• Podczas uruchamiania i pracy pilarkę należy trzymać obiema
rękami.
• Należy upewnić się czy materiał przecinany jest unieruchomiony
w sposób pewny.
• Korzystać z zacisków, aby unieruchomić materiał.
• Nigdy nie wolno jednocześnie przecinać więcej niż jedną gałąź.
Podczas odcinania zwrócić uwagę na gałęzie sąsiadujące.
Konserwacja i przechowywanie
• Utrzymywać w należytym stanie wszystkie podzespoły, aby być
pewnym, że pilarka będzie bezpiecznie pracować.
• Wymieniać w celu zachowania bezpieczeństwa zużyte lub
uszkodzone części.
• Chronić pilarkę przed wilgocią.
• Przechowywać poza zasięgiem dzieci.
UWAGA! Mimo zastosowania konstrukcji bezpiecznej z
samego założenia, stosowania środków zabezpieczających i
dodatkowych środków ochronnych, zawsze istnieje ryzyko
szczątkowe doznania urazów podczas pracy.
Objaśnienie zastosowanych piktogramów
1. UWAGA! Zachowaj szczególne środki ostrożności.
2. Przeczytaj instrukcję obsługi, przestrzegaj ostrzeżeń i warunków
bezpieczeństwa w niej zawartych!
3. Używaj środki ochrony osobistej (gogle ochronne, ochronniki
słuchu).
4. Używaj rękawic ochronnych.
5. Używaj odzieży ochronnej.
6. Nie dopuszczać dzieci do narzędzia.
7. Wyjmij akumulator z urządzenia przed przystąpieniem do
czynności związanych z regulacją lub czyszczeniem.
8. Urządzenie ogrodowe przeznaczone do pracy na zewnątrz
pomieszczeń.
9. Chroń urządzenie przed wilgocią.
10. Nie zbliżaj kończyn do elementów tnących!
11. Zagrożenie na skutek odrzutu.
12. Uwaga ryzyko skaleczenia dłoni, odcięcia palców.
13. Zachowaj bezpieczny odstęp od pracującego urządzenia
ogrodowego.
14. Recykling.
BUDOWA I ZASTOSOWANIE
Pilarka łańcuchowa akumulatorowa jest urządzeniem typu
ręcznego. Napęd stanowi silnik komutatorowy prądu stałego. Tego
typu elektronarzędzia są przeznaczone do wykonywania prac w
ogrodzie przydomowym. Pilarka może służyć do wykonywania cięć
pielęgnacyjnych drzew, obcinania gałęzi, przygotowywania drewna
opałowego, drewna do kominka i do innych zastosowań
wymagających przecinania drewna. Pilarka łańcuchowa
akumulatorowa jest elektronarzędziem przeznaczonym wyłącznie
do zastosowań amatorskich.
OSTRZEŻENIE! Urządzenie nie powinno być wykorzystywane
podczas ścinki drzew. Nie wolno używać urządzenia
niezgodnie z jego przeznaczeniem.
OPIS STRON GRAFICZNYCH
Poniższa numeracja odnosi się do elementów urządzenia
przedstawionych na stronach graficznych niniejszej instrukcji.
1. Łańcuch
2. Prowadnica
3. Dźwignia hamulca (przednia osłona dłoni)
4. Uchwyt przedni
5. Przycisk blokady włącznika
6. Włącznik
7. Rękojeść
8. Wskaźnik poziomu oleju
9. Korek wlewu oleju
10. Szpon przypory
11. Pokrętło mocowania prowadnicy
12. Pokrętło naciągu łańcucha
13. Pokrywa koła łańcuchowego
14. Osłona prowadnicy łańcucha
15. Zaczepy pokrywy
16. Sworzeń
17. Koło łańcuchowe
18. Kanał olejowy
* Mogą występować różnice między rysunkiem a wyrobem.
WYPOSAŻENIE I AKCESORIA
1. Prowadnica - 1 szt.
2. Łańcuch - 1 szt.
3. Osłona prowadnicy - 1 szt.
PRZYGOTOWANIE DO PRACY
PRZENOSZENIE PILARKI ŁAŃCUCHOWEJ
OSTRZEŻENIE! Przed przystąpieniem do przeniesienia pilarki
łańcuchowej należy zawsze odłączyć akumulator i nasunąć
osłonę prowadnicy łańcucha. Jeśli zachodzi potrzeba
wykonania kolejno kilku operacji przecinania, to pomiędzy
operacjami pilarka powinna być wyłączana za pomocą
włącznika.
MONTAŻ PROWADNICY I ŁAŃCUCHA PILARKI
UWAGA! Prowadnica łańcucha i łańcuch pilarki są
dostarczane osobno.

6
Pilarka łańcuchowa powinna być odłączona od źródła zasilania
(akumulatora).
Aby zapobiec skaleczeniu przez ostre krawędzie, przy
montowaniu łańcucha i sprawdzaniu łańcucha zawsze trzeba
mieć włożone rękawice ochronne.
OSTRZEŻENIE! Przed zmontowaniem prowadnicy z
łańcuchem należy sprawdzić właściwe usytuowanie ostrzy
tnących łańcucha (właściwe umieszczenie łańcucha na
prowadnicy pokazano strzałką na wierzchołku prowadnicy)
(rys. A).
• Przesunąć i zwolnić z zaczepu ruchomą część pokrętła
mocowania prowadnicy (11) (rys. B).
• Odciągnąć ruchomą część pokrętła i obracać w lewo luzując
docisk pokrętła mocowania prowadnicy (11) (rys. C).
• Zdjąć pokrywę koła łańcuchowego (13) wysuwając zaczepy
pokrywy (15) z otworów ustalających (rys. D).
• Przytrzymać pionowo prowadnicę (2) tak, aby jej wierzchołek był
zwrócony ku górze.
• Założyć łańcuch (1), poczynając od wierzchołka prowadnicy (2).
• Upewnić się czy łańcuch (1) znajduje się w rowku prowadzącym
prowadnicy (2).
• Założyć prowadnicę (2) z zamontowanym łańcuchem (1) na koło
łańcuchowe (17) (zwracając uwagę, aby sworzeń (16) znajdował
się w rowku pośrodku prowadnicy) (rys. E, F).
• Umieścić pokrywę koła łańcuchowego (13) wsuwając zaczepy
pokrywy (15) w otwory ustalające i lekko dokręcić pokrętło
mocowania prowadnicy (11).
NACIĄGANIE ŁAŃCUCHA PILARKI
Przy poluzowanym pokrętle mocowania prowadnicy (11) obracać
pokrętłem naciągu łańcucha (12)
• w prawo - celem naciągnięcia łańcucha.
• w lewo - celem poluzowania łańcucha.
• Sprawdzić naciąg łańcucha czy jest prawidłowy.
• Zabezpieczyć dokręcając pokrętło mocowania prowadnicy (11).
UWAGA! Nie można naciągnąć łańcucha nazbyt silnie.
Łańcuch pilarki powinien być tak naciągnięty, aby dało się go
unieść, w środku prowadnicy na wysokość około 5 mm (rys.
G).
Podczas pracy łańcuch pilarki rozgrzewa się, co powoduje jego
rozciągnięcie się i poluzowanie, a tym samym występuje
niebezpieczeństwo ześlizgnięcia z prowadnicy.
Regulacja przeprowadzona na silnie rozgrzanym łańcuchu może
doprowadzić do jego nadmiernego naciągnięcia w miarę stygnięcia.
UWAGA! Nowy łańcuch pilarki wymaga okresu rozruchu,
trwającego około 5 minut. Na tym etapie bardzo ważne jest
smarowanie łańcucha. Po okresie rozruchu sprawdzić naciąg
łańcucha i poprawić go, jeśli trzeba.
Dość często trzeba sprawdzać i regulować jego naciąg, gdyż
luźny łańcuch łatwo może spaść z prowadnicy, ulec szybkiemu
zużyciu lub spowodować szybkie zużycie prowadnicy.
ŚRODKI DO SMAROWANIA ŁAŃCUCHA
Trwałość łańcucha i prowadnicy pilarki w dużej mierze zależy od
jakości zastosowanego czynnika smarującego. Należy używać
wyłącznie środki smarujące przeznaczone dla pilarek
łańcuchowych.
OSTRZEŻENIE! Nigdy nie wolno stosować starego, zużytego
oleju do smarowania łańcucha pilarki.
NAPEŁNIANIE ZBIORNIKA OLEJEM DO SMAROWANIA
ŁAŃCUCHA
UWAGA! Nowa pilarka ma pusty zbiornik oleju. Przed użyciem
pilarki należy zbiornik napełnić olejem.
Aby zapobiec przedostaniu się brudu do wnętrza zbiornika należy
oczyścić korek wlewu oleju (9), przed jego odkręceniem.
• Podnieść ruchomą część pokrywy korka (rys. H) i odkręcić korek
wlewu oleju (9).
• Nalać dobrej jakości olej do zbiornika do momentu aż całe okienko
wskaźnika poziomu oleju (8) będzie wypełnione olejem (rys. I)
• Zbiornik oleju, po nalaniu oleju, należy zamknąć starannie
dokręcając korek wlewu oleju (9).
Podczas użytkowania pilarki kontrolować poziom oleju w zbiorniku,
spoglądając na wskaźnik poziomu oleju (8).
SMAROWANIE ŁAŃCUCHA
OSTRZEŻENIE! Aby zapobiec nadmiernemu zużyciu wskutek
tarcia łańcuch pilarki i prowadnica muszą być smarowane w
czasie pracy.
Nigdy nie wolno pracować pilarką, jeśli nie jest zapewnione
smarowanie wymienionych elementów. Gdy łańcuch porusza
się na sucho to szybko ulega poważnemu uszkodzeniu cały
mechanizm cięcia. Dlatego tak duże znaczenie ma sprawdzanie
smarowania łańcucha i kontrola poziomu oleju w czasie
użytkowania pilarki.
SPRAWDZENIE SMAROWANIA ŁAŃCUCHA
Smarowanie łańcucha i prowadnicy odbywa się automatycznie.
Przed rozpoczęciem pracy sprawdzić smarowanie łańcucha pilarki
i poziom oleju w zbiorniku.
• Włączyć pilarkę i trzymać ją nad ziemią
• Jeśli dadzą się zauważyć zwiększające się ślady oleju, to znaczy,
że smarowanie łańcucha działa właściwie (rys. J).
• Jeśli w ogóle nie ma żadnych śladów oleju, trzeba spróbować
oczyścić wylot oleju (18) (rys. E) i kanał olejowy prowadnicy (rys. K)
lub skontaktować się z serwisem.
UWAGA! Należy zachować ostrożność i nigdy nie dopuścić do
tego, aby pilarka zetknęła się z ziemią. Ze względu
bezpieczeństwa zawsze należy zachować odstęp od ziemi co
najmniej około 20 cm.
PRZED URUCHOMIENIEM PILARKI ŁAŃCUCHOWEJ
• Sprawdzić czy smarowanie łańcucha i stan pokazywany przez
wskaźnik poziomu oleju (8) są właściwe.
• Sprawdzić naciąg łańcucha i ewentualnie go wyregulować, jeśli
zachodzi potrzeba.
PRACA / USTAWIENIA
WŁĄCZANIE / WYŁĄCZANIE
OSTRZEŻENIE! Przed uruchomieniem pilarki należy zdjąć
osłonę prowadnicy łańcucha i zamontować akumulator.
Pilarka posiada przycisk blokady włącznika zabezpieczający przed
przypadkowym uruchomieniem.
Włączenie - wcisnąć przycisk blokady włącznika (5), a następnie
przycisk włącznika (6) (rys. L).
Wyłączenie - zwolnić nacisk na przycisk włącznika (6).
OSTRZEŻENIE! Po włączeniu pilarka natychmiast zaczyna
pracować ze swoją pełną prędkością.
SPRAWDZENIE HAMULCA ŁAŃCUCHA
UWAGA! Dźwignia hamulca, a zarazem przednia osłona dłoni
(3) chroni lewą rękę przed kontaktem z łańcuchem pilarki, służy
do automatycznej aktywacji hamulca łańcucha.
Odrzut powstaje, gdy obracający się łańcuch trafi obszarem
wokół górnej ćwiartki wierzchołka prowadnicy na twardy
przedmiot i zostanie nagle zatrzymany. Obracający się łańcuch
zakleszczy się w wierzchołku prowadnicy.
Hamulec łańcucha w przypadku wystarczająco mocnego odrzutu
jest automatycznie zaciągany siłą bezwładności lub też może być
zaciągnięty przez użytkownika.
Dźwignię hamulca (3) odciągnąć od uchwytu przedniego (4) za
pomocą lewej ręki. Hamulec łańcucha zablokuje się w sposób
słyszalny. Hamulec łańcucha jest zaciągnięty.
• Pociągnąć dźwignię hamulca (3) lewą rękę w kierunku
użytkownika. Dźwignia hamulca (3) zablokuje się w sposób
słyszalny. Hamulec łańcucha jest zwolniony.
• Włączyć pilarkę.

7
• Włączyć hamulec łańcucha. Jeśli łańcuch pilarki zatrzyma się
natychmiast, hamulec łańcucha działa prawidłowo.
• Jeśli łańcuch pilarki nie zatrzyma się natychmiast - hamulec
łańcucha jest uszkodzony. Nie używać pilarki i skontaktować się z
autoryzowanym serwisem.
PRACA PILARKĄ ŁAŃCUCHOWĄ
UWAGA! Nigdy nie wolno posługiwać się pilarką łańcuchową
w czasie deszczu i w otoczeniu wilgotnym.
OSTRZEŻENIE! Wszystkie części powinny być odpowiednio
zamontowane i spełniać wymagania zapewniające właściwą
pracę pilarki. Jakikolwiek uszkodzony element
zabezpieczający, czy część powinny zostać natychmiast
naprawione lub wymienione.
• Przed przystąpieniem do wykonania zamierzonej pracy należy
zapoznać się z punktem zawierającym zasady bezpiecznej pracy
pilarką łańcuchową. Zaleca się najpierw nabyć wprawy przecinając
zbędne kawałki drewna. Umożliwia to także bliższe zapoznanie się
z możliwościami pilarki.
• Zawsze należy przestrzegać przepisów bezpieczeństwa.
• Pilarka łańcuchowa może być wykorzystywana wyłącznie do
przecinania drewna. Zabrania się przecinać nią innych materiałów.
• Natężenie drgań i zjawisko odrzutu zmieniają się podczas
przecinania rożnych gatunków drzew.
• Nie wolno wykorzystywać pilarki łańcuchowej jako dźwigni
służącej do unoszenia, przesuwania lub rozdzielania obiektów.
• W przypadku zakleszczenia się łańcucha należy wyłączyć silnik i
wbić w drewno plastikowy lub drewniany klin, aby uwolnić pilarkę
(rys. M). Ponownie uruchomić urządzenie i jeszcze raz ostrożnie
przystąpić do przecinania.
• Nie wolno mocować jej do stanowisk stacjonarnych.
• Zabronione jest podłączanie do jej napędu innych urządzeń, które
nie są wymienione przez producenta pilarki.
• Podczas przecinania nie ma potrzeby dociskania pilarki z dużą
siłą. Trzeba wywrzeć tylko niewielki docisk.
UWAGA! Gdy w czasie cięcia pilarka zostanie zakleszczona w
rzazie nie wolno wyciągać jej siłą. Grozi to utratą kontroli nad
pilarką i zranieniem operatora oraz/lub uszkodzeniem pilarki.
WSKAZÓWKI PRAKTYCZNE
Odrzut
UWAGA! Należy unikać przecinania wierzchołkiem
prowadnicy, gdyż może to spowodować gwałtowny odrzut
pilarki do tyłu, ku górze. Przez odrzut rozumie się ruch
prowadnicy łańcucha pilarki łańcuchowej ku górze i/lub do
tyłu, który może się zdarzyć, gdy łańcuch pilarki, swoim
fragmentem znajdującym się przy wierzchołku prowadnicy,
napotka na przeszkodę (rys. N).
Przy pracy pilarką łańcuchową zawsze należy stosować
kompletne wyposażenie bezpieczne oraz odpowiednie ubranie
robocze.
• Należy upewnić się czy materiał przecinany jest unieruchomiony
w sposób pewny.
• Korzystać z zacisków, aby unieruchomić materiał.
• Podczas uruchamiania i pracy pilarkę należy trzymać obiema
rękami.
• W czasie odrzutu pilarka zachowuje się w sposób
niekontrolowany, następuje poluzowanie łańcucha.
• Łańcuch niewłaściwie naostrzony zwiększa ryzyko wystąpienia
odrzutu.
• Nigdy nie wolno wykonywać przecinania powyżej wysokości
ramion.
UWAGA! W przypadku zakleszczenia się łańcucha, przy
przecinaniu górną częścią łańcucha, może wystąpić tzw.
odrzut skierowany w kierunku operatora. Z tego powodu tam,
gdzie to jest możliwe, należy dążyć do przecinania dolną
częścią łańcucha, gdyż wówczas, przy zakleszczeniu łańcucha
efekt odrzutu zostanie skierowany w kierunku od ciała
operatora, ku przecinanemu drewnu.
PRZECINANIE KAWAŁKÓW DREWNA
Przy przecinaniu kawałków drewna należy przestrzegać
wskazówek dotyczących bezpieczeństwa pracy i postępować w
sposób następujący:
• Upewnić się czy kawałek materiału nie może się przesunąć.
• Krótkie kawałki materiału, przed rozpoczęciem cięcia,
unieruchomić za pomocą zacisków.
• Wolno przecinać wyłącznie drewno lub materiały
drewnopochodne.
• Przed przecinaniem upewnić się, że pilarka nie zetknie się z
kamieniami lub gwoździami, gdyż to mogłoby spowodować
wyrwanie pilarki i uszkodzenie łańcucha pilarki.
• Unikać sytuacji, w których pracująca pilarka mogłaby zetknąć się
z drucianym ogrodzeniem lub ziemią.
• Przy obcinaniu gałęzi, na ile to możliwe, podeprzeć pilarkę i nie
przecinać wierzchołkiem prowadnicy łańcucha pilarki.
• Uważać na przeszkody takie jak wystające pniaki, korzenie,
zagłębienia i dziury w ziemi, gdyż mogą one być przyczyną upadku.
PRZECINANIE PNI DRZEW
• Docisnąć szpon przypory (10) do materiału i wykonać cięcie (rys.
O).
• Jeśli nie udało się zakończyć cięcia pomimo wyczerpania
możliwości przesuwu pilarki to należy:
- wycofać prowadnicę do tyłu na pewną odległość z przecinanego
materiału (przy ruchomym łańcuchu tnącym), przesunąć nieco
rękojeść (7) w dół i podeprzeć szpon przypory (10).
- dokończyć cięcie unosząc nieco rękojeść (7).
PRZECINANIE PNIA LEŻĄCEGO NA ZIEMI
OSTRZEŻENIE!
• Zawsze trzeba mieć pewną przyczepność stóp do gruntu. Nie
wolno stawać na pniu.
• Uważać na możliwość obrócenia się powalonego pnia.
• Przestrzegać wskazówek instrukcji dotyczących bezpiecznej
pracy, aby uniknąć odrzutu pilarki
• Zawsze należy kończyć cięcie od strony występowania
naprężenia rozciągającego celem niedopuszczenia do
zakleszczenia łańcucha pilarki w rzazie.
• Przed rozpoczęciem pracy sprawdzić kierunek działania
naprężenia w pniu, który będzie przecinany, aby uniknąć
zakleszczenia łańcucha pilarki.
• Pierwsze cięcie należy wykonać po stronie poddanej
naprężeniom rozciągającym, aby je wyeliminować (rys. P).
• Przy przecinaniu pnia leżącego na ziemi najpierw dokonać cięcia
na głębokość równą 1/3 jego średnicy, następnie obrócić pień i
zakończyć przecinanie po przeciwnej stronie.
• Przy przecinaniu pnia leżącego na ziemi, nie wolno dopuścić do
zagłębienia się łańcucha tnącego w grunt, znajdujący się pod
pniem. Zaniedbanie tego może spowodować natychmiastowe
uszkodzenie łańcucha.
• Przy przecinaniu pni leżących na zboczu operator zawsze
powinien znajdować się na stoku powyżej pnia.
PRZECINANIE PNIA UNIESIONEGO NAD ZIEMIĄ
• W przypadku pni podpartych lub umieszczonych na stabilnych
koziołkach w zależności od miejsca przecinania zawsze należy
dokonać wcięcia na jedną trzecią grubości pnia od strony
występowania naprężenia ściskającego i zakończyć cięcie po
przeciwnej stronie (rys. R).
PRZYCINANIE / OBCINANIE GAŁĘZI DRZEW I KRZEWÓW
• Obcinanie gałęzi powalonego drzewa należy rozpocząć przy
podstawie ściętego drzewa i kontynuować w stronę szczytu. Małe
gałązki należy obcinać jednym cięciem.
• Najpierw sprawdzić, w którą stronę jest gałąź odgięta. Następnie
wykonać cięcie wstępne od strony wygięcia i zakończyć przecinanie
od strony przeciwnej. Uważać na możliwość odskoczenia gałęzi
odcinanej.
• Podczas przycinania gałęzi drzew zawsze powinno się ciąć z góry
do dołu umożliwiając swobodne opadnięcie odcinanej gałęzi.

8
Niekiedy może być jednak przydatne podcięcie gałęzi od spodu
(rys. S).
• Należy zachować szczególną uwagę podczas przecinania gałęzi,
która może być naprężona. Taka gałąź może po odcięciu
odskoczyć i uderzyć operatora.
OSTRZEŻENIE!
• Gałęzi nie wolno obcinać wspinając się na drzewo.
• Nie wolno stawać na drabinach, platformach, kłodach lub w
innych pozycjach, które mogą spowodować utratę równowagi
i kontroli nad pilarką.
• Nie wolno dokonywać przecinania powyżej wysokości
ramion.
• Pilarkę zawsze trzeba trzymać obiema rękami.
OBSŁUGA I KONSERWACJA
OSTRZEŻENIE! Przed przystąpieniem do jakichkolwiek
czynności związanych z instalowaniem, regulacją, naprawą lub
obsługą należy wyjąć akumulator z urządzenia.
UWAGA! Zachować ostrożność ze względu na ostre krawędzie
łańcucha. Kiedy pilarka nie jest używana prowadnica z
łańcuchem powinna być zawsze zabezpieczona osłoną (rys. T)
OSTRZENIE ŁAŃCUCHA PILARKI
Narzędziom tnącym należy poświęcać odpowiednią uwagę.
Narzędzia tnące powinny być ostre i czyste, co zapewnia sprawne
i bezpieczne wykonanie pracy. Samodzielne ostrzenie łańcucha
wymaga niezbędnego sprzętu, jak również umiejętności. Zaleca się
czynność ostrzenia łańcucha powierzyć wyspecjalizowanym
warsztatom.
PROWADNICA ŁAŃCUCHA
Prowadnica jest narażona na szczególnie intensywne zużycie w
części przedniej i spodniej. Aby zapobiec jednostronnemu zużyciu
wskutek tarcia, przy okazji każdego ostrzenia łańcucha, zaleca się
sprawdzenie prowadnicy.
KOŁO ŁAŃCUCHOWE
Koło łańcuchowe (17) jest narażone na szczególnie intensywne
zużycie. Jeśli zostaną zauważone wyraźne oznaki zużycia na
zębach koła, koło należy wymienić. Zużyte koło łańcuchowe
dodatkowo skraca trwałość łańcucha pilarki. Koło łańcuchowe
powinno zostać wymienione przez autoryzowany warsztat
serwisowy.
KONSERWACJA I PRZECHOWYWANIE
• Nie należy używać żadnych środków czyszczących lub
rozpuszczalników, gdyż mogą one uszkodzić części wykonane z
tworzywa sztucznego.
• Należy uważać, aby do wnętrza urządzenia nie dostała się woda.
• Zawsze trzeba pamiętać, aby otwory wentylacyjne obudowy
silnika były drożne.
• Przy pilarce mogą być przeprowadzane wyłącznie zabiegi
konserwacyjne opisane w niniejszej instrukcji. Wszelkie inne
czynności mogą być wykonywane tylko przez autoryzowany serwis.
• Nie wolno dokonywać jakichkolwiek zmian w konstrukcji pilarki.
• Pilarka, gdy nie jest użytkowana, powinna być przechowywana w
stanie czystym, na płaskiej powierzchni, w suchym miejscu,
niedostępnym dla dzieci.
Wszelkiego rodzaju usterki powinny być usuwane przez
autoryzowany serwis producenta.
PARAMETRY TECHNICZNE
DANE ZNAMIONOWE
DANE DOTYCZĄCE HAŁASU I DRGAŃ
Informacje na temat hałasu i wibracji
Poziom emitowanego hałasu przez urządzenie opisano poprzez:
poziom emitowanego ciśnienia akustycznego LpA oraz poziom
mocy akustycznej LWA (gdzie K oznacza niepewność pomiaru).
Drgania emitowane przez urządzenie opisano poprzez wartość
przyśpieszeń drgań ah (gdzie K oznacza niepewność pomiaru).
Podane w niniejszej instrukcji: poziom emitowanego ciśnienia
akustycznego LpA, poziom mocy akustycznej LWA oraz wartość
przyśpieszeń drgań ah zostały zmierzone zgodnie z EN 60745-1.
Podany poziom drgań ah może zostać użyty do porównywania
urządzeń oraz do wstępnej oceny ekspozycji na drgania.
Podany poziom drgań jest reprezentatywny jedynie dla
podstawowych zastosowań urządzenia. Jeżeli urządzenie zostanie
użyte do innych zastosowań lub z innymi narzędziami roboczymi,
poziom drgań może ulec zmianie. Na wyższy poziom drgań będzie
wpływać niewystarczająca czy zbyt rzadka konserwacja
urządzenia. Podane powyżej przyczyny mogą spowodować
zwiększenie ekspozycji na drgania podczas całego okresu pracy.
Aby dokładnie oszacować ekspozycję na drgania, należy
uwzględnić okresy kiedy urządzenie jest wyłączone lub kiedy
jest włączone ale nie jest używane do pracy. Po dokładnym
oszacowaniu wszystkich czynników łączna ekspozycja na
drgania może okazać się znacznie niższa.
W celu ochrony użytkownika przed skutkami drgań należy
wprowadzić dodatkowe środki bezpieczeństwa, takie jak: cykliczna
konserwacja urządzenia i narzędzi roboczych, zabezpieczenie
odpowiedniej temperatury rąk oraz właściwa organizacja pracy.
Pilarka łańcuchowa akumulatorowa 58G034
Parametr
Wartość
Napięcie akumulatora
18V DC
Prędkość silnika (bez obciążenia)
3300 min-1
Prędkość liniowa łańcucha (bez obciążenia)
6 m/s
Pojemność zbiornika oleju łańcuchowego
100 ml
System podawania oleju łańcuchowego
automatyczny
Koło łańcuchowe (zęby x podziałka)
6 x 3/8’’
Typ prowadnicy
10’’ (250 mm)
Długość robocza prowadnicy
240 mm
Podziałka łańcucha
3/8’’ (9,525
mm)
Grubość łańcucha
1,3 mm
Klasa ochronności
III
Masa
3,2 kg
Rok produkcji
2021
58G034 oznacza zarówno typ oraz określenie maszyny
Poziom ciśnienia
akustycznego
LpA = 90,4 dB (A) K=3dB (A)
Poziom mocy akustycznej
LWA = 99,4 dB (A) K=3dB (A)
Wartość przyśpieszeń drgań
(rękojeść przednia)
ah = 6,414 m/s2 K=1,5 m/s2
Wartość przyśpieszeń drgań
(rękojeść tylna)
ah = 4,819 m/s2 K=1,5 m/s2

9
OCHRONA ŚRODOWISKA
Produktów zasilanych elektrycznie nie należy wyrzucać wraz z
domowymi odpadkami, lecz oddać je do utylizacji w
odpowiednich zakładach. Informacji na temat utylizacji udzieli
sprzedawca produktu lub miejscowe władze. Zużyty sprzęt
elektryczny i elektroniczny zawiera substancje nieobojętne dla
środowiska naturalnego. Sprzęt nie poddany recyclingowi
stanowi potencjalne zagrożenie dla środowiska i zdrowia ludzi.
* Zastrzega się prawo dokonywania zmian.
„Grupa Topex Spółka z ograniczoną odpowiedzialnością” Spółka komandytowa
z siedzibą w Warszawie, ul. Pograniczna 2/4 (dalej: „Grupa Topex”) informuje, iż
wszelkie prawa autorskie do treści niniejszej instrukcji (dalej: „Instrukcja”), w tym
m.in. jej tekstu, zamieszczonych fotografii, schematów, rysunków, a także jej
kompozycji, należą wyłącznie do Grupy Topex i podlegają ochronie prawnej
zgodnie z ustawą z dnia 4 lutego 1994 roku, o prawie autorskim i prawach
pokrewnych (tj. Dz. U. 2006 Nr 90 Poz 631 z późn. zm.). Kopiowanie,
przetwarzanie, publikowanie, modyfikowanie w celach komercyjnych całości
Instrukcji jak i poszczególnych jej elementów, bez zgody Grupy Topex wyrażonej
na piśmie, jest surowo zabronione i może spowodować pociągnięcie do
odpowiedzialności cywilnej i karnej.
GWARANCJA I SERWIS
Warunki gwarancji oraz opis postępowania w przypadku
reklamacji zawarte są w załączonej Karcie Gwarancyjnej.
Warunki gwarancji oraz opis postępowania w przypadku reklamacji
zawarte są w załączonej Karcie Gwarancyjnej.
Serwis Centralny GTX Service Sp. z o.o. Sp.k.
ul. Pograniczna 2/4 tel. +48 22 364 53 50
Sieć Punktów Serwisowych do napraw gwarancyjnych i
pogwarancyjnych dostępna na platformie internetowej gtxservice.pl
Zeskanuj QR kod i wejdź na gtxservice.pl

10
Deklaracja Zgodności WE
/EC Declaration of Conformity//Megfelelőségi Nyilatkozat EK/
/ES vyhlásenie o zhode// Prohlášení o shodě ES/
/ЕО декларация за съответствие/
/Declarația de conformitate CE/
/EG-Konformitätserklärung//Dichiarazione di conformità CE/
PL EN HU SK CS BG RO DE IT
Producent
/Manufacturer//Gyártó//Výrobca//Výrobce//Производител/
/Producător//Hersteller//Produttore/
Grupa Topex Sp. z o.o. Sp.k.
ul. Pograniczna 2/4, 02-285 Warszawa
Wyrób
/Product/
/Termék/
/Produkt/
/Produkt/
/Продукт/
/Produs/
/Produkt/
/Prodotto/
Pilarka łańcuchowa akumulatorowa
/Cordless chain saw/
/Akkumulátoros láncfűrész/
/Akumulátorová reťazová pílka/
/Akumulátorová řetězová pila/
/Верижен акумулаторен трион/
/Drujbă cu acumulator/
/Akku-kettensäge/
/Motosega a batteria/
Model
/Model//Modell//Model//Model//Модел//Model//Modell//Modello/
58G034
Nazwa handlowa
/Commercial name//Kereskedelmi név/
/Obchodný názov//Obchodního názvu/
/Търговско наименование//Nume
comercial//Handelsname/
/Nome depositato/
GRAPHITE
Numer seryjny
/Serial number//Sorszám//Poradové číslo/
/Výrobního čísla//Сериен номер//Număr de serie/
/Ordnungsnummer//Numero di serie/
00001 ÷ 99999
Opisany wyżej wyrób jest zgodny z następującymi dokumentami:
/The above listed product is in conformity with the following UE Directives://A fent jelzett termék megfelel az alábbi irányelveknek:/
/Vyššie popísaný výrobok je v zhode s nasledujúcimi dokumentmi://Výše popsaný výrobek splňuje následující
dokumenty://Описаният по-горе продукт отговаря на следните документи://Produsul descris mai sus respectă
următoarele documente://Das oben beschriebene Produkt entspricht den folgenden Dokumenten://Il prodotto sopra descritto è
conforme ai seguenti documenti:/
Dyrektywa Maszynowa 2006/42/WE
/Machinery Directive 2006/42/EC/
/2006/42/EK Gépek/
/Smernica Európskeho Parlamentu a Rady 2006/42/ES/
/Směrnice Evropského Parlamentu a Rady 2006/42/ES/
/Директива за машините 2006/42/ЕО/
/Directiva 2006/42 / CE privind utilajele
/Maschinenrichtlinie 2006/42 / EG/
/Direttiva macchine 2006/42 / CE/
Dyrektywa o Kompatybilności Elektromagnetycznej 2014/30/UE
/EMC Directive 2014/30/EU/
/2014/30/EU Elektromágneses összeférhetőség/
/EMC Smernica Európskeho Parlamentu a Rady 2014/30/EÚ/
/EMC Směrnice Evropského Parlamentu a Rady 2014/30/EU/
/Директива за електромагнитната съвместимост
2014/30/ЕС/
/Directiva 2014/30 / UE privind compatibilitatea electromagnetică/
/Richtlinie über elektromagnetische Verträglichkeit 2014/30 / EU/
/Direttiva sulla compatibilità elettromagnetica 2014/30 / UE/
Dyrektywa o Emisji Hałasu 2000/14/WE zmieniona
2005/88/WE
/Noise Emission Directive 2000/14/EC as amended
2005/88/EC/
/A 2005/88/EK módosított 2000/14/EK zajkibocsátási
irányelv/ / /Smernica o emisiách hluku 2000/14/ES,
2005/88/ES/
/Směrnice o emisích hluku 2000/14/ES, 2005/88/ES /
/Директива за шумовите емисии 2000/14/ЕО,
2005/88/ЕО/
/Directiva 2000/14/ CE privind zgomotul modificată prin
2005/88/CE/
/Lärmschutzrichtlinie 2000/14 / EG geändert durch 2005/88
/ EG/
/Direttiva sul rumore 2000/14 / CE modificata dalla 2005/88
/ CE/
Gwarantowany poziom mocy akustycznej LWA= 103 dB(A)
/Guaranteed sound power level/
/garantált mennyiség/
/zaručená hladina akustického výkonu/
/Zaručená hladina akustického výkonu/
/гарантирано ниво на звукова мощност/
/Nivel de putere sonor garantat/
/Garantierter Schallleistungspegel/
/Livello di potenza sonora garantito/

11
Zmierzony poziom mocy akustycznej LWA= 99,4 dB(A) K=3
dB(A)
/The measured sound power level/
/A mért hangteljesítményszint/
/Nameraná hladina akustického výkonu/
/Měřená hladina akustického výkonu/
/Измереното ниво на звукова мощност/
/Nivelul de putere sonor măsurat/
/Gemessener Schallleistungspegel/
/Il livello di potenza sonora misurato/
Dyrektywa RoHS 2011/65/UE zmieniona Dyrektywą 2015/863/UE
/RoHS Directive 2011/65/EU as amended by Directive 2015/863/EU/
/A 2015/863/EU irányelvvel módosított 2011/65/EU RoHS irányelv/
/Smernica RoHS 2011/65/EÚ zmenená a doplnená 2015/863/EÚ/
/Směrnice RoHS 2011/65 /EU pozměněná 2015/863/EU/
/Директива 2011/65/ЕС на RoHS, изменена с Директива
2015/863/ЕС/
/Directiva RoHS 2011/65 / UE modificată prin Directiva 2015/863 /
UE/
/RoHS-Richtlinie 2011/65 / EU geändert durch Richtlinie 2015/863 /
EU/
/Direttiva RoHS 2011/65 / UE modificata dalla direttiva 2015/863 /
UE/
oraz spełnia wymagania norm:
/and fulfils requirements of the following Standards://valamint megfelel az alábbi szabványoknak://a spĺňa požiadavky://a splňuje
požadavky norem:/ /и отговаря на изискванията на стандартите://și îndeplinește cerințele standardelor://und erfüllt die
Anforderungen der Normen:// e soddisfa i requisiti delle norme:/
IEC 60745-1:2006; EN 60745-2-13:2009/A1:2010; EN ISO 12100:2010;
EN 55014-1:2017; EN 55014-2:2015;
IEC 62321-1:2013; IEC 62321-2:2013; IEC 62321-3-1:2013; IEC 62321-4:2013+A1:2017; IEC 62321-5:2013: IEC 62321-6:2015;
IEC 62321-7-1-2015; IEC 62321-7-2:2017; ISO 17075-1:2017; IEC 62321-8:2017
Deklaracja ta odnosi się wyłącznie do maszyny w stanie, w jakim została wprowadzona do obrotu i nie obejmuje części składowych
dodanych przez użytkownika końcowego lub przeprowadzonych przez niego późniejszych działań. /This declaration relates
exclusively to the machinery in the state in which it was placed on the market, and excludes components which are added and/or
operations carried out subsequently by the final user.//Ez a nyilatkozat a gépnek kizárólag arra az állapotára vonatkozik, amelyben
forgalomba hozták, és kizár minden olyan alkatrészt, amelyet hozzáadnak, és/vagy olyan műveletet, amit a végső felhasználó ezt
követően végez rajta.//Toto vyhlásenie sa vzťahuje výlučne na strojové zariadenie v stave, v akom sa uvádza na trh, a nezahŕňa
pridané komponenty a/alebo činnosti vykonávané následne koncovým používateľom.//Toto prohlášení se vztahuje výlučně na
strojní zařízení ve stavu, v jakém bylo uvedeno na trh, a nevztahuje se na součásti, které byly následně přidány konečným
uživatelem, nebo následně provedené zásahy konečného uživatele.//Тази декларация се отнася изключително за машината
в състоянието, в което е пусната на пазара, и изключва компоненти, които са добавени и / или операции, извършени
впоследствие от крайния потребител.//Această declarație se referă doar la mașina din starea în care a fost introdusă pe piață
și nu acoperă componentele adăugate de utilizatorul final sau acțiunile ulterioare efectuate de utilizatorul final.//Diese Erklärung
bezieht sich nur auf die Maschine in dem Zustand, in dem sie in Verkehr gebracht wurde, und gilt nicht für vom Endbenutzer
hinzugefügte Komponenten oder nachfolgende vom Endbenutzer durchgeführte Aktionen.// La presente dichiarazione si riferisce
solo alla macchina immessa sul mercato e non copre i componenti aggiunti dall'utente finale o le operazioni successive eseguite
dall'utente finale./
Jednostka notyfikowana: /Noified
body://Bejelentett szervezet:/
/Notifikovaný organ:/ /Notifikovaný
orgán://Нотифицирана единица/
/Unitate notificată//Benachrichtigte
Einheit//Unità notificata/
Certyfikat badania typu WE numer:/Number of EC type certificate:/
/Az EK típusú bizonyítványtanúsítványa://Certifikát počet typu osvedčenia ES://Číslo
certifikátu EU přezkoušení typu://Номер на сертификата за ЕО изследване на
типа://Numărul certificatului de examinare CE de tip:/
/Nummer des EG-Musterprüfzeugnisses://Numero del certificato di esame CE del tipo:/
No. 0123; TŰV SŰD Product Service GmbH, Ridlerstraβe 65,
80339 Műnchen, Germany
M6A 063262 0232
Nazwisko i adres osoby mającej miejsce zamieszkania lub siedzibę w UE upoważnionej do przygotowania dokumentacji
technicznej:
/Name and address of the person who established in the Community and authorized to compile the technical file://A műszaki
dokumentáció összeállítására felhatalmazott, a közösség területén lakóhellyel vagy székhellyel rendelkező személy neve és
címe://Meno a adresa osoby alebo bydliska v EÚ poverená zostavením technickej dokumentácie:// Jméno a adresu osoby pověřené
sestavením technické dokumentace, přičemž tato osoba musí být usazena ve Společenství://Име и адрес на лицето, което
пребивава или е установено в ЕС, упълномощено да съставя техническото досие://Numele și adresa persoanei care
locuiește sau este stabilită în UE autorizată să întocmească dosarul tehnic:/
/Name und Anschrift der Person mit Wohnsitz oder Niederlassung in der EU, die zur Erstellung der technischen Akte berechtigt
ist:/ Nome e indirizzo della persona residente o stabilita nell'UE autorizzata a compilare il fascicolo tecnico:/
Podpisano w imieniu:
/Signed for and on behalf of:/
/A tanúsítványt a következő nevében és megbízásából írták alá/
/Podpísané v mene:/
/Podepsáno jménem:/
/Подписано от името на:/
/Semnat în numele:/
/Unterzeichnet im Namen von:/
/Firmato per conto di:/
Grupa Topex Sp. z o.o. Sp.k.
ul. Pograniczna 2/4
02-285 Warszawa
Paweł Kowalski
Pełnomocnik ds. jakości firmy GRUPA
TOPEX
/GRUPA TOPEX Quality Agent/
/A GRUPA TOPEX Minőségügyi
meghatalmazott képviselője/
/Splnomocnenec Kvalita TOPEX GROUP/
/Zástupce pro Kvalitu TOPEX GROUP/
/Качествен представител на GRUPA
TOPEX/
/Reprezentant de calitate al GRUPA TOPEX/
/Qualitätsbeauftragter von GRUPA TOPEX/
/Rappresentante della qualità di GRUPA
TOPEX/
Warszawa, 2021-03-19

12
TRANSLATION OF THE ORIGINAL
INSTRUCTION MANUAL
CORDLESS CHAINSAW
58G034
ATTENTION! BEFORE USING THE POWER TOOL, READ THIS
MANUAL CAREFULLY AND KEEP IT FOR FUTURE
REFERENCE.
DETAILED SAFETY REGULATIONS
SPECIFIC SAFETY CONDITIONS FOR CORDLESS
CHAINSAWS
WARNING! Observe the safety regulations when using the
chain saw. For your own safety and the safety of third parties,
please read this manual before starting work with the
chainsaw. Please keep this manual for future reference.
CHAIN SAW SAFETY WARNINGS:
• Keep all parts of the body away from the saw chain when saw
is operating. Before you start the chain saw, make sure the saw
chain is not contacting anything. A moment of inattention while
operating chain saws may cause entanglement of your clothing or
body with the saw chain.
• Always hold the chain saw with your right hand on the rear
handle and your left hand on the front handle. Holding the chain
saw with a reversed hand configuration increases the risk of
personal injury and should never be done.
• Wear safety glasses and hearing protection. Further
protective equipment for head, hands, legs and feet is
recommended. Adequate protective clothing will reduce personal
injury by flying debris or accidental contact with the saw chain.
• Do not operate a chain saw in a tree. Operation of a chain saw
while up in a tree may result in personal injury.
• Always keep proper footing and operate the chain saw only
when standing on fixed, secure and level surface. Slippery or
unstable surfaces such as ladders may cause a loos of balance or
control of the chain saw.
• When cutting a limb that is under tension be alert for spring
back. When the tension in the wood fibers is released the spring
loaded limb may strike the operator and/or throw the chain saw out
of control.
• Use extreme caution when cutting brush and saplings. The
slender material may catch the saw chain and be whipped toward
you or pull you off balance.
• Carry the chain saw by the front handle with the chain saw
switched off and away from your body. When transporting or
storing the chain saw always fit the guide bar cover. Proper
handling of the chain saw will reduce the likelihood of accidental
contact with the moving saw chain.
• Follow instructions for lubricating, chain tensioning and
changing accessories. Improperly tensioned or lubricated chain
may either break or increase the chance for kickback.
• Keep handles dry, clean, and free from oil and grease. Greasy,
oily handles ale slippery causing loss of control.
• Cut wood only. Do not use chain saw for purposes not
intended. For example: do not use chain saw for cutting
plastic, masonry or non-wood building materials. Use of the
chain saw for operations different than intended could result in a
hazardous situation.
CAUSES AND OPERATOR PREVENTION OF KICKBACK:
Kickback may occur when the nose or tip of the guide bar touches
an object, or when the wood closes in and pinches the saw chain in
the cut.
Tip contact in some cases may cause a sudden reverse reaction,
kicking the guide bar up and back towards the operator.
Pinching the saw chain along the top of the guide bar may push the
guide bar rapidly back towards the operator.
Either of these reactions may cause you to lose control of he saw
which could result in serious personal injury. Do not rely exclusively
upon the safety devices built into your saw. As a chain saw user,
you should take several steps to keep your cutting jobs free from
accident or injury.
Kickback is the result of tool misuse and/or incorrect operating
procedures or conditions and can be avoided by taking proper
precautions as given below:
• Maintain a firm grip, with thumbs and fingers encircling the
chain saw handles, with both hands on the saw and position
your body and arm to allow you to resist kickback forces.
Kickback forces can be controlled by the operator, if proper
precautions are taken. Do not let go of the chain saw.
• Do not overreach and do not cut above should height. This
helps prevent unintended tip contact and enables better control of
the chain saw in unexpected situations.
• Only use replacement bars and chains specified by the
manufacturer. Incorrect replacement bars and chains may cause
chain breakage and/or kickback.
• Follow the manufacturer’s sharpening and maintenance
instructions for the saw chain. Decreasing the depth gauge
height can lead to increased kickback.
ADDITIONAL SAFETY TIPS:
• Only hold the saw by the insulated handles as the saw chain
may touch the invisible electric wire. Touching the saw chain to
a live wire may cause voltage to appear on the exposed parts of the
tool and electrocute the operator.
• The chainsaw is used to make maintenance cuts in the home
garden. It is intended for cutting or cutting branches. The device is
not intended for felling trees.
WORK
• Be especially careful at the end of cutting, because the saw,
having no resistance in the form of the cut material, falls down by
inertia, which may cause injuries.
• The operator may experience tingling or numbness in the fingers
and hands when working for a long time. You should then stop
working, as numbness reduces the precision of using the saw.
• The saw becomes hot during operation, be careful not to touch
any exposed parts of the body with hot parts of the saw.
• The chain saw may only be operated by one person at a time.
Keep all other persons and animals away from the chain saw's
operating area.
• When starting the saw, the saw chain must not rest on the material
to be cut.
• The chainsaw must not be used by children or young people. The
chainsaw may only be entrusted to adults who know how to use it.
If you provide a chain saw, this operator's manual must also be
available.
• Stop using the chain saw immediately if you feel tired.
• When cutting sawn timber or thin limbs, a support (trestle) should
be used.
• It is not allowed to cut several boards at the same time (stacked
on top of each other), material held by another person or held by a
leg.
• Long cut elements should be properly fixed.
• On slopes, always make the cut while standing facing the top of
the slope.
• Always use the buttress claw as a fulcrum when cutting through.
Hold the saw by the rear handle and guide it with the front handle.
• If it is not possible to make a cut at once, extend the saw, put the
buttress on the buttress and continue cutting by lifting the rear
handle of the saw.
• When cutting horizontally, position yourself at an angle that is the
least deviating from 90º to the cutting line. Cutting horizontally
requires a lot of concentration on the part of the saw operator.
• If the chain becomes jammed when cutting with the top of the
chain, a so-called kickback directed towards the operator. For this
reason, where possible, try to cut with the lower part of the chain,
because then when the chain is jammed, the recoil effect will be
directed away from the operator's body.
• Particular care should be taken when cutting splitting wood. The
cut pieces of wood can be thrown in any direction (risk of injury!).
• Cutting tree branches should be performed by trained personnel!
There is a risk of injury if the tree branch falls if it falls
uncontrolled!
• Watch out for stumps that may roll towards the operator. Jump
away!

13
• During kickback, the saw behaves in an uncontrolled manner and
the chain becomes loose.
• An incorrectly sharpened chain increases the risk of kickback.
• Hold the chain saw with both hands when starting and operating.
• Make sure that the material to be cut is firmly fixed.
• Use clamps to hold the material in place.
• Never cut more than one branch at a time. When cutting down,
pay attention to the surrounding branches.
MAINTENANCE AND STORAGE
• Maintain all components in good condition to make sure that the
saw works safely.
• Replace worn or damaged parts for safety.
• Protect the saw from moisture.
• Keep out of the reach of children.
ATTENTION! Despite the inherently safe construction, the use
of safety measures and additional protective measures, there
is always a residual risk of injury during work.
Explanation of used symbols.
1. CAUTION! Take special precautions.
2. Read the operating manual, observe the warnings and safety
conditions contained in it!
3. Use personal protective equipment (safety goggles, hearing
protection).
4. Use protective gloves.
5. Use protective clothing.
6. Keep children away from the tool.
7. Remove the battery from the device before making any
adjustments or cleaning.
8. A garden device intended for outdoor use.
9. Protect the device against moisture.
10. Keep your limbs away from the cutting elements!
11. Threat due to kickback.
12. Caution, risk of cutting your hands, cutting your fingers.
13. Maintain a safe distance from the garden equipment in
operation.
14. Recycling.
CONSTRUCTION AND USE
The cordless chainsaw is a handheld type device. The drive is a DC
commutator motor. These types of power tools are intended for
work in the home garden. The saw can be used to perform tree
maintenance cuts, pruning branches, preparing firewood, fireplace
wood and other applications that require sawing wood. The cordless
chainsaw is a power tool intended for amateur use only. The
cordless chainsaw is a handheld type device. The drive is a DC
commutator motor. These types of power tools are intended for
work in the home garden. The saw can be used to perform tree
maintenance cuts, pruning branches, preparing firewood, fireplace
wood and other applications that require sawing wood. The cordless
chainsaw is a power tool intended for amateur use only.
WARNING! The device should not be used during tree felling.
Do not use the device contrary to its intended use.
DESCRIPTION OF DRAWING PAGES
The numbering below refers to the components of the device shown
on the graphic pages of this manual.
1. Chain
2. Guide
3. Brake lever (front hand guard)
4. Front handle
5. Switch lock button
6. Switch
7. Handle
8. Oil level indicator
9. Oil filler cap
10. The claw of the buttress
11. The guide bar mounting knob
12. Chain tension knob
13. Sprocket cover
14. Chain guide guard
15. Cover hooks
16. Bolt
17. Chain wheel
18. Oil channel
* Differences may appear between the product and drawing.
EQUIPMENT AND ACCESSORIES
1. Guide - 1 pc.
2. Chain - 1 pc.
3. Guide cover - 1 pc.
PREPARATION TO WORK
TRANSFERRING THE CHAIN SAW
WARNING! Always disconnect the battery and slide on the
chain guide cover before moving the chain saw. If there is a
need to perform several cutting operations in succession, the
saw should be turned off between operations using the switch.
ASSEMBLY OF THE GUIDE BAR AND THE SAW CHAIN
ATTENTION! Chain guide and saw chain are supplied
separately.
The chain saw should be disconnected from the power source
(battery).
Always wear protective gloves when fitting the chain and
checking the chain to prevent injury from sharp edges.
WARNING! Before assembling the guide bar with the chain,
check the correct positioning of the chain cutting blades (the
correct positioning of the chain on the guide bar is shown by
the arrow on the guide bar tip) (fig. A).
• Slide and release from the catch the movable part of the bar
mounting knob (11) (fig. B).
• Pull back the movable part of the knob and turn anticlockwise,
loosening the pressure of the guide bar mounting knob (11) (fig. C).
• Remove the sprocket cover (13) by sliding the cover catches (15)
out of the retaining holes (fig. D).
• Hold the guide (2) vertically so that its tip points upwards.
• Fit the chain (1), starting at the tip of the guide bar (2).
• Make sure that the chain (1) is in the guide groove of the guide
bar (2).
• Place the bar (2) with the attached chain (1) on the chain wheel
(17) (making sure that the pin (16) is in the groove in the center of
the bar) (fig. E, F).
• Place the sprocket cover (13) by inserting the cover catches (15)
into the locating holes and slightly tighten the guide bar mounting
knob (11).
TIGHTENING THE SAW CHAIN
With the bar fixing knob (11) loose, turn the chain tensioning knob
(12)
• clockwise - to stretch the chain.

14
• counterclockwise - to loosen the chain.
• Check chain tension is correct.
• Secure by tightening the guide bar mounting knob (11).
ATTENTION! You cannot pull the chain too tight. The saw chain
should be tensioned to allow it to be lifted, about 5 mm in the
center of the guide bar (fig. G).
The saw chain becomes hot during operation which causes it to
stretch and loosen, and there is a risk of it slipping off the guide bar.
Adjustments made on a very hot chain may lead to over-tightening
of the chain as it cools down.
ATTENTION! A new saw chain requires a run-in period of
approximately 5 minutes. It is very important to lubricate the
chain at this stage. Check the chain tension after the run-in
period and correct it if necessary.
It is often necessary to check and adjust its tension, as a loose
chain can easily fall off the guide bar, wear out quickly, or
cause rapid wear of the guide bar.
CHAIN LUBRICANTS
The durability of the chain and saw guide bar is largely dependent
on the quality of the lubricant used. Use only lubricants designed for
chain saws.
WARNING! Never use old, used oil to lubricate the saw chain.
FILLING THE TANK WITH OIL FOR CHAIN LUBRICATION
ATTENTION! The new saw has an empty oil reservoir. Before
using the chain saw, the tank must be filled with oil.
To prevent dirt from getting inside the reservoir, clean the oil filler
cap (9) before removing it.
• Lift the movable part of the plug cover (fig. H) and unscrew the oil
filler plug (9).
• Pour good quality oil into the reservoir until the entire window of
the oil level indicator (8) is filled with oil (fig. I)
• After adding oil, close the oil tank by carefully tightening the oil
filler plug (9).
• When using the saw, check the oil level in the tank by looking at
the oil level indicator (8).
CHAIN LUBRICATION
WARNING! To prevent excessive frictional wear, the saw chain
and bar must be lubricated during operation.
Never work with the chain saw if the lubrication of the
components mentioned is not provided. When the chain runs
dry, the entire cutting mechanism is quickly severely damaged.
That is why it is so important to check the chain lubrication and
check the oil level while using the saw.
CHAIN LUBRICATION CHECK
The lubrication of the chain and guide bar is automatic. Before
starting work, check the saw chain lubrication and the oil level in the
reservoir.
• Switch on the chain saw and hold it off the ground
• If you can see increasing traces of oil, the chain lubrication is
working properly (fig. J).
• If there are no traces of oil at all, try cleaning the oil outlet (18)
(Fig. E) and the guide oil channel (Fig. K) or contact the service
center.
ATTENTION! Be careful and never allow the chain saw to touch
the ground. For safety reasons, always keep a distance from
the ground and at least about 20 cm.
BEFORE STARTING YOUR CHAIN SAW
• Check that the chain lubrication and the condition indicated on the
dipstick (8) are correct.
• Check chain tension and adjust if necessary.
OPERATION / SETTINGS
ON / OFF
WARNING! Before operating the saw, remove the chain guide
cover and install the battery.
The saw has a switch lock button to prevent accidental start-up.
Turning on - press the switch lock button (5) and then the switch
button (6) (Fig. L).
Switching off - release the pressure on the switch button (6).
WARNING! The saw immediately starts working at full speed
when it is switched on.
CHAIN BRAKE CHECK
ATTENTION! The brake lever, and at the same time the front
hand guard (3), protects the left hand from contact with the saw
chain, and is used to automatically activate the chain brake.
Kickback occurs when the rotating chain hits a hard object
with the area around the top quarter of the bar tip and is
suddenly stopped. The rotating chain will jam in the tip of the
bar.
The chain brake, in the event of a sufficiently strong kickback, is
automatically engaged by the force of inertia or can be applied by
the user.
Pull the brake lever (3) away from the front handle (4) with your left
hand. The chain brake audibly locks. The chain brake is on.
• Pull the brake lever (3) with your left hand towards the user. The
brake lever (3) audibly engages. The chain brake is now released.
• Switch on the saw.
• Engage the chain brake. If the saw chain stops immediately, the
chain brake is working properly.
• If the saw chain does not stop immediately, the chain brake is
defective. Do not use the saw and contact an authorized service
center.
CHAIN SAW WORK
ATTENTION! Never use a chain saw in rain or wet conditions.
WARNING! All parts should be properly installed and meet the
requirements for proper saw operation. Any damaged safety
element or part should be repaired or replaced immediately.
• Before commencing the intended work, read the section on safe
chain saw operation. It is recommended to first practice cutting
unnecessary pieces of wood. It also allows you to get to know the
saw's capabilities in more detail.
• Always follow the safety regulations.
• The chainsaw may only be used for cutting wood. It is forbidden
to cut other materials with it.
• The intensity of vibrations and the phenomenon of recoil change
when cutting different types of trees.
• Do not use the chain saw as a lever to lift, move or separate
objects.
• If the chain is jammed, switch off the engine and insert a plastic or
wooden wedge into the wood to release the saw (fig. M). Restart
the machine and start cutting carefully again.
• It must not be attached to stationary positions.
• It is forbidden to connect other devices to the drive that are not
specified by the manufacturer of the saw.
• There is no need to apply great pressure to the saw when cutting.
Only a small amount of pressure needs to be applied.
ATTENTION! If the saw is jammed in the cut during cutting, it
must not be pulled out by force. This may result in loss of
control of the saw and injury to the operator and / or damage
to the saw.

15
PRACTICAL TIPS
Recoil
ATTENTION! Avoid cutting with the tip of the guide bar as this
may cause the saw to kick back upwards. Kickback is
understood as the upward and / or backward movement of the
chainsaw chain guide, which may occur when the saw chain
meets an obstacle with its segment at the tip of the guide bar
(Fig. N).
When working with a chain saw, always use complete safety
equipment and appropriate work clothes.
• Make sure that the material to be cut is firmly fixed.
• Use clamps to hold the material in place.
• Hold the chain saw with both hands when starting and operating.
• During kickback, the saw behaves in an uncontrolled manner and
the chain becomes loose.
• An incorrectly sharpened chain increases the risk of kickback.
• Never cut above shoulder height.
ATTENTION! In the event of the chain jamming when cutting
with the upper part of the chain, the so-called kickback
directed towards the operator. For this reason, where possible,
try to cut with the lower part of the chain, because then, when
the chain gets jammed, the recoil effect will be directed away
from the operator's body, towards the cut wood.
WOOD CUTTING
When cutting pieces of wood, follow the safety instructions and
proceed as follows:
• Make sure that the piece of material cannot move.
• Fasten short pieces of material with clamps before starting to cut.
• Slowly moving only cut wood or wood-based materials.
• Before cutting, make sure the saw does not come into contact with
stones or nails, as this could break the saw out and damage the
saw chain.
• Avoid situations where a running saw could touch the wire fence
or the ground.
• When cutting branches, support the saw as much as possible and
do not cut through the guide bar of the saw chain with the tip.
• Watch out for obstacles such as protruding stumps, roots, hollows
and holes in the ground as they may cause you to fall.
CUTTING THROUGH TREE TRUNKS
• Press the buttress claw (10) against the material and make a cut
(Fig. O).
• If the cutting could not be completed despite the saw depletion
being able to move, do the following:
- move the guide back some distance from the material to be cut
(with the saw chain moving), move the handle (7) down slightly and
support the buttress claw (10).
- finish the cut by slightly lifting the handle (7).
CUTTING THROUGH ON THE EARTH
WARNING!
• Always have a firm grip on the ground with your feet. It is not
allowed to stand on the trunk.
• Watch out for the fallen trunk to turn over.
• Follow the instructions in the safe work instructions to avoid
kickback of the saw
• Always finish the cut on the tensile side to prevent the saw chain
from jamming in the kerf.
• Before starting work, check the direction of the tension in the log
to be cut to avoid jamming the saw chain.
• Make the first cut on the tensile side to eliminate it (fig. P).
• When cutting a stump lying on the ground, first make a cut to a
depth equal to 1/3 of its diameter, then turn the stump and finish
cutting on the opposite side.
• When cutting a stump lying on the ground, do not allow the saw
chain to sink into the ground located under the stump. Failure to do
so may result in immediate damage to the chain.
• When cutting logs lying on a slope, the operator should always be
on the slope above the log.
CUTTING HILLED ABOVE THE EARTH
In the case of trunks supported or placed on stable trestles,
depending on the cutting site, always indent one third of the trunk
thickness from the side.compressive stress and finish the cut on the
opposite side (Fig. R).
TRIMMING / CUTTING BRANCHES OF TREES AND BUSHES
• Trimming the branches of the felled tree should be started at the
base of the felled tree and continued towards the top. Cut small
twigs with one cut.
• First check in which direction the branch is bent. Then make a
preliminary cut from the side of the bend and finish the cut from the
opposite side. Be careful that the branch being cut may spring back.
• When pruning tree branches you should always cut from top to
bottom, allowing the cut branches to fall freely. Sometimes,
however, it may be useful to undercut the branches from below (Fig.
S).
• Be especially careful when cutting through branches that may be
under tension. Such a branch may jump back and hit the operator
when cut off.
WARNING!
• Branches must not be cut while climbing a tree.
• Do not stand on ladders, platforms, logs or any other position
that may cause loss of balance and control of the saw.
• Do not cut above shoulder height.
• Always hold the saw with both hands.
CARE AND MAINTENANCE
WARNING! Before performing any installation, adjustment,
repair or maintenance activities, remove the battery from the
device.
ATTENTION! Be careful with the sharp edges of the chain.
When the saw is not in use, the guide bar and chain should
always be protected with a guard (fig. T).
SHARPENING THE SAW CHAIN
Give proper attention to cutting tools. Cutting tools should be sharp
and clean to ensure that the job is done efficiently and safely.
Sharpening a chain yourself requires the necessary equipment as
well as skill. It is recommended that chain sharpening be entrusted
to specialized workshops.
CHAIN GUIDE
The guide bar is subject to particularly intense wear on the front and
bottom parts. To prevent frictional wear from one side, it is
recommended to check the guide bar each time the chain is
sharpened.
CHAIN WHEEL
The chain wheel (17) is subject to particularly intense wear. If there
are clear signs of wear on the gear teeth, the wheel must be
replaced. A worn chain wheel will further reduce the life of the saw
chain. The sprocket should be replaced by an authorized service
workshop.
MAINTENANCE AND STORAGE
• Do not use any cleaning agents or solvents as these may damage
the plastic parts.
• Be careful not to let water get inside the device.
• Always ensure that the air vents in the motor housing are not
obstructed.
• Only the maintenance work described in this manual may be
carried out on the saw. Any other activities may only be performed
by an authorized service center.
• do not make any changes to the structure of the saw.
• The saw, when not in use, should be stored clean, on a flat
surface, in a dry place, out of the reach of children.
All kinds of faults should be removed by the manufacturer's
authorized service.

16
TECHNICAL PARAMETERS
RATED DATA
NOISE AND VIBRATION DATA
Sound pressure level
LpA = 90,4 dB (A) K=3dB (A)
Sound power level
LWA = 99,4 dB (A) K=3dB (A)
Vibration acceleration value
(front handle)
ah = 6,414 m/s2 K=1,5 m/s2
Vibration acceleration value
(rear handle)
ah = 4,819 m/s2 K=1,5 m/s2
Information regarding noise and vibration
The level of noise emitted by the device is described by: the level of
the emitted sound pressure LpA and the sound power level LWA
(where K is the measurement uncertainty). The vibrations emitted
by the device are described by the value of the vibration
acceleration ah (where K is the measurement uncertainty).
The following information: emitted sound pressure level LpA, sound
power level LWA and vibration acceleration ah have been
measured in accordance with EN 60745-1. The stated vibration
level ah can be used to compare devices and for a preliminary
assessment of vibration exposure.
The stated vibration level is representative only for the basic use of
the device. If the machine is used for different applications or with
different work tools, the vibration level may change. The higher
vibration level will be influenced by inadequate or too seldom
maintenance of the device. The reasons given above may result in
an increased exposure to vibration during the entire period of
operation.
To accurately estimate exposure to vibration, consider periods
when the equipment is turned off or when it is turned on but
not in use. After all factors have been carefully assessed, the
overall vibration exposure may be significantly lower.
In order to protect the user against the effects of vibrations,
additional safety measures should be implemented, such as:
periodic maintenance of the device and working tools, protection of
the appropriate temperature of hands and proper organization of
work.
ENVIRONMENTAL PROTECTION
Electrical equipment must not be disposed off with household
waste and, instead, should be utilized at appropriate facilities.
Information on utilization can be provided by the product vendor or
the local authorities. Waste electrical and electronic equipment
contains substances that are not neutral to the natural
environment. Equipment that is not recycled constitutes a potential
hazard to the environment and to human health.
* Right to introduce changes is reserved.
“Grupa Topex Spółka z ograniczoną odpowiedzialnością” Spółka komandytowa
with seat in Warsaw at ul. Pograniczna 2/4 (hereinafter Grupa Topex) informs,
that all copyrights to this instruction (hereinafter Instruction), including, but not
limited to, text, photographies, schemes, drawings and layout of the instruction,
belong to Grupa Topex exclusively and are protected by laws accordingly to
Copyright and Related Rights Act of 4 February 2004 (ustawa o prawie autorskim
i prawach pokrewnych, Dz. U. 2006 No 90 item 631 with later ammendments).
Copying, processing, publishing, modifications for commercial purposes of the
entire Instruction or its parts without written permission of Grupa Topex are strictly
forbidden and may cause civil and legal liability.
ÜBERSETZUNG DER ORIGINAL
BETRIEBSANLEITUNG
KABELLOSE KETTENSÄGE
58G034
BEACHTUNG! LESEN SIE DIESES HANDBUCH SORGFÄLTIG
DURCH, BEVOR SIE DAS STROMWERKZEUG VERWENDEN,
UND BEWAHREN SIE ES FÜR ZUKÜNFTIGE VERWEISE AUF.
DETAILLIERTE SICHERHEITSVORSCHRIFTEN
SPEZIFISCHE SICHERHEITSBEDINGUNGEN FÜR
KABELLOSE KETTENSÄGEN
WARNUNG! Beachten Sie bei der Verwendung der Kettensäge
die Sicherheitsbestimmungen. Lesen Sie zu Ihrer eigenen
Sicherheit und zur Sicherheit Dritter dieses Handbuch, bevor
Sie mit der Arbeit mit der Kettensäge beginnen. Bitte bewahren
Sie dieses Handbuch zum späteren Nachschlagen auf.
KETTENSÄGENSICHERHEITSHINWEISE:
• Halten Sie alle Körperteile von der Sägekette fern, wenn die
Säge in Betrieb ist. Stellen Sie vor dem Starten der Kettensäge
sicher, dass die Sägekette nichts berührt. Ein Moment der
Unaufmerksamkeit beim Bedienen von Kettensägen kann zu einer
Verwicklung Ihrer Kleidung oder Ihres Körpers mit der Sägekette
führen.
• Halten Sie die Kettensäge immer mit der rechten Hand am
hinteren Griff und der linken Hand am vorderen Griff. Das
Halten der Kettensäge mit einer umgekehrten Handkonfiguration
erhöht das Risiko von Personenschäden und sollte niemals
durchgeführt werden.
• Tragen Sie eine Schutzbrille und einen Gehörschutz. Weitere
Schutzausrüstung für Kopf, Hände, Beine und Füße wird
empfohlen. Angemessene Schutzkleidung verringert
Personenschäden durch herumfliegende Fremdkörper oder
versehentlichen Kontakt mit der Sägekette.
• Betreiben Sie keine Kettensäge in einem Baum. Der Betrieb
einer Kettensäge in einem Baum kann zu Verletzungen führen.
• Halten Sie immer den richtigen Stand und bedienen Sie die
Kettensäge nur, wenn Sie auf einer festen, sicheren und
ebenen Oberfläche stehen. Rutschige oder instabile Oberflächen
wie Leitern können zu Gleichgewichtsstörungen oder zur Kontrolle
der Kettensäge führen.
• Achten Sie beim Schneiden eines unter Spannung stehenden
Gliedes auf ein Zurückfedern. Wenn die Spannung in den
Holzfasern gelöst wird, kann das federbelastete Glied den Bediener
treffen und / oder die Kettensäge außer Kontrolle bringen.
• Gehen Sie beim Schneiden von Bürste und Setzlingen
äußerst vorsichtig vor. Das schlanke Material kann die Sägekette
erfassen und auf Sie zugeschlagen werden oder Sie aus dem
Gleichgewicht bringen.
• Tragen Sie die Kettensäge am vorderen Griff bei
ausgeschalteter Kettensäge und von Ihrem Körper weg. Beim
Transport oder bei der Lagerung der Kettensäge immer die
Abdeckung der Führungsschiene anbringen. Durch die richtige
Handhabung der Kettensäge wird die Wahrscheinlichkeit eines
versehentlichen Kontakts mit der beweglichen Sägekette verringert.
• Befolgen Sie die Anweisungen zum Schmieren, Spannen und
Wechseln des Zubehörs. Eine falsch gespannte oder geschmierte
Kette kann entweder brechen oder die Wahrscheinlichkeit eines
Rückschlags erhöhen.
• Halten Sie die Griffe trocken, sauber und frei von Öl und Fett.
Fettige, ölige Griffe Ale rutschig, was zu Kontrollverlust führt.
• Nur Holz schneiden. Verwenden Sie die Kettensäge nicht für
nicht vorgesehene Zwecke. Zum Beispiel: Verwenden Sie
keine Kettensäge zum Schneiden von Kunststoff-,
Mauerwerks- oder Nichtholzbaustoffen. Die Verwendung der
Kettensäge für andere als vorgesehene Vorgänge kann zu einer
gefährlichen Situation führen.
Cordless chainsaw 58G034
Parameter
Value
Battery voltage
18V DC
Engine speed (no load)
3300 min-1
Chain linear speed (no load)
6 m/s
Chain oil tank capacity
100 ml
Chain oil supply system
automatic
Chain wheel (teeth x pitch)
6 x 3/8’’
Type of guide
10’’ (250 mm)
Working length of the guide
240 mm
Chain pitch
3/8’’ (9,525 mm)
Chain thickness
1,3 mm
Protection class
III
Mass
3,2 kg
Year of production
2021
58G034 stands for both the type and designation of the
machine

17
URSACHEN UND BETRIEBSVORBEUGUNG VON KICKBACK:
Ein Rückschlag kann auftreten, wenn die Nase oder Spitze der
Führungsschiene ein Objekt berührt oder wenn sich das Holz
schließt und die Sägekette im Schnitt einklemmt.
In einigen Fällen kann ein Kontakt mit der Spitze eine plötzliche
Rückreaktion verursachen, bei der die Führungsschiene nach oben
und hinten in Richtung Bediener getreten wird.
Durch Einklemmen der Sägekette entlang der Oberseite der
Führungsschiene kann die Führungsschiene schnell zurück zum
Bediener gedrückt werden.
Jede dieser Reaktionen kann dazu führen, dass Sie die Kontrolle
über die Säge verlieren, was zu schweren Verletzungen führen
kann. Verlassen Sie sich nicht ausschließlich auf die in Ihre Säge
eingebauten Sicherheitsvorrichtungen. Als Benutzer einer
Kettensäge sollten Sie mehrere Schritte unternehmen, um Ihre
Schneidarbeiten frei von Unfällen oder Verletzungen zu halten.
Rückschlag ist das Ergebnis von Werkzeugmissbrauch und / oder
falschen Betriebsverfahren oder -bedingungen und kann vermieden
werden, indem die folgenden Vorsichtsmaßnahmen getroffen
werden:
• Halten Sie einen festen Griff mit Daumen und Fingern, die die
Kettensägengriffe umschließen, mit beiden Händen an der
Säge und positionieren Sie Ihren Körper und Arm, damit Sie
Rückschlagkräften widerstehen können. Rückschlagkräfte
können vom Bediener gesteuert werden, wenn die entsprechenden
Vorsichtsmaßnahmen getroffen werden. Lassen Sie die
Kettensäge nicht los.
• Überschreiten Sie nicht und schneiden Sie nicht über die
Sollhöhe hinaus. Dies verhindert unbeabsichtigten Kontakt mit der
Spitze und ermöglicht eine bessere Kontrolle der Kettensäge in
unerwarteten Situationen.
• Verwenden Sie nur vom Hersteller angegebene
Ersatzstangen und -ketten. Falsche Ersatzstangen und -ketten
können zu Kettenbruch und / oder Rückschlag führen.
• Befolgen Sie die Anweisungen des Herstellers zum Schärfen
und zur Wartung der Sägekette. Das Verringern der Höhe des
Tiefenmessers kann zu einem erhöhten Rückschlag führen.
ZUSÄTZLICHE SICHERHEITSTIPPS:
• Halten Sie die Säge nur an den isolierten Griffen fest, da die
Sägekette den unsichtbaren elektrischen Draht berühren kann.
Das Berühren eines stromführenden Kabels mit der Sägekette kann
dazu führen, dass an den freiliegenden Teilen des Werkzeugs
Spannung auftritt und der Bediener einen Stromschlag erleidet.
• Mit der Kettensäge werden Wartungsarbeiten im Hausgarten
durchgeführt. Es ist zum Schneiden oder Schneiden von Zweigen
vorgesehen. Das Gerät ist nicht zum Fällen von Bäumen
vorgesehen.
ARBEIT
• Seien Sie am Ende des Schneidens besonders vorsichtig, da die
Säge, die keinen Widerstand in Form des geschnittenen Materials
aufweist, durch Trägheit herunterfällt, was zu Verletzungen führen
kann.
• Der Bediener kann bei längerer Arbeit ein Kribbeln oder
Taubheitsgefühl in den Fingern und Händen verspüren. Sie sollten
dann aufhören zu arbeiten, da Taubheitsgefühl die Präzision bei der
Verwendung der Säge verringert.
• Die Säge wird während des Betriebs heiß. Achten Sie darauf,
keine freiliegenden Körperteile mit heißen Teilen der Säge zu
berühren.
• Die Kettensäge darf jeweils nur von einer Person bedient werden.
Halten Sie alle anderen Personen und Tiere vom Arbeitsbereich der
Kettensäge fern.
• Beim Starten der Säge darf die Sägekette nicht auf dem zu
schneidenden Material aufliegen.
• Die Kettensäge darf nicht von Kindern oder Jugendlichen benutzt
werden. Die Kettensäge darf nur Erwachsenen anvertraut werden,
die wissen, wie man sie benutzt. Wenn Sie eine Kettensäge
bereitstellen, muss auch diese Bedienungsanleitung verfügbar
sein.
• Verwenden Sie die Kettensäge sofort nicht mehr, wenn Sie sich
müde fühlen.
• Beim Schneiden von Schnittholz oder dünnen Gliedmaßen sollte
eine Stütze (Bock) verwendet werden.
• Es ist nicht gestattet, mehrere Bretter gleichzeitig (übereinander
gestapelt) zu schneiden, Material, das von einer anderen Person
oder von einem Bein gehalten wird.
• Lang geschnittene Elemente sollten ordnungsgemäß befestigt
sein.
• Führen Sie an Hängen den Schnitt immer aus, während Sie mit
der Oberseite des Hangs stehen.
• Verwenden Sie beim Durchschneiden immer die Stützklaue als
Drehpunkt. Halten Sie die Säge am hinteren Griff und führen Sie sie
mit dem vorderen Griff.
• Wenn es nicht möglich ist, sofort einen Schnitt auszuführen,
verlängern Sie die Säge, setzen Sie den Stützpfeiler auf den
Stützpfeiler und schneiden Sie weiter, indem Sie den hinteren Griff
der Säge anheben.
• Positionieren Sie sich beim horizontalen Schneiden in einem
Winkel, der am wenigsten von 90 ° zur Schnittlinie abweicht. Das
horizontale Schneiden erfordert viel Konzentration seitens des
Sägebetreibers.
• Wenn sich die Kette beim Schneiden mit der Oberseite der Kette
verklemmt, wird ein sogenannter Rückschlag auf den Bediener
gerichtet. Versuchen Sie daher nach Möglichkeit, mit dem unteren
Teil der Kette zu schneiden, da der Rückstoßeffekt beim
Einklemmen der Kette vom Körper des Bedieners weg gerichtet
wird.
• Beim Schneiden von Holzspalten ist besondere Vorsicht geboten.
Die geschnittenen Holzstücke können in jede Richtung geworfen
werden (Verletzungsgefahr!).
• Das Schneiden von Ästen sollte von geschultem Personal
durchgeführt werden! Es besteht Verletzungsgefahr, wenn der
Ast fällt, wenn er unkontrolliert fällt!
• Achten Sie auf Stümpfe, die zum Bediener hin rollen können.
Spring weg!
• Während des Rückschlags verhält sich die Säge unkontrolliert
und die Kette löst sich.
• Eine falsch geschärfte Kette erhöht das Risiko eines Rückschlags.
• Halten Sie die Kettensäge beim Starten und Bedienen mit beiden
Händen fest.
• Stellen Sie sicher, dass das zu schneidende Material fest sitzt.
• Verwenden Sie Klammern, um das Material an Ort und Stelle zu
halten.
• Schneiden Sie niemals mehr als einen Ast gleichzeitig. Achten Sie
beim Schneiden auf die umliegenden Äste.
WARTUNG UND LAGERUNG
• Halten Sie alle Komponenten in gutem Zustand, um
sicherzustellen, dass die Säge sicher funktioniert.
• Ersetzen Sie abgenutzte oder beschädigte Teile aus
Sicherheitsgründen.
• Schützen Sie die Säge vor Feuchtigkeit.
• Von Kindern fern halten.
BEACHTUNG! Trotz der inhärent sicheren Konstruktion, der
Anwendung von Sicherheitsmaßnahmen und zusätzlichen
Schutzmaßnahmen besteht immer ein Restverletzungsrisiko
während der Arbeit.

18
Erklärung der verwendeten Piktogramme.
1. VORSICHT! Treffen Sie besondere Vorsichtsmaßnahmen.
2. Lesen Sie die Bedienungsanleitung, beachten Sie die darin
enthaltenen Warnungen und Sicherheitsbedingungen!
3. Verwenden Sie persönliche Schutzausrüstung (Schutzbrille,
Gehörschutz).
4. Verwenden Sie Schutzhandschuhe.
5. Schutzkleidung verwenden.
6. Halten Sie Kinder vom Werkzeug fern.
7. Entfernen Sie den Akku aus dem Gerät, bevor Sie Einstellungen
oder Reinigungen vornehmen.
8. Ein Gartengerät für den Außenbereich.
9. Schützen Sie das Gerät vor Feuchtigkeit.
10. Halten Sie Ihre Gliedmaßen von den Schneidelementen fern!
11. Bedrohung durch Rückschlag.
12. Vorsicht, Gefahr, sich die Hände oder Finger zu schneiden.
13. Halten Sie einen Sicherheitsabstand zu den in Betrieb
befindlichen Gartengeräten ein.
14. Recycling.
BAU UND GEBRAUCH
Die schnurlose Kettensäge ist ein Handgerät. Der Antrieb ist ein
Gleichstromkommutatormotor. Diese Arten von Elektrowerkzeugen
sind für die Arbeit im Hausgarten vorgesehen. Mit der Säge können
Baumpflegeschnitte durchgeführt, Äste beschnitten, Brennholz,
Kaminholz und andere Anwendungen, bei denen Holz gesägt
werden muss, vorbereitet werden. Die schnurlose Kettensäge ist
ein Elektrowerkzeug, das nur für Amateure bestimmt ist. Die
schnurlose Kettensäge ist ein Handgerät. Der Antrieb ist ein
Gleichstromkommutatormotor. Diese Arten von Elektrowerkzeugen
sind für die Arbeit im Hausgarten vorgesehen. Mit der Säge können
Baumpflegeschnitte durchgeführt, Äste beschnitten, Brennholz,
Kaminholz und andere Anwendungen, bei denen Holz gesägt
werden muss, vorbereitet werden. Die schnurlose Kettensäge ist
ein Elektrowerkzeug, das nur für Amateure bestimmt ist.
WARNUNG! Das Gerät sollte nicht beim Fällen von Bäumen
verwendet werden. Verwenden Sie das Gerät nicht entgegen
dem Verwendungszweck.
BESCHREIBUNG DER ZEICHNUNGSSEITEN
Die folgende Nummerierung bezieht sich auf die Komponenten des
Geräts, die auf den Grafikseiten dieses Handbuchs angezeigt
werden.
1. Kette
2. Anleitung
3. Bremshebel (vorderer Handschutz)
4. Vorderer Griff
5. Sperren Sie die Sperrtaste
6. Wechseln
7. Griff
8. Ölstandsanzeige
9. Öleinfülldeckel
10. Die Klaue des Pfeilers
11. Der Befestigungsknopf der Führungsschiene
12. Kettenspannungsknopf
13. Kettenradabdeckung
14. Kettenführungsschutz
15. Haken abdecken
16. Schraube
17. Kettenrad
18. Ölkanal
* Es können Unterschiede zwischen Produkt und Zeichnung
auftreten.
AUSRÜSTUNG UND ZUBEHÖR
1. Führung - 1 Stck.
2. Kette - 1 Stck.
3. Führungsabdeckung - 1 Stck.
VORBEREITUNG ZUR ARBEIT
ÜBERTRAGUNG DER KETTENSÄGE
WARNUNG! Trennen Sie immer die Batterie und schieben Sie
die Kettenführungsabdeckung auf, bevor Sie die Kettensäge
bewegen. Wenn mehrere Schneidvorgänge nacheinander
ausgeführt werden müssen, sollte die Säge zwischen den
Vorgängen mit dem Schalter ausgeschaltet werden.
MONTAGE DER FÜHRUNGSLEISTE UND DER SÄGEKETTE
BEACHTUNG! Kettenführung und Sägekette werden separat
geliefert.
Die Kettensäge sollte von der Stromquelle (Batterie) getrennt
werden.
Tragen Sie immer Schutzhandschuhe, wenn Sie die Kette
montieren und die Kette überprüfen, um Verletzungen durch
scharfe Kanten zu vermeiden.
WARNUNG! Überprüfen Sie vor dem Zusammenbau der
Führungsschiene mit der Kette die korrekte Positionierung der
Kettenschneidklingen (die korrekte Positionierung der Kette
auf der Führungsschiene wird durch den Pfeil auf der
Führungsschienenspitze angezeigt) (Abb. A).
• Schieben Sie den beweglichen Teil des Stangenmontageknopfs
(11) aus der Verriegelung und lassen Sie ihn los (Abb. B).
• Ziehen Sie den beweglichen Teil des Knopfes zurück und drehen
Sie ihn gegen den Uhrzeigersinn, um den Druck des
Führungsknopf-Montageknopfs (11) zu verringern (Abb. C).
• Entfernen Sie die Kettenradabdeckung (13), indem Sie die
Abdeckungsriegel (15) aus den Haltelöchern herausschieben (Abb.
D).
• Halten Sie die Führung (2) senkrecht, so dass ihre Spitze nach
oben zeigt.
• Die Kette (1) beginnend an der Spitze der Führungsschiene (2)
montieren.
• Stellen Sie sicher, dass sich die Kette (1) in der Führungsnut der
Führungsschiene (2) befindet.
• Setzen Sie die Stange (2) mit der angebrachten Kette (1) auf das
Kettenrad (17) (stellen Sie sicher, dass sich der Stift (16) in der Nut
in der Mitte der Stange befindet) (Abb. E, F).
• Setzen Sie die Kettenradabdeckung (13) ein, indem Sie die
Abdeckungsverriegelungen (15) in die Positionierungslöcher
einsetzen und den Befestigungsknopf (11) der Führungsschiene
leicht festziehen.
ANZIEHEN DER SÄGEKETTE
Drehen Sie den Kettenspannknopf (12) mit losem
Stangenbefestigungsknopf (11).
• im Uhrzeigersinn - um die Kette zu dehnen.
• gegen den Uhrzeigersinn - um die Kette zu lösen.
• Überprüfen Sie, ob die Kettenspannung korrekt ist.
• Sichern Sie den Befestigungsknopf (11) der Führungsschiene.
BEACHTUNG! Sie können die Kette nicht zu fest ziehen. Die
Sägekette sollte gespannt werden, damit sie etwa 5 mm in der
Mitte der Führungsschiene angehoben werden kann (Abb. G).

19
Die Sägekette wird während des Betriebs heiß, wodurch sie
sich dehnt und löst, und es besteht die Gefahr, dass sie von
der Führungsschiene rutscht.
Anpassungen an einer sehr heißen Kette können zu einem zu
starken Festziehen der Kette beim Abkühlen führen.
BEACHTUNG! Eine neue Sägekette benötigt eine Einlaufzeit
von ca. 5 Minuten. In diesem Stadium ist es sehr wichtig, die
Kette zu schmieren. Überprüfen Sie die Kettenspannung nach
der Einlaufzeit und korrigieren Sie sie gegebenenfalls.
Oft ist es notwendig, die Spannung zu überprüfen und
einzustellen, da eine lose Kette leicht von der
Führungsschiene fallen, sich schnell abnutzen oder einen
schnellen Verschleiß der Führungsschiene verursachen kann.
KETTENSCHMIERSTOFFE
Die Haltbarkeit der Ketten- und Sägeführungsstange hängt
weitgehend von der Qualität des verwendeten Schmiermittels ab.
Verwenden Sie nur Schmiermittel für Kettensägen.
WARNUNG! Verwenden Sie niemals altes Altöl, um die
Sägekette zu schmieren.
FÜLLEN SIE DEN TANK MIT ÖL FÜR DIE
KETTENSCHMIERUNG
BEACHTUNG! Die neue Säge hat einen leeren Ölbehälter. Vor
der Verwendung der Kettensäge muss der Tank mit Öl gefüllt
werden.
Reinigen Sie den Öleinfülldeckel (9), bevor Sie ihn entfernen, um
zu verhindern, dass Schmutz in den Behälter gelangt.
• Heben Sie den beweglichen Teil der Stopfenabdeckung an (Abb.
H) und schrauben Sie die Öleinfüllschraube (9) ab.
• Gießen Sie hochwertiges Öl in den Vorratsbehälter, bis das
gesamte Fenster der Ölstandsanzeige (8) mit Öl gefüllt ist (Abb. I).
• Schließen Sie nach dem Einfüllen von Öl den Öltank, indem Sie
die Öleinfüllschraube (9) vorsichtig festziehen.
• Überprüfen Sie bei Verwendung der Säge den Ölstand im Tank
anhand der Ölstandsanzeige (8).
KETTENSCHMIERUNG
WARNUNG! Um übermäßigen Reibungsverschleiß zu
vermeiden, müssen die Sägekette und die Stange während des
Betriebs geschmiert werden.
Arbeiten Sie niemals mit der Kettensäge, wenn die Schmierung
der genannten Komponenten nicht vorgesehen ist. Wenn die
Kette trocken läuft, wird der gesamte Schneidemechanismus
schnell schwer beschädigt. Deshalb ist es so wichtig, die
Kettenschmierung und den Ölstand während der Verwendung
der Säge zu überprüfen.
KETTENSCHMIERUNG PRÜFEN
Die Schmierung der Kette und der Führungsschiene erfolgt
automatisch. Überprüfen Sie vor Beginn der Arbeiten die
Schmierung der Sägekette und den Ölstand im Vorratsbehälter.
• Schalten Sie die Kettensäge ein und halten Sie sie vom Boden ab
• Wenn Sie zunehmende Ölspuren feststellen, funktioniert die
Kettenschmierung ordnungsgemäß (Abb. J).
• Wenn überhaupt keine Ölspuren vorhanden sind, reinigen Sie den
Ölauslass (18) (Abb. E) und den Führungsölkanal (Abb. K) oder
wenden Sie sich an das Servicecenter.
BEACHTUNG! Seien Sie vorsichtig und lassen Sie die
Kettensäge niemals den Boden berühren. Halten Sie aus
Sicherheitsgründen immer einen Abstand zum Boden und
mindestens 20 cm ein.
BEVOR SIE IHRE KETTENSÄGE STARTEN
• Überprüfen Sie, ob die Kettenschmierung und der auf dem
Ölmessstab (8) angegebene Zustand korrekt sind.
• Kettenspannung prüfen und ggf. einstellen.
BETRIEB / EINSTELLUNGEN
AN AUS
WARNUNG! Entfernen Sie vor dem Betrieb der Säge die
Kettenführungsabdeckung und setzen Sie die Batterie ein.
Die Säge verfügt über eine Schalterverriegelungstaste, um ein
versehentliches Starten zu verhindern.
Einschalten - Drücken Sie die Schalterverriegelungstaste (5) und
dann die Schaltertaste (6) (Abb. L).
Ausschalten - Druck auf den Schalterknopf (6) ablassen.
WARNUNG! Die Säge beginnt sofort mit voller
Geschwindigkeit zu arbeiten, wenn sie eingeschaltet wird.
KETTENBREMSE PRÜFEN
BEACHTUNG! Der Bremshebel und gleichzeitig der vordere
Handschutz (3) schützen die linke Hand vor dem Kontakt mit
der Sägekette und dienen zur automatischen Aktivierung der
Kettenbremse.
Ein Rückschlag tritt auf, wenn die rotierende Kette auf einen
harten Gegenstand mit dem Bereich um das obere Viertel der
Stangenspitze trifft und plötzlich gestoppt wird. Die rotierende
Kette verklemmt sich in der Spitze der Stange.
Die Kettenbremse wird bei einem ausreichend starken Rückschlag
automatisch durch die Trägheitskraft betätigt oder kann vom
Benutzer betätigt werden.
Ziehen Sie den Bremshebel (3) mit der linken Hand vom vorderen
Griff (4) weg. Die Kettenbremse rastet hörbar ein. Die
Kettenbremse ist angezogen.
• Ziehen Sie den Bremshebel (3) mit der linken Hand zum Benutzer.
Der Bremshebel (3) rastet hörbar ein. Die Kettenbremse ist jetzt
gelöst.
• Schalten Sie die Säge ein.
• Kettenbremse anziehen. Wenn die Sägekette sofort stoppt,
funktioniert die Kettenbremse ordnungsgemäß.
• Wenn die Sägekette nicht sofort stoppt, ist die Kettenbremse
defekt. Verwenden Sie die Säge nicht und wenden Sie sich an ein
autorisiertes Servicecenter.
KETTENSÄGE ARBEITEN
BEACHTUNG! Verwenden Sie niemals eine Kettensäge bei
Regen oder Nässe.
WARNUNG! Alle Teile sollten ordnungsgemäß installiert sein
und den Anforderungen für einen ordnungsgemäßen
Sägebetrieb entsprechen. Beschädigte Sicherheitselemente
oder Teile sollten sofort repariert oder ersetzt werden.
• Lesen Sie vor Beginn der geplanten Arbeiten den Abschnitt über
den sicheren Betrieb der Kettensäge. Es wird empfohlen, zuerst
das Schneiden unnötiger Holzstücke zu üben. Außerdem können
Sie die Funktionen der Säge genauer kennenlernen.
• Befolgen Sie immer die Sicherheitsbestimmungen.
• Die Kettensäge darf nur zum Schneiden von Holz verwendet
werden. Es ist verboten, andere Materialien damit zu schneiden.
• Die Intensität der Vibrationen und das Phänomen des Rückstoßes
ändern sich beim Fällen verschiedener Baumarten.
• Verwenden Sie die Kettensäge nicht als Hebel zum Heben,
Bewegen oder Trennen von Gegenständen.
• Wenn die Kette verklemmt ist, schalten Sie den Motor aus und
setzen Sie einen Kunststoff- oder Holzkeil in das Holz ein, um die
Säge freizugeben (Abb. M). Starten Sie die Maschine neu und
beginnen Sie erneut vorsichtig zu schneiden.
• Es darf nicht an stationären Positionen befestigt werden.
• Es ist verboten, andere Geräte an den Antrieb anzuschließen, die
nicht vom Hersteller der Säge angegeben wurden.
• Beim Schneiden muss kein großer Druck auf die Säge ausgeübt
werden. Es muss nur ein geringer Druck ausgeübt werden.
BEACHTUNG! Wenn sich die Säge während des Schneidens
im Schnitt verklemmt, darf sie nicht mit Gewalt herausgezogen
werden. Dies kann zum Verlust der Kontrolle über die Säge und
Pagina se încarcă...
Pagina se încarcă...
Pagina se încarcă...
Pagina se încarcă...
Pagina se încarcă...
Pagina se încarcă...
Pagina se încarcă...
Pagina se încarcă...
Pagina se încarcă...
Pagina se încarcă...
Pagina se încarcă...
Pagina se încarcă...
Pagina se încarcă...
Pagina se încarcă...
Pagina se încarcă...
Pagina se încarcă...
Pagina se încarcă...
Pagina se încarcă...
Pagina se încarcă...
Pagina se încarcă...
Pagina se încarcă...
Pagina se încarcă...
Pagina se încarcă...
Pagina se încarcă...
Pagina se încarcă...
Pagina se încarcă...
Pagina se încarcă...
Pagina se încarcă...
Pagina se încarcă...
Pagina se încarcă...
Pagina se încarcă...
Pagina se încarcă...
Pagina se încarcă...
Pagina se încarcă...
Pagina se încarcă...
Pagina se încarcă...
Pagina se încarcă...
Pagina se încarcă...
Pagina se încarcă...
Pagina se încarcă...
Pagina se încarcă...
Pagina se încarcă...
Pagina se încarcă...
Pagina se încarcă...
Pagina se încarcă...
Pagina se încarcă...
Pagina se încarcă...
Pagina se încarcă...
Pagina se încarcă...
Pagina se încarcă...
Pagina se încarcă...
Pagina se încarcă...
Pagina se încarcă...
Pagina se încarcă...
Pagina se încarcă...
Pagina se încarcă...
Pagina se încarcă...
Pagina se încarcă...
Pagina se încarcă...
Pagina se încarcă...
Pagina se încarcă...
Pagina se încarcă...
Pagina se încarcă...
Pagina se încarcă...
Pagina se încarcă...
Pagina se încarcă...
Pagina se încarcă...
Pagina se încarcă...
Pagina se încarcă...
Pagina se încarcă...
Pagina se încarcă...
Pagina se încarcă...
Pagina se încarcă...
Pagina se încarcă...
Pagina se încarcă...
Pagina se încarcă...
Pagina se încarcă...
Pagina se încarcă...
Pagina se încarcă...
Pagina se încarcă...
Pagina se încarcă...
Pagina se încarcă...
-
 1
1
-
 2
2
-
 3
3
-
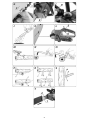 4
4
-
 5
5
-
 6
6
-
 7
7
-
 8
8
-
 9
9
-
 10
10
-
 11
11
-
 12
12
-
 13
13
-
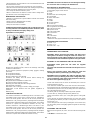 14
14
-
 15
15
-
 16
16
-
 17
17
-
 18
18
-
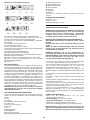 19
19
-
 20
20
-
 21
21
-
 22
22
-
 23
23
-
 24
24
-
 25
25
-
 26
26
-
 27
27
-
 28
28
-
 29
29
-
 30
30
-
 31
31
-
 32
32
-
 33
33
-
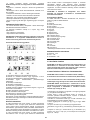 34
34
-
 35
35
-
 36
36
-
 37
37
-
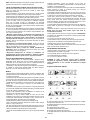 38
38
-
 39
39
-
 40
40
-
 41
41
-
 42
42
-
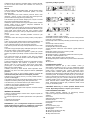 43
43
-
 44
44
-
 45
45
-
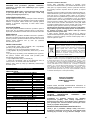 46
46
-
 47
47
-
 48
48
-
 49
49
-
 50
50
-
 51
51
-
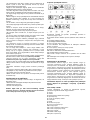 52
52
-
 53
53
-
 54
54
-
 55
55
-
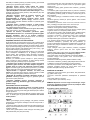 56
56
-
 57
57
-
 58
58
-
 59
59
-
 60
60
-
 61
61
-
 62
62
-
 63
63
-
 64
64
-
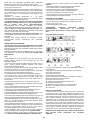 65
65
-
 66
66
-
 67
67
-
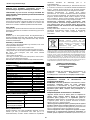 68
68
-
 69
69
-
 70
70
-
 71
71
-
 72
72
-
 73
73
-
 74
74
-
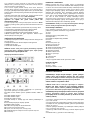 75
75
-
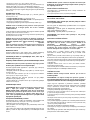 76
76
-
 77
77
-
 78
78
-
 79
79
-
 80
80
-
 81
81
-
 82
82
-
 83
83
-
 84
84
-
 85
85
-
 86
86
-
 87
87
-
 88
88
-
 89
89
-
 90
90
-
 91
91
-
 92
92
-
 93
93
-
 94
94
-
 95
95
-
 96
96
-
 97
97
-
 98
98
-
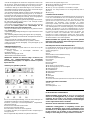 99
99
-
 100
100
-
 101
101
-
 102
102


Graphite 58G034 Manualul proprietarului
- Categorie
- Ferăstraie cu lanț fără fir
- Tip
- Manualul proprietarului
în alte limbi
- slovenčina: Graphite 58G034 Návod na obsluhu
- eesti: Graphite 58G034 Omaniku manuaal
Lucrări înrudite
Alte documente
-
Makita UC3530A Manual de utilizare
-
Makita UC4020A Manual de utilizare
-
Makita DCS232T Manual de utilizare
-
Worx EC-P115 Manualul proprietarului
-
Makita EA3201S Original Instruction Manual
-
Hikoki TCS 33EB Manual de utilizare
-
Oregon 572627 Manual de utilizare
-
STIHL MSA 160 C, 200 C Manualul proprietarului
-
-
Hitachi CS51EAP Handling Instructions Manual