
Swing-Στέπέρ
Οδηγίες συναρμολόγησης και ασφάλειας
Степер
Инструкции за монтаж и безопасност
Stepper Swing
Instrucţiuni de montare şi de siguranţă
Swing-Steper
Napomene za montažu i sigurnosne napomene
Side Swing Stepper
Assembly and safety advice
Z29550
7
Swing-Stepper
Bedienungs- und Sicherheitshinweise

GB / CY Assembly and safety advice Page 6
HR Napomene za montažu i sigurnosne napomene Stranica 14
RO Instrucţiuni de montare şi de siguranţă Pagina 22
BG Инструкции за монтаж и безопасност Страница 30
GR / CY Οδηγίες συναρμολόγησης και ασφάλειας Σελίδα 39
DE / AT / CH Bedienungs- und Sicherheitshinweise Seite 48

3
1
3
2
4
56
7
8

4
A
C
B
D
93
2
7
8
10
11
145
4
14

5
MODE
PUSH
AND
HOLD TO
RESET
STOP
TMR REPS CAL TTR
E
G
I
F
H
K
12
13

6 GB/CY
Table of Contents
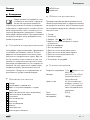
Introduction
Intended use .......................................................................................................................................Page 7
Description of parts ............................................................................................................................Page 7
Scope of Delivery ...............................................................................................................................Page 7
Technical data ....................................................................................................................................Page 7
Safety instructions ..................................................................................................................Page 7
Important health care advice ............................................................................................................Page 8
Battery Safety Instructions ..................................................................................................................Page 9
Assembly ........................................................................................................................................Page 9
Getting started .........................................................................................................................Page 10
Computer functions ............................................................................................................................Page 11
Switching the machine on and off ....................................................................................................Page 11
Choosing the display .........................................................................................................................Page 12
Choosing the mode ............................................................................................................................Page 12
Specifying exercise objectives ..........................................................................................................Page 12
Resetting the display ..........................................................................................................................Page 12
Replacing the batteries ......................................................................................................................Page 12
Cleaning and care ...................................................................................................................Page 13
Disposal ...........................................................................................................................................Page 13

7 GB/CY
Introduction / Safety instructions
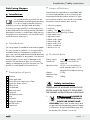
Side Swing Stepper
Q
Introduction
You should familiarise yourself with the
product before assembling and operating
it. To do so, please read the following
assembly instructions and the health and safety
instructions through carefully. Use the product only
as described and for the training exercises described.
Keep these instructions in a safe place. When passing
this product on to third parties, you should also pass
on all documents relating to it.
Q
Intended use
The swing stepper is intended to be a exercise gadget
for use in private households. It is not approved for
installation and use in therapeutic or professional
gyms. Any use of the product other than that described
above or any alteration to the product is not allowed
and can lead to injuries and / or damage to the
product. The manufacturer does not assume any
liability for damage arising from improper use. The
product is not designed for commercial use.
Q
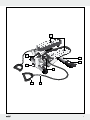
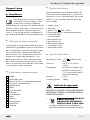
Description of parts
1
Platform
2
Frame pipe back
3
Plastic foot with supporting surface
4
Eyelet (for elastic cords)
5
Elastic cords
6
Cord handle
7
Adjusting screw
8
Computer
9
Self-tapping screw
10
Plug
11
Projection
12
Computer display
13
MODE button
14
Snap hook
Q
Scope of Delivery
Please check the supplied items immediately after
you have unpacked them to ensure that they are
complete and that the product and all of its parts
are in perfect condition. You should not assemble
the product if there are any items missing.
1 side swing stepper
1 computer
1 battery 1.5 V
, AAA, (LR 03)
2 plastic feet with supporting surfaces
2 sheet metal screws
1 adjustment screw
2 elastic cords, green
2 elastic cords, red
2 elastic cords, blue
1 Philips screwdriver
1 directions for use
Q
Technical data
Energy supply: 1.5 V AAA battery, LR 03
Dimensions: approx. 52 x 24 x 52 cm
(w x h x d)
Equipment class: HC (for use in private house-
holds, accuracy class C) / not
designed for therapeutic training
Weight: 9.2 kg
Maximum load
capacity: 100 kg
Safety instructions
PLEASE READ THE ASSEMBLY INSTRUCTIONS
BEFORE USING THE PRODUCT! PLEASE KEEP
THE ASSEMBLY INSTRUCTIONS IN A SAFE PLACE!
J
WARNING!
DANGER TO
LIFE AND DANGER OF ACCI-
DENTS FOR INFANTS AND
CHILDREN! Never leave children alone and
unsupervised with the packaging material. Danger
of suffocation. Always keep children away from
the product. This product is not a toy!

8 GB/CY
Safety instructions
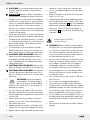
m CAUTION! Do not leave children alone and
unsupervised! The product is not a climbing
frame or toy!
WARNING!
Danger to life by strangulation,
injuries and / or damage to property may result.
J Children or persons who lack the knowledge or
experience to use the device or whose physical,
sensory or intellectual capacities are limited must
never be allowed to use the device without su-
pervision or instruction by a person responsible
for their safety. Children must never be allowed
to play with the device.
J When setting the device up, choose a place that
offers enough space for assembly and training.
The area chosen should be at least 2 x 2 metres
in size and well ventilated. The subsurface must
be level and straight. Check that the product
has a secure footing.
J Oil might leak out of the hydraulic cylinders.
Place the device on a level, non-slip base in or-
der to avoid soiling or marking the subsurface.
m CAUTION! RISK OF INJURY! Make sure
that all parts are undamaged and correctly
assembled. Improper assembly may result in
injury. Damaged parts could adversely affect
safety and function.
m CAUTION! RISK OF INJURY! Never under-
take any changes to the device while exercising.
CAUTION! RISK OF BURNS! The hydraulic
cylinders become hot when exercising. On no
account should you touch them - not even after
exercising.
J
100 kg
CAUTION! Never overload the
swing stepper. The body weight of
the user should not exceed 100 kg.
Otherwise this could result in injuries and / or
damage to property.
J Do not use the swing stepper when you have
bare feet. While exercising, wear comfortable,
air-permeable clothing and trainers that have a
non-slip sole.
J Never subject the swing stepper to high tem-
peratures or moisture. Otherwise damage to
the product may result.
J Regularly check the condition of all parts and
screw joints. You may have to tighten lose screws.
J Repairs may only be undertaken by authorised
specialists. Only original parts may be used.
J Do not use a defective device until it has been
repaired.
J Keep the stepper out of reach of other people
when it is not in use.
J Check regularly that all the threaded connections
are still tight and correctly seated. Check regu-
larly that the elastic belts
5
are firmly attached
and that the hydraulic shock absorbers are not
leaking oil. Do not use the Swing-Stepper or
elastic belts
5
if you discover anything wrong
with them.
Important health
care advice
m CAUTION! Before using this exercise device
for the first time, you must have a general check-
up. Consult your doctor before starting to exer-
cise. Present the doctor with the directions of
use for this product and let the doctor draw up
an individual exercise plan for you.
J You must consult a doctor if you have any of the
following complaints: heart conditions, circula-
tory problems, problems with your balance,
orthopaedic problems or breathing difficul-
ties / asthma. Furthermore, consult a doctor if
you are pregnant or if you are taking medica-
tion that influences your pulse, blood pressure
or cholesterol level.
J Do not exercise if you feel unwell or suffer from
other illnesses.
J Do not exercise immediately after eating.
J Stop exercising immediately if the following
symptoms occur: breathing difficulties, irregular
heartbeat, extreme shortness of breath, drowsi-
ness, dizziness, pain, nausea. Only continue
exercising again after consulting your doctor.
J Do not exhaust yourself completely. At first, you
should exercise at an appropriate range of per-
formance and increase your exercise intensity
slowly.
J Don‘t forget to include warm-up and cool-down
periods.

9 GB/CY
Safety instructions / Assembly
Battery Safety
Instructions
WARNING!
DANGER TO LIFE! Keep
batteries out of the reach of children. Do not
leave batteries lying around. There is a risk of
children or animals swallowing them. Consult a
doctor immediately if a battery is swallowed.
J
EXPLOSION HAZARD! Never
recharge nonrechargeable batteries,
short-circuit and / or open batteries.
This can cause them to overheat, burn or burst.
Never throw batteries into fire or water. The
batteries may explode.
J Immediately remove a spent battery from the
appliance. There is an increased risk of leakage
otherwise!
J Check the battery regularly for leaks.
J Leaked or damaged batteries can cause chemi-
cal burns if they come into contact with the skin;
in such cases you must wear suitable protective
gloves.
J Remove the battery from the product if it is not
going to be used for a prolonged period.
J Make sure that the polarity is correct when you
insert the battery. This is indicated in the battery
compartment.
J Remove any used battery from the device. Very
old or used batteries may leak. The chemical
liquid will damage the product.
J Do not dispose of batteries in the domestic waste!
J All consumers are required by law to dispose
of batteries properly!
J Avoid contact with the skin, eyes and mucous
membranes. In the case of contact with battery
acid, rinse the affected area with plenty of water
and / or consult a doctor!
J Use only batteries of the specified type (see
“Technical Data”).
Q
Assembly
J Make sure the product is only assembled by
competent person.
The swing stepper comes, for the most part, preas-
sembled. The few assembly steps that have to be
taken are described below. You will need to use
the crosshead (Philips) screwdriver supplied.
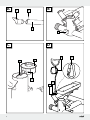
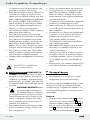
Figure A:
j Insert the two plastic feet
3
into the back frame
pipe
2
in such a way that the supporting sur-
face of the plastic feet
3
point backwards.
Screw the self-tapping screw
9
into each of
the pre-drilled holes in the lower side of the
frame pipe
2
.
Figure B:
j Turn the adjusting screw
7
into the screw
thread on the front frame of the swing stepper.
Note: You can adjust the step height by means
of the adjusting screw
7
. Turning it clockwise
will raise the platforms
1
; turning it anticlock-
wise
will lower the platforms
1
and thus
decrease the step height.
Figure C:
j Pull the computer
8
upwards so that it comes
off the casing. Insert the battery included in
delivery into the battery compartment on the
lower side of the computer
8
. Ensure correct
polarity.
Ensure that the plug
10
is correctly plugged in.
Insert the computer
8
back into the casing
again. To do so, press gently on the projection
11
.
Make sure that the cable does not bend or jam.
Figure D:
j Select the desired elastic cords
5
. Three differ-
ent strengths are supplied for various loads.
See also the table under “Getting started”.
j Now attach the elastic cords
5
. Attach the
two elastic cords
5
by means of snap hooks
14
in the respective eyelet
4
. Before every
training session please ensure that the elastic
cords
5
are securely attached.
The swing stepper is now ready for use.
m ATTENTION! The eyelets
4
must not be sub-
jected to transverse loads as they are only designed

10 GB/CY
Assembly / Getting started
for tensile stress from above. Otherwise this may
result in injuries or damage to the swing stepper.
Note: Unhook the elastic cords
5
if you do not
need them for exercising. This will help you avoid
the danger of stumbling. Finally, check that all nuts,
bolts and screws are securely tightened.
Q
Getting started
You can exercise nearly all your body with this swing
stepper. Besides up and down, the exercise motion
also goes sideways. This means that you will tone
your hips, buttocks and stomach as well as the inner
and outer muscles of your thighs in particular. The
elastic cords
5
are to help you improve your upper
arm muscle strength while exercising.
Carefully read all safety and health care instructions
through.
Warming up:
In order to avoid the risk of injuries, you should
always warm up and relax your muscles before
doing any exercise.
j Set aside about 5 to 10 minutes to warm up
your muscles before you start exercising.
j For example, walk or run on the spot and
swing your arms in circular motions.
Exercising / getting on and off:
j Do not put yourself under any pressure. At the
beginning, you should exercise at a level that
does not strain you. Slowly increase the intensity.
j As someone who is new to exercising, start with
just 3 minutes a day. In the first 2 weeks, increase
the exercise time to not more than 10 minutes.
After that you can increase the intensity.
j Press one pedal all the way down (until it is
lying on the base frame) by firmly pressing the
foot down on the platform
1
. Now step onto
this platform
1
with the appropriate foot and
place the other foot on the platform
1
that is
up in the air.
j Use the exercise device as if you were climbing
stairs.
j Keep your breath as calm and as measured as
possible.
m ATTENTION! Always pay attention to your
body’s reactions when exercising. Stop exercis-
ing immediately if you feel any pain or feel ill.
j Do not stop exercising abruptly. Gradually slow
the step speed down.
j In order to get off the device, press one plat-
form
1
right down and first remove the foot
on the other platform
1
that is in the air. After
that, get off the other platform
1
.
Note: The way the device behaves depends
on speed and step movement. The amount of
force increases with step speed.
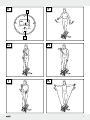
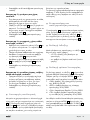
Exercising without the elastic cords
5
for
calves, thighs and buttocks, Figure F:
j Always carry out the running or stair-climbing
movements at a steady speed.
j While exercising, move the arms backwards
and forwards in a natural motion. During the
exercise period, gradually raise your arms
higher and higher.
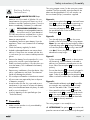
Exercises No. 1 to 4 with elastic cords
5
:
m CAUTION! DANGER OF INJURY! Do not
extend the elastic cords
5
beyond their maximum
length. The maximum lengths of the elastic cords
5
are listed in the table below. Failure to do so
may cause injury and / or damage to the product.
m CAUTION! RISK OF INJURY! Never wind
the elastic cords
5
around the wrists. Always use
the handles
6
.
m ATTENTION! Hold the handles
6
horizon-
tally when you pull on the elastic cords
5
.
The longer you pull the elastic cords
5
, the greater
the exertion or the energy expended. We recommend
you do 3 sets of 6 to 12 repetitions for every exercise
described. Stretch your muscles after exercising.

11 GB/CY
Getting started
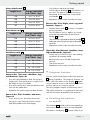
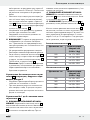
Green elastic cord
5
Length in cm Energy expended
in N (10 N ≈ 1 kg)
120 ca. 17 ± 10 N
140 ca. 24 ± 10 N
160 ca. 43 ± 10 N
185 ca. 80 ± 10 N
Blue elastic cord
5
Length in cm Energy expended
in N (10 N ≈ 1 kg)
120 ca. 30 ± 10 N
140 ca. 41 ± 10 N
160 ca. 50 ± 10 N
185 ca. 65 ± 10 N
Red elastic cord
5
Length in cm Energy expended
in N (10 N ≈ 1 kg)
120 ca. 50 ± 10 N
140 ca. 70 ± 10 N
160 ca. 79 ± 10 N
185 ca. 118 ± 10 N
Exercise No. 1 for arms, shoulders, legs
and buttocks, Figure G:
j Press the right pedal down and, with the arm
slightly bent, raise the left arm to roughly shoul-
der height in front of the body.
j Then lower the left arm, raise the right arm and
press the left pedal down.
j Repeat the two workout steps one after the other.
Exercise No. 2 for shoulders and arms,
Figure H:
j In this exercise, you should not exercise as
though you were climbing stairs but should
keep both pedals at the same height.
j First hold your hands at hip height.
j Pull the right cord handle
6
in the direction of
your chin. The palm of your hand will point
downward. At the same time, lower the left
cord handle
6
.
j Repeat the workout steps one after the other.
Exercise No. 3 for thighs, arms, legs and
buttocks, Figure I:
j Hold the elastic cords
5
as shown – the palms
pointing upwards.
j Press the elbows firmly in against your body.
j Lower the left pedal and pull the left cord
handle
6
upwards.
j Then lower the right pedal and the left handle
6
and at the same time pull the right cord handle
6
upwards.
j Repeat the workout steps one after the other.
Figure No. 4 for the back, shoulders, chest,
legs and buttocks, Figure K:
j Always carry out the running or stair-climbing
movements at a steady speed.
j Raise the arms up to shoulder height while
doing so.
j Then lower the arms.
j Repeat the workout steps one after the other.
Q
Computer functions
You can use the swing stepper without the computer
8
being switched on. The computer, however, will
show useful information on the display
12
regard-
ing your exercise session so far and will tell you how
you can improve your exercise regime.
The swing stepper complies with accuracy class C.
That means that there is no guarantee of accuracy
with the information displayed by the computer.
Q
Switching the machine
on and off
The computer
8
switches itself on automatically as
soon as you start exercising or moving the pedals.
The values in the display
12
become visible. If you

12 GB/CY
Getting started
do not use the device for approx. 4 minutes, the com-
puter
8
will automatically switch itself off.
Q
Choosing the display
While you are exercising, the first line of the
display
12
shows
– “STOP“ as soon as you stop exercising
– the number of steps per minute (estimated
figure)
Q
Choosing the mode
The second line of the display
12
will display vari-
ous exercise data (modes). Briefly press the MODE
button
13
to change from one mode to another.
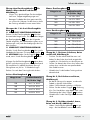
1. “TMR“ (lights up): time exercised so far, 0:00
to 99:59
2. “REPS“: Number of steps in the current exercise
session, 0 to 9999
3. “CAL“: the number of calories used
1
), 0 to
9999
4. “TTR“: Number of training steps in total since
the batteries were inserted, 0 to 9999
If you wish to see all exercise data one after the
other, press the MODE button
13
as often as nec-
essary until the “TMR“ flashes in the display. The
display
12
will automatically change from one mode
to the next every 5 seconds.
1) The calculation is based on pre-programmed
standard values that can only serve as a guide-
line. The calories consumed by using the elastic
cords are not taken into account.
Q
Specifying exercise objectives
You can specify one or several objectives:
– Duration of exercise session (TMR)
– Number of steps (REPS)
– Calorie consumption (CAL)
1. Press the MODE button
13
down until “0:00
(TMR)“ appears in the second line of the display
12
and the first 0 flashes (approx. 4 seconds).
2. In order to specify the duration of an exercise
session, press the MODE button
13
as often as
necessary until the display
12
indicates the
desired duration in minutes.
3. Wait a few seconds until the display
12
shows
the next mode (REPS). Press the MODE button
13
to set the desired number of steps, in increments
of 10.
4. In the next mode (CAL), you can set the desired
calorie consumption, in increments of 10.
5. Start exercising. The computer
8
will count
down the preset values until they reach zero
and this will be indicated in the display
12
.
6. When the set objective has been achieved, the
computer
8
will stop counting for about
10 seconds.
Then the computer
8
will start again at zero.
Q
Resetting the display
The display
12
will only be on zero before your first
exercise session. With every subsequent exercise
session, the computer
8
will continue counting from
where it left off in the last exercise session.
You can reset the display by pressing the MODE
button
13
down until all the symbols can be seen
at the same time. You can reset the total number of
training steps (TTR) by removing the batteries.
Q
Replacing the batteries
j Make sure the display
12
is off before removing
and inserting battery.
j Pull the computer
8
upwards so that it comes
off the casing.
j Remove the used battery and dispose of it in
an environmentally friendly way (see section
called “Disposal“).
j Insert a new 1.5 V
AAA battery into the bat-
tery compartment on the lower side of the com-
puter
8
. Ensure correct polarity. Ensure that
the plug
10
is correctly plugged in. Insert the

13 GB/CY
Getting started / Cleaning and care / Disposal
computer
8
back into the casing again. To do
so, press gently on the projection
11
. Make
sure that the cable does not bend or jam
Q
Cleaning and care
j Use a dry fluff-free cloth when you are cleaning
or polishing the product.
j Remove any stubborn dirt using a moist cloth.
j Do not use corrosive or abrasive cleaning
agents as they may damage the product.
Q
Disposal
The packaging is made entirely of
recyclable materials, which you may
dispose of at local recycling facilities.
Contact your local refuse disposal authority for more
details of how to dispose of your worn-out product.
To help protect the environment, please
dispose of the product properly when it
has reached the end of its useful life and
not in the household waste. Information
on collection points and their opening
hours can be obtained from your local
authority.
Faulty or used batteries must be recycled in accord-
ance with Directive 2006 / 66 / EC. Please return
the batteries and / or the device to the available
collection points.
Environmental damage through
incorrect disposal of the batteries!
Batteries may not be disposed of with the usual do-
mestic waste. They may contain toxic heavy metals
and are subject to hazardous waste treatment rules
and regulations. The chemical symbols for heavy
metals are as follows: Cd = cadmium, Hg= mercury,
Pb = lead. That is why you should dispose of used
batteries at a local collection point.
EMC
Product Description:
Side Swing Stepper
Model-no.: Z29550
Version: 06 / 2010

14 HR
Popis sadržaja
Uvod
Namjenska uporaba ....................................................................................................................Stranica 15
Opis dijelova ................................................................................................................................ Stranica 15
Opseg isporuke ............................................................................................................................Stranica 15
Tehnički podatci ...........................................................................................................................Stranica 15
Sigurnosne upute ..............................................................................................................Stranica 15
Važne zdravstvene upute ............................................................................................................Stranica 16
Sigurnosne upute za baterije ......................................................................................................Stranica 17
Montaža .................................................................................................................................... Stranica 17
Stavljanje u pogon ........................................................................................................... Stranica 18
Funkcije računala ......................................................................................................................... Stranica 19
Uključivanje i isključivanje uređaja .............................................................................................Stranica 19
Odabir pokazivanja ....................................................................................................................Stranica 20
Odabir modusa ............................................................................................................................Stranica 20
Određivanje ciljeva tijelovježbi ...................................................................................................Stranica 20
Vraćanje pokazivanja ..................................................................................................................Stranica 20
Zamjena baterije .......................................................................................................................... Stranica 20
Čišćenje i njega .................................................................................................................... Stranica 20
Zbrinjavanje otpada ......................................................................................................Stranica 21

15 HR
Uvod / Sigurnosne upute
Swing-steper
Q
Uvod
Prije montaže i prvog stavljanja u pogon,
upoznajte se sa proizvodom. Za to pro-
čitajte pomno slijedeće upute za montažu
kao i upute za sigurnost i zdravlje. Rabite proizvod
isključivo prema uputama i za navedene tijelovježbe.
Brižljivo sačuvajte ove upute. U slučaju prosljeđivanja
proizvoda trećim osobama, izručite također svu
pripadajuću dokumentaciju.
Q
Namjenska uporaba
Koračalo za vježbanje nogu i ruku predviđeno je
kao uređaj za vježbanje u privatnom kućanstvu. Nije
dozvoljeno postavljanje i uporaba u terapeutske svrhe,
te u profesionalnim centrima za šport i tijelovježbu.
Nije dozvoljeno upotrebljavati proizvod za nešto
drugo, što nije prethodno navedeno ili raditi izmjene
na proizvodu jer bi to moglo uzrokovati ozljede i / ili
oštetiti proizvod. Proizvođač ne odgovara za štete
nastale uslijed nedozvoljene upotrebe. Proizvod
nije namjenjen za profesionalnu upotrebu.
Q
Opis dijelova
1
Gazište
2
Cijev postolja otraga
3
Plastična noga sa površinom za postavljanje
4
Ušica (za elastičnu poteznu vrpcu)
5
Elastična potezna vrpca
6
Potezna držka
7
Vijak za namještanje
8
Računalo
9
Vijak za lim
10
Utikač
11
Nos
12
Računalsko pokazivanje
13
Tipka MODE
14
Kuka s osiguračem
Q
Opseg isporuke
Odmah nakon otvaranja paketa provjerite dali su
svi dijelovi unutra, te dali su proizvod i svi pojedini
dijelovi ispravni. Nikako ne montirajte proizvod, ako
se u paketu ne nalaze svi potrebni dijelovi.
1 swing-steper
1 računalo
1 baterija od 1,5 V
, AAA, (LR 03)
2 plastične nogare s površinama za postavljanje
2 limena vijka
1 vijak za namještanje
2 elastične potezne vrpce, zelene
2 elastične potezne vrpce, crvene
2 elastične potezne vrpce, plave
1 izvijač za vijke s križnim prorezom
1 upute za uporabu
Q
Tehnički podatci
Opskrba energijom: 1,5 V , baterijski tip
AAA, LR 03
Mjere: Cca. 52 x 24 x 52 cm
(š x v x d)
Klasa uređaja: HC (za uporabu u privat-
nom kućanstvu, točnost
C) / nije predviđeno za
terapeutsku tijelovježbu
Težina: 9,2 kg
Maksimalno opterećenje: 100 kg
Sigurnosne upute
MOLIMO PRIJE UPORABE PROČITAJTE
UPUTE ZA MONTAŽU! MOLIMO BRIŽLJIVO
SAČUVAJTE UPUTE ZA MONTAŽU!
J
UPOZORENJE!
OPA-
SNOST OD OZLJEDA I OPA-
SNO PO ŽIVOT ZA MALE BEBE
I DJECU! Nikada ne ostavljajte ambalažu u
blizini djece bez nadzora. Postoji opasnost od
gušenja. Ne puštajte djecu u blizinu proizvoda.
Proizvod nije igračka!

16 HR
Sigurnosne upute
m OPREZ! Ne ostavljajte djecu bez nadzora!
Proizvod nije predmet za penjanje i nije igračka!
UPOZORENJE!
Opasnost po život davlje-
njem, opasnost od ozljeda i / ili materijalne štete.
J Ovaj uređaj nije namijenjen za uporabu oso-
bama (uključivši djecu) s ograničenim tijelesnim,
senzoričkim ili mentalnim sposobnostima ili sa
nedostatnim iskustvom i / ili znanjem, osim ako
su pod nadzorom osobe koja je odgovorna za
njihovu sigurnost ili ako rabe uređaj sukladno
njenim uputama. Potrebno je nadzirati djecu,
kako se nebi igrala s uređajem.
J Odaberite mjesto postave, koje nudi dostatno
mjesta za montažu i vježbanje. Odabrana
površina treba biti najmanje 2 x 2 m velika i
dobro prozračena. Podloga treba biti glatka i
ravna. Provjerite sigurnu postavu.
J Na hidrauličkim cilindrima može istjecati ulje.
Postavite uređaj na glatku, protukliznu podlogu,
kako bi spriječili onečišćenje podloge.
m OPREZ! OPASNOST OD OZLJEDA! Osi-
gurajte, da su svi dijelovi neoštećeni i stručno
montirani. U slučaju nestručne montaže prijeti
opasnost od ozljeda. Oštećeni dijelovi mogu
utjecati na sigurnost i funkciju.
m OPREZ! OPASNOST OD OZLJEDA! Ne
poduzimajte nikakve promjene na uređaju
tijekom vježbanja.
OPREZ! OPASNOST OD OPEKLINA!
Hidraulični cilindri mogu se tijekom vježbe veoma
zagrijati. Ne dodirujte ih ni u kojem slučaju - ta-
kođer ne ni nakon vježbanja.
J
100 kg
OPREZ! Ne preopterećujte koračalo
za vježbanje ruku i nogu. Težina tijela
korisnika ne smije prekoračiti 100 kg.
Inače bi moglo prouzročiti ozljede i / ili materi-
jalnu štetu.
J Ne rabite koračalo za vježbanje nogu i ruku bo-
sim nogama. Nosite za vrijeme vježbe športsku
obuću sa protukliznim đonom i ugodnu, prozračnu
odjeću.
J Ne izlažite koračalo za vježbanje nogu i ruku
visokim temperaturama ili vlagi. Proizvod bi se
inače mogao oštetiti.
J Redovito provjeravajte stanje svih dijelova i sve
vijčane spojeve. Eventualno pritegnite labave
vijke.
J Prepustite popravke isključivo ovlaštenom struč-
nom osoblju. Dozvoljena je uporaba isključivo
originalnih rezervnih dijelova.
J Do popravka ne koristite neispravan uređaj.
J Držite steper nedostupnim za treće, ako isti nije
u uporabi.
J Redovito provjerite čvrstu pritegnutost svih vij-
čanih spojeva. U redovitim razmacima provjeri-
te sigurno držanje elastičnih poteznih traka
5
i osigurajte da hidraulični amortizeri ne gube
ulje. Ne koristite Swing-Steper ili elastične pote-
zne trake
5
, ako utvrdite ikakve nepravilnosti.
Važne zdravstvene upute
m OPREZ! Prije prve tijelovježbe obavite općenitu
provjeru fizičke spremnosti. Prije početka tijelo-
vježbi, zatražite liječnički savjet. Priložite upute
za uporabu ovog proizvoda, kako bi Vam se
eventualno mogle izraditi individualne preporuke
za tijelovježbu.
J Obvezno zatražite liječnički savjet, ukoliko imate
poteškoća sa srcem, krvotokom, ravnotežom tj.
ortopedske probleme ili poteškoće u dihanju /
astmu. Nadalje, obvezno zatražite liječnički
savjet, ako ste trudni, ili ako trošite lijekove koji
utječu na udar bila, krvni tlak ili na razinu kole-
sterola.
J Ne vježbajte, ako se ne osjećate dobro ili ako
patite od bilo kakvog oboljenja.
J Ne vježbajte izravno nakon obroka.
J Smjesta prekinite tijelovježbu, ukoliko se pojave
slijedeći simptomi: poteškoće dihanja, neredoviti
otkucaj srca, ekstremno kratki dah, omamljenost,
vrtoglavica, bolovi, mučnina. Nastavite s tijelo-
vježbom tek nakon što ste se prethodno savje-
tovali s liječnikom.
J Ne umarajte se prekomjerno. Na početku
obvezno vježbajte na odgovarajućoj razini
snage i lagano povećavajte opterećenje.
J Uzmite si vremena za zagrijavanje i odmaranje.

17 HR
Sigurnosne upute / Montaža
Sigurnosne upute
za baterije
UPOZORENJE!
OPASNOST PO ŽIVOT!
Baterije nisu namijenjene za djecu. Ne odlažite
baterije posvuda. Prijeti opasnost, da ih djeca
ili kućni ljubimci progutaju. Ako se progutaju
baterije, smjesta potražite liječnika.
J
OPASNOST OD EKSPLOZIJE!
Ne punite nenapunjive baterije nikad
ponovno, ne spajajte ih ponovno
i / ili ne otvarajte ih. Isto bi moglo prouzročiti
pregrijavanje, opasnost od požara ili raspuknuće.
Ne bacajte baterije nikad u vatru ili vodu.
Baterije bi mogle eksplodirati.
J Istrošene baterije smjesta otklonite iz uređaja.
Inače prijeti povećana opasnost od iscurivanja!
J Redovito provjeravajte bateriju na propusnost.
J Iscurijele ili oštećene baterije mogu u slučaju
dodira nagristi kožu. Stoga u takvom slučaju
obvezno nosite prikladne zaštitne rukavice!
J U slučaju duljeg nekorištenja, otklonite bateriju
iz proizvoda.
J Pri postavljanju, vodite računa o ispravnoj po-
larizaciji. Ista je prikazana u baterijskom kućištu.
J Istrošenu bateriju smjesta otklonite iz uređaja.
Veoma stare ili rabljene baterije mogle bi iscur-
jeti. Kemička tekućina može prouzročiti štete na
proizvodu.
J Baterije ne pripadaju u kućni otpad!
J Svaki potrošač je zakonski obvezan stručno
ukloniti baterije!
J Izbjegavajte dodir s kožom, očima i sluznicom.
U slučaju dodira baterijske kiseline, isperite do-
tično mjesto s dostatno vode i / ili zatražite
liječnički savjet!
J Rabite isključivo baterije navedenoga tipa (vidite
“Tehnički podatci”).
Q
Montaža
J Prepustite sastavljanje proizvoda isključivo
stručnim osobama.
Koračalo za vježbanje nogu i ruku je pri dostavi
uglavnom prethodno sastavljeno. Sitni još potrebni
koraci sastavljanja opisanu su u nastavku. Za to
Vam je potreban dostavljeni križni izvijač.
Prikaz A:
j Umetnite obje plastične nogare
3
tako u stražnju
cijev postolja
2
, da površine za postavljanje
plastičnih nogara
3
pokazuju prema otraga.
Zavijte vijak za lim
9
u prethodno izbušenu
rupu na donjoj strani cijevi postolja
2
.
Prikaz B:
j Zavijte vijak za namještanje
7
u osovinu na
prednjem okviru koračala za vježbanje nogu i
ruku.
Uputa: Pomoću vijka za namještanje
7
možete namjestiti visinu uspona.
Okretanje u smjeru vrtnje kazaljke sata
povi-
suje gazišta
1
, te okretanjem u suprotnom
smjeru
snižava gazišta
1
i time smanjuje
visinu uspona.
Prikaz C:
j Skinite računalo
8
sa kućišta povlačenjem
prema gore. Umetnite baterije koje su sadržane
u opsegu pošilje u baterijsko kućište na donjoj
strani računala
8
. Vodite računa o ispravnoj
polarizaciji.
Osigurajte, da je utikač
10
ispravno umetnut.
Ponovno umetnite računalo
8
u kućište. Pri
tome lagano pritiskajte nos
11
. Vodite računa
o tome, da se kabel ne prelomi ili ukliješti.
Prikaz D:
j Odaberite željene elastične potezne vrpce
5
.
Opseg pošiljke sadrži tri različite jačine za
različita opterećenja. Za to vidite također tablicu
pod “Stavljanje u pogon”.
j Montirajte sad elastične potezne vrpce
5
. Za-
kvačite obje elastične potezne vrpce
5
pomo-
ću kuke s osiguračem
14
u određenu ušicu
4
.
Prije tijelovježbe, vodite računa da su elastične
potezne vrpce
5
sigurno montirane.
Koračalo za vježbanje nogu i ruku je sad spremno
za pogon.

18 HR
Montaža / Stavljanje u pogon
m POZOR! Ušice
4
se nesmije poprečno
opterećivati, jer su isključivo namijenjene za vlačno
opterećenje prema gore. Inače prijeti opasnost od
ozljede ili oštećenje koračala za vježbanje nogu i ruku.
Uputa: Odkvačite elastične povlačne vrpce
5
ako
Vam više nisu potrebne za vježbu. Na taj način
spriječavate opasnost od spoticanja preko njih.
Nakon toga, provjerite da li su sve matice i svi vijci
sigurno pričvršćeni.
Q
Stavljanje u pogon
Koračalom za vježbanje nogu i ruku možete skoro
cijelo tijelo vježbati. Pored gore i dolje možete ih
također pomicati bočno. Na taj način se posebno
vježba kukove, stražnjicu i trbuh kao i unutarnje i
vanjske mišiće bedara. Elastične potezne vrpce
5
služe, kako bi tijekom vježbe dodatno ojačali mišiće
nadlaktice.
Pomno pročitajte sve sigurnosne i zdravstvene upute.
Zagrijavanje:
Kako bi spriječili opasnost od ozljeda, potrebno je
prije bilo kakvih športskih aktivnosti zagrijati i opustiti
mišiće.
j Uračunajte otprilike 5 do 10 minuta prije Vaše
vježbe, da bi zagrijali mišiće.
j Hodajte ili trčite na primjer na mjestu i kružno
zamahujte rukama.
Vježbanje / uspinjanje i spuštanje:
j Ne stavljajte sebe pod pritisak. Na početku
obvezno vježbajte u području, koje Vas ne
opterećuje. Lagano povećavajte opterećenje.
j Kao neuvježbana osoba, počnite sa 3 minuta
dnevno. Ne povećavajte vrijeme vježbanja u
prva 2 tjedna na više od 10 minuta. Nakon
toga možete povećati Vaš penzum.
j Pritisnite jednu pedalu skroz prema dolje (sve
dok ne prilegne na osnovno postolje), tako da
čvrsto pritisnete nogom na gazište
1
. Popnite
se sad odgovarajućom nogom na to gazište
1
i stavite drugu nogu na uzvišeno gazište
1
.
j Izvodite vježbanje pokretima kao kad se uspinjete
stubama.
j Vodite računa o tome, da mirno i ravnomjerno
dišete.
m POZOR! Tijekom vježbe vodite uvijek računa
o signalima koje Vam daje Vaše tijelo. Prekinite
ili zaustavite vježbu, čim imate bolove ili poteško-
će.
j Ne prekidajte vježbu iznenadno. Ravnomjerno
usporavajte brzinu koračala.
j Kako bi sišli, pritisnite jedno gazište
1
potpuno
prema dolje i skinite kao prvo nogu s drugog,
uzvišenog gazišta
1
. Nakon toga se spustite
s drugog gazišta
1
.
Uputa: Uređaj je ovisan o brzini i pokretu kora-
ka. Potreba za snagom raste s brzinom koraka.
Vježbe bez elastične potezne vrpce
5
,
za listove, bedra i stražnjicu, prikaz F:
j Izvodite ravnomjernom brzinom pokrete trčanja
tj. uspinjanja.
j Pokrećite pri tome ruke potpuno prirodno
naprijed i nazad.
Tijekom vježbe, podižite ruke sve više prema gore.
Vježbe br. 1 do 4 s elastičnim poteznim
vrpcama
5
:
m OPREZ! OPASNOST OD OZLJEDA! Ne
istežite elastične potezne vrpce
5
preko njihove
maksimalne duljine. Maksimalne duljine elastičnih
poteznih vrpca
5
navedene su u slijedećim tabli-
cama. U slučaju nepridržavanja prijeti opasnost od
ozljeda i / ili oštećenje proizvoda.
m OPREZ! OPASNOST OD OZLJEDA! Ne
motajte elastične potezne vrpce
5
oko zglobova.
Rabite uvijke potezne držke
6
.
m POZOR! Držite potezne držke
6
vodoravno,
kad povlačite elastične potezne vrpce
5
.
Što dulje istežete elastične potezne vrpce
5
, to je
veći napor tj. snaga koju primjenjujete. Preporuču-
jemo za svaku opisanu vježbu 3 skupine vježbi sa
po 6 do 12 ponavljanja.Nakon vježbanja istežite
Vaše mišiće.

19 HR
Stavljanje u pogon
Zelena elastična potezna vrpca
5
Duljina u cm Snaga koju se
primjenjuje u N
(10 N ≈ 1 kg)
120 ca. 17 ± 10 N
140 ca. 24 ± 10 N
160 ca. 43 ± 10 N
185 ca. 80 ± 10 N
Plava elastična potezna vrpca
5
Duljina u cm Snaga koju se
primjenjuje u N
(10 N ≈ 1 kg)
120 ca. 30 ± 10 N
140 ca. 41 ± 10 N
160 ca. 50 ± 10 N
185 ca. 65 ± 10 N
Crvena elastična potezna vrpca
5
Duljina u cm Snaga koju se
primjenjuje u N
(10 N ≈ 1 kg)
120 ca. 50 ± 10 N
140 ca. 70 ± 10 N
160 ca. 79 ± 10 N
185 ca. 118 ± 10 N
Vježba br. 1, za ruke, ramena, noge i
stražnjicu, prikaz G:
j Pritisnite desnu pedalu prema dolje i podignite
lijevu ruku lagano savijenu otprilike sve do visine
ramena ispred tijela.
j Nakon toga, spustite lijevu ruku, podignite desnu
ruku i pritisnite odgovarajuću lijevu pedalu.
j Ponavljajte izmjenično obje vježbe.
Vježba br. 2, za ramena i ruke, prikaz H:
j Kod te vježbe ne koračati, već držite pedale
na istoj razini.
j Kao prvo držite ruke na razini kukova.
j Potegnite desnu poteznu držku
6
prema bradi.
Hrbat ruke pri tome pokazuje prema dolje. Isto-
vremeno spustite lijevu poteznu držku
6
.
j Ponavljajte izmjenično obje vježbe.
Vježba br. 3, za bedra, ruke, noge i
stražnjicu, prikaz I:
j Držite elastične potezne vrpce
5
kao što je
prikazano - dlanovi su okrenuti prema gore.
j Pritisnite lakat čvrsto uz Vaše tijelo.
j Spustite lijevu pedalu i povucite lijevu poteznu
držku
6
prema gore.
j Nakon toga spustite desnu pedalu i lijevu poteznu
držku
6
i povucite pri tome desnu poteznu
držku
6
prema gore.
j Ponovite slijed vježbi izmjenično.
Vježba br. 4, za leđa, ramena, prsa, noge
i stražnjicu, prikaz K:
j Izvodite ravnomjernom brzinom pokrete trčanja
tj. uspinjanja.
j Pri tome podižite ruke sve do visine ramena.
j Nakon toga ponovno spustite ruke.
j Ponovite slijed vježbi izmjenično.
Q
Funkcije računala
Koračalo za vježbanje nogu i ruku možete također
rabiti bez uključenog računala
8
. Međutim, raču-
nalo Vam na pokazivanju
12
, vidite također prikaz
E, daje korisne informacije o dosadašnjem slijedu
vježbanja i kako bi mogli poboljšati Vaše vježbanje.
Koračalo za vježbanje nogu i ruku odgovara klasi
točnosti C. To znači, ne postoji zahtjev za točnost
pokazivanja na računalu.
Q
Uključivanje i
isključivanje uređaja
Računalo
8
se automatski isključuje, čim počnete
vježbu tj. pokrenete pedale. Vrijednosti na pokazi-
vanju
12
postaju vidljivi. Ako uređaj cca. 4 minute
ne rabite, računalo se automatski
8
isključi.

20 HR
Stavljanje u pogon / Čišćenje i njega
Q
Odabir pokazivanja
Tijekom vježbanja, pokazivanje
12
pokazuje u
prvome redu
– »STOP«, čim prekinete vježbanje
– količinu koraka u minuti (zbrajanje)
Q
Odabir modusa
U drugome redu pokazivanje
12
pokazuje različite
podatke vježbanja (modusi). Pritisnite kratko tipku
MODE
13
, kako bi prebacili s jednog modusa u drugi.
1. »TMR« (svijetli): dosadašnje vrijeme vježbanja,
0:00 do 99:59
2. »REPS«: količina koraka trenutne jedinice vjež-
banja, 0 do 9999
3. »CAL«: potrošene kalorije
1
), 0 do 9999
4. »TTR«: količina koraka u vježbanju od postav-
ljanja baterije, 0 do 9999
Ako želite vidjeti sve podatke vježbana jedno iza
drugog, pritiskajte tipku MODE
13
toliko dugo, sve
dok žmiga polje »TMR«. Pokazivanje
12
automatski
prebacuje svakih 5 sekundi iz jednog modusa u drugi.
1) Obračun se izvodi na prethodno programiranim
standardnim vrijednostima, koje služe samo kao
orijentacijske vrijednosti. Potrošnja kalorija kori-
štenjem poteznih vrpci ne uzima se u obzir.
Q
Određivanje ciljeva tijelovježbi
Možete odrediti jedan ili više ciljeva:
– trajanje vježbanja (TMR)
– broj koraka (REPS)
– potrošnja kalorija (CAL)
1. Držite tipku MODE
13
toliko dugo pritisnutom,
sve dok se pojavi drugi red pokazivanja
12
»0:00 (TMR)« i prva 0 žmiga (cca. 4 sek.).
2. Kako bi odredili trajanje vježbe, pritiskajte tipku
MODE
13
toliko dugo, sve dok pokazivanje
12
pokazuje željeno trajanje u minutama.
3. Pričekajte nekoliko sekundi, sve dok pokazivanje
12
pokazuje slijedeći modus (REPS). Pritisnite
tipku MODE
13
, kako bi namjestili količinu
koraka, u decimalnim koracima.
4. U slijedećem modusu (CAL) možete namjestiti
željenu potrošnju kalorija u decimalnim koracima.
5. Započnite vježbanje. Računalo
8
broji pret-
hodno namještene vrijednosti sve do nule i
pokazuje to u pokazivanju
12
.
6. Kad je namješteni cilj postignut, računalo
8
ne
broji više cca. 10 sekundi. Nakon toga računalo
8
započinje opet od nule.
Q
Vraćanje pokazivanja
Pokazivanje
12
je samo prije Vašeg prvog vježbanja
postavljeno na nuli. Kod svih slijedećih jedinica
vježbanja računalo
8
nastavlja brojanje, kad ste
završili Vašu zadnju vježbu.
To pokazivanje možete vratiti unazad, na način da
tipku MODE
13
držite toliko dugo pritisnutom, sve
dok se sve znakove istovremeno može vidjeti. Ukupan
broj koraka vježbanja (TTR) vraćate unazad, na
način da odstranite bateriju.
Q
Zamjena baterije
j Prije zamjene baterije, osigurajte, da je pokazi-
vanje
12
izgašeno.
j Skinite računalo
8
sa kućišta povlačenjem
prema gore.
j Izvucite istrošenu bateriju i uklonite istu na
način koji ne ugrožava okoliš (vidite članak
„Uklanjanje otpada”).
j Umetnite novu bateriju od 1,5 V
AAA u ba-
terijsko kućište na donjoj strani računala
8
.
Vodite računa o ispravnoj polarizaciji. Osigurajte,
da je utikač
10
ispravno utaknut. Ponovno
umetnite računalo
8
u kućište. Pri tome lagano
pritiskajte nos
11
. Vodite računa o tome, da se
kabel ne prelomi ili ukliješti.
Q
Čišćenje i njega
j Za čišćenje i njegu rabite suhu krpu bez sitnih
vlakanaca.
Pagina se încarcă...
Pagina se încarcă...
Pagina se încarcă...
Pagina se încarcă...
Pagina se încarcă...
Pagina se încarcă...
Pagina se încarcă...
Pagina se încarcă...
Pagina se încarcă...
Pagina se încarcă...
Pagina se încarcă...
Pagina se încarcă...
Pagina se încarcă...
Pagina se încarcă...
Pagina se încarcă...
Pagina se încarcă...
Pagina se încarcă...
Pagina se încarcă...
Pagina se încarcă...
Pagina se încarcă...
Pagina se încarcă...
Pagina se încarcă...
Pagina se încarcă...
Pagina se încarcă...
Pagina se încarcă...
Pagina se încarcă...
Pagina se încarcă...
Pagina se încarcă...
Pagina se încarcă...
Pagina se încarcă...
Pagina se încarcă...
Pagina se încarcă...
Pagina se încarcă...
Pagina se încarcă...
Pagina se încarcă...
Pagina se încarcă...
Pagina se încarcă...
-
 1
1
-
 2
2
-
 3
3
-
 4
4
-
 5
5
-
 6
6
-
 7
7
-
 8
8
-
 9
9
-
 10
10
-
 11
11
-
 12
12
-
 13
13
-
 14
14
-
 15
15
-
 16
16
-
 17
17
-
 18
18
-
 19
19
-
 20
20
-
 21
21
-
 22
22
-
 23
23
-
 24
24
-
 25
25
-
 26
26
-
 27
27
-
 28
28
-
 29
29
-
 30
30
-
 31
31
-
 32
32
-
 33
33
-
 34
34
-
 35
35
-
 36
36
-
 37
37
-
 38
38
-
 39
39
-
 40
40
-
 41
41
-
 42
42
-
 43
43
-
 44
44
-
 45
45
-
 46
46
-
 47
47
-
 48
48
-
 49
49
-
 50
50
-
 51
51
-
 52
52
-
 53
53
-
 54
54
-
 55
55
-
 56
56
-
 57
57


Lucrări înrudite
Alte documente
-
Domyos ST 660 Manual de utilizare
-
Domyos ST 190 Manual de utilizare
-
-
-
-
-
-
DIS Domyos VM 480 Operating Instructions Manual
-
-
Kettler VITO M Training And Operating Instructions