
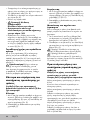
1
http://qr.lidl.com/lese0jaC
IAN 282677
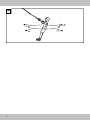
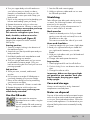
RESISTANCE BANDS WITH PULLEY
Instructions for use
BENZI SUSPENDATE CU SCRIPE-
TE PENTRU ANTRENAMENT
Instrucţiuni de utilizare
TRAKE ZA VJEŽBANJE S
KOLUTOM ZA SKRETANJE
Uputa za korištenje
МУЛТИТРЕНАЖОР
Ръководство за обслужване
ΣΎΣΤΗΜΑ ΕΚΓΎΜΝΑΣΗΣ ΜΕ
ΙΜΑΝΤΕΣ
Οδηγιεσ χρησησ
SCHLINGENTRAINER
MIT UMLENKROLLE
Gebrauchsanweisung
RESISTANCE BANDS WITH PULLEY

2
9
10
11
6
8
1
2
3
4
5
7
Attention,
entraînement en cours !
Ne pas ouvrir la porte !
Sangle de suspension
Slingtrainer
Schlingentrainer
Let op training!
Deur niet openen!
Achtung Training!
Tür nicht önen!
Delta-Sport-Nr.:
STOP
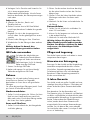
A
B C
5
1
5 4 3 1
E
5a
6
D
F

3
1
2
2a
G
9
1
H
I
J

4
L
M
K

5
N
O
P

6
Q

7

8
Contents / Sadržaj / Cuprins / Съдържание
Opseg isporuke / Oznaka dijelova ................ 17
Tehnički podaci .................................................. 17
Namjenska uporaba .........................................17
Sigurnosne napomene ...............................17 - 18
Napomene kod postavljanja / montaža 18 - 19
Skraćivanje i produljivanje suspenzijske
trake ................................................................19
Preporučena duljina suspenzijske trake za
vježbanje ............................................................ 19
Skidanje kotačića ............................................. 19
Postavljanje kotačića ................................ 19 - 20
Opće upute za vježbanje ................................ 20
Zagrijavanje ...................................................... 20
Predložene vježbe .................................... 20 - 22
Korištenje QR-koda .......................................... 22
Istezanje .....................................................22 - 23
Njega i skladištenje .......................................... 23
Upute za zbrinjavanje ...................................... 23
3 godine jamstva .............................................. 23
Furnitura / Denumirea pieselor .................24
Date tehnice ...........................................24
Utilizare conform destinaţiei .....................24
Indicaţii de siguranţă ........................24 - 25
Indicaţii de montaj / Montaj..............25 - 26
Scurtarea şi prelungirea
sforii de antrenament ...............................26
Lungimea recomandată a
sforii de antrenament ...............................26
Îndepărtarea scripetelui ..................... 27
Atașarea scripetelui ........................... 27
Indicații generale privind
antrenamentul ................................... 27
Încălzirea ......................................... 27
Sugestii privind exercițiile ............ 27 - 30
Utilizarea codului QR ........................ 30
Întindere ...........................................30
Îngrijirea și depozitarea ..................... 30
Indicații privind eliminarea ................. 31
3 ani garanție .................................. 31
Обем на доставката/ описание на частите 32
Технически данни ........................................... 32
Употреба по предназначение ....................... 32
Указания за безопасност ....................... 32 - 33
Указания за закрепването/монтажа ....33 - 34
Скъсяване и удължаване на
мултитренажора ..............................................34
Препоръчителна дължина на
мултитренажора ..............................................34
Сваляне на направляващата ролка ............. 35
Поставяне на направляващата ролка ......... 35
Общи указания за тренировка ..................... 35
Загряване ......................................................... 35
Примерни упражнения .......................... 35 - 38
Използване на QR-кода ................................. 38
Разтягане ............................................................38
Поддръжка, съхранение ................................ 38
Указания за отстраняване
като отпадък ..................................................... 39
3 години гаранция .................................. 39 - 41
Scope of delivery / Part names ...................... 10
Technical data .................................................... 10
Correct use ......................................................... 10
Safety notes ............................................... 10 - 11
Assembly instructions ........................................ 11
Shortening and lengthening
the sling trainer................................................... 12
Recommended length of the sling trainer ........ 12
Removing the pulley .......................................... 12
Attaching the pulley ........................................... 12
General training notes ..................................... 12
Warming up ...................................................... 13
Suggested exercises ................................. 13 - 15
Use the QR-code .............................................. 15
Stretching ........................................................... 15
Care and storage ............................................. 15
Notes on disposal ............................................ 15
3-year warranty ................................................ 16

9
Πινακας περιεχομενων / Inhaltsverzeichnis
Παραδοτέος εξοπλισμός /
Περιγραφή εξαρτημάτων ................................... 42
Τεχνικά χαρακτηριστικά ..................................... 42
Προβλεπόμενη χρήση ....................................... 42
Υποδείξεις ασφαλείας ............................... 42 - 43
Υποδείξεις τοποθέτησης /
Συναρμολόγηση ........................................ 43 - 44
Κόντεμα και επιμήκυνση του συστήματος
προπόνησης με ιμάντες ..................................... 44
Προτεινόμενο μήκος του συστήματος
προπόνησης με ιμάντες ............................. 44 - 45
Αφαίρεση τροχαλίας αναστροφής .................. 45
Τοποθέτηση τροχαλίας αναστροφής .............. 45
Γενικές υποδείξεις προπόνησης ...................... 45
Προθέρμανση ................................................... 45
Προτεινόμενες ασκήσεις ........................... 45 - 48
Χρήση κωδικού QR ........................................... 48
Διατάσεις ............................................................48
Συντήρηση και αποθήκευση ............................. 48
Υποδείξεις απόρριψης ..................................... 48
3 έτη εγγύηση .................................................... 49
Lieferumfang / Teilebezeichnung ....................50
Technische Daten ...............................................50
Bestimmungsgemäße Verwendung ..................50
Sicherheitshinweise ....................................50 - 51
Aufbauhinweise / Montage ..................... 51 - 52
Schlingentrainer verkürzen
und verlängern ...................................................52
Empfohlene Länge des Schlingentrainers ........52
Umlenkrolle entfernen ............................... 52 - 53
Umlenkrolle anbringen ...................................... 53
Allgemeine Trainingshinweise ......................... 53
Aufwärmen ........................................................ 53
Übungsvorschläge .................................... 53 - 56
QR-Code verwenden ....................................... 56
Dehnen .............................................................. 56
Pflege und Lagerung .........................................56
Hinweise zur Entsorgung ..................................56
3 Jahre Garantie .......................................56 - 57

10
Congratulations!
With your purchase you have decided on a
high-quality product. Get to know the product
before you start to use it.
Carefully read the following instructions
for use.
Use the product only as described and only
for the given areas of application. Keep these
instructions safe. When passing the product
on to a third party, always make sure that the
documentation is included.
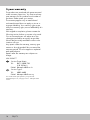
Scope of delivery/
Part names (figure A)
1 x Instructions for use
1 x Resistance Bands with Pulley
(1) Belt strap with anchor loops
(2) Door anchor
(3) Snap hook
(4) Pulley
(5) Rope
(6) Adjustment clasp
(7) Handles
(8) Foot loop
(9) Extension belt
(10) Door notice
(11) Storage bag
Technical data
Maximum weight of user: 120kg
Correct use
This article was developed as a piece of training
equipment that can be used to train your whole
body. The sling trainer was designed for private
use, and it is not suitable for medical and com-
mercial use.
This article has been designed for both indoor
and outdoor use and may only be attached to
doors with the included door anchor or on rods,
branches, hooks, or similar using the additional
snap hook.
Safety notes
Risk of injury!
• Consult with your doctor before you begin
training. Make sure that you are in suitable
health for the training.
• Do not use the article if you are injured or if
your health is impaired.
• This article is designed for a maximum body
weight of 120kg. Do not use the article if
your body weight is higher than this.
• Always remember to warm up before training
and train in accordance with your current
abilities. Serious injury can occur if you exert
yourself too much and overtrain. Cease trai-
ning immediately if you experience discom-
fort, weakness, or fatigue and consult a
doctor.
• Keep the operating instructions and exercise
descriptions to hand at all times.
• Pregnant women should only train with the
article following consultation with their doctor.
• The article may only be used by one person
at a time.
• This article is not suitable for therapeutic
training.
• Keep an area of approx. 0.6m around the
training area on all sides (figure Q).
• Only train on a flat and non-slip surface.
• Do not use the article in the vicinity of stairs or
steps.
• Cease training immediately if you feel dizzy,
experience palpitations etc. and consult with a
doctor immediately.
• The article must be assembled by an adult in
order to avoid injuries through incorrect hand-
ling. Make sure you only use the article once
it has been fully assembled.
• Do not train if you are tired or lack concentra-
tion. Do not train immediately after eating.
Wait for approximately 2 hours after meals
before training.
• Ventilate the training room sufficiently but
avoid draughts.
• Drink sufficient liquids during training.
• Never wrap the article around your head,
neck, or chest. Risk of strangulation!
GB/CY

11GB/CY
• Inspect the article regularly for damage and
wear. Cease use of the product if damage is
found.
Beware of damage to property
• Never drop the suspension trainer or allow it
to spring back against the door. Otherwise
the door may be damaged.
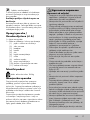
Assembly instructions
• Select a training area with dimensions of
approx. 3.00 x 1.80m (L x W).
• Attach the sling trainer at a height between
1.80 and 2.30m.
• Only train on a level, non-slip surface.
• Only mount the sling trainer on doors that
open outwards (i.e. away from you) (figure B).
• Lay the anchor over the top of the door in the
centre (figure B).
• Lock the door securely.
•
Caution! Risk of injury!
Always lock the door!
• Always use the included door notice
(10)!
• Please ensure that the door to which you
attach the door anchor (2) is stable, robust,
and can carry your body weight, and that the
door anchor is securely fastened. To test this
pull hard on the rope (5) a few times
(figure C).
Assembly/use of the additional
snap hook
Use the extension belt (9) to attach the suspensi-
on trainer to rods, tree branches, or hooks (figure
H). Remove the door anchor (2) from the belt
strap (1) for this purpose.
Warning! Always test the load-bearing
capacity of the attachment points in order to
make sure that there are sufficient safety mar-
gins. There is a risk of serious injury if this is not
adhered to.
• Do not use the article for other purposes (e.g.
as a tow or pulling rope or similar).
• Caution! Only attach the suspension
trainer to doors.
• Warning! Risk of injury! Only attach
the suspension trainer to doors that
open outwards (away from you)!
Never mount the suspension trainer
on doors that open inwards (towards
you). The door could pull open, which
could lead to serious injury!
• Warning! Risk of injury! Always lock
the door to which you have attached
the suspension trainer!
• Caution! Always use the included
door sign while you are training.
Make sure that it located on the other
side of the door and that it is legible.
Particular caution –
Risk of injury for children!
• Keep the packaging materials away from
children. There is a risk of suffocation!
• The article is not suitable for use as a toy and
must be stored out of the reach of children
while not in use. Children may not be within
reach of the article during training to eliminate
the risk of injury.
• Instruct children specifically that the article is
not a toy.
Risks from wear
• The article may only be used when in perfect
condition. Examine the article for damage
and wear before each use. The safety of the
suspension trainer can only be guaranteed if it
is examined regularly for damage and wear.
• Only use original replacement parts.
• Protect the article from extreme temperatures,
sun, and moisture. Incorrect storage and use
of the article can lead to premature wear and
possible breakage of the structure, which
could result in injury.
• Do not attach the article to areas with sharp
edges, e.g. door hinges. Nylon will tear if it
scrapes along sharp edges.
• Do not saw! Sawing movements lead to
premature wear.

12
Shortening and lengthening
the sling trainer
Note! Before adjustment always ensure
that the rope (5) is not twisted!
Shortening
1. Hold the end of the rope (5a) in one hand
and pull the adjustment clasp (6) with your
other hand towards the attachment point
(figure D).
2. Repeat the process for the other handle (7).
Lengthening
1. Hold the end of the rope (5a) in one hand
and pull the adjustment clasp (6) with your
other hand towards the handle (7) (figure D).
2. Repeat the process for the other handle (7).
Moving the anchor point
If the suspension trainer is fundamentally too
long then you can move the anchor point.
1. To do this, open the hook-and-loop fastener
(2a) on the door anchor (2) and remove the
anchor from the belt strap (1) (figure G).
2. Position it in one of the lower loops and then
secure the door anchor to the loop with the
hook-and-loop fastener (figure G).
Caution! Position the door anchors (2) only
in the anchor loops!
Caution! Risk of injury!
Never simply wrap the belt strap (1) around
the door anchor (2) to shorten it. The belt strap
could come loose!
Recommended length
of the sling trainer
Adjust the length of the sling trainer for
each exercise as described below:
Length of sling trainer: short
Shorten the sling trainer as much as possible.
Length of sling trainer: medium length
Adjust the sling trainer to a medium length by
fixing the black adjustment loops to the blue
double markings that are sewn onto the middle
of the band
Length of sling trainer: knee height
Adjust the sling trainer so that the handles are
just below your knees.
Length of sling trainer: long
Pull the bands on the sling trainer out fully so that
the handles are approximately 7cm above the
floor.
Removing the pulley
You can remove the pulley (4) from the suspen-
sion trainer or attach the rope (5) directly to the
belt strap (1) (figure E).
1. Release the snap hook (3) from the belt strap
(1).
2. Unhook the snap hook from the pulley (4).
3. Remove the rope (5) from the pulley.
4. Double the rope so that it forms a loop.
5. Thread the loop through the last anchor loop
on the belt strap (1).
6. Pull the loop over the entire belt strap and pull
the loop tight to form a knot.
Important: Please ensure that the ropes
are of equal length. Check this by hol-
ding the handles next to one another
(figure F).
Attaching the pulley
Attach the pulley as described in figure E, just in
the reverse order.
1. Release the rope (5) from the belt strap (1).
2. Lay the rope over the roller (4) and position
the holes in the roller above one another.
3. Insert the snap hook (3) through both holes in
the roller and attach this to the belt strap.
General training notes
Training process
• Wear comfortable sport clothing and trainers.
• Warm up well before each training session
and end each training session gradually.
• Take sufficiently long breaks between the
exercises and drink enough.
• As a beginner do not train too intensely.
Slowly increase your training intensity.
• Carry out all the exercises steadily, not with
sudden movements or too quickly.
• Be sure to breathe regularly. Breathe out with
effort and breathe in on recovery.
• Ensure a correct body position during the
exercises.
GB/CY

13
End position:
3. Tense your stomach muscles.
4. Pull your heels up to your pelvis.
5. Slowly return to the starting position.
6. Repeat the exercise 10 times.
Important: Press your heels into the
foot loops during the entire movement.
Increase the intensity by lifting your
pelvis during the exercise.
Crunch (figure J)
Length of suspension trainer: knee height
With or without pulley
Starting position:
1. Place your feel into the foot loops with your
toes facing downwards.
Note: Push the plastic handles upwards for a
more comfortable foot position.
2. Take a plank position supporting yourself on
your hands.
End position:
3. Tense your buttock and stomach muscles.
4. Pull your knees into your chest.
5. Move back into the starting position.
6. Repeat the exercise 15 times.
Important: Make sure you keep your
body tensed and retain good posture.
Most plank exercises on the floor are
easier if you support yourself on your
lower arms.
If you support yourself on your hands
with your arms extended then the
exercise becomes more difficult.
Hip lifts (figure K)
Length of suspension trainer: knee height
With or without pulley
Starting position:
1. Lie on your back with your heels in the foot
loops.
2. Your arms are at your sides and your palms
flat on the floor.
End position:
3. Tense your core muscles.
4. Lift your pelvis off the ground by pressing your
heels into the foot loops.
5. Lower your pelvis again half way.
6. Repeat the exercise 15 times.
Warming up
Take sufficient time before each training session
to warm up. The following includes descriptions
of some simple exercises for this purpose. Repeat
these exercises 2 to 3 times each.
Neck muscles
1. Turn your head slowly to the left and to the
right. Repeat this movement 4-5 times.
2. Circle your head slowly, first in one direction
and then in the other.
Arms and shoulders
1. Clasp your hands behind your back and pull
them carefully upwards. If you bend your
upper body forwards at the same time all the
muscles are warmed up optimally.
2. Circle both your shoulders forwards at the
same time and then change direction after
one minute.
3. Pull your shoulders up to your ears and let
your shoulders fall again.
4. Circle your right and left arms alternately
forwards and then after one minute
backwards.
Important: Don’t forget to continue
breathing steadily throughout!
Suggested exercises
Some of the many possible exercises are
described in the following:
Note: In some exercises you have the option
of training with or without a pulley. If you wish
to train without a pulley then you need to attach
the rope directly to the belt strap. For more
information about this, please see the section
‘removing the pulley’.
Caution! Always wear non-slip sports
shoes!
Leg curls (figure I)
Length of suspension trainer: knee height
With or without pulley
Starting position:
1. Lie down, facing upwards, and place your
heels in the foot loops.
Note: Push the plastic handles upwards for a
more comfortable foot position.
2. Your arms are at your sides.
GB/CY

14
Important: Make sure you keep your
body tensed and retain good posture.
Most floor exercises become more
difficult the further away you are from
the attachment point (and vice versa).
Side plank (figure L)
Length of suspension trainer: knee height
With or without pulley
Starting position:
1. Lie on your left hip and support yourself on
your lower left arm with your toes in the foot
loops under the attachment point.
2. Your legs are offset with the upper leg in front.
End position:
3. Tense your buttock and stomach muscles.
4. Lift your pelvis into a plank position and hold
for 10 seconds.
5. Return to the starting position.
6. Repeat the exercise 10 times on each side.
Important: Increase the intensity by
supporting your free arm on your hip or
extending it upwards.
Cycling in a press-up position
(figure M)
Length of suspension trainer: knee height
With pulley
Starting position:
1. Position your feet in the foot loops with your
toes pointing to the floor.
2. Take up a plank position with your arms
extended.
3. Pull one knee into your chest and extend the
other straight out behind you.
End position:
4. Tense your arm, stomach, and buttock
muscles.
5. Carry out circular movements by alternately
pulling one leg towards your chest and
extending the other straight out backwards.
6. Keep your upper body tensed and try to lift
the extended leg to buttock height.
7. Repeat the exercise 20 times.
Important: Keep your body tensed and
your posture straight.
To reduce the difficulty of the exercise
you can support yourself on the floor
on your lower arms. This exercise
strengthens your stomach and buttock
muscles.
One-sided press-ups (figure N)
Length of the suspension trainer: knee height
With pulley
Starting position:
1. Stand up straight facing away from the
attachment point.
2. Stand with your feet hip-width apart and hold
both handles with your arms extended.
3. Shift your weight forwards until you are at a
reasonable angle of resistance. Only the balls
of your feet are in contact with the floor.
End position:
4. Tense your arm, stomach, and buttock
muscles.
5. Pull one arm in to your body at an angle of
90 degrees, keeping your straight posture.
6. Return to the starting position by extending
your bent arm again.
7. Carry out the exercise 10 times on each side.
8. Repeat the exercise with the other arm.
Important: Please ensure that you keep
your whole body straight. This exercise
strengthens the muscles in your chest,
shoulders, and torso.
Arm press (figure O)
Length of suspension trainer: medium
With pulley
Starting position:
1. Stand up straight, facing away from the
attachment point.
2. Stand with your feet hip-width apart and hold
both handles with your arms extended.
3. Shift your weight forwards until you are at a
reasonable resistance angle.
End position:
4. Tense your arm, stomach, and buttock
muscles.
5. Pull your left arm into a 90-degree angle to
your body while simultaneously extending
your right arm further forwards.
GB/CY

15
6. Turn your upper body to the left and move
your left arm past your body in order to
extend it out backwards. Look at your left
hand with your arms open wide. Keep your
body tensed.
7. Return to the starting position by bending your
left arm and leading it past your body.
8. Repeat the exercise with your other arm.
9. Carry out the exercise 10 times on each side.
Important: Please ensure that you keep
your whole body extended.
This exercise strengthens your chest,
back, shoulder, and torso muscles.
One-sided chest pull (figure P)
Length of the suspension trainer: medium
With pulley
Starting position:
1. Stand up straight, looking in the direction of
the attachment point.
2. Stand with your feet hip-width apart and your
body extended.
3. Hold both handles with extended arms and
your palms facing one another.
4. Shift your weight backwards until you are at
a reasonable resistance angle. Only your
heels are touching the floor and your toes are
pointing upwards.
End position:
5. Tense your arm, stomach, and buttock
muscles.
6. Pull one arm to an angle of 90 degrees to
your body, keeping your posture straight.
7. Return to the starting position by extending
your bent arm out again.
8. Carry out the exercise 15 times on each side.
9. Repeat the exercise with the other arm.
Important: Make sure you keep your
whole body extended.
Use the QR-code
You can watch the exercises
described here as a video using the
QR-code.
You will need a QR-code scanning
app on your phone or tablet to do
this.
1. Start the QR-code scanning app.
2. Hold your phone or tablet and use it to scan
the QR-code provided.
Stretching
Take sufficient time after each training session
to stretch. The following illustrates some simple
exercises for this purpose.
You should carry out the relevant exercises 3
times on each side for 5 seconds.
Neck muscles
1. Stand in a relaxed position. Pull your head
gently to one side with one hand, first to the
left and then to the right.
This exercise stretches the sides of your neck.
Arms and shoulders
1. Stand up straight with your knees slightly bent.
2. Bend your right arm behind your head until
your right hand is between your shoulder
blades.
3. Hold your right elbow with your left hand and
pull it backwards.
4. Change sides and repeat the exercise.
Leg muscles
1. Stand upright and lift one foot off the floor.
2. Circle it slowly, first in one direction then in the
other.
3. Change foot after a while.
Important: Make sure that your thighs
are parallel to one another. Push your
hips forwards, keeping your upper
body upright.
Care and storage
Always store the article in a dry, clean and
temperature-controlled place.
Notes on disposal
Dispose of the article and all associated compo-
nents through an authorised disposal operation
or via your municipal administration. Follow the
current, valid regulations. If in doubt ask at your
disposal facility about environmentally friendly
disposal.
GB/CY

16
3-year warranty
The product was produced with great care and
under constant supervision. You receive a three-
year warranty for this product from the date of
purchase. Please retain your receipt.
The warranty applies only to material and
workmanship and does not apply to misuse or
improper handling. Your statutory rights, espe-
cially the warranty rights, are not affected by this
warranty.
With regard to complaints, please contact the
following service hotline or contact us by e-mail.
Our service employees will advise as to the
subsequent procedure as quickly as possible.
We will be personally available to discuss the
situation with you.
Any repairs under the warranty, statutory gua-
rantees or through goodwill do not extend the
warranty period. This also applies to replaced
and repaired parts.
Repairs after the warranty are subject to a
charge.
IAN: 282677
Service Great Britain
Tel.: 0871 5000 720
(£ 0.10/Min.)
Service Cyprus
Tel.: 8009 4409
You can also find spare parts for your product at:
www.delta-sport.com, category Service - Lidl Spare Parts
Service
GB/CY

17HR
Sigurnosne napomene
Opasnost od ozljeda!
• Savjetujte se sa svojim liječnikom prije nego
započnete s vježbanjem. Uvjerite se da ste
zdravstveno sposobni za vježbanje.
• Nemojte koristiti proizvod ako ste ozlijeđeni ili
ugroženog zdravlja.
• Ovaj proizvod je dimenzioniran za maksimal
nu tjelesnu težinu od 120 kg. Nemojte koristiti
proizvod ako je Vaša težina veća od toga.
• Vodite računa da se prije vježbanja trebate
zagrijati i vježbajte u skladu sa svojom trenut-
nom kondicijom. U slučaju prevelikog napre-
zanja i pretjeranog vježbanja prijete Vam
teške ozljede. U slučaju poteškoća, osjećaja
slabosti ili umora odmah prekinite s
vježbanjem i posavjetujte se s liječnikom.
• Držite upute za uporabu s predlošcima za
vježbanje uvijek nadohvat ruke.
• Trudnice bi trebale izvoditi ove vježbe samo u
dogovoru sa svojim liječnikom.
• Proizvod uvijek smije koristiti samo jedna
osoba.
• Ovaj proizvod nije predviđen za korištenje u
terapeutske svrhe.
• Oko zone vježbanja morate osigurati slobod
no područje prema svim stranama od cca.
0,6 m (sl. Q).
• Vježbajte samo na ravnoj i protukliznoj podlo-
zi.
• Nemojte koristiti proizvod u blizini stepenica i
podesta.
• Smjesta prekinite vježbanje ako osjećate
nesvjesticu, lupanje srca i dr. te odmah
potražite liječnika.
• Proizvod smije montirati samo odrasla osoba
kako bi se izbjegle ozljede uslijed nestručnog
rukovanja. Vodite računa da koristite proizvod
tek nakon što je u potpunosti montiran.
• Nemojte vježbati ako ste umorni ili dekoncen
trirani. Nemojte vježbati neposredno nakon
jela. Pričekajte s vježbanjem cca. 2 sata.
• Dostatno prozračite prostor za vježbanje, ali
izbjegavajte propuh.
• Za vrijeme vježbanja pijte dovoljno tekućine.
Srdačno vam čestitamo!
S vašom kupnjom ste odabrali vrlo kvalitetan
proizvod. Upoznajte se sa proizvodom prije
prve upotrebe.
Pročitajte pažljivo slijedeće upute za
korištenje.
Koristite proizvod samo kako je opisano i za
navedenu namjenu. Sačuvajte dobro ove upute.
Priložite bezuvjetno i ove informacije, ako proiz-
vod dajete drugoj osobi.
Opseg isporuke /
Oznaka dijelova (sl. A)
1 x Upute za uporabu
1 x Trake za vježbanje s kolutom za skretanje
(1) pojas s omčom za učvršćenje
(2) sidro za vrata
(3) karabiner
(4) kotačić
(5) uže
(6) kopča za namještanje
(7) ručka
(8) omča za stopalo
(9) remen za produljenje
(10) pločica s upozorenjem za vrata
(11) vrećica za čuvanje
Tehnički podaci
Maks. težina korisnika: 120 kg
Namjenska uporaba
Ovaj proizvod je razvijen kao sprava za
vježbanje, pomoću koje možete vježbati
cijelo tijelo. Suspenzijska traka za vježbanje je
koncipirana za korištenje u privatne svrhe i nije
prikladna za korištenje u medicinske i komerci-
jalne svrhe.
Suspenzijska je traka koncipirana za uporabu
u unutarnjem i vanjskom prostoru i smije se
pričvrstiti isključivo na vrata s isporučenim sidrom
za vrata te pomoću dodatnog karabinera na
šipke, grane stabala, kuke i slično.

18
• Koristite isključivo originalne rezervne dije-
love.
• Zaštitite proizvod od ekstremnih temperatura,
sunca i vlage. Nepravilno skladištenje i
korištenje proizvoda mogu dovesti do njego-
vog preranog trošenja i mogućeg pucanja, što
za posljedicu može imati ozljede.
• Nemojte pričvrstiti proizvod na mjesta s oštrim
rubovima, npr. šarke za vrata, jer najlon puca
kada grebe o oštre rubove.
• Nemojte izvoditi pokrete piljenja s trakom!
Pokreti piljenja vode ka preranom trošenju
proizvoda.
• Redovito provjeravajte je li proizvod oštećen
ili istrošen. U slučaju oštećenja ne smijete više
koristiti proizvod.
Oprez od materijalnih šteta
• Nikada nemojte pustiti da suspenzijske trake
jednostavno padnu na pod odnosno povratno
udare o vrata. U protivnom može doći do
oštećenja vrata.
Napomene kod postavljanja/
montaža
• Izaberite područje za vježbanje veličine
cca. 3,00 x 1,80 m (D x Š).
• Pričvrstite suspenzijsku traku za vježbanje na
visini između 1,80 i 2,30 m.
• Vježbajte samo na ravnoj i protukliznoj podlo-
zi.
• Suspenzijsku traku montirajte isključivo na
vrata koja se otvaraju prema van (od Vas
prema van) (sl. B).
• Postavite sidro na sredinu vrata (sl. B).
• Čvrsto zaključajte vrata.
• Pozor! Opasnost od ozljeda!
Uvijek zaključajte vrata!
• Koristite uvijek isporučenu pločicu s
upozorenjem za vrata (10)!
• Osigurajte da su vrata na koja učvršćujete
sidro (2) stabilna i robusna, da mogu nositi
Vašu tjelesnu težinu i da sidro čvrsto sjedi.
Za provjeru nekoliko puta čvrsto povucite uže
(5) (sl. C).
• Nikada nemojte omotati proizvod oko glave,
vrata ili prsiju jer postoji opasnost od davljen-
ja!
• Nemojte koristiti proizvod u druge svrhe (kao
npr. zatezno uže, uže za tegljenje ili slično).
• Pozor! Suspenzijske trake pričvrstite
isključivo na vrata!
• Upozorenje! Opasnost od ozljeda!
Suspenzijske trake pričvrstite
isključivo na vrata koja se otvaraju
prema van (od Vas)! Suspenzijske
trake nikada nemojte pričvrstiti na
vrata koja se otvaraju prema unutra
(prema Vama)! Vrata bi se mogla
otvoriti, što bi moglo prouzročiti teške
ozljede!
• Upozorenje! Opasnost od ozljeda!
Uvijek zaključajte vrata na koja
pričvršćujete suspenzijske trake!
• Pozor! Dok vježbate uvijek koristite
isporučenu pločicu za vrata s upozo-
renjem! Vodite računa da je dobro
vidljiva i da se nalazi na drugoj strani
vrata.
Poseban oprez – opasnost od
ozljede za djecu!
• Držite djecu dalje od ambalažnog materijala
jer postoji opasnost od gušenja!
• Proizvod nije namijenjen za korištenje kao
igračka i kada se ne koristi mora se spremiti
tako da je nedostupan za djecu. Za vrijeme
vježbanja djeca ne smiju biti u dosegu sprave
za vježbanje kako bi se isključila opasnost od
ozljeda.
• Posebno upozorite djecu da ova sprava nije
igračka.
Opasnosti uslijed trošenja
proizvoda
• Proizvod se smije koristiti samo u besprijekor-
nom stanju. Prije svake uporabe provjerite je li
proizvod oštećen ili istrošen. Sigurnost suspen-
zijskih traka se može osigurati samo ako ih
redovito provjeravate glede oštećenja i
istrošenosti.
HR

19HR
Preporučena duljina
suspenzijske trake za
vježbanje
Namjestite duljinu suspenzijske trake
za vježbanje za svaku vježbu kao što je
dolje opisano:
Duljina suspenzijske trake: kratka
Skratite suspenzijsku traku što je više moguće.
Duljina suspenzijske trake: srednja duljina
Namjestite suspenzijsku traku na srednju duljinu
tako da crne omče za namještanje duljine
pričvrstite za plave dvostruke oznake koje su
ušivene u sredinu trake.
Duljina suspenzijske trake: visina koljena
Namjestite suspenzijsku traku za vježbanje tako
da se ručke nalaze na visini malo ispod Vaših
koljena.
Duljina suspenzijske trake: dugačka
Izvucite pojaseve suspenzijske trake do kraja,
tako da ručke vise cca. 7 cm iznad poda.
Skidanje kotačića
Imate mogućnost ukloniti kotačić (4) iz traka za
vježbanje ili uže učvrstiti (5) izravno na pojas
(1) (sl. E).
1. Skinite karabiner (3) s pojasa (1).
2. Otkačite karabiner iz kotačića (4).
3. Skinite uže (5) s kotačića.
4. Omotajte uže dvostruko, tako da nastane
omča.
5. Provucite omču kroz posljednju sidrenu omču
pojasa (1).
6. Navucite omču preko cijelog pojasa i čvrsto
povucite omču tako da nastane čvor.
Važno: vodite računa da je uže iste dul-
jine. Provjerite to tako da ručke držite
jednu pored druge (sl. F).
Montaža/korištenje dodatnog
karabinera
Pomoću remena za produljenje (9) trake za
vježbanje možete montirati na šipke, grane
drveta ili kuke (sl. H). U tu svrhu uklonite sidro za
vrata (2) iz pojasa (1).
Upozorenje! Uvijek provjerite nosivost
točki učvršćenja kako biste osigurali dovoljnu
sigurnosnu rezervu. U slučaju da to ne učinite
postoji opasnost od teških ozljeda.
Skraćivanje i produljivanje
suspenzijske trake
Napomena: prije namještanja duljine
svaki put provjerite da uže (5) nije
uvrnuto!
Skraćivanje
1. Čvrsto držite jednom rukom kraj užeta (5a), a
drugom rukom povucite kopču za namještanje
(6) u smjeru točke učvršćenja (sl. D).
2. Ponovite postupak za drugu ručku (7).
Produljenje
1. Čvrsto držite jednom rukom kraj užeta (5a), a
drugom rukom povucite kopču za namještanje
(6) u smjeru ručke (7) (sl. D).
2. Ponovite postupak za drugu ručku (7).
Premještanje točke sidrenja
Ako su trake za vježbanje načelno predugačke,
možete premjestiti točku sidrenja.
1. U tu svrhu otvorite zatvarač na čičak (2a) na
sidru za vrata (2) i izvadite sidro iz pojasa (1)
(sl. G).
2. Stavite ga u jednu od donjih omči i zatim
osigurajte sidro zatvaračem na čičak na omči
(sl. G).
Pozor! Postavite sidro za vrata (2) isključivo
u omče za sidrenje!
Pozor! Opasnost od ozljeda!
Nikada nemojte radi skraćivanja omotati pojas
(1) oko sidra za vrata (2). Pojas se može
odvezati!

20
Postavljanje kotačića
Postavite kotačić obrnutim redoslijedom, kako je
opisano na slici E.
1. Skinite uže (5) s pojasa (1).
2. Postavite uže preko kotačića (4) i postavite
rupe kotačića jednu iznad druge.
3. Utaknite karabiner (3) kroz obje rupe
kotačića i pričvrstite ga na pojas.
Opće upute za vježbanje
Tijek vježbanja
• Nosite udobnu sportsku odjeću i tenisice.
• Zagrijte se prije svakog vježbanja i završite
vježbanje postupno.
• Između vježbi pravite dovoljno dugačke
stanke i pijte dovoljno tekućine.
• Kao početnik nikada ne vježbajte s prevelikim
opterećenjem. Polako povećajte intenzitet
vježbanja.
• Izvodite sve vježbe ravnomjerno, bez trzaja i
polako.
• Pazite na ravnomjerno disanje. Kod
naprezanja izdahnite i kod opuštanja
udahnite.
• Pazite na pravilno držanje tijela za vrijeme
vježbanja.
Zagrijavanje
Prije svakog vježbanja uzmite si dovoljno
vremena za zagrijavanje. U nastavku ćemo
Vam opisati nekoliko jednostavnih vježbi za
zagrijavanje. Dotične vježbe trebali biste
ponoviti 2 do 3 puta.
Mišići vrata
1. Polako okrenite glavu ulijevo i udesno.
Ponovite ovu kretnju 4-5 puta.
2. Lagano kružite glavom najprije u jednom, a
zatim u drugom smjeru.
Ruke i ramena
1. Prekrižite ruke iza leđa i povucite ih pažljivo
prema gore. Ako pritom nagnete gornji dio
tijela prema naprijed, svi će se mišići
optimalno zagrijati.
2. Kružite s oba ramena istodobno prema
naprijed i promijenite smjer nakon jedne
minute.
3. Povucite ramena u smjeru ušiju i zatim ih opet
spustite.
4. Kružite naizmjenično lijevom i desnom rukom
prema naprijed i nakon jedne minute prema
natrag.
Važno: ne zaboravite pritom i dalje
mirno disati!
Predložene vježbe
U nastavku ćemo Vam pokazati neke od velikog
broja mogućih vježbi.
Napomena: kod nekih vježbi možete birati
hoćete li vježbati sa ili bez kotačića. Ako
želite vježbati bez kotačića, morate pričvrstiti
uže izravno na pojas. Više informacija o tome
pročitajte u odlomku „Skidanje kotačića“.
Pozor! Obavezno nosite protukliznu
sportsku obuću!
Savijanje noge (sl. I)
Duljina suspenzijske trake: dugačka
Sa ili bez kotačića
Početni položaj:
1. Lezite s licem prema gore i stavite pete u
omče za stopala.
Napomena: za udobniji položaj stopala
gurnite plastične ručke prema gore.
2. Ruke leže bočno pored tijela.
Završni položaj:
3. Zategnite trbušne mišiće.
4. Povucite pete prema zdjelici.
5. Polako se vratite u početni položaj.
6. Ponovite vježbu 10 puta.
Važno: za sve vrijeme kretanja čvrsto
pritisnite pete u omče za stopala.
Pojačajte intenzitet vježbanja tako da
podignete zdjelicu za vrijeme izvođenja
vježbe.
HR
Pagina se încarcă...
Pagina se încarcă...
Pagina se încarcă...
Pagina se încarcă...
Pagina se încarcă...
Pagina se încarcă...
Pagina se încarcă...
Pagina se încarcă...
Pagina se încarcă...
Pagina se încarcă...
Pagina se încarcă...
Pagina se încarcă...
Pagina se încarcă...
Pagina se încarcă...
Pagina se încarcă...
Pagina se încarcă...
Pagina se încarcă...
Pagina se încarcă...
Pagina se încarcă...
Pagina se încarcă...
Pagina se încarcă...
Pagina se încarcă...
Pagina se încarcă...
Pagina se încarcă...
Pagina se încarcă...
Pagina se încarcă...
Pagina se încarcă...
Pagina se încarcă...
Pagina se încarcă...
Pagina se încarcă...
Pagina se încarcă...
Pagina se încarcă...
Pagina se încarcă...
Pagina se încarcă...
Pagina se încarcă...
Pagina se încarcă...
Pagina se încarcă...
Pagina se încarcă...
Pagina se încarcă...
Pagina se încarcă...
-
 1
1
-
 2
2
-
 3
3
-
 4
4
-
 5
5
-
 6
6
-
 7
7
-
 8
8
-
 9
9
-
 10
10
-
 11
11
-
 12
12
-
 13
13
-
 14
14
-
 15
15
-
 16
16
-
 17
17
-
 18
18
-
 19
19
-
 20
20
-
 21
21
-
 22
22
-
 23
23
-
 24
24
-
 25
25
-
 26
26
-
 27
27
-
 28
28
-
 29
29
-
 30
30
-
 31
31
-
 32
32
-
 33
33
-
 34
34
-
 35
35
-
 36
36
-
 37
37
-
 38
38
-
 39
39
-
 40
40
-
 41
41
-
 42
42
-
 43
43
-
 44
44
-
 45
45
-
 46
46
-
 47
47
-
 48
48
-
 49
49
-
 50
50
-
 51
51
-
 52
52
-
 53
53
-
 54
54
-
 55
55
-
 56
56
-
 57
57
-
 58
58
-
 59
59
-
 60
60


Crivit RESISTANCE BANDS WITH PULLEY Instructions For Use Manual
- Tip
- Instructions For Use Manual
- Acest manual este potrivit și pentru
Lucrări înrudite
-
Crivit 292739 Assembly, Operating And Safety Instructions
-
-
-
-
-
-
-
Alte documente
-
Delta Clay Instrucțiuni de utilizare
-
LIVARNO 499058 Manualul proprietarului
-
-
Güde GSZ 600 Translation Of Original Operating Instructions
-
Domyos ST 190 Manual de utilizare
-
-
-
Domyos ST 660 Manual de utilizare
-
-