Crivit 292739 Assembly, Operating And Safety Instructions
- Tip
- Assembly, Operating And Safety Instructions

WORKOUT BENCH
BANCĂ PENTRU ANTRENAMENT
Indicaţii de montaj-, utilizare- şi siguranţă
ЛЕЖАНКА
Инструкции за монтаж, обслужване и безопасност
TRAININGSBANK
Montage-, Bedienungs- und Sicherheitshinweise
ΠΆΓΚΟΣ ΓΥΜΝΆΣΤΙΚΉΣ
Οδηγίες συναρμολόγησης, χειρισμού και ασφάλειας
KLUPA ZA VJEŽBANJE
Upute za montažu, uporabu i sigurnost
WORKOUT BENCH
Assembly, operating and safety instructions
IAN 292739

GB / CY Assembly, operating and safety instructions Page 5
HR Upute za montažu, uporabu i sigurnost Stranica 12
RO Indicaţii de montaj-, utilizare- şi siguranţă Pagina 19
BG Инструкции за монтаж, обслужване и безопасност Cтраница 27
GR / CY Οδηγίες συναρμολόγησης, χειρισμού και ασφάλειας Σελίδα 37
DE / AT / CH Montage-, Bedienungs- und Sicherheitshinweise Seite 45

F G
A
1 2 3 4 7 85 6
9 1210 11
B C
D E

H I
J K
L M
N O P
5

5 GB/CY
Introduction ................................................................................................................................... Page 6
Intended use ........................................................................................................................................ Page 6
Items delivered / description of parts ................................................................................................. Page 6
Technical data ..................................................................................................................................... Page 6
Safety notes ..................................................................................................................................Page 6
Assembly .........................................................................................................................................Page 8
Tools required......................................................................................................................................Page 8
Fold mechanism .........................................................................................................................Page 8
Resistance band adjustment ........................................................................................... Page 8
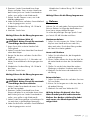
Training notes .............................................................................................................................. Page 8
Warming up ........................................................................................................................................Page 9
Suggested exercises .............................................................................................................. Page 9
Stretching ........................................................................................................................................Page 11
Maintenance, storage ..........................................................................................................Page 11
Disposal ............................................................................................................................................Page 11
Warranty ......................................................................................................................................... Page 11

6 GB/CY
Workout bench
Introduction
We congratulate you on the purchase of
your new product. You have chosen a
high quality product. Familiarise yourself
with the product before using it for the first time. In
addition, please carefully refer to the operating in-
structions and the safety advice below. Only use
the product as instructed and only for the indicated
field of application. Keep these instructions in a
safe place. If you pass the product on to anyone
else, please ensure that you also pass on all the
documentation with it.
Failure to follow the safety instructions
could lead to serious injury.
Intended use
This product is designed exclusively for private use
as training equipment. The product is not suitable
for therapeutic or commercial use. Indoor use only.
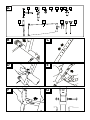
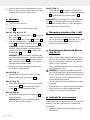
Items delivered / description
of parts (fig. A)
1
1 x Base
2
1 x Handle
3
2 x Large plastic nuts
4
1 x Assembly bolt
5
1 x Security pin
6
2 x Washer
7
1 x Footrest
8
1 x Big Washer
9
1 x Bar
10
1 x Workout bench
11
2 x Wrenches
12
2 x Resistance band
1 x Instructions for use
Technical data
Maximum user load: 110 kg
Dimensions: assembled approx. 136 x
57 x 70–79.5 cm (L x W x H)
Resistance bands:
Length: approx. 70–80 cm
Maximum
extension length: 190 cm
Class H training equipment (Domestic use)
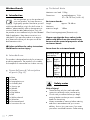
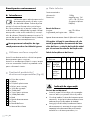
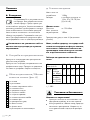
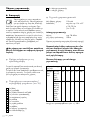
Please note that the force values in the
table could differ from the actual forces
because of the material properties of the
resistance bands.
Force chart for resistance bands
Stretching length
(cm) approx.
120 140 160 185 190
Force
(N)
approx.
Full
length
(approx.
80 cm)
26 33 38 47 48
Adjusted
at MIN
mark
(approx.
70 cm)
36 43 50 60 62
Tolerance of the above mentioned values: +/- 20%
Safety notes
Risk of injury!
The article may only be used under adult
supervision and may not be used as a toy.
Consult with your doctor before you begin
training. Make sure that you are in suitable
health for the training.
Always remember to warm up before training
and train in accordance with your current
abilities. Serious injury can occur if you exert
yourself too much and overtrain. Cease training

7 GB/CY
immediately if you experience discomfort, weak-
ness, or fatigue and consult a doctor.
Keep the operating instructions with the exercise
descriptions to hand at all times.
Please note the maximum load bearing capacity
of 110 kg. If this weight limit is exceeded it can
lead to damage to the product and compromise
its function.
Pregnant women should only train with the
article following consultation with their doctor.
A free area of not less than 0.6 m shall
remain around the training area
in the
directions from which the equipment is
accessed (fig. X).
Only train on a flat and non-slip surface.
Do not use the article in the vicinity of stairs or
steps.
Never use the article in the vicinity of open fire
or ovens.
Always hold the resistance bands tensed and
make sure you do not slip.
Always return the resistance bands to the start-
ing position slowly and under tension.
Never attach the resistance bands to objects
such as a table, door, or step.
Never pull the resistance bands towards your
face and never wrap them around your head,
neck, or chest.
Do not use the article for other purposes (e.g.
as a tow or pulling rope or similar).
The maximum extension length of the resist-
ance bands is 190 cm. Do not exceed this
extension length during any exercise.
Only the included resistance bands may be
used.
When setting the height of the training bench,
note the MAX mark on the base. The MAX
mark is to indicate the maximum height of ad-
justment. Do not adjust it over the MAX mark.
Do not adjust the length of resistance band
shorter than the MIN mark on the band
(fig. P).
Particular caution – Risk of injury for
children
Keep the packaging materials away from
children. There is a risk of suffocation!
Parents and other supervisors should be aware
of their responsibility as situations and conduct
may arise for which the training equipment was
not designed due to the playfulness and exper-
imentation that is natural in children.
If you allow your children to use the equipment
you should take their mental and physical devel-
opment into account and, most importantly,
their temperament. Supervise the children as
necessary and always instruct them on how to
use the device correctly. This training equipment
is absolutely not suitable for use as a toy.
Store the article out of the reach of children
when not in use. In order to prevent the risk of
injury children may not be within reach of the
article during training.
Instruct children specifically that the article is
not a toy.
Risks from wear
The article may only be used when in perfect
condition. Examine the article for damage and
wear before each use. The safety of the sus-
pension trainer can only be guaranteed if it is
examined regularly for damage and wear.
Discontinue use if damage is found. Replace
defective components immediately and/or
keep the equipment out of use until repair.
Also check parts that are susceptible to wear:
foam rollers, the locking pins in the seat and
back cushions, and the joints on the training
bench, the resistance bands and the carabiner.
Avoiding damage to property
Protect the article from sunlight.
Avoid contact with sharp, hot, pointed, or haz-
ardous objects. Please ensure that your training
area is free of pointed objects.
Please use a corresponding underlay on sus-
ceptible flooring in order to protect your floor
from damage.

8 GB/CY
Assembly
Tools required
2 x Wrenches
11
(included)
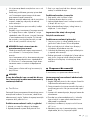
Step 1 (fig. B, C, D, E)
Attach the two resistance bands
12
to the
base
1
.
Push the base
1
into the bar
9
and secure
this connection using the footrest
7
and the
plastic nut
3
.
Note: You can change the position of the
footrest
7
and the position of the exercise
bench
10
depending on your height and
experience.
CAUTION! When setting the height of the
training bench, note the MAX mark on the
base
1
. The MAX mark is to indicate the max-
imum height of adjustment. Do not adjust it
over the MAX mark.
Please ensure that you tighten the connection
securely again following adjustment.
Step 2 (fig. F)
Now mount the already assembled stand pipe
onto the training bench
10
.
Step 3 (fig. G)
Fasten the stand pipe (1/9) using the assembly
bolt
4
and the two washers
6
provided,
and tighten this securely, but not too fast.
Step 4 (fig. H)
Next, fasten the security pin
5
as shown.
Note! This pin prevents the whole base from
collapsing.
Step 5 (fig. I)
Attach the handle
2
to the upper end of the
stand pipe (1/9) and fasten it with the big
washer
8
and second plastic nut
3
.
Note! For exercise R, U and W, attach the handle
2
with the adjustment screw facing outwards. For
all other exercises, the adjustment screw should
face the bench cushion.
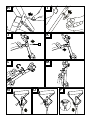
Fold mechanism (fig. J–M)
To fold the base, pull out the security pin
5
and gently push the base forward. The base
can then be folded.
Resistance band adjustment
(fig. N–P)
To fix the length of resistance band, pull out the
knob and adjust the resistance band then put
the knob sit into the slot tightly.
To release the resistance band, take out the
knob from the slot
CAUTION! Do not adjust the length of resistance
band shorter than the MIN mark on the band
(fig. P)! It is the permissible minimum length of
the resistance band while adjusted on this mark.
Only use the enclosed knob for the length
adjustment.
Exercise with improper adjustment of the band
may result in product damage and risk of
injury!
Training notes
The following exercises only represent a selection. You
can find further exercises in the relevant literature.
Warm up well before each training session.
Do not train if you feel ill or unwell.
When starting training, get instruction on the
correct execution of the exercises from an ex-
perienced physiotherapist if possible.
Only exercise as long as you feel well and/ or
you are able to carry out the exercises correctly.
Wear comfortable sports clothing and trainers.
Determine the frequency and intensity of the
exercises yourself. Start slowly 2 to 3 times a
week for 10 minutes at a time, and increase
the frequency and the exercise intensity gradu-
ally. The more frequently and regularly you
carry out the exercises, the fitter and better you
will feel.

9 GB/CY
CAUTION! Avoid training too intensely!
When you first begin training, 2–3 minutes are
sufficient per exercise. If you train every day
the duration can be increased to 5–10 minutes
after approximately one week. The maximum
training time should, however, not exceed
1 hour.
Take sufficient breaks between exercises and
drink sufficient fluids.
CAUTION!
Cease exercising immediately if you ex-
perience discomfort or feel unwell and
consult your doctor.
Warming up
Take sufficient time before each training session to
warm up. The following includes descriptions of
some simple exercises for this purpose. Repeat
these exercises 2 to 3 times each.
Warming up neck muscles
1. Turn your head slowly to the left and to the right.
2. Repeat this movement 4 - 5 times.
3. Circle your head slowly, first in one direction
and then in the other.
Warming up arms and shoulders
1. Circle both your shoulders forwards at the same
time.
2. Change direction after one minute.
3. Then pull your shoulders up to your ears and let
your shoulders fall again.
4. Circle your right and left arms alternately for-
wards and then after one minute backwards.
Important: Don’t forget to continue
breathing steadily throughout
Warming up leg muscles
1. Stand on one leg and lift the other leg with your
knee bent until it is approximately 20cm from the
floor.
2. First circle the lifted foot in one direction and
then change direction after several seconds.
3. Then change legs and repeat the exercise.
4. Lift your legs in turn and take several steps in
place. Make sure that you lift your legs only as
far as you are able to maintain good balance.
Suggested exercises
Some of many exercises are described in the
following.
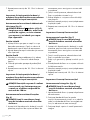
Training your frontal abdominals (fig. Q)
1. Adjust the height of the front foot to your height.
2. Hook your feet under the lower crossbar and
position your knees under the upper crossbar.
3. Sit upright on the training bench in this position.
4. Tense your stomach muscles and lower your up-
per body back slowly until it is parallel to the
floor.
5. Hold the tension and move your upper body
upwards by approximately 45°.
6. Hold this position briefly and then return to the
starting position.
7. Repeat this exercise 10–15 times for three sets.
Important: Avoid hollowing your back
and keep your stomach muscles tensed
throughout the exercise.
Training your lower abdominals (fig. R)
CAUTION! For this exercise the handle
2
must be fixed in such a way that
the adjustment screw is facing away
from the equipment and never towards
the seat.
Starting position
1. Lie on the training bench on your back with your
head at the top. Your head may not extend be-
yond the set on the training bench.
2. Hold the handles on the upper crossbar with
your hands above your head.
End position
3. Tense your stomach muscles and pull your legs
upwards. Your knees are pointing towards your
head.

10 GB/CY
4. Lower your legs down again until they are just
above the floor (no contact).
5. Repeat this exercise 10–15 times for three sets.
Important: Avoid hollowing your back
and keep your stomach muscles tensed
throughout the exercise.
CAUTION! The exercise may only be
possible to a limited extent or may not
be possible for persons who are taller
than 190 cm.
Training your arm muscles (fig. S)
Caution! Please pay attention to the
maximum extension length of the
resistance bands
1. Stand on the foot of the training bench facing
towards the bar side as shown in order to
guarantee secure contact with the floor.
2. Hold the resistance band handles with your
palms face up as shown.
3. Lifting upwards the arms in a steady movement
to your chest height.
4. Hold this position and then return to the starting
position.
5. Repeat this exercise 10–15 times for three sets.
Important: Carry the exercise out slowly.
Training your shoulder (fig. T)
Caution! Please pay attention to the
maximum extension length of the
resistance bands
1. Stand on the foot of the training bench facing to-
wards the bar side as shown in order to guarantee
secure contact with the floor.
2. Hold the resistance band handles with your
palms in cross style as shown.
3. Slightly bend the knee and forward slightly the
upper body.
4. Lifting upwards the resistance band in steady
movement to your shoulder height.
5. Hold this position and then return to the starting
position.
6. Repeat this exercise 10–15 times for three sets.
Important: Carry the exercise out slowly.
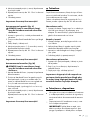
Training your triceps (fig. U)
Caution! Please pay attention to the
maximum extension length of the
resistance bands
1. Hold the resistance band and sit on the training
bench.
2. Place the resistance band behind the body and
hold with one hand behind your back (the
shorter you adjust the resistance band, the
higher the resistance).
3. Now straighten the upper arm as illustrated.
4. Hold this position and then return to the starting
position.
5. Repeat this exercise 10–15 times for three sets.
6. Switch sides
Important: Carry the exercise out slowly.
Training your back (fig. V)
Caution! Please pay attention to the
maximum extension length of the
resistance bands
1. Place one knee and the hand on the training
bench.
2. Keep with the free hand the resistance band
next to the body.
3. Bend your arm and lift the elbow.
4. Hold this position for 1–2 seconds and then
return to the starting position.
5. Repeat this exercise 10–15 times for three sets.
6. Switch sides
Important: Carry the exercise out slowly.
Training your shoulder (fig. W)
Caution! Please pay attention to the
maximum extension length of the
resistance bands
1. Hold the resistance band and sit on the training
bench.
2. Place the resistance band behind the body and
hold with both arms behind your back (the
shorter you adjust the resistance band, the
higher the resistance).
3. Keep both arms open and extend them upwards
in steady movement.

11 GB/CY
4. Hold this position and then return to the starting
position.
5. Repeat this exercise 10–15 times for three sets.
Important: Carry the exercise out slowly.
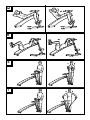
Stretching
Take sufficient time after each training session to
stretch. The following illustrates a simple exercise
for this purpose. You should carry out the stretching
exercise 3 times on each side for 30–40 seconds.
Neck muscles
1. Stand in a relaxed position. Pull your head gently
to the left and to the right using one hand. This
exercise stretches the sides of your neck.
Arms and shoulders
1. Stand up straight with your knees slightly bent.
2. Put your right arm behind your head until your
right hand is between your shoulder blades.
3. Hold your right elbow with your left hand and
pull it backwards.
4. Change sides and repeat the exercise.
Leg muscles
1. Stand up straight and lift one foot off the
ground.
2. Slowly circle your foot, first in one direction and
then in the other.
3. Change feet after a while.
Important: Please ensure that your
thighs stay parallel next to one another.
Push your hips forward and keep your
upper body upright.
Maintenance, storage
Do not forget that regularly maintaining and
cleaning your weight bench ensures its safety
and preservation.
Always store the product at room temperature
in a clean, dry condition.
IMPORTANT! Only clean with water, and
never with abrasive cleaning products. After-
wards, wipe dry with a cleaning cloth.
Replace defective components immediately
and / or keep the equipment out of use until
repair
Disposal
The packaging is made entirely of recyclable mate-
rials, which you may dispose of at local recycling
facilities.
Contact your local refuse disposal authority for
more details of how to dispose of your worn-out
product.
Warranty
The product has been manufactured to strict quality
guidelines and meticulously examined before deli-
very. In the event of product defects you have legal
rights against the retailer of this product. Your legal
rights are not limited in any way by our warranty
detailed below.
The warranty for this product is 3 years from the
date of purchase. Should this product show any
fault in materials or manufacture within 3 years
from the date of purchase, we will repair or re-
place it – at our choice – free of charge to you.
The warranty period begins on the date of purchase.
Please keep the original sales receipt in a safe location
.
This document is required as your proof of purchase.
This warranty becomes void if the product has been
damaged, or used or maintained improperly.
The warranty applies to defects in material or
manufacture. This warranty does not cover product
parts subject to normal wear, thus possibly conside-
red consumables (e.g. batteries) or for damage to
fragile parts, e.g. switches, rechargeable batteries
or glass parts.

12 HR
Uvod .............................................................................................................................................. Stranica 13
Namjenska uporaba ..................................................................................................................... Stranica 13
Opseg isporuke / Opis dijelova ................................................................................................... Stranica 13
Tehnički podatci ............................................................................................................................ Stranica 13
Sigurnosne upute ............................................................................................................... Stranica 13
Montaža ..................................................................................................................................... Stranica 15
Potreban alat ................................................................................................................................. Stranica 15
Preklopni mehanizam .................................................................................................... Stranica 15
Usmjeravanje trake za vježbanje ........................................................................ Stranica 15
Napomene za vježbanje.............................................................................................. Stranica 15
Zagrijavanje .................................................................................................................................. Stranica 16
Prijedlozi vježbi ................................................................................................................... Stranica 16
Rastezanje ................................................................................................................................ Stranica 18
Njega, skladištenje ........................................................................................................... Stranica 18
Zbrinjavanje ........................................................................................................................... Stranica 18
Jamstvo ...................................................................................................................................... Stranica 18

13 HR
Klupa za vježbanje
Uvod
Čestitamo vam na kupnji novog proi-
zvoda. Time ste se odlučili za jedan vrlo
kvalitetan proizvod. Prije prvog stavljanja
u pogon, upoznajte se sa proizvodom. Za to pomno
pročitajte slijedeće upute za uporabu i sigurnost.
Koristite ovaj proizvod u skladu s navedenim upu-
tama te u navedene svrhe. Sačuvajte ove upute.
U slučaju davanja proizvoda trećim osobama,
izručite također svu pripadajuću dokumentaciju.
Nepridržavanje sigurnosnih uputa
može dovesti do ozbiljnih ozljeda.
Namjenska uporaba
Artikl je isključivo osmišljen kao sprava za trening
za privatnu uporabu.
Artikl nije prikladan za terapeutske ili komercijalne
svrhe. Ovaj proizvod je namijenjen samo za
unutarnji prostor.
Opseg isporuke /
Opis dijelova (sl. A)
1
1 x postolje
2
1 x ručka
3
2 x velika plastična matica
4
1 x klin za montažu
5
1 x osigurač rascjepka
6
2 x podložna ploča
7
1 x podloška za noge
8
1 x velika podložna ploča
9
1 x šipka
10
1 x klupa za vježbanje
11
2 x vijčani ključ
12
2 x traka za vježbanje
1 x uputa za korištenje
Tehnički podatci
Maksimalno
opterećenje korisnika: 110 kg
Dimenzije: sastavljeno oko 136 x
57 x 70–79,5 cm
(D x Š x V)
Trake za vježbanje:
Dužina: oko 70–80 cm
maks. dužina rastezanja: 190 cm
Sprava za vježbanje razreda H (korištenje kod kuće)
Obratite pažnju na to da na temelju ka-
rakteristika materijala traka za vježbanje
vrijednosti snage navedene u tablici mogu
odstupati od stvarnih vrijednosti snage.
Tablica snage traka za vježbanje
Dužina rastezanja
(cm) oko
120 140 160 185 190
Snaga
(N)
oko
Kod pune
dužine
(oko
80 cm)
26 33 38 47 48
Prilago-
đeno MIN
oznakama
(oko
70 cm)
36 43 50 60 62
Tolerancija prethodno navedenih vrijednosti:
+ / - 20%
Sigurnosne upute
Opasnost od ozljeda!
Artikl se smije koristiti samo pod nadzorom
odraslih i ne smije se koristiti kao igračka.
Konzultirajte liječnika prije nego počnete s
vježbanjem. Osigurajte da Vaše zdravstveno
stanje dozvoljava vježbanje.
Mislite na to da se prije vježbanja uvijek zagri-
jete i vježbajte odgovarajuće Vašim trenutnim
mogućnostima snage. Kod prevelikog napora i

14 HR
prekomjernog vježbanja prijete teške ozlijede.
Kod bolova, osjećaja slabosti ili umora smjesta
prekinite vježbanje i kontaktirajte liječnika.
Pohranite uputu za korištenje s propisanim
vježbama uvijek na dohvat ruke.
Poštujte maksimalno dozvoljeno opterećenje
od 110 kg. Prekoračenje granične težine može
dovesti do oštećenja proizvoda kao i do utje-
caja na funkcije.
Trudnice mogu provoditi vježbanje jedino na-
kon dogovora s liječnikom.
Na području vježbanja za pristup proizvodu
treba ostati slobodnog prostora
od 0,6 m
(sl. X).
Vježbajte samo na ravnoj neklizećoj površini.
Nemojte koristiti artikl u blizini stepenica ili
povišenja.
Nikada nemojte koristiti artikl blizu otvorene
vatre ili peći.
Trake za vježbanje uvijek držite napetima, te
pripazite da Vam ne skliznu!
Trake za vježbanje uvijek polako i pod napeto-
sti vratite u početni položaj.
Trake za vježbanje nikada nemojte pričvršćavati
na predmete kao npr. stol, vrata ili stepenicu.
Nikada ne povlačite trake za vježbanje u
smjeru lica i ne omotavajte ju oko glave, vrata
ili prsa.
Trake za vježbanje nemojte koristiti u druge
svrhe kao npr. uže za zatezanje, uže za
povlačenje ili slično.
Maksimalna dužina ratezanja traka za vježba-
nje iznosi 190 cm. Ni kod koje vježbe nemojte
prekoračiti ovu dužinu rastezanja!
Dozvoljeno je korištenje samo dostavljenih
traka za vježbanje.
Kod podešavanja visine klupe za vježbanje
pazite na MAKS-oznaku na postolju. MAKS-
oznaka pokazuje maksimalnu visinu podešava-
nja. Ne podešavajte visinu iznad
MAKS-oznake.
Ne podešavajte duljinu trake za vježbanje
kraće od MIN-oznake na traci za vježbanje
(sl. P).
Poseban oprez – Opasnost od ozljeda
za djecu!
Držite ambalažu dalje od djece. Postoji
opasnost od gušenja!
Roditelji i druge osobe koje nadziru djecu
tebaju biti svjesni odgovornosti jer na temelju
prirodnog nagona za igrom i želje za eksperi-
mentiranjem treba računati na situacije i način
ponšanja djece za koje sprave za vježbanje
nisu napravljene.
Ako puštate djecu na spravu, trebate paziti na
njihov psihički i tjelesni razvoj te prije svega na
njihov temperament.
Djecu po potrebi treba nadgledati i prije svega
uputiti ih na ispravno korištenje sprave.
Ova sprava ni u kojem slučaju nije prikladna
kao igračka.
Kod nekorištenja potrebno ju je pohraniti nedo-
stupno djeci. Za vrijeme vježbanja djeca se ne
smiju nalaziti u dometu artikla da bi se isklju-
čile mogućnosti za ozljeđivanje.
Svakako napomenite djeci da artikl nije
igračka.
Opasnost zbog istrošenosti
Artikl se smije koristiti samo u besprijekornome
stanju. Prije svakog korištenja provjerite artikl
na oštećenja ili istrošenost. Sigurnost artikla se
može jamčiti samo ako se ovaj redovno kontro-
lira na oštećenja i istrošenost. Kod oštećenja
više ga ne smijete koristiti. Zamijenite oštećene
komponente smjesta i/ili više nemojte koristiti
proizvod dok se ne popravi.
Kontrolirajte i dijelove koji se mogu istrošiti: role
od pjene, sigurnosne štiftove sjedala i naslona
te zglobove klupe za vježbanje kao i trake za
vježbanje i karabinere.
Izbjegavanje materijalne štete
Zaštitite artikl od sunčevih zraka.
Izbjegavajte kontakt s oštrim, vrućim, zaoštre-
nim ili opasnim predmetima. Pazite da se na
području vježbanja ne nalaze oštri predmeti.
Kod osjetljivih podloga pazite na odgovarajući
podmetač da biste zaštitili Vašu podlogu od
oštećenja.

15 HR
Montaža
Potreban alat
2 x Vijčani ključ
11
(sadržano u opsegu isporuke)
Korak 1 (sl. B, C, D, E)
Pričvrstite dvije trake za vježbanje
12
na
postolje
1
.
Gurnite postolje
1
u šipku
9
i fiksirajte ovu
vezu s podlogom za noge
7
i plastičnom
maticom
3
.
Napomena: Ovisno o tjelesnoj visini i vježbi
možete promijeniti po visini poziciju podloge
za noge
7
i klupe za vježbanje
10
.
OPREZ! Kod podešavanja visine klupe za
vježbanje pazite na MAKS-oznaku na postolju
1
. MAKS-oznaka pokazuje maksimalnu visinu
podešavanja. Ne podešavajte visinu iznad
MAKS-oznake.
Pazite da nakon promijene ponovno čvrsto
pritegnete vezu.
Korak 2 (sl. F)
Montirajte upravo montiranu fiksnu cijev na
klupu za vježbanje
10
.
Korak 3 (sl. G)
Pričvrstite fiksnu cijev (1/9) dostavljenim
klipovima za montažu
4
i s dvije dostavljene
podloške
6
i nemojte ih prečvrsto pritegnuti.
Korak 4 (sl. H)
Na kraju pričvrstite osigurač rascjepku
5
kako je prikazano.
Napomena! Ova rascjepka sprječava
sklapanje kompletnog postolja.
Korak 5 (sl. I)
Pričvrstite ručku
2
na gornji kraj fiksne cijevi
(1/9)i pričvrstite ju velikom podloškom
8
i
drugom plastičnom maticom
3
.
Napomena! Za vježbe R, U i W pričvrstite
ručku
2
vijkom za namještanje kako pokazuje
prema van. Kod svih ostalih vježbi vijak za namje-
štanje gleda prema podlošci klupe.
Preklopni mehanizam (sl. J–M)
Da biste preklopili postolje povucite osigurač
rascjepku
5
i lagano gurnite postolje prema
naprijed. Nakon toga možete preklopiti postolje.
Usmjeravanje trake za
vježbanje (sl. N–P)
Da biste fiksirali dužinu trake za vježbanje izvu-
cite sigurnosnu kuglu i usmjerite traku za vjež-
banje. Zatim čvrsto uglavite sigurnosnu kuglu u
za to predviđeni otvor.
Da biste otpustili traku za vježbanje izvucite
sigurnosnu kuglu iz otvora.
OPREZ! Ne podešavajte duljinu trake za vjež-
banje kraće od MIN-oznake na traci za vjež-
banje (sl. P). Radi se o dozvoljenoj najmanjoj
dužini trake za vježbanje kada je usmjerena
na ovu oznaku.
Koristite sigurnosnu kuglu samo kako biste
postavili dužinu.
Vježbanje uz nedozvoljeno postavljanje trake
za vježbanje može dovesti do oštećenja
proizvoda i opasnosti od ozljeđivanja.
Napomene za vježbanje
Vježbe koje slijede predstavljaju samo jedan izbor.
Ostale vježbe možete pronaći u stručnoj literaturi
koja se time bavi.
Zagrijte se prije svakog vježbanja.
Nemojte vježbati ako se osjećate bolesno ili se
ne osjećate dobro.
Ukoliko je moguće neka Vam prvi put pravilno
izvođenje vježbi pokaže iskusni fizioterapeut.
Vježbe izvodite najduže onoliko koliko se dugo
dobro osjećate, odn. dok vježbu možete izvesti
ispravno.
Nosite udobnu sportsku odjeću i tenisice.
Sami odredite učestalost i intenzitet vježbi. Poč-
nite lagano 2 do 3 puta tjedno, po 10 minuta,
i postepeno povećavajte učestalost i intenzitet
vježbi. Što ćešće i redovitije budete izvodili
vježbe, to ćete se više osjećati fit i ugodno.

16 HR
PAŽNJA! Izbjegavajte preveliki
intenzitet vježbanja!
Kad počnete s vježbanjem, 2–3 minute po
vježbi su dostatne.
Kod svakodnevnog vježbanja možete trajanje
vježbi nakon nekih tjedan dana povećati na
5–10 minuta. Maksimalno vrijeme vježbanja
ne bi trebalo prelaziti 1 sat.
Između vježbanja radite dovoljno duge pauze
i pijte dovoljno vode.
PAŽNJA!
Kod bolova ili lošeg osjećaja smjesta
prekinite vježbanje i kontaktirajte Vašeg
liječnika.
Zagrijavanje
Prije svakog vježbanja uzmite dovoljno vremena
za vježbanje. U nastavku ćemo Vam opisati neko-
liko jednostavnih vježbi. Svaku pojedinačnu vježbu
treba ponoviti 2 do 3 puta.
Zagrijavanje vrata i muskulature zatiljka
1. Okrećite glavu lagano lijevo desno.
2. Ponovite ovaj pokret 4 do 5 puta.
3. Zatim lagano kružite glavom najprije u jednu, a
potom u drugu stranu.
Zagrijavanje ruku i ramena
1. Kružite ramenima istovremeno prema naprijed.
2. Nakon jedne minute promijenite smjer.
3. Zatim povucite Vaša ramena u smjeru ušiju te ih
pustite da ponovno padnu.
4. Kružite naizmjenice Vašom lijevom i desnom
rukom prema naprijed i nakon oko 1 minute
prema natrag.
Važno: ne zaboravite mirno
dalje disati!
Zagrijavanje muskulature nogu
1. Stanite na jednu nogu i drugu nogu podignite
20ak cm iznad tla sa savijenim koljenom.
2. Zatim podignutom nogom kružite u jednom
smjeru te nakon nekoliko sekundi promijenite
smjer.
3. Zatim zamijenite noge i ponovite vježbu.
4. Podižite naizmjenice noge i hodajte u mjestu. Pa-
zite na to da noge podižete onoliko dok možete
dobro držati ravnotežu.
Prijedlozi vježbi
U nastavku ćemo Vam opisati nekoliko jednostav-
nih vježbi.
Vježba prednje muskulature trbuha (sl. Q)
1. Podesite visinu prednjeg dijela postolja Vašoj tje-
lesnoj visini.
2. Uglavite noge ispod donje poprečne šipke i po-
zicionirajte koljena ispod gornje poprečne šipke.
3. U ovoj poziciji sjednite okomito na klupu za vjež-
banje.
4. Napnite trbušne mišiće i spustite gornji dio tijela
lagano prema iza dok se ne nađe paralelno s
tlom.
5. Zadržite napetost i pomaknite Vaš gornji dio
tijela za nekih 45° prema gore.
6. Ostanite kratko u ovoj poziciji i ponovno se
vratite u početnu poziciju.
7. Ponovite ovu vježbu 10–15 puta u tri seta.
Važno: izbjegavajte iskrivljenje kičme i
za vrijeme vježbe stalno držite trbušne
mišiće napetima.
Vježba donjih trbušnih mišića (sl. R)
PAŽNJA! Ručka
2
kod ove vježbe
mora biti tako pičvršćena da vijak za
namještanje gleda od sprave i nikad
ne pokazuje prema podlozi.
Početni položaj
1. Legnite na klupu za vježbanje na leđa s glavom
prema gore. Glava ne smije stršati izvan pod-
loge klupe za vježbanje.
2. Odovuda iznad Vaše glave dohvatite ručke
gornje poprečne šipke.

17 HR
Završna pozicija
3. Napnite trbušne mišiće i povucite Vaše noge
prema gore. Koljena pokazuju u smjeru glave.
4. Spustite noge do malo iznad tla (bez kontakta).
5. Ponovite ovu vježbu 10–15 puta u tri seta.
Važno: izbjegavajte iskrivljenje kičme i
za vrijeme vježbe stalno držite trbušne
mišiće napetima.
PAŽNJA! Za osobe tjelesne visine više
od 190 cm ova se vježba može provo-
diti eventualno uz ograničenja ili čak i
nije provediva.
Vježba muskulature ruku (sl. S)
PAŽNJA! Pazite na maksimalnu du-
žinu rastezanja traka za vježbanje.
1. Stanite okrenuti prema šipki kako je prikazano
na postolju klupe za vježbanje da bi se zajam-
čio čvrsti kontakt s tlom.
2. Držite, kako je prikazano, ručke traka za vježba-
nje dlanovima prema gore.
3.
Podižite ruke ravnomjernim pokretima do visine prsa.
4. Zadržite ovaj položaj i zatim se vratite u
početnu poziciju.
5. Ponovite ovu vježbu 10–15 puta u tri seta.
Važno: ovu vježbu provodite polako.
Vježba ramena (sl. T)
PAŽNJA! Pazite na maksimalnu du-
žinu rastezanja traka za vježbanje.
1. Stanite okrenuti prema šipki kako je prikazano
na postolju klupe za vježbanje da bi se zajam-
čio čvrsti kontakt s tlom.
2. Držite, kako je prikazano, ručke traka za
vježbanje dlanovima u križ.
3. Lagano savijte koljena i gornji dio tijela prema
naprijed.
4. Povlačite traku za vježbanje ravnomjernim
pokretom do visine ramena.
5. Zadržite ovaj položaj i zatim se vratite u
početnu poziciju.
6. Ponovite ovu vježbu 10–15 puta u tri seta.
Važno: ovu vježbu provodite polako.
Vježba tricepsa (sl. U)
PAŽNJA! Pazite na maksimalnu du-
žinu rastezanja traka za vježbanje.
1. Držite traku za vježbanje i sjednite na klupu za
vježbanje.
2. Smjestite traku za vježbanje iza Vašeg tijela i dr-
žite ju jednom rukom iza leđa (što je traka za
vježbanje kraće podešena, to je veći otpor).
3. Usmjerite gornji dio ruke kako je prikazano na slici.
4. Zadržite ovaj položaj i zatim se vratite u
početnu poziciju.
5. Ponovite ovu vježbu 10–15 puta u tri seta.
6. Promijenite stranu.
Važno: ovu vježbu provodite polako.
Vježba leđa (sl. V)
PAŽNJA! Pazite na maksimalnu
dužinu rastezanja traka za vježbanje.
1. Polegnite na klupu za vježbanje jedno koljeno i
jedan dlan.
2. Slobodnom rukom držite traku za vježbanje
pored tijela.
3. Savijte ruku i podignite lakat.
4. Zadržite ovaj položaj na 1–2 sekunde i zatim se
vratite u početnu poziciju.
5. Ponovite ovu vježbu 10–15 puta u tri seta.
6. Zamijenite stranu.
Važno: ovu vježbu provodite polako.
Vježba ramena (sl. W)
PAŽNJA! Pazite na maksimalnu du-
žinu rastezanja traka za vježbanje.
1. Držite traku za vježbanje i sjednite na klupu za
vježbanje.
2. Smjestite traku za vježbanje iza Vašeg
tijela i držite jus obje ruke iza leđa (što je traka
za vježbanje kraće podešena, to je veći otpor).
3. Držite ruke otvorenima i produljujte pokret rav-
nomjerno prema gore.
4. Zadržite ovaj položaj i zatim se vratite u
početnu poziciju.
Ponovite ovu vježbu 10–15 puta u tri seta.
Važno: ovu vježbu provodite polako.

18 HR
Rastezanje
Nakon svakog vježbanja uzmite dovoljno vremena
za rastezanje. U nastavku ćemo Vam opisati neko-
liko jednostavnih vježbi.
Svaku pojedinačnu vježbu treba ponoviti po 3 puta
po strani od 30–40 sekundi.
Muskulatura zatiljka
1. Stanite opušteno. Povucite Vašu glavu jednom
rukom prvo na lijevo, a zatim na desno. Na ovaj
se način rastežu strane Vašega vrata.
Ruke i ramena
1. Stanite uspravno, koljena su u zglobu lagano
savinuta.
2. Stavite desnu ruku iza glave, dok se desna
nalazi između lopatica.
3. Lijevom rukom uhvatite desni lakat i povucite ga
prema natrag.
4. Promijenite stranu i ponovite vježbu.
Muskulatura nogu
1. Stanite uspravno i podignite jednu nogu s tla.
2. Lagano kružite nogom najprije u jednom, a
potom u drugom smjeru.
3. Nakon nekog vremena promijenite nogu.
Važno: pazite da bedre stoje paralelno
jedna uz drugu. Zdjelicu pomaknite na-
prijed, gornji dio tijela ostaje ispravljen.
Njega, skladištenje
Nemojte zaboraviti da redovito održavanje i
čišćenje doprinose sigurnosti i čuvanju Vaše
klupe za vježbanje.
Skladištite artikl u suhoj, čistoj i umjereno
zagrijanoj prostoriji.
VAŽNO! Čistite samo vodom, nikada jakim
sredstvima za čišćenje. Na kraju do suhog
obrišite krpom za čišćenje.
Zamijenite oštećene komponente smjesta i/ili
više nemojte koristiti proizvod dok se ne
popravi.
Zbrinjavanje
Ambalaža se sastoji od ekološki neškodljivih mate-
rijala koje možete zbrinuti na lokalnim mjestima za
reciklažu.
O mogućnostima zbrinjavanja dotrajalog proi-
zvoda možete se raspitati kod vaše općinske ili
gradske uprave.
Jamstvo
Proizvod se brižno izrađuje prema strogim smjerni-
cama kvalitete i prije isporuke savjesno ispituje. U
slučaju nedostataka na ovom proizvodu, na raspo-
laganju imate zakonska prava protiv prodavača
tog uređaja. Vaša zakonska prava ovim našim jam-
stvom koje je predstavljeno u nastavku, ostaju neta-
knuta.
Za ovaj proizvod dobivate jamstvo u trajanju od
3 godine od datuma kupnje. Jamstveni rok počinje
s datumom kupovine. Molimo dobro sačuvajte ori-
ginalan račun s blagajne. To je dokumentacija kao
dokaz kupovine koji će se zahtijevati.
Ako u razdoblju od 3 godine od datuma kupovine
ovog proizvoda nastane kakva greška na materi-
jalu ili tvornočka greška, proizvod ćemo – prema
našem izboru – besplatno popraviti ili zamijeniti.
Ovo jamstvo se poništava, kada se proizvod ošteti,
nestručno koristi ili ne održava.
Jamstvo vrijedi za nedostatke na materijalu ili tvor-
ničke pogreške. Ovo jamstvo se ne proteže na dije-
love proizvoda, koji podliježu normalnom trošenju i
stoga se mogu smatrati kao normalni potrošni dije-
lovi (npr. baterije) ili za oštećenja na krhkim dijelo-
vima, npr. prekidaču, punjivim baterijama ili takvi,
koji su izrađeni od stakla.

19 RO
Introducere ................................................................................................................................ Pagina 20
Utilizare conform scopului .............................................................................................................. Pagina 20
Conţinutul pachetului / descrierea componentelor ....................................................................... Pagina 20
Date tehnice .................................................................................................................................... Pagina 20
Indicaţii de siguranţă ........................................................................................................ Pagina 20
Montare ........................................................................................................................................ Pagina 22
Unelta necesară .............................................................................................................................. Pagina 22
Mecanism de pliere ............................................................................................................ Pagina 22
Poziţionarea benzii de fitness ................................................................................... Pagina 22
Indicaţii de antrenament ................................................................................................ Pagina 22
Încălzire ........................................................................................................................................... Pagina 23
Propuneri de exerciţii ....................................................................................................... Pagina 23
Întindere ....................................................................................................................................... Pagina 25
Întreţinere, depozitare .................................................................................................... Pagina 25
Înlăturare .................................................................................................................................... Pagina 26
Garanţie ....................................................................................................................................... Pagina 26

20 RO
Bancă pentru antrenament
Introducere
Vă felicităm pentru achiziţionarea noului
dumneavoastră produs. Aţi ales un pro-
dus de înaltă calitate. Înainte de prima
punere în funcţiune informaţi-vă cu privire la pro-
dus. Pentru aceasta citiţi cu atenţie următorul ma-
nual de utilizare şi indicaţiile de siguranţă. Utilizaţi
acest produs numai conform descrierii şi instrucţiu-
nilor de utilizare. Păstraţi bine aceste instrucţiuni. În
caz că, daţi produsul mai departe la terţi, înmânaţi
de asemenea şi documentaţia acestuia.
Nerespectarea indicaţiilor de sigu-
ranţă poate conduce la vătămări grave.
Utilizare conform scopului
Articolul este destinat exclusiv utilizării ca aparat
de antrenament pentru uz privat.
Articolul nu este destinat utilizării în scopuri terape-
utice sau comerciale. Produsul se pretează numai
pentru utilizarea în interior.
Conţinutul pachetului/
descrierea componentelor (fig. A)
1
1 x Picior de susţinere
2
1 x Mâner
3
2 x Piuliţă din plastic mare
4
1 x Bolţuri pentru montaj
5
1 x Splint de siguranţă
6
2 x Şaibă plată
7
1 x Suport pentru picioare
8
1 x Şaibă plată mare
9
1 x Bară
10
1 x Bancă de antrenament
11
2 x Cheie
12
2 x Bandă de fitness
1 x Manual de utilizare
Date tehnice
Sarcina maximă a
utilizatorului: 110 kg
Dimensiuni: asamblat cca. 136
x 57 x 70–79,5 cm
(lungimeL x lăţime x
înălţime)
Benzi de fitness:
Lungime: cca. 70–80 cm
lungimea de prelungire max.: 190 cm
Aparat de antrenament clasa H (domeniul casnic)
Vă rugăm să luaţi în considerare că, da-
torită proprietăţilor de material ale ben-
zilor de fitness, valorile de forţă din tabel
pot să varieze de valorile de forţă reale.
Tabel de forţă benzi de fitness
Lungimea întinde-
rii (cm) cca.
120 140 160 185 190
Forţa
(N)
cca.
În lungime
completă
(cca. 80 cm)
26 33 38 47 48
Adaptat la
marcajul
MIN (cca.
70 cm)
36 43 50 60 62
Toleranţa valorilor menţionate anterior: +/- 20 %
Indicaţii de siguranţă
Pericol de accidentare!
Articolul poate fi folosit doar sub supraveghe-
rea unui adult și nu poate fi folosit ca jucărie.
Consultaţi medicul, înainte de începerea antre-
namentului. Asiguraţi-vă că antrenamentul este
adecvat din punct de vedere al sănătăţii.
Aveţi grijă să vă încălziţi întotdeauna înainte
de antrenament şi antrenaţi-vă corespunzător
capacităţii dumneavoastră de performanţă
actuală. La o solicitare prea mare şi un
Pagina se încarcă...
Pagina se încarcă...
Pagina se încarcă...
Pagina se încarcă...
Pagina se încarcă...
Pagina se încarcă...
Pagina se încarcă...
Pagina se încarcă...
Pagina se încarcă...
Pagina se încarcă...
Pagina se încarcă...
Pagina se încarcă...
Pagina se încarcă...
Pagina se încarcă...
Pagina se încarcă...
Pagina se încarcă...
Pagina se încarcă...
Pagina se încarcă...
Pagina se încarcă...
Pagina se încarcă...
Pagina se încarcă...
Pagina se încarcă...
Pagina se încarcă...
Pagina se încarcă...
Pagina se încarcă...
Pagina se încarcă...
Pagina se încarcă...
Pagina se încarcă...
Pagina se încarcă...
Pagina se încarcă...
Pagina se încarcă...
Pagina se încarcă...
Pagina se încarcă...
Pagina se încarcă...
Pagina se încarcă...
-
 1
1
-
 2
2
-
 3
3
-
 4
4
-
 5
5
-
 6
6
-
 7
7
-
 8
8
-
 9
9
-
 10
10
-
 11
11
-
 12
12
-
 13
13
-
 14
14
-
 15
15
-
 16
16
-
 17
17
-
 18
18
-
 19
19
-
 20
20
-
 21
21
-
 22
22
-
 23
23
-
 24
24
-
 25
25
-
 26
26
-
 27
27
-
 28
28
-
 29
29
-
 30
30
-
 31
31
-
 32
32
-
 33
33
-
 34
34
-
 35
35
-
 36
36
-
 37
37
-
 38
38
-
 39
39
-
 40
40
-
 41
41
-
 42
42
-
 43
43
-
 44
44
-
 45
45
-
 46
46
-
 47
47
-
 48
48
-
 49
49
-
 50
50
-
 51
51
-
 52
52
-
 53
53
-
 54
54
-
 55
55


Crivit 292739 Assembly, Operating And Safety Instructions
- Tip
- Assembly, Operating And Safety Instructions
în alte limbi
- Deutsch: Crivit 292739
Lucrări înrudite
-
Crivit RESISTANCE BANDS WITH PULLEY Instructions For Use Manual
-
-
-
-
-
-