Crivit 327402_1904 Operating Instructions Manual
- Tip
- Operating Instructions Manual

MINI STEPPER
MINI STEPPER
Operating instructions
STEPER
Uputstvo za rukovanje
SWING STEPER
Upute za rukovanje
СТЕПЕР
Ръководство за обслужване
SWING-STEPPER
Bedienungsanleitung
SWING STEPPER
Οδηγίες χειρισμού
STEPPER SWING
Instrucțiuni de funcționare
GB/CY Operating and safety information Page 10
HR Napomene o rukovanju i sigurnosti Strana 20
RS Napomene o rukovanju i bezbednosne napomene Strana 29
RO Instrucțiuni de funcționare și privind siguranța Pagina 39
BG Указания за обслужване и безопасност Страни 51
GR/CY Οδηγίες χειρισμού και ασφαλείας Σελίδα 64
DE/AT/CH Bedienungs- und Sicherheitshinweise Seite 74
Before reading, fold out the illustration page and get to know all of the functions of your unit.
Prije čitanja otvorite stranicu sa slikama i upoznajte se sa svim funkcijama uređaja.
Pre početka čitanja rasklopite stranicu sa slikama a zatim se u nastavku upoznajte sa svim funkcijama
uređaja.
Înainte să citiţi, deschideţi pagina cu imagini şi după aceea familiarizaţi-vă cu toate
funcţiunile aparatului.
Разгънете страницата със схемите преди да я прочетете и се запознайте с всички функции на
уреда.
Ξεδιπλώστε πριν την ανάγνωση την πλευρά με τις απεικονίσεις και εξοικειωθείτε κατόπιν με όλες τις
λειτουργίες της συσκευής.
Klappen Sie vor dem Lesen die Seite mit den Abbildungen aus und machen Sie sich anschließend mit
allen Funktionen des Artikels vertraut.
DELTA-SPORT HANDELSKONTOR GMBH
Wragekamp 6 • DE-22397 Hamburg
GERMANY
09/2019
Delta-Sport-Nr.: SW-5755
IAN 327402_1904 IAN 327402_1904
07.05.2019 / PM 3:39

D
B C
A F
G
HE

5
I
J
K

6
L
M
N

7
O
P
Q

8
Contents/Sadržaj/Sadržaj/Cuprins
Safety information –
risks for children ................................................ 10
Package contents .............................................. 10
Technical data ................................................... 10
Intended use ...................................................... 10
Safety information ..................................... 11 - 12
Replacing the batteries ..................................... 12
Assembling the stepper .................................... 12
Operating the computer .................................. 13
Training instructions .................................. 13 - 15
Stretching exercises .................................. 15 - 16
Exercises without straps .................................... 16
Exercises with straps ................................. 16 - 18
Maintenance, storage, cleaning ..................... 18
Disposal ............................................................. 18
Notes on the guarantee and service
handling .................................................... 18 - 19
Indicații cu privire la siguranță –
pericole pentru copii .......................... 39
Pachet de livrare ............................... 39
Date tehnice .............................. 39 - 40
Destinație de utilizare ........................ 40
Indicații cu privire la siguranță ..... 40 - 41
Înlocuirea bateriei ............................. 41
Montarea stepper-ului ........................ 42
Utilizarea calculatorului .............. 42 - 43
Indicații cu privire la antrenament 43 - 45
Exerciții de tensionare ................. 45 - 47
Exerciții fără corzi ............................. 47
Exerciții cu corzi ........................ 47 - 49
Întreținere, depozitare și curățare ........ 49
Instrucţiuni privind eliminarea ............. 49
Indicații referitoare la garanție și
operațiuni de service .................... 49 - 50
Sigurnosne napomene –
Opasnosti za djecu .......................................... 20
Opseg isporuke ................................................ 20
Tehnički podaci ................................................. 20
Namjenska upotreba ....................................... 20
Sigurnosne napomene ............................. 21 - 22
Zamjena baterije .............................................. 22
Montaža stepera .............................................. 22
Rukovanje računalom ....................................... 23
Upute za trening ....................................... 23 - 25
Vježbe istezanja ....................................... 25 - 26
Vježbe bez traka za povlačenje ..................... 26
Vježbe s trakama za povlačenje ............. 26 - 28
Održavanje, skladištenje, čišćenje ................. 28
Uputa za zbrinjavanje ..................................... 28
Napomene vezane za garanciju i
usluge servisa ..................................................... 28
Bezbednosne napomene -
Opasnosti po decu ........................................... 29
Obim isporuke .................................................. 29
Tehnički podaci ................................................. 29
Namenska upotreba ........................................ 29
Bezbednosne napomene ......................... 30 - 31
Zamena baterije ............................................... 31
Montaža stepera .............................................. 31
Rukovanje računarom ....................................... 32
Uputstva za vežbanje .............................. 32 - 34
Vežbe istezanja ........................................ 34 - 35
Vežbe bez rasteznih traka ............................... 35
Vežbe sa rasteznim trakama ................... 35 - 37
Održavanje, čuvanje, čišćenje ........................ 37
Napomene u vezi odlaganja u otpad ........... 37
Napomene za garanciju i postupak za
servisiranje ...................................................37 - 38

9
Съдържание/Πινακας περιεχομενων/Inhaltsverzeichnis
Προειδοποιήσεις ασφαλείας —
Κίνδυνοι για παιδιά ........................................... 64
Παραδοτέος εξοπλισμός ................................ 64
Τεχνικά χαρακτηριστικά .................................... 64
Προβλεπόμενη χρήση ...................................... 64
Προειδοποιήσεις ασφαλείας ................... 65 - 66
Αντικατάσταση μπαταρίας ............................... 66
Συναρμολόγηση του στέπερ .................... 66 - 67
Χρήση του υπολογιστή ............................. 67 - 68
Συμβουλές για την άσκηση ...................... 68 - 69
Διατάσεις ................................................... 69 - 71
Ασκήσεις χωρίς ιμάντες .................................... 71
Ασκήσεις με ιμάντες .................................. 71 - 72
Συντήρηση, αποθήκευση,
καθαρισμός ............................................... 72 - 73
Υποδείξεις ως προς την απόρριψη .................. 73
Υποδείξεις σχετικά με την εγγύηση
και τη διαδικασία σέρβις ....................................73
Sicherheitshinweise
Gefahren für Kinder ......................................... 74
Lieferumfang ...................................................... 74
Technische Daten .............................................. 74
Bestimmungsgemäße Verwendung ................. 75
Sicherheitshinweise ................................... 75 - 76
Batterie austauschen ........................................ 76
Montage des Steppers ............................ 76 - 77
Bedienung des Computers ....................... 77 - 78
Trainingshinweise ...................................... 78 - 79
Dehnungsübungen ................................... 79 - 81
Übungen ohne Zugbänder .............................. 81
Übungen mit Zugbändern ....................... 81 - 83
Wartung, Lagerung, Reinigung ....................... 83
Hinweise zur Entsorgung ................................. 83
Hinweise zur Garantie und
Serviceabwicklung ............................................ 84
Указания за безопасност
Рискове за деца ............................................... 51
Обхват на доставката .................................... 51
Технически данни ........................................... 51
Използване по предназначение ................... 52
Указания за безопасност ....................... 52 - 53
Смяна на батерия ........................................... 53
Монтаж на степера ................................ 53 - 54
Използване на компютъра .................... 54 - 55
Указания за тренировки .......................... 55 - 56
Упражнения за разтягане ....................... 56 - 58
Упражнения без ластици ............................... 58
Упражнения с ластици ........................... 58 - 60
Поддръжка, съхранение, почистване .......... 60
Указания за отстраняване
като отпадък ..................................................... 60
Указания за гаранцията и процеса
на сервизно обслужване .........................60 - 63

10
Technical data
Measurements: approx. 52 x 24.5 x 52cm
(W x H x D)
Weight: approx. 9.050kg
Energy supply:
1 x 1.5V LR03, AAA
Rated power consumption: 0.09mW
Symbol for DC voltage
Maximum load: 100kg
Delta-Sport Handelskontor GmbH hereby
declares that this product complies with
the following basic requirements as well as other
relevant statutory provisions:
2014/30/EU – EMC Directive
2011/65/EU – RoHS Directive
Full declarations of conformity are available under
http://www.conformity.delta-sport.com/
Date of manufacture (month/year):
09/2019
Device class: HC (for use in private households,
exactitude C)/not intended for therapeutic training
Tested according to: DIN EN ISO 20957-1:
2014, DIN EN ISO 20957-8,
Training device DIN 32935 – A
Maximum stretch length 165cm at 19.5N.
The tolerance range for the force is max. 20% (+/-).
Training appliance form A is compliant with
DIN 32935.
Stepping motion
The stepper facilitates a stepper-determined
stepping motion.
Brake resistance system
The stepper uses a speed-dependent system.
Intended use
The item is intended to be used exclusively
as training equipment, and is approved for
installation and use in the home only.
Congratulations!
You have chosen to purchase a high-quality prod-
uct. Familiarise yourself with the product before
using it for the first time.
Read the following operating
instructions carefully.
Use the product only as described and only
for the given areas of application. Store these
operating instructions carefully. When passing the
product on to third parties, please also hand over
all accompanying documents.
Safety information –
risks for children
• This apparatus may be used by
children from 8 years of age
upwards, as well by persons with
diminished physical, sensory or
mental abilities, or those with little
experience and knowledge, if they
are supervised or instructed with
regard to its safe use, provided they
also understand potential risks.
• Children may not play with the
apparatus.
• Cleaning and maintenance may not
be carried out by children without
supervision.
Package contents (Fig. A)
1 x mini stepper
2 x strap with handle
2 x plastic foot with support surfaces
2 x self-tapping screw
1 x adjusting screw
1 x Allen key with Phillips screwdriver
1 x battery (1.5V LR03, AAA)
1 x operating instructions
GB/CY

11GB/CY
Safety information
General risk
• Please ensure that the packaging materials do
not become a deadly trap for a child (risk of
suffocation).
• Never let small children play with the battery.
Swallowing can cause serious harm to your
health.
• Keep children away from the pedals during
training sessions (risk of being crushed).
• The item is not a toy. When not in use, please
store it so that it is inaccessible to children.
• Maximum load: The item is designed for a
maximum body weight of 100kg.
• Do not pull the expander bands beyond the
maximum stretch length of 165cm!
• The stretch length may not be adjusted beyond
the marking (MIN.).
• No adjustment devices which may hinder the
user’s movements may protrude from the item.
The item must be positioned in an area that
gives you enough space for training. An area of
at least 2 x 2m is necessary.
• Position the item on an even and level surface,
so that it is stable during training, and does not
“wobble”.
• Please check that the item is in optimum
condition before each use. Do not use it if this is
not the case.
Defective parts must be replaced, as otherwise
function and safety are impaired.
• Repairs may only be performed by authorised
specialists.
• Only original spare parts may be used.
• The item may only be used with appropriate
gym shoes.
• There must be a clear space of approx. 0.6m
around the training area (Fig. E).
• The elastomers on the expanders must be
protected from solar radiation.
Risk of burns!
• The hydraulic dampers become hot during
training. Do not touch them immediately after
training under any circumstances.
Risks due to incorrect/excessive
training!
• Please ensure that you observe all the
instructions in the chapter entitled “Training
Instructions”.
Material damages!
• Oil could leak out of the hydraulic dampers.
To avoid staining of floors or carpets, place the
item on a level, non-slip surface.
• Prevent fluids from penetrating the computer.
The sensitive electronics could become
damaged. Protect the computer from direct
sunlight.
• Check regularly to make sure all bolted
connections are tight! Self-securing nuts cannot
come loose through vibration.
This characteristic is, however, only guaranteed
when tightened once only. In the event that the
stepper is dismantled, all self-securing nuts must
be replaced.
• When the item is not in use for an extended
period, remove the battery from the computer.
These could otherwise leak and cause damage.
• We recommend using an underlay during
training, to prevent damage to the floor.
Battery warning notice!
• Remove the batteries when they are flat, or if
the item is not in use for an extended period.
• Do not use different types or brands of batter-
ies, or combine new and used batteries, nor use
batteries with different capacities, as these can
leak and cause damage.
• Ensure the polarity (+/-) is correct when insert-
ing the batteries.
• Replace all batteries at the same time and
dispose of the old batteries as prescribed.
• Warning! Batteries may not be charged or reac-
tivated by any other means, taken apart, thrown
into fire or short-circuited.
• Always keep batteries out of reach of children.
• Do not use rechargeable batteries!
• Cleaning and maintenance may not be carried
out by children without supervision.
• Clean the battery and device contacts as need-
ed and before inserting.

12
• Do not expose the batteries to extreme
conditions (e.g. radiators or direct sunlight).
Otherwise there is an increased risk of leakage.
• Batteries can be life-threatening if swallowed.
Therefore, always store them out of reach of small
children. Medical attention must be sought imme-
diately if a battery has been swallowed.
Danger!
• Handle damaged or leaking batteries with extreme
caution and dispose of them properly as soon as
possible. Wear gloves when doing so.
• If you come into contact with battery acid, wash
the affected area with soap and water. If battery
acid gets in your eye, rinse it with water and seek
medical attention immediately!
• The connection terminals must not be short-cir-
cuited.
Replacing the batteries
CAUTION! Observe the following instruc-
tions to avoid mechanical and electrical
damage.
Danger!
There is a battery LR03 in the item. You can
replace the battery if it stops working.
1. Raise the display on the side, and carefully
remove it. The battery is at the back of the display.
2. Slide the battery carefully out of the battery
casing and replace with a new one.
Note: Make sure that the battery is inserted
properly and completely in its casing.
3. Insert the display and the cable connections
into the casing once again.
Note: Make sure that the display is correctly
inserted in the casing once again.
Assembling the stepper
Step 1:
Insert both plastic feet into the pipe on the back of
the frame. The ribbed contact surfaces lie on the
floor and the sharp ends point backward (Fig. C).
To anchor it, a self-tapping screw is inserted into
the pre-drilled hole on the underside of the frame.
Note: Make sure that the pre-drilled hole in the
frame and the plastic foot are placed exactly on
top of each other.
Step 2:
The adjustable screw is screwed into the thread on
the front of the stepper.
With the help of this screw, you may adjust the
step height of the tread surfaces.
To increase the step height, turn the adjustable
screw in a clockwise direction. To lower the step
height, turn the adjustable screw in an anticlock-
wise direction.
Step 3:
Remove the computer from the stepper by pulling
it upwards.
Place the supplied battery in its appropriate com-
partment on the underside of the computer. Ensure
that the polarities are correctly aligned.
Connect the computer to the connector on the cas-
ing and insert it once again. Make sure that the
cable does not get pinched during this procedure.
Step 4:
Observe the maximum stretch length of
the straps.
The shorter the straps, the greater the effort
expended.
• Shorten the straps by locking the rubber hose
with the safety ball into place (Fig. B).
IMPORTANT! Make sure not to shorten
the straps too far. Do not go past the
“MIN.” marking!
• Hook the metal hook into the eyelet on the
stepper frame and screw in the fastener on the
hook tightly (Fig. D).
Important! Before training, check that
the straps are securely fitted, and that
the hook is safely and tightly screwed in.
Caution! The eyelets are secured for ten-
sile loads upwards only, and may not be
subjected to transverse loads. There is a
risk of injury, or damage to the stepper.
When you are not training with the straps, unhook
them from the eyelets to avoid tripping over them.
Check whether all screws and nuts are securely
tightened.
GB/CY

13GB/CY
Operating the computer
The stepper meets accuracy grade C, i.e., there is
no claim to accuracy in the computer displays.
Turning the item on and off
When you start exercising or operating the pedals,
the computer switches on automatically. If the
stepper is out of operation for approx. 4 minutes, the
computer switches off automatically.
Display
The top row displays:
1. “STOP”, if training is paused;
2. The number of steps per minute (projection)
Selecting the mode
The 4 modes are displayed on the bottom row.
Briefly press the MODE button to change from
one mode to the next.
1. “TMR”: Training time to date, from 0:00 to
99:59
2. “REPS”: Number of steps completed during the
current training session from 0 to 9999
3. “CAL”: Calories burned* from 0 to 9999
4. “TTR”: Number of training steps since inserting
the battery, from 0 to 9999
* The calculation is based on pre-programmed
standard values, that serve as a guideline only.
The calories burned through use of the straps is
not considered.
You may display all the training data, one after
the other. To do this, press the “MODE” button a
few times, until the “TMR” row blinks. The display
will then automatically change from mode to
mode every 5 seconds.
Entering training goals
You may enter one or more goals:
- Duration of training (TMR)
- Number of steps (REPS)
- Calorie consumption (CAL)
1. Hold the MODE button down until “0:00
(TMR)” appears in the bottom row and the first
0 blinks (approx. 7 secs.).
2. To enter your training duration, press the MODE
button several times, until the display shows the
required duration in minutes.
3. After a few seconds the display will show the
next mode (REPS). Press the MODE button, to
set the amount of steps in increments of 10.
4. You may set the desired calorie consumption in
the next mode (CAL) in increments of 10.
5. Now you may start with your training. The com-
puter counts down the pre-programmed values
to “0:00”.
6. As soon as the pre-programmed goal is
reached, the computer ceases to count for
approx. 10 seconds. Afterwards, the computer
starts again at 0.
Resetting the display
The display is on 0 only when used for the first
time. With all subsequent training sessions, the
computer continues counting from the last time
you trained. To reset the display, keep the MODE
button pressed down until all symbols can be seen
at the same time.
To reset the total number of training steps (TTR),
remove the battery.
Training instructions
General
Consult with your doctor before you start training!
Goal-setting
Various goals can be achieved through
appropriate training:
• Improvement in your general fitness levels
• Increase in endurance
• Improved feeling of well-being
Success is essentially dependent on the following
points, which we would particularly like to bring to
your attention:
• Regular training and sufficient duration of
training sessions
• Appropriate nutrition
• Monitoring your training milestones
Who can train?
If you haven’t trained or participated in sport
for an extended period, have cardiovascular or
orthopaedic problems, take medication, or are
pregnant, you should consult your doctor before
you commence training. Tell him/her which
training equipment you intend using. Undergo
an examination to ascertain which training
programmes are suitable for you. To be safe, take
the operating instructions with you, so that your
doctor may put together an individual training
programme with you.

14 GB/CY
In general, every physically healthy person,
whether young or old, can begin a fitness training
programme, if he/she has consulted a doctor
beforehand.
Note!
Incorrect or excessive training can
endanger your health.
Load
Intensive workouts make demands on the entire
body, and not merely the leg muscles.
The body, especially the heart and circulatory
system, requires time to adapt to the changes
brought on by the training sessions. For this
reason, it is important to increase levels slowly,
and to ensure that appropriate breaks are taken
during and after training.
Ensure that you train at an appropriate level, i.e.
one in which you do not over-strain yourself. Listen
to your body; end the workout immediately if you
feel unwell, are short of breath or experience
dizziness.
You are exercising at the correct level if you can
have a normal discussion during your training
session.
Cool-down/Relaxation
A cool-down, i.e. a relaxation programme is as
important as a warm-up regime. Always end your
training session appropriately; reduce your pace
and effort level, and do light stretching exercises
when you have dismounted the item. In this way,
your pulse has time to calm down, and your body
is able to recover more effectively for further
efforts.
The duration of recovery periods between training
sessions should be based on your fitness level.
Avoid excessively high training intensities, to prevent
over-training. Excessive strain can cause health
problems and lead to death. If you feel fatigue or
weak ness, cease training immediately.
To determine your individual training intensity,
you may use the following calculation formula
to ascertain your approximate maximum heart
frequency (MHF):
MHF = 220 – your age
Depending on your training goal, there are 5
training zones within which you may push the
effort level to your maximum heart frequency.
Zones
Regeneration zone = 50–60 % of the MHF
Fat-burning zone = 60–70 % of the MHF
Carbohydrate-burning zone = 70–80 % of the
MHF
Anaerobic zone = 80–90 % of the MHF
Warning zone = 90–100 % of the MHF
• Regeneration zone/health zone
This training is aimed at basic physical fitness. It
consists of longer endurance exercises, which are
to be performed slowly. It is especially suitable
for beginners and/or people in weak physical
condition.
• Fat-burning zone
Optimized for fat-burning, the workout is designed
for strengthening the cardiovascular system. In this
zone, the body burns proportionately the most
kilojoules from fat. During your training session,
you should feel relaxed and be able to converse.
• Carbohydrate-burning zone
In this zone, more carbohydrates are burned than
fat. The training effort is more strenuous, but also
more effective.
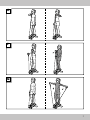
Mounting the stepper
Press one pedal down completely with your foot,
so that the pedal arm rests on the floor frame on
its stopper.
Then climb onto the foot pedal of the pedal which
is in the bottom position.
Then put your other foot onto the other pedal
which is leaning upward.
Dismounting
Press one pedal completely down with one foot,
so that the one pedal arm rests on the floor frame
on its stopper.
Then take your foot from the pedal which is
pointing upward, and place it on the floor. Then
take your foot from the pedal which is pointing
downward.
Movement of the stepper during
training
Your stepper simulates climbing stairs.
The swing effect causes the pedals not only to
move up and down, but also to swing to the left
and right.

15GB/CY
Muscle groups exercised
When exercising without the straps, it is mainly the
leg and buttocks that are exercised.
During exercises when you use both the stepper
and the straps, you strengthen your buttocks, leg,
arm and shoulder muscles.
During exercises where you do not step, but use
the straps, you strengthen your arm and shoulder
muscles.
Body posture
Please ensure that you keep your body straight
during training sessions. Avoid a hollow-back
posture at all costs.
Important: During exercising, keep con-
stant abdominal tension and keep your
upper body erect!
If you maintain an even stepping motion, the
pedal arm stoppers should not touch the floor
frame. Just before standing up each time you step,
shift your body weight from one leg to the other. It
can also be helpful if you let your arms swing at a
slight angle to your upper body while stepping in
a rhythmic motion.
Stretching exercises
Stretching the lower back muscles
(Fig. F)
Starting position
1. Get down on all fours.
2. Position your hand and knee joints under your
shoulders and buttocks.
End position
3. Tighten your stomach muscles and roll your
back into an arch like a cat, until you feel the
stretch in your entire back.
4. Keep your eyes directed on your hands.
5. Stay in this position for a moment and then go
back to your starting position.
6. Repeat this exercise 2–3 times in three sets.
Important: Keep your back and pelvis
straight in the all-fours position.
Stretching the backs of the thighs
(Fig. G)
Starting position
1. Lie with your back on the floor. Your legs are
stretched out in a relaxed position.
End position
2. Tense your stomach muscles and lift one leg
straight up into a vertical position.
3. Grab your upper thigh with your hands and pull
it towards you more to increase the stretch.
4. Your toes point downward while your other leg
stays stretched on the ground.
5. Stay in this position for a moment and then go
back to your starting position.
6. Repeat this exercise 2–3 times in sets of three,
and then change legs.
Important: Some people have very short
rear thigh muscles. If this applies to you,
you may use a towel to help pull your
thigh towards yourself.
Stretching the chest muscles (Fig. H)
Variation 1
Starting position
1. Place one underarm and one elbow on a wall,
with your hand facing upwards. The upper and
lower arm must form a right angle.
End position
2. Keeping your arm on the wall, turn your upper
body slightly away from the wall.
3. Repeat this exercise 2–3 times in sets of three
and then change sides.
Variation 2
Starting position
1. Stretch both underarms up and to the sides, so
that upper and lower arms form a right angle.
2. Lean slightly in a stepping stance in front of a
door frame.
End position
3. Press your upper body forwards carefully, so
that you feel the stretch in your chest area.
4. Repeat this exercise 2–3 times in three sets.
Important: Hold the stretch for 5 seconds.
Stretching the neck muscles (Fig. I)
Starting position
1. Stand up straight.
End position
2. Tilt your head to the side towards your shoulder,
while simultaneously pulling the other shoulder
down. You should feel the stretch on the side of
your neck.

16 GB/CY
3. Stay in this position for approx. 5 seconds and
then go back to your starting position.
4. Repeat this exercise 2–3 times in sets of three,
and then change sides.
Important: Keep your head looking
straight forward, without twisting your
neck. Performing this exercise in front of a
mirror will facilitate the correct posture.
Stretching the front thigh muscles
(Fig. J)
Starting position
1. Tighten your stomach muscles while standing up
straight.
2. Avoid a hollow back position by pulling your
pelvis upwards.
3. For better support you may lean against a wall
with one hand.
End position
4. Holding the tension, grab one ankle and pull it
towards your buttocks. Keep your legs parallel
during this movement.
5. The stretch should be felt on the front upper
thigh of the bent leg.
6. Stay in this position for approx. 5 seconds and
then go back to your starting position.
7. Repeat this exercise 2–3 times in sets of three,
and then change legs.
Important: Some people have very short
front thigh muscles. If this applies to you,
you may use a towel to pull your foot
toward yourself.
Stretching the hip flexor (Fig. K)
Starting position
1. Lunge forward and put your back leg on the
ground, with your shin on the floor.
2. Upper and lower parts of the front leg make a
right angle, and your arms rest on the front leg.
End position
3. With a straight, upright back, push your pelvis
forward and towards the floor, so that you can
feel the stretch in the hip area of your back leg.
4. The front knee should not jut out over your toes.
5. During this movement, make sure that your back
leg and your hip make a straight line, and you
don’t turn your pelvis outward.
6. Stay in this position for approx. 5 seconds and
then go back to your starting position.
7. Repeat this exercise 2–3 times in sets of three,
and then change legs.
Important: Keep your back straight dur-
ing the exercise.
Stretching the inner thigh (Fig. L)
Starting position
1. Stand with your legs wide apart, and bend out
one leg from this wide-legged stance.
2. Place your hands lightly on your hips.
End position
3. Stretch the other leg to the side, and shift your
body weight onto the bent leg.
4. Keep the foot of the stretched leg on the floor,
so that you feel the stretch in the inner upper
thigh of the outstretched leg.
5. Stay in this position for approx. 5 seconds and
then go back to your starting position.
6. Repeat this exercise 2–3 times in sets of three,
and then change legs.
Important: Keep your back and pelvis
straight during the exercise.
Exercises without straps
For thighs, calves and buttocks
(Fig. M)
Starting position
1. Stand with your feet on the stepper.
End position
2. Tighten your buttocks and stomach muscles.
3. Press down alternately on the pedals with your
feet. Your arms should move back and forth
naturally, as if you were walking or climbing
stairs.
4. Your head is an extension of your spine and
your upper body is upright.
5. Increase the intensity by gradually raising your
arms.
6. Repeat this exercise 10-15 times in three sets.
Important: Your arms swing in the
opposite direction of your legs, and your
pelvis remains straight.
Exercises with straps
Notice for training with straps!
The strap may be stretched to a
maximum of 165cm. Otherwise, it could
become damaged and injure the user.

17
The longer you stretch the strap, the
more energy you need to expend.
The correct grip
Ensure that your grip is always kept level
when pulling the straps.
Do not bend your wrist joints, as you
would overstrain them.
Exercises
For all the following exercises, please
note:
• Take hold of the handles.
• Execute the movements in a controlled
fashion.
• Keep your arms tense.
• Before each training session, check
whether the fastenings of the rope
hooks are tightly closed.
• The duration of the exercise sets should
be based on your personal fitness
level. Divide the exercises into multiple
sets and pause between individual
sets.
We recommend 3 sets per exercise, with
the duration of the repetitions orientated
according to your fitness level.
For arms, shoulders, legs and
buttocks (Fig. N)
Starting position
1. Stand with your feet on the stepper.
2. Take hold of the straps. The backs of your
hands are pointing upwards.
End position
3. Tighten your arm and stomach muscles and
buttocks.
4. Lift your left arm, slightly bent, in front of you to
shoulder height, while you press the right pedal
down with your foot.
5. Drop your left arm, and lift your right one at the
same time, while pressing the left pedal down
with your foot.
6. Your head is an extension of your spine and
your upper body is upright.
7. Repeat this exercise 10–15 times in sets of three.
Important: Your arms swing in the
opposite direction of your legs, and your
pelvis remains straight.
For the arms, especially for the
shoulders (Fig. O)
Starting position
1. Stand with your feet on the stepper. The pedals
are not needed for this exercise.
2. Take hold of the straps and hold your hands at
hip-height.
End position
3. Tighten your arm and stomach muscles.
4. Pull your right arm towards your chin. While
doing this, pull your elbow up sideways to
shoulder height, with the back of your hand
facing upwards.
5. At the same time, lower your left arm.
6. Stay in this position for a moment and then go
back to your starting position.
7. Now, pull your left arm up towards your chin.
While doing this, pull your elbow up sideways
to shoulder height, with the back of your hand
facing upwards.
8. At the same time, lower your right arm.
9. Repeat this exercise 10–15 times in sets of
three.
Important: During this exercise, keep
your upper body and pelvis straight.
For the arms, legs, buttocks and
especially the upper arms (Fig. P)
Starting position
1. Stand with your feet on the stepper.
2. Take hold of the straps and hold your hands at
hip-height. Your elbows remain close to your
body. The palms of your hands are pointing
upwards.
End position
3. Tighten your arm and stomach muscles.
4. Lift your right underarm up, at the same time
pressing the left pedal down with your foot.
5. Lift your left underarm up now, pressing the right
pedal down with your foot at the same time.
6. The right arm is lowered down at the same time.
7. Repeat this exercise 10–15 times in sets of
three.
Important: During this exercise, keep
your upper body and pelvis straight.
GB/CY

18 GB/CY
For the back, shoulders, chest, legs
and buttocks (Fig. Q)
Starting position
1. Stand with your feet on the stepper.
2. Take hold of the straps and hold your hands
close to your body at the sides.
End position
3. Tighten your buttocks and stomach muscles.
4. Press down alternately on the pedals with your
feet. Your arms should move back and forth
naturally, as if you were walking or climbing
stairs.
5. Your head is an extension of your spine and
your upper body is upright.
6. With outstretched arms, pull the straps up
to shoulder height, and then lower them
again. The palms of your hands are pointing
downwards.
7. Repeat this exercise 10–15 times in sets of
three.
Important: During this exercise, keep
your upper body and pelvis straight.
Variation: Perform the exercise with the
palms of your hands facing upwards.
Maintenance, storage,
cleaning
Please remember that regular maintenance and
cleaning contribute to the safety of your stepper
and mean that you will enjoy using your stepper
for a long time.
When not in use, always store the product clean
and dry at room temperature.
Only use water to clean and wipe it dry with
cleaning cloth.
IMPORTANT! Never clean the product with
aggressive cleaning agents.
Disposal
In the interest of protecting the environ-
ment, do not throw your product into the
household waste once you are finished
with it, but rather take it to a specialty disposal
facility. Find out about collection sites and their
hours of operation from your local authority.
Defective or used batteries must be recycled
pursuant to Directive 2006/66/EC and changes
to it. Return batteries and/or the product via the
collecting sites provided. Packaging materials,
such as plastic bags, must be kept away from
children. Keep the packaging materials out of
reach of children.
Environmental damage caused by
improper disposal of batteries! Batteries
may not be disposed of with household
waste. They may contain toxic heavy metals and
are subject to hazardous waste treatment. The
chemical symbols of the heavy metals are as
follows: Cd = cadmium, Hg = mercury, Pb = lead.
Dispose of used batteries at a municipal collection
site.
Dispose of the product and packaging in
an environmentally friendly manner.
Note the label on the packaging materials
when separating waste, as these are
labelled with abbreviations (a) and
numbers (b) with the following meaning: 1–7:
plastics/20–22: paper and cardboard/80–98:
composite materials.
The product and the packaging materials can be
recycled, dispose of them separately for better
treatment of waste. The Triman logo only applies
to France. Find out how to dispose of the used
product from your municipal or city administration.
Notes on the guarantee and
service handling
The product was produced with great care and
under constant supervision. You receive a three-
year warranty for this product from the date of
purchase. Please retain your receipt.
The warranty applies only to material and work-
manship and does not apply to misuse or improp-
er handling. Your statutory rights, especially the
warranty rights, are not affected by this warranty.

19
With regard to complaints, please contact the fol-
lowing service hotline or contact us by e-mail. Our
service employees will advise as to the subsequent
procedure as quickly as possible. We will be per-
sonally available to discuss the situation with you.
Any repairs under the warranty, statutory guar-
antees or through goodwill do not extend the
warranty period. This also applies to replaced
and repaired parts. Repairs after the warranty are
subject to a charge.
IAN: 327402_1904
Service Great Britain
Tel.: 0800 404 7657
E-Mail: deltaspor[email protected]
Service Cyprus
Tel.: 8009 4409
E-Mail: deltaspor[email protected]
GB/CY

20
Čestitamo!
Ovom kupnjom odlučili ste se za visokokvalitetan
proizvod. Upoznajte se s proizvodom prije prve
upotrebe.
Stoga pažljivo pročitajte sljedeću
uputu za rukovanje.
Koristite se proizvodom samo na način kako je
ovdje opisano i u navedene svrhe. Dobro čuvajte
ove upute za rukovanje. Ako proizvod predaje-
te drugim osobama, svakako im predajte i svu
dokumentaciju.
Sigurnosne napomene
Opasnosti za djecu!
• Djeca od 8 godina nadalje
i osobe smanjenih psihičkih,
senzoričkih ili mentalnih
sposobnosti odnosno osobe s
nedostatkom iskustva i znanja smiju
upotrebljavati ovaj proizvod pod
nadzorom ili uz upute za njegovu
sigurnu upotrebu te upozorenje
na eventualne opasnosti tijekom
upotrebe.
• Djeca se ne smiju igrati uređajem.
• Čišćenje i korisničko održavanje
ne smiju izvoditi djeca bez
nadzora.
Opseg isporuke (sl. A)
1 x swing steper
2 x traka za povlačenje s ručkom
2 x plastične nožice s ležištem
2 x vijak za lim
1 x vijak za podešavanje
1 x imbus ključ s križnim odvijačem
1 x baterija (1,5 V LR03, AAA)
1 x upute za rukovanje
Tehnički podaci
Dimenzije: cca 52 x 24,5 x 52 cm
(Š x V x D)
Težina: cca 9,050 kg
Napajanje:
1 x 1,5 V LR03, AAA
Nazivna snaga: 0,09 mW
Simbol za istosmjerni napon
Maksimalna opteretivost: 100 kg
Tvrtka Delta-Sport Handelskontor GmbH
ovime izjavljuje da ovaj proizvod
odgovara sljedećim osnovnim zahtjevima i ostalim
primjenjivim odredbama:
2014/30/EU – Direktiva o elektromagnetskoj
kompatibilnosti
2011/65/EU – Direktiva o ograničenju uporabe
određenih opasnih tvari u električnoj i elektronič-
koj opremi
Cjeloviti tekstovi izjava o sukladnosti dostupni su
na http://www.conformity.delta-sport.com/
Datum proizvodnje (mjesec/godina):
09/2019
Klasa uređaja: HC (za uporabu u privatnim
kućanstvima, preciznost C) / nije predviđen za
terapeutski trening
Provjereno prema: DIN EN ISO 20957-1: 2014,
DIN EN ISO 20957-8,
Sprava za vježbanje DIN 32935 – A
Maksimalna duljina rastezanja iznosi 165 cm pri
19,5 N.
Raspon tolerancije za silu iznosi najviše 20 % (+/–).
Verzija A sprave za vježbanje u skladu je s
normom DIN 32935.
Koračno kretanje
Steper radi na principu ovisnog koračnog
kretanja.
Sustav kočnog otpora
Ovaj je steper sustav ovisan o brzini.
Namjenska upotreba
Proizvod je namijenjen isključivo treningu te ga
se smije postaviti i upotrebljavati samo u kućnom
okruženju.
HR

21HR
Sigurnosne napomene
Općenita opasnost
• Folija u koju je proizvod zapakiran može
predstavljati smrtonosnu opasnost za djecu
(opasnost od gušenja).
• Mala djeca ne smiju se igrati baterijom.
Gutanje baterije može uzrokovati ozbiljne
zdravstvene probleme.
• Djeca se tijekom treninga ne smiju približavati
pedalama (opasnost od prignječenja).
• Ovaj proizvod nije dječja igračka. Izvan
uporabe treba ga spremiti na mjesto
nedostupno djeci.
• Maksimalno opterećenje: Proizvod je
namijenjen maksimalnoj tjelesnoj težini
korisnika od 100 kg.
• Trake ekspandera nemojte rastezati više od
maksimalne duljine od 165 cm!
• Duljina istezanja ne smije se podesiti više od
oznake (MIN.).
• Na proizvodu se ne smiju nalaziti uređaji
za podešavanje koji mogu spriječiti kretanje
korisnika. Proizvod treba postaviti na mjesto
koje omogućava dovoljno prostora za trening.
Potrebna je površina od najmanje 2 x 2 m.
• Postavite proizvod na ravnu i vodoravnu
površinu kako bi za vrijeme treninga stajao
stabilno i kako se ne bi „prevrnuo“.
• Prije svake uporabe provjerite je li proizvod u
potpunosti ispravan. U suprotnom ga nemojte
upotrebljavati.
Neispravne dijelove treba zamijeniti jer se u
suprotnom smanjuju funkcionalnost i sigurnost.
• Popravke smiju vršiti samo ovlašteni stručnjaci.
• Smiju se upotrebljavati samo originalni
rezervni dijelovi.
• Proizvod se smije upotrebljavati samo u
sportskoj obući.
• Oko područja na kojem trenirate mora
postojati slobodni prostor od oko 0,6 m (sl. E).
• Elastomere ekspandera treba štititi od sunčeva
zračenja.
Opasnost od opeklina!
• Hidraulični amortizeri tijekom treninga postaju
vrući. Nikako ih nemojte dodirivati neposredno
nakon treninga.
Opasnost zbog pogrešnog/
prenapornog treninga!
• Svakako se pridržavajte svih uputa iz
poglavlja „Upute za trening“.
Materijalna oštećenja!
• Kroz propusna mjesta na hidrauličnim
amortizerima može curiti ulje. Postavite
proizvod na ravnu protukliznu podlogu kako
ne bi došlo do prljanja poda ili tepiha.
• Spriječite prodiranje tekućine u računalo.
Mogle bi se oštetiti osjetljive elektroničke
komponente. Zaštitite računalo od izravne
sunčeve svjetlosti.
• Redovito provjeravajte čvrsti dosjed svih vijaka
i matica. Samoosiguravajuće matice ne mogu
se otpustiti zbog vibracija.
Ta je osobina zajamčena samo u slučaju
jednokratnog pričvršćivanja matica. Ako se
steper rastavi, sve se samoosiguravajuće
matice moraju zamijeniti novima.
• Ako je proizvod duže izvan uporabe, izvadite
bateriju iz računala jer bi mogla iscuriti i
uzrokovati štetu.
• Preporučujemo uporabu podloge tijekom
treninga kako bi se izbjegla oštećenja poda.
Upozorenje o baterijama!
• Uklonite baterije ako su potrošene ili ako se
proizvod duže ne upotrebljava.
• Nemojte upotrebljavati baterije različitog tipa,
različite marke, nemojte međusobno kombinirati
nove i stare baterije ili one različitog kapaciteta
jer bi mogle iscuriti i time uzrokovati štetu.
• Prilikom umetanja pazite na polaritet (+/-).
• Sve baterije mijenjajte istodobno i stare baterije
zbrinite na propisan način.
• Pozor! Baterije se ne smiju puniti ili reaktivirati
drugim sredstvima, rastavljati, bacati u vatru niti
upotrijebiti za stvaranje kratkog spoja.
• Uvijek čuvajte baterije izvan dosega djece.
• Nemojte upotrebljavati punjive baterije!
• Čišćenje i korisničko održavanje ne smiju izvodi-
ti djeca bez nadzora.
• Po potrebi prije umetanja očistite kontakte
baterije i uređaja.
• Nemojte izlagati baterije ekstremnim uvjetima
(npr. radijatorima ili izravnim sunčevim zraka-
ma). U suprotnom bi mogle iscuriti.

22
• Baterije bi u slučaju gutanja mogle biti opasne
po život. Stoga ih čuvajte na mjestu gdje ih dje-
ca ne mogu dohvatiti. Ako je došlo do gutanja
baterije, odmah potražite liječničku pomoć.
Opasnost!
• Postupajte s oštećenom ili iscurjelom baterijom
s posebnom pažnjom te je odmah propisno
zbrinite. Pritom nosite rukavice.
• Ako dođete u dodir s kiselinom iz baterije,
isperite zahvaćeno područje sapunom i vodom.
Ako vam kiselina iz baterije uđe u oči, isperite
ih vodom i odmah potražite liječničku pomoć!
• Priključci baterije ne smiju se spojiti tako da
nastane kratki spoj.
OPREZ
UPOZORENJE:
Mogućnost strujnog udara!
Ne otvarati kućište proizvoda!
Zamjena baterije
POZOR! Radi izbjegavanja mehaničkih
i električnih šteta obratite pozornost na
sljedeće upute.
Opasnost!
U proizvodu se nalazi jedna baterija LR03. Ako
baterija više ne radi, možete ju zamijeniti.
1. Podignite zaslon u stranu i pažljivo izvadite
bateriju. Baterija se nalazi na stražnjoj strani
zaslona.
2. Pažljivo izvadite praznu bateriju iz držača
baterije i zamijenite ju novom baterijom.
Napomena: pripazite da se baterija u cijelosti
nalazi u držaču.
3. Vratite kabelske spojeve i zaslon u kućište.
Napomena: pazite da zaslon ispravno sjedne
u kućište.
Montaža stepera
Korak 1:
Umetnite obje plastične nožice u cijev na stražnjoj
strani postolja. Rebrasta ležišta leže na podu, a
šiljati krajevi pokazuju unatrag (sl. C). Za fiksiranje
se po jedan vijak za lim uvija u postojeću rupu s
donje strane postolja.
Napomena: pazite da se poklapaju postojeća
rupa na okviru i ona na plastičnoj nožici.
Korak 2:
Vijak za podešavanje uvija se u navoj na prednjoj
strani stepera.
Tim se vijkom može podesiti visina dizanja stojnih
površina.
Za povećavanje visine dizanja okrenite vijak za
podešavanje u smjeru kazaljke na satu. Za smanji-
vanje visine dizanja okrenite vijak za podešavanje
u smjeru suprotnom od kazaljke na satu.
Korak 3:
Izvadite računalo iz stepera tako da ga izvučete
prema gore.
Umetnite isporučenu bateriju u odgovarajući preti-
nac na donjoj strani računala. Pazite na ispravan
polaritet.
Spojite računalo s utikačem na kućištu i ponovno
ga umetnite. Pazite da pritom ne prikliještite kabel.
Korak 4:
Uzmite u obzir maksimalnu duljinu iste-
zanja traka za povlačenje.
Što kraće podesite trake za povlačenje, to je
potrebna veća sila.
• Trake za povlačenje skraćuju se tako da se gu-
meno crijevo fiksira sigurnosnom kuglom (sl. B).
VAŽNO! Pazite da trake za povlačenje
ne skratite previše. Oznaka „MIN.“ ne
smije se prekoračiti!
• Zakvačite metalnu kuku za omču na postolju
stepera i čvrsto zavrnite zatvarač na kukici
(sl. D).
Važno! Prije treninga provjerite jesu li
trake za povlačenje sigurno montirane
i je li kukica sigurno pričvršćena. Pozor!
Omče su namijenjene isključivo vlačnim
opterećenjima u gornjem smjeru i ne smi-
ju se opterećivati u poprečnom smjeru.
Postoji opasnost od ozljeda ili oštećenja
stepera.
Ako ne trenirate s trakama za povlačenje, izvadite
ih iz omči kako ne bi došlo do spoticanja.
Provjerite jesu li svi vijci i matice sigurno zategnuti.
HR
Pagina se încarcă...
Pagina se încarcă...
Pagina se încarcă...
Pagina se încarcă...
Pagina se încarcă...
Pagina se încarcă...
Pagina se încarcă...
Pagina se încarcă...
Pagina se încarcă...
Pagina se încarcă...
Pagina se încarcă...
Pagina se încarcă...
Pagina se încarcă...
Pagina se încarcă...
Pagina se încarcă...
Pagina se încarcă...
Pagina se încarcă...
Pagina se încarcă...
Pagina se încarcă...
Pagina se încarcă...
Pagina se încarcă...
Pagina se încarcă...
Pagina se încarcă...
Pagina se încarcă...
Pagina se încarcă...
Pagina se încarcă...
Pagina se încarcă...
Pagina se încarcă...
Pagina se încarcă...
Pagina se încarcă...
Pagina se încarcă...
Pagina se încarcă...
Pagina se încarcă...
Pagina se încarcă...
Pagina se încarcă...
Pagina se încarcă...
Pagina se încarcă...
Pagina se încarcă...
Pagina se încarcă...
Pagina se încarcă...
Pagina se încarcă...
Pagina se încarcă...
Pagina se încarcă...
Pagina se încarcă...
Pagina se încarcă...
Pagina se încarcă...
Pagina se încarcă...
Pagina se încarcă...
Pagina se încarcă...
Pagina se încarcă...
Pagina se încarcă...
Pagina se încarcă...
Pagina se încarcă...
Pagina se încarcă...
Pagina se încarcă...
Pagina se încarcă...
Pagina se încarcă...
Pagina se încarcă...
Pagina se încarcă...
Pagina se încarcă...
Pagina se încarcă...
Pagina se încarcă...
Pagina se încarcă...
Pagina se încarcă...
Pagina se încarcă...
Pagina se încarcă...
-
 1
1
-
 2
2
-
 3
3
-
 4
4
-
 5
5
-
 6
6
-
 7
7
-
 8
8
-
 9
9
-
 10
10
-
 11
11
-
 12
12
-
 13
13
-
 14
14
-
 15
15
-
 16
16
-
 17
17
-
 18
18
-
 19
19
-
 20
20
-
 21
21
-
 22
22
-
 23
23
-
 24
24
-
 25
25
-
 26
26
-
 27
27
-
 28
28
-
 29
29
-
 30
30
-
 31
31
-
 32
32
-
 33
33
-
 34
34
-
 35
35
-
 36
36
-
 37
37
-
 38
38
-
 39
39
-
 40
40
-
 41
41
-
 42
42
-
 43
43
-
 44
44
-
 45
45
-
 46
46
-
 47
47
-
 48
48
-
 49
49
-
 50
50
-
 51
51
-
 52
52
-
 53
53
-
 54
54
-
 55
55
-
 56
56
-
 57
57
-
 58
58
-
 59
59
-
 60
60
-
 61
61
-
 62
62
-
 63
63
-
 64
64
-
 65
65
-
 66
66
-
 67
67
-
 68
68
-
 69
69
-
 70
70
-
 71
71
-
 72
72
-
 73
73
-
 74
74
-
 75
75
-
 76
76
-
 77
77
-
 78
78
-
 79
79
-
 80
80
-
 81
81
-
 82
82
-
 83
83
-
 84
84
-
 85
85
-
 86
86


Crivit 327402_1904 Operating Instructions Manual
- Tip
- Operating Instructions Manual
Lucrări înrudite
-
Crivit Z29550 Assembly And Safety Advice
-
-
-
-
-
-
-
Alte documente
-
Domyos ST 660 Manual de utilizare
-
Domyos ST 190 Manual de utilizare
-
-
-
Delta Clay Instrucțiuni de utilizare
-
DIS Domyos VM 480 Operating Instructions Manual
-
-
-
LIVARNO 408493 Manualul proprietarului
-