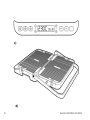
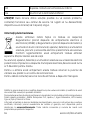
AENO AEG0001 Electric Grill Manual de utilizare
- Categorie
- Grătare
- Tip
- Manual de utilizare

aeno.com/documents 1
((Model AEG0001,
AEG0001-UK)
09.01.2023 | v 2.7.4

2 aeno.com/documents
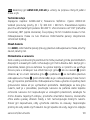
ENG How to connect
ARA
BUL Как да се свържете
CES Jak se připojit
DEU Wie man verbindet
EST Kuidas ühendada
FRA Comment se connecter
HRV Kako se povezati
HUN Hogyan kell csatlakozni
HYE
ITA Come connettersi
KAT როგორ დავუკავშირდეთ
KAZ Қалай қосылуға болады
LAV Kā izveidot savienojumu
LIT Kaip prisijungti
POL Jak podłączyć się
RON Cum să vă conectați
RUS Как подключиться
SLK Ako sa pripojiť
SRP Како се повезати
UKR Як підключитися
UZB Қандай уланади
ZHO 如何连接 Wi-Fi

aeno.com/documents 3
ENG………………………………………………………………………………………………………………………………………………………
7
ARA…………………………………………………………………………………………………………………………...…………………..…..…..
13
BUL………………………………………………………………………………………………………………………………………………..………
17
CES…………………………………………………………………………………………………………………….…………………………...…...
23
DEU…………………………………………………………………………………………………………………………………………………..…...
28
EST……………………………………………………………………………………………………………………………………….………………...
34
FRA………………………………………………………………………………………………………………………………………………………
39
HRV………………………………………………………………………………………………………………………………………………………..
44
HUN………………………………………………………………………………………………………………………………………………………
49
HYE……………………………………………………………………………………………………………………………….…………………..
54
ITA…………………………………………………………………………………………………………………………………………………………..
59
KAT………………………………………………………………………………………………………………………………………..……………….
65
KAZ……………...………………………………………………………………………………………………………………………..……………….
71
LAV……………………………………………………………………………………………………………………………………….………………
76
LIT………………………………………………………………………………………………………………………………………..………….……
81
POL…………………………………………………………………………………………………………………………………….………………..
85
RON……………………………………………………………………………………………………………………………………………............
90
RUS……………………………………………………………………………………………………………………………………………………
95
SLK………………………………………………………………………………………………………………………………………….……………
101
SRP……………………………………………………………………………………………………………………………………………………
106
UKR………………………………………………………………………………………………………………………………………………..………
112
UZB……………………………………………………………………………………………………………………………….………………..
118
ZHO…………………………………………………………………………………………………………………………….…………………..
124

4 aeno.com/documents
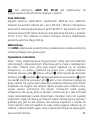
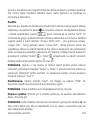
a)

aeno.com/documents 5
b)

6 aeno.com/documents
c)
d)

aeno.com/documents 7
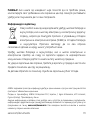
ENG AENO EG1, EG1-UK Electric Grill is designed to cook various meat and fish
dishes.
Specifications
Power supply voltage: AC220–240 V; Frequency: 50/60 Hz. Power: 2000.0 W.
Cooking surface area (L × W): 320mm × 220mm. Operating temperature of
cooking plates: 80°C to 230°C. Opening angle: 40° to 130° (optional opening),
180° (full opening). Cooking time for a 15mm thick steak: 5min. Drip tray: Plastic.
Removable plates: Reversible. Weight: 5.08kg.
Package Contents
AENO Electric Grill, removable plates (2 pcs.), plastic drip tray, quick start guide,
warranty card.
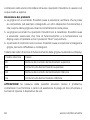
Limitations and Warnings
Children and people with disabilities may only use the grill under the
supervision of adults or people with an adequate level of experience in using
the device. Keep the grill out of the reach of children. The grill’s surface
becomes very hot during operation, and food products may emit steam or
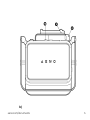
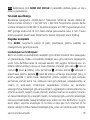
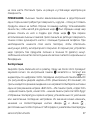
splashes of oil. The grill’s cover panel ❷ shall only opened by the handle ❶ (See
Figure a). The plastic drip tray ❽ (See Figure b) is installed inside the grill’s body
❺ on a special plate ❾: You should move the grill carefully if there is hot grease
in the drip tray. Do not remove the drip tray from the grill’s body until the
appliance is cooled down. Do not touch the the grill’s casing with hands; use
heat-protective gloves when operating the grill. Do not use the grill outdoors,
and keep it away from sources of heat, direct sunlight, open fire or high
humidity, as well as never operate it with wet hands. Always unplug the grill
when it’s not used for cooking. Do not immerse the device in water or other
liquids. If the grill falls into water, you must unplug it first, and only then remove
it from water with gloved hands. Never use the grill if it’s damaged or its power

8 aeno.com/documents
cord is broken. Do not try to repair the device on your own. Always install the
grill on a flat and stable heat-resistant surface in a well-ventilated area. If the
grill contains too many food products at once, so it can hardly be closed, never
use force to close it as you may damage the device. To avoid fire hazard, never
leave the switched-on device unattended. The grill’s cover panel ❷ must be
closed before connecting it to the mains. After cooking, the cooked food shall
be removed from the grill using wooden or heat-resistant spatula only. Do not
use a sharp fork or knife to remove food products from the grill as this may
damage its non-stick coating.
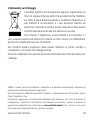
Initial Setup
Unpack the grill and reel out its cable, but do not plug it into the mains socket.
Make sure that the drip tray ❽ is installed on the plate ❾ (See Figure b) at the
rear of the grill’s body ❺ (See Figure a). Press the upper lock button ❹ to
remove the upper removable plate ❼, and then press the lower lock button ❹
to remove the lower removable plate ❻ by simply pulling it. Wash the
removable plates in warm soapy water, and then wipe them dry with a soft
cloth. These parts can also be washed in the dishwasher. Please note that
plates should be washed and dried after each cooking operation. Install both
the upper and the lower grill plates back in place before use. Put the grill on a
flat and stable heat-resistant surface.
NOTE that removable plates are interchangeable and reversible. One surface
of the plate is ribbed, and the other is flat. Food products can be cooked on any
of the above surfaces. While installing, make sure that the drip tray drain ❿ is
facing backwards, because the grease must be drained away into the drip tray
❽. When used for the first time, removable plates shall be oiled with a thin
layer of cooking oil using a paper towel. If necessary, oil the surface again to

aeno.com/documents 9
ensure proper operation of the non-stick coating. For the first time, the device
shall be heat up without food products for about ten (10) minutes. A small
amount of light smoke or odor is deemed to be normal and harmless.
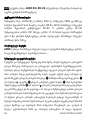
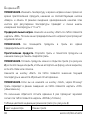
Operation
Close the grill. Plug it into a mains socket. You will hear an audible signal, and
all LEDs will flash and go out on the control panel ❸. The “OFF” message will
be displayed on the digital display (See Figure c) in the middle of the
control panel. This means that the grill is in a stand-by mode, and that it is not
heating up. Then, you should select one of the three heating modes with the
buttons, namely: “Both Grill” meaning the use of both cooking plates, “Upper
Grill” meaning the use of the upper cooking plate only, or “Lower Grill” meaning
the use of the lower cooking plate only. The display will show the default
temperature and the heating time, or the latest settings thereof. Such settings
may be changed by pressing the respective “Up” and “Down” buttons on
either side of the display next to the temperature and time indicators.
NOTE that you can change the temperature and the heating time right during
the cooking by pressing “Up” and “Down” buttons. While in the stand-by mode,
you may change the temperature scale from °C to °F by pressing these
temperature adjustment buttons simultaneously.
Preheating. Press the “Start” button. The “PRE” message will be displayed.
After preheating is done, an audible signal will sound for 5 times.
NOTE that food products must not be put into the grill during preheating.
Cooking. Open the grill and place food products on the lower removable plate.
Close the grill.
NOTE that you may cook pizza or fish on the open grill (See Figure d) so as to
keep its shape intact, or you may cook steak or sausage in the closed grill.

10 aeno.com/documents
Press the “Start” button. The current temperature will be displayed, and the
countdown timer will be started.
NOTE that is you do not press the “Start” button, the grill will be switched to
the standby mode in 30 minutes, and the “OFF” message will be displayed.
At the end of the countdown, an audible signal will sound for 5 times. The
“DONE” message will be displayed.
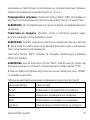
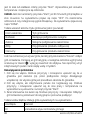
See below the LED indication of the grill’s modes (See Figure c):
LED colour
Grill mode
Blue
Preheating is on
Green
Preheating is finished
Yellow
Cooking is on
Red
Cooking is finished
When you finished with cooking, press the “Cancel” button and unplug the
grill. Wait for the grill to cool down, then carefully remove the drip tray ❽ and
pour its contents down the drain. Don’t forget to wash the removable plates
and the drip tray with warm soapy water.
Troubleshooting
1. The grill does not turn on. Possible causes and solutions: Make sure that
there is no power supply failure in the mains socket (e.g. plug any known
good device into it) and that the grill is correctly plugged into the mains
socket.
2. The grill is switched on, but removable plates do not heat up. Possible causes
and solutions: Make sure that you set both the operating time and the
temperature and that the “Start” button was pressed.
3. The control panel does not light up. Possible causes and solutions: Unplug
the grill, let it cool down, and plug it in again.

aeno.com/documents 11
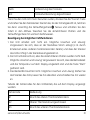
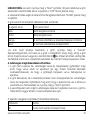
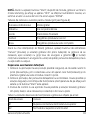
Table of error codes displayed on the display:
Error code
Value
Е1
Upper thermostat contact breakage
Е2
Upper thermostat short-circuit
Е3
Lower thermostat contact breakage
Е4
Lower thermostat short-circuit
ATTENTION! If your problem persists, please contact your local supplier or the
service center for support. Please do not disassemble the device or try to repair
it on your own.
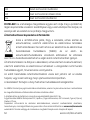
Recycling information
These symbols indicate that you must follow the Waste Electrical
and Electronic Equipment (WEEE) and Waste Battery and Battery
Regulations when disposing of the device, its batteries and
accumulators, and its electrical and electronic accessories.
According to the rules, this equipment must be disposed of
separately at the end of its service life.
Do not dispose of the device, its batteries and accumulators, or its electrical and
electronic accessories together with unsorted municipal waste, as this will
harm the environment.
To dispose of this equipment, it must be returned to the point of sale or turned
in to a local recycling facility.
You should contact your local household waste disposal service for details.
ASBISc reserves the right to modify the device and to make edits and changes to this document
without prior notice to users.
The warranty period and service life shall be 2 years as from the date of purchase of the device.
Manufacturer: ASBISc Enterprises PLC, Iapetou, 1, Agios Athanasios, 4101 Limassol, Cyprus. Made in
China. For current information and details on the device description and specification, as well as
connection process, certificates, warranty, and quality issues, see relevant Installation and
Operation Manuals available for downloading at aeno.com/documents. All trademarks and names
herein are the property of their respective owners.

12 aeno.com/documents
AENO
220–240
50/60
80–230 °C
40°–130°
180°
AENO
a❺
❾❽b
❽
b
a
AR

aeno.com/documents 13
❼
❿
❸
с
OFF
Both Grill
Upper GrillLower Grill
°C°F
StartPRE

14 aeno.com/documents
d
Start
StartOFF
DONE
c
Cancel
1
2
Start
3
Е1

aeno.com/documents 15
Е2
Е3
Е4
ASBISc
. 4101 1 : .
aeno.com/documents

16 aeno.com/documents
BUL Електрическата скара AENO EG1, EG1-UK е предназначена за
приготвяне на различни месни и рибни ястия.
Технически спецификации
Захранващо напрежение: AC220–240 V; частота: 50/60 Hz. Захранване:
2000.0 W. Размер на работната повърхност (Д × Ш): 320 mm × 220 mm.
Работна температура на повърхността на подвижните панели: 80-230 °C.
Ъгъл на отваряне: 40°-130° (произволно отваряне), 180° (пълно отваряне).
Време за приготвяне на пържола с дебелина 15 mm: 5 min. Тава за
оттичане на мазнината: пластмаса. Свалящи се панели: двустранни. Тегло:
5,08 kg.
Съдържание на комплекта
Скара AENO, подвижни панели (2 части), кратко ръководство за
потребителя, гаранционна карта.
Ограничения и предупреждения
Деца и хора с увреждания може да използват скарата само под
наблюдение на възрастни и опитни хора. Скарата да се съхранява на
недостъпно за деца място. Когато грилът работи, корпусът на грила се
нагрява до висока температура, а храната отделя гореща пара и пръски
мазнина. Повдигнете капака на скарата ❷ само за дръжката ❶ (вж. фигура
a). В основата на грила ❺ в основата ❾ има пластмасова тава за капки ❽
(вж. фигура b): преместете грила внимателно, ако в тавата за капки има
гореща мазнина. Не изваждайте тавата за капки от основата на корпуса на
грила, докато уредът не изстине. Не докосвайте тялото на грила с ръце,
когато той работи, използвайте ръкавици за готвене или термозащитни
ръкавици. Не използвайте скарата на открито, съхранявайте я далеч от
източници на топлина, преки слънчеви лъчи, открит пламък или висока
влажност и никога не я използвайте с мокри ръце. Винаги изключвайте

aeno.com/documents 17
щепсела от контакта, когато не използвате грила. Не потапяйте
устройството във вода или други течности. Ако грилът попадне във вода,
първо го изключете от електрическата мрежа и едва след това го извадете
от водата, като носите ръкавици. Никога не използвайте скарата, ако тя
или захранващият ѝ кабел са повредени. Не се опитвайте сами да
поправяте устройството. Винаги поставяйте грила върху права, стабилна
повърхност с твърда, топлоустойчива основа и на добре проветриво
място. Ако върху скарата са поставени прекалено много продукти и се
затваря трудно, никога не използвайте сила, тъй като това може да
повреди уреда. За да се избегне пожар, никога не оставяйте уреда без
надзор докато работи. Преди да свържете грила към електрическата
мрежа, той трябва да бъде в затворено положение: капакът ❷ е спуснат.
След като е готова, отстранете храната като използвате само дървена или
топлоустойчива шпатула. За отстраняване на храна не използвайте остра
вилица или нож, тъй като това може да повреди незалепващото покритие.
Подготовка за работа
Разопаковайте скарата и развийте кабела, но не я включвайте в контакт.
Уверете се, че тавата за капки мазнина ❽ е поставена в тавата ❾ (вж.
фигура b) в задната част на основата на корпуса на грила ❺ (вж. фигура a).
Натиснете горния бутон за освобождаване ❹ на горния подвижен панел
❼, за да го отстраните, и след това използвайте долния бутон за
освобождаване ❹, за да отстраните долния подвижен панел ❻, като
просто го повдигнете нагоре. Измийте подвижните панели на грила в
топла сапунена вода, след което ги избършете до сухо с мека кърпа. Тези
части могат да се мият и в съдомиялна машина. Измивайте и
подсушавайте панелите след всяко готвене. Поставете горната и долната
плоча на грила обратно на мястото им преди употреба. Поставете скарата
върху плоска, стабилна и устойчива на топлина повърхност.

18 aeno.com/documents
ЗАБЕЛЕЖКА. Подвижните панели са сменяеми и могат да се обръщат:
едната страна е с оребрена повърхност, а другата е плоска. Храната може
да бъде приготвена от всяка страна по ваш избор. Монтирайте панелите
така, че коритото за мазнина ❿ да е обърнато назад: мазнината трябва да
се оттича от него в тавата за мазнина ❽. Когато използвате подвижните
панели за грил за първи път, намажете повърхността им за готвене с тънък
слой олио с помощта на хартиена кърпа. Ако е необходимо, нанесете
отново слой олио, за да осигурите най-добрата работа на незалепващото
покритие. За първи път устройството трябва да се нагрява без хранителни
продукти за около десет (10) минути. Малко количество лек дим или
миризма се счита за нормално и безвредно.
Експлоатация
Затворете грила. Включете го в контакт. Веднага след това ще се чуе
звуков сигнал. Всички индикатори на контролния панел ❸ ще светнат и
ще угаснат. На цифровия дисплей в средата на контролния панел
(вж. фигура c) ще видите “OFF”. Това означава, че грилът е в режим на
готовност и не се нагрява. Използвайте бутоните, за да изберете един от
трите режима на отопление: “Both Grill” – двата панела на скара, “Upper
Grill” – горният панел на скара, “Lower Grill” – долният панел на скара. На
таблото ще бъдат показани температурата и времето за нагряване,
зададени по подразбиране или същите като последната настройка.
Стойностите им могат да се променят с натискане на съответните бутони
“Нагоре” и “Надолу” , разположени от двете страни на дисплея до
температурните и време индикатори.
ПРИМЕЧАНИЕ. Възможно е да променяте температурата и времето за
нагряване директно по време на готвене, като натискате съответните
бутони “Нагоре” и “Надолу”. В режим на готовност едновременното

aeno.com/documents 19
натискане на тези бутони за регулиране на температурата ще промени
скалата за измерване на температурата от °C на °F.
Предварително загряване. Натиснете бутона “Start”. “PRE” се появява на
дисплея. Когато загряването приключи, звуковият сигнал се чува 5 пъти.
ЗАБЕЛЕЖКА. Не поставяйте храна в грила по време на предварителното
загряване.
Подготовка на продукта. Отворете грила и поставете храната върху
долната подвижна плоча. Затворете грила.
ЗАБЕЛЕЖКА. Храната може да се приготвя в отворения грил (вж. фигура
d), ако е пица или риба, за да не се развали формата ѝ, или в затворения
грил, ако е пържола или наденички.
Натиснете бутона “Start”. Показва се текущата температура и започва
обратното броене.
ЗАБЕЛЕЖКА. Ако не натиснете бутона “Start”, след 30 минути грилът ще
премине в режим на готовност: на дисплея ще се появи надпис “OFF”.
В края на обратното броене акустичен сигнал ще прозвучи 5 пъти. “DONE”
се появява на дисплея.
Таблица за цветовата индикация на режима на скара (вж. фигура с):
Цвет индикатора
Режим скара
Синьо
Извършва се предварително загряване
Зелен
Завършено предварително загряване
Жълт
Подготовката на продукта се извършва
Червено
Приключване на подготовката на продукта

20 aeno.com/documents
Ако вече не възнамерявате да използвате грила, натиснете бутона за
захранване “Cancel” и изключете грила от електрическата мрежа.
Изчакайте грилът да изстине, след което внимателно извадете тавата за
оттичане на мазнини ❽ и изсипете съдържанието ѝ в канализацията. Не
забравяйте да измиете подвижните панели и таблата с топла сапунена
вода.
Отстраняване на възможни неизправности
1. Скарата не се включва. Възможни причини и решения: Уверете се, че в
контакта има захранване (например чрез включване на друг работещ
уред) и че щепселът на решетката е правилно поставен в контакта.
2. Грилът се включва, но подвижните панели не се нагряват. Възможни
причини и решение: Уверете се, че работното време и температурата на
дисплея са зададени и е натиснат бутонът “Старт”.
3. Контролният панел не светва. Възможни причини и решение:
Изключете грила от електрическата мрежа, оставете го да изстине и го
включете отново.
Таблица на кодовете за грешки при работа, които се показват на дисплея:
Код за грешка
Стойност
Е1
Прекъсване на контакта на горния термостат
Е2
Късо съединение на горния термостат
Е3
Прекъсване на контакта на долния термостата
Е4
Долен термостат късо съединение
ВНИМАНИЕ! Ако нито един от посочените възможни начини за
разрешаване на проблема не помогне, тогава се свържете с вашия
Pagina se încarcă...
Pagina se încarcă...
Pagina se încarcă...
Pagina se încarcă...
Pagina se încarcă...
Pagina se încarcă...
Pagina se încarcă...
Pagina se încarcă...
Pagina se încarcă...
Pagina se încarcă...
Pagina se încarcă...
Pagina se încarcă...
Pagina se încarcă...
Pagina se încarcă...
Pagina se încarcă...
Pagina se încarcă...
Pagina se încarcă...
Pagina se încarcă...
Pagina se încarcă...
Pagina se încarcă...
Pagina se încarcă...
Pagina se încarcă...
Pagina se încarcă...
Pagina se încarcă...
Pagina se încarcă...
Pagina se încarcă...
Pagina se încarcă...
Pagina se încarcă...
Pagina se încarcă...
Pagina se încarcă...
Pagina se încarcă...
Pagina se încarcă...
Pagina se încarcă...
Pagina se încarcă...
Pagina se încarcă...
Pagina se încarcă...
Pagina se încarcă...
Pagina se încarcă...
Pagina se încarcă...
Pagina se încarcă...
Pagina se încarcă...
Pagina se încarcă...
Pagina se încarcă...
Pagina se încarcă...
Pagina se încarcă...
Pagina se încarcă...
Pagina se încarcă...
Pagina se încarcă...
Pagina se încarcă...
Pagina se încarcă...
Pagina se încarcă...
Pagina se încarcă...
Pagina se încarcă...
Pagina se încarcă...
Pagina se încarcă...
Pagina se încarcă...
Pagina se încarcă...
Pagina se încarcă...
Pagina se încarcă...
Pagina se încarcă...
Pagina se încarcă...
Pagina se încarcă...
Pagina se încarcă...
Pagina se încarcă...
Pagina se încarcă...
Pagina se încarcă...
Pagina se încarcă...
Pagina se încarcă...
Pagina se încarcă...
Pagina se încarcă...
Pagina se încarcă...
Pagina se încarcă...
Pagina se încarcă...
Pagina se încarcă...
Pagina se încarcă...
Pagina se încarcă...
Pagina se încarcă...
Pagina se încarcă...
Pagina se încarcă...
Pagina se încarcă...
Pagina se încarcă...
Pagina se încarcă...
Pagina se încarcă...
Pagina se încarcă...
Pagina se încarcă...
Pagina se încarcă...
Pagina se încarcă...
Pagina se încarcă...
Pagina se încarcă...
Pagina se încarcă...
Pagina se încarcă...
Pagina se încarcă...
Pagina se încarcă...
Pagina se încarcă...
Pagina se încarcă...
Pagina se încarcă...
Pagina se încarcă...
Pagina se încarcă...
Pagina se încarcă...
Pagina se încarcă...
Pagina se încarcă...
Pagina se încarcă...
Pagina se încarcă...
Pagina se încarcă...
Pagina se încarcă...
Pagina se încarcă...
Pagina se încarcă...
Pagina se încarcă...
-
 1
1
-
 2
2
-
 3
3
-
 4
4
-
 5
5
-
 6
6
-
 7
7
-
 8
8
-
 9
9
-
 10
10
-
 11
11
-
 12
12
-
 13
13
-
 14
14
-
 15
15
-
 16
16
-
 17
17
-
 18
18
-
 19
19
-
 20
20
-
 21
21
-
 22
22
-
 23
23
-
 24
24
-
 25
25
-
 26
26
-
 27
27
-
 28
28
-
 29
29
-
 30
30
-
 31
31
-
 32
32
-
 33
33
-
 34
34
-
 35
35
-
 36
36
-
 37
37
-
 38
38
-
 39
39
-
 40
40
-
 41
41
-
 42
42
-
 43
43
-
 44
44
-
 45
45
-
 46
46
-
 47
47
-
 48
48
-
 49
49
-
 50
50
-
 51
51
-
 52
52
-
 53
53
-
 54
54
-
 55
55
-
 56
56
-
 57
57
-
 58
58
-
 59
59
-
 60
60
-
 61
61
-
 62
62
-
 63
63
-
 64
64
-
 65
65
-
 66
66
-
 67
67
-
 68
68
-
 69
69
-
 70
70
-
 71
71
-
 72
72
-
 73
73
-
 74
74
-
 75
75
-
 76
76
-
 77
77
-
 78
78
-
 79
79
-
 80
80
-
 81
81
-
 82
82
-
 83
83
-
 84
84
-
 85
85
-
 86
86
-
 87
87
-
 88
88
-
 89
89
-
 90
90
-
 91
91
-
 92
92
-
 93
93
-
 94
94
-
 95
95
-
 96
96
-
 97
97
-
 98
98
-
 99
99
-
 100
100
-
 101
101
-
 102
102
-
 103
103
-
 104
104
-
 105
105
-
 106
106
-
 107
107
-
 108
108
-
 109
109
-
 110
110
-
 111
111
-
 112
112
-
 113
113
-
 114
114
-
 115
115
-
 116
116
-
 117
117
-
 118
118
-
 119
119
-
 120
120
-
 121
121
-
 122
122
-
 123
123
-
 124
124
-
 125
125
-
 126
126
-
 127
127
-
 128
128


AENO AEG0001 Electric Grill Manual de utilizare
- Categorie
- Grătare
- Tip
- Manual de utilizare
în alte limbi
Lucrări înrudite
-
AENO AEG0002 Manual de utilizare
-
AENO AEG0005 Manualul utilizatorului
-
AENO EG2 Manual de utilizare
-
-
AENO ASVOOO1 Manualul utilizatorului
-
AENO AEK0007S Manualul utilizatorului
-
AENO ATB0002 Manualul utilizatorului
-
AENO AEK0001S Manualul utilizatorului
-
AENO RC2S Manualul utilizatorului
-
AENO ATB0003 Manual de utilizare
Alte documente
-
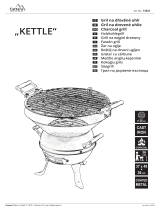 Cattara 13023 Instrucțiuni de utilizare
-
Tefal YY4399FB Manual de utilizare
-
Russell Hobbs 22160-56 Manual de utilizare
-
 Russell Hobbs 24640-56 Manual de utilizare
-
Russell Hobbs 23450-56 Manual de utilizare
-
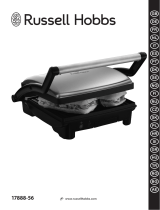 Russell Hobbs 17888-56 Manual de utilizare
-
Russell Hobbs 20841-56 Manual de utilizare
-
-


