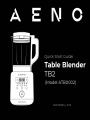
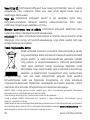
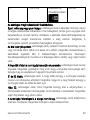
AENO ATB0002 Manualul utilizatorului
- Categorie
- Procesatoare de alimente
- Tip
- Manualul utilizatorului

aeno.com/documents 1
(Model ATB0002)
06.07.2022 | v 2.7.2

2 aeno.com/documents
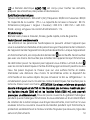
EN Recipes here
RU Рецепты здесь
AR
BG Рецепти тук
CS Recepty zde
DE Rezepte hier
ET Retseptid siin
FR Recettes ici
HR Recepti ovdje
HU Receptek itt
HY
IT Ricette qui
KA რეცეპტები აქ არის
KK Мұнда рецепттер
LT Receptai čia
LV Receptes šeit
PL Przepisy tutaj
RO Rețete aici
SK Recepty tu
SR Рецепти овде
UK Рецепти тут
UZ Bu erda retseptlar
ZH 这里的食谱

aeno.com/documents 3
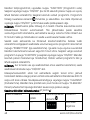
EN
........................................................................................................................................................................
13
RU
.......................................................................................................................................................................
18
AR
.......................................................................................................................................................................
25
BG
.......................................................................................................................................................................
29
CS
.......................................................................................................................................................................
35
DE
...........................................................................................................................................................................
40
ET
........................................................................................................................................................................
46
FR
........................................................................................................................................................................
51
HR
........................................................................................................................................................................
57
HU
........................................................................................................................................................................
63
HY
..........................................................................................................................................................................
69
IT
..........................................................................................................................................................................
75
KA
...........................................................................................................................................................................
81
KK
........................................................................................................................................................................
87
LT
.........................................................................................................................................................................
91
LV
..........................................................................................................................................................................
99
PL
........................................................................................................................................................................
105
RO
….....................................................................................................................................................................
111
SK
...........................................................................................................................................................................
117
SR
...........................................................................................................................................................................
122
UK
...........................................................................................................................................................................
128
UZ
.........................................................................................................................................................................
134
ZH
..........................................................................................................................................................................
140

4 aeno.com/documents
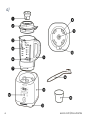
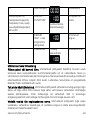
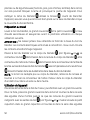
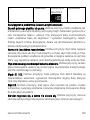
а)

aeno.com/documents 5
b)

6 aeno.com/documents
c)

aeno.com/documents 7
d)

8 aeno.com/documents
e)

aeno.com/documents 9

10 aeno.com/documents

aeno.com/documents 11

12 aeno.com/documents

aeno.com/documents 13
EN AENO TB2 electric blender is designed for chopping food, making
smoothies, purees and drinks.
Specifications
Supply voltage: AC 220–240 V; frequency: 50/60 Hz. Power: 800.0 W. Bowl
Capacity: 1.75 L. Measuring cup capacity: 80ml. Dimensions (L×W×H): 230 mm
× 200 mm × 420 mm. Weight: 4.6 kg. Power cord length: 1 m.
Package Contents
AENO TB2 blender, measuring cup, brush, quick start guide, warranty card.
Limitations and Warnings
Children and persons with disabilities may use the device only under the
supervision of adults who are experienced in its use. Keep the device out of the
reach of children. During the operation the bowl housinng heats up. Do not
touch it. Also, do not touch the device housing while it is operating. Do not
disassemble or repair the blender on your own. Do not wash the bowl base
with the electrical contacts and the clutch shaft with water. Place the blender only
on a firm and stable surface. The distance from the operating device to other
objects should be at least 15 centimeters. Do not store the blender cup in the
refrigerator: short circuit of electrical contacts may occur due to condensation. Do
not touch the blender blade. WARNING! The min product level in the blender is
750 ml. Do not exceed the max level for hot liquids (1200 ml) and cold liquids (1500
ml), it may cause overflow. Do not open the lid of the blender cup while the
blender is in operation. If you hear an intermittent sound of the blade turning
when chopping food, this is normal. If you lift the bowl or open the lid of the
blender while it is running, the protection will be triggered and the motor will stop.
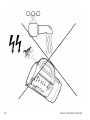
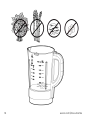
Do not add sugar, plant stems or legumes (beans, peas, chickpeas, lentils) into
the bowl, as the blade can jam and it can cause damage to the device. To clean
the blade use the brush . Before plugging in, make sure that the bowl is
securely seated on the blender base and that the bowl lid is closed.

14 aeno.com/documents
Preparing for operation
Wash the blender bowl, large lid and small lid with warm soapy water
and wipe it dry.
WARNING! Never allow water to get to the bottom of the base of the blender
cup. Short circuit of electrical contacts will occur and the device will break down.
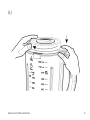
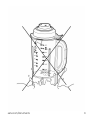
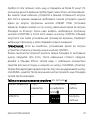
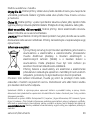
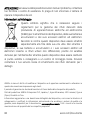
Place the bowl on the blender housing (See figures a and d). The bowl
connector must fit into the groove of the blender housing , and the motor
shaft connector must fit into the blade shaft connector on the bottom of
the bowl base . At the same time, the rubber compensators should enter
the recesses of the bowl base.
NOTE. If the bowl can not be installed on the blender housing, remove it from
the base and twist the motor shaft connector in the blender housing by hand
half a turn in either direction.
Operating the device
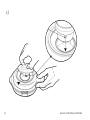
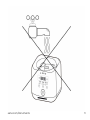
Place food in blender bowl. Then place the large lid in the bowl and turn it
clockwise until the grooves on the large lid align with the protrusions on the
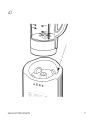
bowl (See figures a and b). After that insert the small cap into the large cap
and turn it clockwise (See picture c). To open the large and small lids turn them
counterclockwise.
NOTE. The device will immediately stop working if you open the large lid. If you
need to add food or spices while the blender is running, you can open the small
lid to do so. Use the measuring cup to dose spices and other products. You can
find recipes of various dishes in the full instructions at aeno.com/documents.
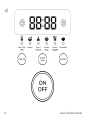
Plug the device into a power outlet. Power control mode will turn on. Press the
"ON/OFF" (Start/Stop) button to switch to standby mode. Select one of the six
blender programs by pressing the "FUNCTION" (Select a program) button.
Then press the "ON/OFF" button (if you do not press the button within

aeno.com/documents 15
30 seconds, the blender will go into standby mode). After that the selected
program will start. You can control the program run time in minutes and
seconds on the display . When the process is finished, press the "ON/OFF"
button and unplug the blender.
NOTE. The maximum continuous operation time is 5 cycles. In case of longer
use, engine will be automaticly blocked. To resume work, you must disconnect
the device from the power supply, remove the bowl and wait for no longer then
10 minutes. After this time, the device will be ready for use again.
You can also turn on the device in delayed start mode. To do this in standby mode
you must first set the desired time before starting the program with the "PRESET
TIME" button. Each press of this button increases the time until the blender starts
by 30 minutes. Then select the desired program with the "FUNCTION" button and
then press the "ON/OFF" button. The blender will start itself after a set period of
time, work the selected program, and then go into standby mode.
NOTE. If you set the wrong time before the blender starts, you can cancel the
setting with the "ON/OFF" button.
The self-cleaning mode helps to clean the blade from stuck food peaces. To do
this, you need to remove food from the blender, pour 500ml of warm water
with a little dishwashing detergent into the blender and press the "CLEANING"
button. The blade will rotate as long as you hold down the "CLEANING" button.
When the cleaning is finished, rinse the bowl with warm running water.
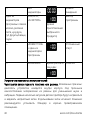
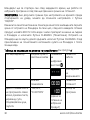
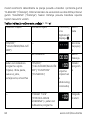
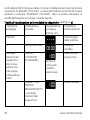
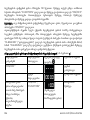
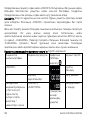
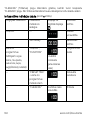
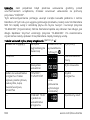
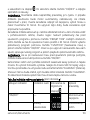
Device mode indication table (See figure e):
LED indicator,
blinking
LED indicator,
lights up
Digital display
Mode
"ON/OFF"
---
Power
control

16 aeno.com/documents
---
All indicators
Standby
mode
One program
indicator: soy
milk, rice paste,
corn, soup,
fruit/vegetables,
smoothies
"ON/OFF",
"FUNCTION"
(cooking time of the
selected product)
Program
selection
---
"PRESET TIME" +
one of the program
indicators
Delayed
start
---
"CLEANING"
Operating time in
seconds
Cleaning
Troubleshooting
The smell of burning plastic or rubber. Possible causes: the appliance motor is
inside the housing under strong rubber materials to reduce noise and
vibration. The first few starts, the parts of the appliance will be hot and emit an
unpleasant odor. Later on, the smell will disappear. Solution: It is recommended
to install the blender in a well-ventilated room.
The products are badly chopped. Possible causes: low mains voltage; too much
or too little food in the bowl; not enough water in the bowl. Solution: plug the
appliance into an outlet with a supply voltage of at least 220 V, use a voltage
regulator; remove excess food from the bowl or add water to it.
The liquid pours over the edge of the blender bowl. Possible causes: too much
liquid. Solution: make sure that the amount of liquid does not exceed the
maximum level specified in the instructions.

aeno.com/documents 17
Errors E1 and E2. Possible causes: large lid and/or blender cup is installed
incorrectly, with misalignment. Solution: take out the large lid and/or blender
bowl and reinstall them again.
Error E3. Possible causes: no liquid and/or food in the bowl, temperature sensors
turn off the device due to overheating. Solution: add liquid or food to the bowl.
The blender heats up, the blade does not rotate. Possible causes: short circuit.
Solution: contact the service center.
WARNING! If your problem persists, please contact your local supplier or the
service center for support. Please do not disassemble the device or try to repair
it on your own.
Recycling information
These symbols indicate that you must follow the Waste
Electrical and Electronic Equipment (WEEE) and Waste
Battery and Battery Regulations when disposing of the device,
its batteries and accumulators, and its electrical and electronic
accessories. According to the rules, this equipment must be
disposed of separately at the end of its service life.
Do not dispose of the device, its batteries and accumulators,
or its electrical and electronic accessories together with unsorted municipal
waste, as this will harm the environment. To dispose of this equipment, it must
be returned to the point of sale or turned in to a local recycling facility.
You should contact your local household waste disposal service for details.
ASBISc reserves the right to modify the device and to make edits and changes to this document
without prior notice to users.
The warranty period and service life shall be 2 years as from the date of purchase of the device.
Manufacturer: ASBISc Enterprises PLC, Lapetou, 1, Agios Athanasios, 4101 Limassol, Cyprus. Made in
China. For current information and details on the device description and specification, as well as
connection process, certificates, warranty, and quality issues, see relevant Installation and
Operation Manuals available for downloading at aeno.com/documents. All trademarks and names
herein are the property of their respective owners.

18 aeno.com/documents
RU Блендер электрический AENO TB2 предназначен для измельчения
пищи, приготовления смузи, пюре, напитков и др.
Tехнические характеристики
Напряжение питания: 220–240 В (AC); частота: 50/60 Гц. Мощность: 800,0 Вт.
Емкость чаши: 1,75 л. Емкость мерного стакана: 80 мл. Размеры (Д × Ш × В):
230 мм × 200 мм × 420 мм. Вес: 4,6 кг. Длина шнура питания: 1 м.
Комплект поставки
Блендер AENO TB2, мерный стакан, щетка, краткое руководство, гарантийный
талон.
Ограничения и предупреждения
Дети и лица с ограниченными возможностями могут использовать
устройство только под наблюдением взрослых и имеющих опыт
использования устройства людей. Храните устройство в недоступном для
детей месте. В процессе работы устройства поверхность корпуса его чаши
нагревается. Не трогайте ее руками. Также не прикасайтесь к корпусу
устройства во время его работы. Не разбирайте и не ремонтируйте
устройство самостоятельно. Во время очистки корпуса чаши основание
чаши с электрическими контактами и валом сцепления нельзя мыть
водой. Устанавливайте основание блендера всегда только на твердую
и устойчивую поверхность. Расстояние от работающего устройства до
других предметов должно быть не менее 15 сантиметров. Не храните чашу
блендера в холодильнике: конденсат может замкнуть электрические
контакты. Не прикасайтесь руками к лезвию блендера. ВНИМАНИЕ!
Минимальный уровень продуктов в блендере – 750 мл. Не превышайте
максимальный уровень для горячих (1200 мл) и холодных (1500 мл)
жидкостей, это может привести к переливу. Не открывайте крышку чаши

aeno.com/documents 19
блендера во время его работы. Если при перемалывании продуктов
слышен прерывистый, то быстрый, то медленный звук вращения лезвия,
это нормально. Если поднять чашу или открыть крышку блендера во
время его работы, сработает защита, и двигатель остановится. Не
добавляйте сахар, стебли растений, бобовые (фасоль, горох, нут, чечевицу)
в чашу, так как это может заклинить лезвие и привести к поломке
устройства. Для очистки лезвия блендера используйте щетку . Перед
включением вилки устройства в розетку убедитесь, что чаша надежно
установлена на основание блендера, а крышка чаши закрыта.
Подготовка к работе
Перед первым и каждым последующим использованием вымойте чашу
блендера и малую крышку теплой мыльной водой и вытрите насухо.
ВНИМАНИЕ! Ни в коем случае не допускайте попадания воды на дно
основания чаши блендера. Там расположены электрические контакты –
вода вызовет замыкание контактов и поломку устройства.
Установите чашу блендера на корпус блендера (см. рисунки a и d) так,
чтобы соединитель чаши вошел в паз корпуса блендера , а разъем
вала двигателя вошел в разъем вала лезвия на дне основания чаши
блендера . При этом резиновые компенсаторы должны войти в
выемки основания чаши блендера.
ПРИМЕЧАНИЕ. Если чаша не устанавливается на корпус блендера,
снимите ее с основания и прокрутите рукой на пол-оборота в любую
сторону разъем вала двигателя в корпусе блендера.
Эксплуатация устройства

20 aeno.com/documents
Поместите продукты в чашу блендера, затем закройте ее большой
крышкой. Для этого установите в чашу большую крышку и проверните ее
по часовой стрелке до совпадения пазов большой крышки с выступами на
чаше (см. рисунки a и b). Затем вставьте в большую крышку малую
крышку и проверните ее по часовой стрелке (см. рисунок с). Большая и
малая крышки открываются, если повернуть их против часовой стрелки.
ПРИМЕЧАНИЕ. Устройство сразу же прекратит работу, если вы откроете
большую крышку. Если вам необходимо добавить небольшое количество
продуктов или специй во время работы блендера, вы можете открывать
для этого малую крышку. Для точной дозировки специй и других
продуктов пользуйтесь мерным стаканом . Рецепты для приготовления
различных блюд вы можете найти в полной версии инструкции на сайте
aeno.com/documents.
Включите вилку шнура питания прибора в розетку. Устройство перейдет
в режим контроля питания. Для перехода в режим ожидания нажмите на
кнопку «ON/OFF» («Старт/Стоп»). Выберите одну из шести программ
работы блендера, нажимая на кнопку «FUNCTION» (Выбор программы).
Затем нажмите на кнопку «ON/OFF» (если вы не нажмете на кнопку в
течение 30 секунд, блендер перейдет в режим ожидания). После этого
запустится выбранная программа. Время работы программы будет
отображаться в минутах и секундах на табло . По окончании работы
нажмите на кнопку «ON/OFF» и выключите прибор из розетки.
ПРИМЕЧАНИЕ. Максимальное время непрерывной работы - 5 циклов. В
случае более длительного использования произойдет автоматическая
блокировка двигателя. Для возобновления работы необходимо отключить
Pagina se încarcă...
Pagina se încarcă...
Pagina se încarcă...
Pagina se încarcă...
Pagina se încarcă...
Pagina se încarcă...
Pagina se încarcă...
Pagina se încarcă...
Pagina se încarcă...
Pagina se încarcă...
Pagina se încarcă...
Pagina se încarcă...
Pagina se încarcă...
Pagina se încarcă...
Pagina se încarcă...
Pagina se încarcă...
Pagina se încarcă...
Pagina se încarcă...
Pagina se încarcă...
Pagina se încarcă...
Pagina se încarcă...
Pagina se încarcă...
Pagina se încarcă...
Pagina se încarcă...
Pagina se încarcă...
Pagina se încarcă...
Pagina se încarcă...
Pagina se încarcă...
Pagina se încarcă...
Pagina se încarcă...
Pagina se încarcă...
Pagina se încarcă...
Pagina se încarcă...
Pagina se încarcă...
Pagina se încarcă...
Pagina se încarcă...
Pagina se încarcă...
Pagina se încarcă...
Pagina se încarcă...
Pagina se încarcă...
Pagina se încarcă...
Pagina se încarcă...
Pagina se încarcă...
Pagina se încarcă...
Pagina se încarcă...
Pagina se încarcă...
Pagina se încarcă...
Pagina se încarcă...
Pagina se încarcă...
Pagina se încarcă...
Pagina se încarcă...
Pagina se încarcă...
Pagina se încarcă...
Pagina se încarcă...
Pagina se încarcă...
Pagina se încarcă...
Pagina se încarcă...
Pagina se încarcă...
Pagina se încarcă...
Pagina se încarcă...
Pagina se încarcă...
Pagina se încarcă...
Pagina se încarcă...
Pagina se încarcă...
Pagina se încarcă...
Pagina se încarcă...
Pagina se încarcă...
Pagina se încarcă...
Pagina se încarcă...
Pagina se încarcă...
Pagina se încarcă...
Pagina se încarcă...
Pagina se încarcă...
Pagina se încarcă...
Pagina se încarcă...
Pagina se încarcă...
Pagina se încarcă...
Pagina se încarcă...
Pagina se încarcă...
Pagina se încarcă...
Pagina se încarcă...
Pagina se încarcă...
Pagina se încarcă...
Pagina se încarcă...
Pagina se încarcă...
Pagina se încarcă...
Pagina se încarcă...
Pagina se încarcă...
Pagina se încarcă...
Pagina se încarcă...
Pagina se încarcă...
Pagina se încarcă...
Pagina se încarcă...
Pagina se încarcă...
Pagina se încarcă...
Pagina se încarcă...
Pagina se încarcă...
Pagina se încarcă...
Pagina se încarcă...
Pagina se încarcă...
Pagina se încarcă...
Pagina se încarcă...
Pagina se încarcă...
Pagina se încarcă...
Pagina se încarcă...
Pagina se încarcă...
Pagina se încarcă...
Pagina se încarcă...
Pagina se încarcă...
Pagina se încarcă...
Pagina se încarcă...
Pagina se încarcă...
Pagina se încarcă...
Pagina se încarcă...
Pagina se încarcă...
Pagina se încarcă...
Pagina se încarcă...
Pagina se încarcă...
Pagina se încarcă...
Pagina se încarcă...
Pagina se încarcă...
Pagina se încarcă...
Pagina se încarcă...
Pagina se încarcă...
-
 1
1
-
 2
2
-
 3
3
-
 4
4
-
 5
5
-
 6
6
-
 7
7
-
 8
8
-
 9
9
-
 10
10
-
 11
11
-
 12
12
-
 13
13
-
 14
14
-
 15
15
-
 16
16
-
 17
17
-
 18
18
-
 19
19
-
 20
20
-
 21
21
-
 22
22
-
 23
23
-
 24
24
-
 25
25
-
 26
26
-
 27
27
-
 28
28
-
 29
29
-
 30
30
-
 31
31
-
 32
32
-
 33
33
-
 34
34
-
 35
35
-
 36
36
-
 37
37
-
 38
38
-
 39
39
-
 40
40
-
 41
41
-
 42
42
-
 43
43
-
 44
44
-
 45
45
-
 46
46
-
 47
47
-
 48
48
-
 49
49
-
 50
50
-
 51
51
-
 52
52
-
 53
53
-
 54
54
-
 55
55
-
 56
56
-
 57
57
-
 58
58
-
 59
59
-
 60
60
-
 61
61
-
 62
62
-
 63
63
-
 64
64
-
 65
65
-
 66
66
-
 67
67
-
 68
68
-
 69
69
-
 70
70
-
 71
71
-
 72
72
-
 73
73
-
 74
74
-
 75
75
-
 76
76
-
 77
77
-
 78
78
-
 79
79
-
 80
80
-
 81
81
-
 82
82
-
 83
83
-
 84
84
-
 85
85
-
 86
86
-
 87
87
-
 88
88
-
 89
89
-
 90
90
-
 91
91
-
 92
92
-
 93
93
-
 94
94
-
 95
95
-
 96
96
-
 97
97
-
 98
98
-
 99
99
-
 100
100
-
 101
101
-
 102
102
-
 103
103
-
 104
104
-
 105
105
-
 106
106
-
 107
107
-
 108
108
-
 109
109
-
 110
110
-
 111
111
-
 112
112
-
 113
113
-
 114
114
-
 115
115
-
 116
116
-
 117
117
-
 118
118
-
 119
119
-
 120
120
-
 121
121
-
 122
122
-
 123
123
-
 124
124
-
 125
125
-
 126
126
-
 127
127
-
 128
128
-
 129
129
-
 130
130
-
 131
131
-
 132
132
-
 133
133
-
 134
134
-
 135
135
-
 136
136
-
 137
137
-
 138
138
-
 139
139
-
 140
140
-
 141
141
-
 142
142
-
 143
143
-
 144
144


AENO ATB0002 Manualul utilizatorului
- Categorie
- Procesatoare de alimente
- Tip
- Manualul utilizatorului
în alte limbi
- slovenčina: AENO ATB0002 Užívateľská príručka
Lucrări înrudite
-
AENO ATB0003 Manual de utilizare
-
AENO ASVOOO1 Manualul utilizatorului
-
AENO AEG0005 Manualul utilizatorului
-
AENO AEK0007S Manualul utilizatorului
-
-
AENO AEK0002 Manualul utilizatorului
-
-
AENO AEG0002 Manual de utilizare
-
-