
FC8796, FC8794,
FC8792


2
3
19
2022
9
4
5
6 7
8
18
23
21
1
16
17
14
15
13
11 12
10
1


English
Introduction
Congratulations on your purchase and welcome to Philips! To fully benefit from the support that
Philips offers, register your product at www.philips.com/welcome.
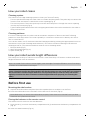
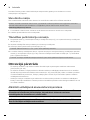
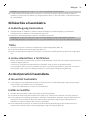
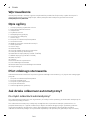
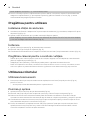
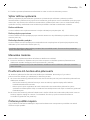
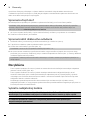
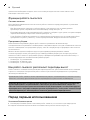
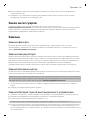
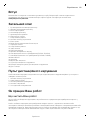
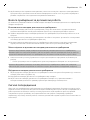
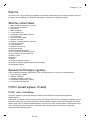
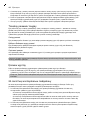
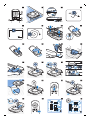
General description
1 Handle of dust container lid
2 Dust container lid
3 Filter unit
4 Dust container
5 Edge of top cover
6 Docking station sensor
7 Suction opening
8 Start/stop button
9 Side brushes
10 Shafts for mounting the side brushes
11 Front wheel
12 Suction opening
13 Side wheels
14 Drop-off sensors
15 Cover of the battery compartment
16 Mopping attachment (FC8796, FC8794)
17 Mopping pad (FC8796, FC8794)
18 Small plug
19 Adapter
20 Cleaning brush
21 Remote control
22 AAA batteries for remote control
23 Docking station
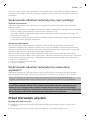
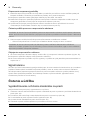
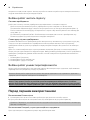
Remote control
You can operate the robot with the remote control (Fig. 2). It has the following buttons:
1 Start/stop button
2 Navigation buttons
3 Cleaning mode buttons
4 Docking button
5 24-hour scheduler
How your robot works
What your robot cleans
This robot is equipped with features that make it a suitable cleaner to help you clean the floors in your
home.
The robot is especially suitable for cleaning hard floors, such as wooden, tiled or linoleum floors. It
may experience problems cleaning soft floors, such as carpet or rugs. If you use the robot on a carpet
or rug, please stay close by the first time to see if the robot can deal with this type of floor. The robot
also needs supervision when you use it on very dark or shiny hard floors.
6
English

How your robot cleans
Cleaning system
The robot has a 3-stage cleaning system to clean your floors efficiently.
-
The two side brushes help the robot clean in corners and along walls. They also help to remove dirt
from the floor and move it towards the suction opening (Fig. 3).
-
The suction power of the robot picks up loose dirt and transports it through the suction opening
into the dust container (Fig. 4).
-
Types FC8796 and FC8794 come with a mopping attachment that can be attached to the robot to
mop your hard floor.
Cleaning patterns
In its auto cleaning mode, the robot uses an automatic sequence of bounce and wall-following
patterns to clean each area of the room optimally. It continues to clean until its battery runs low or
until it is switched off.
You can also select one of the three individual cleaning modes by pressing the appropriate button on
the remote control (see 'Cleaning mode selection'). The robot continues cleaning in the selected
cleaning mode for a few minutes and then returns to auto cleaning mode.
1 Bounce mode (Fig. 5)
2 Wall-following mode (Fig. 6)
3 Spiral mode (Fig. 7)
How your robot avoids height differences
The robot has five drop-off sensors in its bottom. It uses these drop-off sensors to detect and avoid
height differences such as staircases.
Note: It is normal for the robot to move slightly over the edge of a height difference, as its front drop-
off sensor is located behind the bumper.
Caution: In some cases, the drop-off sensors may not detect a staircase or other height difference
in time. Therefore monitor the robot carefully the first few times you use it, and when you operate it
near a staircase or another height difference. It is important that you clean the drop-off sensors
regularly to ensure the robot continues to detect height differences properly (see 'Cleaning the
robot').
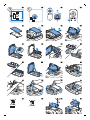
Before first use
Mounting the side brushes
1 Unpack the side brushes and place the robot upside down on a table or on the floor.
2 Push the side brushes onto the shafts on the bottom of the robot (Fig. 8).
Note: Make sure you attach the side brushes properly. Press them onto the shaft until you hear
them lock into position with a click.
Placing the batteries in the remote control
The remote control works on two AAA batteries.
1 Push the tab (1) to unlock the battery compartment lid (2) and remove the battery compartment lid
(Fig. 9).
2 Insert two AAA batteries (Fig. 10).
7
English

Note: Make sure the + and - poles point in the right direction.
3 To reattach the battery compartment lid, first insert the lug into the opening in the rim of the
compartment (1) and then push down the lid (2) until it locks with a click (Fig. 11). Now the remote
control is ready for use.
Preparing for use
Installing the docking station
1 Insert the small plug of the adapter into the socket on the docking station (1) and insert the adapter
into the wall socket (2) (Fig. 12).
2 Place the docking station on a horizontal, level floor against a wall.
Note: Make sure that there are no obstacles or height differences 150 cm in front, 30 cm to the right
and 100 cm to the left of the docking station (Fig. 13).
Charging
1 Place the robot on the plugged-in docking station (Fig. 14).
2 The start/stop button starts flashing (Fig. 15).
3 When the rechargeable battery is fully charged, the start/stop button lights up continuously (Fig.
16).
Preparing the room for a cleaning run
-
Before you start the robot on its cleaning run, make sure that you remove all loose and fragile
objects from the floor (Fig. 17).
-
Remove all cables, wires and cords from the floor to prevent the robot from getting entangled in
them.
-
If there is a rug with tassels in the room you want the robot to clean, fold the tassels under the rug
to prevent the robot from getting stuck on the tassels and to prevent the rug from getting damaged
(Fig. 18).
Using your robot
Using the remote control
1 Place the robot on the docking station or press the start/stop button on the robot (Fig. 19) to
activate the robot.
-
Now you can use the remote control to operate the robot.
Starting and stopping
1 Press the start/stop button on the remote control (Fig. 20).
2 The start/stop button on the robot lights up continuously and the robot starts cleaning (Fig. 21).
3 The robot cleans in auto-cleaning mode until its battery runs low. In auto cleaning mode, it follows
repeated sequences of random, wall-following and spiral movements.
4 When the battery runs low, the start/stop button starts flashing quickly and the robot starts
searching for the docking station to charge (Fig. 22).
8
English

5 You can also press the start/stop button to interrupt or stop the cleaning run. If you press the
start/stop button again and there is still enough energy in the rechargeable battery, the robot
continues cleaning in the auto cleaning mode.
6 To make the robot return to the docking station before the rechargeable battery runs low, press
the docking button on the remote control (Fig. 23).
7 The start/stop button starts flashing and the robot returns to the docking station.
Cleaning mode selection
This robot has four cleaning modes. Its standard cleaning mode is the auto cleaning mode, which is an
automatic sequence of bounce and wall-following patterns (Fig. 24). Next to this auto cleaning mode,
the robot has three individual cleaning modes that can each be activated by pressing the appropriate
button on the remote control.
Bounce mode
In this mode, the robot cleans the room in a mixed pattern of straight and crisscross movements (Fig.
25).
Wall-following mode
In this mode, the robot follows the walls of the room to give the area alongside the walls an extra
clean (Fig. 26).
Spiral mode
In this mode, the robot moves in an expanding spiral from a central point to clean the area thoroughly
(Fig. 27).
Note: The manually selected modes are only active for a couple of minutes. After that, the robot
switches to auto-cleaning mode.
Manual driving
You can drive the robot manually with buttons on the remote control.
1 Use the arrow buttons above and below and to the left and right of the start/stop button on the
remote control to navigate the robot through the room. (Fig. 28)
Note: Be careful when you drive the robot manually close to height differences and staircases.
Using the 24-hour scheduler
The 24-hour scheduler can be activated with the remote control. Make sure the robot is in standby
mode and is placed on the docking station.
1 Press the 24-hour scheduler button (Fig. 29) on the remote control to activate the 24-hour
scheduler.
-
When you activate the 24-hour scheduler, you hear a sound and the display starts to flash
briefly every few seconds.
-
The robot will start a cleaning run 24 hours after you activated the 24-hour scheduler. It will
continue to start a cleaning run at the same time every 24 hours until you deactivate the
24-hour scheduler.
2 To deactivate the 24-hour scheduler, press the 24-hour scheduler button. You will hear a sound
and the display will light up continuously to show the robot is in standby mode and the 24-hour
scheduler is no longer active.
9
English

Mopping with the robot
Types FC8796 and FC8794 come with a mopping attachment and a mopping pad for wet cleaning of
hard floors.
Attaching the mopping pad
1 Soak the mopping pad in water or wet the mopping pad under the tap. You can add a few drops of
a readily available floor cleaner that is suitable for your floor.
2 Squeeze the mopping pad thoroughly to ensure it is only damp instead of wet.
3 Attach the damp mopping pad to the mopping attachment by pushing the Velcro fasteners of the
mopping pad onto Velcro fasteners of the mopping attachment (Fig. 30).
4 Insert the attachment lugs of the mopping attachment into the two attachment holes located just
behind the wheels. Then press down until you hear a click (Fig. 31).
Cleaning floors with the mopping attachment
Note: To clean hard floors with the mopping attachment, you have to start the robot from a point in
the room you wish to clean. You cannot start the robot from its docking station with the mopping pad
attached.
1 Just press the start/stop button on the remote control to start the robot.
-
The robot continues mopping until its battery runs low and the robot stops.
Note: Detach the mopping pad and the mopping attachment before you send the robot to the
docking station with the docking button on the remote control or before you place the robot on the
docking station manually.
Detaching the mopping attachment
1 To detach the mopping attachment, press the tab (1) and pull up the mopping attachment to
remove it (2) (Fig. 32).
2 Pull the mopping pad off the mopping attachment.
3 To clean the mopping pad, wash it in the washing machine on a gentle cycle at a temperature of
60°C max.
Alarm signal
If the robot gets into trouble while cleaning (e.g., because a wheel jams or is no longer in contact with
the floor, or because a sensor can no longer detect the floor), you will hear a sound and the robot
stops. Press the start/stop button to switch the robot to standby mode and solve the problem that
causes the alarm signal, for instance by removing the obstacle that blocks the wheel, cleaning the
sensors, or picking up the robot and putting it down in a different place.
Cleaning and maintenance
Emptying and cleaning the dust container
Empty and clean the dust container when the dust container is full.
1 Pull up the handle of the dust container lid and lift the dust container out of the dust container
compartment (Fig. 33).
2 Pull the tab on the side of the dust container to open the lid (Fig. 34).
3 Remove the filter unit from the dust container (Fig. 35).
4 Shake the dust container over a dustbin to empty it (Fig. 36).
10
English

5 You can clean the dust container under a lukewarm tap.
Caution: Do not clean the dust container in the dishwasher.
6 To clean the filters thoroughly, take the filter unit apart by pressing the tabs located on both sides
of the filter unit and taking the dust filter off the EPA filter. Then clean the EPA filter with the
cleaning brush supplied (Fig. 37).
7 Reassemble the filter unit, snap the EPA filter into the dust filter. Then place the filter unit back into
the dust container (Fig. 38).
Note: If you cleaned the dust container under the tap, please make sure it is dry before you reinsert
the filter unit.
8 Put the lid on the dust container and make sure it locks into place with a click (Fig. 39).
9 Put the dust container back into the dust container compartment and fold down the dust
container handle (Fig. 40).
Caution: Always make sure the filter unit is present inside the dust container. If you use the robot
without the filter unit inside the dust container, the motor will be damaged.
Cleaning the robot
To maintain good cleaning performance, you have to clean the drop-off sensors, the wheels, the side
brushes and the suction opening from time to time.
1 Place the robot upside down on a flat surface.
2 To clean the side brushes, grab them by the bristles and pull them off their shafts (Fig. 41).
3 Clean the side brushes and the shafts of the side brushes with the cleaning brush supplied (Fig. 42).
4 Remove dust or fluff from the front wheel and side wheels with the cleaning brush supplied (Fig.
43).
5 Remove dust or fluff from the dust or fluff from the drop-off sensors with the cleaning brush
supplied (Fig. 44).
Note: It is important that you clean the drop-off sensors regularly. If the drop-off sensors are dirty,
the robot may fail to detect height differences or staircases.
6 Use the cleaning brush supplied to clean the suction opening (Fig. 45).
7 Check the side brushes and the bottom of the robot for any sharp objects that could damage your
floor.
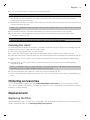
Ordering accessories
To buy accessories or spare parts, visit www.shop.philips.com/service or go to your Philips dealer.
You can also contact the Philips Consumer Care Center in your country (see the international warranty
leaflet for contact details).
Replacement
Replacing the filter
Replace the EPA filter if it is very dirty or damaged (see 'Emptying and cleaning the dust container'). To
obtain a new EPA filter, go to www.shop.philips.com/service.
11
English

Replacing the rechargeable battery
The rechargeable battery of the robot may only be replaced by qualified service engineers. Take the
robot to an authorized Philips service center to have the battery replaced when you can no longer
recharge it or when it runs out of power quickly. You can find the contact details of the Philips
Consumer Care Center in your country in the international warranty leaflet or go to
www.philips.com/support.
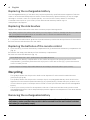
Replacing the side brushes
Replace the side brushes after some time to ensure proper cleaning results.
Note: Always replace the side brushes when you notice signs of wear or damage. We also recommend
that you replace both side brushes at the same time. To obtain new side brushes, go to
www.shop.philips.com/service.
1 To replace the side brushes, grab the old side brushes by the bristles and pull them off their shafts.
2 Push the new side brushes onto the shafts.
Replacing the batteries of the remote control
1 Push the tab (1) to unlock the battery compartment lid (2) and remove the battery compartment lid
(Fig. 9).
2 Remove the empty AAA batteries from the battery compartment.
3 Insert two new AAA batteries (Fig. 10).
Note: Make sure the + and - poles point in the right direction.
4 To reattach the battery compartment lid, first insert the lug into the opening in the rim of the
compartment (1) and then push down the lid (2) until it locks with a click (Fig. 11). Now the remote
control is ready for use.
Note: Dispose of empty disposable batteries according to the local rules in your country.
Recycling
-
This symbol means that this product shall not be disposed of with normal household waste
(2012/19/EU) (Fig. 46).
-
This symbol means that this product contains a built-in rechargeable battery which shall not be
disposed of with normal household waste (Fig. 47) (2006/66/EC). Please take your product to an
official collection point or a Philips service center to have a professional remove the rechargeable
battery.
-
Follow your country’s rules for the separate collection of electrical and electronic products and
rechargeable batteries. Correct disposal helps prevent negative consequences for the environment
and human health.
Removing the rechargeable battery
Only remove the rechargeable battery when you discard the product. Before you remove
the battery, make sure that the product is disconnected from the wall socket and that
the battery is completely empty.
12
English

Take any necessary safety precautions when you handle tools to open the product and
when you dispose of the rechargeable battery.
Removing the rechargeable battery
Warning: Only remove the rechargeable battery when you discard the appliance. Make
sure the battery is completely empty when you remove it.
To remove the rechargeable battery, follow the instructions below. You can also take the robot to a
Philips service center to have the rechargeable battery removed. Contact the Philips Consumer Care
Center in your country for the address of a service center near you.
1 Let the robot run until the rechargeable battery is empty to make sure that the rechargeable
battery is completely discharged before you remove it and dispose of it.
2 Undo the screws of the battery compartment lid and remove the lid (Fig. 48).
3 Lift out the rechargeable battery and disconnect it (Fig. 49).
4 Take the robot and the rechargeable battery to a collection point for electrical and electronic
waste.
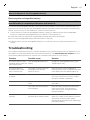
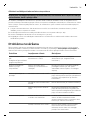
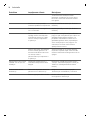
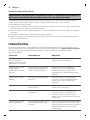
Troubleshooting
This chapter summarizes the most common problems you could encounter with the appliance. If you
are unable to solve the problem with the information below, visit www.philips.com/support for a list
of frequently asked questions or contact the Consumer Care Center in your country.
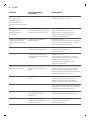
Problem
Possible cause Solution
The robot does not start
cleaning when I press the
start/stop button.
The rechargeable battery is
empty.
Charge the rechargeable battery (see
'Preparing for use').
The robot does not
respond when I press
one of the buttons.
The robot could not find the
docking station and the
battery ran out.
Place the robot on the plugged-in
docking station. After a few seconds, the
robot beeps and the display lights up.
The robot beeped and
stopped.
One or both wheels are stuck. Press the start/stop button. Remove the
fluff, hair, thread or wire that is caught
around the wheel suspension.
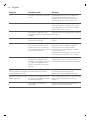
One or both side brushes are
stuck.
Clean the side brushes (see 'Cleaning
the robot').
The robot was lifted while it
was cleaning.
Press the start/stop button. Place the
robot on the floor. Then press the
start/stop button to make the robot
resume cleaning.
The robot does not clean
properly.
The bristles of one or both side
brushes are crooked or bent.
Soak the brush or brushes in warm
water for a while. If this does not restore
the bristles to their proper shape,
replace the side brushes (see 'Replacing
the side brushes').
13
English

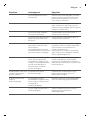
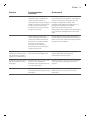
Problem Possible cause Solution
The filter in the dust container
is dirty.
Disassemble the filter unit. Clean the
dust filer and the EPA filter with a
toothbrush with soft bristles. You can
also rinse the dust filter under a tap.
If cleaning the EPA filter does not help
anymore, replace the filter with a new
one. We advise you to replace the EPA
filter at least once a year.
The suction opening in the
bottom of the dust container is
clogged.
Clean the suction opening (see 'Cleaning
the robot').
The front wheel is jammed
with hair or other dirt.
Clean the front wheel (see 'Cleaning the
robot').
The robot is cleaning a very
dark or shiny surface, which
triggers the drop-off sensors.
This causes the robot to move
in an unusual pattern.
Press the start/stop button and then
move the robot to a lighter colored
piece of the floor. If the problem
continues to occur on lighter colored
floors, please go to
www.philips.com/support or contact the
Consumer Care Center in your country.
The robot is cleaning a floor
that reflects sunlight quite
strongly. This triggers the drop-
off sensors and causes the
robot to move in an unusual
pattern.
Close the curtains to block sunlight from
entering the room. You can also start
cleaning when the sunlight is less bright.
The rechargeable battery
can no longer be charged
or runs empty very fast.
The rechargeable battery has
reached the end of its life.
Have the rechargeable battery replaced
by a Philips service center (see
'Replacing the rechargeable battery').
The robot cannot find the
docking station.
There is not enough room for
the robot to navigate towards
the docking station.
Try to find another place for the docking
station (see 'Installing the docking
station').
The robot is still actively
searching.
Give the robot around 20 minutes to
return to the docking station.
14
English

Čeština
Úvod
Společnost Philips Vám gratuluje ke koupi a vítá Vás! Chcete-li využívat všech výhod podpory
nabízené společností Philips, zaregistrujte svůj výrobek na stránkách www.philips.com/welcome.
Všeobecný popis
1 Rukojeť víka nádoby na prach
2 Víko nádoby na prach
3 Jednotka filtru
4 Nádoba na prach
5 Hrana horního krytu
6 čidlo dokovací stanice
7 Sací otvor
8 Tlačítko spuštění/zastavení
9 Postranní kartáčky
10 Hřídele pro montáž postranních kartáčků
11 Přední kolečko
12 Sací otvor
13 Postranní kolečka
14 Senzory pádu
15 Kryt přihrádky na baterii
16 Mopovací nástavec (FC8796, FC8794)
17 Mopovací podložka (FC8796, FC8794)
18 Malá zástrčka
19 Adaptér
20 Čisticí kartáč
21 dálkový ovladač
22 Baterie AAA pro dálkové ovládání
23 Dokovací stanice
Dálkový ovladač
Robota můžete ovládat pomocí dálkového ovladače (obr. 2). Ovladač obsahuje následující tlačítka:
1 Tlačítko spuštění/zastavení
2 Navigační tlačítka
3 Tlačítka režimu čištění
4 Tlačítko dokování
5 Plánovač 24hodinového cyklu
Jak robot funguje
Co robot uklízí
Tento robot je vybaven funkcemi, které umožňují, aby se stal vaším praktickým pomocníkem při úklidu
podlah.
Robot je vhodný především pro čištění tvrdých podlah ze dřeva, dlaždic, linolea apod. Čištění měkkých
podlah, např. koberců, mu může činit potíže. Pokud robota používáte kčištění koberce, zůstaňte při
prvním použití poblíž, abyste viděli, zda si dokáže stímto typem podlahy poradit. Na robota je také
třeba dohlížet při používání na velmi tmavých nebo lesklých tvrdých podlahách.
15
Čeština

Jak robot uklízí
Systém čištění
Robot je vybaven třífázovým systémem úklidu, který zajišťuje efektivní úklid podlah.
-
Dva postranní kartáčky pomáhají robotovi při čištění dosáhnout do rohů amíst podél zdí. Také
pomáhají sbírat špínu ze země aposouvat ji směrem ksacímu otvoru (obr. 3).
-
Volnou špínu robot sebere díky dostatečně výkonnému sání askrze sací otvor ji uloží do nádoby na
prach (obr. 4).
-
Typy FC8796 aFC8794 se dodávají smopovacím nástavcem, který je krobotickému zařízení
možno připevňovat tehdy, je-li třeba provádět čištění tvrdé podlahy.
Schémata čištění
Vrežimu automatického čištění používá robot koptimálnímu čištění jednotlivých oblastí místnosti
automatickou posloupnost schémat odrážení apohybu podél stěny. Robot bude včištění pokračovat,
dokud se jeho akumulátor téměř nevybije nebo dokud ho nevypnete.
Stisknutím příslušného tlačítka na dálkovém ovladači (viz 'Výběr čisticího režimu') můžete vybrat jeden
ze tří individuálních režimů čištění. Robot bude pokračovat ve zvoleném režimu čištění po dobu
několika minut apoté se vrátí do režimu automatického čištění.
1 Režim (obr. 5) odrážení
2 Režim (obr. 6) pohybu podél stěn
3 Spirálový režim (obr. 7)
Jak se robot vyhýbá výškovým rozdílům
Ve spodní části je robot vybaven pěti senzory pádu. Tyto senzory pádu slouží ktomu, aby robot
rozpoznal výškové rozdíly, například schody.
Poznámka: Pokud se robot dostane mírně nad hranu stupně svýškovým rozdílem, je to normální,
protože senzory pádu jsou umístěny až za nárazníkem.
Upozornění: V některých případech senzory pádu nemusí schodiště nebo jiný výškový rozdíl
rozpoznat včas. Proto robota při několika prvních použitích a při provozu v blízkosti schodiště nebo
jiného výškového rozdílu bedlivě sledujte. Senzory pádu je důležité pravidelně čistit, aby si robot
zachoval schopnost správně (viz 'Čištění robota') rozpoznávat výškové rozdíly.
Před prvním použitím
Montáž postranních kartáčků
1 Vybalte postranní kartáčky apoložte robota vzhůru nohama na stůl nebo na podlahu.
2 Nasaďte postranní kartáčky na hřídele ve spodní části robota (obr. 8).
Poznámka: Ujistěte se, že jste postranní kartáčky upevnili správně. Nasaďte je na hřídel, až uslyšíte,
že skliknutím zapadly na své místo.
Umístění baterií v dálkovém ovladači
Dálkový ovladač je napájen dvěma bateriemi typu AAA.
1 Stisknutím zajišťovací západky(1) odemkněte víčko přihrádky (2) pro baterie a poté toto víčko
sejměte (obr. 9).
2 Vložte dvě baterie (obr. 10) typu AAA.
Poznámka: Zkontrolujte správnou orientaci pólů + a – baterií.
16
Čeština

3 Postup opětovného připevnění víčka přihrádky pro baterie: nejprve zasuňte výstupek do otvoru v
okraji přihrádky (1) a poté zatlačujte víčko (2) dolů, dokud slyšitelně (obr. 11) nezapadne. Dálkový
ovladač je připraven kpoužití.
Příprava k použití
Instalace dokovací stanice
1 Zapojte malou zástrčku adaptéru do zásuvky na dokovací stanici (1) a adaptér zapojte do zásuvky
ve zdi (2) (obr. 12).
2 Umístěte dokovací stanici na vodorovný povrch ke zdi.
Poznámka: Zkontrolujte, že ve vzdálenosti 150cm vpředu, 30cm napravo a100cm nalevo od
dokovací stanice (obr. 13) nejsou žádné překážky.
Nabíjení
1 Umístěte robota do dokovací stanice (obr. 14) připojené kelektrické zásuvce.
2 Tlačítko spuštění/zastavení začne blikat (obr. 15).
3 Když je akumulátor plně nabitý, tlačítko spuštění/zastavení nepřetržitě svítí (obr. 16).
Příprava místnosti na úklid
-
Než pošlete robota uklízet, seberte zpodlahy všechny volné a křehké předměty (obr. 17).
-
Z podlahy odstraňte všechny kabely, dráty a šňůry, aby se do nich robot nemohl zachytit.
-
Nachází-li se v místnosti, jejíž úklid má robot provádět, koberec s třásněmi, složte tyto třásně pod
koberec, aby na nich robot nemohl uvíznout a aby se zamezilo poškození (obr. 18) koberce.
Používání robota
Používání dálkového ovladače
1 Umístěte robota do dokovací stanice nebo stiskněte tlačítko spuštění/zastavení na robotu (obr. 19)
pro jeho aktivaci.
-
Nyní můžete kovládání robota používat dálkový ovladač.
Spuštění azastavení
1 Stiskněte tlačítko spuštění/zastavení na dálkovém ovladači (obr. 20).
2 Tlačítko spuštění/zastavení na robotovi se trvale rozsvítí a robot zahájí provádění úklidu. (obr. 21)
3 Robot bude uklízet vrežimu automatického čištění, dokud se baterie téměř nevybije. Vrežimu
automatického čištění robot opakuje předem dané pořadí schémat náhodného čištění, pohybu
podél stěn a spirálových pohybů.
4 Po dosažení určitého stupně vybití baterie začne tlačítko spuštění/zastavení rychle blikat a robot
začne hledat dokovací stanici, aby se nabil (obr. 22).
5 Stisknutím tlačítka spuštění/zastavení lze také čištění přerušit nebo zastavit. Jestliže tlačítko
spuštění/zastavení stisknete znovu a baterie je dostatečně nabitá, robot bude pokračovat vrežimu
automatického čištění.
6 Chcete-li, aby se robot vrátil do dokovací stanice dříve, než bude baterie téměř vybitá, stiskněte
dokovací tlačítko na dálkovém ovladači (obr. 23).
17
Čeština

7 Tlačítko spuštění/zastavení začne blikat a robot se vrátí do dokovací stanice.
Výběr čisticího režimu
Tento robot disponuje čtyřmi režimy čištění. Výchozím režimem čištění je režim automatického čištění,
který spočívá vautomatické posloupnosti schémat odrážení apohybu podél zdi (obr. 24). Kromě
režimu automatického čištění má robot další tři individuální režimy čištění, které můžete vybrat
stisknutím příslušného tlačítka na dálkovém ovladači.
Režim odrážení
Vtomto režimu se robot při čištění místnosti pohybuje střídavě rovnými akřížovými pohyby (obr. 25).
Režim pohybu podél stěn
Vtomto režimu se robot pohybuje podél stěn místnosti, aby tyto oblasti vyčistil pečlivěji (obr. 26).
Spirálový režim
Vtomto režimu se robot pohybuje po rozšiřující se spirále od středového bodu, aby oblast důkladně
vyčistil (obr. 27).
Poznámka: Ručně vybrané režimy jsou aktivní pouze po několik minut. Poté se robot přepne do
režimu automatického čištění.
Ruční ovládání
Robota můžete ovládat manuálně pomocí tlačítek na dálkovém ovladači.
1 Pohyb robota pomístnosti (obr. 28) můžete ovládat tlačítky šipek kolem tlačítka spuštění/zastavení
na dálkovém ovladači.
Poznámka: Když robota ovládáte ručně, dávejte pozor na výškové rozdíly a schody.
Použití plánovače 24hodinového cyklu
Funkci plánovače 24hodinového cyklu je možno aktivovat pomocí dálkového ovladače. Ujistěte se, že
je robot vpohotovostním režimu aže se nachází vdokovací stanici.
1 Aktivujte funkci plánovače 24hodinového cyklu stisknutím tlačítka (obr. 29) plánovače
24hodinového cyklu na dálkovém ovladači.
-
Po aktivaci funkce plánovače 24hodinového cyklu se ozve zvukový signál adisplej vždy po
několika sekundách krátce zabliká.
-
Aktivujete-li funkci plánovače 24hodinového cyklu, zahájí robot úklidový cyklus, který bude trvat
24hodin. Tentýž 24hodinový úklidový cyklus bude robot opakovaně provádět ve stejnou dobu,
dokud funkci plánovače 24hodinového cyklu opět nedeaktivujete.
2 Funkci plánovače 24hodinového cyklu můžete deaktivovat stisknutím tlačítka plánovače
24hodinového cyklu na dálkovém ovladači. Ozve se zvukový signál adisplej bude nepřetržitě svítit,
aby signalizoval, že se robot nachází vpohotovostním režimu aže funkce plánovače 24hodinového
cyklu již není aktivní.
Mopování pomocí robota
Typy FC8796 a FC8794 se dodávají s mopovacím nástavcem a mopovací podložkou pro mokré čištění
tvrdých podlah.
18
Čeština

Připojení mopovací podložky
1 Namočte mopovací podložku ponořením do vody nebo umístěním pod vodovodní kohoutek.
Můžete přidat několik kapek čisticího prostředku na podlahy, který je připraven k okamžitému
použití a který je vhodný pro vaši podlahu.
2 Mopovací podložku důkladně vyždímejte, abyste zajistili, že bude pouze vlhká a nikoli mokrá.
3 Připevněte mopovací podložku k mopovacímu nástavci přitlačením suchých zipů na mopovací
podložce k suchým zipům mopovacího nástavce (obr. 30).
4 Zasuňte upevňovací výstupky mopovacího nástavce do dvou upevňovacích otvorů nacházejících
se bezprostředně za kolečky. Poté nástavec zatlačujte dolů, dokud nezaznamenáte slyšitelné
zapadnutí (obr. 31).
Čištění podlah pomocí mopovacího nástavce
Poznámka: Chcete-li čistit tvrdé podlahy pomocí mopovacího nástavce, musíte robota spouštět z
místa nacházejícího se v místnosti, jejíž úklid se má provádět. Robota s připevněným mopovacím
nástavcem nelze spouštět z jeho dokovací stanice.
1 Robota spustíte jednoduchým stisknutím tlačítka spuštění/zastavení na dálkovém ovladači.
-
Robot bude pokračovat vmopování, dokud se jeho baterie nevybije, což způsobí jeho
zastavení.
Poznámka: Než pomocí dokovacího tlačítka na dálkovém ovladači odešlete robota do dokovací
stanice nebo než robota umístíte do dokovací stanice ručně, odpojte mopovací podložku i mopovací
nástavec.
Odpojení mopovacího nástavce
1 Chcete-li odpojit mopovací nástavec, stiskněte úchyt (1) a vyjměte mopovací nástavec (2) (obr. 32)
tím, že jej vytáhnete nahoru.
2 Stáhněte zmopovacího nástavce mopovací podložku.
3 Mopovací podložku lze prát v pračce při šetrném pracím cyklu a při teplotě max. do 60°C.
Poplašný signál
Pokud se robot při úklidu dostane do potíží (například z důvodu uvíznutí kolečka či ztráty styku s
podlahou nebo proto, že snímač již nemůže zjistit podlahu), ozve se zvukový signál a robot se zastaví.
Přepněte robota do pohotovostního režimu stisknutím tlačítka spuštění/zastavení a vyřešte problém,
který způsobil vydání poplašného signálu, například tím, že odstraníte překážku blokující kolečko,
očistíte snímače nebo robota přenesete na jiné místo.
Čištění a údržba
Vyprazdňování a čištění nádoby na prach
Pokud je nádoba na prach plná, vysypte avyčistěte ji.
1 Zatáhněte za rukojeť víka nádoby na prach avyndejte nádobu zprostoru pro nádobu na prach
(obr. 33).
2 Vytažením úchytu na boku nádoby na prach otevřete víčko (obr. 34).
3 Z nádoby na prach (obr. 35) vyjměte jednotku filtru.
4 Nádobu na prach vyprázdněte (obr. 36) vyklepáním nad odpadkovým košem.
5 Nádobu na prach můžete vyčistit vypláchnutím pod vlažnou tekoucí vodou.
19
Čeština

Upozornění: Nádobu na prach neumývejte v myčce na nádobí.
6 Je-li třeba provést důkladné vyčištění filtrů, oddělte filtrační jednotku stisknutím úchytů umístěných
po obou jejích stranách a oddělte prachový filtr od filtru EPA. Poté filtr EPA vyčistěte pomocí
dodaného čisticího kartáčku (obr. 37).
7 Znovu sestavte filtrační jednotku zasunutím filtru EPA do prachového filtru. Poté filtrační jednotku
vložte zpět do nádoby na prach (obr. 38).
Poznámka: Pokud jste nádobu na prach čistili pod tekoucí vodou, před opětovným vložením
filtrační jednotky se ujistěte, že tato nádoba je zcela suchá.
8 Umístěte víčko na prachovou nádobu a ujistěte se, že slyšitelně zapadlo (obr. 39).
9 Vraťte nádobu na prach zpět do jejího prostoru asklopte rukojeť nádoby na prach (obr. 40).
Upozornění: Vždy se ujistěte, že se v nádobě na prach nachází filtrační jednotka. Pokud robota
budete používat bez filtrační jednotky v nádobě na prach, dojde k poškození motoru.
Čištění robota
Aby robot mohl stále dobře uklízet, je nutné občas vyčistit senzory pádu, kolečka,postranní kartáčky a
sací otvor.
1 Položte robot vzhůru nohama na rovný povrch.
2 Postranní kartáčky před čištěním uchopte za štětiny astáhněte je zhřídelí (obr. 41).
3 Postranní kartáčky ahřídele postranních kartáčků čistěte pomocí dodaného (obr. 42) čisticího
kartáče.
4 Pomocí tohoto dodaného (obr. 43) čisticího kartáče odstraňujte také prach nebo chomáče
zpředního kolečka apostranních koleček.
5 Pomocí tohoto dodaného (obr. 44) čisticího kartáče odstraňujte také prach nebo chomáče ze
snímačů pádu.
Poznámka: Senzory pádu je důležité čistit pravidelně. Když jsou senzory pádu špinavé, robot
nemusí rozpoznat výškové rozdíly nebo schody.
6 Dodaný čisticí kartáč používejte také kčištění sacího otvoru (obr. 45).
7 Zkontrolujte, zda na postranních kartáčcích nebo na spodní straně robota nejsou nějaké ostré
předměty, které by mohly poškodit podlahu.
Objednávání příslušenství
Chcete-li koupit příslušenství nebo náhradní díly, navštivte adresu www.shop.philips.com/service
nebo se obraťte na prodejce výrobků Philips. Můžete se také obrátit na středisko péče ozákazníky
společnosti Philips ve své zemi (kontaktní údaje naleznete na letáčku scelosvětovou zárukou).
Výměna
Výměna filtru
Pokud je filtr EPA velmi špinavý nebo poškozený (viz 'Vyprazdňování a čištění nádoby na prach'),
vyměňte jej. Nový filtr EPA můžete pořídit prostřednictvím stránek www.shop.philips.com/service.
Výměna akumulátoru
Výměnu akumulátoru robota smějí provádět pouze kvalifikovaní servisní technici. Pokud akumulátor
nelze nabít nebo se příliš rychle vybíjí, odneste robota do autorizovaného servisního střediska Philips,
20
Čeština
Pagina se încarcă...
Pagina se încarcă...
Pagina se încarcă...
Pagina se încarcă...
Pagina se încarcă...
Pagina se încarcă...
Pagina se încarcă...
Pagina se încarcă...
Pagina se încarcă...
Pagina se încarcă...
Pagina se încarcă...
Pagina se încarcă...
Pagina se încarcă...
Pagina se încarcă...
Pagina se încarcă...
Pagina se încarcă...
Pagina se încarcă...
Pagina se încarcă...
Pagina se încarcă...
Pagina se încarcă...
Pagina se încarcă...
Pagina se încarcă...
Pagina se încarcă...
Pagina se încarcă...
Pagina se încarcă...
Pagina se încarcă...
Pagina se încarcă...
Pagina se încarcă...
Pagina se încarcă...
Pagina se încarcă...
Pagina se încarcă...
Pagina se încarcă...
Pagina se încarcă...
Pagina se încarcă...
Pagina se încarcă...
Pagina se încarcă...
Pagina se încarcă...
Pagina se încarcă...
Pagina se încarcă...
Pagina se încarcă...
Pagina se încarcă...
Pagina se încarcă...
Pagina se încarcă...
Pagina se încarcă...
Pagina se încarcă...
Pagina se încarcă...
Pagina se încarcă...
Pagina se încarcă...
Pagina se încarcă...
Pagina se încarcă...
Pagina se încarcă...
Pagina se încarcă...
Pagina se încarcă...
Pagina se încarcă...
Pagina se încarcă...
Pagina se încarcă...
Pagina se încarcă...
Pagina se încarcă...
Pagina se încarcă...
Pagina se încarcă...
Pagina se încarcă...
Pagina se încarcă...
Pagina se încarcă...
Pagina se încarcă...
Pagina se încarcă...
Pagina se încarcă...
Pagina se încarcă...
Pagina se încarcă...
Pagina se încarcă...
Pagina se încarcă...
Pagina se încarcă...
Pagina se încarcă...
Pagina se încarcă...
Pagina se încarcă...
Pagina se încarcă...
Pagina se încarcă...
Pagina se încarcă...
Pagina se încarcă...
Pagina se încarcă...
Pagina se încarcă...
Pagina se încarcă...
Pagina se încarcă...
Pagina se încarcă...
Pagina se încarcă...
Pagina se încarcă...
Pagina se încarcă...
Pagina se încarcă...
Pagina se încarcă...
Pagina se încarcă...
Pagina se încarcă...
Pagina se încarcă...
Pagina se încarcă...
Pagina se încarcă...
Pagina se încarcă...
-
 1
1
-
 2
2
-
 3
3
-
 4
4
-
 5
5
-
 6
6
-
 7
7
-
 8
8
-
 9
9
-
 10
10
-
 11
11
-
 12
12
-
 13
13
-
 14
14
-
 15
15
-
 16
16
-
 17
17
-
 18
18
-
 19
19
-
 20
20
-
 21
21
-
 22
22
-
 23
23
-
 24
24
-
 25
25
-
 26
26
-
 27
27
-
 28
28
-
 29
29
-
 30
30
-
 31
31
-
 32
32
-
 33
33
-
 34
34
-
 35
35
-
 36
36
-
 37
37
-
 38
38
-
 39
39
-
 40
40
-
 41
41
-
 42
42
-
 43
43
-
 44
44
-
 45
45
-
 46
46
-
 47
47
-
 48
48
-
 49
49
-
 50
50
-
 51
51
-
 52
52
-
 53
53
-
 54
54
-
 55
55
-
 56
56
-
 57
57
-
 58
58
-
 59
59
-
 60
60
-
 61
61
-
 62
62
-
 63
63
-
 64
64
-
 65
65
-
 66
66
-
 67
67
-
 68
68
-
 69
69
-
 70
70
-
 71
71
-
 72
72
-
 73
73
-
 74
74
-
 75
75
-
 76
76
-
 77
77
-
 78
78
-
 79
79
-
 80
80
-
 81
81
-
 82
82
-
 83
83
-
 84
84
-
 85
85
-
 86
86
-
 87
87
-
 88
88
-
 89
89
-
 90
90
-
 91
91
-
 92
92
-
 93
93
-
 94
94
-
 95
95
-
 96
96
-
 97
97
-
 98
98
-
 99
99
-
 100
100
-
 101
101
-
 102
102
-
 103
103
-
 104
104
-
 105
105
-
 106
106
-
 107
107
-
 108
108
-
 109
109
-
 110
110
-
 111
111
-
 112
112
-
 113
113
-
 114
114


Philips FC8796/01 Manual de utilizare
- Tip
- Manual de utilizare
în alte limbi
- slovenčina: Philips FC8796/01 Používateľská príručka
- polski: Philips FC8796/01 Instrukcja obsługi
Lucrări înrudite
-
Philips FC8802/01 Manual de utilizare
-
-
-
Philips FC8812/01 Manual de utilizare
-
Philips FC8776/01 Manual de utilizare
-
-
Philips FC7070/11 Manual de utilizare
-
Philips FC7070/01 Manual de utilizare
-
-
Alte documente
-
Hisense RVCL144AB Manual de utilizare
-
 Myria MY4523 Manual de utilizare
-
Tesla RoboStar T60 – white Manual de utilizare
-
-
Scarlett SC-VC80R14 Manual de utilizare
-
 V-TAC VT-5555 Manual de utilizare
-
Tesla RoboStar iQ300 Manual de utilizare
-
Scarlett SC-VC80R12 Manual de utilizare
-
Samsung VR05R5050WK Manual de utilizare
-
Scarlett SC-VC80R11 Manual de utilizare

