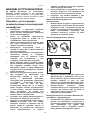
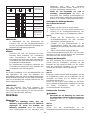
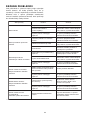
Dolmar AT1831U Manualul proprietarului
- Categorie
- Unelte electrice
- Tip
- Manualul proprietarului

1
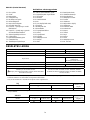
GB
Cordless Grass Trimmer INSTRUCTION MANUAL
UA
Акумуляторна газонокосарка ІНСТРУКЦІЯ З ЕКСПЛУАТАЦІЇ
PL
Akumulatorowa wykaszarka do trawy
INSTRUKCJA OBSŁUGI
RO
Motocositoare pentru iarbă fără cablu
MANUAL DE INSTRUCŢIUNI
DE
Akku-Rasentrimmer BEDIENUNGSANLEITUNG
HU
Vezeték nélküli fűkasza HASZNÁLATI KÉZIKÖNYV
SK
Akumulátorová kosačka NÁVOD NA OBSLUHU
CZ
Akumulátorový vyžínač NÁVOD K OBSLUZE
AT-1831 U
AT-1831 UD

2
1
2
3
1 013921
1
2
2 013834
1
2
3 013807
1
2
3
4 013835
1
5 013922
1
6 012128
1
2
7 013836
1
2
8 015676
1
9 013811
1
2
3
4
5
2
1
10 013831
1
2
3
5
4
3
11 013832
1
2
3
4
12 013830

3
1
13 013829 14 013813
1
2
15 013839
1
2
3
16 013838
1
17 013840 18 013843
1
2
19 013841 20 013842
1
2
4
3
21 013817
1
2
22 013804
1
23 013833
1
24 013805

4
1
2
25 013923
26 013822
1
27 013823
28 013824
29 013825 30 013826
31 013827

5
ENGLISH (Original instructions)
Explanation of general view
1-1. Red indicator
1-2. Button
1-3. Battery cartridge
2-1. Power indicator
2-2. Power button
3-1. Lock-off button
3-2. Switch trigger
4-1. Reversing switch
4-2. A position depressed for normal
operation
4-3. B position depressed for weed and
debris removal
5-1. Speed adjusting dial
6-1. Star marking
7-1. Battery indicator
7-2. Power indicator
8-1. Indicator lamps
8-2. CHECK button
9-1. Most effective cutting area
10-1. Joint
10-2. Lock lever
10-3. Joint cover
10-4. Lever
10-5. Pipe (Cutting tool side)
11-1. Lock lever
11-2. Concave portion
11-3. Protrusion
12-1. Handle clamp
12-2. Groove
12-3. Handle holder
12-4. Handle
13-1. Hex bolt
15-1. Grooves
15-2. Protector
16-1. Concave portions
16-2. Protector holder
16-3. Protrusions
17-1. Hex bolts
19-1. Holes
19-2. Wire guard
21-1. Nylon cutting head
21-2. Metal guard
21-3. Receive washer
21-4. Hex wrench
22-1. Buckle
22-2. Hook
23-1. Cap
24-1. Buckle
25-1. Cushion
25-2. Hex bolt
27-1. 80 - 100 mm
SPECIFICATIONS
Model AT-1831 U AT-1831 UD
Type of pipe Integrated pipe Splittable pipe
No load speed 3,500 - 6,000 min
-1
1,843 mm
Overall length
-
967 mm (Cutting tool side including cap)
982 mm (Battery side)
Cutting diameter with nylon cutting head 300 mm
Net weight 4.1 kg 4.3 kg
Rated voltage D.C. 18 V
Standard battery cartridge and charger
Always keep the combinations of battery/charger on the right columns.
AP-183, AP-1840, BL1815N, BL1820, BL1820B, BL1830,
BL1830B, BL1840, BL1840B, BL1850, BL1850B, BL1860B /
LG-184, DC18RC
• Due to our continuing program of research and development, the specifications herein are subject to change without notice.
• Specifications and battery cartridge may differ from country to country.
• Weight, with battery cartridge, according to EPTA-Procedure 01/2003
Noise Sound pressure level
Model L
PA
(dB (A)) Uncertainty K (dB (A))
Applicable
standard or
directive
AT-1831 U / AT-1831 UD 79 0.7 2000/14/EC
• Even if the sound pressure level listed above is 80 dB (A) or less, the level under working may exceed 80 dB (A). Wear ear protection.
Vibration Left hand Right hand
Model a
h
(m/s
2
)
Uncertainty K
(m/s
2
)
a
h
(m/s
2
)
Uncertainty K
(m/s
2
)
Applicable
standard or
directive
AT-1831 U / AT-1831 UD 2.5 1.5 2.5 1.5 EN786

6
ENG901-1
•
The declared vibration emission value has been
measured in accordance with the standard test
method and may be used for comparing one tool
with another.
• The declared vibration emission value may also be
used in a preliminary assessment of exposure.
WARNING:
• The vibration emission during actual use of the
power tool can differ from the declared emission
value depending on the ways in which the tool is
used.
• Be sure to identify safety measures to protect the
operator that are based on an estimation of
exposure in the actual conditions of use (taking
account of all parts of the operating cycle such as
the times when the tool is switched off and when it
is running idle in addition to the trigger time).
END020-3
Symbols
The following show the symbols used for the equipment.
Be sure that you understand their meaning before use.
・ Take particular care and attention.
・ Read instruction manual.
・ Danger; be aware of thrown objects.
・ The distance between the tool and
bystanders must be at least 15 m.
・ Keep bystanders away.
・ Keep distance at least 15 m.
・ Wear a helmet, goggles and ear
protection.
・ Wear protective gloves.
・ Wear sturdy boots with nonslip soles.
Steeltoed safety boots are
recommended.
・ Do not expose to moisture.
・ Top permissible tool speed.
・ Never use metal blade.
・ Only for EU countries
Do not dispose of electric equipment or
battery pack together with household
waste material!
In observance of the European
Directives, on Waste Electric and
Electronic Equipment and Batteries and
Accumulators and Waste Batteries and
Accumulators and their implementation
in accordance with national laws,
electric equipment and batteries and
battery pack(s) that have reached the
end of their life must be collected
separately and returned to an
environmentally compatible recycling
facility.
ENH220-4
For European countries only
EC Declaration of Conformity
Makita declares that the following Machine(s):
Designation of Machine:
Cordless Grass Trimmer
Model No./ Type: AT-1831 U, AT-1831 UD
Specifications: see "SPECIFICATIONS" table.
Conforms to the following European Directives:
2000/14/EC, 2006/42/EC
They are manufactured in accordance with the following
standard or standardized documents:
EN60335, EN50636
The technical file in accordance with 2006/42/EC is
available from:
Makita, Jan-Baptist Vinkstraat 2, 3070, Belgium
The conformity assessment procedure required by
Directive 2000/14/EC was in Accordance with annex VI.
Notified Body:
TÜV Rheinland LGA Products GmbH
Tillystraße 2
90431 Nürnberg, Germany
Identification number 0197
Measured Sound Power Level: 90 dB (A)
Guaranteed Sound Power Level: 90 dB (A)
1.10.2015
000331
Yasushi Fukaya
Director
Makita, Jan-Baptist Vinkstraat 2, 3070, Belgium
GEB109-5
IMPORTANT SAFETY
INSTRUCTIONS
WARNING! Read all safety warnings and all
instructions. Failure to follow the warnings and
instructions may result in electric shock, fire and/or
serious injury.
Save all warnings and
instructions for future reference.
1. Be familiar with the controls and proper use
of the equipment.
15m(50FT)
Cd
Ni-MH
Li-ion

7
2. Cutting elements continue to rotate after the
motor is switched off.
3. Never allow children or people unfamiliar with
the instructions to use the machine.
4. Stop using the machine while people,
especially children, or pets are nearby.
5. Only use the machine in daylight or good
artificial light.
6. Before using the machine and after any
impact, check for signs of wear or damage
and repair as necessary.
7. Take care against injury from any device fitted
for trimming the filament line length. After
extending new cutter line always return the
machine to its normal operating position
before switching on.
8. Never fit metal cutting elements.
9. This appliance is not intended for use by
persons (including children) with reduced
physical, sensory or mental capabilities, or
lack of experience and knowledge, unless
they have been given supervision or
instruction concerning use of the appliance
by a person responsible for their safety.
Children should be supervised to ensure that
they do not play with the appliance.
10. Use the tool with the utmost care and
attention.
11. Operate the tool only if you are in good
physical condition. Perform all work calmly
and carefully. Use common sense and keep in
mind that the operator or user is responsible
for accidents or hazards occurring to other
people or their property.
12. Never operate the tool when tired, feeling ill or
under the influence of alcohol or drugs.
13. The tool should be switched off immediately if
it shows any signs of unusual operation.
Intended use of the tool
1. Use right tool. The cordless grass trimmer is
only intended for cutting grass, light weeds. It
should not be used for any other purpose
such as hedge cutting as this may cause
injury.
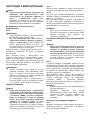
Personal protective equipment
010820
010821
1. Dress Properly. The clothing worn should be
functional and appropriate, i.e. it should be
tight-fitting but not cause hindrance. Do not
wear either jewelry or clothing which could
become entangled with high grass. Wear
protective hair covering to contain long hair.
2. When using the tool, always wear sturdy
shoes with a non-slip sole. This protects
against injuries and ensures a good footing.
3. Wear protective glasses or goggles.
Electrical and battery safety
1. Avoid dangerous environment. Don't use the
tool in damp or wet locations or expose it to
rain. Water entering the tool will increase the
risk of electric shock.
2. Recharge only with the charger specified by
the manufacturer. A charger that is suitable
for one type of battery pack may create a risk
of fire when used with another battery pack.
3. Use power tools only with specifically
designated battery packs. Use of any other
battery packs may create a risk of injury and
fire.
4. When battery pack is not in use, keep it away
from other metal objects, like paper clips,
coins, keys, nails, screws or other small metal
objects, that can make a connection from one
terminal to another. Shorting the battery
terminals together may cause burns or a fire.
5. Under abusive conditions, liquid may be ejected
from the battery; avoid contact. If contact
accidentally occurs, flush with water. If liquid
contacts eyes, seek medical help. Liquid ejected
from the battery may cause irritation or burns.
6. Do not dispose of the battery(ies) in a fire. The
cell may explode. Check with local codes for
possible special disposal instructions.
7. Do not open or mutilate the battery(ies).
Released electrolyte is corrosive and may
cause damage to the eyes or skin. It may be
toxic if swallowed.

8
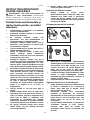
Starting up the tool
360°
012858
1. Make sure that there are no children or other
people within a working range of 15 meters
(50 ft), also pay attention to any animals in the
working vicinity. Otherwise stop using the
tool.
2. Before use always check that the tool is safe
for operation. Check the security of the
cutting tool and the guard and the switch
trigger/lever for easy and proper action.
Check for clean and dry handles and test the
on/off function of the switch.
3. Check damaged parts before further use of
the tool. A guard or other part that is damaged
should be carefully checked to determine that
it will operate properly and perform its
intended function. Check for alignment of
moving parts, binding of moving parts,
breakage of parts, mounting, and any other
condition that may affect its operation. A
guard or other part that is damaged should be
properly repaired or replaced by our
authorized service center unless indicated
elsewhere in this manual.
4. Switch on the motor only when hands and
feet are away from the cutting tool.
5. Before starting make sure that the cutting tool
has no contact with hard objects such as
branches, stones etc. as the cutting tool will
revolve when starting.
Method of operation
1. Never operate the machine with damaged
guards or without the guards in place.
2. Only use the tool in good light and visibility.
During the winter season beware of slippery
or wet areas, ice and snow (risk of slipping).
Always ensure a safe footing.
3. Take care against injury to feet and hands
from the cutting tool.
4. Keep hands and feet away from the cutting
means at all times and especially when
switching on the motor.
5. Never cut above waist height.
6. Never stand on a ladder and run the tool.
7. Never work on unstable surfaces.
8. Don't overreach. Keep proper footing and
balance at all times.
9. Always be sure of your footing on slopes.
10. Walk, never run.
11. Remove sand, stones, nails etc. found within
the working range. Foreign particles may
damage the cutting tool and can cause to be
thrown away, resulting in a serious injury.
12. Never touch moving hazardous parts before
the machine is disconnected from the mains
and the moving hazardous parts have come to
a complete stop.
13. Should the cutting tool hit stones or other
hard objects, immediately switch off the
motor and inspect the cutting tool.
14. Before commencing cutting, the cutting tool
must have reached full working speed.
15. During operation always hold the tool with
both hands. Never hold the tool with one hand
during use. Always ensure a safe footing.
16. All protective equipment such as guards
supplied with the tool must be used during
operation.
17. Except in case of emergency, never drop or
cast the tool to the ground or this may
severely damage the tool.
18. Never drag the tool on the ground when
moving from place to place, the tool may
become damaged if moved in this manner.
19. Always remove the battery cartridge from the
tool:
− whenever leaving the tool unattended;
− before clearing a blockage;
− before checking, cleaning or working on
the tool;
− before making any adjustments, changing
accessories or storing;
− whenever the tool starts vibrating
unusually;
− whenever transporting the tool.
20. Don't force the tool. It will do the job better
and with less likelihood of a risk of injury at
the rate for which it was designed.
21. Do not operate power tools in explosive
atmospheres, such as in the presence of
flammable liquids, gases or dust. Power tools
create sparks which may ignite the dust or fumes.
22. Take a rest to prevent loss of control caused
by fatigue. We recommend to take a 10 to 20-
minute rest every hour.
Maintenance instructions
1. The condition of the cutting tool, protective
devices and shoulder strap must be checked
before commencing work.
2. Turn off the motor and remove the battery
cartridge before carrying out maintenance,
replacing the cutting tool and cleaning the
tool.

9
3. After use, disconnect the battery cartridge
from the tool and check for damage.
4. Check for loose fasteners and damaged parts
such as nearly halfway cut-off state in the
cutting tool.
5. When not in use store the equipment in a dry
location that is locked up or out of children's
reach.
6. Use only the manufacturer's recommended
replacement parts and accessories.
7. Always ensure that ventilation openings are
kept clear of debris.
8. Inspect and maintain the tool regularly,
especially before/after use. Have the tool
repaired only by our authorized service center.
9. Keep handles dry, clean and free from oil and
grease.
SAVE THESE INSTRUCTIONS.
WARNING:
DO NOT let comfort or familiarity with product
(gained from repeated use) replace strict adherence
to safety rules for the subject product. MISUSE or
failure to follow the safety rules stated in this
instruction manual may cause serious personal
injury.
ENC011-2
IMPORTANT SAFETY
INSTRUCTIONS
FOR BATTERY CARTRIDGE
1. Before using battery cartridge, read all
instructions and cautionary markings on (1)
battery charger, (2) battery, and (3) product
using battery.
2. Do not disassemble battery cartridge.
3. If operating time has become excessively
shorter, stop operating immediately. It may
result in a risk of overheating, possible burns
and even an explosion.
4. If electrolyte gets into your eyes, rinse them
out with clear water and seek medical
attention right away. It may result in loss of
your eyesight.
5. Do not short the battery cartridge:
(1) Do not touch the terminals with any
conductive material.
(2) Avoid storing battery cartridge in a
container with other metal objects such
as nails, coins, etc.
(3) Do not expose battery cartridge to water
or rain.
A battery short can cause a large current flow,
overheating, possible burns and even a
breakdown.
6. Do not store the tool and battery cartridge in
locations where the temperature may reach or
exceed 50 ゚ C (122 ゚ F).
7. Do not incinerate the battery cartridge even if
it is severely damaged or is completely worn
out. The battery cartridge can explode in a fire.
8. Be careful not to drop or strike battery.
9. Do not use a damaged battery.
10. The contained lithium-ion batteries are
subject to the Dangerous Goods Legislation
requirements.
For commercial transports e.g. by third parties,
forwarding agents, special requirement on
packaging and labeling must be observed.
For preparation of the item being shipped,
consulting an expert for hazardous material is
required. Please also observe possibly more
detailed national regulations.
Tape or mask off open contacts and pack up the
battery in such a manner that it cannot move
around in the packaging.
11. Follow your local regulations relating to
disposal of battery.
SAVE THESE INSTRUCTIONS.
CAUTION: Only use genuine Makita/Dolmar
batteries.
Use of non-genuine Makita/Dolmar batteries, or
batteries that have been altered, may result in the
battery bursting causing fires, personal injury and
damage. It will also void the Makita/Dolmar warranty for
the Makita/Dolmar tool and charger.
Tips for maintaining maximum battery life
1. Charge the battery cartridge before
completely discharged.
Always stop tool operation and charge the
battery cartridge when you notice less tool
power.
2. Never recharge a fully charged battery
cartridge.
Overcharging shortens the battery service life.
3. Charge the battery cartridge with room
temperature at 10 ゚ C - 40 ゚ C (50 ゚ F - 104 ゚ F).
Let a hot battery cartridge cool down before
charging it.
4. Charge the battery cartridge if you do not use
it for a long period (more than six months).

10
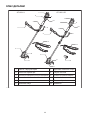
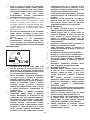
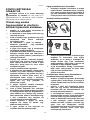
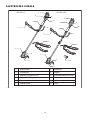
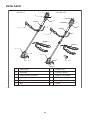
PARTS DESCRIPTION
1
2
3
4
5
9
7
8
6
1
2
3
4
5
9
7
8
6
10
11
12
10
11
1
2
3
4
5
7
8
9
Battery cartridge
Indication lamp
Switch trigger
Hanger (suspension point)
Grip
Cutting tool
Shoulder harness
Wire guard
10
Cap
6 Guard
11
Speed adjusting dial
12
Power button
AT-1831 U AT-1831 UD
014200

11
FUNCTIONAL DESCRIPTION
WARNING:
• Always be sure that the tool is switched off
and battery cartridge is removed before
adjusting or checking the functions on the tool.
Failure to switch off and remove the battery
cartridge may result in serious personal injury from
accidental start-up.
Installing or removing battery cartridge
Fig.1
CAUTION:
• Always switch off the tool before installing or
removing of the battery cartridge.
• Hold the tool and the battery cartridge firmly
when installing or removing battery cartridge.
Failure to hold the tool and the battery cartridge
firmly may cause them to slip off your hands and
result in damage to the tool and battery cartridge
and a personal injury.
To remove the battery cartridge, slide it from the tool
while sliding the button on the front of the cartridge.
To install the battery cartridge, align the tongue on the
battery cartridge with the groove in the housing and slip
it into place. Insert it all the way until it locks in place
with a little click. If you can see the red indicator on the
upper side of the button, it is not locked completely.
CAUTION:
• Always install the battery cartridge fully until the
red indicator cannot be seen. If not, it may
accidentally fall out of the tool, causing injury to
you or someone around you.
• Do not install the battery cartridge forcibly. If the
cartridge does not slide in easily, it is not being
inserted correctly.
Power switch action
WARNING:
• Before inserting the battery cartridge in the
tool, always check to see that the switch
trigger actuates properly and returns to the
"OFF" position when released. Do not pull the
switch trigger hard without pressing in the
lock-off button. This can cause switch
breakage. Operating a tool with a switch that does
not actuate properly can lead to loss of control and
serious personal injury.
Fig.2
Push the power button on the housing so that the tool is
powered on and power indicator lights.
Fig.3
To prevent the switch trigger from being accidentally
pulled, a lock-off button is provided.
To start the tool, press in the lock-off button and pull the
switch trigger. Release the switch trigger to stop.
NOTE:
• After the power button is pushed and the tool is
left one minute without any operations, the tool is
automatically powered off.
Reversing Switch for Debris Removal
WARNING:
• Always be sure that the tool is switched off
and battery cartridge is removed before
removing weeds or debris entangled in the tool
that could not be removed when operated in
the reverse mode. Failure to switch off and
remove the battery cartridge may result in serious
personal injury from accidental start-up.
Fig.4
This tool has a reversing switch which is only provided
to change the direction of rotation so that it can be used
to remove weeds and debris entangled in the tool. To
operate the tool normally the "A" side of the switch
should be depressed.
To remove weeds and debris that are jammed in the
rotating head the tool can be reversed by depressing
the "B" side of the switch. In the reverse position the
tool will only operate for a short period of time and
automatically shut off.
NOTICE:
• Always check the direction of rotation before
operation.
• Use the reversing switch only after the tool comes
to a complete stop. Changing the direction of
rotation before the tool stops may damage it.
Speed adjusting dial
Fig.5
The tool speed can be infinitely adjusted from 3,500 min
-1
to 6,000 min
-1
with the speed adjusting dial.
Turn the speed adjusting dial clockwise for higher speed,
and counterclockwise for lower speed.
Battery protection system
(Lithium-ion battery with star marking)
Fig.6
Lithium-ion batteries with a star marking are equipped
with a protection system. This system automatically cuts
off power to the tool to extend battery life.
The tool will automatically stop during operation if the
tool and/or battery are placed under one of the following
conditions:

12
• Overloaded:
The tool is operated in a manner that causes
it to draw an abnormally high current.
In this situation, release the switch trigger on
the tool and stop the application that caused
the tool to become overloaded. Then pull the
switch trigger again to restart.
If the tool does not start, the battery is
overheated. In this situation, let the battery
cool before pulling the switch trigger again.
• Low battery voltage:
The remaining battery capacity is too low
and the tool will not operate. In this situation,
remove and recharge the battery.
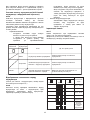
Indication lamps
Fig.7
When the protection system works during the operation,
the lamps light up.
Refer to the following table for the status and action to
be taken for the indication lamp.
Status
Blinking
Lighting Up
Battery power has been
nearly used up.
Battery protector is
shutting off the power -
battery power has been
used up.
Action to be taken
Replace the battery with fully charged one.
Replace the battery with fully charged one.
Rest and cool down the equipment
for a while.
Overheat protector is shutting
off the power - overheating.
Power
indicator
Battery
indicator
Blinking
013900
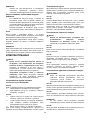
Indicating the remaining battery capacity
(Only for battery cartridges with "B" at the end of the
model number.)
Fig.8
Press the check button on the battery cartridge to
indicate the remaining battery capacity. The indicator
lamps light up for few seconds.
Off
BlinkingLighted
Indicator lamps
Charge the
battery.
0% to 25%
25% to 50%
50% to 75%
75% to 100%
Remaining
capacity
The battery
may have
malfunctioned.
015658
NOTE:
• Depending on the conditions of use and the
ambient temperature, the indication may differ
slightly from the actual capacity.
Nylon cutting head
NOTICE:
• Do not attempt to bump feed the head while the
tool is operating at a high RPM. Bump feeding at a
high RPM may cause damage to the nylon cutting
head.
• The bump feed will not operate properly if the
head is not rotating.
Fig.9
The nylon cutting head is a dual grass trimmer head
provided with a bump & feed mechanism.
To cause the nylon cord to feed out, the cutting head
should be bumped against the ground while rotating at a
low RPM.
NOTE:
If the nylon cord does not feed out while bumping the
head, rewind/replace the nylon cord by following the
procedures described under “Maintenance” .

13
ASSEMBLY
WARNING:
• Always be sure that the tool is switched off
and battery cartridge is removed before
carrying out any work on the tool. Failure to
switch off and remove the battery cartridge may
result in serious personal injury from accidental
start-up.
• Never start the tool unless it is completely
assembled. Operation of the tool in a partially
assembled state may result in serious personal
injury from accidental start-up.
Mounting the attachment pipe
Only for model AT-1831 UD
Fig.10
To mount the attachment to a power unit:
1. Make sure that the lever is not tightened.
2. To open the entrance of the joint, depress the
joint cover.
Fig.11
3. Align the protrusion on the pipe (cutting tool side)
with the concave portion of the joint part.
4. Insert the attachment pipe into the joint part.
Make sure that the surface of the lock lever is
horizontal to the pipe.
5. Tighten the lever firmly as shown.
To remove the attachment, loosen the lever, press the
front part of the lock lever and then slide the pipe.
Installing the handles
To allow power switch action by right hand, place the
handle with the switch trigger to the right side of the tool.
Place the other side handle to the left side of the tool.
Fig.12
Fig.13
Set both tops of the handles in the groove in the handle
holder, cover the handles by the handle clamp and then
secure it slightly by the hex bolts.
Adjust the handle to an angle that provides a comfortable
working position and then secure by firmly hex bolts.
Installing the guard
WARNING:
•
Never use the tool without the guard illustrated in
place.
Failure to do so can cause serious personal injury.
Fig.14
Fig.15
Align the protrusions on the protector with the grooves
of the motor housing.
Fig.16
Align the protrusions on the protector holder with the
concave portions of the motor housing. Insert the
protector holder to the motor housing.
Fig.17
After attaching the protector and the protector holder to
the motor housing, tighten the hex bolts securely.
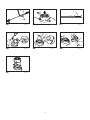
Installing the wire guard
CAUTION:
• Before adjusting the wire guard, wait for the
cutting head comes to standstill. Do not adjust the
wire guard with your foot.
Fig.18
To reduce the risk damaging the objects in front of the
cutting head, insert the wire guard so that it controls the
cutting range of the mowing line.
Fig.19
Slightly expand the wire guard outward and then insert it
into the holes of the protector.
NOTE:
• Do not expand the wire guard outward too much.
Otherwise it may break.
Fig.20
When wire guard is not in use, lift it for the idle position.
Installing nylon cutting head
NOTICE:
• Be sure to use genuine Dolmar nylon cutting head.
Turn the tool upside down so that you can replace the
nylon cutting head easily.
Fig.21
Insert the hex wrench through the hole on the protector cover
and the motor housing and rotate the receive washer until it is
locked with the hex wrench. Mount the metal guard, the nylon
cutting head onto the threaded spindle directly and tighten it
by turning it counterclockwise. Remove the hex wrench.
To remove the nylon cutting head, turn the nylon cutting
head clockwise while holding the receive washer with
the hex wrench.
CAUTION:
• If during operation the nylon cutting head
accidentally impacts a rock or hard object the
trimmer should be stopped and inspected for
any damage. If the nylon cutting head is
damaged it should be replaced immediately.
Use of a damaged nylon cutting head could result
in serious personal injury.
OPERATION
Correct handling of tool
Attachment of shoulder harness
Fig.22
Put the shoulder harness on. Then connect the buckles
on both the hook and the harness. Be sure that the
buckles click and lock completely in place.

14
Only for model AT-1831 UD
Fig.23
When the cap is not in use, hang it on the hook.
Detachment
Fig.24
The buckle is provided with a means of quick release.
Simply squeeze the sides and the buckle to release the
tool.
WARNING:
• Be extremely careful to maintain control of the
tool at all times. Do not allow the tool to be
deflected toward you or anyone in the work
vicinity. Failure to keep control of the tool could
result in serious injury to the bystander and the
operator.
Adjustment of the hanger position and shoulder
harness
Fig.25
To change the hanger position, loosen the hex bolt on
the hanger with the supplied wrench. Then move the
hanger and cushion.
After adjusting the hanger position, tighten the hex bolt
with the wrench securely.
MAINTENANCE
WARNING:
• Always be sure that the tool is switched off
and battery cartridge is removed before
attempting to perform inspection or
maintenance on the tool. Failure to switch off
and remove the battery cartridge may result in
serious personal injury from accidental start-up.
NOTICE:
Never use gasoline, benzine, thinner, alcohol or
the like. Discoloration, deformation or cracks may
result.
Replacing the nylon cord
WARNING:
• Make sure that the cover of the nylon cutting
head is secured to the housing properly as
described below. Failure to properly secure the
cover may cause the nylon cutting head to fly
apart resulting in serious personal injury.
Fig.26
Take off cover from housing, pressing two latches which
are slotted section oppositely on side of housing.
Fig.27
Cut a nylon line in 3 - 6 m. Fold the cutting line in two
halves, leave one of half longer 80 - 100 mm than
another.
Fig.28
Hook the middle of the new nylon cord to the notch
located at the center of the spool between the 2
channels provided for the nylon cord.
Wind both ends firmly around the spool in the direction
marked on the head for left hand direction indicated by
LH.
Fig.29
Wind all but about 100 mm of the cords, leaving the
ends temporarily hooked through a notch on the side of
the spool.
Fig.30
Mount the spool on the cover so that the grooves and
protrusions on the spool match up with those on the
cover. Now, unhook the ends of the cord from their
temporary position and feed the cords through the
eyelets to come out of the cover.
Fig.31
Align the protrusion on the underside of the cover with
the slots of the eyelets. Then push the cover firmly onto
the housing to secure it. Make sure the latches fully
spread in the cover.
To maintain product SAFETY and RELIABILITY, repairs,
any other maintenance or adjustment should be
performed by DOLMAR Authorized Service Centers,
always using DOLMAR replacement parts.

15
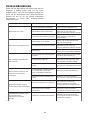
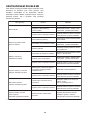
TROUBLE SHOOTING
Before asking for repairs, conduct your own inspection
first. If you find a problem that is not explained in the
manual, do not attempt to dismantle the tool. Instead,
ask Dolmar Authorized Service Centers, always using
Dolmar replacement parts for repairs.
Malfunction status
Motor does not run.
Cause
Battery cartridge is not installed.
Battery problem (under voltage)
Rotation is in reverse.
Overheating.
Battery power is dropping.
Electric or electronic malfunction.
Action
Install the battery cartridge.
Remove the foreign object.
Motor stops running after
a little use.
It does not reach maximum
RPM.
Cutting tool does not rotate:
stop the machine immediately!
Abnormal vibration:
stop the machine immediately!
Cutting tool and motor cannot
stop:
Remove the battery
immediately!
The drive system does not work
correctly.
One end of the nylon cord has
been broken.
The drive system does not work
correctly.
Foreign object such as a branch
is jammed between the guard and
the nylon cutting head.
The drive system does
not work correctly.
Battery is installed improperly.
Battery's charge level is low.
The drive system does not work
correctly.
Recharge the battery. If recharging
is not effective, replace battery.
Ask your local authorized service
center for repair.
Ask your local authorized service
center for repair.
Ask your local authorized service
center for repair.
Ask your local authorized service
center for repair.
Remove the battery and ask your
local authorized service center for
repair.
Bump the nylon cutting head
against the ground while it is
rotating to cause the cord to feed.
Recharge the battery. If recharging
is not effective, replace battery.
Install the battery cartridge as
described in this manual.
Stop using of tool to allow it to cool
down.
Recharge the battery. If recharging
is not effective, replace battery.
Change the direction of ratation
with the reversing switch.
010856

16
OPTIONAL ACCESSORIES
CAUTION:
• These accessories or attachments are
recommended for use with your Dolmar tool
specified in this manual. The use of any other
accessories or attachments might present a risk of
injury to persons. Only use accessory or
attachment for its stated purpose.
If you need any assistance for more details regarding
these accessories, ask your local Dolmar service center.
• Nylon cutting head
• Nylon cord (cutting line)
• Shoulder harness
• Hex wrench
• Makita/Dolmar genuine battery and charger
NOTE:
• Some items in the list may be included in the tool
package as standard accessories. They may differ
from country to country.

17
УКРАЇНСЬКА (Оригінальні інструкції)
Пояснення до загального виду
1-1. Червоний індикатор
1-2. Кнопка
1-3. Касета з акумулятором
2-1. Індикатор живлення
2-2. Кнопка живлення
3-1. Кнопка блокування вимкненого
положення
3-2. Кнопка вимикача
4-1. Перемикач зворотного ходу
4-2. Натиснутий у положення А –
нормальна робота
4-3. Натиснутий у положення В –
видалення бур'яну і сміття
5-1. Коліщатко регулювання
швидкості
6-1. Маркувальна зірочка
7-1. Індикатор акумулятора
7-2. Індикатор живлення
8-1.
Індикаторні ла
мпи
8-2. Кнопка ПЕРЕВІРКА
9-1. Сектор, найбільш ефективний
для різання
10-1. Муфта
10-2. Стопорний важіль
10-3. Кришка з’єднання
10-4. Важіль
10-5. Трубка
(сторона ріжучої частини)
11-1. Стопорний важіль
11-2. Увігнута частина
11-3. Виступ
12-1. Затискач ручки
12-2. Паз
12-3. Тримач ручки
12-4. Ручка
13-1. Болт із шестигранною голівкою
15-1. Пази
15-2. Протектор
16-1. Увігнуті частини
16-2. Тримач захисного
пр
истрою
16-3. Виступи
17-1. Болти із шестигранною голівкою
19-1. Отвори
19-2. Дротовий захисний кожух
21-1. Ріжуча головка з нейлоновим
шнуром
21-2. Металева захисна пластина
21-3. Опорна шайба
21-4. Шестигранний ключ
22-1. Пряжка
22-2. Скоба
23-1. Ковпачок
24-1. Пряжка
25-1. Підкладка
25-2. Болт із шестигранною голівкою
27-1. 80 - 100 мм
ТЕХНІЧНІ ХАРАКТЕРИСТИКИ
Модель AT-1831 U AT-1831 UD
Тип трубки Убудована трубка Трубка, що від’єднується
Швидкість без навантаження 3500 - 6000 хв
-1
1843 мм
Загальна довжина
-
967 мм (сторона ріжучої
частини з ковпачком)
982 мм (сторона акумулятора)
Діаметр різання ріжучою головкою з нейлоновим шнуром 300 мм
Чиста вага 4,1 кг 4,3 кг
Номінальна напруга 18 В пост. струму
Стандартна касета з акумулятором та заряджаючий пристрій
Завжди використовуйте комбінації акумулятора/заряджаючого
пристрою, наведені у колонках праворуч.
AP-183, AP-1840, BL1815N, BL1820, BL1820B, BL1830,
BL1830B, BL1840, BL1840B, BL1850, BL1850B, BL1860B /
LG-184, DC18RC
• Через те, що ми не припиняємо програми досліджень і розвитку, наведені тут технічні характеристики можуть бути змінені
без попередження.
• Технічні характеристики приладу та касета з акумулятором можуть відрізнятися в різних країнах.
• Вага разом з касетою з акумулятором відповідно до EPTA-Procedure 01/2003
Шум Рівень звукового тиску
Модель L
PA
(дБ (A)) Похибка K (дБ (A))
Застосовний
стандарт або
директива
AT-1831 U / AT-1831 UD 79 0,7 2000/14/EC
• Навіть якщо наведений вище рівень звукового тиску менше або дорівнює 80 дБ (A), рівень безпосередньо у місці виконання
роботи може перевищувати 80 дБ (A). Використовуйте засоби захисту органів слуху.
Вібрація Ліва рука Права рука
Модель a
h
(м/с
2
)
Похибка K
(м/с
2
)
a
h
(м/с
2
)
Похибка K
(м/с
2
)
Застосовний
стандарт або
директива
AT-1831 U / AT-1831 UD 2,5 1,5 2,5 1,5 EN786

18
ENG901-1
•
Заявлене значення вібрації було виміряно у
відповідності до стандартних методів
тестування та може використовуватися для
порівняння одного інструмента з іншим.
•
Заявлене значення вібрації може також
використовуватися для попередньої оцінки впливу.
УВАГА:
• Залежно від умов використання вібрація під час
фактичної роботи інструмента може
відрізнятися від заявленого значення вібрації.
• Забезпечте належні запобіжні заходи для
захисту оператора, що відповідатимуть умовам
використання інструмента (слід брати до уваги
всі складові робочого циклу, такі як час, коли
інструмент вимкнено та коли він починає
працювати на холостому ході під час запуску).
END020-3
Символи
Далі наведені символи, які застосовуються для
позначення обладнання. Перед користуванням
переконайтеся, що Ви розумієте їхнє значення.
・ Будьте особливо уважні та обережні!
・ Читайте інструкцію з експлуатації.
・ Небезпека; пам’ятайте, що предмети
можуть відскочити.
・ Відстань між інструментом і людьми,
що знаходяться поблизу, повинна
становити не менше 15 метрів.
・ Слідкуйте
за ти
м, щоб сторонні
особи знаходилися на небезпечній
відстані.
・ Тримайте відстань щонайменше 15
метрів.
・ Обов'язково надягайте шолом,
захисні окуляри та засоби захисту
органів слуху.
・ Вдягайте захисні рукавиці.
・ Надягайте міцне взуття із підошвами,
що не ковзають. Ми рекомендуємо
захисне взуття зі сталевим носком.
・ Не піддавайте інструмент
впливу
во
логи.
・ Максимально припустима швидкість
роботи інструмента.
・ Ніколи не використовуйте металеву
ріжучу пластину.
・ Тільки для країн ЄС
Не викидайте електроприлади або
акумуляторні батареї разом із
побутовим сміттям!
Згідно з Європейськими директивами
про утилізацію електричного та
електронного обладнання та про
утилізацію батарей та акумуляторів і
батарей та акумуляторів, термін
сл
ужби яких закінчився, та їх
використанням із дотриманням
національних законів, електричне
обладнання, батареї та акумулятори,
термін служби яких закінчився,
потрібно збирати окремо та
відправляти на екологічно чисті
підприємства з їхньої переробки.
ENH220-4
Тільки для країн Європи
Декларація про відповідність стандартам
ЄС
Компанія Makita наголошує на тому, що
обладнання:
Позначення обладнання:
Акумуляторна газонокосарка
№ моделі / тип: AT-1831 U, AT-1831 UD
Технічні характеристики: див. Таблицю
"ТЕХНІЧНІ ХАРАКТЕРИСТИКИ".
Відповідає таким Європейським Директивам:
2000/14/EC, 2006/42/EC
Обладнання виготовлене відповідно до таких
стандартів або стандартизованих документів:
EN60335, EN50636
Технічну інформацію відповідно до 2006/42/EC
можна отримати:
Makita, Jan-Baptist Vinkstraat 2, 3070, Бельгія
Процедура оцінювання відповідності, якої вимагає
Директива 2000/14/EC, відбулася відповідно до
До
датка VI.
Уповноважений орган:
TÜV Rheinland LGA Products GmbH
Tillystraße 2
90431 Nürnberg, Німеччина
Ідентифікаційний номер: 0197
Заміряний рівень звукової потужності: 90 дБ (A)
Гарантований рівень звукової потужності: 90 дБ (A)
1.10.2015
000331
Ясуші Фукайя
Директор
Makita, Jan-Baptist Vinkstraat 2, 3070, Бельгія
15m(50FT)
Cd
Ni-MH
Li-ion

19
GEB109-5
ВАЖЛИВІ ІНСТРУКЦІЇ БЕЗПЕКИ
УВАГА! Прочитайте усі застереження
стосовно техніки безпеки та всі інструкції.
Недотримання цих застережень та інструкцій може
призвести до ураження струмом, виникнення пожежі
та/або може спричинити серйозні травми.
Збережіть усі інструкції з
техніки безпеки та експлуатації
на майбутнє.
1. Ознайомтеся із правилами належного
користування і керування інструментом.
2. Ріжучі частини продовжують обертатися
після вимкнення двигуна.
3. Ніколи не дозволяйте користуватися
інструментом дітям та особам, які не
ознайомилися з цими інструкціями.
4. Ніколи не використовуйте інструмент, коли
інші люди, особливо діти, або домашні
тварини знаходяться поблизу.
5. Користуйтеся інструментом тільки у
світлий
час доб
и або за умови належного
штучного освітлення.
6. До початку використання і після будь-якого
зовнішнього впливу на інструмент
перевіряйте його на наявність ознак
зношення або пошкодження; у разі
необхідності відремонтуйте інструмент.
7. Будьте обережні, щоб не отримати травми
під час використання будь-якого пристрою
для підрізання довжини шнура. Після
витягування
шну
ра та перед увімкненням
інструмента його слід повертати у звичайне
робоче положення.
8.
Ніколи не застосовуйте металеві ріжучі частини.
9. Цей інструмент не призначений для
використання особами (у тому числі
дітьми) з обмеженими фізичними,
сенсорними або розумовими здібностями
та особами з недостатнім досвідом і
знаннями, доки за ними не буде
встановлений нагляд або їм не будуть
надані інструкції особою, відповідальною
за їхню безпеку, стосовно використання
цього інструмента. За дітьми слід
забезпечити наг
ляд, щоб бути певними, що
вони не грають із інструментом.
10. Інструмент слід завжди використовувати із
максимальною обережністю та увагою.
11. Працювати із інструментом можна тільки у
доброму фізичному стані. Усю роботу
виконуйте спокійно та обережно. Під час
роботи керуйтеся здоровим глуздом та
пам’ятайте, що оператор або користувач
несуть відповідальність за нещ
асні
випадки та небезпеку, якій вони піддають
інших людей або їхнє майно.
12.
Ніколи не працюйте з інструментом, коли Ви
втомлені, нездужаєте або перебуваєте під
впливом алкоголю чи лікарських засобів.
13. Інструмент слід негайно вимикати у разі
появи будь-яких ознак несправної роботи.
Використання інструмента за
призначенням
1.
Використовуйте інструмент за призначенням.
Акумуляторна газонокосарка призначена для
скошування трави та невеликого бур'яну. Не
дозволяється використовувати інструмент за
іншим призначенням, наприклад для
стриження живоплоту, оскільки це може
призвести до отримання травм.
Засоби індивідуального захисту
010820
010821
1.
Вдягніться належним чином. Одяг повинен бути
функціональним та відповідним, тобто він має
щільно прилягати, проте не заважати роботі. Не
надягайте прикраси чи одяг, що може
заплутатися у високій траві. Щоб сховати довге
волосся, слід надягати захисний головний убір.
2. Використовуючи інструмент, завжди
надягайте міцне взуття з підошвами, що не
ковзають. Це захистить Вас від травм та
забезпечить стійку опору на ноги.
3. Надягайте захисні окуляри.
Електробезпечність та техніка безпеки під
час роботи з акумулятором
1. Не працюйте із інструментом у небезпечних
умовах. Не користуйтеся інструментом у
вологих або мокрих місцях і не допускайте
його знаходження під дощем. При
потраплянні води в інструмент зростає
ризик ураження електричним струмом.

20
2. Перезаряджайте акумулятор лише за
допомогою зарядного пристрою, вказаного
виробником. Зарядний пристрій, який
підходить для одного типу акумуляторів,
може призвести до пожежі при
використанні з іншим типом.
3.
Використовуйте електроприлад лише зі
спеціально призначеним типом акумуляторів.
Використання акумуляторів інших типів може
призвести до травм і пожежі.
4. Коли акумулятор не використовується,
тримайте його подалі від таких металевих
предметів, як скріпки, монети, ключі, цвяхи,
шурупи тощо, які можуть закоротити клеми
акумулятора. Закорочення клем
акумулятора може призвести до отримання
опіків або до виникнення пожежі.
5. За умов недбалого користування з
акумулятора може витікати рідина, контакту з
якою слід уникати. У раз
і випадкового
потрапляння рідини на тіло відповідну частину
тіла слід промити водою. При потраплянні
рідини в очі необхідно звернутися до лікаря.
Рідина з акумулятора може спричинити
подразнення та опіки.
6. Не спалюйте акумулятор(и). Акумулятор
може вибухнути. Ознайомтеся з місцевими
законами на предмет можливих
спеціальних інструкцій з утилізації відходів.
7.
Не відкривайте та не деформуйте
акумулятор(и). Пролитий електроліт є
роз'їдаючою речовиною, тому може нанести
травму при контакті зі шкірою або очима.
При проковтуванні може бути токсичним.
Запуск інструмента
360°
012858
1. Будь ласка, переконайтеся, що в радіусі 15
метрів (50 футів) немає дітей або сторонніх
осіб, також слідкуйте за тваринами поблизу
місця роботи. Інакше роботу інструмента
слід зупинити.
2.
Перед початком роботи завжди перевіряйте,
щоб інструмент був у безпечному для роботи
стані. Перевіряйте надійність кріплення
ріжучої частини та захисного кожуха, а також
легкість і надійність функціонування
важеля/куркового вмикача. Переконайтеся,
що ручки чисті та сухі, після чого перевірте
функцію увімкнення/вимкнення вмикача.
3. Перед подальшим використанням
інструмента його слід перевіряти на
наявність пошкоджених частин. Захисний
кожух або іншу пошкоджену деталь слід
уважно оглянути, щоб переконатися у тому,
що вони можуть далі виконувати свої
функції належним чином. Перевіряйте
положення та закріплення рухомих частин,
наявність поломок частин, монтаж та інші
аспекти, які можуть впливати на
експлуатацію ін
струмента. Ремонтувати
або замінювати пошкоджені деталі або
захисний кожух повинні спеціалісти
авторизованого сервісного центру, якщо
інше не зазначено в цій інструкції.
4. Вмикайте двигун тільки тоді, коли руки та
ноги перебувають на відстані від ріжучої
частини.
5. Перед початком роботи слід переконатися,
що ріжуча частина не торкається твердих
предметів, наприклад, гілля
, ка
міння тощо,
оскільки під час пуску він обертатиметься.
Порядок роботи
1. Ніколи не користуйтеся інструментом, якщо
захисні кожухи пошкоджені або відсутні.
2. Інструмент можна використовувати тільки
за умов гарного освітлення та видимості.
Узимку слід берегтися слизьких або
вологих ділянок, льоду та снігу (небезпека
ковзання). Постійно слідкуйте за надійною
опорою ніг.
3. Будьте обережні, щоб не травмувати ноги
або руки ріжучою частиною.
4. Завжди
тр
имайте руки та ноги на відстані
від ріжучої частини, особливо під час
увімкнення двигуна.
5. Ніколи не ріжте вище рівня пояса.
6. Ніколи не стійте на сходах під час роботи з
інструментом.
7. Заборонено працювати на нестійких
поверхнях.
8. Не тягніться. Слід завжди твердо стояти на
ногах та тримати рівновагу.
9. Завжди займайте
ст
ійке положення на
похилій поверхні.
10. Пересувайтеся повільно, ніколи не біжіть.
11. Якщо в межах місця роботи знаходяться
цвяхи, пісок, каміння тощо, їх слід
прибрати. Сторонні предмети можуть
пошкодити ріжучу частину, а також можуть
відскочити і завдати серйозної травми.
12. Ніколи не торкайтеся рухомих деталей, що
несуть потенційну небезпеку, доки не
від
’єд
наєте пристрій від мережі змінного
струму та доки рухомі деталі, що несуть
потенційну небезпеку, остаточно не
зупиняться.
Pagina se încarcă...
Pagina se încarcă...
Pagina se încarcă...
Pagina se încarcă...
Pagina se încarcă...
Pagina se încarcă...
Pagina se încarcă...
Pagina se încarcă...
Pagina se încarcă...
Pagina se încarcă...
Pagina se încarcă...
Pagina se încarcă...
Pagina se încarcă...
Pagina se încarcă...
Pagina se încarcă...
Pagina se încarcă...
Pagina se încarcă...
Pagina se încarcă...
Pagina se încarcă...
Pagina se încarcă...
Pagina se încarcă...
Pagina se încarcă...
Pagina se încarcă...
Pagina se încarcă...
Pagina se încarcă...
Pagina se încarcă...
Pagina se încarcă...
Pagina se încarcă...
Pagina se încarcă...
Pagina se încarcă...
Pagina se încarcă...
Pagina se încarcă...
Pagina se încarcă...
Pagina se încarcă...
Pagina se încarcă...
Pagina se încarcă...
Pagina se încarcă...
Pagina se încarcă...
Pagina se încarcă...
Pagina se încarcă...
Pagina se încarcă...
Pagina se încarcă...
Pagina se încarcă...
Pagina se încarcă...
Pagina se încarcă...
Pagina se încarcă...
Pagina se încarcă...
Pagina se încarcă...
Pagina se încarcă...
Pagina se încarcă...
Pagina se încarcă...
Pagina se încarcă...
Pagina se încarcă...
Pagina se încarcă...
Pagina se încarcă...
Pagina se încarcă...
Pagina se încarcă...
Pagina se încarcă...
Pagina se încarcă...
Pagina se încarcă...
Pagina se încarcă...
Pagina se încarcă...
Pagina se încarcă...
Pagina se încarcă...
Pagina se încarcă...
Pagina se încarcă...
Pagina se încarcă...
Pagina se încarcă...
Pagina se încarcă...
Pagina se încarcă...
Pagina se încarcă...
Pagina se încarcă...
Pagina se încarcă...
Pagina se încarcă...
Pagina se încarcă...
Pagina se încarcă...
Pagina se încarcă...
Pagina se încarcă...
Pagina se încarcă...
Pagina se încarcă...
Pagina se încarcă...
Pagina se încarcă...
Pagina se încarcă...
Pagina se încarcă...
Pagina se încarcă...
Pagina se încarcă...
Pagina se încarcă...
Pagina se încarcă...
-
 1
1
-
 2
2
-
 3
3
-
 4
4
-
 5
5
-
 6
6
-
 7
7
-
 8
8
-
 9
9
-
 10
10
-
 11
11
-
 12
12
-
 13
13
-
 14
14
-
 15
15
-
 16
16
-
 17
17
-
 18
18
-
 19
19
-
 20
20
-
 21
21
-
 22
22
-
 23
23
-
 24
24
-
 25
25
-
 26
26
-
 27
27
-
 28
28
-
 29
29
-
 30
30
-
 31
31
-
 32
32
-
 33
33
-
 34
34
-
 35
35
-
 36
36
-
 37
37
-
 38
38
-
 39
39
-
 40
40
-
 41
41
-
 42
42
-
 43
43
-
 44
44
-
 45
45
-
 46
46
-
 47
47
-
 48
48
-
 49
49
-
 50
50
-
 51
51
-
 52
52
-
 53
53
-
 54
54
-
 55
55
-
 56
56
-
 57
57
-
 58
58
-
 59
59
-
 60
60
-
 61
61
-
 62
62
-
 63
63
-
 64
64
-
 65
65
-
 66
66
-
 67
67
-
 68
68
-
 69
69
-
 70
70
-
 71
71
-
 72
72
-
 73
73
-
 74
74
-
 75
75
-
 76
76
-
 77
77
-
 78
78
-
 79
79
-
 80
80
-
 81
81
-
 82
82
-
 83
83
-
 84
84
-
 85
85
-
 86
86
-
 87
87
-
 88
88
-
 89
89
-
 90
90
-
 91
91
-
 92
92
-
 93
93
-
 94
94
-
 95
95
-
 96
96
-
 97
97
-
 98
98
-
 99
99
-
 100
100
-
 101
101
-
 102
102
-
 103
103
-
 104
104
-
 105
105
-
 106
106
-
 107
107
-
 108
108


Dolmar AT1831U Manualul proprietarului
- Categorie
- Unelte electrice
- Tip
- Manualul proprietarului
în alte limbi
- slovenčina: Dolmar AT1831U Návod na obsluhu
- polski: Dolmar AT1831U Instrukcja obsługi
Lucrări înrudite
-
Dolmar ET101C Manualul proprietarului
-
-
-
-
-
-
-
-
-
Alte documente
-
Makita DUR192L Manual de utilizare
-
-
-
Makita DMP181 Manual de utilizare
-
-
-
-
Hikoki CG36DB(L) Manual de utilizare
-
Makita DCF301 Manual de utilizare
-
Makita CF002G Manual de utilizare