Parkside PAS 500 B1 Original Operation Manual
- Tip
- Original Operation Manual

ASPIRATOR CENUȘĂ
Traducerea instrucţiunilor de utilizare originale
ПРАХОСМУКАЧКА ЗА ПЕПЕЛ
Превод на оригиналното ръководство за експлоатация
USISAVAČ ZA PEPEO
Prijevod originalnih uputa za uporabu
ASH VACUUM CLEANER
Translation of original operation manual
ASCHESAUGER
Originalbetriebsanleitung
ΗΛΕΚΤΡΙΚΗ ΣΚΟΥΠΑ ΓΙΑ ΣΤΑΧΤΕΣ
Μετάφραση των αυθεντικών οδηγιών λειτουργίας
7
ASH VACUUM CLEANER PAS 500 B1
66991_par_Aschesauger_PAS_500_B1_Cover_LB7.indd 23 03.08.11 10:05

GB / CY Translation of original operation manual Page 4
HR Prijevod originalnih uputa za uporabu Stranica 12
RO Traducerea instrucţiunilor de utilizare originale Pagina 20
BG Превод на оригиналното ръководство за експлоатация Страница 28
GR / CY Μετάφραση των αυθεντικών οδηγιών λειτουργίας Σελίδα 36
DE / AT / CH Originalbetriebsanleitung Seite 45
Before reading, unfold the page containing the illustrations and familiarise yourself with all functions of the
device.
Prije nego što pročitate tekst, otvorite stranicu sa slikama i upoznajte se na osnovu toga sa svim funkcijama
uređaja.
Înainte de a citi instrucţiunile, priviţi imaginile şi familiarizaţi-vă cu toate funcţiile aparatului.
Преди да прочетете отворете страницата с фигурите и след това се запознайте с всички функции.
Πριν ξεκινήσετε την ανάγνωση, ανοίξτε τη σελίδα με τις εικόνες και εξοικειωθείτε με όλες τις λειτουργίες της
συσκευής.
Klappen Sie vor dem Lesen die Seite mit den Abbildungen aus und machen Sie sich anschließend mit allen
Funktionen des Gerätes vertraut.
66991_par_Aschesauger_PAS_500_B1_Cover_LB7.indd 24 03.08.11 10:05

3
1
11
12
13
14
14
13
16
15b
15a
32 4 5
6
5
5
5
2
12
1
4
11
17
18
7
8
9
10
5
7
8
10
11
12

4
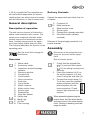
GB CY
Safety information .................................4
Device symbols ....................................4
Symbols used in the instructions..........5
General notes on safety .......................5
Application .............................................6
General description ...............................7
Description of operation .......................7
Overview ..............................................7
Delivery Contents .................................7
Assembly................................................7
Switching on/off .....................................8
Operating Instructions ..........................8
Cleaning/Maintenance...........................8
General Cleaning Work ........................8
Cleaning the Wire Filter Basket and
Pleated Filter ........................................8
Cleaning the Air Filter ...........................9
Storage ...................................................9
Technical data ........................................9
Disposal/Environmental protection ...10
Warranty ...............................................10
Trouble shooting .................................11
Replacement parts ..............................11
Translation of the original EC
declaration of conformity ...................54
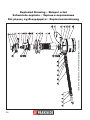
Exploded Drawing ..............................56
Grizzly Service-Center ........................57
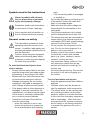
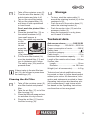
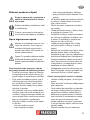
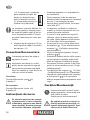
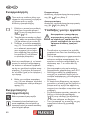
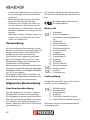
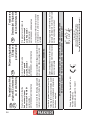
Warning!
Read the operating instruc-
tions!
Do not expose the unit to rain.
For cold ashes only*!
Matter exceeding a tempera-
ture of 40°C poses a re risk!
1 During vacuuming, constantly
check the hoses and vacuum for
heating.
Do not vacuum up soot or combus-
tible materials.
The vacuumed material must not
exceed a temperature of 40°C.
2 - 4 Open, empty and clean the
vacuum outdoors before and after
vacuuming.
Electrical machines do not belong
with domestic waste.
Safety class II
* “Cold ashes” are ashes that have cooled for
a sufcient time and no longer contain pockets
of embers. This can be determined by sifting
through the ashes with a metal implement be-
fore using the equipment. The cold ashes emit
no further perceptible heat radiation.
Before initial start-up, please
read through these operating instructions
carefully prior to using the machine. Keep
the instructions safe and pass them on to
any subsequent user so that the informa-
tion is always available.

5
CYGB
Hazard symbols with informa-
tion on prevention of personal
injury and property damage.
Precaution symbol with information
on prevention of harm / damage.
Notice symbol with information on
how to handle the device properly.
The information contained in these
operating instructions must be ob-
served. In addition, legal safety and
accident prevention regulations must
also be observed.
Caution: when using the equipment,
observe the following basic safety
measures in order to protect against
the risks of injury and re:
To avoid accidents and injuries from
electric shocks:
• Ensure that the mains cable is not dam-
aged by being pulled over sharp edges,
by jamming, or by pulling on the cable.
• Before each use, check the power sup-
ply lead and the extension cable for
damage and ageing. Do not use the
equipment if the cable is damaged or
worn. Danger of electric shock hazard.
• If the power cable for this equipment is
damaged, it must be replaced by the
manufacturer, a customer service agent
of the same or a similarly qualied per-
son in order to prevent hazards.
• Switch the machine off and discon-
nect the mains plug:
- when the machine is not in use,
- before the machine is opened up,
- for all maintenance and cleaning
work,
- if the connecting cable is damaged
or tangled up.
• Do not use the cable to pull the plug out
of the socket. Protect the cable from
heat, oil, and sharp edges.
• Make sure that the mains voltage cor-
responds with the information on the
rating plate.
• Only plug the appliance into a socket
which is safeguarded by at least 16A.
• The device must only be connected to a
mains socket via a residual-current cir-
cuit breaker (RCD) with a rated leakage
current of not more than 30 mA.
• Do not expose the equipment to the
rain. Do not use the equipment in a
damp or wet environment.
• Protect yourself from electric shocks.
Avoid bodily contact with earthed
parts (e.g. pipes, radiators, electric
cookers, cooling devices).
• Use extension cables outdoors. Use
only extension cables that are ap-
proved and labelled accordingly for
outdoor use.
• Avoid accidental starting. Ensure that
the switch is off when plugging into
the socket.
To avoid accidents and injuries:
• Keep the appliance away from children -
and pets.
• Children should only be allowed to
use the appliance under supervision.
• The device must not be used by peo-
ple (including children) with limited
physical, sensory or mental faculties
or who lack the necessary experience
and/or knowledge - other than they
are supervised by a person responsi-
ble for safety or are being instructed
to operate the appliance by such a
person.

6
GB CY
• Children must be supervised in order
to ensure that they do not play with
the equipment.
• Never leave a machine which is ready
for operation unattended at the work-
place.
• People and animals must not be vacu-
umed with the machine.
• Nozzles and suction tubes must not
reach head level whilst in use. Personal
injury could occur.
• Do not vacuum up substances or dusts
that are hot, glowing, combustible,
explosive or hazardous to health (dust
classes L, M, H). This includes hot
ashes, petrol, solvents, acids or caustic
solutions. Personal injury could occur.
• Caution! Do not vacuum up hazardous
substances (e.g. petrol, solvents, acids
or lyes) and ash from unauthorised fu-
els (e.g. from oil-burning ovens or heat-
ing boilers). There is a risk of injury.
• Do not vacuum up ne, combustible
dusts. There is a risk of explosion.
• Do not vacuum up hot ashes and hot,
glowing or combustible objects (e.g.
charcoal, cigarettes...). There is a risk
of re.
• Do not vacuum up liquids, soot or plas-
ter and cement dust. You could damage
the equipment.
• The vacuum must not exceed a tem-
perature of 40°C. Vacuum material that
appears cool from the outside may still
be hot inside. Hot vacuum material can
re-ignite in the air stream. Furthermore,
the equipment can be damaged.
In the event of a rise in temperature,
switch off the equipment and disconnect
at the plug. Place the equipment out-
side and monitor it as it cools.
The following states how damage to
the appliance and possible injury to
people can be avoided:
• Ensure that the equipment is assem-
bled correctly and the lter is in the
correct position.
• When vacuuming, do not place the
equipment on heat sensitive oors.
For safety reasons, use a reproof
base when cleaning ovens, chimneys
or barbecue equipment.
• Do not extinguish hot ash particles
with water, as the sudden temperature
differences can cause cracks in your
chimney.
• Use only replacement parts and ac-
cessories supplied and recommended
by our service centre (cf. address on
page 57). The use of foreign parts will
result in immediate invalidation of the
guarantee.
• Have repairs carried out only by cus-
tomer service points that we have
authorised.
• Observe the instructions for the clean-
ing and maintenance of the equip-
ment.
• Empty and clean the vacuum before
and after vacuuming in order to pre-
vent the accumulation in the vacuum
of materials that represent a re load.
• Keep the equipment in a dry place,
out of reach of children.
The motor-operated ash vacuum is intend-
ed for vacuuming cold ashes, ne dust and
vacuum material from chimneys, wood/coal-
red ovens, ashtrays or barbecues.
The equipment is not suitable for vacuum-
ing liquids, soot or cement dust or for vacu-
uming heating boilers and oil-burning ovens.
Vacuuming of glowing embers or materi-
als and dusts that are combustible, explo-
sive or hazardous to health (dust classes

7
CYGB
L, M, H) is prohibited.The manufacturer
will not be held responsible for injuries
resulting from use which does not comply
with the directions, or from incorrect use.
The ash vacuum cleaner is tted with a
stable metal container with a cover. The
vacuum set comprises a exible metal
suction hose and an aluminium suction
hose. A safety stop prevents the equip-
ment from being usable without a lter.
The following describes the function of the
operating parts.
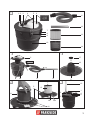
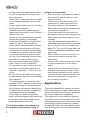
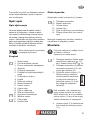
See the front fold-out page for
illustrations.
1 M
ains cable
2 Accessory holder
3
Inspection window blockage
indicator
4 Retaining bracket
5 Container lid
6 On/off switch
7 Hose connection
8 Seal clips
9 Carry handle
10 Metal container
11 Metal suction hose
12 Suction tube
13 Pleated lter
14 Wire lter basket
15 Safety stop
16 Metal lugs
17 Air lter
18 Filter housing
Unpack the equipment and check that it is
complete.
5 Container lid
10 Metal container
11 Metal suction hose
12 Suction tube
13 Pleated lter
(already mounted)
14 Wire lter basket
(already
mounted)
Dispose of the packaging material in a
proper manner.
Disconnect at the plug before car-
rying out any work on the equip-
ment.
Risk of electric shock!
1. Check that the pleated lter
(
13) and wire lter basket
(
14) are sitting correctly and
securely.
2. Place the container lid (5) on
the metal container (10) and
close it using the seal clips (8).
3. Connect the suction hose (11).
To do this, insert the rotatable
plastic end piece (with the
printed symbol) into the
hose connection (7) and
screw it tight (bayonet con-
nection).
When assembling/detaching the
suction hose, hold the black plastic
end piece and not the metal suction
hose. Twisting or bending could da-
mage the hose.

8
GB CY
4. Plug the suction tube (12) onto
the rigid end piece of the suc-
tion hose (11).
Connect the mains plug.
The equipment is tted with a
safety stop, which allows operation
only with the pleated lter and wire
lter basket installed correctly.
Switching On:
On/Off Switch (see
6) In position “I“
Switching Off:
On/Off Switch (see
6) In position “0”
The vacuuming of glowing em-
bers and of materials that are
combustible, explosive or harm-
ful to health is prohibited.
There is a risk of injury!
• Place the equipment on a level sur-
face that is not heat sensitive.
• Always use the suction tube for vacu-
uming. Hold the suction tube at a dis-
tance of approx. 1 cm above the ash.
• Vacuum only cooled ash at less than
40°C.
• When vacuuming, keep checking the
metal container and suction hose for
rises in temperature.
• In the event of a rise in temperature,
switch off the equipment and discon-
nect at the plug. Place the equipment
outside and monitor it as it cools.
• During breaks, you can place the suc-
tion hose (
12) in the accessory
holder (
2) on the container lid.
• Always use the carry handle (
9) for
transporting the equipment.
• The metal container may be lled to
no more than half, so the pleated lter
always remains clear.
• Empty the container outside in order
to avoid mess (see “cleaning/mainte-
nance“).
• Clean the pleated lter (
13) (see
“cleaning/maintenance“) if the suction
performance deterio rates or when the
inspection window blockage indicator
(
3) on the container lid turns red.
Pull out the mains plug.
Danger of electric shock.
Never hose the appliance down
with water. Never use aggres-
sive cleaning agents or sol-
vents. This could damage the
appliance.
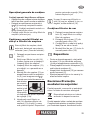
Clean the equipment after each use:
• Carry out cleaning outside in order to
avoid mess.
• Take off the container lid (
5) and
empty the metal container (
10).
Clean the metal container with water
and allow it to dry.
• Clean the wire lter basket and the
pleated lter (see below).
Replace the pleated lter if it is
worn, damaged or heavily soiled
(see “replacement parts“).

9
CYGB
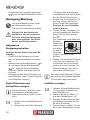
1. Take off the container cover (5).
2. Turn the wire lter basket (14)
anticlockwise and take it off.
Tap out the wire lter basket.
3. Tap out the pleated lter (13)
and clean it with a paintbrush
or hand brush.
Don‘t wash the pleated lter
in water.
4. Place the pleated lter (13) on
the rotated container lid (5)
(see small image
).
Here, the rubber ring must be
on the
0mm
15
container
lid and
press the
safety stop
switch
(15a) downwards.
5. Pull the wire lter basket (14)
over the pleated lter (13) and
turn it clockwise until it stops.
The safety stop (15b) must be
pressed down.
If there is play in the wire lter bas-
ket (14), use a nger to press down
the metal lugs (16).
1. Take off the container cover (5),
wire lter basket and pleated
lter.
2. Take the air lter (17) out of the
lter housing (18).
3. Clean the lter with soap and wa-
ter and allow it to dry in the air.
4. Place the air lter (17) back in
the lter housing (18).
• To store, wind the mains cable (1)
around the retaining bracket (4) on the
container lid (5).
• Push the end of the suction hose (11)
under the retaining bracket (4).
• Push the suction tube (12) onto the
accessory holder (2).
• Keep the equipment in a dry place,
out of reach of children.
Ash vacuum cleaner ............... PAS 500 B1
Mains voltage ......... 220-240V~, 50/60 Hz
Power consumption of motor ..........500 W
Safety class .........................................
II
Protection category............................IP20
Cable length .................................... 2.5 m
Stainless steel container
capacity .......... 18 l
Length of the metal s
uction hose
....120 cm
Suction tube
:
Length..........................................30 cm
Diameter ............................ca. 39.8 mm
Weight (incl. all accessories) ...........4.0 kg
Technical and visual modications may
be carried out due to further development
without prior notice. All dimensions, infor-
mation and statements provided in these
Operating Instructions are therefore sub-
ject to amendment. Legal claims which
are based on the Operating Instructions
can therefore not be recognised.

10
GB CY
Be environmentally friendly. Return the
tool, accessories and packaging to a recy-
cling centre when you have nished with
them.
Machines must not be disposed of
with household refuse.
Take the machine to a recycling point.
The waste plastic and metal parts can be
separated, accurately graded and passed
on for recycling. Contact our Service Cen-
tre for more details.
Defective units returned to us will be dis-
posed of for free.
This unit has a guarantee period of 36
months, or 12 months for units used on a
commercial basis or for replacement units
according to the statutory regulations.
Justied guarantee claims should be report-
ed to our Service Centre (see page 57 for
telephone & fax no.s, and email address).
Our Service Team will tell you more about
our complaints handling procedure.
Damage resulting from normal wear and
tear, overloading or improper use is ex-
cluded from the warranty. Certain parts such
as the lters and attachments are subject to
normal wear and tear and are excluded from
the warranty.
Warranty claims can only be recognised if
the directions in the Operating Instructions
on cleaning and maintenance have been
followed. Damage resulting from material
defects or manufacturing errors will be recti-
ed at no extra charge by replacement or
repair, on condition that the appliance has
not been dismantled and is returned to our
Service Centre with proof of purchase and
guarantee (see addresses page 57).
You can have repairs which are not covered
by the warranty carried out by our Service
Center which will charge you for this. They
will be happy to draw up a cost estimate for
you.
We can only carry out work on machines
which have adequate packaging and post-
age.
Warning: In the case of a warranty claim or
a service, please deliver your machine to our
service address in a clean condition accom-
panied by a description of the problem.
Machines sent without prepaid postage
– as bulky goods, express, or by special
freight – will not be accepted.
Defective units returned to us will be dis-
posed of for free.

11
CYGB
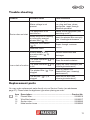
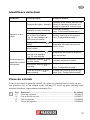
Problem Possible cause Fault correction
Device does not start
Mains voltage is not
present
Check plug socket, cable,
line, plug and fuse, where
appropriate, repair through
electrical specialist
The equipment is not
switched on
Switch on the equipment (see
“switching on/off“)
Safety stop due to missing
or incorrectly inserted
pleated lter (
13)
Insert the pleated lter correctly
(see “cleaning/maintenance“)
Defective on/off switch
(
6)
Repair through customer
service
Defective motor
Low or lack of suction
Suction hose (
11)
or suction tube (
12)
blocked
Remove obstructions and
blockages
The metal container (
10)
is not closed
Close the metal container
The metal container (
10)
is full
Empty the metal container (see
“cleaning/maintenance“)
The pleated lter (
13) is
clogged
Clean or replace the
pleated lter (see “cleaning/
maintenance“)
The air lter (
17) is
clogged
Clean the air lter (see
“cleaning/maintenance“)
You can order replacement parts directly via our Service Centre (see addresses
page 57). Please state the appliance type when placing an order.
Item Description ........................................................................... Product No.
13
Pleated lter
.............................................................................. 91099216
14
Wire lter basket
........................................................................ 91099217
12
Suction tube
.............................................................................. 91099242
11 Metal
suction hose
.................................................................... 91099243

12
HR
Sigurnosne upute ................................12
Simboli na uređaju ............................12
Slikovni znakovi u Uputi ....................13
Opće sigurnosne upute ......................13
Primjena ..............................................14
Opći opis ..............................................15
Opis djelovanja...................................15
Pregled ...............................................15
Obim isporuke ....................................15
Montaža ................................................15
Uključivanje/isključivanje ...................16
Napomena za rad .................................16
Čišćenje/održavanje ............................16
Opće napomene o čišćenju................16
Čišćenje žičane košare ltra i ltra s
naborima ............................................16
Čišćenje zračnog ltra ........................17
Čuvanje.................................................17
Tehnički podaci ....................................17
Uklanjanje/zaštita okoliša ...................18
Jamstvo ................................................18
Traženje greške ...................................19
Rezervni dijelovi ..................................19
Prijevod originalne CE Izjave o
podudarnosti ........................................54
Sklopni crtež ........................................56
Grizzly Service-Center ........................57
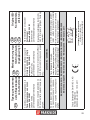
Pozor!
Pročitajte Uputu za uporabu!
Nemojte izlagati uređaj kiši!
Samo za hladni pepeo*!
Postoji opasnost od požara, ako
temperatura usisanih tvari pre-
korači 40°C!
1 Pri usisavanju stalno provjeravati
zagrijavanje crijeva i usisavača.
Ne usisavati čađ i zapaljive tvari.
Usisani materijal ne smije prekoračiti
temperaturu od 40°C.
2 - 4 Poslije i prije usisavanja otvoriti, ispra-
zniti i očistiti usisavač na otvorenom.
Električni uređaji ne pripadaju u
kućno smeće.
Klasa zaštite II
Hrvatska oznaka ispitivanja kon-
formnosti. Izjava o sukladnosti za
ovaj proizvod dostupna je na inter-
net stranici www.lidl.hr.
* „Hladni pepeo“ je pepeo, koji se dovolj-
no dugo hladio i više ne sadrži komade
žara. To se može utvrditi, tako što se prije
uporabe uređaja pepeo pročešlja nekim
metalnim pomoćnim sredstvom. S hladnog
pepela se više se osjeti zračenje topline.
Molimo prije prvog uključiva-
nja uređaja pažljivo pročitajte ovo uputstvo
za upotrebu. Sačuvajte uputstvo i predajte
ga svakom sljedećem korisniku kako bi
informacije uvijek bile dostupne.

13
HR
Znakovi opasnosti s podacima o
zaštiti od materijalnih ili ošteće-
nja osoba.
Znakovi naredbe s podacima o zašti-
ti od oštećenja.
Znakovi upozorenja s informacija-
ma za bolje postupanje s uređajem.
Morate se pridržavati uputa u ovoj
Uputi za uporabu. Osim toga se
morate pridržavati sigurnosnih i
propisa za zaštitu od nesreća od
strane zakonodavca.
Oprez: Pri uporabi uređaja se morate
pridržavati sljedećih načelnih sigur-
nosnih mjera radi zaštite od povreda i
požara:
Ovako spriječavate nesreće i ozljede
koje mogu nastati od električnog udara:
• Pazite da se strujni kabel ne oštećuje
povlačenjem preko oštrih rubova, pri-
gnječivanjem ili povlačenjem za kabel.
• Prije svake uporabe provjerite, ima li
oštećenja na vodu mrežnog priključ-
ka i produžnom kabelu i jesu li stari.
Nemojte koristiti uređaj, ako je kabel
oštećen ili istrošen.
• Ako priključni vod ovog uređaja bude
oštećen, onda isti mora zamijeniti pro-
izvođač ili njegova servisna služba od-
nosno druga slično kvalicirana osoba,
kako bi se spriječilo ugrožavanje.
• Isključite uređaj i izvucite strujni kabel
iz utičnice:
- ako se uređaj ne koristi,
- prije otvaranja uređaja,
- kod svakog održavanja i čišćenja,
- ako je priključni kabel oštećen ili za-
petljan.
• Ne koristite kabel za izvlačenje utikača
iz utičnice. Zaštite kabel od vrućine,
ulja i oštrih rubova.
• Pazite da napon odgovara navodima
na uređaju.
• Uređaj priključite samo u utičnicu koja
je osigurana s barem 16A.
• Priključite uređaj po mogućnosti samo
na utičnicu sa zaštitnim uređajem stru-
je kvara (FI-prekidač) s izmjerenom
strujom ne više od 30 mA.
• Uređaj nemojte izlagati kiši. Uređaj
nemojte koristiti u vlažnoj ili mokroj
okolini.
• Zaštitite se od električnog udara. Izbje-
gavajte tjelesni dodir s uzemljenim
elementima (npr. cijevima, radijatorima,
električnim štednjacima, hladnjacima).
• Koristite produžne kabele za uporabu
vani. Na otvorenom koristite samo za
to dopuštene i na odgovarajući način
označene produžne kabele.
• Izbjegavajte nehotično aktiviranje ure-
đaja. Osigurajte se da je prekidač kod
umetanja utičnice u utikač ugašen.
Ovako ćete spriječiti nesreće i ozlijede:
• Udaljite uređaj od djece i kućnih ljubi-
maca.
• Djeci dozvolite korištenje uređaja samo
pod nadzorom.
• Ovaj uređaj nije predviđen za uporabu
od strane osoba (uključujući djecu) s
ograničenim zičkim, senzoričkim ili
duševnim sposobnostima ili nedostat-
kom iskustva i/ili nedostatkom znanja;
osim ako su pod nadzorom neke
osobe nadležne za njihovu sigurnost
ili od nje dobivaju upute, kako se mora
koristiti uređaj.
• Djeca bi trebala biti pod nadzorom,

14
HR
kako biste bili sigurni, da se ona ne
igraju s uređajem.
• Nikada ne ostavljajte uređaj koji se
može uključiti bez nadzora na radnom
mjestu.
• Uređajem nije dozvoljeno usisavati lju-
de i životinje.
• Mlaznice i cijev za usisavanje prilikom
rada ne smiju doći u razinu glave. Po-
stoji opasnost od ozljeda.
• Nemojte usisavati vruće, užarene,
zapaljive, eksplozivne tvari ili prašine
ili one koje ugrožavaju zdravlje (kla-
sa prašine L, M, H). U njih između
ostalog spadaju vrući pepeo, benzin,
otapala, kiseline ili lužine. Postoji opa-
snost od ozljeda.
• Pažnja! Nije dozvoljeno usisavanje
opasnih tvari (poput benzina, otapala,
kiselina ili lužina) kao i pepeo nedozvo-
ljenih goriva (npr. iz peći koje je lože
naftom ili kotlova)!
Postoji opasnost nastanka osobnih oz-
ljeda.
• Nemojte usisavati nu, zapaljivu praši-
nu, postoji opasnost od eksplozije.
• Nemojte usisavati vrući pepeo ili vruće,
užarene ili gorive predmete (poput
drvenog ugljena, cigareta…). Postoji
opasnost od paljenja.
• Nemojte usisavati tekućinu, čađu ili
prašinu morta ili cementa. To bi moglo
oštetiti uređaj.
• Materijal koji se usisava ne smije imati
temperaturu višu od 40°C. Materijal
koji se usisava može se izvana činiti
ohlađenim, ali iznutra još uvijek biti
vruć. Vruća prašina koja se usisa
može se u zračnoj struji ponovno za-
paliti. Osim toga može oštetiti i uređaj.
U slučaju zagrijavanja ugasite uređaj
te izvucite utikač iz utičnice. Pustite
uređaj da se ohladi vani, ali ga pritom
nadzirite.
Ovako ćete spriječiti oštećenja uređaja
i eventualno iz toga rezultirajuće po-
vrede osoba:
• Provjerite je li uređaj pravilno sastav-
ljen i jesu li ltri na točnoj poziciji.
• Nemojte prilikom usisavanja uređaj
odložiti na podove koji su osjetljivi na
toplinu. Iz sigurnosnih razloga kod či-
šćenja peći, dimnjaka ili roštilja koristite
podloge koje su otporne na vatru.
• Vruće čestice pepela nemojte gasiti
vodom, jer zbog iznenadnih i velikih
temperaturnih razlika mogu nastati pu-
kotine u dimnjaku.
• Koristite rezervne dijelove i dodatnu
opremu koju Vam isporuči i preporuča
naš servisni centar (v. adresu str. 57).
Primjena rezervnih dijelova drugih pro-
izvođača dovodi do brisanja jamstve-
nog prava.
• Popravke neka izvode samo servisne
službe koje smo mi ovlastili .
• Obratite pažnju na napomene o čišće-
nju i održavanju uređaja.
• Poslije i prije usisavanja ispraznite i
očistite usisavač, kako biste izbjegli
skupljanje materijala u usisavaču, koji
predstavljaju opterećenje od zapaljenja.
• Uređaj čuvajte na suhom mjestu i izvan
dohvata djece.
Motorni usisavač pepela predviđen je za
usisavanje hladnog pepela, ne prašine
i materijala za usisavanje iz kamina, peći
na drvo i ugljen, pepeljara ili roštilja.
Uređaj nije primjeren za usisavanje teku-
ćine, čađi, prašine morta ili cementa kao
ni za usisavanje kotlova i uljnih peći.
Zabranjeno je usisavanje užarenog pe-
pela kao i zapaljivih, eksplozivnih tvari ili
prašina ili onih koje ugrožavaju zdravlje
(klasa prašine L, M, H).

15
HR
Proizvođač ne jamči za oštećenja nastala
uslijed nepridržavanja uputa ili nepravil-
nim korištenjem.
Usisavač pepela sadrži stabilni metalni
spremnik s poklopcem. Usisna se garni-
tura sastoji od eksibilnog usisnog crijeva
od metala i jednog aluminijskog usisnog
crijeva. Mehanizam za sigurnosno zaustav-
ljanje rada sprječava paljenje uređaja bez
ltra. O funkciji sastavnih dijelova molimo
pročitajte u sljedećim odlomcima.
Skice ćete pronaći na prednjoj
preklopljenoj stranici.
1 Strujni kabel
2 Prihvat dodatne opreme
3 Prozor pokazivača začepljenja
4 Stremen
5 Poklopac spremnika
6 Prekidač za uključivanje/isključi-
vanje
7 Priključak za crijevo
8 Kopča
9 Drška za nošenje
10 Metalni spremnik
11 Usisno crijevo
12 Usisna cijev
13 Filtar s naborima
14 Žičana košara ltra
15 Sigurnosni zaustavljač
16 Metalne vezice
17 Filtar zraka
18 Kućište ltra
Otpakirajte uređaj i provjerite je li potpun.
5 Poklopac spremnika
10 Metalni spremnik
11 Usisno crijevo
12 Usisna cijev
13 Filtar s naborima (već montirani)
14 Žičana košara ltra (već monti-
rani)
Materijal za pakiranje uklonite u skladu s
odredbama o odlaganju smeća.
Prije svih radova na uređaju izvuci-
te utikač iz utičnice.
Opasnost od udara struje!
1. Provjerite ispravno i ksno zasje-
danje ltra s naborima (
13)
kao i žičane košare ltra (
14).
2. Poklopac spremnika (5) stavite
na metalni spremnik (10) i za-
tvorite ga kopčama (8).
3. Priključite usisno crijevo (11).
Zatim ponovno umetnite
okretni plastični završetak
(s otisnutim simbolom) u
priključak crijeva (7) te do-
bro zategnite (bajonetni
zatvarač).
Kod montaže, odn. skidanja usi-
snog crijeva uhvatite za crni pla-
stični završni dio, a ne za metalno
usisno crijevo. Crijevo bi se moglo
oštetiti okretanjem ili savijanjem.
4. Usisno crijevo (12) nataknite na
kruti krajnji dio usisnog crijeva
(11).

16
HR
Uključite utikač uređaja.
Uređaj je opremljen sigurnosnim
zaustavljačem, koji dopušta pogon
samo s pravilno ugrađenim nabra-
nim ltrom i žičanom košarom za
ltar.
Uključivanje:
Prekidač za uključivanje/isključivanje (vidi
6) u položaj „I“
Isključivanje:
Prekidač za uključivanje/isključivanje (vidi
6) u položaj „0“
Zabranjeno je usisavanje uža-
renog pepela kao i zapaljivih,
eksplozivnih ili tvari koje ugro-
žavaju zdravlje.
Opasnost po život!
• Uređaj odlažite uvijek na ravnu površi-
nu koja nije osjetljiva na vrućinu.
• Za usisavanje uvijek koristite usisnu
cijev. Usisnu cijev držite u razmaku od
ca. 1 cm iznad pepela.
• Usisavajte isključivo ohlađeni pepeo
čija temperatura nije viša od 40°C.
• Prilikom usisavanja stalno provjeravaj-
te jesu li se slučajno metalni spremnik
i usisno crijevo zagrijali.
• U slučaju zagrijavanja, ugasite uređaj
te izvucite utikač iz utičnice. Pustite
uređaj da se ohladi vani, ali ga pritom
nadzirite.
• Za vrijeme predaha možete usisnu
cijev (
12) umetnuti u prihvate pri-
bora (
2) na poklopcu spremnika.
• Kod transporta uređaj uvijek nosite za
dršku (
9).
• Metalni spremnik se smije maksimal-
no napuniti do polovice kako bi ltar s
naborima uvijek bio slobodan.
• Spremnik praznite vani kako ne biste
zaprljali unutarnji prostor (vidi „Čišće-
nje/Održavanje“).
• Očistite ltar s naborima (
13) (vidi
„Čišćenje/Održavanje“) ukoliko primi-
jetite da usisivač slabije vuče ili ako se
na zaslonu prikaza popunjenosti ltra
(
3) na poklopcu spremnika pojavi
crvena oznaka.
Izvucite utikač.
Opasnost uslijed električnog udara.
Nemojte prskati uređaj vodom i
nemojte primjenjivati nikakva oš-
tra sredstva za čišćenje odn. ota-
pala. Uređaj bi se mogao oštetiti.
Nakon svake primjene očistite uređaj:
• Čišćenje izvedite vani kako ne biste
zaprljali unutarnji prostor.
• Skinite poklopac spremnika (
5) i
ispraznite metalni spremnik (
10).
Metalni spremnik očistite vodom i pu-
stite ga da se osuši.
• Očistite žičanu košaru ltra kao i ltar
s naborima (vidi dolje).
Zamijenite ltar s naborima ako je
začepljen, oštećen ili jako zaprljan
(vidi „rezervni dijelovi“).

17
HR
1. Skinite poklopac spremnika (5) .
2. Okrećite žičanu košaru ltra
(14) u suprotnom smjeru od
smjera kazaljke na satu te ju
skinite. Lupkajte žičanu košaru
ltra da se sadržaj isprazni.
3. Lupkanjem ispraznite žičanu
košaru ltra (13) te ju očistite
kistom ili ručnom metlicom.
4. Filtar s naborima (13) stavite na
okrenuti poklopac spremnika (5)
(vidi manju sliku
).
Gumeni prsten pri tome mora
sjesti na
0mm
15
poklopac
spremnika i
šalter sigur-
nosnog zau-
stavljanja
(15a) pritisnuti prema dolje.
5. Žičanu košaru ltra stavite pre-
ko (14) ltra s naborima (13) i
okrećite u smjeru kazaljke na
satu do graničnika. Sigurnosni
zaustavljač (15b) mora biti priti-
snut prema dolje.
Ako žičana košara ltra (14) ima
slobodnog prostora, pritisnite me-
talne vezice (16) prstima prema
dolje.
1. Skinite poklopac spremnika,
žičanu košaru ltra i ltar s na-
borima .
2. Zračni ltar (17) izvadite iz kući-
šta ltra (18).
3. Filtar čistite sapunom i vodom te
ga ostavite da se osuši na zraku.
4. Sada možete zračni ltar (17)
ponovno umetnuti u kućište ltra
(18).
• Kod spremanja mrežni kabel (1) omo-
tajte oko stremena (4) na poklopcu
spremnika (5).
• Kraj usisnog crijeva (11) ugurajte pod
stremen (4).
• Usisnu cijev (12) nataknite na prihvat
dodatne opreme (2).
• Uređaj čuvajte na suhom mjestu i
izvan dohvata djece.
Usisivač pepela....................PAS 500 B1
Struja .......................220-240V~, 50/60 Hz
Snaga motora ................................. 500 W
Klasa zaštite .......................................
II
Vrsta zaštite ...................................... IP20
Dužina kabla .....................................2,5 m
Sadržaj spremnika za nečistoću ............18 l
Duljina usisno crijevo .....................120 cm
Usisna cijev:
Duljina..........................................30 cm
Promjer ..............................ca. 39,8 mm
Težina (uklj. sve dijelove).................4,0 kg
Tehničke i optičke promjene mogu uslije-
diti tijekom daljnjeg razvoja bez najave.
Stoga ne jamčimo za sve mjere, upute i
navodi ovog uputstva za upotrebu. Sto-
ga se svi pravni zahtjevi postavljen na
temelju uputstva za upotrebu ne mogu
ostvariti.

18
HR
Odnesite uređaj, pribor i pakiranje na po-
novnu preradu radi zaštite okoliša.
Električni uređaji ne pripadaju u
kućno smeće
Predajte uređaj na mjesto za recikliranje
otpada. Korišteni plastični i metalni dijelovi
mogu se odvojiti i reciklirati. Raspitajte se
o tome u našem servisnom centru.
Vršimo besplatno uklanjanje Vaših pokva-
renih poslanih uređaja.
• Za ovaj uređaj dajemo 36 mjeseci
jamstva. Za službeno korištenje i za-
mjenske uređaje vrijedi skraćeno jam-
stvo od 12 mjeseci, prema zakonskim
odredbama.
• Kod postojanja opravdanog slučaja
garancije molimo stupite u kontakt s
našim servisnim centrom (br. tel., br.
telefaksa, e-mail-adresu vidi na stra-
ni 57). Tamo ćete dobiti ostale infor-
macije o obradi reklamacije.
• Štete nastali prirodnim habanjem,
preopterećenjem ili nestručnim ko-
rištenjem nisu uključene u jamstvo.
Određeni sastavni dijelovi podliježu
normalnom trošenju i isključeni su iz
jamstva. U to osobito spadaju ltri i
dodaci.
• Preduvjet za ostvarivanje jamstva je i
pridržavanje uputa o čišćenju i održa-
vanju.
• Štete nastale greškom u materijalu
i greškom proizvođača uklonit ćemo
besplatno isporukom rezervnih dijelo-
va ili popravkom.
Preduvjet je da se uređaj vrati našem
servisnom centru nerastavljen i s po-
tvrdom o kupnji i jamstvu (vidi adresu
na stranici 57).
• Popravke koji ne podliježu jamstvu
možete dati napraviti uz plaćanje u
našem servisnom centru. Naš servisni
centar rado će vam ispostaviti predra-
čun.
Možemo obraditi uređaje koji su po-
slani u odgovarajućem paketu i dovolj-
no frankirani.
• Pažnja: U slučaju reklamacije ili po-
pravka dostavite nam očišćen uređaj
s uputom o kvaru na adresu našeg
servisa.
Uređaje poslane kao glomazna
roba, hitno ili s drugim posebnim
teretom nećemo primiti.
• Vršimo besplatno uklanjanje Vaših po-
kvarenih poslanih uređaja.

19
HR
Problem Mogući uzrok Uklanjanje greške
Uređaj ne
starta
Nedostaje mrežni napon
Ispitati utičnicu, kabel, vod, utikač i
osigurač, prema potrebi popravak kod
električara
Uređaj nije upaljen.
Upalite uređaj.
(vidi „Paljenje/Gašenje“)
Sigurnosno zaustavljanje zbog
nepostojećeg ili pogrešno
umetnutog ltra s naborima
(
13)
Umetnite ltar s naborima pravilno
(vidi „Čišćenje/Održavanje“)
Uključivač/ isključivač (
6)
pokvaren
Popravak u servisnoj službi
Motor pokvaren
Nedostaje
usisna snaga
ili je slaba
Usisno crijevo (
11) ili usisna
cijev (
12) su začepljeni.
Odstranite začepljenja ili blokade
Metalni spremnik(
10) nije
zatvoren.
Zatvorite metalni spremnik.
Metalni spremnik (
10) je
pun.
Ispraznite metalni spremnik.
(vidi „Čišćenje/Održavanje“)
Filtar s naborima (
13) je
izvrgnut.
Zamijenite ili očistite ltar s nabori-
ma.
(vidi „Čišćenje/Održavanje“)
Rezervne dijelove možete direktno naučiti preko našeg servisnog centra (v. adresu na
stranici 57). Prilikom naručivanje obavezno navedite tip uređaja.
Poz. Oznaka ...................................................................................... Br. artikla
13 Filtar s naborima ........................................................................ 91099216
14 Žičana košara ltra .................................................................... 91099217
12 Usisna cijev ............................................................................... 91099242
11 Usisno crijevo ............................................................................ 91099243

20
RO
Vă rugăm să citiţi cu atenţie
acest manual de operare, înainte de prima
punere în funcţiune a aparatului. Menţineţi
ghidul în condiţii corespunzătoare şi pre-
daţi-l operatorului următor, astfel încât in-
formaţiile să e accesibile în orice moment.
Atenţie!
Citiţi manualul de operare!
Nu expuneţi aparatul unor con-
diţii meteorologice precare
Doar pentru cenuşă rece*!
Dacă produsul ce urmează a
aspirat depăşeşte temperatura
de 40°C, poate apărea riscul de
incendiu!
1 În timpul aspirării, asiguraţi-vă con-
stant că furtunurile şi aspiratorul nu
s-au supra-încălzit.
Nu aspiraţi funingine şi substanţe
inamabile.
Materialul aspirabil nu trebuie să
depăşească temperatura de 40°C.
2 - 4 Înainte şi după ecare aspirare,
aspiratorul trebuie deschis, golit şi
curăţat în aer liber.
Dispozitivele electrice nu trebuie
aruncate în deşeurile casnice.
Clasă de izolare II
* „Cenuşa rece“ este cenuşa care a fost su-
cient de bine răcită şi care nu mai conţine
cărbuni încinşi. Aceasta se poate determina
utilizând un mijloc auxiliar metalic pentru a
agita uşor cenuşa, înainte de a utiliza aspi-
ratorul. Eventuala radiaţie termică emisă de
cenuşă nu trebuie să e perceptibilă.
Instrucţiuni de siguranţă .....................20
Simboluri înscrise pe aparat ............20
Simboluri folosite .............................21
Instrucţiuni generale de siguranţă ...21
Utilizare.................................................23
Descriere generală ..............................23
Privire de ansamblu ........................23
Descrierea modului de funcţionare .23
Inventar de livrare ...........................23
Montare .................................................23
Conectare/Deconectare ......................24
Instrucţiuni de lucru ............................24
Curăţire/Mentenanţă ............................24
Operaţiuni generale de curăţare .....25
Curăţarea coşului ltrului cu sită
şi a ltrului de umplere ....................25
Curăţirea ltrelor de aer ..................25
Depozitare ............................................25
Reciclare/Protecţia mediului
înconjurător ..........................................25
Date tehnice .........................................26
Garanţie ................................................26
Identicare defecţiuni .........................27
Piese de schimb ..................................27
Traducerea Declaraţiei Originale de
Conformitate CE ..................................54
Schemă de explozie ............................56
Grizzly Service-Center ........................57
Pagina se încarcă...
Pagina se încarcă...
Pagina se încarcă...
Pagina se încarcă...
Pagina se încarcă...
Pagina se încarcă...
Pagina se încarcă...
Pagina se încarcă...
Pagina se încarcă...
Pagina se încarcă...
Pagina se încarcă...
Pagina se încarcă...
Pagina se încarcă...
Pagina se încarcă...
Pagina se încarcă...
Pagina se încarcă...
Pagina se încarcă...
Pagina se încarcă...
Pagina se încarcă...
Pagina se încarcă...
Pagina se încarcă...
Pagina se încarcă...
Pagina se încarcă...
Pagina se încarcă...
Pagina se încarcă...
Pagina se încarcă...
Pagina se încarcă...
Pagina se încarcă...
Pagina se încarcă...
Pagina se încarcă...
Pagina se încarcă...
Pagina se încarcă...
Pagina se încarcă...
Pagina se încarcă...
Pagina se încarcă...
Pagina se încarcă...
Pagina se încarcă...
Pagina se încarcă...
-
 1
1
-
 2
2
-
 3
3
-
 4
4
-
 5
5
-
 6
6
-
 7
7
-
 8
8
-
 9
9
-
 10
10
-
 11
11
-
 12
12
-
 13
13
-
 14
14
-
 15
15
-
 16
16
-
 17
17
-
 18
18
-
 19
19
-
 20
20
-
 21
21
-
 22
22
-
 23
23
-
 24
24
-
 25
25
-
 26
26
-
 27
27
-
 28
28
-
 29
29
-
 30
30
-
 31
31
-
 32
32
-
 33
33
-
 34
34
-
 35
35
-
 36
36
-
 37
37
-
 38
38
-
 39
39
-
 40
40
-
 41
41
-
 42
42
-
 43
43
-
 44
44
-
 45
45
-
 46
46
-
 47
47
-
 48
48
-
 49
49
-
 50
50
-
 51
51
-
 52
52
-
 53
53
-
 54
54
-
 55
55
-
 56
56
-
 57
57
-
 58
58


Parkside PAS 500 B1 Original Operation Manual
- Tip
- Original Operation Manual
Lucrări înrudite
-
Parkside PAS 900 A1 Translation Of The Original Instructions
-
Parkside PNTS 1400 A1 Translation Of Original Operation Manual
-
Parkside PNTS 1400 B1 Original Operation Manual
-
-
Parkside PNTS 1300 B2 Translation Of Original Operation Manual
-
Alte documente
-
EINHELL RT-VC 1420 Instrucțiuni de utilizare
-
Kärcher CV 30-2 Bp Battery-Powered Vacuum Manual de utilizare
-
EINHELL TH-VC 1318 Instrucțiuni de utilizare
-
-
Kärcher AS EN DROOGZUIGER AD4 PREMIUM Manual de utilizare
-
Kärcher WD 4 Premium Manualul proprietarului
-
-
Bosch GAS 15 L Instrucțiuni de utilizare
-
K RCHER IVM 40 Industrial Vacuum Manual de utilizare
-
ULTIMATE SPEED 12 V UOP 12 C1 Operation and Safety Notes