Philips HD7762/00 Manual de utilizare
- Categorie
- Accesorii pentru prepararea cafelei
- Tip
- Manual de utilizare
Acest manual este potrivit și pentru

HD7769, HD7762
11832.pdf 1 30-04-18 11:36


1
2
4
3
5 6
7
8
9
10
11
12
13
14
15
1816
17 19 22 24
20 21 23
25
26
27
1


English
Introduction
Congratulations on your purchase and welcome to Philips! To fully benefit from the support that
Philips offers, register your product at www.philips.com/welcome.
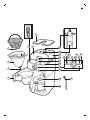
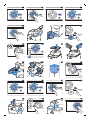
General description (Fig. 1)
1 Permanent filter
2 Filter basket
3 Drip stop
4 Filter basket holder
5 Water level indicator
6 Water reservoir lid
7 Bean container lid
8 Bean container selector
9 Coarseness knob
10 Fresh bean duo container
11 Grinder funnel lid
12 Lock of grinder funnel lid
13 Water filling hole
14 Display
15 On/off button
16 Pre-ground coffee icon
17 Number of cups
18 Coffee cup icon
19 Strength select coffee bean icon
20 Strength select button
21 Timer button
22 Control knob
23 Time indication
24 Timer icon
25 Glass jug lid
26 Glass jug
27 Bean chute cleaning brush
Important
Danger
-
Never immerse the appliance in water or any other liquid, nor
rinse it under the tap.
Warning
-
Check if the voltage indicated on the appliance corresponds to
the local mains voltage before you connect the appliance.
-
Do not use the appliance if the plug, the mains cord or the
appliance itself is damaged.
6
English

-
If the mains cord is damaged, you must have it replaced by
Philips, a service center authorized by Philips or similarly qualified
persons in order to avoid a hazard.
-
Connect the appliance to an earthed wall socket.
-
This appliance can be used by children aged from 8 years and
above and by persons with reduced physical, sensory or mental
capabilities or lack of experience and knowledge if they have
been given supervision or instruction concerning use of the
appliance in a safe way and if they understand the hazards
involved. Cleaning and user maintenance shall not be made by
children unless they are older than 8 and supervised. Keep the
appliance and its cord out of reach of children aged less than 8
years.
-
Children shall not play with the appliance.
-
Only use this appliance for its intended purpose to avoid
potential hazard or injury.
-
Do not let the mains cord hang over the edge of the table or
worktop on which the appliance stands.
-
Do not touch the grinding burrs of the of the appliance, especially
when the appliance is connected to a wall socket.
-
Do not touch the hot surfaces of the appliance when it operates.
-
Do not empty the water reservoir by tilting the appliance, as this
can damage the appliance. To empty the appliance, follow the
instructions for flushing the appliance (see 'Flushing the
appliance').
-
If a problem occurs that you cannot solve by means of this user
manual, contact the Consumer Care Center in your country. If the
problem cannot be solved, take the appliance to a service center
authorized by Philips for examination or repair. Do not attempt to
repair the appliance yourself, otherwise your warranty becomes
invalid.
7
English

Caution
-
Do not place the appliance on a hot surface and prevent the
mains cord from coming into contact with hot surfaces.
-
Unplug the appliance if problems occur during grinding or
brewing and before you clean it.
-
Keep the plug and the wall socket dry.
-
Do not lift and move the appliance while it is operating.
-
The jug is hot during and after brewing. Always hold the jug by its
handle.
-
Never use the jug in a microwave oven.
-
Wait until the appliance has cooled down before you store it. The
hotplate and the coffee jug may be hot.
-
After you have unpacked the appliance, make sure it is complete
and undamaged. If in doubt, do not use the appliance but contact
the Consumer Care Center in your country.
-
This machine is intended for normal household use only. It is not
intended for use in environments such as staff kitchens of shops,
offices, farms or other work environments.
Electromagnetic fields (EMF)
This Philips appliance complies with all applicable standards and regulations regarding exposure to
electromagnetic fields.
Before first use
Setting the clock
1 Put the mains plug in the wall socket. The time indication flashes on the display to indicate that
you have to set the clock time.
2 Turn the control knob to set the hour. The hour indication flashes (Fig. 2).
3 Press the center of the control knob to confirm the hour (Fig. 3).
4 The minutes indication starts flashing to indicate that you have to set the minutes (Fig. 4).
5 Turn the control knob to set the minutes (Fig. 5).
6 Press the center of the control knob to confirm the minutes (Fig. 6).
7 The display shows the set clock time. The coffeemaker is now ready for use.
Setting the automatic switch-off time
You can choose how long you want your coffee to stay hot after brewing by adjusting the time after
which the appliance automatically switches off. The default automatic switch-off time is 30 minutes.
8
English

The maximum automatic switch-off time is 120 minutes. To adjust the automatic switch-off time,
follow the steps below.
1 Make sure that the appliance is switched off but the mains plug is in the wall socket.
2 Press the center of the control knob until the display starts flashing.
3 Turn the control knob to increase or decrease the time. 1 is 10 minutes, 2 is 20 minutes, 3 is 30
minutes and so on until 12 is 120 minutes.
4 Press the center of the control knob to confirm the automatic switch-off time.
Note: The appliance always saves the last setting.
Flushing the appliance
Always flush the coffeemaker once before first use.
1 Open the water reservoir lid. Fill the water reservoir with fresh cold water up to the 8-cup indication
(Fig. 7).
Note: Do not put coffee beans or pre-ground coffee in the water reservoir.
2 Close the water reservoir lid.
3 Put the jug in the appliance (Fig. 8).
4 Press the on/off button (Fig. 9). The display lights up and the appliance beeps.
5 Press the strength select button (Fig. 10).
6 Turn the control knob to choose the pre-ground coffee setting (Fig. 11). The pre-ground coffee icon
starts flashing.
7 Press the center of the control knob twice to confirm (Fig. 25). The appliance starts the flushing
process.
8 Let the appliance operate until the flushing process is finished. It is finished when the appliance
stops beeping.
9 Empty the jug.
10 Press the on/off button to switch off the appliance.
Using the appliance
Filling the water reservoir
There are indications for 2 to 10 cups (275ml to 1375ml) on the water-level window. You can use these
indications to determine how much water to put in the water reservoir. The reflection changes from
light to dark for each cup of water added.
1 Open the water reservoir lid and fill the water reservoir with the required amount of cold water (Fig.
7).
Note: Do not fill the water reservoir beyond the 10-cup indication.
Note: Make sure that the amount of water you pour into the water reservoir is consistent with the
number of cups you want to brew. The coffeemaker uses all the water in the water reservoir.
Using coffee beans
Warning: Always keep the water reservoir lid closed when you fill the coffee bean
container with coffee beans. Otherwise coffee beans can fall into the water reservoir
and block up the water inlet.
9
English

1 Open the coffee bean container lid (Fig. 12).
2 Fill the fresh bean duo container with coffee beans. You can fill the two containers with two
different types of coffee beans. Make sure that there are enough coffee beans in the duo container
for the amount of coffee you want to brew (Fig. 13).
Note: Always make sure that the fresh bean duo bean container is at least half full.
Warning: To prevent the grinder from jamming, do not use unroasted or caramelized
beans. Use coffee beans instead of espresso beans, as espresso beans may damage
the grinder.
3 Open the filter basket holder (Fig. 14).
4 Place a paper filter (type 1x4 or no. 4) or the permanent filter in the filter basket (Fig. 15).
5 Close the filter basket holder.
6 Turn the coarseness knob to select the desired type of grind (from fine to coarse). There are nine
grind settings (Fig. 16).
Tip: The coarseness knob allows you to choose between 9 different settings. The icons indicate 3
preselected optimal settings, but you can choose any setting in between. We advise you to
experiment with the different grind settings to find out which setting you prefer.
7 Turn the container selector to choose between the two containers.
Note: Whenever you switch between coffee bean containers or coffee beans, there will always be
traces of coffee left of the previously ground type of coffee beans. Clean the grinder funnel after
you switch to a new type of coffee bean to prevent this.
8 Press the strength button (Fig. 10). The coffee bean icons start flashing.
9 Turn the control knob to select the desired coffee strength: 1 bean for mild coffee, 2 beans for
medium-strong coffee or 3 beans for strong coffee.
10 Press the center of the control knob to confirm the strength (Fig. 6).
11 To select the number of cups, turn the control knob until the desired number of cups flashes on the
display.
Note: Please keep in mind that the coffeemaker uses all the water in the water reservoir. If you
select a number of cups that is smaller than the amount of water, the coffee becomes weaker than
you intended.
12 Press the center of the control knob to confirm the number of cups (Fig. 6).
13 Press the center of the control knob again. The appliance beeps and starts grinding the required
amount of coffee beans. When the grinding process is finished, the appliance starts brewing coffee
14 Wait until the coffeemaker has stopped beeping before you remove the jug.
Note: After brewing, coffee drips from the filter basket for several seconds.
15 The appliance keeps your coffee hot until it switches off automatically. If you do not need your
coffee to be kept hot, press the on/off button to switch off the appliance.
Using pre-ground coffee
If you want to use pre-ground coffee instead of coffee beans, follow the steps below.
1 Open the water reservoir lid and fill the water reservoir with the required amount of cold water (Fig.
7).
2 Open the filter basket holder (Fig. 14).
3 Place a paper filter (type 1x4 or no. 4) or the permanent filter in the filter basket.
4 Put pre-ground coffee in the paper filter or in the permanent filter.
5 Close the filter basket holder.
10
English

6 Put the jug in the appliance (Fig. 8).
7 Press the on/off button (Fig. 9). The display lights up.
8 Press the strength select button (Fig. 10).
9 Turn the control knob to choose the pre-ground coffee setting (Fig. 11). The pre-ground coffee icon
lights up.
10 Press the center of the control knob to confirm (Fig. 6).
11 Then press the center of the control knob again to start the brewing process (Fig. 6).
12 Wait until the coffeemaker has stopped beeping before you remove the jug.
Note: After brewing, coffee drips from the filter basket for several seconds.
13 The appliance keeps your coffee hot until it switches off automatically. If you do not need your
coffee to be kept hot, press the on/off button to switch off the appliance.
Setting the timer
The timer enables you to program the time at which you want the brewing process to start. Make sure
that all steps of brewing coffee with either preground coffee or coffee beans have been taken before
setting the timer.
1 Press the timer button (Fig. 17) and the timer icon will appear on the display. The hour indication
flashes to indicate that you have to set the hour.
2 Turn the knob to set the hour (Fig. 18).
3 Press the center of the control knob to confirm the hour (Fig. 20). The minutes indication starts to
flash to indicate that you have to set the minutes.
4 Turn the control knob to set the minutes (Fig. 19).
5 Press the center of the knob to confirm the minutes and the time set (Fig. 20). The timer is set and
the brewing process will start at the preset time.
Note: To cancel the timer, simply press the timer button again and the timer icon will disappear from
the display.
Drip stop function
The drip stop function enables you to remove the jug from the coffeemaker before the brewing
process is finished. When you remove the jug, the drip stop stops the flow of coffee into the jug.
Note: The brewing process does not stop when you remove the jug. If you do not put the jug back in
the appliance within 20 seconds, the filter basket overflows.
Cleaning and maintenance
Cleaning after every use
Never immerse the appliance in water or any other liquid, nor rinse it under the tap.
1 Remove the mains plug from the wall socket.
2 Wipe the outside of the coffeemaker with a damp cloth.
3 Clean the filter basket and the permanent filter with hot water and some washing-up liquid or
clean them in the dishwasher.
11
English

Cleaning the grinder funnel
Important: Clean the grinder funnel every 1 to 2 weeks to prevent clogging with ground coffee. This
is easily and quickly done by following the steps below.
Note: Make sure the coffee bean container is empty before you start the cleaning procedure.
1 Press the on/off button to switch off the appliance (Fig. 21).
2 Open the filter basket holder (Fig. 14).
3 Place a paper filter (type 1x4 or no. 4) or the permanent filter in the filter basket (Fig. 15).
4 Close the filter basket holder.
5 Use the end of the bean chute cleaning brush to open the grinder funnel lid (Fig. 22).
6 Press and hold the strength select button for 4 seconds (Fig. 23). The grinder starts cleaning itself.
7 When the grinder has stopped cleaning, use the bean chute cleaning brush to brush ground coffee
residues into the lower part of the funnel (Fig. 24). The ground coffee residues fall into the filter
basket.
8 Close the lid of the grinder funnel.
9 Remove the paper filter or permanent filter with the ground coffee residues.
Descaling the coffeemaker
Descale the coffeemaker when you notice excessive steaming or when the brewing time increases. It
is advisable to descale the coffeemaker every two months. Only use white vinegar to descale, as other
products may cause damage to the coffeemaker. For more information on descaling, see
www.philips.com/descale-coffeemaker.
Warning: Never use vinegar with an acetic acid content of 8% or more, natural vinegar,
powder descalers or tablet descalers to descale the appliance, as this may cause
damage.
1 Open the water reservoir lid.
2 Fill the water reservoir with white vinegar (4% acetic acid) up to the 10-cup indication.
3 Place a paper filter (type 1x4 or no. 4) or the permanent filter in the filter basket and close the filter
basket holder.
4 Put the empty jug in the appliance.
5 Put the mains plug in the wall socket.
6 Press the on/off button to switch on the appliance (Fig. 9). The display lights up.
7 Press the strength select button and turn the control knob to choose the pre-ground coffee setting
(Fig. 11).
8 Press the center of the control knob to confirm (Fig. 6).
9 Press the center of the control knob again to start the brewing process.
10 Wait until half of the vinegar has flowed into the jug. Then press the on/off button to interrupt the
brewing process. Let the vinegar act for at least 15 minutes.
11 Press the on/off button to switch the coffeemaker back on.
12 Press the center of the control knob twice to let the appliance complete the brewing process (Fig.
25).
13 Empty the jug and remove the paper filter or the permanent filter with the scale residues.
14 Fill the water reservoir with fresh cold water and press the center of the control knob twice to start
another brewing process (Fig. 25). Let the coffeemaker complete the entire brewing process and
empty the jug.
12
English

Note: If necessary, repeat step 14 until the water that comes out of the appliance no longer tastes
or smells of vinegar.
15 Clean the filter basket and the jug with hot water and some washing-up liquid.
16 Press the on/off button on the front of the appliance to switch off the appliance (Fig. 21).
Ordering accessories
To buy accessories or spare parts, visit www.shop.philips.com/service or go to your Philips dealer.
You can also contact the Philips Consumer Care Center in your country (see the international warranty
leaflet for contact details).
Warranty and support
If you need information or support, please visit www.philips.com/support or read the international
warranty leaflet.
Recycling
-
This symbol means that this product shall not be disposed of with normal household waste
(2012/19/EU) (Fig. 26).
-
Follow your country's rules for the separate collection of electrical and electronic products. Correct
disposal helps prevent negative consequences for the environment and human health.
Troubleshooting
This chapter summarizes the most common problems you could encounter with the appliance. If you
are unable to solve the problem with the information below, visit www.philips.com/support for a list
of frequently asked questions or contact the Consumer Care Center in your country.
Problem
Solution
The appliance does not
work.
Put the mains plug in the wall socket and press the on/off button to
switch on the appliance.
Make sure that the voltage indicated on the appliance corresponds to
the local mains voltage.
Fill the water reservoir with water.
Close the lid of the grinder funnel.
The grinder does not work
or does not work properly.
Make sure that you did not select pre-ground coffee. If the symbol for
pre-ground coffee is visible on the display, you selected pre-ground
coffee.
Clean the grinder funnel by following the instructions.
When I use the grinder,
the coffee is too weak.
Make sure that the number of cups you selected is consistent with the
amount of water in the water reservoir. Please keep in mind that the
coffeemaker uses all the water in the water reservoir.
Use the strength button to set the coffee strength to ‘strong’.
Use coffee beans of a stronger blend or flavor.
13
English

When I use pre-ground
coffee, the coffee is too
weak.
Make sure that the amount of pre-ground coffee in the filter is
consistent with the amount of water in the water reservoir. Please keep
in mind that the appliance uses all the water in the water reservoir.
Use ground coffee of a stronger blend or flavor.
To increase the coffee strength, increase the amount of pre-ground
coffee or decrease the amount of water.
The filter overflows when I
remove the jug from the
appliance while it is
brewing coffee.
If you remove the jug for more than 20 seconds during the brewing
process, the drip stop causes the filter basket to overflow. Also note that
the coffee does not reach its full taste before the end of the brewing
process. Therefore we advise you not to remove the jug and pour out
the coffee before the end of the brewing process.
The appliance continues
to drip long after the
brewing process has
ended.
The dripping is caused by condensation of steam. It is completely
normal that the appliance drips for some time.
If the dripping does not stop, the drip stop may be clogged. To clean the
drip stop, open the filter basket holder and take out the filter basket.
Rinse the filter basket and the drip stop under the tap.
The coffee is not hot
enough.
The coffee in the jug cools down faster if you brew only a few cups. The
coffee stays hot longer if you brew 10 cups, which is a full jug.
Descale the appliance.
The appliance does not
start cleaning the grinder
funnel.
Make sure that the appliance is plugged in.
Open the lid of the grinder funnel before you press and hold the coffee
strength button.
Press and hold the coffee strength button for 4 seconds until the grinder
starts cleaning itself.
The appliance works but
makes a beeping sound.
Please check if the lid of the grinder funnel is closed properly.
The coffee beans seem to
be used up quickly.
To brew a perfect cup of coffee, the appliance needs a certain amount
of ground coffee. The amount of coffee beans the appliance uses to
obtain the optimal amount of ground coffee per cup is normal.
The timer does not work. Make sure to complete all steps for brewing coffee with coffee beans or
pre-ground coffee before you set the timer.
14
English

Română
Introducere
Felicitări pentru achiziţie şi bun venit la Philips! Pentru a beneficia pe deplin de asistenţa oferită de
Philips, înregistraţi-vă produsul la www.philips.com/welcome.
Descriere generală (Fig. 1)
1 Filtru permanent
2 Coș filtru
3 Anti-picurare
4 Suport coș filtru
5 Indicator nivel apă
6 Capac rezervor de apă
7 Capac pentru recipientul pentru boabe
8 Selector al recipientului pentru boabe
9 Selectornivel de măcinare
10 Recipient dublu pentru boabe proaspete
11 Capacpâlnie râșniță
12 Blocare capacpâlnie râșniță
13 Orificiu de umplere apă
14 Afișaj
15 Buton de pornire/oprire
16 Pictogramă cafea pre-măcinată
17 Număr de cești
18 Pictogramă ceașcă de cafea
19 Pictogramă boabă de cafea pentru selectarea concentrației
20 Buton de selectare a concentrației
21 Buton cronometru
22 Buton de comandă
23 Indicarea orei
24 Pictogramă cronometru
25 Capac vas de sticlă
26 Vas de sticlă
27 Perie de curățare a toboganului pentru boabe
Important
Pericol
-
Este interzisă introducerea aparatului în apă sau în orice alt lichid
și clătirea acestuia sub jet de apă.
Avertisment
-
Înainte de a conecta aparatul, verificaţi dacă tensiunea indicată
pe aparat corespunde tensiunii de alimentare locale.
-
Nu folosiţi aparatul dacă ştecherul, cablul de alimentare sau
aparatul însuşi este deteriorat.
15
Română

-
În cazul în care cablul de alimentare este deteriorat, acesta
trebuie înlocuit întotdeauna de Philips, de un centru de service
autorizat de Philips sau de personal calificat în domeniu, pentru a
evita orice accident.
-
Conectaţi aparatul numai la o priză de perete cu împământare.
-
Acest aparat poate fi utilizat de către copii începând de la vârsta
de 8 ani şi persoane care au capacităţi fizice, senzoriale sau
mentale reduse sau sunt lipsite de experienţă şi cunoştinţe, dacă
sunt supravegheate sau au fost instruite cu privire la utilizarea în
condiţii de siguranţă a aparatului şi înţeleg pericolele pe care le
prezintă. Curăţarea şi întreţinerea nu trebuie să fie efectuate de
către copii, decât dacă aceştia au vârsta mai mare de 8 ani şi sunt
supravegheaţi. Nu lăsaţi aparatul şi cablul acestuia la îndemâna
copiilor sub 8 ani.
-
Nu permiteţi copiilor să se joace cu aparatul.
-
Utilizaţi acest aparat doar în scopul în care a fost conceput,
pentru a evita potenţiale vătămări sau pericole.
-
Nu lăsaţi cablul de alimentare să atârne peste marginea mesei
sau a blatului pe care este aşezat aparatul.
-
Nu atingeți sfredelele de măcinare ale aparatului, în special atunci
când aparatul este conectat la o priză de perete.
-
Nu atingeți suprafețele fierbinți ale aparatului când acesta este în
funcțiune.
-
Nu goliți rezervorul de apă prin înclinarea aparatului, deoarece
acest lucru poate deteriora aparatul. Pentrua goli aparatul, urmați
instrucțiunile pentru golirea aparatului (consultaţi 'Spălarea
aparatului').
-
Dacă apare o problemă pe care nu o puteți soluționa cu ajutorul
acestui manual de utilizare, contactați centrul de asistență pentru
clienți din țara dvs. Dacă problema nu poate fi rezolvată, duceți
aparatul la un centru de service autorizat de Philips pentru
control sau reparare. Nu încercați să reparați personal aparatul, în
caz contrar garanția dvs. devine nulă.
16
Română

Atenţie
-
Nu așezați aparatul pe o suprafață fierbinte și feriți cablul de
alimentare de contactul cu suprafețele fierbinți.
-
Scoateți aparatul din priză dacă apar probleme în timpul măcinării
sau preparării și înainte de a-l curăța.
-
Mențineți ștecărul și priza de perete uscate.
-
Nu ridicați și nu deplasați aparatul în timp ce funcționează.
-
Vasul este fierbinte în timpul și după preparare. Țineți
întotdeauna vasul de mâner.
-
Nu utilizați niciodată vasul în cuptorul cu microunde.
-
Înainte de a depozita aparatul, așteptați să se răcească. Este
posibil ca plita și vasul de cafea să fie fierbinți.
-
După ce despachetați aparatul, asigurați-vă că acesta este
complet și nedeteriorat. Dacă aveți dubii, nu utilizați aparatulși
contactați centrul de asistență pentru clienți din țara dvs.
-
Acest aparat este conceput numai pentru utilizarea casnică
normală. Nu este conceput pentru utilizarea în medii cum ar fi
zona bucătăriei pentru personalul din magazine, birouri, ferme şi
alte medii de lucru.
Câmpuri electromagnetice (EMF)
Acest aparat Philips respectă toate standardele şi reglementările aplicabile privind expunerea la
câmpuri electromagnetice.
Înainte de prima utilizare
Setarea ceasului
1 Cuplați ștecărul la priza de perete. Indicatorul de timpclipește pe afișaj pentru a arăta că trebuie să
setați ora ceasului.
2 Rotiți butonul de control pentru a seta ora. Indicatorul de oră clipește (Fig. 2).
3 Apăsați în centrul butonului de control pentru a confirma ora (Fig. 3).
4 Indicatorul de minute începe să clipească pentru a arăta că trebuie să setați minutele (Fig. 4).
5 Rotiți butonul de control pentru a seta minutele (Fig. 5).
6 Apăsați în centrul butonului de control pentru a confirma minutele (Fig. 6).
7 Afișajul indică ora setată a ceasului. În acest moment, cafetiera este gata de utilizare.
17
Română

Setarea timpului de stingere automată
Puteți alege perioada de timp în care cafeaua să rămână fierbinte după preparare, prin reglarea
timpului după care aparatul se stinge automat. Timpul implicit de stingere automată este de 30 de
minute. Timpul maxim de stingere automată este de 120 de minute. Pentru a regla timpul de stingere
automată, urmați pașii de mai jos.
1 Asigurați-vă că aparatul este oprit și că ștecărul este introdus în priză.
2 Apăsați în centrul butonului de control până când afișajul începe să clipească.
3 Rotiți butonul de control pentru mări sau micșora timpul. 1 reprezintă 10 minute, 2 reprezintă 20 de
minute, 3 reprezintă 30 de minute și așa mai departe până la 12 care reprezintă 120 de minute.
4 Apăsați în centrul butonului de control pentru a confirma timpul de stingere automată.
Notă: Aparatul salvează întotdeauna ultima setare.
Spălarea aparatului
Clătiți întotdeauna cafetiera o dată înainte de prima utilizare.
1 Deschideți capacul rezervorului de apă. Umpleți rezervorul de apă cu apă curată rece până la
gradația (Fig. 7) pentru 8 cești.
Notă: Nu introduceți boabe de cafea sau cafea pre-măcinată în rezervorul de apă.
2 Închideți capacul rezervorului de apă.
3 Introduceți vasul în aparat (Fig. 8).
4 Apăsați butonul (Fig. 9) de pornire/oprire. Afișajul se aprinde și aparatul emite semnale sonore.
5 Apăsați butonul (Fig. 10) de selectare a concentrației.
6 Rotiți butonul de control pentru a alege setarea (Fig. 11) pentru cafea pre-măcinată. Pictograma
pentru cafea pre-măcinată începe să clipească.
7 Apăsați de două ori în centrul butonului de control pentru a confirma (Fig. 25). Aparatul începe
procesul de golire.
8 Lăsați aparatul să funcționeze până la finalizarea procesului de golire. Acesta este finalizat în
momentul în care aparatul nu mai emite semnale sonore.
9 Goliți vasul.
10 Apăsați butonul de pornire/oprirepentru a opri aparatul.
Utilizarea aparatului
Umplerea rezervorului de apă
Există gradații pentru 2 până la 10 cești (de la 275 ml până la 1375 ml) pe vizorul pentru nivelul apei.
Puteți utiliza aceste gradații pentru a stabili câtă apă să turnați în rezervorul de apă. Reflexia se
schimbă de la deschis la închis pentru fiecare ceașcă de apă adăugată.
1 Deschideți capacul rezervorului de apă și umpleți rezervorul de apă cu cantitatea necesară de apă
(Fig. 7) rece.
Notă: Nu umpleți rezervorul de apă peste gradația pentru 10 cești.
Notă: Asigurați-vă că volumul de apă pe care îl turnați în rezervorul de apă corespunde numărului
de cești pe care doriți să îl preparați. Cafetiera utilizează toată apa din rezervorul de apă.
18
Română

Utilizarea boabelor de cafea
Avertisment: Păstrați întotdeauna capacul rezervorului de apă închis atunci când
umpleți cu boabe de cafea recipientul pentru boabe de cafea. În caz contrar, boabele de
cafea pot să cadă în rezervorul de apă și pot bloca orificiul de alimentare cu apă.
1 Deschideți capacul (Fig. 12) recipientului pentru boabe de cafea.
2 Umpleți cu boabe de cafea recipientul dublu pentru boabe proaspete. Puteți umple cele două
recipiente cu două tipuri diferite de boabe de cafea. Asigurați-vă că sunt suficiente boabe de cafea
în recipientul dublu pentru cantitatea de cafea pe care doriți să o preparați (Fig. 13).
Notă: Asigurați-vă întotdeauna că recipientul dublu pentru boabe proaspete este plin cel puțin pe
jumătate.
Avertisment: Pentru a împiedica blocarea râșniței, nu utilizați boabe de cafea
neprăjite sau caramelizate. Utilizați boabe de cafea în loc de boabe espresso,
deoarece boabele espresso pot deteriora râșnița.
3 Deschideți suportul coșului (Fig. 14) filtrului.
4 Introduceți un filtru de hârtie (tip 1x4 sau nr. 4) sau filtrul permanentîn coșul (Fig. 15) filtrului.
5 Închideți suportul coșului filtrului.
6 Rotiți selectorul de măcinare a cafelei pentru a selecta tipul de măcinare dorit (de la fin la grosier).
Există nouă setări (Fig. 16) pentru măcinare.
Sugestie: Selectorul de măcinare a cafelei vă permite să alegeți dintre 9 setări diferite. Pictograma
indică 3 setări optime preselectate, dar puteți alege oricare setare aflată între acestea. Vă
recomandăm să încercați diferite setări pentru măcinare pentru a afla ce setare preferați.
7 Rotiți selectorul pentru recipiente pentru a alege dintre cele două recipiente.
Notă: De fiecare dată când schimbați recipientele sau boabele de cafea, vor exista întotdeauna
urme de cafea rămase de la tipul de boabe de cafea măcinat anterior. Curățați pâlnia râșniței după
ce treceți la un nou tip de boabe de cafea, pentru a evita acest lucru.
8 Apăsați butonul pentru concentrație (Fig. 10). Pictograma cu boabe de cafea începe să clipească.
9 Rotiți butonul de control pentru a selecta concentrația dorită: 1 boabă pentru cafea slabă, 2 boabe
pentru cafea medie-tare sau 3 boabe pentru cafea tare.
10 Apăsați în centrul butonului de control pentru a confirma concentrația (Fig. 6).
11 Pentru a selecta numărul de cești,rotiți butonul de control până când numărul dorit de cești
clipește pe afișaj.
Notă: Rețineți că aparatul de cafea utilizează toată apa din rezervorul de apă. Dacă selectați un
număr de cești care este mai mic decât cantitatea de apă, cafeaua devine mai slabă decât ați avut
intenția să o faceți.
12 Apăsați în centrul butonului de control pentru a confirma numărul de cești (Fig. 6).
13 Apăsați din nou în centrul butonului de control. Aparatul emite un semnal sonor și începe să
macine cantitatea necesară de boabe de cafea. După încheierea procesului de măcinare, aparatul
începe să prepare cafeaua.
14 Așteptați până când cafetiera nu mai emite semnale sonore înainte de a îndepărtavasul.
Notă: După preparare, cafeaua picură din coșul filtrului timp de câteva secunde.
15 Aparatul menține cafeaua fierbinte până la stingerea automată. Dacă nu doriți să păstrați cafeaua
fierbinte, apăsați butonul de pornire/oprire pentru a opri aparatul.
19
Română

Utilizarea cafelei pre-măcinate
Dacă doriți să utilizați cafea pre-măcinată în loc de boabe de cafea, urmați pașii de mai jos.
1 Deschideți capacul rezervorului de apă și umpleți rezervorul de apă cu cantitatea necesară de apă
(Fig. 7) rece.
2 Deschideți suportul coșului (Fig. 14) filtrului.
3 Introduceți un filtru de hârtie (tip 1x4 sau nr. 4) sau filtrul permanentîn coșul filtrului.
4 Introduceți cafeaua pre-măcinată în filtrul de hârtie sau în filtrul permanent.
5 Închideți suportul coșului filtrului.
6 Introduceți vasul în aparat (Fig. 8).
7 Apăsați butonul de pornire/oprire (Fig. 9). Afișajul se aprinde.
8 Apăsați butonul de selectare a concentrației (Fig. 10).
9 Rotiți butonul de control pentru a alege setarea pentru cafea pre-măcinată (Fig. 11). Pictograma
pentru cafea pre-măcinată se aprinde.
10 Apăsați în centrul butonului de control pentru a confirma (Fig. 6).
11 Apoi apăsați din nou în centrul butonului de control pentru a porni procesul de preparare (Fig. 6).
12 Așteptați până când cafetiera nu mai emite semnale sonore înainte de a îndepărtavasul.
Notă: După preparare, cafeaua picură din coșul filtrului timp de câteva secunde.
13 Aparatul menține cafeaua fierbinte până la stingerea automată. Dacă nu doriți să păstrați cafeaua
fierbinte, apăsați butonul de pornire/oprire pentru a opri aparatul.
Setarea cronometrului
Cronometrul vă permite să programați ora la care doriți începerea procesului de preparare. Asigurați-
vă ați urmat toți pașii pentru prepararea cafelei cu cafea pre-măcinată sau cu boabe de cafea înainte
de setarea cronometrului.
1 Apăsați butonul pentru cronometru (Fig. 17) și pictograma cronometru va apărea pe afișaj.
Indicatorul de oră clipește pentru a indica faptul că trebuie să setați ora.
2 Rotiți butonul pentru a seta ora (Fig. 18).
3 Apăsați în centrul butonului de control pentru a confirma ora (Fig. 20). Indicatorul de minute începe
să clipească pentru a arăta că trebuie să setați minutele.
4 Rotiți butonul de control pentru a seta minutele (Fig. 19).
5 Apăsați în centrul butonului pentru a confirma minutele și ora setate (Fig. 20). Cronometrul este
programat și procesul de preparare va începe la ora prestabilită.
Notă: Pentru a anula cronometrul, este suficient să apăsați din nou butonul pentru cronometru și
pictograma cronometru va dispărea de pe afișaj.
Funcția anti-picurare
Funcția anti-picurare vă permite să îndepărtați vasul din cafetieră înainte de finalizarea procesului de
preparare. Când îndepărtațivasul,funcția anti-picurare oprește curgerea cafelei învas
Notă: Procesul de preparare nu se oprește atunci când îndepărtați vasul. Dacă nu introduceți vasul
înapoi în aparat în interval de 20 de secunde, coșul filtruluise revarsă.
20
Română
Pagina se încarcă...
Pagina se încarcă...
Pagina se încarcă...
Pagina se încarcă...
Pagina se încarcă...
Pagina se încarcă...
Pagina se încarcă...
Pagina se încarcă...
Pagina se încarcă...
Pagina se încarcă...
-
 1
1
-
 2
2
-
 3
3
-
 4
4
-
 5
5
-
 6
6
-
 7
7
-
 8
8
-
 9
9
-
 10
10
-
 11
11
-
 12
12
-
 13
13
-
 14
14
-
 15
15
-
 16
16
-
 17
17
-
 18
18
-
 19
19
-
 20
20
-
 21
21
-
 22
22
-
 23
23
-
 24
24
-
 25
25
-
 26
26
-
 27
27
-
 28
28
-
 29
29
-
 30
30


Philips HD7762/00 Manual de utilizare
- Categorie
- Accesorii pentru prepararea cafelei
- Tip
- Manual de utilizare
- Acest manual este potrivit și pentru
în alte limbi
- English: Philips HD7762/00 User manual
Lucrări înrudite
Alte documente
-
Beko CEG 3190 B Manual de utilizare
-
Gorenje ESCM15DBK Manualul proprietarului
-
-
Electrolux ECG6400AU Manual de utilizare
-
-
Breville BARISTA MAX VCF126X01 Manualul proprietarului
-
-
Krups KM832810 Grind & Brew Manualul proprietarului
-
Braun 3074 Manualul proprietarului
-
 Myria MY4053 Manual de utilizare
