
LV Lietotājarokasgrāmata 63
PL Instrukcjaobsługi 70
RO Manualdeutilizare 78
RU Руководствопользователя 86
SK Príručkaužívateľa 95
SL Uporabniškipriročnik 102
SR Korisničkipriručnik 109
UK Посібниккористувача 116
EN Usermanual 5
BG Ръководствозапотребителя 12
CS Příručkaprouživatele 20
ET Kasutusjuhend 27
HR Korisničkipriručnik 34
HU Felhasználóikézikönyv 41
KK Қолданушының нұсқасы 48
LT Vartotojovadovas 56
HD7751


CALC
RESET
1


5
3 Important
Read this user manual carefully before you use the
appliance and save it for future reference.
3.1 Danger
• Never immerse the appliance in water or any
other liquid, nor rinse it under the tap.
3.2 Warning
• Check if the voltage indicated on the bottom
of the appliance corresponds to the local
mains voltage before you connect the
appliance.
• If the mains cord is damaged, you must have it
replaced by Philips, a service centre authorised
order to avoid a hazard.
• This appliance is not intended for use by
persons (including children) with reduced
physical, sensory or mental capabilities, or lack
of experience and knowledge, unless they
have been given supervision or instruction
concerning use of the appliance by a person
responsible for their safety.
• Children should be supervised to ensure that
they do not play with the appliance.
• Keep the mains cord out of the reach of
children. Do not let the mains cord hang over
the edge of the table or worktop on which
the appliance stands.
• Do not touch the grinding burrs of the
appliance, especially when the appliance is
connected to the mains.
• Keep the packaging materials (plastic bags,
cardboard buffers, etc.) out of the reach of
children, as they are not a toy.
• Do not touch the hot surfaces of the
appliance when it operates.
• This appliance is designed to grind beans and
make coffee. Use it correctly and with care to
avoid scalding by hot water and steam.
• Do not use the appliance if the plug, the mains
cord or the appliance itself is damaged.
1 Introduction
Congratulations on your purchase and welcome
Philips offers, register your product at
www.philips.com/welcome.
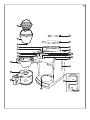
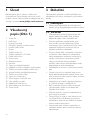
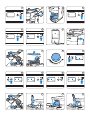
2 General
description (Fig. 1)
2 Filter basket
3 Drip stop
4 Lock of coffee bean chute
5 Grind selection knob
6 Display
7 STRENGTH button
8 2-10 cups button
9 Filter basket holder
10 Jug lid
11 Glass jug
12 Hotplate
14 Water reservoir with water level window
16 On/off, start/standby button
17 Pre-ground coffee button
18 Steam vent
19 Lid of coffee bean chute
20 Water reservoir lid
21 Coffee bean container
22 Coffee bean container lid
23 Cleaning brush
ENGLISH

6
4 Beforerstuse
4.1 Flushing the appliance
1 Put the mains plug in the wall socket.
• The start/standby button lights up.
2 Press the start/standby button (Fig. 2).
• The display lights up and the appliance
beeps.
D
Note:
If you do not press any button within
5 minutes, the appliance goes into standby
mode. In this case, the display goes out and
only the start/standby button stays on to
indicate that the appliance is still switched on.
In standby mode, you can press any button to
reactivate the appliance.
3 Open the water reservoir lid. Fill the water
reservoir with fresh cold water up to the
10-cup indication (Fig. 3).
D
Note:
Do not put coffee beans or ground coffee in
the appliance.
4 Close the water reservoir lid.
5 Place the jug on the hotplate (Fig. 4).
D
Note:
Make sure the lid is on the jug and the jug is
properly placed on the hot plate. The spout of
the jug has to face forward into the appliance.
If the lid is not on the jug or the jug is not
properly placed, the drip stop function is
automatically activated (see chapter ‘Using the
appliance’, section ‘Drip stop function’).
6 Press the start/standby button (Fig. 5).
• The appliance beeps and the freshness
indicator appears on the display.
7 Press the pre-ground coffee button to switch
off the grinder (Fig. 6).
• The button lights up when you press it.
• If a problem occurs that you cannot solve
by means of this user manual, contact the
Consumer Care Centre in your country. If the
problem cannot be solved, take the appliance
to a service centre authorised by Philips for
examination or repair. Do not attempt to
repair the appliance yourself, otherwise your
guarantee becomes invalid.
3.3 Caution
• Do not place the appliance on a hot surface
and prevent the mains cord from coming into
contact with hot surfaces.
• Unplug the appliance if problems occur during
grinding or brewing and before you clean it.
• The jug is hot during and after brewing.
Always hold the jug by its handle.
• Never use the jug in a microwave oven.
• Do not move the appliance while it is operating.
• Wait until the appliance has cooled down
before you store it. The hotplate and the
coffee jug may be hot.
• After you have unpacked the appliance, make
sure it is complete and undamaged. If in doubt,
do not use the appliance but contact the
Consumer Care Centre in your country.
• This appliance is intended for normal
household use only. It is not intended for
use in environments such as staff kitchens
environments. Nor is it intended to be used
by clients in hotels, motels, bed and breakfasts
and other residential environments.
3.4Electromagneticelds
(EMF)
This Philips appliance complies with all standards
properly and according to the instructions in this
user manual, the appliance is safe to use based on

7
ENGLISH
5.2 Using coffee beans
B Warning:
Donotputespressocoffeebeansinthecoffee
beancontainer.Onlyuseregularcoffeebeans.
B
Warning:
Alwayskeepthewaterreservoirlidclosed
whenyoullthecoffeebeancontainerwithcoffee
beans.Otherwisecoffeebeanscanfallintothe
waterreservoirandblockupthewaterinlet.
1 Press the OPEN button on the right-hand
holder. (Fig. 9)
2
the ground coffee. (Fig. 10)
3 Remove the coffee bean container lid (1) and
sure there are enough coffee beans in the
container for the amount of coffee you want
to brew (Fig. 11).
D
Note:
Always make sure the bean container is at
least half full.
B
Warning:
Themaximumcapacityofthecoffeebean
containeris250g.Topreventthegrinder
fromjamming,donotexceedthisamount.
B
Warning:
Topreventthegrinderfromjamming,donot
useunroastedorcaramelisedbeans.
4 Turn the grind selection knob to select the
There are nine grind settings (Fig. 12).
E
Tip:
We advise you to experiment with the
setting you prefer.
5 To select the number of cups, press the
2-10 cups button as many times as the
desired number of cups (Fig. 13).
D Note:
When you switch off the grinder, the number
of cups and the strength setting are not
shown on the display.
8 Press the start/standby button to start the
brewing process (Fig. 7).
9 Let the appliance operate until all the water
• The coffeemaker produces 5 beeps when
the brewing process is nished.
10 Press the start/standby button to stop the
brewing/ keep-warm process. (Fig. 5)
11 Empty the jug.
5 Using the appliance
5.1 Filling the water reservoir
1
reservoir with the required amount of cold
water (Fig. 3).
There are indications for 2 to 10 cups (275ml
to 1375ml) on the water level window and
on the jug. You can use these indications to
determine how much water to put in the
water reservoir. Keep in mind that the amount
of brewed coffee will be slightly less, since
ground coffee absorbs water.
E
Tip:
required amount of water.
D
Note: (Fig. 8)
10-cup indication, otherwise water spills from
the opening at the back.

8
D Note:
basket for several seconds.
• The freshness indicator ashes slowly on
the display for 120 minutes after brewing, to
indicate that the coffee is fresh.
9 If you do not need the hotplate to keep the
coffee hot, press the start/standby button to
put the appliance in standby mode (Fig. 17).
• The appliance produces a long beep and
the start/standby button stays on to indicate
that the appliance is still switched on.
D
Note:
If you do not press the start/standby button
to put the appliance in standby mode,
the appliance goes into standby mode
automatically after 120 minutes. The start/
standby button stays on to indicate that the
appliance is still plugged into the mains.
D
Note:
You can press any button to activate the
appliance and brew coffee again.
5.3 Using pre-ground coffee
If you want to use pre-ground coffee instead of
coffee beans, follow the steps below.
1 Fill the water reservoir with water, as
described in ‘Filling the water reservoir’.
2 Press the OPEN button on the right-hand
holder. (Fig. 9)
3
4 Press the pre-ground coffee button to switch
off the grinder (Fig. 6).
• The button lights up when you press it.
D
Note:
When you switch off the grinder, the number
of cups and the strength setting are not
shown on the display.
5
• The 2-10 cups button lights up when you
press it.
• The selected number of cups appears on
the display.
D
Note:
The appliance uses all the water in the water
tank. Make sure that the number of cups you
select with the 2-10 cups button equals the
amount of water that you have poured into
the water reservoir. If you select a number of
cups that is smaller than the amount of water,
the coffee becomes weaker than you intended.
6 Press the STRENGTH button once or several
times until the desired coffee strength is
selected (mild, medium or strong) (Fig. 14).
• The STRENGTH button lights up when you
press it.
• The display shows the selected coffee
strength.
7 Press the start/standby button to start the
brewing process (Fig. 15).
B
Warning:
Keepawayfromthesteamventduringbrewing,
ashotsteamescapesthroughthevent.
• The grinder grinds the required amount of
coffee beans.
• The freshness indicator ashes quickly on
the display until the brewing process is
nished (Fig. 16).
• The coffeemaker beeps 5 times when the
brewing process is nished.
• The hotplate switches on automatically.
B
Warning:
Donottouchthehotplatewhileitison,
asitgetshot.
8
Wait until the coffeemaker has stopped beeping
before you remove the jug from the hotplate.

9
ENGLISH
6.2 Cleaning the coffee bean
chute
You have to clean the coffee bean chute every
1 to 2 weeks, depending on the frequency of use.
1 Put the mains plug in the wall socket.
2 Press the start/standby button (Fig. 2).
• The start/standby button and the display
lights up.
3 Press the start/standby button and then
remove the mains plug from the wall socket.
4
handle into the chute lock and turn the lock
to the ‘open’ position. (Fig. 19)
5 Open the lid of the coffee bean
chute (Fig. 20).
6 Use the cleaning brush to brush ground
coffee residues into the lower part of the
chute (Fig. 21).
E
Tip:
coffee.
• The ground coffee residues fall into the lter
basket.
7 Close the lid of the coffee bean chute and
turn the lock to the ‘locked’ position (Fig. 22).
8
coffee residues and throw it away.
6.3 Descaling the coffeemaker
When the message ‘CALC’ appears on the display
(after approx. 60 brewing processes), you need
to descale the coffeemaker, as scale can clog the
coffeemaker.
Regular descaling prolongs the life of the appliance
and guarantees optimal brewing results and a
constant brewing time for a long time. Descale the
appliance:
• every 120 brewing cycles if you use soft water
(up to 18dH).
• every 60 brewing cycles if you use hard water
(over 18dH).
You can contact your local water board for
information about the water hardness in your area.
D Note:
How much pre-ground coffee you use is a
matter of personal taste. For a medium-strong
cup of coffee, use one measuring spoon
(approximately 6g) for each cup (125ml).
6
the jug on the hotplate.
7 Follow steps 7, 8 and 9 in section ‘Using coffee
beans’.
5.4 Drip stop function
The drip stop function enables you to remove
the jug from the coffeemaker before the brewing
D
Note:
The brewing process does not stop when you
remove the jug. If you do not put the jug back
6 Cleaning and
maintenance
6.1 Cleaning after every use
B Warning:
Neverimmersetheapplianceinwaterorany
otherliquid,norrinseitunderthetap.
1 Remove the mains plug from the wall socket.
2 Wipe the outside of the coffeemaker and the
hotplate with a damp cloth.
3
some washing-up liquid or clean them in the
dishwasher.

10
7 Ordering accessories
To buy accessories or spare parts, visit
www.shop.philips.com/service or go to your
Philips dealer. You can also contact the Philips
Consumer Care Centre in your country (see the
8 Environment
• Do not throw away the appliance with the
normal household waste at the end of its life,
recycling. By doing this, you help to preserve
the environment (Fig. 24).
9 Guarantee and
support
If you need information or support, please
visit www.philips.com/support or read the
10 Troubleshooting
This chapter summarises the most common
problems you could encounter with the
appliance. If you are unable to solve the problem
with the
information below, visit www.philips.com/
support for a list of frequently asked questions or
contact the Consumer Care Centre in your country.
D Note:
If you are not aware of the water hardness in your
area and are not in a position to contact your
local water board, we advise you to descale the
appliance every time the ‘CALC’ message appears
on the display.
D
Note:
To remove the ‘CALC’ message from the display,
press the 2-10 CUPS button and the STRENGTH
button simultaneously.
1 Open the water reservoir lid.
2 Fill the water reservoir with 7 cups of white
vinegar (4% acetic acid) and 3 cups of
water (Fig. 23).
3
4 Place the empty jug on the hotplate (Fig. 4).
5 Put the mains plug in the wall socket.
6 Press the start/standby button.
7 Press the pre-ground coffee button to switch
off the grinder. Then press the start/standby
button to start the brewing process.
8
Wait until half of the vinegar-water solution has
button to stop the brewing process and let the
solution soak for at least 15 minutes.
9 Press the start/standby button to switch the
coffeemaker back on and wait until the rest
press the start/standby button to put the
appliance in standby mode.
10
11 Fill the water reservoir with cold water
and press the start/standby button to
start another brewing process. Let the
coffeemaker complete the entire brewing
process and empty the jug.
12 Repeat step 12 until the water no longer
tastes or smells like vinegar.
13
water and some washing-up liquid.

11
ENGLISH
The appliance continues to drip long after the
brewing process has ended.
• The dripping is caused by condensation
of steam. It is completely normal that the
appliance drips for some time.
• If the dripping does not stop, the drip stop may
be clogged. To clean the drip stop, press the
OPEN button on the right-hand side of the
and the drip stop under the tap.
• If you remove the jug for more than 20 seconds
during the brewing process, the drip stop
The coffee is not hot enough.
• Make sure the jug is placed properly on the
hotplate.
• Make sure that the hotplate and the bottom of
the jug are clean.
• Use thin-walled cups, because they absorb less
heat from the coffee than thick-walled cups.
• Do not use milk that comes directly out of the
fridge.
• Descale the appliance. See section ‘Descaling’ in
chapter ‘Cleaning and maintenance’.
The appliance does not work.
• Make sure that the voltage indicated on the
appliance corresponds to the local mains voltage.
• Fill the water reservoir with water.
When I use the grinder, the coffee is too weak.
• Make sure the number of cups you select with
the 2-10 cups button is consistent with the
amount of water in the water reservoir. Please
keep in mind that the appliance uses all the
water in the water reservoir.
• Use the STRENGTH button to set the coffee
strength to ‘strong’.
• When you use coffee beans, make sure you
do not press the pre-ground coffee button, as
this switches off the grinder.
•
• To increase the coffee strength, select a higher
number of cups with the 2-10 cups button than the
When I use pre-ground coffee, the coffee is too
weak.
• Make sure the amount of pre-ground coffee in
the water reservoir. Please keep in mind that the
appliance uses all the water in the water reservoir.
•
• To increase the coffee strength, increase the
amount of pre-ground coffee or decrease the
amount of water.
the appliance while it is brewing coffee.
• If yo
u remove the jug for more than 20 seconds
during the brewing process, the drip stop causes
the coffee d
oes not reach its full taste before
the end of the brewing process. Therefore we
advise you not to remove the jug and pour
out the coffee before the end of the brewing
process.

12
3 Важно
3.1Опасност
•
3.2Предупреждение
•
•
•
•
•
•
•
•
•
1 Въведение
www.philips.com/welcome.
2 Общо
описание(фиг.1)

13
3.4Електромагнитни
излъчвания(EMF)
4 Предипървата
употреба
4.1Промиваненауреда
1
• Светва бутонът за старт/готовност.
2
• Дисплеят светва и уредът издава
кратък звуков сигнал.
D
Забележка:
3
доозначениетоза
10чаши(фиг.3).
•
•
3.3Внимание
•
•
•
•
•
•
•
•

14
5 Използванена
уреда
5.1Напълваненаводния
резервоар
1
E
Съвет:
D
Забележка:(фиг.8)
5.2Използваненакафена
зърна
BПредупреждение:
Неслагайтекафеенизърназаеспресов
контейнерaзакафеназърна.Използвайте
самообиконвенокафеназърна.
B
Предупреждение:
Винагидръжтекапаказатворен,когато
пълнитеконтейнераскафеназърна.В
противенслучайкафеенитезърнамогатда
паднатвъвводниярезервоаридазапушат
отворазаподаваненавода.
DЗабележка:
4
5
D
Забележка:
6
• Уредът издава звуков сигнал и на
дисплея се появява индикаторът за
прясно кафе.
7
• Бутонът светва, когато го натиснете.
D
Забележка:
8
9
• Кафе машината издава 5 кратки
звукови сигнала, когато процесът на
варене приключи.
10
11

15
DЗабележка:
6
• Бутонът STRENGTH светва, когато го
натиснете.
• Дисплеят показва избраната сила на
кафето.
7
B
Предупреждение:
Пазетесеототворазапараповремена
варенето,тъйкатоотнегоизлизагореща
пара.
• Мелачката смила необходимото
количество кафе на зърна.
• Индикаторът за прясно кафе мига
бързо на дисплея, докато процесът на
варене не приключи (фиг. 16).
• Кафе машината издава 5 звукови
сигнала, когато процесът на варене
приключи.
• Нагревателната плоча се включва
автоматично.
B
Предупреждение:
Недокосвайтенагревателната
плоча,когатоевключена,защотосе
нагорещява.
8
1
2
3
D
Забележка:
B
Предупреждение:
Максималнатавместимостнаконтейнера
закафеназърнае250г.Зада
избегнетезадръстваненамелачката,не
превишавайтетоваколичество.
B
Предупреждение:
Задаизбегнетезадръстванена
мелачката,неизползвайтесуровиили
карамелизираникафеенизърна.
4
E
Съвет:
5
• Бутонът 2-10 CUPS светва, когато го
натиснете.
• Избраният брой чаши се появява на
дисплея.

16
DЗабележка:
5
D
Забележка:
6
7
5.4Функциязаспиранена
прокапването
DЗабележка:
DЗабележка:
• Индикаторът за прясно кафе мига
бавно на дисплея в продължение на
120 минути след сваряване на кафето,
за да покаже, че кафето е прясно.
9
• Уредът издава дълъг звуков сигнал и
бутонът за старт/готовност остава
да свети, за да покаже, че уредът все
още е включен.
D
Забележка:
D
Забележка:
5.3Използваненамлянокафе
1
2
3
4
• Бутонът светва, когато го натиснете.

17
EСъвет:
• Остатъците от смляно кафе ще
паднат в поставката за филтър.
7
8
6.3Почистваненакафе
машинатаотнакип
•
•
D
Забележка:
6 Почистванеи
поддръжка
6.1Почистванеследвсяка
употреба
BПредупреждение:
Никоганепотапяйтезадвижващияблок
въвводаилидругатечностинегомийтес
течащавода.
1
2
3
6.2Почистваненаулеяза
кафеназърна
1
2
• Натиснете бутона за старт/
готовност. Дисплеят светва.
3
4
5
6

18
7 Поръчванена
аксесоари
www.shop.philips.com/service
8 Опазванена
околнатасреда
•
9 Гаранцияи
поддръжка
www.philips.com/support
DЗабележка:
1
2
3
4
5
6
7
8
9
10
11
12
13

19
•
•
•
•
•
•
•
•
•
•
•
10Отстраняванена
неизправности
www.philips.com/support
•
•
•
•
•
•
•
•

20
3 Důležité
3.1Nebezpečí
•
3.2Varování
•
•
•
•
•
•
•
•
•
•
1 Úvod
výrobek na adrese www.philips.com/welcome.
2 Všeobecný
popis (Obr. 1)
3 Funkce Drip Stop
6 Displej
12 Plotýnka
Pagina se încarcă...
Pagina se încarcă...
Pagina se încarcă...
Pagina se încarcă...
Pagina se încarcă...
Pagina se încarcă...
Pagina se încarcă...
Pagina se încarcă...
Pagina se încarcă...
Pagina se încarcă...
Pagina se încarcă...
Pagina se încarcă...
Pagina se încarcă...
Pagina se încarcă...
Pagina se încarcă...
Pagina se încarcă...
Pagina se încarcă...
Pagina se încarcă...
Pagina se încarcă...
Pagina se încarcă...
Pagina se încarcă...
Pagina se încarcă...
Pagina se încarcă...
Pagina se încarcă...
Pagina se încarcă...
Pagina se încarcă...
Pagina se încarcă...
Pagina se încarcă...
Pagina se încarcă...
Pagina se încarcă...
Pagina se încarcă...
Pagina se încarcă...
Pagina se încarcă...
Pagina se încarcă...
Pagina se încarcă...
Pagina se încarcă...
Pagina se încarcă...
Pagina se încarcă...
Pagina se încarcă...
Pagina se încarcă...
Pagina se încarcă...
Pagina se încarcă...
Pagina se încarcă...
Pagina se încarcă...
Pagina se încarcă...
Pagina se încarcă...
Pagina se încarcă...
Pagina se încarcă...
Pagina se încarcă...
Pagina se încarcă...
Pagina se încarcă...
Pagina se încarcă...
Pagina se încarcă...
Pagina se încarcă...
Pagina se încarcă...
Pagina se încarcă...
Pagina se încarcă...
Pagina se încarcă...
Pagina se încarcă...
Pagina se încarcă...
Pagina se încarcă...
Pagina se încarcă...
Pagina se încarcă...
Pagina se încarcă...
Pagina se încarcă...
Pagina se încarcă...
Pagina se încarcă...
Pagina se încarcă...
Pagina se încarcă...
Pagina se încarcă...
Pagina se încarcă...
Pagina se încarcă...
Pagina se încarcă...
Pagina se încarcă...
Pagina se încarcă...
Pagina se încarcă...
Pagina se încarcă...
Pagina se încarcă...
Pagina se încarcă...
Pagina se încarcă...
Pagina se încarcă...
Pagina se încarcă...
Pagina se încarcă...
Pagina se încarcă...
Pagina se încarcă...
Pagina se încarcă...
Pagina se încarcă...
Pagina se încarcă...
Pagina se încarcă...
Pagina se încarcă...
Pagina se încarcă...
Pagina se încarcă...
Pagina se încarcă...
Pagina se încarcă...
Pagina se încarcă...
Pagina se încarcă...
Pagina se încarcă...
Pagina se încarcă...
Pagina se încarcă...
Pagina se încarcă...
Pagina se încarcă...
Pagina se încarcă...
Pagina se încarcă...
Pagina se încarcă...
Pagina se încarcă...
Pagina se încarcă...
Pagina se încarcă...
Pagina se încarcă...
-
 1
1
-
 2
2
-
 3
3
-
 4
4
-
 5
5
-
 6
6
-
 7
7
-
 8
8
-
 9
9
-
 10
10
-
 11
11
-
 12
12
-
 13
13
-
 14
14
-
 15
15
-
 16
16
-
 17
17
-
 18
18
-
 19
19
-
 20
20
-
 21
21
-
 22
22
-
 23
23
-
 24
24
-
 25
25
-
 26
26
-
 27
27
-
 28
28
-
 29
29
-
 30
30
-
 31
31
-
 32
32
-
 33
33
-
 34
34
-
 35
35
-
 36
36
-
 37
37
-
 38
38
-
 39
39
-
 40
40
-
 41
41
-
 42
42
-
 43
43
-
 44
44
-
 45
45
-
 46
46
-
 47
47
-
 48
48
-
 49
49
-
 50
50
-
 51
51
-
 52
52
-
 53
53
-
 54
54
-
 55
55
-
 56
56
-
 57
57
-
 58
58
-
 59
59
-
 60
60
-
 61
61
-
 62
62
-
 63
63
-
 64
64
-
 65
65
-
 66
66
-
 67
67
-
 68
68
-
 69
69
-
 70
70
-
 71
71
-
 72
72
-
 73
73
-
 74
74
-
 75
75
-
 76
76
-
 77
77
-
 78
78
-
 79
79
-
 80
80
-
 81
81
-
 82
82
-
 83
83
-
 84
84
-
 85
85
-
 86
86
-
 87
87
-
 88
88
-
 89
89
-
 90
90
-
 91
91
-
 92
92
-
 93
93
-
 94
94
-
 95
95
-
 96
96
-
 97
97
-
 98
98
-
 99
99
-
 100
100
-
 101
101
-
 102
102
-
 103
103
-
 104
104
-
 105
105
-
 106
106
-
 107
107
-
 108
108
-
 109
109
-
 110
110
-
 111
111
-
 112
112
-
 113
113
-
 114
114
-
 115
115
-
 116
116
-
 117
117
-
 118
118
-
 119
119
-
 120
120
-
 121
121
-
 122
122
-
 123
123
-
 124
124
-
 125
125
-
 126
126
-
 127
127
-
 128
128


în alte limbi
- slovenčina: Philips HD7751/00 Používateľská príručka
Lucrări înrudite
-
Philips HD7888/01 Manual de utilizare
-
Philips HD7459/20 Manual de utilizare
-
Philips HD7461/00 Manual de utilizare
-
Philips HD5120 Manual de utilizare
-
Philips HD7584 Manual de utilizare
-
Philips HD7140/80 Manual de utilizare
-
Philips HD7435/20 Manual de utilizare
-
-
Philips HD7762/00 Manual de utilizare
-
Philips HD7459 Manual de utilizare
Alte documente
-
Electrolux E6CM1-5ST Manual de utilizare
-
-
 Russell Hobbs 25610-56 Manual de utilizare
-
 Russell Hobbs 25620-56 Manual de utilizare
-
-
Maestro MR410 Manualul proprietarului
-
Scarlett sc-cg44502 Instrucțiuni de utilizare
-
Zelmer ZCM1111X (CM1001D) Manual de utilizare
-
Cafissimo CA6502/61 Manual de utilizare
-
SENSEO® CSA210/31 Manual de utilizare

