
FR-WR
JP
2
EN
INSTRUCTIONS
14
FR
MODE D’EMPLOI
26
ES
INSTRUCCIONES
36
DE
BEDIENUNGSANLEITUNG
48
KR
사용설명서
58
CHT 68
TH
คําแนะนําการใชงาน
78
VI
CÁC HƯỚNG DẪN
88
Model No.: IM013

2
JP
FR-WR
1
2
3
4
5
6
0
7
8
9
a
1
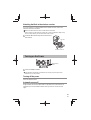
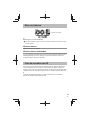
A/B/C ..........P. 7
2
1-15 .........P. 7
3
*
4
...............................P. 4
5
.........................P. 4
6
...............................P. 5
7
X-RCV / ................P. 7
8
BEEP / ..................P. 8
9
...................................P. 3
0
ON/OFF / ..............P. 5
a
*

3
JP
x
350V
x
• 4 2
• 4 2
x
4
1
2
•
+
/
-
3

4
JP
FLST-1
1
1
2
2
3
1

5
JP
x
x
1
ON/OFF /
1
ON/OFF
x
ON/OFF
ON/OFF
60
ON/OFF

6
JP
3
/
B
A
C
+
30m
•
•

7
JP
2.4GHz
ON/OFF /
BEEP /
X-RCV /
1
•
2
ON/OFF
• ON/OFF
3
X-RCV
• X-RCV RCV
• X-RCV X-RCV
4
5
• RCV
• X-RCV
6
•

8
JP
1
BEEP BEEP
• BEEP BEEP
•
•
•
•
•
• AF
•
•
•

9
JP
•
•
•
•
•
•
•
•
•
•

10
JP
1
2
3
2.4GHz DSSS
10m
• 15cm

11
JP
*
1
30m
2.4GHz
15
3
RCV X-RCV
4 2 /
4 2
1 IPX1
*
1
6.4 4
/ *
2
-10ºC 40ºC / 30 90%
/ -20ºC 60ºC / 10 90%
59.1 x 46.1 x 51.0 mm
75g
*1
*2

12
JP

13
MEMOMEMO

14
EN
Thank you for purchasing this Olympus product.
To ensure your safety, please read this instruction manual carefully before use.
In addition, please keep the manual handy for future reference.
Be sure to read the instruction manuals for the fl ash and the wireless commander
as well.
If you use the product outside the country or region of purchase, you may violate
local regulations. Olympus accepts no liability in this case.
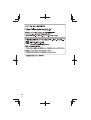
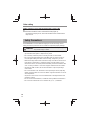
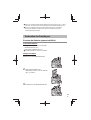
Checking the Contents of the Package
Wireless radiowave receiver: FR-WR
Pouch
Instructions (This manual)
Warranty card
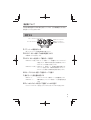
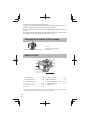
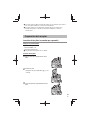
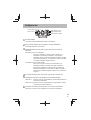
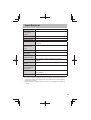
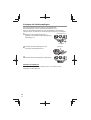
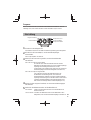
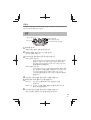
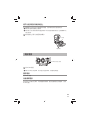
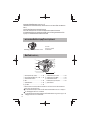
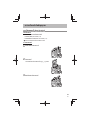
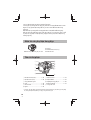
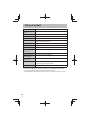
Names of Parts
1
2
3
4
5
6
0
7
8
9
a
1 Group dial (A/B/C) ........................P. 19
2 Channel dial (1-15) .......................P. 19
3 External fl ash terminal*
4 Latch .............................................P. 16
5 Latch release button .....................P. 16
6 Hot shoe .......................................P. 17
7 X-RCV lamp/button .......................P. 19
8 BEEP lamp/button.........................P. 20
9 Battery compartment cover ...........P. 15
0 ON/OFF lamp/button ....................P. 17
a Tripod socket
* Use the external fl ash terminal when you connect a commercial fl ash via a sync cord. Always
attach the cap when you are not using the external fl ash terminal.

15
EN
x
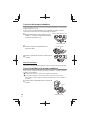
If you connect an older type of commercial fl ash with a voltage of approx. 350 V or
higher, the wireless receiver will malfunction.
x
If you connect a fl ash with a communication terminal that does not meet the
Olympus standard, the wireless receiver may malfunction.
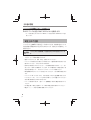
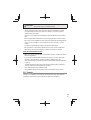
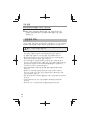
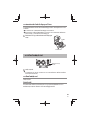
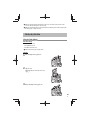
Preparing the Receiver
Inserting the batteries (sold separately)Inserting the batteries (sold separately)
Batteries to use
Choose from the following batteries.
• AAA NiMH batteries (x 2)
• AAA alkaline dry-cell batteries (x 2)
x
AAA manganese batteries are not usable.
Inserting the batteries
1
Open the battery compartment cover.
2
Insert the batteries.
• Make sure that the polarity (+/-) is
correct.
3
Close the battery compartment cover.

16
EN
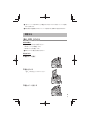
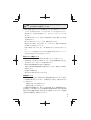
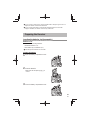
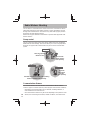
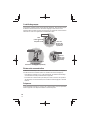
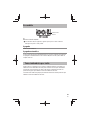
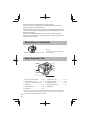
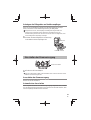
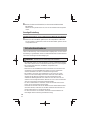
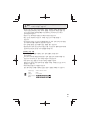
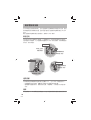
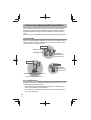
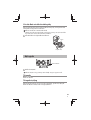
Attaching the wireless receiver Attaching the wireless receiver
This procedure describes how to attach the wireless receiver to a separate fl ash
stand (FLST-1).
If you are attaching the wireless receiver to a commercial shoe adapter, refer to
the instruction manual for the shoe adapter.
1
Hold down the latch release button (
1
), and
slide the latch in the direction of the arrow (
2
).
Latch release button
Latch
2
Insert the receiver all the way into the fl ash
stand.
Flash stand
3
Slide the latch in the direction of the arrow.
Removing the receiver
Perform Step 1 of the above procedure and remove the receiver from the fl ash
stand.

17
EN
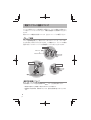
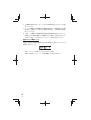
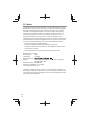
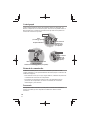
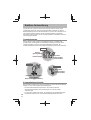
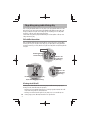
Attaching the fl ash to the wireless receiver Attaching the fl ash to the wireless receiver
If you are attaching a commercial fl ash to the wireless receiver, refer to the
instruction manual for the fl ash.
x
Make sure that both the receiver and the fl ash are turned off.
x
Dirt or moisture on the electrical contacts may cause a malfunction. Wipe off any
dirt or moisture before you attach the fl ash to the receiver.
1
Insert the fl ash all the way into the hot shoe of
the receiver.
Hot shoe
Electrical contacts
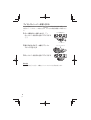
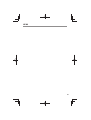
Turning on the Power
ON/OFF lamp/
button
1
Press the ON/OFF button.
x
If the ON/OFF lamp fl ashes, the batteries are running very low. Replace the
batteries as soon as possible.
Turning off the powerTurning off the power
Press the ON/OFF button.
Automatic power offAutomatic power off
If approximately 60 minutes elapse with no operations, the power will turn off
automatically. Press the ON/OFF button when you want to use the receiver
again.

18
EN
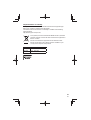
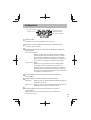
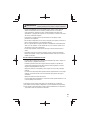
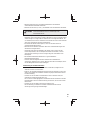
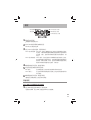
Radio Wireless Shooting
You can attach a commander to the camera and use the commander as well as
a fl ash that supports the radio wireless function to control this wireless receiver
through radio communications. This function only works with Olympus products
that support the radio wireless function.
Refer to the Olympus website for information on products that support the radio
wireless function.
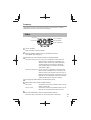
Group controlGroup control
You can control up to three groups of receivers. Within each group, the fl ashes
will fi re with the same settings. This function allows you to use an Olympus fl ash
that does not support radio communications as part of a radio communication
system.
Flash with radio wireless function (sold separately) /
Wireless commander (sold separately)
Group B
Group A
Group C
Flash (sold separately)
+
Wireless receiver
Flash with
radio wireless
function
(sold separately)
Flash with radio
wireless function
(sold separately)
Communication distanceCommunication distance
The maximum distance for radio wireless communications with this wireless
receiver is approx. 30 meters (98.4 ft.) (under Olympus measurement conditions).
• This distance assumes that there are no obstacles, shielding materials, or
radio interference from other devices.
• The communication distance may be shorter depending on the positions of the
devices, the surrounding environment, weather conditions, and other factors.

19
EN
FrequencyFrequency
This product uses the 2.4 GHz band for wireless communications. However,
other wireless devices may use the same frequency.
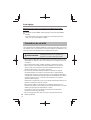
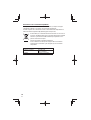
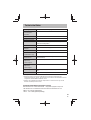
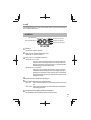
Setup
ON/OFF lamp/button
BEEP lamp/button
X-RCV lamp/button
Channel dial
Group dial
1
Turn on the fl ash.
• Refer to the fl ash manual for details.
2
Press the ON/OFF button to turn on the wireless receiver.
• The ON/OFF lamp will light up.
3
Hold down the X-RCV button to select an operating mode.
• The X-RCV lamp is off: RCV mode (You set the fl ash control mode and
fl ash intensity on the wireless commander. This
wireless receiver receives the setting information
and fi ring signal from the wireless commander.
Then, the fl ash that is connected to this wireless
receiver fi res a fl ash.)
• The X-RCV lamp is on: X-RCV mode (You set the fl ash control mode and
fl ash intensity on the fl ash that is connected to this
wireless receiver. This wireless receiver receives a
fi ring signal from the wireless commander. Then, the
fl ash that is connected to this wireless receiver fi res
a fl ash with this wireless receiver’s settings.)
4
Turn the group dial to select a communication group.
5
Set the fl ash control mode and fl ash intensity.
• RCV mode: Set the fl ash control mode and fl ash intensity on the
wireless commander.
• X-RCV mode: Set the fl ash control mode and fl ash intensity on the
fl ash that is connected to this wireless receiver.
6
Turn the channel dial to select a communication channel.
• Select the same channel that you set on the wireless commander.

20
EN
Other settingOther setting
Setting a beeping sound to indicate that the fl ash is ready to fi re
1
Hold down the BEEP button until the BEEP lamp lights up.
• To disable the beeping sound, hold down the BEEP button until the BEEP
lamp turns off.
Safety Precautions
Read WARNINGS and CAUTIONS thoroughly to ensure safe usage. These
safety precautions protect the users and others and prevent property damage.
WARNING
Failure to observe the precautions indicated by this symbol
may result in injury or death.
• Do not use fl ash in places where it may be exposed to fl ammable or explosive
gas. Otherwise, fi re ignition or explosion may result.
• Do not directly solder the product or modify, remodel, or disassemble.
• Do not cover the light emitting area of the fl ash with your hand, and do not
touch the light emitting area after continuous fi ring. It may burn your skin.
• Water and foreign matter inside of the device may cause fi re or electric shock.
If the device is immersed in or exposed to water or foreign matter is found
inside of the device, turn off the power immediately and remove batteries with
care. Contact your dealer or consult an Olympus Authorized Service Station.
• To prevent a traffi c accident, do not direct the fl ash at a person operating a
motor vehicle.
• Do not use the fl ash or AF illuminator in close proximity to others (especially
infants). Keep the fl ash out of reach of children. Light from the fl ash can cause
visual impairment.
• To prevent a short circuit, do not use batteries with a damaged external seal
(insulation coating).
• Do not mix old and new batteries, or batteries made by different manufacturers.
• Do not connect substances such as metal to the (+) or (–) of batteries.
Pagina se încarcă ...
Pagina se încarcă ...
Pagina se încarcă ...
Pagina se încarcă ...
Pagina se încarcă ...
Pagina se încarcă ...
Pagina se încarcă ...
Pagina se încarcă ...
Pagina se încarcă ...
Pagina se încarcă ...
Pagina se încarcă ...
Pagina se încarcă ...
Pagina se încarcă ...
Pagina se încarcă ...
Pagina se încarcă ...
Pagina se încarcă ...
Pagina se încarcă ...
Pagina se încarcă ...
Pagina se încarcă ...
Pagina se încarcă ...
Pagina se încarcă ...
Pagina se încarcă ...
Pagina se încarcă ...
Pagina se încarcă ...
Pagina se încarcă ...
Pagina se încarcă ...
Pagina se încarcă ...
Pagina se încarcă ...
Pagina se încarcă ...
Pagina se încarcă ...
Pagina se încarcă ...
Pagina se încarcă ...
Pagina se încarcă ...
Pagina se încarcă ...
Pagina se încarcă ...
Pagina se încarcă ...
Pagina se încarcă ...
Pagina se încarcă ...
Pagina se încarcă ...
Pagina se încarcă ...
Pagina se încarcă ...
Pagina se încarcă ...
Pagina se încarcă ...
Pagina se încarcă ...
Pagina se încarcă ...
Pagina se încarcă ...
Pagina se încarcă ...
Pagina se încarcă ...
Pagina se încarcă ...
Pagina se încarcă ...
Pagina se încarcă ...
Pagina se încarcă ...
Pagina se încarcă ...
Pagina se încarcă ...
Pagina se încarcă ...
Pagina se încarcă ...
Pagina se încarcă ...
Pagina se încarcă ...
Pagina se încarcă ...
Pagina se încarcă ...
Pagina se încarcă ...
Pagina se încarcă ...
Pagina se încarcă ...
Pagina se încarcă ...
Pagina se încarcă ...
Pagina se încarcă ...
Pagina se încarcă ...
Pagina se încarcă ...
Pagina se încarcă ...
Pagina se încarcă ...
Pagina se încarcă ...
Pagina se încarcă ...
Pagina se încarcă ...
Pagina se încarcă ...
Pagina se încarcă ...
Pagina se încarcă ...
Pagina se încarcă ...
Pagina se încarcă ...
Pagina se încarcă ...
Pagina se încarcă ...
-
 1
1
-
 2
2
-
 3
3
-
 4
4
-
 5
5
-
 6
6
-
 7
7
-
 8
8
-
 9
9
-
 10
10
-
 11
11
-
 12
12
-
 13
13
-
 14
14
-
 15
15
-
 16
16
-
 17
17
-
 18
18
-
 19
19
-
 20
20
-
 21
21
-
 22
22
-
 23
23
-
 24
24
-
 25
25
-
 26
26
-
 27
27
-
 28
28
-
 29
29
-
 30
30
-
 31
31
-
 32
32
-
 33
33
-
 34
34
-
 35
35
-
 36
36
-
 37
37
-
 38
38
-
 39
39
-
 40
40
-
 41
41
-
 42
42
-
 43
43
-
 44
44
-
 45
45
-
 46
46
-
 47
47
-
 48
48
-
 49
49
-
 50
50
-
 51
51
-
 52
52
-
 53
53
-
 54
54
-
 55
55
-
 56
56
-
 57
57
-
 58
58
-
 59
59
-
 60
60
-
 61
61
-
 62
62
-
 63
63
-
 64
64
-
 65
65
-
 66
66
-
 67
67
-
 68
68
-
 69
69
-
 70
70
-
 71
71
-
 72
72
-
 73
73
-
 74
74
-
 75
75
-
 76
76
-
 77
77
-
 78
78
-
 79
79
-
 80
80
-
 81
81
-
 82
82
-
 83
83
-
 84
84
-
 85
85
-
 86
86
-
 87
87
-
 88
88
-
 89
89
-
 90
90
-
 91
91
-
 92
92
-
 93
93
-
 94
94
-
 95
95
-
 96
96
-
 97
97
-
 98
98
-
 99
99
-
 100
100


în alte limbi
- français: Olympus FR-WR Manuel utilisateur
- English: Olympus FR-WR User manual
- 日本語: Olympus FR-WR ユーザーマニュアル
- español: Olympus FR-WR Manual de usuario
Lucrări conexe
Alte documente
-
Nikon SD-9 Manual de utilizare
-
BeeWi BBZ352 Manual de utilizare
-
-
Sony TGA-1 Manualul proprietarului
-
HP Color LaserJet Enterprise M855 Printer series Ghid de instalare
-
-
-
Yamaha SWK-W10 Manualul proprietarului