Olympus M.ZUIKO DIGITAL ED 150-400mm F4.5 TC1.25x IS PRO Manual de utilizare
- Tip
- Manual de utilizare

© 2020
WD705600
Printed in China
date of issue 2020.07.
04 -
JP
10 -
EN
INSTRUCTIONS
17 -
FR
MODE D’EMPLOI
23 -
ES
INSTRUCCIONES
29 -
DE
BEDIENUNGSANLEITUNG
35 -
BG
41 -
CS
47 -
DA
BETJENINGSVEJLEDNING
53 -
EL
59 -
ET
JUHISED
65 -
FI
KÄYTTÖOHJEET
71 -
HR
UPUTE
77 -
HU
HASZNÁLATI ÚTMUTATÓ
83 -
IT
ISTRUZIONI
89 -
LT
INSTRUKCIJA
95 -
LV
101
-
NL
AANWIJZINGEN
107
-
NO
INSTRUKSJONER
113
-
PL
INSTRUKCJA
119
-
PT
INSTRUÇÕES
125
-
RO
131
-
RU
137
-
SK
143
-
SL
NAVODILA
149
-
SR
UPUTSTVO ZA UPOTREBU
155
-
SV
BRUKSANVISNING
161
-
TR
167
-
UK
178
-
AR
179
-
CHT
使用說明書
185
-
KR
취급설명서
191
-
TH
197
-
VI
ED 150-400mm f4.5
TC1.25x IS PRO
Model No.:IM017/IM017-L
The following importer description applies to products imported
into the EU directly by OLYMPUS EUROPA SE & Co. KG only.
OLYMPUS EUROPA SE & Co. KG
Wendenstrasse 14-18, 20097 Hamburg, Germany
Manufactured by OLYMPUS CORPORATION
2951 Ishikawa-machi, Hachioji-shi, Tokyo 192-8507, Japan

4 JP 205
JP
このたびは当社製品をお買い上げいただきありがとうございます。
ご使用前に本説明書の内容をよくご理解の上、安全に正しくご使用ください。この説
明書はご使用の際にいつでも見られるように大切に保管してください。
カメラのファームウェアを最新にしてお使いください。カメラによって動作が異なりま
す。詳細は当社ホームページをご覧ください。
他社製カメラに装着時は、各製造元へお問い合わせください。
•レンズで太陽を見ないでください。失明や視力障害を起こすことがあります。
•レンズキャップを付けずに放置しないでください。太陽光が焦点を結んで故障や火
災の原因になることがあります。
•カメラに取り付けた状態でレンズを太陽に向けないでください。太陽光が焦点を結
んで故障や火災の原因になることがあります。
J
•カメラ本体にレンズを取り付けた状態では必ずレンズ側を保持してください。カメ
ラ本体のみで保持するとマウント部分の破損やレンズが落下する恐れがあります。
また、防滴性能・光学性能が確保できないことがあります。
•カメラ本体のストラップではなく、レンズに取り付けたストラップのみをご使用くだ
さい。
•三脚を使うときはカメラ本体の三脚穴ではなくレンズの三脚座に取り付けてくだ
さい。
1
1
レ ン ズ フ ード
2
フ ード 取 り 付 け つ ま み
3
フォーカスリング
4
L-Fn
ボタン
5
ズームリング
6
三脚座
7
三脚座固定つまみ
8
取り付け指標
9
三脚座フット部
0
スト ラッ プ 取 り 付 け 部
a
フ ォ ー カ ス リ ミ ット ス イ ッ チ
b
フォー カス 切り換えスイッチ
c
L-Fn
ボタン切り換えスイッチ
d
IS
スイッチ
e
電子音スイッチ
f
セ キ ュ リ テ ィ ー ス ロ ット
g
SET
ボタン
h
内蔵テレコンバーター切り換えレバー
i
内蔵テレコンバーター切り換えロック
スイッチ
j
電気回路接点
1
2 3
4
5
6
1 2 43 5 7 86
9
0
i
b
a
c
d
g
j
h
e
f
1
3
1
2
3
1
3
2
2
1
3
2
1
2
3
4
5

JP 5
撮影距離範囲を設定します。設定した範囲でピント合わせを行います。
AF/MF
を切り換えます。
L-Fn
L-Fn
ボタンの動作を切り換えます
。
L-Fn
:
L-Fn
ボタンを押している間、
AF
は停止してピントは固定されます。
カメラの設定で他の機能を割り当てることができます。
PRESET
:
プリセットフォーカス機能を使用できます。
L-Fn
L-Fn
ボタン切り換 えスイッチの 位置によります。
4
箇所どのボタンでも同じ動作をします。
SET
ピント位置を記憶させることができます。プリセットフォーカス機能で呼び出すことが
できます。
IS
手 ぶ れ 補 正(
IS
)の
ON/OFF
を切り換えます。
ON
:
レンズとカメラの手ぶれ補正機能が動作します。
IS
の動作はカメラ側の
IS
設定に従います。
OFF
:
レンズとカメラの両方の手ぶれ補正機能をオフにします。
プリセットフォーカス機能を使用するときの通知音の
ON/OFF
を切り換えます。
セキュリティーワイヤー(市販品)を取り付けることができます。
あらかじめレンズにピント位置を記録させて(
SET
機能)、瞬時にピント位置を呼び出す
(
CALL
機能)ことができます。
SET
1
設定したい位置や被写体にピントを合わせます。
2
SET
ボタンを押します。
•
ピント位置が記憶されます。
•
電子音スイッチがs( オ ン )の と き は 、通 知 音 が
1
回鳴ります。通知音が
3
回鳴っ
たときは正しく記憶されていません。再度手順
1
から操作してください。
記憶したピント位置の情報は、新たにピント位置を記憶するまで保持します。

6 JP
CALL
1
L-Fn
ボタン切り換えスイッチを
PRESET
にします 。
2
L-Fn
ボタンを押します。
• SET
機能で記憶された位置へピントが移動します。
•
電子音スイッチがs( オ ン )の と き は 、通 知 音 が
2
回鳴ります。通知音が
3
回鳴っ
たときは記憶したフォーカス位置にピントが移動していません。再度
SET
機能か
ら操作してください。
SET
後に焦点距離を変更したり、内蔵テレコンバーターの倍率を切り換えたりすると
ピントがずれることがあります。再度ピント合わせを行ってください。
内蔵テレコンバーター切り換えレバーを操作することで焦点距離を
1
×と
1.25
×に 切
り換えることができます 。
1 2
3
1
内蔵テレコンバーター切り換えロックスイッチを矢印の方向にスライドして(1)
ロックを 解 除しま す 。
2
内蔵テレコンバーター切り換えレバーを切り換えます(2)。
3
内蔵テレコンバーター切り換えロックスイッチを矢印の方向にスライドして(3)
ロックしま す 。
J
•内蔵テレコンバーターの切り換え後にピント合わせを行ってください。
•内蔵テレコンバーターを切り換えると絞り値が変更されることがあります。露出補
正は内蔵テレコンバーター切り換え後に行ってください。
•誤操作防止のため、内蔵テレコンバーター切り換えレバーの操作後は必ずロックし
てください。
•誤作動防止のため、以下の場合は内蔵テレコンバーター切り換えレバーの操作をし
ないでください。操作した場合は、もう一度ピント合わせなどをやり直してください。
- シャッターボタンを半押し、または全押ししているとき
- レンズ、カメラが動作中のとき
•使用するカメラにより、内蔵テレコンバーター切り換えレバーの操作時にカメラの
ファインダーやモニターが一瞬暗くなることがありますが、故障ではありません。

JP 7
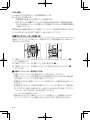
2
1
三脚座固定つまみを緩めます(1)。
2
任意の位置にレンズを回転させます(2)。
•
位置合わせの目安として
90
度 ごと に クリックが あ り ま す 。
3
三脚座固定つまみを締めます(3)。
三脚座、三脚座フット部は取り外しできません。
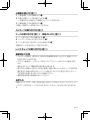
3
4
5
1
フード取り付けつまみを緩めます(1)。
2
レ ン ズ フ ー ド を ま っ す ぐ 取 り 付 け ま す( 2)。
3
フード取り付けつまみをしっかりと締めます(3)。
収納時はフードを逆向きにして取り付けます。
6
•フィルターを
2
枚以上重ねたり、厚みがある種類を使用したときには、画面にケラレ
が発 生することがあります 。
•フラッシュ使用時、レンズやフードなどによってフラッシュ光がケラレる場合があり
ます。
•使用状況によって、撮影枚数が減る場合があります。
•寒い戸外から暖かい室内に入るなど急激に温度が変わったときは、レンズ内部で結
露が発生する場合があります。ビニール袋などに入れてから室内に持ち込み、レン
ズを室内の温度になじませてからご使用ください。
•電気回路接点部に直接触れないでください。
市販のレンズブロアーでほこりを吹き払います。レンズはレンズクリーニングペーパ
ーでやさしく拭きます。レンズを汚れたままにしておくと、カビが生えることがありま
す。

8 JP
マイクロフォーサーズマウント
150 mm
~
400 mm
(
35 mm
フィルム換 算
300 mm
~
800 mm
)
187.5 mm
~
500 mm
(
35 mm
フィルム換 算
375 mm
~
1000 mm
)
F4.5
F5.6
8.2
°
~
3.1
°
6.6
°
~
2.5
°
18
群
28
枚(内蔵テレコンバーター
4
群
7
枚)
F4.5
~
F22
F5.6
~
F29
1.3 m
~
)
(無限遠)
AF/MF
切り換え
⌀
115.8 mm
(最大径)
×
314.3 mm
(長さ)
1875 g
( フ ー ド 、キ ャ ッ プ 除 く )
⌀
95 mm
かぶせ式
M.ZUIKO
のテレコンバーターに対応しています。対応テレコンバーターおよび組み
合わせ注意事項は当社ホームページをご覧ください。
※
外観・仕様は改善のため予告なく変更することがありますので、ご了承ください。

JP 9
Micro Four Thirds
及び
Micro Four
Thirds
ロゴマークはオリンパス株式会
社の商標または登録商標です。
このレンズを購入した国・地域以外での
使用については、その国・地域の規則に
違反する恐れがありますので、当社では
一切の責任は負えません。
このレンズの内部のソフトウェアは第
三者作成のソフトウェアを含んでいま
す。第三者作成のソフトウェアは、その
所有者または著作権者により所定の条
件が課せられており、その条件に基づ
いてあなたに配布されています。この
条件の中であなたに告知するものがあ
る場合には、以下の
URL
のウェブサイ
トに必要に応じて準備された
software
notice PDF
ファイル内に見出すことが
できます。
http://www.olympus.co.jp/
en/support/imsg/digicamera/
download/notice/notice.cfm

10 EN
EN
INSTRUCTIONS
Thank you for purchasing this Olympus product.
To ensure your safety, please read this instruction manual before use, and keep it
handy for future reference.
Please use the latest firmware for the camera. Operations will vary depending on
the camera. For more information, please visit our home page.
Contact the other manufacturer to mount the lens on another manufacturer’s
camera.
Precautions: Be Sure to Read the Following
Warnings: Safety Precautions
• Do not view the sun through the lens. It may cause blindness or vision
impairment.
• Do not leave the lens without the cap. If solar light is converged through the
lens, a fire may result.
• Do not point the camera lens at the sun. Sunlight will converge in the lens and
focus inside the camera, possibly causing a malfunction or fire.
J
Precautions for Use
• Be sure to support the lens while it is attached to the camera. Supporting only
the camera could result in damage to the lens mount or cause the lens to fall. It
could also adversely affect splashproof and optical performance.
• When carrying the camera with the lens attached, use a strap attached to the
lens, not the strap attached to the camera.
• When using a tripod, attach the tripod to the lens tripod mount, not to the
camera.
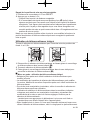
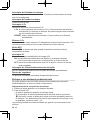
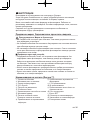
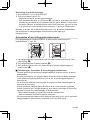
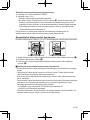
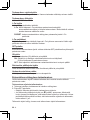
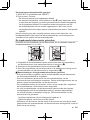
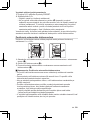
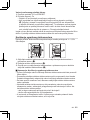
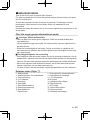
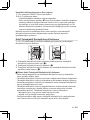
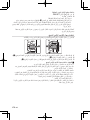
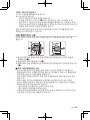
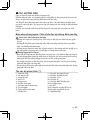
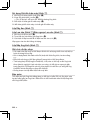
Names of parts (Figure 1)
1 Lens hood
2 Hood mounting screw
3 Focus ring
4 L-Fn buttons
5 Zoom ring
6 Tripod mount
7 Tripod mount lock screw
8 Mount index
9 Tripod mount foot
0 Strap eyelet
a Focus limiter switch
b Focus mode switch
c L-Fn switch
d IS switch
e Beep on/off switch
f Security slot
g SET button
h Teleconverter selector
i Teleconverter lock
j Electrical contacts

EN 11
Focus limiter switch
Sets the range of the photographing distance. Focusing is done within the range
that is set.
Focus mode switch
Switches between AF/MF.
L-Fn switch
Choose the role played by the L-Fn buttons.
L-Fn: Pressing any of the L-Fn buttons suspends the autofocus operation and
locks focus. Other roles can be assigned using camera controls.
PRESET: Press any of the L-Fn buttons to focus at a preset distance.
L-Fn buttons
The role played by the four L-Fn buttons depends on the position of the L-Fn
switch. The selected role is performed by all four buttons.
SET button
The SET button can be used to save the current focus position for later recall.
IS switch
Turn image stabilization (IS) on or off.
ON: Stabilizing functions in the lens and camera operate.
The IS operates according to the IS setting in the camera.
OFF: Stabilizing functions in both the lens and camera are off.
Beep on/off switch
Turn preset focus beep notifications on or off.
Security slot
An attachment point for third-party security cables.
Focusing at a Preset Distance
A selected focus position can be saved for instant recall as described below.
Saving a Focus Position
1 Focus on the desired subject or at the desired distance.
2 Press the SET button.
• The lens will save the current focus position.
• If the beep on/off switch is in the s (on) position, a beep will sound once to
notify you that the focus position has been saved. Three beeps in succession
indicate that the focus position was not saved; repeat Steps 1 and 2.
The saved position will be stored until a new focus position is saved.

12 EN
Recalling the Saved Focus Position
1 Slide the L-Fn switch to PRESET.
2 Press an L-Fn button.
• The lens will focus at the saved distance.
• If the beep on/off switch is in the s (on) position, a beep will sound twice
to notify you that the lens has focused at the saved distance. Three beeps
in succession indicate that the focus position could not be recalled and that
you will need to save a new focus position as described in “Saving a Focus
Position”.
Note that you may need to refocus if you change the focal length or the position of
the teleconverter selector after saving the focus position.
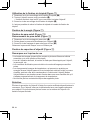
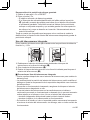
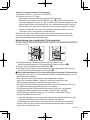
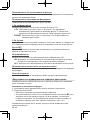
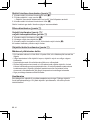
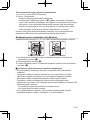
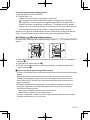
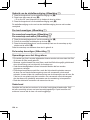
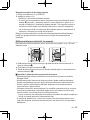
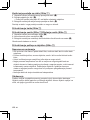
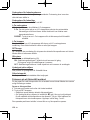
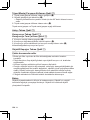
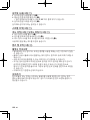
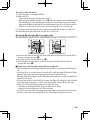
Using the Built-in Teleconverter
Rotate the teleconverter selector to switch between the 1× and 1.25× focal length
positions.
1 2
3
1 Unlock the teleconverter selector by sliding the teleconverter lock in the
direction shown (1).
2 Rotate the teleconverter selector (2).
3 Slide the teleconverter lock in the direction shown to lock the teleconverter
selector (3).
J
Cautions: Using the Built-in Teleconverter
• Refocus after using the teleconverter selector to change the focal length.
• Changing the position of the teleconverter selector may change the aperture.
Adjust exposure compensation after using the teleconverter selector.
• To prevent unintended operation, be sure to lock the teleconverter selector after
use.
• Using the teleconverter selector under the conditions listed below will result in
unintended operation, requiring adjustments to focus or the like. Do not use the
teleconverter selector:
- while the shutter button is pressed halfway or all the way down or
- while operating the lens and/or camera.
• Depending on the camera, the viewfinder or monitor may briefly go dark when
you operate the teleconverter selector, but this is not a malfunction.

EN 13
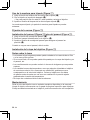
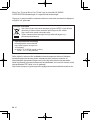
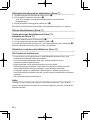
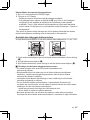
Using the Tripod Mount (Figure 2)
1 Loosen the tripod mount lock screw (1).
2 Rotate the lens as desired (2).
• There is a click position every 90° to help orient the lens.
3 Tighten the tripod mount lock screw (3).
The tripod mount and tripod mount foot cannot be removed.
Attaching the Strap (Figure 3)
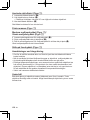
Attaching the Hood (Figure 4)/Reversing the Hood (Figure 5)
1 Loosen the hood mounting screw (1).
2 Slide the hood straight onto the lens (2).
3 Tighten the hood mounting screw to secure the hood in place (3).
Reverse the hood when it is not in use.
Attaching the Lens Cap (Figure 6)
Notes on Shooting
• Edges of pictures may be cut off if more than one filter is used or if a thick filter
is used.
• When using a flash, flash light may be blocked by the lens body, lens hood, etc.
• Usage conditions may lower the number of images that can be captured.
• Sudden changes in temperature, as for example may occur when the lens
is taken from a cold outdoor environment into a heated area, may cause
condensation inside the lens. Placing the lens in a plastic bag prior to entering a
heated area allows it to adjust gradually to the change in temperature.
• Do not touch electric contacts on cameras.
Maintenance
Blow dust off the lens with a commercially available blower. For the lens, wipe
gently with a lens cleaning paper. Mold may form on the lens surface if the lens is
left dirty.

14 EN
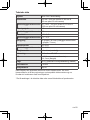
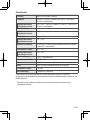
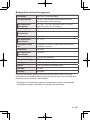
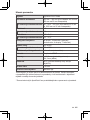
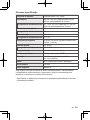
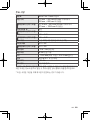
Main Specifications
Mount Micro Four Thirds mount
Focal distance 150 mm – 400 mm (equivalent to 300 mm to
800 mm on a 35 mm camera)
With built-in teleconverter 187.5 mm – 500 mm (equivalent to 375 mm to
1000 mm on a 35 mm camera)
Max. aperture f4.5
With built-in teleconverter f5.6
Image angle 8.2° – 3.1°
With built-in teleconverter 6.6° – 2.5°
Lens configuration 18 groups, 28 lenses (built-in teleconverter
4 groups, 7 lenses)
Iris control f4.5 to f22
With built-in teleconverter f5.6 to f29
Shooting range
1.3 m (51.2 in.) to ) (infinite)
Focus adjustment AF/MF switching
Dimensions ⌀ 115.8 mm/4.6 in. (maximum diameter) ×
314.3 mm/12.4 in. (length)
Weight 1875 g (66.1 oz.) (excluding hood and cap)
Filter size ⌀ 95 mm
Lens hood Slip on
This lens can be used with an M.ZUIKO teleconverter. For more information on
compatible teleconverters and notes on combining them with the lens, please visit
our home page.
* Specifications are subject to change without any notice or obligation on the part
of the manufacturer.

EN 15
Micro Four Thirds and the Micro Four Thirds logo are trademarks or registered
trademarks of OLYMPUS CORPORATION.
Olympus will not be held liable for violations of local regulations arising from use
of this product outside the country or region of purchase.
FCC Notice
This equipment has been tested and found to comply with the limits for a Class
B digital device, pursuant to part 15 of the FCC Rules. These limits are designed
to provide reasonable protection against harmful interference in a residential
installation. This equipment generates, uses and can radiate radio frequency
energy and, if not installed and used in accordance with the instructions, may cause
harmful interference to radio communications. However, there is no guarantee that
interference will not occur in a particular installation. If this equipment does cause
harmful interference to radio or television reception, which can be determined
by turning the equipment off and on, the user is encouraged to try to correct the
interference by one or more of the following measures:
• Reorient or relocate the receiving antenna.
• Increase the separation between the equipment and receiver.
• Connect the equipment into an outlet on a circuit different from that to which the
receiver is connected.
• Consult the dealer or an experienced radio/TV technician for help.
• Only the OLYMPUS-supplied USB cable should be used to connect the camera to
USB enabled personal computers.
FCC Caution
Changes or modifications not expressly approved by the party responsible for
compliance could void the user’s authority to operate the equipment.
For customers in North America, Central America, South America and the
Caribbean
Declaration of Conformity
Model Number : IM017/IM017-L
Trade Name : OLYMPUS
Responsible Party :
Address : 3500 Corporate Parkway, P. O. Box 610, Center Valley,
PA 18034-0610, USA
Telephone Number : 484-896-5000
Tested To Comply With FCC Standards
FOR HOME OR OFFICE USE
This device complies with part 15 of the FCC Rules. Operation is subject to the
following two conditions:
(1) This device may not cause harmful interference, and
(2) this device must accept any interference received, including interference that may
cause undesired operation.
CAN ICES-3(B)/NMB-3(B)

16 EN
• Technical Support (U.S.A. / Canada)
24/7 online automated help : http://www.olympusamerica.com/support
Phone customer support : Tel.1-800-260-1625 (Toll-free)
Our phone customer support is available from 9 am to 9 pm (Monday to Friday) ET
E-Mail : [email protected]
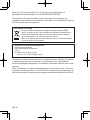
For customers in Europe
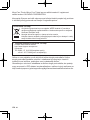
This symbol [crossed-out wheeled bin WEEE Annex IV] indicates
separate collection of waste electrical and electronic equipment in the EU
countries.
Please do not throw the equipment into the domestic refuse.
Please use the return and collection systems available in your country for
the disposal of this product.
• European Technical Customer Support
Please visit our homepage
http://www.olympus-europa.com
or call:
Tel. 00800 - 67 10 83 00 (Toll-free)
+49 40 - 237 73 899 (Charged)
The software in this lens may include third party software. Any third party software
is subject to the terms and conditions, imposed by the owners or licensors of that
software, under which software is provided to you.
Those terms and other third party software notices, if any, may be found in the
software notice PDF file stored at
http://www.olympus.co.jp/en/support/imsg/digicamera/download/notice/notice.cfm

FR 17
FR
MODE D’EMPLOI
Nous vous remercions pour l’achat de ce produit Olympus.
Pour votre sécurité, veuillez lire ce mode d’emploi avant utilisation et conserver
ces instructions à portée de main pour un usage ultérieur.
Veuillez utiliser la version la plus récente du micro-logiciel pour l’appareil photo.
Le fonctionnement varie selon l’appareil photo. Pour plus d’informations, veuillez
consulter notre page d’accueil.
Contactez l’autre fabricant concerné pour monter l’objectif sur l’appareil photo
d’un autre fabricant.
Précautions : bien lire la suite
Avertissements : précautions de sécurité
• Ne pas regarder le soleil à travers l’objectif. Cela pourrait causer des troubles ou
la perte de la vue.
• Ne pas laisser l’objectif sans le bouchon. Si des rayons du soleil sont concentrés
à travers l’objectif, un incendie risque de se produire.
• Ne pas pointer l’objectif monté sur l’appareil vers le soleil. Les rayons du soleil
seraient concentrés dans l’appareil photo, pouvant provoquer un mauvais
fonctionnement ou un incendie.
J
Précautions d’emploi
• Veillez à soutenir l’objectif lorsqu’il est fixé sur l’appareil photo. Si vous soutenez
uniquement l’appareil photo, vous risquez d’endommager la monture de
l’objectif ou de faire tomber ce dernier. Cela risque également de nuire aux
caractéristiques de résistance à l’eau ou aux performances optiques.
• Lorsque vous portez l’appareil photo équipé de l’objectif, utilisez une sangle
fixée à l’objectif et non celle fixée à l’appareil photo.
• Lors de l’utilisation d’un trépied, fixez ce dernier au système de fixation du
trépied de l’objectif et non à celui de l’appareil photo.
Noms des pièces (Figure 1)
1 Pare-soleil
2 Vis de montage du pare-soleil
3 Bague de mise au point
4 Boutons L-Fn
5 Bague de zoom
6 Fixation du trépied
7 Vis de verrouillage de la fixation du
trépied
8 Repère de montage
9 Sabot de fixation du trépied
0 Œillet de fixation de la sangle
a Commutateur du limiteur de mise
au point
b Commutateur du mode de mise au
point
c Commutateur L-Fn
d Commutateur IS
e Commutateur de signal sonore
f Fente de sécurité
g Bouton SET
h Sélecteur du téléconvertisseur
i Verrouillage du téléconvertisseur
j Contacts électriques

18 FR
Commutateur du limiteur de mise au point
Définit la plage de la distance de la prise de vue. La mise au point est effectuée
dans la plage définie.
Commutateur du mode de mise au point
Commutateur entre AF/MF.
Commutateur L-Fn
Choisissez le rôle joué par les boutons L-Fn.
L-Fn : la pression de l’un des boutons L-Fn interrompt l’opération d’autofocus
et verrouille la mise au point. Il est possible d’attribuer d’autres rôles à
l’aide des commandes de l’appareil photo.
PRESET : appuyez sur l’un des boutons L-Fn pour faire le point à une distance
prédéfinie.
Boutons L-Fn
Le rôle joué par les quatre boutons L-Fn dépend de la position du commutateur
L-Fn. Le rôle sélectionné est effectué par les quatre boutons.
Bouton SET
Le bouton SET permet d’enregistrer la position de mise au point actuelle en vue
de la réutiliser ultérieurement.
Commutateur IS
Activez ou désactivez la stabilisation d’image (IS).
ON : les fonctions de stabilisation dans l’objectif et l’appareil photo
fonctionnent.
L’IS fonctionne selon les réglages IS dans l’appareil photo.
OFF : les fonctions de stabilisation à la fois dans l’objectif et l’appareil photo
sont éteintes.
Commutateur de signal sonore
Activez ou désactivez les notifications sonores de la mise au point prédéfinie.
Fente de sécurité
Point de fixation pour les câbles de sécurité tiers.
Mise au point à une distance prédéfinie
Il est possible d’enregistrer une position de mise au point particulière pour pouvoir
la réutiliser ultérieurement comme décrit ci-dessous.
Enregistrement d’une position de mise au point
1 Faites le point sur le sujet souhaité ou à la distance souhaitée.
2 Appuyez sur le bouton SET.
• L’objectif enregistre la position de mise au point actuelle.
• Si le commutateur de signal sonore est positionné sur s (activé), un signal
sonore est émis pour vous avertir que la position de mise au point a été
enregistrée. Trois signaux émis successivement indiquent que la position de
mise au point n’a pas été enregistrée ; répétez les étapes 1 et 2.
La position enregistrée sera conservée jusqu’à ce qu’une nouvelle position de
mise au point soit enregistrée.

FR 19
Rappel de la position de mise au point enregistrée
1 Positionnez le commutateur L-Fn sur PRESET.
2 Appuyez sur un bouton L-Fn.
• L’objectif fera le point à la distance enregistrée.
• Si le commutateur de signal sonore est positionné sur s (activé), deux
signaux sont émis pour vous avertir que l’objectif a fait le point à la distance
enregistrée. Trois signaux émis successivement indiquent que la position de
mise au point n’a pas pu être rappelée et que vous devez enregistrer une
nouvelle position de mise au point comme décrit dans « Enregistrement d’une
position de mise au point ».
Notez que vous devrez peut-être refaire le point si vous modifiez la focale ou la
position du sélecteur du téléconvertisseur après avoir enregistré la position de
mise au point.
Utilisation du téléconvertisseur intégré
Tournez le sélecteur du téléconvertisseur pour commuter entre les positions de
focale 1× et 1,25×.
1 2
3
1 Déverrouillez le sélecteur du téléconvertisseur en faisant glisser le verrouillage
du téléconvertisseur dans le sens indiqué (1).
2 Tournez le sélecteur du téléconvertisseur (2).
3 Faites glisser le verrouillage du téléconvertisseur dans le sens indiqué pour
verrouiller le sélecteur du téléconvertisseur (3).
J
Mises en garde : utilisation du téléconvertisseur intégré
• Refaites le point après avoir utilisé le sélecteur du téléconvertisseur pour
modifier la focale.
• La modification de la position du sélecteur du téléconvertisseur peut modifier
l’ouverture. Modifiez la correction d’exposition après avoir utilisé le sélecteur du
téléconvertisseur.
• Pour éviter toute manipulation involontaire, veillez à verrouiller le sélecteur du
téléconvertisseur après son utilisation.
• L’utilisation du sélecteur du téléconvertisseur dans les conditions indiquées
ci-dessous peut entraîner une manipulation involontaire, nécessitant des
modifications de la mise au point ou d’autres réglages. N’utilisez pas le
sélecteur du téléconvertisseur :
- pendant que vous appuyez sur le déclencheur à mi-course ou à fond ou
- pendant que vous utilisez l’objectif et/ou l’appareil photo.
• Selon l’appareil photo, le viseur ou l’écran peut s’assombrir brièvement lorsque vous
utilisez le sélecteur du téléconvertisseur, mais il ne s’agit pas d’un dysfonctionnement.

20 FR
Utilisation de la fixation du trépied (Figure 2)
1 Desserrez la vis de verrouillage de la fixation du trépied (1).
2 Tournez l’objectif comme vous le souhaitez (2).
• Un déclic est émis tous les 90° pour vous aider à orienter l’objectif.
3 Serrez la vis de verrouillage de la fixation du trépied (3).
Il n’est pas possible de retirer la fixation du trépied et le sabot de fixation du
trépied.
Fixation de la sangle (Figure 3)
Fixation du pare-soleil (Figure 4)/
Retournement du pare-soleil (Figure 5)
1 Desserrez la vis de montage du pare-soleil (1).
2 Faites glisser le pare-soleil directement sur l’objectif (2).
3 Serrez la vis de montage du pare-soleil pour le fixer (3).
Retournez le pare-soleil lorsque vous ne l’utilisez pas.
Fixation du capuchon d’objectif (Figure 6)
Remarques sur la prise de vue
• Les bords des images risquent d’être coupés si plusieurs filtres sont utilisés
ensemble ou si vous utilisez un filtre épais.
• Lors de l’utilisation du flash, la lumière du flash peut être stoppée par l’objectif,
le pare-soleil, etc.
• Les conditions d’utilisation peuvent réduire le nombre d’images pouvant être
prises.
• Les changements brusques de température, qui peuvent se produire par
exemple lorsque l’objectif passe d’un environnement extérieur froid à une zone
chauffée, peuvent créer de la condensation à l’intérieur de l’objectif. Mettez
l’objectif dans un sac plastique avant d’entrer dans une zone chauffée afin qu’il
s’adapte progressivement au changement de température.
• Ne touchez pas les contacts électriques des appareils photo.
Entretien
Éliminez la poussière de l’objectif à l’aide d’une poire soufflante disponible dans le
commerce. Pour l’objectif, essuyez-le délicatement avec une lingette nettoyante
pour objectif. De la moisissure peut se former sur la surface de l’objectif si la
saleté n’est pas éliminée.

FR 21
Caractéristiques principales
Fixation Avec Micro Four Thirds
Longueur focale 150 mm à 400 mm (équivalent à 300 mm à
800 mm sur un appareil photo 35 mm)
Avec le téléconvertisseur
intégré
187,5 mm à 500 mm (équivalent à 375 mm à
1 000 mm sur un appareil photo 35 mm)
Ouverture maximale f4,5
Avec le téléconvertisseur
intégré
f5,6
Angle de vue 8,2° à 3,1°
Avec le téléconvertisseur
intégré
6,6° à 2,5°
Configuration de l’objectif 18 groupes, 28 lentilles (téléconvertisseur intégré
4 groupes, 7 lentilles)
Commande de diaphragme f4,5 à f22
Avec le téléconvertisseur
intégré
f5,6 à f29
Plage de prise de vue
1,3 m à ) (infini)
Réglage de la mise au point Commutation AF/MF
Dimensions ⌀ 115,8 mm (diamètre maximal) × 314,3 mm
(longueur)
Poids 1875 g (pare-soleil et capuchon exclus)
Taille du filtre ⌀ 95 mm
Pare-soleil À emboîtement
Cet objectif peut être utilisé avec un téléconvertisseur M.ZUIKO. Pour plus
d’informations sur les téléconvertisseurs compatibles et pour lire des notes sur la
manière de les associer à l’objectif, veuillez consulter notre page d’accueil.
* Caractéristiques modifiables sans préavis ni obligations de la part du fabricant.

22 FR
Micro Four Thirds et le logo Micro Four Thirds sont des marques commerciales ou
déposées de OLYMPUS CORPORATION.
Olympus ne sera pas tenu responsable des violations des réglementations locales
résultant de l’utilisation de ce produit en dehors du pays ou de la région d’achat.
Pour les utilisateurs en Amérique du Nord, Amérique Centrale, Amérique
du Sud et aux Caraïbes
CAN ICES-3(B)/NMB-3(B)
• Support technique (États-Unis / Canada)
Aide en ligne 24/24h, 7/7 jours : http://www.olympusamerica.com/support
Ligne téléphonique de support : Tél. 1-800-260-1625 (appel gratuit)
Notre centre d’appels clients est ouvert de 9 h à 21 h (du lundi au vendredi) Heure
de l’Est
Email : [email protected]
Pour les utilisateurs en Europe
Le symbole [poubelle sur roue barrée d’une croix WEEE annexe IV]
indique une collecte séparée des déchets d’équipements électriques et
électroniques dans les pays de l’UE.
Veuillez ne pas jeter l’équipement dans les ordures domestiques.
A utiliser pour la mise au rebut de ces types d’équipements
conformément aux systèmes de traitement et de collecte disponibles
dans votre pays.
• Support technique européen
Visitez notre site à l’adresse
http://www.olympus-europa.com
ou appelez le :
00800 - 67 10 83 00 (appel gratuit)
+49 40 - 237 73 899 (appel payant)
Le logiciel compris dans cet objectif peut inclure un logiciel tiers. Tout logiciel
tiers est soumis aux conditions d’utilisation, imposées par les propriétaires ou
concédants de licence de ce logiciel, en vertu desquelles le logiciel vous est
fourni.
Ces conditions et autres avis de logiciels tiers, le cas échéant, se trouvent dans le
fichier PDF d’avis de logiciels stocké sur
http://www.olympus.co.jp/en/support/imsg/digicamera/download/notice/notice.cfm
Pagina se încarcă...
Pagina se încarcă...
Pagina se încarcă...
Pagina se încarcă...
Pagina se încarcă...
Pagina se încarcă...
Pagina se încarcă...
Pagina se încarcă...
Pagina se încarcă...
Pagina se încarcă...
Pagina se încarcă...
Pagina se încarcă...
Pagina se încarcă...
Pagina se încarcă...
Pagina se încarcă...
Pagina se încarcă...
Pagina se încarcă...
Pagina se încarcă...
Pagina se încarcă...
Pagina se încarcă...
Pagina se încarcă...
Pagina se încarcă...
Pagina se încarcă...
Pagina se încarcă...
Pagina se încarcă...
Pagina se încarcă...
Pagina se încarcă...
Pagina se încarcă...
Pagina se încarcă...
Pagina se încarcă...
Pagina se încarcă...
Pagina se încarcă...
Pagina se încarcă...
Pagina se încarcă...
Pagina se încarcă...
Pagina se încarcă...
Pagina se încarcă...
Pagina se încarcă...
Pagina se încarcă...
Pagina se încarcă...
Pagina se încarcă...
Pagina se încarcă...
Pagina se încarcă...
Pagina se încarcă...
Pagina se încarcă...
Pagina se încarcă...
Pagina se încarcă...
Pagina se încarcă...
Pagina se încarcă...
Pagina se încarcă...
Pagina se încarcă...
Pagina se încarcă...
Pagina se încarcă...
Pagina se încarcă...
Pagina se încarcă...
Pagina se încarcă...
Pagina se încarcă...
Pagina se încarcă...
Pagina se încarcă...
Pagina se încarcă...
Pagina se încarcă...
Pagina se încarcă...
Pagina se încarcă...
Pagina se încarcă...
Pagina se încarcă...
Pagina se încarcă...
Pagina se încarcă...
Pagina se încarcă...
Pagina se încarcă...
Pagina se încarcă...
Pagina se încarcă...
Pagina se încarcă...
Pagina se încarcă...
Pagina se încarcă...
Pagina se încarcă...
Pagina se încarcă...
Pagina se încarcă...
Pagina se încarcă...
Pagina se încarcă...
Pagina se încarcă...
Pagina se încarcă...
Pagina se încarcă...
Pagina se încarcă...
Pagina se încarcă...
Pagina se încarcă...
Pagina se încarcă...
Pagina se încarcă...
Pagina se încarcă...
Pagina se încarcă...
Pagina se încarcă...
Pagina se încarcă...
Pagina se încarcă...
Pagina se încarcă...
Pagina se încarcă...
Pagina se încarcă...
Pagina se încarcă...
Pagina se încarcă...
Pagina se încarcă...
Pagina se încarcă...
Pagina se încarcă...
Pagina se încarcă...
Pagina se încarcă...
Pagina se încarcă...
Pagina se încarcă...
Pagina se încarcă...
Pagina se încarcă...
Pagina se încarcă...
Pagina se încarcă...
Pagina se încarcă...
Pagina se încarcă...
Pagina se încarcă...
Pagina se încarcă...
Pagina se încarcă...
Pagina se încarcă...
Pagina se încarcă...
Pagina se încarcă...
Pagina se încarcă...
Pagina se încarcă...
Pagina se încarcă...
Pagina se încarcă...
Pagina se încarcă...
Pagina se încarcă...
Pagina se încarcă...
Pagina se încarcă...
Pagina se încarcă...
Pagina se încarcă...
Pagina se încarcă...
Pagina se încarcă...
Pagina se încarcă...
Pagina se încarcă...
Pagina se încarcă...
Pagina se încarcă...
Pagina se încarcă...
Pagina se încarcă...
Pagina se încarcă...
Pagina se încarcă...
Pagina se încarcă...
Pagina se încarcă...
Pagina se încarcă...
Pagina se încarcă...
Pagina se încarcă...
Pagina se încarcă...
Pagina se încarcă...
Pagina se încarcă...
Pagina se încarcă...
Pagina se încarcă...
Pagina se încarcă...
Pagina se încarcă...
Pagina se încarcă...
Pagina se încarcă...
Pagina se încarcă...
Pagina se încarcă...
Pagina se încarcă...
Pagina se încarcă...
Pagina se încarcă...
Pagina se încarcă...
Pagina se încarcă...
Pagina se încarcă...
Pagina se încarcă...
Pagina se încarcă...
Pagina se încarcă...
Pagina se încarcă...
Pagina se încarcă...
Pagina se încarcă...
Pagina se încarcă...
Pagina se încarcă...
Pagina se încarcă...
Pagina se încarcă...
Pagina se încarcă...
Pagina se încarcă...
Pagina se încarcă...
Pagina se încarcă...
Pagina se încarcă...
Pagina se încarcă...
Pagina se încarcă...
Pagina se încarcă...
Pagina se încarcă...
Pagina se încarcă...
Pagina se încarcă...
Pagina se încarcă...
Pagina se încarcă...
Pagina se încarcă...
-
 1
1
-
 2
2
-
 3
3
-
 4
4
-
 5
5
-
 6
6
-
 7
7
-
 8
8
-
 9
9
-
 10
10
-
 11
11
-
 12
12
-
 13
13
-
 14
14
-
 15
15
-
 16
16
-
 17
17
-
 18
18
-
 19
19
-
 20
20
-
 21
21
-
 22
22
-
 23
23
-
 24
24
-
 25
25
-
 26
26
-
 27
27
-
 28
28
-
 29
29
-
 30
30
-
 31
31
-
 32
32
-
 33
33
-
 34
34
-
 35
35
-
 36
36
-
 37
37
-
 38
38
-
 39
39
-
 40
40
-
 41
41
-
 42
42
-
 43
43
-
 44
44
-
 45
45
-
 46
46
-
 47
47
-
 48
48
-
 49
49
-
 50
50
-
 51
51
-
 52
52
-
 53
53
-
 54
54
-
 55
55
-
 56
56
-
 57
57
-
 58
58
-
 59
59
-
 60
60
-
 61
61
-
 62
62
-
 63
63
-
 64
64
-
 65
65
-
 66
66
-
 67
67
-
 68
68
-
 69
69
-
 70
70
-
 71
71
-
 72
72
-
 73
73
-
 74
74
-
 75
75
-
 76
76
-
 77
77
-
 78
78
-
 79
79
-
 80
80
-
 81
81
-
 82
82
-
 83
83
-
 84
84
-
 85
85
-
 86
86
-
 87
87
-
 88
88
-
 89
89
-
 90
90
-
 91
91
-
 92
92
-
 93
93
-
 94
94
-
 95
95
-
 96
96
-
 97
97
-
 98
98
-
 99
99
-
 100
100
-
 101
101
-
 102
102
-
 103
103
-
 104
104
-
 105
105
-
 106
106
-
 107
107
-
 108
108
-
 109
109
-
 110
110
-
 111
111
-
 112
112
-
 113
113
-
 114
114
-
 115
115
-
 116
116
-
 117
117
-
 118
118
-
 119
119
-
 120
120
-
 121
121
-
 122
122
-
 123
123
-
 124
124
-
 125
125
-
 126
126
-
 127
127
-
 128
128
-
 129
129
-
 130
130
-
 131
131
-
 132
132
-
 133
133
-
 134
134
-
 135
135
-
 136
136
-
 137
137
-
 138
138
-
 139
139
-
 140
140
-
 141
141
-
 142
142
-
 143
143
-
 144
144
-
 145
145
-
 146
146
-
 147
147
-
 148
148
-
 149
149
-
 150
150
-
 151
151
-
 152
152
-
 153
153
-
 154
154
-
 155
155
-
 156
156
-
 157
157
-
 158
158
-
 159
159
-
 160
160
-
 161
161
-
 162
162
-
 163
163
-
 164
164
-
 165
165
-
 166
166
-
 167
167
-
 168
168
-
 169
169
-
 170
170
-
 171
171
-
 172
172
-
 173
173
-
 174
174
-
 175
175
-
 176
176
-
 177
177
-
 178
178
-
 179
179
-
 180
180
-
 181
181
-
 182
182
-
 183
183
-
 184
184
-
 185
185
-
 186
186
-
 187
187
-
 188
188
-
 189
189
-
 190
190
-
 191
191
-
 192
192
-
 193
193
-
 194
194
-
 195
195
-
 196
196
-
 197
197
-
 198
198
-
 199
199
-
 200
200
-
 201
201
-
 202
202


Olympus M.ZUIKO DIGITAL ED 150-400mm F4.5 TC1.25x IS PRO Manual de utilizare
- Tip
- Manual de utilizare
în alte limbi
Lucrări înrudite
-
Olympus V311100BU000 Manual de utilizare
-
-
-
-
-
-
-
-
-
Alte documente
-
Nikon AF-S Teleconverter TC-14E III Manual de utilizare
-
-
-
-
-
Sony DSC-RX0M2G Manualul proprietarului
-
-
-
-