Makita DMR116 Manual de utilizare
- Categorie
- Aparate de radio
- Tip
- Manual de utilizare

DMR116
EN Job Site Radio Instruction manual 4
PL Akumulatorowy odbiornik radiowy Instrukcja obsługi 11
HU Munkahelyi rádió Használati utasítás 18
SK Pracovné rádio Návod na obsluhu 25
CS Pracovní rádio Návod k obsluze 32
UK Радіоприймач для використання
на робочому місці Інструкція з експлуатації 39
RO Radio pentru locul de lucru Manual de instrucţiuni 46
DE Baustellenradio Betriebsanleitung 53
SL Prenosni Radio Navodila za uporabo 60
SQ Radio për kantier pune Manuali i përdorimit 67
BG Радио за Работни Обекти Инструкция за работа 74
HR Gradilišni Radio Priručnik s uputama za uporabu 81
MK Радио за работно место Упатство за работа 87
SR Radio za gradilište Uputstvo za upotrebu 94
RU Радиоприемник для использования
на рабочей площадке Инструкция по эксплуатации 101

2
1
12
14
13
11
2 3
7
6
89
5
14
10
PM
L K J
A
B
C
D
E
I
H
G
F
15
16
17

3
67
2
1

4 ENGLISH
ENGLISH
(Original instructions)
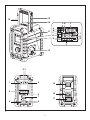
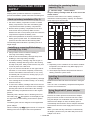
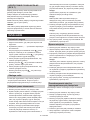
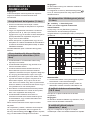
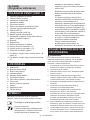
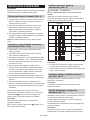
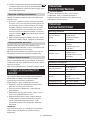
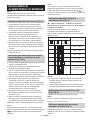
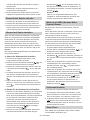
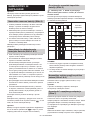
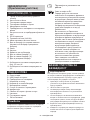
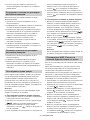
CONTROLS (FIG. 1)
1. Power and Sleep timer
2. Band and Mono button
3. Radio alarm set
4. Buzzer alarm set
5. Preset stations
6. Scan tuning and Time set
7. Tuning/Volume control knob
8. DC IN socket
9. Input terminal (AUX IN)
10. Soft bended rod antenna
11. Battery compartment (covering main battery
pack and back up batteries)
12. Handle
13. Speaker
14. Battery compartment locker
15. Main battery compartment (*1)
16. Main battery compartment (*2)
17. Back up battery compartment
*1: For the batteries whose names end with a
number, “B”, or “N”.
*2: For the batteries whose names end with “G”.
LCD DISPLAY
A. Radio alarm
B. HWS buzzer alarm
C. Scan tuning
D. Band Indicator
E. Low battery indicator
F. Preset stations
G. Sleep and Snooze status
H. Frequency
I. Stereo symbol and Volume
J. Clock
K. Time set
L. PM for clock
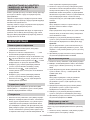
SYMBOLS
The following show the symbols used for the equipment.
Be sure that you understand their meaning before use.
Read instruction manual.
Only for EU countries.
Due to the presence of hazardous
components in the equipment, waste
electrical and electronic equipment,
accumulators and batteries may have
a negative impact on the environment
and human health.
Do not dispose of electrical and
electronic appliances or batteries with
household waste!
In accordance with the European
Directive on waste electrical and
electronic equipment and on
accumulators and batteries and waste
accumulators and batteries, as well
as their adaptation to national law,
waste electrical equipment, batteries
and accumulators should be stored
separately and delivered to a separate
collection point for municipal waste,
operating in accordance with the
regulations on environmental protection.
This is indicated by the symbol of the
crossed-out wheeled bin placed on the
equipment.
IMPORTANT SAFETY
INSTRUCTIONS
WARNING:
When using electric tools, basic safety precautions should
always be followed to reduce the risk of fire, electric
shock, and personal injury, including the following:
1. Read this instruction manual and the charger
instruction manual carefully before use.
2. Clean only with dry cloth.
3. Do not block any ventilation opening. Install in
accordance with the manufacturer’s instruction.
4. Do not install near any heat sources such as
radiators, heat registers, stoves, or other apparatus
(including amplifiers) that produce heat.
5. Only use attachments/accessories specified by the
manufacturer.
6. Unplug this apparatus during lighting storms or
when unused for long periods of time.
7. A battery operated radio with integral batteries or a
separate battery pack must be recharged only with
the specified charger for the battery. A charger that
may be suitable for one type of battery may create a
risk of fire when used with another battery.
8. Use battery operated radio only with specifically
designated battery packs. Use of any other batteries
may create a risk of fire.
9. When battery pack is not in use, keep it away from
other metal objects like: paper clips, coins, keys,
nails, screws, or other small metal objects that can
make a connection from one terminal to another.
Shorting the battery terminals together may cause
sparks, burns, or a fire.

5 ENGLISH
10. Avoid body contact with grounded surfaces such
as pipes, radiators, ranges and refrigerators. There
is an increased risk of electric shock if your body is
grounded.
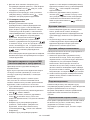
11. Under abusive conditions, liquid may be ejected from
the battery; avoid contact. If contact accidentally
occurs, flush with water. If liquid contacts eyes,
additionally seek medical help. Liquid ejected from
the battery may cause irritation or burns.
12. Do not use a battery pack or tool that is damaged
or modified. Damaged or modified batteries may
exhibit unpredictable behavior resulting in fire,
EXPLOSION or risk of injury.
13. Do not expose a battery pack or tool to fire
or excessive temperature. Exposure to fire or
temperature above 130°C may cause explosion.
14. Follow all charging instructions and do not charge
the battery pack or tool outside the temperature
range specified in the instructions. Charging
improperly or at temperatures outside the specified
range may damage the BATTERY and increase the
risk of fire.
SAVE THESE INSTRUCTIONS
SPECIFIC SAFETY RULES
FOR BATTERY CARTRIDGE
1. Before using battery cartridge, read all instructions
and cautionary markings on (1) battery charger, (2)
battery, and (3) product using battery.
2. Do not disassemble battery cartridge.
3. If operating time has become excessively shorter,
stop operating immediately. It may result in a risk of
overheating, possible burns and even an explosion.
4. If electrolyte gets into your eyes, rinse them out with
clear water and seek medical attention right away. It
may result in loss of your eyesight.
5. Do not short the battery cartridge:
(1) Do not touch the terminals with any conductive
material.
(2) Avoid storing battery cartridge in a container
with other metal objects such as nails, coins,
etc.
(3) Do not expose battery cartridge to water or
rain. A battery short can cause a large current
flow, overheating, possible burns and even a
breakdown.
6. Do not store and use the tool and battery cartridge
in locations where the temperature may reach or
exceed 50°C (122°F).
7. Do not incinerate the battery cartridge even if it is
severely damaged or is completely worn out. The
battery cartridge can explode in a fire.
8. Do not nail, cut, crush, throw, drop the battery
cartridge, or hit against a hard object to the battery
cartridge. Such conduct may result in a fire,
excessive heat, or explosion.
9. Do not use a damaged battery.
10. To avoid risk, the manual of replaceable the battery
should be read before use. And the max discharging
current of the battery should be greater than or
equal to 8A.
11. The contained lithium-ion batteries are subject to
the Dangerous Goods Legislation requirements.
12. When disposing the battery cartridge, remove
it from the tool and dispose of it in a safe place.
Follow your local regulations relating to disposal of
battery.
13. Use the batteries only with the products specified
by Makita. Installing the batteries to non-compliant
products may result in a fire, excessive heat,
explosion, or leak of electrolyte.
14. If the tool is not used for a long period of time, the
battery must be removed from the tool.
15. During and after use, the battery cartridge may take
on heat which can cause burns or low temperature
burns.
16. Do not touch the terminal of the tool immediately
after use as it may get hot enough to cause burns.
17. Do not allow chips, dust, or soil stuck into the
terminals, holes, and grooves of the battery
cartridge. It may result in poor performance or
breakdown of the tool or battery cartridge.
18. Unless the tool supports the use near a high-
voltage electrical power lines, do not use the battery
cartridge near a high-voltage electrical power lines.
It may result in a malfunction or breakdown of the
tool or battery cartridge.
19. Keep the battery away from children.
CAUTION:
● Danger of explosion if battery is incorrectly
replaced.
● Replace only with the same or equivalent type.
● Only use genuine Makita batteries. Use of non-
genuine Makita batteries, or batteries that have
been altered, may result in the battery bursting
causing fires personal injury and damage. It will
also void the Makita warranty for the Makita tool
and charger.
Tips for maintaining maximum battery
life
1. Charge the battery cartridge before completely
discharged. Always stop tool operation and charge
the battery cartridge when you notice less tool power.
2. Never recharge a fully charged battery cartridge.
Overcharging shortens the battery service life.

6 ENGLISH
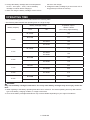
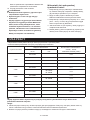
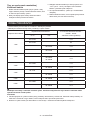
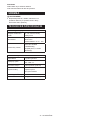
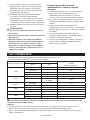
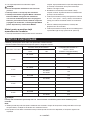
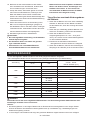
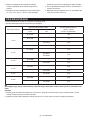
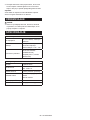
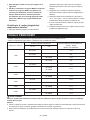
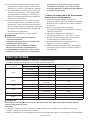
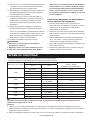
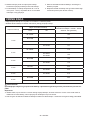
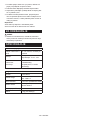
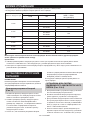
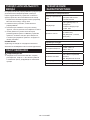
OPERATING TIME
* The suitable battery packs for this radio listed as the following table.
* The following table indicates the operating time on a single charge.
Battery Capacity
Battery Cartridge Voltage At speaker output =
50mW + 50mW
(Unit: Hour) (Approximately)
14.4V 18V
1.5Ah
BL1415G 10.0
BL1415N 8.5
BL1815G 10.0
BL1815N 9.0
2.0Ah
BL1420G 11.0
BL1820G
BL1820B 12.0
3.0Ah
BL1430B 14.0
BL1830B 17.0
4.0Ah
BL1440 23.0
BL1840B 24.0
5.0Ah BL1850B 31.0
6.0Ah
BL1460B 30.0
BL1860B 37.0
WARNING:
Only use the battery cartridges listed above. Use of any other battery cartridges may cause injury and/or fire.
Note:
● Table regarding to the battery operating time above is for reference. The actual operating time may differ with the
type of the battery, charging condition, or usage environment.
●Some of the battery cartridges listed above may not be available depending on your region of residence.
3. Charge the battery cartridge with room temperature
at 10°C - 40°C (50°F - 104°F). Let a hot battery
cartridge cool down before charging it.
4. When not using the battery cartridge, remove it from
the tool or the charger.
5. Charge the battery cartridge if you do not use it for a
long period (more than six months).

7 ENGLISH
INSTALLATION AND POWER
SUPPLY
Note:
Keeping back up batteries inside the compartment
prevent stored data in preset memories from being lost.
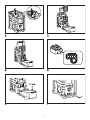
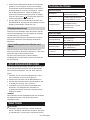
Back up battery installation (Fig. 2)
1. Pull out the battery compartment locker to release
battery compartment. There are main battery pack
compartment and back up battery compartment.
2. Remove back up battery compartment cover and
insert 2 fresh UM-3 (AA sizes). Make sure the
batteries are with correct polarity as shown inside the
compartment. Replace the battery cover.
3. After back up batteries are inserted, insert the main
battery pack to power radio. The suitable battery
packs for this radio listed as the following table.
The following tables indicate the operating time on a
single charge.
Installing or removing Slide battery
cartridge (Fig. 3 & 4)
● Always switch off the tool before installing or
removing of the battery cartridge.
● Hold the tool and the battery cartridge firmly when
installing or removing battery cartridge.
● To install the battery cartridge, align the tongue on
the battery cartridge with the groove in the housing
and slip it into place. Always insert it all the way until
it locks in place with a little click.
● If you can see the red indicator on the upper side of
the button, it is not locked completely. Install it fully
until the red indicator cannot be seen. If not, it may
accidentally fall out of the tool, causing injury to you
or someone around you.
● Do not use force when installing the battery cartridge.
If the cartridge does not slide in easily, it is not being
inserted correctly.
● To remove the battery cartridge, slide it from the tool
while sliding the button on the front of the cartridge or
pressing the buttons on both sides of the cartridge.
Return the battery compartment locker to the original
position.
Reduced power, distortion and a “stuttering sound” or
low battery sign that appears on the display are all
the signs that the main battery pack needs to replace.
Note:
The battery pack can’t be charged via the supplied AC
power adaptor.
When low battery sign appears and an “E” keeps on
flashing is the time to replace the back up batteries.
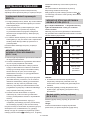
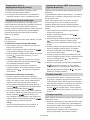
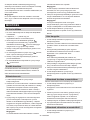
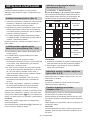
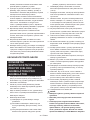
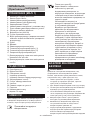
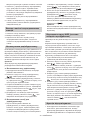
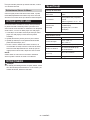
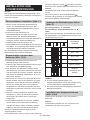
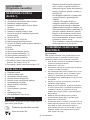
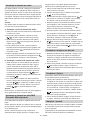
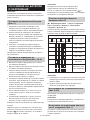
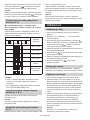
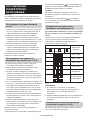
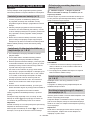
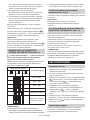
Indicating the remaining battery
capacity (Fig. 5)
1. Indicator lamps 2.Check button
Only for battery cartridges with “B” at the end of the
model number
Press the check button on the battery cartridge to
indicate the remaining battery capacity. The indicator
lamps light up for few seconds.
Indicator or lamps
Remaining capacity
Lighted Off Blinking
75% to 100%
50% to 75%
25% to 50%
0% to 25%
Charge the battery.
The battery may
have malfunctioned.
015658
Note:
● Depending on the conditions of use and the ambient
temperature, the indication may differ slightly from
the actual capacity.
● The first(far left) indicator lamp will brink when the
battery protection system works.
Installing the soft bended rod antenna
(Fig. 2 & 6)
Install the soft bended rod antenna as shown in the figure.
Note:
There is a click in the battery compartment designed to
store the removed antenna.
Using Supplied AC power adaptor
(Fig. 7)
Remove the rubber protector and insert the adaptor
plug into the DC socket on the front side of the radio.
Plug the adaptor into a standard mains socket outlet.
Whenever the adaptor is used, the battery pack is
automatically disconnected. The AC adaptor should be
disconnected from the main supply when not in use.
Note:
When your radio has any interference in AM band by
its adaptor, please move your radio away from its AC
adaptor over 30cm.

8 ENGLISH
OPERATION
Setting the clock
1. Clock can be set either when the radio is power on or
off.
2. Display will show “-: - -” when the back up batteries
are installed.
3. Long press the time set button for more than 2
seconds, display will flash time set symbol and
also the hour digit, followed by a beep.
4. Rotate Tuning/Volume control knob to set the
required hour.
5. Press button to confirm hour setting, the minute
digit will flash.
6. Rotate Tuning/Volume control knob to set the
required minute.
7. Press the button again to complete clock setting.
Operating the radio
This radio equips with three tuning methods - Scan
tuning, Manual tuning and Memory presets recall.
Scan Tuning
1. Press the Power button to turn on the radio.
2. Select the required waveband by pressing the Band
button. Make sure the rubber bended rod antenna
has been well placed for best FM reception. For AM
(MW) band, rotate the radio to get best signal. Try to
avoid operating the radio next to computer screen
and other equipment which will cause interference to
the radio.
3. Press and release Scan button (long press Scan
button more than 2 seconds will activate time setting),
LCD display will flash Scan symbol and the radio will
search and stop automatically when it finds a radio
station. Press the Scan button again to pick up the
found station.
Note:
A stereo symbol will appear on the display, if the
station found is a stereo station.
Note:
The radio will continue to search next available
stations if you do not press Scan button again when it
finds a radio station.
4. Rotate the Tuning/Volume control knob to get
required sound level. LCD display will show sound
level changes.
Note:
During operating volume control, you can press in
Tuning/Volume control knob to change volume control
to tuning control status.
5. To turn off the radio, press the Power button. Display
will show OFF.
Manual Tuning
1. Press the Power button to turn on the radio.
2. Select the required waveband by pressing the Band
button. Adjust the antenna as described above.
3. A single rotary to the Tuning/Volume control knob will
change the frequency in the following increment:
FM: 0.05MHz
AM: 9kHz
Note:
If the radio is in volume control status, press in the
tuning/volume control to become Tuning status.
4. Keep on rotating the Tuning/Volume control knob until
the required frequency shown on the display.
5. Rotate the Tuning/Volume control knob to get
required sound level.
6. To turn off the radio, press the Power button. Display
will show OFF.
Storing stations in preset memories
There are 5 memory presets for each waveband.
1. Press the Power button to turn on the radio.
2. Tune to required station using one of the methods
previously described.
3. Press and hold down the required preset until radio
beeps. The preset number will appear in the display
and the station will be stored under chosen preset
button.
4. Repeat this procedure for the remaining presets.
5. Stations stored in preset memories can be overwritten
by following above procedures.
Recall stations from preset memories
1. Press the Power button to turn on the radio.
2. Select the required waveband.
3. Momentarily press the required Preset button, the
preset number and station frequency will appear in
the display.
Setting the radio alarm
When the radio alarm is selected, the radio will turn on
and play the chosen radio station at the chosen alarm
time. The radio alarm will continue for one hour unless
turned off by pressing the Power button. Pressing the
Power button whilst the alarm is activated will cancel the
alarm for 24 hours.
Note:
When the radio is in low battery status, the radio alarm
can’t be activated.
a. Setting radio alarm time:
1. The radio alarm can be set either when radio is on or
off.
2. Press and release radio alarm button , the
radio alarm symbol will flash.

9 ENGLISH
3. While the radio alarm symbol is flashing, press
button for more than 2 seconds until you hear a beep.
4. Display Hour will flash, rotate Tuning/Volume control
knob to select the hour then press button again
to confirm hour setting.
5. Follow same procedures of setting hour to set
required minute. Press button to complete alarm
time setting.
b. Setting radio alarmed station
1. During setting radio alarm time and radio alarm
symbol is flashing, press Band button to activate the
radio to select required wake-up band and station
by manual tuning and recall the preset stations.
Press button to complete radio alarm setting.
Display will show .
2. When above radio alarm time and station are set,
press and hold down radio alarm button for 2
seconds followed by a beep to switch alarm on or off.
Display will show when radio alarm is set.
Note:
If new radio alarm station is not selected, it will select
the last alarm station.
Setting the HWS (Humane Wake
System) buzzer alarm
A beep tone will activate when selecting the HWS
buzzer alarm.
The alarm beep will become shorter every 15 seconds
for one minute followed by one minute silence before
repeating the cycle.
The HWS alarm will sound for one hour until turning off
by pressing the Power button. Press the Power button
whilst the alarm is activated will cancel the alarm for 24
hours.
1. The HWS buzzer alarm can be set either radio is on
or off.
2. Press and release the HWS buzzer alarm button
, the symbol will flash.
3. During the symbol flashes, long pressing the
button for more than 2 seconds followed by a beep
and display Hour digit will flash.
4. Rotate Tuning/Volume control knob to select required
alarm hour, then press time set button again.
The minute digit will then flash.
5. Rotate Tuning/Volume control knob to select required
alarm minute, the press time set button again to
complete HWS buzzer alarm setting.
6. Press and hold down buzzer alarm button for
more than 2 seconds followed by a beep to switch
on or off the HWS buzzer alarm. Display will appear
when buzzer alarm has been set.
Snooze function
1. Whilst the alarm is activated, pressing any buttons
except the Power button will activate the snooze
function. The radio or HWS buzzer alarm will be
silenced with interval of 5 minutes.
2. The display will flash both the snooze symbol
and the alarm symbol. The snooze function can be
repeatedly during one hour that the alarms are active.
Sleep function
The sleep timer will automatically switch off the radio
after
a preset time has elapsed.
1. Press and continue to hold down the Power button for
more than 2 seconds, followed by a beep tone, the
display will cycle through the available sleep times in
the order 60-45-30-15-120-90-60.
Release the Power button when the required sleep
time appears in the display. The symbol will
appear in the display and the radio will play the last
station selected.
2. To cancel the sleep function, press the Power button.
The Symbol will disappear and radio is off.
Display illumination
Press any buttons or rotate Tuning/Volume control knob
will illuminate the LCD display for approx. 15 seconds.
During scanning stations and alarm activated, will also
automatically illuminate the display.
Change Stereo to Mono
When the stereo FM station reception is weak, you
can improve it by pressing Mono button for 2 seconds.
The sound is no longer in stereo and stereo indicator
disappears.
AUXILIARY INPUT SOCKET
A 3.5mm Auxiliary input socket is provided at the front
of your radio to permit an audio signal to be fed into the
unit from an external audio device such as a MP3 or CD
player.
1. Connect an external audio source (for example, MP3
or CD player) to the AUX IN socket.
2. Press the Power button to switch on your radio.
3. Repeatedly press and release the Band button until
“AU1” is displayed.
4. To have the better sound quality, we recommend
setting the volume to more than two-thirds level on
your audio device and then adjust the volume on the
radio as required.
Note:
Audio cord is not included as standard accessories.
AUX can’t be activated as alarm source.

10 ENGLISH
MAINTENANCE
CAUTION:
● Never use gasoline, benzine, thinner, alcohol or the
like. Discoloration, deformation or cracks may result.
SPECIFICATIONS
Power Requirements
AC power adaptor DC 12V 700mA, center pin
positive
Battery
UM-3 (AA size) x 2 for back
up
Slide battery: 14.4V - 18V
Frequency coverage
FM 87.50-108 MHz
(0.05MHz/step)
AM (MW) 522-1,710 kHz
(9kHz/step)
Circuit feature
Loudspeaker 3inches 8ohm
Output Power 14.4V: 2.2W x 2,
18V: 3.5W x 2
Input terminal 3.5mm dia. (AUX IN)
Antenna system FM: soft bended rod antenna
AM: bar antenna
Dimension (W x H x D)
in mm 280 x 163 x 302mm
Weight 4.1Kg (without battery)

11 POLSKI
POLSKI
(oryginalna instrukcja)
STEROWANIE (RYS. 1)
1. Zasilanieitimeruśpienia
2. Przycisk Pasma i Mono
3. Ustawienie alarmu radiowego
4. Ustawieniealarmudźwiękowego
5. Wstępnieustawionestacje
6. Strojenie i ustawianie czasu
7. PokrętłoregulacjiStrojenia/Głośności
8. Gniazdoprądustałego
9. Terminalwejściowy(AUXIN)
10. Giętkaantenaprętowa
11. Komoraakumulatora(obejmującagłówny
akumulator i akumulator zapasowy)
12. Uchwyt
13. Głośnik
14. Blokada komory akumulatora
15. Głównakomoraakumulatora(*1)
16. Głównakomoraakumulatora(*2)
17. Komora akumulatora zapasowego
*1:Dlaakumulatorów,którychnazwykończąsię
cyfrą,„B”lub„N”.
*2:Dlaakumulatorów,którychnazwykończąsię
na„G”.
WYŚWIETLACZ LCD
A. Alarm radiowy
B. Alarm HWS
C. Strojenie przez skanowanie
D. Wskaźnikpasma
E. Wskaźnikniskiegopoziomubaterii
F. Wstępnieustawionestacje
G. Stan snu i drzemki
H. Częstotliwość
I. Symbolstereoigłośności
J. Zegar
K. Ustawienia czasu
L. PM dla zegara
SYMBOLE
Poniżejprzedstawionosymbolestosowanewprzypadku
omawianegourządzenia.Przedrozpoczęciemjego
użytkowanianależyupewnićsię,żesąonezrozumiałe.
Przeczytaćinstrukcjęobsługi.
TylkodlakrajówUE.
Zewzględunaobecność
niebezpiecznychczęściwsprzęcie,
zużytysprzętelektrycznyi
elektroniczny, akumulatory i baterie
mogąmiećnegatywnywpływna
środowiskoizdrowieczłowieka.
Nienależywyrzucaćurządzeń
elektrycznych i elektronicznych ani
baterii z odpadami domowymi!
ZgodniezDyrektywąEuropejską
dotyczącązużytegosprzętu
elektrycznego i elektronicznego,
akumulatorówibateriiorazzużytych
akumulatorówibaterii,atakżeich
dostosowania do prawa krajowego,
zużytysprzętelektryczny,bateriei
akumulatorypowinnybyćskładowane
oddzielnie i dostarczane do punktu
selektywnejzbiórkiodpadów
komunalnych,działającegozgodnie
zprzepisamidotyczącymiochrony
środowiska.
Wskazujenatosymbolprzekreślonego
koszanakółkachumieszczonyna
urządzeniu.
WAŻNE ZASADY
BEZPIECZEŃSTWA
OSTRZEŻENIE:
Używającelektronarzędzi,należyzawszeprzestrzegać
podstawowychśrodkówostrożnościwceluzmniejszenia
ryzykawystąpieniapożaru,porażeniaprądemoraz
uszkodzeniaciała,włączającponiższe:
1. Przedkorzystaniemzurządzenianależydokładnie
zapoznaćsięzniniejsząinstrukcjąobsługioraz
instrukcjąobsługiładowarki.
2. Czyścićwyłączniesuchąszmatką.
3. Niezasłaniajotworówwentylacyjnych.Zamontuj
zgodnie z instrukcjami producenta.
4. Niemontowaćprzyjakimkolwiekźródleciepła,takim
jakgrzejniki,kratkiwylotoweciepłegopowietrza,
piecelubinneurządzenia(równieżwzmacniacze)
wytwarzająceciepło.
5. Stosowaćwyłącznieprzyrządy/akcesoriazalecane
przez producenta.
6. Wyłączyćniniejszeurządzeniepodczasburzyoraz
wprzypadkunieużywaniaprzezdłuższyczas.
7. Akumulatorowy odbiornik radiowy z akumulatorem
wbudowanymluboddzielnymmusibyćładowany
wyłączniezapomocąokreślonejładowarkido
akumulatora.Ładowarkaprzeznaczonadojednego
typuakumulatoramożestwarzaćzagrożenie
wystąpieniapożaruwprzypadkustosowaniajejdo
ładowaniainnegoakumulatora.
8. Do zasilania akumulatorowego odbiornika
radiowegonależyużywaćtylkoprzeznaczonych

12 POLSKI
doniegoakumulatorów.Używanieinnych
akumulatorówmożestwarzaćryzykowystąpienia
pożaru.
9. Gdyakumulatorniejestużywany,należy
zabezpieczyćgoprzedkontaktemzinnymi
metalowymi przedmiotami, takimi jak spinacze,
monety,klucze,gwoździe,wkrętybądźinnemałe
przedmiotymetalowe,któremogąpowodować
zwarciestykówakumulatora.Zwarciestyków
akumulatoragrozipojawieniemsięiskier,
poparzeniamilubpożarem.
10. Należyunikaćkontaktuciałazprzedmiotami
uziemionymi, takimi jak rury, grzejniki, kuchenki
czylodówki.Gdyciałoczłowiekajestuziemione,
wzrastaryzykoporażeniaprądemelektrycznym.
11. Wrazieniewłaściwychwarunkówużytkowania
możedojśćdowyciekuelektrolituzakumulatora.
Unikaćkontaktu.Wrazieprzypadkowegokontaktu,
należyprzemyćskażonąskóręwodą.Wprzypadku
kontaktuelektrolituzoczaminależydodatkowo
zasięgnąćporadylekarza.Płynzakumulatoramoże
powodowaćpodrażnienialubpoparzenia.
12. Nieużywajbateriilubnarzędzia,gdyzostały
uszkodzonebądźzmodyfikowane.Uszkodzone
lubzmodyfikowanebateriemogąwykazywać
nieprzewidywalnezachowanieskutkującepożarem,
wybuchemlubwystąpieniemryzykaobrażeń.
13. Niewystawiajbateriilubnarzędzianadziałanie
ognialubwysokiejtemperatury.Narażeniena
działanieognialubtemperaturypowyżej130°C
możespowodowaćwybuch.
14. Postępujzgodniezwszystkimiinstrukcjamidot.
ładowaniainieładujbateriilubnarzędziapoza
wyznaczonym w instrukcji zakresem temperatur.
Nieprawidłoweładowanielubładowaniew
temperaturzeprzekraczającejokreślonyzakres
możeuszkodzićbaterięispowodowaćryzyko
wystąpieniapożaru.
ZACHOWAĆ INSTRUKCJĘ
OBSŁUGI.
SZCZEGÓŁOWE ZASADY
BEZPIECZEŃSTWA
DOTYCZY AKUMULATORA
1. Przedużyciembaterii,przeczytajwszystkie
instrukcje oraz oznaczenia dot. uwag na (1)
ładowarcedobaterii,(2)bateriachoraz(3)
produkciekorzystającymzbaterii.
2. Nie rozmontowuj baterii.
3. Jeżeliczasużywaniaznaczącosięzmniejszył,
natychmiastprzestańkorzystaćzurządzenia.Może
toskutkowaćprzegrzaniem,powodowaćoparzenia,
anawetprowadzićdowybuchu.
4. Gdyelektrolitdostaniesiędotwoichoczu,przepłucz
jeczystąwodąinatychmiastskonsultujsięz
lekarzem.Możetoskutkowaćutratąwzroku.
5. Nie powoduj zwarcia baterii:
(1) Niedotykajstykówprzypomocyprzewodzących
materiałów.
(2) Unikaj przechowywania baterii w pojemniku
z innymi metalowymi przedmiotami, np.
gwoździami,monetamiitp.
(3) Nienarażajbateriinaoddziaływaniewodylub
deszczu.Zwarciebateriimożeskutkowaćdużym
przepływemnapięcia,przegrzaniem,możliwymi
oparzeniami i uszkodzeniem.
6. Nieprzechowujnarzędziaibateriiwmiejscach,
gdzietemperaturamożeosiągaćlubprzekraczać
50°C (122°F).
7. Niespalajbateriinawet,jeżelisąbardzozniszczone
lubkompletniezużyte.Bateriamożewybuchnąćw
ogniu.
8. Nienakłuwać,ciąć,zgniatać,rzucać,upuszczać
wkładuakumulatoraaniuderzaćtwardym
przedmiotem.Takiepostępowaniemoże
spowodowaćpożar,nadmierneciepłolubwybuch.
9. Nieużywajuszkodzonychbaterii.
10. Abyuniknąćryzyka,należyzapoznaćsięz
instrukcjąobsługibaterii.Maksymalnenatężenie
wyładowaniabateriipowinnobyćwiększelubrówne
8A.
11. Bateria litowo-jonowa podlega wymogom
Prawodawstwadot.towarówniebezpiecznych.
12. Abyusunąćkasetęakumulatorową,wyjmijjąz
urządzenia,anastępniezutylizujwbezpiecznym
miejscu.Postępujzgodniezmiejscowymi
regulacjamidotyczącymiwyrzucaniabaterii.
13. Używajbateriiwyłączniezproduktamiokreślonymi
przezfirmęMakita.Instalacjabateriiwproduktach
niezgodnychmożeskutkowaćpożarem,
nadmiernymprzegrzewaniemsięlubwyciekiem
elektrolitu.
14. Jeśliurządzenieniejestużywaneprzezdłuższy
czas,należywyjąćakumulatorzurządzenia.
15. Podczasipoużyciuakumulatormożesię
nagrzewać,comożepowodowaćpoparzenialub
oparzenia niskotemperaturowe.
16. Niedotykaćkońcówkiterminalabezpośredniopo
użyciu,ponieważmożebyćnagrzanynatyle,aby
spowodowaćoparzenia.
17. Niepozwól,abywióry,kurzlubbruddostałysiędo
styków,otworówirowkówwewkładzieakumulatora.
Możetospowodowaćsłabąwydajnośćlub
uszkodzenieurządzenialubakumulatora.
18. Oileurządzeniepozwalanaużytkowaniew
pobliżuliniiwysokiegonapięcia,nienależyużywać
akumulatorawpobliżuliniiwysokiegonapięcia.

13 POLSKI
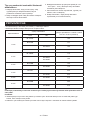
CZAS PRACY
*Odpowiedniezestawybateriidlategoradiasąwymienionewponiższejtabeli.
*Poniższatabelaprzedstawiaczaspracynapojedynczymładowaniu.
Pojemnośćbaterii
Napięcieakumulatora NAWYJŚCIUZGŁOŚNIKA=
50mW + 50mW
Jednostka:Godzina(około)
14.4V 18V
1.5Ah
BL1415G 10.0
BL1415N 8.5
BL1815G 10.0
BL1815N 9.0
2.0Ah
BL1420G 11.0
BL1820G
BL1820B 12.0
3.0Ah
BL1430B 14.0
BL1830B 17.0
4.0Ah
BL1440 23.0
BL1840B 24.0
5.0Ah BL1850B 31.0
6.0Ah
BL1460B 30.0
BL1860B 37.0
OSTRZEŻENIE:
Używaj wyłącznie baterii wymienionych powyżej. Korzystanie z jakichkolwiek innych baterii może
powodować obrażenia lub pożar.
Uwaga:
● Tabeladotyczącaczasupracynabateriipowyżejjesttylkopoglądowa.Faktycznyczaspracybateriimożesię
różnićwzależnościodtypubaterii,warunkówładowaniaorazśrodowiskaużytkowania.
● Niektórezwyżejwymienionychbateriimogąbyćniedostępnewzależnościodregionuzamieszkania.
Możetospowodowaćnieprawidłowedziałanielub
uszkodzenieurządzenialubakumulatora.
19. Trzymaj akumulator z dala od dzieci.
OSTRZEŻENIE:
● Niebezpieczeństwo wybuchu, gdy bateria jest
nieprawidłowo wymieniona.
● Wymieniaj tylko na ten sam typ lub jego
ekwiwalent.
● Używaj wyłącznie oryginalnych baterii Makita.
Używanie nieoryginalnych baterii Makita lub
baterii, które zostały zmodyfikowane, może
skutkować wybuchem baterii, a w rezultacie
pożarem, obrażeniami ciała i uszkodzeniami.
Spowoduje to także unieważnienie gwarancji
Makity na narzędzie oraz ładowarkę.
Wskazówki dot. maksymalnej
żywotności baterii
1. Ładujbaterięprzedjejcałkowitymrozładowaniem
się.Zawszezatrzymajurządzenieinaładujbaterię,
gdyzauważyszspadekmocywnarzędziu.
2. Nigdynieładujwpełninaładowanychbaterii.
Nadmierneładowanieskracażywotnośćbaterii.
3. Ładujbaterięwtemperaturzepokojowej10°C-40°C
(50°F-104°F).Pozwól,abygorącabateriaostygła
zanimrozpocznieszjejładowanie.
4. Jeśliakumulatorniejestużywany,należywyjąćgoz
urządzenialubładowarki.
5. Naładujbaterię,jeżeliniebędzieszjejużywaćprzez
dłuższyokresczasu(więcejniżsześćmiesięcy).

14 POLSKI
INSTALACJA I ZASILANIE
Uwaga:
Trzymaniezapasowychbateriiwewnątrzkomory
zapobiegautracieprzechowywanychwpamięcidanych.
Instalowanie baterii zapasowych
(RYS. 2)
1. Pociągnijblokadękomorybaterii,abyuwolnićbaterie.
Wbudowanajestkomorabateriigłównychikomora
baterii zapasowych.
2. Usuńpokrywękomorybateriizapasowychiwłóż
2 nowe baterie UM-3 (rozmiar AA). Upewnij
się,żebateriewłożonesązgodniezbiegunami
zaznaczonymiwewnątrzkomory.Załóżpokrywę
komory baterii.
3. Powłożeniubateriizapasowych,włóżrównieżzestaw
bateriigłównych,abyuruchomićradio.Odpowiednie
zestawybateriidlategoradiasąwymienionew
poniższejtabeli.
Poniższetabelewskazujączaspracynajednym
ładowaniu.
MONTAŻ LUB DEMONTAŻ
AKUMULATORA WSUWANEGO
(RYS. 3 & 4)
● Zawszewyłączajurządzenieprzedzamontowaniem
lubwyjęciemakumulatora.
● Podczas instalowania lub wyjmowania akumulatora
mocnotrzymajurządzenieiakumulator.
● Abyzamontowaćakumulator,należywyrównać
występnaakumulatorzezrowkiemwobudowiei
wsunąćgonaswojemiejsce.Akumulatornależy
zawszewsunąćdooporu,domomentujego
zablokowania na miejscu, co jest sygnalizowane
delikatnymkliknięciem.
● Jeśliczerwonywskaźnikwgórnejczęściprzycisku
jestnadalwidoczny,oznaczato,żeniezostałon
całkowiciezablokowany.Należygozamontować
całkowicie,takabyczerwonywskaźnikniebył
widoczny.Wprzeciwnymrazieakumulatormoże
przypadkowowysunąćsięzodbiornikaradiowego,
raniącoperatoralubosobypostronne.
● Podczasmontażuakumulatoranieużywać
nadmiernejsiły.Jeśliniemożnagoswobodnie
wsunąć,prawdopodobniezostałonnieprawidłowo
włożony.
● Abywyjąćkasetęakumulatora,wyjmijjąz
urządzenia,przesuwającprzyciskzprzodukasety
lubnaciskającprzyciskipoobustronachkasety.
Przywróćkomoręnaakumulatordopierwotnejpozycji.
Zmniejszonamoc,zniekształcenie,czy„jąkający
dźwięk”lubgdynawyświetlaczupojawiasięsymbol
niskiego poziomu baterii wskazująnato,żegłówny
zestawakumulatorowymusizostaćwymieniony.
Uwaga:
Niemożnaładowaćakumulatorazapomocą
dołączonegozasilaczasieciowego.
Kiedypojawiasięznakniskiegopoziomubaterii i
„E”stalemiga,oznaczatoczaswymianyakumulatora
zapasowego.
WSKAZUJE STAN NAŁADOWANIA
AKUMULATORA (RYS. 5)
1. Lampki wskaźnikowe 2. Przycisk kontrolny
Tylko dla akumulatorów z literą „B” na końcu
numeru modelu
NacisnąćprzyciskCheck(Sprawdź)naakumulatorze,
abysprawdzićstannaładowaniaakumulatora.Nakilka
sekundzaświecąsiękontrolki.
Lampkiwskaźnikowe
Pozostałobaterii
Zapalony Wyłączony Mruga
75% ~ 100%
50% ~ 75%
25% ~ 50%
0% ~ 25%
Naładujbaterię
Bateriamoże
niedziałać
prawidłowo
015658
UWAGA:
● Wzależnościodwarunkówużywaniaoraz
temperaturyzewnętrznej,wskaźnikmożesię
nieznacznieróżnićodfaktycznejpozostałejilości
zasilania.
● Pierwsza (najdalej po lewej) lampka kontrolna
będziemigać,gdyaktywnyjestsystemochrony
akumulatora.
Montaż giętkiej anteny prętowej
(RYS. 2 & 6)
Zainstalujgiętkąantenęprętową,jakpokazanona
rysunku.
Uwaga:
Wkomorzeakumulatoraznajdujesięzatrzask
przeznaczonydoprzechowywaniawyjętejanteny.

15 POLSKI
KORZYSTANIE Z ZASILACZA AC
(RYS. 7)
Zdejmijgumowąosłonęiwłóżwtyczkęzasilaczado
gniazdaprądustałegozprzoduradia.
Podłączadapterdostandardowegogniazdka.
Kiedykolwiekużywanyjestadapter,bateriajest
automatycznieodłączana.
Zasilaczsieciowynależyodłączyćodgłównegoźródła
zasilania,gdyniejestużywany.
UWAGA:
Jeśliradiowykazujejakąkolwiekingerencjępasma
AMprzezprzejściówkę,toodsuńradioodzasilacza
sieciowego o ponad 30cm.
DZIAŁANIE
Ustawianie zegara
1. Zegarmożnaustawić,gdyradiojestwłączonelub
wyłączone.
2. Wyświetlaczpokaże„-:--”powłożeniuzapasowych
akumulatorów.
3. Przytrzymaj przycisk ustawienia czasu przez
dłużejniż2sekundy,anawyświetlaczuzacznie
migaćsymbolustawieniaczasu i cyfra godziny,
anastępniezabrzmisygnałdźwiękowy.
4. ObróćpokrętłoregulacjiStrojenia/Głośności,aby
ustawićwymaganągodzinę.
5. Naciśnijprzycisk ,abypotwierdzićustawienie
godziny,zaczniemigaćcyframinut.
6. ObróćpokrętłoregulacjiStrojenia/Głośności,aby
ustawićwymaganeminuty.
7. Naciśnijponownieprzycisk ,abyzakończyć
ustawienia czasu.
Obsługa radia
Toradiojestwyposażonewtrzymetodystrojenia
-strojenieprzezskanowania,strojenieręcznei
przywoływaniezaprogramowanychwcześniejstacji.
Strojenie przez skanowanie
1. Naciśnijprzyciskzasilania,abywłączyćradio.
2. Wybierzżądanyzakresodbioru,naciskającprzycisk
Pasma.Upewnijsię,żegiętkaantenaprętowa
zostałaodpowiednioustawionadlanajlepszego
odbioruFM.WprzypadkupasmaAM(MW)obróć
radio,abyuzyskaćnajlepszysygnał.Starajsię
unikaćobsługiradiaobokekranukomputeraiinnych
urządzeń,którespowodujązakłóceniawradiu.
3. NaciśnijizwolnijprzyciskSkanowania(długie
naciśnięcieprzyciskuskanowaniaprzezponad
2 sekundy aktywuje ustawienie Czasu), na
wyświetlaczuLCDzamigasymbolskanowania,a
radioautomatyczniezaczniewyszukiwaćizatrzyma
się,gdyznajdziestacjęradiową.Ponownienaciśnij
przyciskskanowania,abywybraćwyszukanąstację.
Uwaga:
Symbolstereopojawisięnawyświetlaczu,jeśli
znalezionastacjajeststacjąstereo.
Uwaga:
Radiobędzienadalwyszukiwaćkolejnych
dostępnychstacji,jeślinienaciśnieszprzycisku
skanowaniaponownie,gdyznajdziestacjęradiową.
4. PrzekręćpokrętłoregulacjiStrojenia/Głośności,aby
uzyskaćwymaganypoziomdźwięku.Wyświetlacz
LCDpokażezmianypoziomudźwięku.
Uwaga:
Podczaspracyzregulacjągłośnościmożesz
nacisnąćpokrętłokontroliStrojenia/Głośności,aby
przejśćzkontroligłośnościwstatuskontrolistrojenia.
5. Abywyłączyćradio,naciśnijprzyciskzasilania.Na
wyświetlaczupojawisięOFF.
Ręczne strojenie
1. Naciśnijprzyciskzasilania,abywłączyćradio.
2. Wybierzżądanyzakresodbioru,naciskającprzycisk
Pasma.Wyregulujantenęwsposóbopisanypowyżej.
3. PojedynczeprzekręceniepokrętłaStrojenia/głośności
zmieniaczęstotliwośćwnastępującymprzyroście:
FM: 0,05MHz, AM: 9kHz
Uwaga:
Jeśliradiojestwstatusieregulacjigłośności,naciśnij
pokrętłokontroliStrojenia/Głośności,abyuzyskać
status strojenia.
4. PrzekręcajpokrętłokontroliStrojenia/Głośności,aż
douzyskaniawymaganejczęstotliwościwyświetlanej
nawyświetlaczu.
5. PrzekręćpokrętłokontroliStrojenia/Głośności,aby
uzyskaćwymaganypoziomdźwięku.
6. Abywyłączyćradio,naciśnijprzyciskZasilania.Na
wyświetlaczupojawisięOFF.
Przechowywanie stacji w
zaprogramowanych pamięciach
Dlakażdegozakresufaldostępnychjest5ustawień
pamięci.
1. Naciśnijprzyciskzasilania,abywłączyćradio.
2. Dostrójwymaganąstacjęzapomocąjednejz
wcześniejopisanychmetod.
3. Naciśnijiprzytrzymajżądaneustawieniewstępne,
ażpojawisięsygnałradiowy.Zaprogramowany
numerpojawisięnawyświetlaczu,astacja
zostanie zapisana pod wybranym przyciskiem
zaprogramowania.
4. Powtórztęprocedurędlapozostałychustawień.
5. Stacjezapisanewpamięciachmożnanadpisać
wykonującpowyższeprocedury.

16 POLSKI
Przywołanie stacji z
zaprogramowanych pamięci
1. Naciśnijprzyciskzasilania,abywłączyćradio.
2. Wybierz wymagany zakres odbioru.
3. PonaciśnięciuprzyciskuPreset,nawyświetlaczu
pojawisięustawionynumericzęstotliwośćstacji.
Ustawianie alarmu radiowego
Powybraniualarmuradiowego,radiowłączysięi
zacznieodtwarzaćwybranąstacjęradiowąwwybranym
czasiealarmu.Alarmradiowybędzietrwałprzez
godzinę,chybażezostaniewyłączonyprzeznaciśnięcie
przyciskuZasilania.NaciśnięcieprzyciskuZasilania
podczas aktywacji alarmu spowoduje anulowanie
alarmu na 24 godziny.
Uwaga:
Gdyradiomaniskistanbaterii,alarmradiowyniemoże
byćaktywowany.
a. Ustawianie czasu alarmu radiowego:
1. Alarmradiowymożebyćustawiony,gdyradiojest
włączonelubwyłączone.
2. Naciśnijizwolnijprzyciskalarmuradiowego ,
symbolalarmuradiowegozaczniemigać.
3. Podczasmiganiasymbolualarmuradiowego,naciśnij
przycisk przez ponad 2 sekundy, po czym
nastąpisygnałdźwiękowy.
4. Godzinazaczniemigaćnawyświetlaczu,przekręć
ponowniepokrętłokontroliStrojenia/Głośności ,
abyzatwierdzićustawieniegodziny.
5. Postępujzgodnieztymisamymiprocedurami
ustawianiagodziny,abyustawićwymaganąminutę.
Naciśnijprzycisk ,abyzakończyćustawienie
czasu alarmu.
b. Ustawianie radiostacji alarmowej:
1. Podczas ustawiania czasu alarmu radiowego i
miganiasymbolualarmuradiowego,naciśnijprzycisk
Pasmo,abywłączyćradio,wybraćżądanepasmo
budzeniaorazstacjępoprzezręcznestrojenie
lubprzywołaniezaprogramowanejstacji.Naciśnij
przycisk ,abyzakończyćustawieniealarmu
radiowego.Wyświetlaczpokaże .
2. Gdywyżejustawionyczasistacjaalarmuradiowego
sąustawione,należynacisnąćiprzytrzymaćprzycisk
alarmu radiowego przez 2 sekundy, po
czymnastępujesygnałdźwiękowy,abywłączyćlub
wyłączyćalarm.Nawyświetlaczupojawisię ,
gdy alarm radiowy zostanie ustawiony.
Uwaga:
Jeślinowastacjaalarmowaniejestwybrana,to
wybrana zostanie ostatnia stacja alarmowa.
Ustawienie alarmu HWS (Humanitarny
System Budzenia)
PodczaswybieraniaalarmuHWSaktywujesięsygnał
dźwiękowy.
Sygnałdźwiękowyalarmubędziekrótszyco15sekund
przezminutę,anastępnienastąpiminutaciszyprzed
powtórzeniemcyklu.
AlarmHWSbędzietrwałprzezgodzinę,chybaże
zostaniewyłączonyprzeznaciśnięcieprzycisku
Zasilania.NaciśnięcieprzyciskuZasilaniapodczas
aktywacji alarmu spowoduje anulowanie alarmu na 24
godziny.
1. AlarmHWSmożebyćustawiony,gdyradiojest
włączonelubwyłączone.
2. NaciśnijizwolnijprzyciskalarmuHWS ,
symbolzaczniemigać.
3. Podczasmiganiasymbolu,dłużejnaciśnijprzycisk
przezponad2sekundyinastąpisygnał
dźwiękowy,anawyświetlaczuzaczniemigaćcyfra
godziny.
4. PrzekręćpokrętłokontroliStrojenia/Głośności,aby
wybraćwymaganągodzinęalarmu,anastępnie
ponownienaciśnijprzyciskustawieniaczasu .
Cyframinutybędziemigać.
5. PrzekręćpokrętłokontroliStrojenia/Głośności,aby
wybraćwymaganągodzinęalarmu,naciśnijponownie
przycisk ustawienia czasu ,abyzakończyć
ustawienie alarmu HWS.
6. Naciśnijiprzytrzymajprzyciskalarmudźwiękowego
przezponad2sekundy,poczymnastąpi
sygnałdźwiękowy,abywłączyćlubwyłączyćalarm
HWS.Nawyświetlaczupojawisię , gdy alarm
dźwiękowyzostanieustawiony.
Funkcja drzemki
1. Podczasaktywacjialarmu,naciśnięciedowolnych
przyciskówzwyjątkiemprzyciskuzasilaniauaktywni
funkcjędrzemki.Alarmradiowylubalarmbrzęczący
HWSzostaniewyciszonyzinterwałem5minutowym.
2. Nawyświetlaczuzaczniemigaćzarównosymbol
drzemki , jak i symbol alarmu. Funkcja drzemki
możebyćpowtarzanaprzezgodzinę,gdyalarmysą
aktywne.
Funkcja uśpienia
Zegaruśpieniaautomatyczniewyłączaradiopoupływie
ustawionego czasu.
1. Naciśnijiprzytrzymajprzyciskzasilaniaprzezponad
2sekundy,poczymrozlegniesięsygnałdźwiękowy,
wyświetlaczprzejdzieprzezdostępnyczasuśpienia
wkolejności60-45-30-15-120-90-60.
Zwolnijprzyciskzasilania,gdynawyświetlaczu
pojawisięwymaganyczasuśpienia.Symbol

17 POLSKI
pojawisięnawyświetlaczu,aradiozacznie
odtwarzaćostatniąwybranąstację.
2. Abyanulowaćfunkcjęuśpienia,naciśnijprzycisk
zasilania.Symbolzniknieiradiozostaniewyłączone.
Podświetlenie wyświetlacza
Naciśnięciedowolnychprzyciskówlubobrócenie
pokrętłakontroliStrojenia/Głośnościpodświetli
wyświetlaczLCDnaok.15sekund.
Podczas skanowania stacji i aktywacji alarmu,
automatyczniepodświetlisięrównieżwyświetlacz.
Zmień Stereo na Mono
GdyodbiórstacjistereoFMjestsłaby,możnago
poprawićnaciskającprzyciskMonoprzez2sekundy.
Dźwiękniejestjużwstereoiwskaźnikstereoznika.
GNIAZDO WEJŚCIA AUDIO
Dodatkowegniazdowejściowe3.5mmzostało
udostępnionewprzedniejczęściradia,abyumożliwić
połączeniesygnałuaudiozzewnętrznymiurządzeniami
audio, takimi jak MP3 I odtwarzacz CD.
1. Podłączzewnętrzneźródłoaudio(np.MP3,
odtwarzacz CD) do gniazda AUX.
2. Naciśnijprzyciskzasilania,abywłączyćradio.
3. KilkarazynaciśnijizwolnijprzyciskPasmaaż
wyświetlisię„AU1”.
4. Abyuzyskaćlepsząjakośćdźwięku,zalecamy
ustawieniegłośnościnapowyżejjednątrzecią
poziomunatwoimurządzeniuaudio,anastępniew
miarępotrzebydostosowaniegłośnościradia.
UWAGA:
Przewódaudioniejestdołączonyjakostandardowe
wyposażenie.AUXniemożebyćaktywowanejako
źródłoalarmu.
KONSERWACJA
OSTRZEŻENIE:
● Niewolnoużywaćbenzyny,benzenu,
rozpuszczalnika, alkoholu itp. Substancje takie
mogąspowodowaćodbarwienia,odkształcenialub
pęknięcia.
DANE TECHNICZNE
Dane dotyczące zasilania
Zasilaczprądu
zmiennego
12VDC700mA,środkowy
wtyk dodatni
Akumulator
UM-3 (Rozmiar AA) x 2 dla
baterii zapasowych
Bateria wsuwana: 14.4V - 18V
Zakres
częstotliwości
FM 87.50-108 MHz
(0.05MHz/stopień)
AM (MW) 522-1,710 kHz
(9kHz/stopień)
Charakterystyka obwodu
Głośnik 3.5cala,8omów
Mocwyjściowa 14.4V: 2.2W x 2,
18V: 3.5W x 2
Gniazdowejścia Śred.3,5mm(wejścieAUX)
System antenowy FM:giętkaantenaprętowa
AM: antena barowa
Wymiary
(dł.xszer.xwys.) 280 x 163 x 302mm
Masa 4.1Kg (bez akumulatora)

18 MAGYAR
MAGYAR (Eredeti útmutató)
KEZELŐSZERVEK (1. ÁBRA)
1. Bekapcsolásésidőzítettkikapcsolás
2. Sávválasztás és mono gomb
3. Rádiósébresztésbeállítása
4. Sípolóébresztésbeállítása
5. Tárolt állomások
6. Állomáskeresésésazidőbeállítása
7. Hangoló/Hangerőszabályzógomb
8. DC IN bemenet
9. Bemeneti aljzat (AUX IN)
10. Hajlítottrúdantenna
11. Akkutartórekesz(afőakkumulárcsomagot
és a segédakkumulátorokat takarja)
12. Fogó
13. Hangszóró
14. Azakkutartórekeszzárja
15. Főakkutartórekesz(*1)
16. Főakkutartórekesz(*2)
17. Asegédakkumulátortartórekesze
*1:A„B”revagyaz„N”-revégződőnevű
akkumulátorok számára.
*2:A„G”-revégződőnevűakkumulátorok
számára.
LCD kijelző
A. Rádiósébresztő
B. HWSsípolóébresztő
C. Állomáskeresés
D. Hullámsáv jelzése
E. Az alacsony akkufeszültség jelzése
F. Tárolt állomások
G. Azidőzítettkikapcsolásésaszundiállapota
H. Frekvencia
I. Asztereóéshangerőszimbóluma
J. Óra
K. Időbeállítása
L. PMazórához
SZIMBÓLUMOK
Az alábbiakban a készülékkel kapcsolatos
szimbólumokrólolvashat.Fontos,hogyhasználatelőtt
ezekkel tisztában legyen.
Olvassaelahasználatiútmutatót.
Csak az EU tagországaiban.
A veszélyes alkatrészek miatt az
elhasznált elektromos és elektronikus
berendezések, akkumulátorok és
elemek rossz hatással vannak
a környezetetre és az emberi
egészségre.
Az elektromos és
elektronikuskészülékek, elemek nem a
háztartásihulladékbavalók!
Az elhasznált elektromos és
elektronikusberendezésekről,valamint
azakkumulátorokróléselemekrőlés
elhasználtazakkumulátorokrólés
elemekrőlszólóeurópaiirányelvnek,
valamint a nemzeti jogszabályoknak
valóalkalmazkodásnakmegfelelőenaz
elhasznált elektromos berendezéseket,
elemeket és akkumulátorokat külön
kell tárolni, és az adott település
különgyűjtőhelyérekellszállítani,
akörnyezetvédelmielőírásoknak
megfelelően.
Eztaberendezésentalálhatóáthúzott
kerekeskukaszimbólumajelzi.
FONTOS BIZTONSÁGI
UTASÍTÁSOK
FIGYELMEZTETÉS:
Elektromos eszközök használata során mindig tartsa
beazalapvetőbiztonságiutasításokat,ígycsökkentheti
atűzesetek,áramütésésaszemélyisérülések
kockázatát. Ezek az alábbiak:
1. Használatelőttfigyelmesenolvassaelezta
használatiútmutatótésatöltőutasításait.
2. Akészüléketcsakszárazruhávaltisztítsa.
3. Netakarjaleaszellőzőnyílásokat.Akészüléketa
gyártóutasításaialapjánszereljebe.
4. Akészüléketneszereljebehőforrásokközelébe,
pl.radiátorok,hősugárzók,kályhák,erősítőkstb.,
melyekhőttermelnek.
5. Kizárólagagyártóáltalmegadottcsatolmányokat
és alkatrészeket és kellékeket használja.
6. Viharok esetén, illetve ha hosszabb ideig nem
kívánjahasználni,akészülékelektromos
csatlakozójáthúzzakiakonnektorból.
7. Arádióbeépítettakkumulátoraitésakülönálló
akkumulátortkizárólagatöltésükhözelőírt
töltőkészülékkelszabadtölteni.Egybizonyos
akkumulátortípushozhasználhatótöltőmás
akkumulátortípussalvalóhasználatatűzveszélyt
idézhetelő.
8. Azakkumulátorosrádiótkizárólagaszámára
készítettakkumulátorokkalhasználja.Bármely
egyébakkumulátorhasználatatűzkockázatával
járhat.
9. Ha az akkumulátor-egységet nem használja, tartsa
távolirodaikapcsoktól,pénzérméktől,kulcsoktól,
szögektől,csavaroktólésmindenegyébolyan

19 MAGYAR
tárgytól,melyacsatolópontokatösszekötheti.
Azakkumulátorcsatolópontjanakrövidzárlata
következtében szikrák keletkezhetnek, illetve égési
sérülésekkeléstűzesettelisjárhat.
10. Ne kerüljön a testfelülete érintkezésbe olyan
földelt felületekkel, mint például csövek, radiátorok,
vízmelegítőkvagyhűtőgépek.Azáramütésveszélye
fokozottan fennáll, ha a teste földelve van.
11. Helytelenhasználateseténazakkumulátorból
folyadék távozhat; kerüljön ezzel minden
érintkezést. Ha véletlenül érintkezésbe került a
folyadékkal,öblítselevízzel.Haafolyadéka
szembejut,vegyenigénybeorvosisegítséget.Az
akkumulátorbólkiszivárgófolyadékirritációtés
égési sérüléseket okozhat.
12. Nehasználjonsérültvagymódosított
akkumulátor-egységeket vagy eszközöket. A
sérültvagymódosítottakkumulátorokműködése
kiszámíthatatlanlehet,melytűzesethez,
robbanáshoz és sérülésekhez vezethet.
13. Akkumulátor-egységeket, eszközöket ne tegyen ki
nyíltlángnakvagymagashőmérsékleteknek.Atűz
vagya130°Cfelettihőmérsékletrobbanástokozhat.
14. Az akkumulátor-egységek vagy eszközök töltéséhez
kövesseatöltésrevonatkozóutasításokat,és
nevégezzentöltéstazútmutatóbanmegadott
hőmérsékletitartományonkívül.Ahelytelen,vagya
megadotthőmérsékletitartományonkívülitöltéskárt
tehetazakkumulátorban,ésfokozotttűzveszéllyel
is járhat.
ŐRIZZE MEG EZT AZ ÚTMUTATÓT
TERMÉKSPECIFIKUS
BIZTONSÁGI SZABÁLYOK
AKKUTARTÓ REKESZ
1. Azakkukazettahasználataelőttolvassael(1)az
akkutöltőn,(2)azakkumulátoronés(3)aterméken
találhatóutasításokatésfigyelmeztetéseketaz
akkumulátorhasználatáravonatkozóan.
2. Neszereljeszétazakkutartórekeszt.
3. Haaműködésiidőtúlzottanlerövidül,azonnal
függesszefelahasználatot.Eztúlhevülésveszéllyel
járhat, gyulladást vagy robbanás okozhat.
4. Ha az akkumulátor folyadéka a szemébe kerül,
öblítsekitisztavízzel,majdazonnalforduljon
orvoshoz. Ez vakságot is okozhat.
5. Nezárjarövidreazakkutartórekeszt:
(1) Neérjenacsatolópontokhozsemmilyenvezető
anyaggal.
(2) Netároljaazakkutartórekesztegytárolóban
más fém tárgyakkal, például szögekkel,
pénzérmékkel, stb.
(3) Netegyekiazakkutartórekesztvíznek
vagyesőnek.Azakkumulátorrövidzárlata
nagymennyiségűelektromosáramátfolyásával
éstúlhevülésseljárhat,gyulladástokozhat,vagy
akár tönkre is mehet.
6. Netároljaazakkutartórekesztolyanhelyeken,
aholahőmérsékletmeghaladhatjaaz50°C(122°F)
értéket.
7. Nepróbáljaelégetniazakkutartórekesztmég
akkor sem, ha az némileg sérült vagy már teljesen
elhasználódott.Azakkutartórekesztűzben
felrobbanhat.
8. Neszögelje,nezúzzaössze,nedobjaelésne
ejtse le az akkukazettát, és ne üssön hozzá kemény
tárgyakat.Ezektűzesethez,felmelegedéshezvagy
robbanáshoz vezethetnek.
9. Ne használja az akkumulátort, ha az sérült.
10. A kockázatok elkerülése érdekében használat
előttolvassaelacserélhetőakkumulátorkezelési
útmutatóját.Emellettazakkumulátormaximális
kimenőárama8A,vagyannálnagyobblegyen.
11. Akészüléklítium-ionakkumulátorairaatörvény
szerintaveszélyesárukravonatkozókövetelmények
vonatkoznak.
12. Az akkukazettát kiselejtezésekor vegye ki az
eszközbőlésselejtezzekiegybiztonságoshelyen.
Az akkumulátor kiselejtezésével kapcsolatban
kövesse a helyi szabályozásokat.
13. Az akkumulátorokat csak a Makita által megadott
termékekhez használja. Ha az akkumulátor nem
velekompatibilistermékbekerül,aztűzesethez,
túlhevüléhez,vagyazelektrolitszivárgásához
vezethet.
14. Ha az eszközt hosszabb ideig nem használja, vegye
kibelőleazakkumulátort.
15. Használat közben és az után az akkukazetta
felmelegedhet, mely égési sérüléseket, alacsony
hőmérsékletűégéseketokozhat.
16. Neérjenakészülékcsatlakozópontjához
közvetlenül használat után, mert az eléggé
felforrósodikahhoz,hogyégésisérüléstokozzon.
17. Ügyeljen arra, hogy ne maradjon forgács, por
vagyhomokazakkukazettacsatlakozópontjaiban,
nyílásaibanvagyvájataiban.Azateljesítmény
gyengüléséhez és a készülék vagy az elemkazetta
súlyoskárosodásáhozvezethet.
18. Nehasználjaazakkukazettátmagasfeszültségű
elektromos vezetékek közelében, kivéve, ha a
készüléktámogatjaamagasfeszültségűvezetékek
használatát. Az meghibásodáshoz vagy a készülék
vagyazakkukazettasúlyoskárosodásához
vezethet
19. Azakkumulátorttartsagyermekektőltávol.

20 MAGYAR
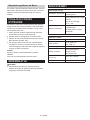
MŰKÖDÉSI IDŐ
*Arádióhozhasználhatóakkupakkoklistájaazalábbitáblázatbantalálható.
*Azalábbitáblázatonláthatóaműködésiidőegytöltéssel.
Akkumulátor
kapacitása
Akkumulátorház feszültsége A HANGFAL KIMENETÉNÉL =
50mW + 50mW
(egység:Óra)(Megközelítőleg)
14.4V 18V
1.5Ah
BL1415G 10.0
BL1415N 8.5
BL1815G 10.0
BL1815N 9.0
2.0Ah
BL1420G 11.0
BL1820G
BL1820B 12.0
3.0Ah
BL1430B 14.0
BL1830B 17.0
4.0Ah
BL1440 23.0
BL1840B 24.0
5.0Ah BL1850B 31.0
6.0Ah
BL1460B 30.0
BL1860B 37.0
FIGYELEM:
Kizárólag a fent felsorolt akkukazettákat használja. Azoktól eltérő kazetták használata sérülésekhez és/vagy
tűzesethez vezethet.
Megjegyzés:
● Azakkumulátorokkészenlétiidejétbemutatótáblázatadataitájékoztatójellegűek.Avalósüzemidőfügghetaz
akkumulátortípusától,atöltésfeltételeitőlésahasználatikörnyezettőlis.
● Afentfelsoroltakkukazettáknémelyikeatartózkodásihelyétőlfüggőenlehet,hogynemleszelérhető.
FIGYELEM:
● Az akkumulátor helytelen behelyezése
robbanáshoz vezethet.
● Csak egyforma vagy annak megfelelő típusúra
cserélje.
● Kizárólag eredeti Makita akkumulátorokat
használjon. A nem eredeti, vagy módosított
akkumulátorok felrobbanhatnak, tűzesetet,
személyi sérüléseket és károkat okozhatnak.
Emellett a Makita eszközre és a töltőre vonatkozó
jótállás is érvényét veszti.
Tippek az akkumulátor élettartamának
meghosszabbításához
1. Töltsefelazakkutartórekeszt,mielőttazteljes
mértékben lemerülne. Minden esetben függessze fel
ahasználatotéstöltsefelazakkutartórekeszt,amint
észleli,hogyakészülékteljesítményegyengül.
2. Sohanetöltseazakkutartórekeszt,amikorazteljes
mértékbenfelvantöltve.Atúltöltésmegrövidítiaz
akkumulátor élettartamát.
3. Azakkutartórekesztöltésétvégezze,
szobahőmérsékleten10°C-40°C(50°F-104°F).
Töltéselőttvárjameg,mígazakkutartórekeszlehűl.
4. Ha nem használja az akkukazettát, vegye ki a
készülékbőlvagyatöltőből.
5. Töltsefelazakkutartórekeszt,haazthosszabb
ideig(hathónapotmeghaladóideig)nemkívánja
használni.
Pagina se încarcă...
Pagina se încarcă...
Pagina se încarcă...
Pagina se încarcă...
Pagina se încarcă...
Pagina se încarcă...
Pagina se încarcă...
Pagina se încarcă...
Pagina se încarcă...
Pagina se încarcă...
Pagina se încarcă...
Pagina se încarcă...
Pagina se încarcă...
Pagina se încarcă...
Pagina se încarcă...
Pagina se încarcă...
Pagina se încarcă...
Pagina se încarcă...
Pagina se încarcă...
Pagina se încarcă...
Pagina se încarcă...
Pagina se încarcă...
Pagina se încarcă...
Pagina se încarcă...
Pagina se încarcă...
Pagina se încarcă...
Pagina se încarcă...
Pagina se încarcă...
Pagina se încarcă...
Pagina se încarcă...
Pagina se încarcă...
Pagina se încarcă...
Pagina se încarcă...
Pagina se încarcă...
Pagina se încarcă...
Pagina se încarcă...
Pagina se încarcă...
Pagina se încarcă...
Pagina se încarcă...
Pagina se încarcă...
Pagina se încarcă...
Pagina se încarcă...
Pagina se încarcă...
Pagina se încarcă...
Pagina se încarcă...
Pagina se încarcă...
Pagina se încarcă...
Pagina se încarcă...
Pagina se încarcă...
Pagina se încarcă...
Pagina se încarcă...
Pagina se încarcă...
Pagina se încarcă...
Pagina se încarcă...
Pagina se încarcă...
Pagina se încarcă...
Pagina se încarcă...
Pagina se încarcă...
Pagina se încarcă...
Pagina se încarcă...
Pagina se încarcă...
Pagina se încarcă...
Pagina se încarcă...
Pagina se încarcă...
Pagina se încarcă...
Pagina se încarcă...
Pagina se încarcă...
Pagina se încarcă...
Pagina se încarcă...
Pagina se încarcă...
Pagina se încarcă...
Pagina se încarcă...
Pagina se încarcă...
Pagina se încarcă...
Pagina se încarcă...
Pagina se încarcă...
Pagina se încarcă...
Pagina se încarcă...
Pagina se încarcă...
Pagina se încarcă...
Pagina se încarcă...
Pagina se încarcă...
Pagina se încarcă...
Pagina se încarcă...
Pagina se încarcă...
Pagina se încarcă...
Pagina se încarcă...
Pagina se încarcă...
Pagina se încarcă...
-
 1
1
-
 2
2
-
 3
3
-
 4
4
-
 5
5
-
 6
6
-
 7
7
-
 8
8
-
 9
9
-
 10
10
-
 11
11
-
 12
12
-
 13
13
-
 14
14
-
 15
15
-
 16
16
-
 17
17
-
 18
18
-
 19
19
-
 20
20
-
 21
21
-
 22
22
-
 23
23
-
 24
24
-
 25
25
-
 26
26
-
 27
27
-
 28
28
-
 29
29
-
 30
30
-
 31
31
-
 32
32
-
 33
33
-
 34
34
-
 35
35
-
 36
36
-
 37
37
-
 38
38
-
 39
39
-
 40
40
-
 41
41
-
 42
42
-
 43
43
-
 44
44
-
 45
45
-
 46
46
-
 47
47
-
 48
48
-
 49
49
-
 50
50
-
 51
51
-
 52
52
-
 53
53
-
 54
54
-
 55
55
-
 56
56
-
 57
57
-
 58
58
-
 59
59
-
 60
60
-
 61
61
-
 62
62
-
 63
63
-
 64
64
-
 65
65
-
 66
66
-
 67
67
-
 68
68
-
 69
69
-
 70
70
-
 71
71
-
 72
72
-
 73
73
-
 74
74
-
 75
75
-
 76
76
-
 77
77
-
 78
78
-
 79
79
-
 80
80
-
 81
81
-
 82
82
-
 83
83
-
 84
84
-
 85
85
-
 86
86
-
 87
87
-
 88
88
-
 89
89
-
 90
90
-
 91
91
-
 92
92
-
 93
93
-
 94
94
-
 95
95
-
 96
96
-
 97
97
-
 98
98
-
 99
99
-
 100
100
-
 101
101
-
 102
102
-
 103
103
-
 104
104
-
 105
105
-
 106
106
-
 107
107
-
 108
108
-
 109
109


Makita DMR116 Manual de utilizare
- Categorie
- Aparate de radio
- Tip
- Manual de utilizare
în alte limbi
- slovenčina: Makita DMR116 Používateľská príručka
Lucrări înrudite
-
Makita DMR116 Manual de utilizare
-
Makita DMR106 Manual de utilizare
-
Makita DMR114 Manual de utilizare
-
-
Makita DMR108N Manual de utilizare
-
Makita DML816 Manual de utilizare
-
-
Makita MR007G Manual de utilizare
-
-
