Makita DMR108N Manual de utilizare
- Categorie
- Ceasuri cu alarmă
- Tip
- Manual de utilizare

DMR108N
EN Job Site Radio Instruction manual 5
PL Akumulatorowy odbiornik radiowy Instrukcja obsługi 15
HU Munkahelyi rádió Használati utasítás 25
SK Pracovné rádio Návod na obsluhu 35
CS Pracovní rádio Návod k obsluze 45
UK Радіоприймач для використання на
робочому місці Інструкція з експлуатації 55
RO Radio pentru locul de lucru Manual de instrucţiuni 66
DE Baustellenradio Betriebsanleitung 76
SL Prenosni Radio Navodila za uporabo 86
SQ Radio për kantier pune Manuali i përdorimit 96
BG Радио за Работни Обекти Упътване за употреба 106
HR Gradilišni Radio Upute za uporabu 117
MK Радио за работно место Упатство за работа 127
SR Radio za gradilište Uputstvo za upotrebu 138
RU Радиоприемник для использования
на рабочей площадке Инструкция по эксплуатации 148

2
1
AB CD
G
F
H
I
E
4
5
1
2
3
78 9 10
12
13
11
14
15
16
6
17
17
17
18

3
1
2
1
2
2
4
6 7
3
5
LXT
LXT
CXT
CXT

4
5
14
8
10
9

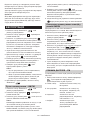
5 ENGLISH
ENGLISH
(Original instructions)
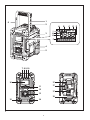
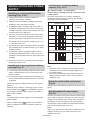
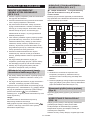
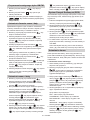
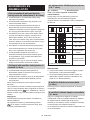
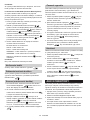
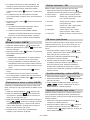
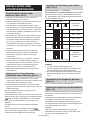
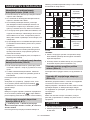
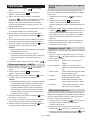
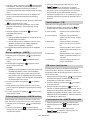
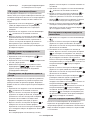
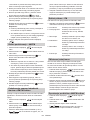
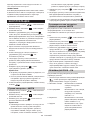
Explanation of general view
(Fig. 1)
1. Handle
2. Battery compartment locker
3. Battery cover
4. Speaker
5. DC IN socket
6. Soft bended rod antenna
7. Power/Sleep timer button
8. Source button
9. Radio alarm button
10. Buzzer alarm button
11. Preset stations/Preset 1 button as Bluetooth®
pair button
12. Menu/Info button
13. Volume/Tuning control/Select knob
14. USB power supply port
15. AUX IN socket
16. LCD display
17. Main battery compartment
18. Back up battery compartment
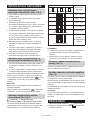
LCD display
A. Radio alarm
B. Buzzer alarm
C. Stereo symbol
D. Low battery indicator
E. Clock
F. Frequency
G. RDS (Radio data system)
H. Sleep status
I. AM/PM for clock
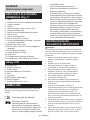
Symbols
The following show the symbols used for the equipment.
Be sure that you understand their meaning before use.
Read instruction manual.
Only for EU countries.
Due to the presence of hazardous
components in the equipment, waste
electrical and electronic equipment,
accumulators and batteries may have
a negative impact on the environment
and human health.
Do not dispose of electrical and
electronic appliances or batteries with
household waste!
In accordance with the European Directive
on waste electrical and electronic
equipment and on accumulators and
batteries and waste accumulators and
batteries, as well as their adaptation to
national law, waste electrical equipment,
batteries and accumulators should be
stored separately and delivered to a
separate collection point for municipal
waste, operating in accordance with the
regulations on environmental protection.
This is indicated by the symbol of the
crossed-out wheeled bin placed on the
equipment.
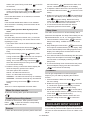
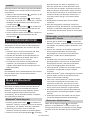
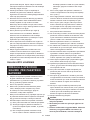
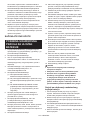
IMPORTANT SAFETY
INSTRUCTIONS
WARNING:
When using electric tools, basic safety precautions
should always be followed to reduce the risk of re,
electric shock, and personal injury, including the
following:
1. Read this instruction manual and the charger
instruction manual carefully before use.
2. Clean only with dry cloth.
3. Do not block any ventilation opening. Install in
accordance with the manufacturer’s instruction.
4. Do not install near any heat sources such as
radiators, heat registers, stoves, or other apparatus
(including ampliers) that produce heat.
5. Only use attachments/accessories specied by the
manufacturer.
6. Unplug this apparatus during lighting storms or
when unused for long periods of time.
7. A battery operated radio with integral batteries or a
separate battery pack must be recharged only with
the specied charger for the battery. A charger that
may be suitable for one type of battery may create a
risk of re when used with another battery.
8. Use battery operated radio only with specically
designated battery packs. Use of any other batteries
may create a risk of re.
9. When battery pack is not in use, keep it away from
other metal objects like: paper clips, coins, keys,
nails, screws, or other small metal objects that can
make a connection from one terminal to another.
Shorting the battery terminals together may cause
sparks, burns, or a re.
10. Avoid body contact with grounded surfaces such
as pipes, radiators, ranges and refrigerators. There
is an increased risk of electric shock if your body is
grounded.

6 ENGLISH
11. Under abusive conditions, liquid may be ejected
from the battery; avoid contact. If contact
accidentally occurs, ush with water. If liquid
contacts eyes, additionally seek medical help.
Liquid ejected from the battery may cause irritation
or burns.
12. Do not use a battery pack or tool that is damaged
or modied. Damaged or modied batteries may
exhibit unpredictable behavior resulting in re,
EXPLOSION or risk of injury.
13. Do not expose a battery pack or tool to re
or excessive temperature. Exposure to re or
temperature above 130°C may cause explosion.
14. Follow all charging instructions and do not charge
the battery pack or tool outside the temperature
range specied in the instructions. Charging
improperly or at temperatures outside the specied
range may damage the BATTERY and increase the
risk of re.
SAVE THESE INSTRUCTIONS
SPECIFIC SAFETY RULES
FOR BATTERY CARTRIDGE
1. Before using battery cartridge, read all instructions
and cautionary markings on (1) battery charger, (2)
battery, and (3) product using battery.
2. Do not disassemble battery cartridge.
3. If operating time has become excessively shorter,
stop operating immediately. It may result in a risk of
overheating, possible burns and even an explosion.
4. If electrolyte gets into your eyes, rinse them out with
clear water and seek medical attention right away. It
may result in loss of your eyesight.
5. Do not short the battery cartridge:
(1) Do not touch the terminals with any conductive
material.
(2) Avoid storing battery cartridge in a container
with other metal objects such as nails, coins,
etc.
(3) Do not expose battery cartridge to water or
rain. A battery short can cause a large current
ow, overheating, possible burns and even a
breakdown.
6. Do not store and use the tool and battery cartridge
in locations where the temperature may reach or
exceed 50°C (122°F).
7. Do not incinerate the battery cartridge even if it is
severely damaged or is completely worn out. The
battery cartridge can explode in a re.
8. Do not nail, cut, crush, throw, drop the battery
cartridge, or hit against a hard object to the battery
cartridge. Such conduct may result in a re,
excessive heat, or explosion.
9. Do not use a damaged battery.
10. To avoid risk, the manual of replaceable the battery
should be read before use. And the max discharging
current of the battery should be greater than or
equal to 8A.
11. The contained lithium-ion batteries are subject to
the Dangerous Goods Legislation requirements.
12. When disposing the battery cartridge, remove it from
the tool and dispose of it in a safe place. Follow
your local regulations relating to disposal of battery.
13. Use the batteries only with the products specied
by Makita. Installing the batteries to non-compliant
products may result in a re, excessive heat,
explosion, or leak of electrolyte.
14. If the tool is not used for a long period of time, the
battery must be removed from the tool.
15. During and after use, the battery cartridge may take
on heat which can cause burns or low temperature
burns.
16. Do not touch the terminal of the tool immediately
after use as it may get hot enough to cause burns.
17. Do not allow chips, dust, or soil stuck into the
terminals, holes, and grooves of the battery
cartridge. It may result in poor performance or
breakdown of the tool or battery cartridge.
18. Unless the tool supports the use near a high-
voltage electrical power lines, do not use the battery
cartridge near a high-voltage electrical power lines.
It may result in a malfunction or breakdown of the
tool or battery cartridge.
19. Keep the battery away from children.
CAUTION:
●Danger of explosion if battery is incorrectly
replaced.
●Replace only with the same or equivalent type.
●Only use genuine Makita batteries. Use of non-
genuine Makita batteries, or batteries that have
been altered, may result in the battery bursting
causing res personal injury and damage. It will
also void the Makita warranty for the Makita tool
and charger.
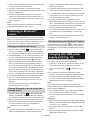
Tips for maintaining maximum battery
life
1. Charge the battery cartridge before completely
discharged. Always stop tool operation and charge
the battery cartridge when you notice less tool power.
2. Never recharge a fully charged battery cartridge.
Overcharging shortens the battery service life.
3. Charge the battery cartridge with room temperature
at 10°C - 40°C (50°F - 104°F). Let a hot battery
cartridge cool down before charging it.
4. When not using the battery cartridge, remove it from
the tool or the charger.

7 ENGLISH
5. Charge the battery cartridge if you do not use it for a
long period (more than six months).
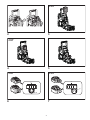
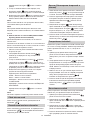
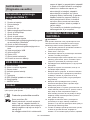
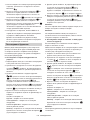
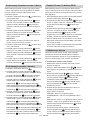
Battery Installation
Note:
Keeping back up batteries inside the compartment
prevent stored data in preset memories from being lost.
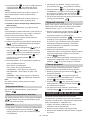
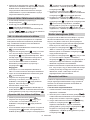
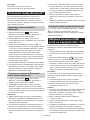
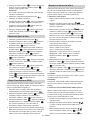
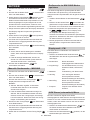
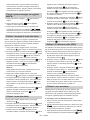
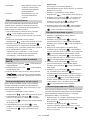
Back up battery Installation (Fig. 2 & 8)
1. Pull out the battery compartment locker to
release battery compartment. There are main
battery pack compartment and back up battery
compartment.
2. Remove back up battery compartment cover and
insert 2 fresh UM-3 (AA sizes). Make sure the
batteries are with correct polarity as shown inside the
compartment. Replace the battery cover.
3. After back up batteries are inserted, insert the main
battery pack to power radio. The suitable battery
packs for this radio listed as the following table.

8 ENGLISH
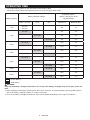
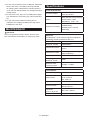
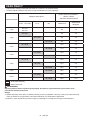
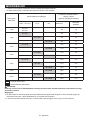
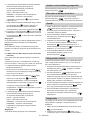
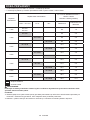
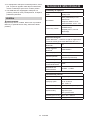
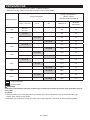
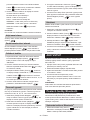
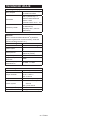
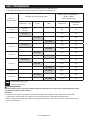
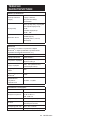
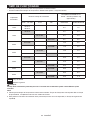
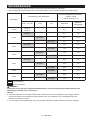
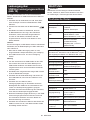
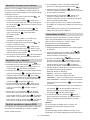
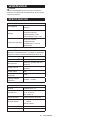
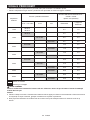
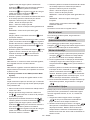
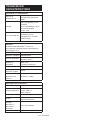
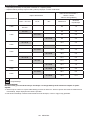
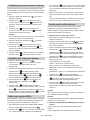
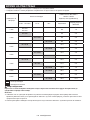
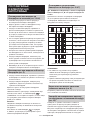
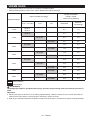
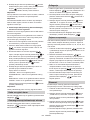
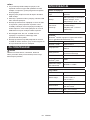
OPERATING TIME
* The suitable battery packs for this radio listed as the following table.
* The following table indicates the operating time on a single charge in Radio mode.
Battery capacity
Battery Cartridge Voltage
At speaker output =
50mW + 50mW (unit: Hour)
(Approximately)
10.8V - 12V max 14.4V 18V Radio/AUX Bluetooth play
1.3Ah BL1013
BL1014 8.0 1.5
1.5Ah
BL1016 9.0 2.0
BL1415N 8.0 2.0
BL1815N 8.5 2.5
2.0Ah
BL1021B 12.0 2.5
BL1820B 11.0 3.5
3.0Ah
BL1430B 13.0 4.0
BL1830B 16.0 5.0
4.0Ah
BL1041B 24.0 5.0
BL1440 21.0 5.5
BL1840B 22.0 7.0
5.0Ah BL1850B 28.0 9.0
6.0Ah
BL1460B 28.0 8.0
BL1860B 34.0 11.0
: Cluster Battery
: Slide Battery
WARNING:
Only use the battery cartridges listed above. Use of any other battery cartridges may cause injury and/or re.
Note:
●Table regarding to the battery operating time above is for reference. The actual operating time may differ with the
type of the battery, charging condition, or usage environment.
●Some of the battery cartridges listed above may not be available depending on your region of residence.

9 ENGLISH
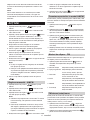
INSTALLATION AND POWER
SUPPLY
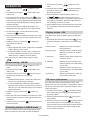
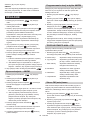
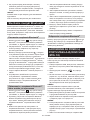
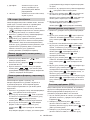
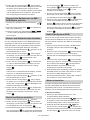
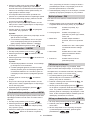
Installing or removing Slide battery
cartridge (Fig. 3 & 4)
●Always switch off the tool before installing or
removing of the battery cartridge.
● Hold the tool and the battery cartridge rmly when
installing or removing battery cartridge.
●To install the battery cartridge, align the tongue on
the battery cartridge with the groove in the housing
and slip it into place. Always insert it all the way until
it locks in place with a little click.
●If you can see the red indicator on the upper side of
the button, it is not locked completely. Install it fully
until the red indicator cannot be seen. If not, it may
accidentally fall out of the tool, causing injury to you
or someone around you.
●Do not use force when inserting the battery cartridge.
If the cartridge does not slide in easily, it is not being
inserted correctly.
●To remove the battery cartridge, withdraw it from
the tool while sliding the button on the front of the
cartridge or pressing the buttons on both sides of the
cartridge.
● Be careful not to pinch your ngers when opening or
closing the battery cover.
Installing or removing Cluster battery
cartridge (Fig. 5)
●To insert the battery cartridge, align the tongue on the
battery cartridge with the grove in the housing and
slip it into place.
●To remove the battery cartridge, take the battery out
of the terminal while pressing the buttons on the side
ofcartridge.
Return the battery compartment locker to the original
position.
Reduced power, distortion, “stuttering sound” or when
both low battery sign and “POWERFAIL” appear
on the display are all the signs that the main battery
pack needs to replace.
Note:
The battery pack can’t be charged via the supplied AC
power adaptor.
When low battery sign appears and an “EMPTY”
keeps on ashing is the time to replace the back up
batteries.
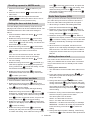
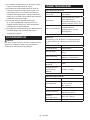
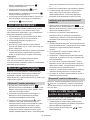
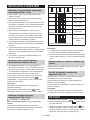
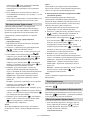
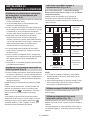
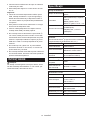
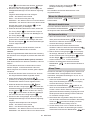
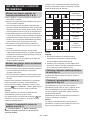
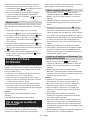
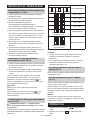
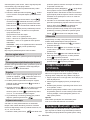
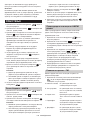
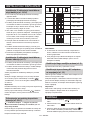
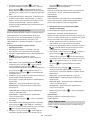
Indicating the remaining battery
capacity (Fig. 6 & 7)
1. Indicator lamps 2. Check button
Only for battery cartridges with “B” at the end of the
model number
Press the check button on the battery cartridge to
indicate the remaining battery capacity. The indicator
lamps light up for few seconds.
Indicator lamps
Remaining
capacity
Lighted Off Blinking
75% to 100%
50% to 75%
25% to 50%
0% to 25%
(For LXT battery cartridges only)
Charge the
battery
(For LXT battery cartridges only)
The battery
may have
malfunctioned
015658
Note:
●Depending on the conditions of use and the ambient
temperature, the indication may differ slightly from
the actual capacity.
● The rst (far left) indicator lamp will brink when the
battery protection system works. (For LXT battery
cartridges only)
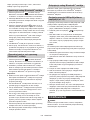
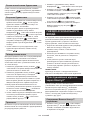
Using the soft bended rod antenna
(Fig. 9)
Straight up the soft bended rod antenna as shown in the
gure.
Using Supplied AC power adaptor
(Fig. 10)
Remove the rubber protector and insert the adaptor plug
into the DC socket on the left side of the radio. Plug the
adaptor into a standard mains socket outlet. Whenever
the adaptor is used, the battery pack is automatically
disconnected. The AC adaptor should be disconnected
from the main supply when not in use.
Note:
When your radio has any interference in AM band by its
adaptor, please move your radio away from its AC
adaptor over 30cm.

10 ENGLISH
OPERATION
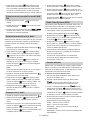
1. Press the Power button to switch on your
radio.
2. Press the Source button to select AM or FM
radio mode.
3. Press and hold the Tuning control knob to carry
out an auto-tune. Your radio will scan up the AM/FM
band from the currently displayed frequency and will
stop scanning automatically when it nds a station of
sufcient strength.
4. After a few seconds the display will update. The
display will show the frequency of the signal found.
5. To nd other station, press and hold the Tuning
control knob as before.
6. When the end of the waveband is reached your radio
will recommence tuning from the opposite end of the
waveband.
7. Rotate the Tuning control knob to adjust the
sound level as required.
Note:
●While adjusting the volume, make sure the FM/AM
is NOT ashing on the screen.
● If AM/FM is ashing on the screen, it allows you
to tune the stations manually (see the section of
“Manual tuning – AM/FM” for more detail).
8. To switch off your radio press the Power button
.
Manual tuning – AM/FM
1. Press the Power button to switch on your
radio.
2. Press the Source button to select AM or FM
radio mode.
3. Press the Tuning control knob and you will see
the FM or AM is ashing on the display.
Note:
● FM/AM will ash approx. 10 seconds. Within this
period, only manual tuning is allowed.
● If volume adjustment is desired while FM/AM is
ashing, press the Tuning control knob to stop the
ash and you can rotate the Tuning control knob to
adjust sound level.
4. Rotate the Tuning control knob to tune to a
station.
5. When the end of the waveband is reached your radio
will recommence tuning from the opposite end of the
waveband.
6. Use the Tuning control knob to adjust the sound
level as required.
Presetting stations in AM/FM mode
There are 5 preset stations each for AM and FM radio.
They are used in the same way for each waveband.
1. Press the Power button to switch on your
radio.
2. Press the Source button to select the desired
waveband. Tune to the required radio station as
previously described.
3. Press and hold the required Preset button (1 to
5) until the display shows “P4” for
example after the frequency. The station will be stored
using the preset number. Repeat this procedure for
the remaining presets as you wish.
4. Preset stations which have already been stored may
be overwritten by following the above procedure if
required.
Display modes – FM
Your radio has a range of display options for FM radio
mode.
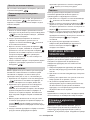
1. Repeatedly press the Menu/Info button to view
the RDS information of the station you are listening
to.
a. Station name Displays the name if the station
being listened to.
b. Program type Displays the type of station being
listened to such as Pop, Classic,
News, etc.
c. Radio text Displays radio text message such
as new items etc.
d. Year/Day Displays the year and day of the
week according to the date setting
of your radio.
e. Date/Day Displays the date and day of the
week according to the date setting
of your radio.
f. Frequency Displays the frequency of the FM
for the station listened to.
FM stereo (auto)/mono
If the FM radio station being listened to has a weak
signal some hiss may be audible. It is possible to reduce
this hiss by forcing the radio to play the station in mono
rather than stereo.
1. Press the Power button as needed to select
the FM band and tune to the desired FM station as
previously stated.
2. Press and hold Menu/Info button to enter the
menu setting.
3. Rotate the Tuning control knob until the FM Auto/
mono setting shows on the display. If the setting is
Auto press the Tuning control knob to switch to Mono
mode to reduce the hiss. Press the Tuning control
knob to select the option.

11 ENGLISH
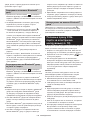
Recalling a preset in AM/FM mode
1. Press the Power button to switch on your
radio.
2. Press the Source button to select AM or FM
radio mode.
3. Momentarily press the required Preset button
to cause your radio to tune to one of
the stations stored in the preset memory.
Setting the time and date format
The clock display used in stand-by mode and on the
playing mode screens can be set to different format. The
selected format is then also used when setting the
alarms.
1. Press and hold the Menu/Info button to enter
the menu setting.
2. Rotate the Tuning control knob until “CLOCK
xxH” appears on the display and press the Tuning
control knob to enter the setting. You will see the
time format begins to ash.
3. Rotate the Tuning control knob to select either
12 or 24 hour format. Press the Tuning control knob
to conrm your choice of clock format.
Note:
If the 12 hour clock format is chosen, the radio
will then use the 12 hour clock for the setting.
4. Press and hold the Menu/Info button to enter
the menu setting.
5. Rotate the Tuning control knob until a date (e.g.
THU APR 3) appears on the display and press the
Tuning control knob to enter the setting. You will
see the date format begins to ash.
6. Rotate the Tuning control knob to select the
desired date format. Press the Tuning control knob
to conrm your choice.
Setting the clock time and date
1. Press and hold the Menu/Info button .
2. Rotate the Tuning control knob until “CLOCK
ADJ” appears on the display. Press the Tuning control
knob to enter the setting.
3. The hour setting on the display will begin ashing.
Rotate the Tuning control knob to select the
desired hour, and press the Tuning control knob
to conrm the setting. Then rotate the Tuning control
knob to select the desired minute, and press the
Tuning control knob to conrm the setting.
4. Rotate the Tuning control knob until “DATE ADJ”
appears on the display. Press the Tuning control knob
to enter the setting.
5. Rotate the Tuning control knob to select the
desired year and press the Tuning control knob
to conrm the setting. Then rotate the Tuning control
knob to select the desired month, and press the
Tuning control knob to conrm the setting. Then
rotate the Tuning control knob to select the
desired date and press the Tuning control knob
to conrm the setting.
Radio Data System (RDS)
When you set the clock time using the RDS function,
your radio will synchronize its clock time whenever it
tunes to a radio station using RDS with CT signals.
1. When tuning to a station transmitting RDS data,
press and hold the Menu/Info button .
2. Rotate the Tuning control knob until “RDS CT”
and a clock symbol appear on the display. Press the
Tuning control knob to enter the setting.
3. Rotate the Tuning control knob until “RDS CT”
appears on the display. Press the Tuning control knob
to conrm the setting. The clock time of the radio
will set up automatically according to the RDS data
received.
4. When the action is completed, the RDS icon will
appear on the LCD display indicating the radio time is
RDS clock time. The radio clock time will be valid for
5 days each time the radio time is synchronized with
RDS CT.
Setting the alarm clock
Your radio has two alarms which can each be set to
wake you to AM/FM radio or buzzer alarm. The alarms
may be set while the unit is in standby mode or while
playing.
a. Setting radio alarm time:
1. The radio alarm can be set either when radio is on or
off.
2. Press and hold the radio alarm button , the
radio alarm symbol and the display hour will ash
along with a beep.
3. During radio alarm symbol ashes, rotate
Tuning control knob to select the hour and press
Tuning control knob again to conrm hour setting.
Then rotate the Tuning control knob to select the
minute and press Tuning control knob to conrm
minute setting.
4. Rotate the Tuning control knob and the display will
show the frequency options for the alarm.
The alarm options are as follows:
ONCE – the alarm will sound once
DAILY – the alarm will sound everyday
WEEKDAY – the alarm will sound only on weekdays
WEEKEND – the alarm will sound only at weekends
Press the Tuning control knob to conrm the
setting.
5. During radio alarm symbol is ashing, rotate Tuning
control knob to select desired wake-up band and

12 ENGLISH
station, then press Tuning control knob to conrm
the selection.
6. Rotate Tuning control knob to select the desired
volume and press Tuning control knob to conrm
the volume. Radio alarm setting is now completed.
Note:
If new radio alarm station is not selected, it will select
the last alarm station.
Note:
If the selected AM/FM alarm station is not available
when the alarm is sounding, the buzzer alarm will be
used instead.
b. Setting HWS (Humane Wake System) buzzer
alarm:
A beep tone will activate when selecting the HWS
buzzer alarm.
The alarm beep will sound shorter every 15 seconds
for one minute followed by one minute silence before
repeating the cycle.
1. The buzzer alarm can be set either when the radio is
on or off.
2. Press and hold the buzzer alarm button , the
symbol and the display hour will ash along with a
beep.
3. During buzzer alarm symbol ashes, rotate
Tuning control knob to select the hour and press
Tuning control knob again to conrm hour
setting. Then rotate the Tuning control knob to
select the minute and press Tuning control knob
to conrm minute setting.
4. Rotate the Tuning control knob and the display will
show the frequency options for the alarm.
The alarm options are as follows:
ONCE – the alarm will sound once
DAILY – the alarm will sound everyday
WEEKDAY – the alarm will sound only on weekdays
WEEKEND – the alarm will sound only at weekends
Press the Tuning control knob to conrm the
setting.
Note:
There is no volume adjustment for buzzer alarm.
When the alarm sounds
To cancel a sounding alarm, press the Power button
.
Disabling/cancelling alarms
To disable an active alarm, either press the Power
button , or press and hold the corresponding
alarm button to cancel the alarm.
Snooze
1. When the alarm sounds, press any button other than
the Power button will silence the alarm for 5
minutes. “SNOOZE” will appear on the display.
2. To adjust the silence time for the snooze timer, press
and hold the Menu/Info button to enter the menu
setting.
3. Rotate the Tuning control knob until “SNOOZE X”
appears on the display, then press the Tuning control
knob to enter the setting. Rotate the Tuning
control knob to adjust the silence time from 5,
10, 15 and 20 minutes for the snooze timer.
4. To cancel the snooze timer while the alarm is
suspended, press the Power button .
Sleep timer
Your radio can be set to turn off automatically after a
preset time has elapsed. The Sleep Timer setting can be
adjusted between 60, 45, 30, 15, 120 and 90 minutes.
1. Press and hold the Power button to enter the
Sleep Timer setting. “SLEEP XX” will show on the
display.
2. Keep holding the Power button and the Sleep
Timer options will start switching on the display. Stop
until the desired Sleep Timer setting appears on the
display. The setting will be saved and the LCD will
return to normal display.
3. Your radio will switch off automatically after the preset
Sleep Timer has elapsed. The Sleep Timer
icon will show on the display indicating an active
Sleep Timer.
4. To cancel the Sleep Timer function before the preset
time has elapsed, simply press the Power button
to turn the unit off manually.
Loudness
You can get compensation on lower and higher
frequency for your radio by adjusting the loudness
function.
1. Press and hold the Menu/Info button to enter
the menu setting.
2. Rotate the Tuning control knob until “LOUD ON”
or “LOUD OFF” appears on the display. Press the
Tuning control knob to enter the setting.
3. Rotate the Tuning control knob to choose ON to
turn on the loudness function, then press the Tuning
control knob to conrm the setting.
4. To turn off the loudness function, select OFF and
press the Tuning control knob to conrm the
setting.
AUXILIARY INPUT SOCKET
A 3.5mm Auxiliary input socket is provided at the front
of your radio to permit an audio signal to be fed into the
unit from an external audio device such as a MP3 or CD
player.

13 ENGLISH
1. Connect an external audio source (for example, MP3
or CD player) to the AUX IN socket.
2. Press the Power button to switch on your radio.
3. Repeatedly press and release the Source button until
“AUX1” is displayed.
4. To have the better sound quality, we recommend
setting the volume to more than two-thirds level on
your audio device and then adjust the volume on the
radio as required.
Note:
Audio cord is not included as standard accessories.
AUX can’t be activated as alarm source.
Listening to Bluetooth®
music
You need to pair your Bluetooth® device with your radio
before you can auto-link to play/stream Bluetooth music
through your radio. Paring creates a permanent “bond”
so two devices can always recognize each other.
Pairing your Bluetooth® device
1. Press the Source button to select Bluetooth®
function. “BT READY” will be shown on the display
and “READY” will ash with every 2 seconds interval.
2. Activate Bluetooth® on your device according to the
device’s user manual to allow the paring procedure.
3. Press and release the Pair button , then “BT
PAIR” will be shown on the display and it will ash
with 1 second interval. You can start the search of
your radio on your Bluetooth® device. Once the name
of your radio is appeared on your Bluetooth® device,
press the item in your Bluetooth® list. With some old
type mobiles (versions earlier than BT2.1 Bluetooth®
device), you may need to input the pass code “0000”.
4. Your Bluetooth® device will be linked with the radio.
5. Once connected, “BLUETOOTH” will remain on
the display and the backlight will be dim-out in 10
seconds.
You can now play the music in your Bluetooth®-
enabled device via your radio.
Playing Bluetooth® device which has
already paired
1. Press the Source button to select Bluetooth®
function. “BT READY” will be shown on the display
and “READY” will ash with every 2 seconds interval.
2. Search and link the radio on your Bluetooth® device.
Some device may link with the radio automatically.
You can now play the music in your Bluetooth®
-enabled device via your radio.
Note:
● The radio can pair with 8 Bluetooth® devices at most.
When you pair Bluetooth® devices more than this
number, pairing history will be overwritten from the
oldest pairing history.
●If there are 2 Bluetooth® devices searching for your
radio, it will show its availability on both devices.
●If your Bluetooth® device is temporarily disconnected
to your radio, then you need to manually reconnect
your device again to the radio.
●If the name of your radio is appeared on your
Bluetooth® device list but your device cannot connect
with it, please delete the item name of your radio from
your list and pair the device with your radio again
following the steps described previously.
●The effective operation range between the radio and
the paired device is approximately 10 meters (30
feet).
●Any obstacle between the radio and the device can
reduce the operational range.
Disconnecting your Bluetooth® device
Press and hold the Pair button for 2-3 seconds to
disconnect with your Bluetooth® device. “BLUETOOTH”
will disappear from the display indicating deactivation of
Bluetooth®.
Charging with USB power
supply port (Fig. 10)
There is the USB port at the front side of the radio. You
can charge USB device trough the USB port.
1. Connect the USB device, such as iPod, MP3, or CD
player, with USB cable available in the market.
2. Press the Power button to switch on your
radio.
3. No matter if the radio is AC powered or battery
powered, the radio can charge the USB device when
the radio is switched on and in FM radio mode, or
BT mode, or AUX mode, which is appeared when an
external audio source is connected.
Note:
You cannot charge USB devices during AM mode
because radio signal reception becomes extremely poor
when charging USB device.
●The maximum volume of the output power speaker
will decrease when your USB is charging.
●The USB socket can provide max 1A 5V of electrical
current.
Important:
●Before connecting USB device to the charger, always
backup your data of USB device. Otherwise your data
may lose by any possibility.
●The charger may not supply power to some USB
devices.
●When not using or after charging, remove the USB
cable and close the cover.

14 ENGLISH
●Do not connect power source to USB port. Otherwise
there is risk of re. The USB port is only intended
for charging lower voltage device. Always place the
cover onto the USB port when not charging the lower
voltage device.
●Do not insert a nail, wire, etc. into USB power supply
port. Otherwise a circuit short may cause smoke and
re.
●Do not connect this USB socket with your PC
USB port, as it is highly possible that it may cause
breakdown of the units.
MAINTENANCE
CAUTION:
Never use gasoline, benzine, thinner, alcohol or the
like. Discoloration, deformation or cracks may result.
Specications
Power Requirements
AC power adaptor DC 12V/1,200mA,
center pin positive
Battery
UM-3 (AA size) x 2 for back up
Cluster battery: 10.8V
Slide battery: 10.8V - 18V
Frequency coverage
FM 87.50-108 MHz
(0.05MHz/step)
AM (MW) 522-1,710 kHz
(9kHz/step)
Bluetooth®
(The Bluetooth® word mark and logos are registered
trademarks owned by Bluetooth SIG, Inc.)
Bluetooth® version 5.0
Bluetooth® proles A2DP/SCMS-T
Transmission power Bluetooth® specication power
Class 2
Transmission range Max. 10m (varies according to
usage conditions)
Supported codec SBC
Compatible
Bluetooth® prole A2DP
Maximum radio-
frequency power BT EDR: 1.71dBm
Circuit feature
Loudspeaker 3.5inches 8ohm x 2
Output Power
10.8V: 1.2W x 2
14.4V: 2.2W x 2
18V: 3.5W x 2
Input terminal 3.5mm dia. (AUX IN)
Antenna system FM: soft bended rod antenna
AM: bar antenna
Dimension
(W x H x D) in mm 282 x 163 x 294mm
Weight 4.3Kg (Without battery)

15 POLSKI
POLSKI
(oryginalna instrukcja)
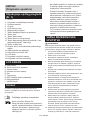
OBJAŚNIENIA DO WIDOKU
OGÓLNEGO (Rys. 1)
1. Uchwyt
2. Blokada komory baterii
3. Pokrywa akumulatora
4. Głośnik
5. Gniazdo DC
6. Giętka antena prętowa
7. Przycisk zasilania/wyłącznika czasowego
8. Przycisk źródłowy
9. Przycisk alarmu radiowego
10. Przycisk alarmu dźwiękowego
11. Przycisk zaprogramowanych stacji/
Zaprogramowanych stacji 1 jako przycisk parowania
Bluetooth®
12. Przycisk Menu/Info
13. Pokrętło Głośności/Kontroli strojenia/Wyboru
14. Port zasilania USB
15. Gniazdo AUX
16. Wyświetlacz LCD
17. Główna komora akumulatora
18. Komora baterii zapasowych
WYŚWIETLACZ LCD
A. Alarm radiowy
B. Alarm dźwiękowy
C. Symbol stereo
D. Wskaźnik niskiego poziomu baterii
E. Zegar
F. Częstotliwość
G. RDS (System danych radiowych)
H. Stan uśpienia
I. Tryb zegara AM/PM
SYMBOLE
Poniżej przedstawiono symbole stosowane w przypadku
omawianego urządzenia. Przed rozpoczęciem jego
użytkowania należy upewnić się, że są one zrozumiałe.
Przeczytać instrukcję obsługi.
Tylko dla krajów UE.
Ze względu na obecność
niebezpiecznych części w sprzęcie,
zużyty sprzęt elektryczny i
elektroniczny, akumulatory i baterie
mogą mieć negatywny wpływ na
środowisko i zdrowie człowieka.
Nie należy wyrzucać urządzeń
elektrycznych i elektronicznych ani baterii z
odpadami domowymi!
Zgodnie z Dyrektywą Europejską
dotyczącą zużytego sprzętu elektrycznego i
elektronicznego, akumulatorów i baterii oraz
zużytych akumulatorów i baterii, a także ich
dostosowania do prawa krajowego, zużyty
sprzęt elektryczny, baterie i akumulatory
powinny być składowane oddzielnie i
dostarczane do punktu selektywnej zbiórki
odpadów komunalnych, działającego
zgodnie z przepisami dotyczącymi ochrony
środowiska.
Wskazuje na to symbol przekreślonego
kosza na kółkach umieszczony na
urządzeniu.
WAŻNE ZASADY
BEZPIECZEŃSTWA
OSTRZEŻENIE:
Używając elektronarzędzi, należy zawsze przestrzegać
podstawowych środków ostrożności w celu zmniejszenia
ryzyka wystąpienia pożaru, porażenia prądem oraz
uszkodzenia ciała, włączając poniższe:
1. Przed korzystaniem z urządzenia należy dokładnie
zapoznać się z niniejszą instrukcją obsługi oraz
instrukcją obsługi ładowarki.
2. Czyścić wyłącznie suchą szmatką.
3. Nie zasłaniaj otworów wentylacyjnych. Zamontuj
zgodnie z instrukcjami producenta.
4. Nie montować przy jakimkolwiek źródle ciepła, takim
jak grzejniki, kratki wylotowe ciepłego powietrza,
piece lub inne urządzenia (również wzmacniacze)
wytwarzające ciepło.
5. Stosować wyłącznie przyrządy/akcesoria zalecane
przez producenta.
6. Wyłączyć niniejsze urządzenie podczas burzy oraz
w przypadku nieużywania przez dłuższy czas.
7. Akumulatorowy odbiornik radiowy z akumulatorem
wbudowanym lub oddzielnym musi być ładowany
wyłącznie za pomocą określonej ładowarki do
akumulatora. Ładowarka przeznaczona do jednego
typu akumulatora może stwarzać zagrożenie
wystąpienia pożaru w przypadku stosowania jej do
ładowania innego akumulatora.
8. Do zasilania akumulatorowego odbiornika
radiowego należy używać tylko przeznaczonych
do niego akumulatorów. Używanie innych
akumulatorów może stwarzać ryzyko wystąpienia
pożaru.
9. Gdy akumulator nie jest używany, należy
zabezpieczyć go przed kontaktem z innymi
metalowymi przedmiotami, takimi jak spinacze,

16 POLSKI
monety, klucze, gwoździe, wkręty bądź inne małe
przedmioty metalowe, które mogą powodować
zwarcie styków akumulatora. Zwarcie styków
akumulatora grozi pojawieniem się iskier,
poparzeniami lub pożarem.
10. Należy unikać kontaktu ciała z przedmiotami
uziemionymi, takimi jak rury, grzejniki, kuchenki
czy lodówki. Gdy ciało człowieka jest uziemione,
wzrasta ryzyko porażenia prądem elektrycznym.
11. W razie niewłaściwych warunków użytkowania
może dojść do wycieku elektrolitu z akumulatora.
Unikać kontaktu. W razie przypadkowego kontaktu,
należy przemyć skażoną skórę wodą. W przypadku
kontaktu elektrolitu z oczami należy dodatkowo
zasięgnąć porady lekarza. Płyn z akumulatora może
powodować podrażnienia lub poparzenia.
12. Nie używaj baterii lub narzędzia, gdy zostały
uszkodzone bądź zmodykowane. Uszkodzone
lub zmodykowane baterie mogą wykazywać
nieprzewidywalne zachowanie skutkujące pożarem,
wybuchem lub wystąpieniem ryzyka obrażeń.
13. Nie wystawiaj baterii lub narzędzia na działanie
ognia lub wysokiej temperatury. Narażenie na
działanie ognia lub temperatury powyżej 130°C
może spowodować wybuch.
14. Postępuj zgodnie z wszystkimi instrukcjami dot.
ładowania i nie ładuj baterii lub narzędzia poza
wyznaczonym w instrukcji zakresem temperatur.
Nieprawidłowe ładowanie lub ładowanie w
temperaturze przekraczającej określony zakres
może uszkodzić baterię i spowodować ryzyko
wystąpienia pożaru.
ZACHOWAĆ INSTRUKCJĘ OBSŁUGI
SZCZEGÓŁOWE ZASADY
BEZPIECZEŃSTWA
DOTYCZY AKUMULATORA
1. Przed użyciem baterii, przeczytaj wszystkie
instrukcje oraz oznaczenia dot. uwag na (1)
ładowarce do baterii, (2) bateriach oraz (3)
produkcie korzystającym z baterii.
2. Nie rozmontowuj baterii.
3. Jeżeli czas używania znacząco się zmniejszył,
natychmiast przestań korzystać z urządzenia. Może
to skutkować przegrzaniem, powodować oparzenia,
a nawet prowadzić do wybuchu.
4. Gdy elektrolit dostanie się do twoich oczu, przepłucz
je czystą wodą i natychmiast skonsultuj się z
lekarzem. Może to skutkować utratą wzroku.
5. Nie powoduj zwarcia baterii:
(1) Nie dotykaj styków przy pomocy przewodzących
materiałów.
(2) Unikaj przechowywania baterii w pojemniku
z innymi metalowymi przedmiotami, np.
gwoździami, monetami itp.
(3) Nie narażaj baterii na oddziaływanie wody
lub deszczu. Zwarcie baterii może skutkować
dużym przepływem napięcia, przegrzaniem,
możliwymi oparzeniami i uszkodzeniem.
6. Nie przechowuj narzędzia i baterii w miejscach,
gdzie temperatura może osiągać lub przekraczać
50°C (122°F).
7. Nie spalaj baterii nawet, jeżeli są bardzo zniszczone
lub kompletnie zużyte. Bateria może wybuchnąć w
ogniu.
8. Nie nakłuwać, ciąć, zgniatać, rzucać, upuszczać
wkładu akumulatora ani uderzać twardym
przedmiotem. Takie postępowanie może
spowodować pożar, nadmierne ciepło lub wybuch.
9. Nie używaj uszkodzonych baterii.
10. Aby uniknąć ryzyka, należy zapoznać się z
instrukcją obsługi baterii. Maksymalne natężenie
wyładowania baterii powinno być większe lub równe
8A.
11. Bateria litowo-jonowa podlega wymogom
Prawodawstwa dot. towarów niebezpiecznych.
12. Aby usunąć kasetę akumulatorową, wyjmij ją z
urządzenia, a następnie zutylizuj w bezpiecznym
miejscu. Postępuj zgodnie z miejscowymi
regulacjami dotyczącymi wyrzucania baterii.
13. Używaj baterii wyłącznie z produktami określonymi
przez rmę Makita. Instalacja baterii w produktach
niezgodnych może skutkować pożarem,
nadmiernym przegrzewaniem się lub wyciekiem
elektrolitu.
14. Jeśli urządzenie nie jest używane przez dłuższy
czas, należy wyjąć akumulator z urządzenia.
15. Podczas i po użyciu akumulator może się
nagrzewać, co może powodować poparzenia lub
oparzenia niskotemperaturowe.
16. Nie dotykać końcówki terminala bezpośrednio po
użyciu, ponieważ może być nagrzany na tyle, aby
spowodować oparzenia.
17. Nie pozwól, aby wióry, kurz lub brud dostały się do
styków, otworów i rowków we wkładzie akumulatora.
Może to spowodować słabą wydajność lub
uszkodzenie urządzenia lub akumulatora.
18. O ile urządzenie pozwala na użytkowanie w
pobliżu linii wysokiego napięcia, nie należy używać
akumulatora w pobliżu linii wysokiego napięcia.
Może to spowodować nieprawidłowe działanie lub
uszkodzenie urządzenia lub akumulatora.
19. Trzymaj akumulator z dala od dzieci.
OSTRZEŻENIE:
●Niebezpieczeństwo wybuchu, gdy bateria jest
nieprawidłowo wymieniona.

17 POLSKI
●Wymieniaj tylko na ten sam typ lub jego
ekwiwalent.
●Używaj wyłącznie oryginalnych baterii Makita.
Używanie nieoryginalnych baterii Makita lub
baterii, które zostały zmodykowane, może
skutkować wybuchem baterii, a w rezultacie
pożarem, obrażeniami ciała i uszkodzeniami.
Spowoduje to także unieważnienie gwarancji
Makity na narzędzie oraz ładowarkę.
Wskazówki dot. maksymalnej
żywotności baterii
1. Ładuj baterię przed jej całkowitym rozładowaniem
się. Zawsze zatrzymaj urządzenie i naładuj baterię,
gdy zauważysz spadek mocy w narzędziu.
2. Nigdy nie ładuj w pełni naładowanych baterii.
Nadmierne ładowanie skraca żywotność baterii.
3. Ładuj baterię w temperaturze pokojowej 10°C - 40°C
(50°F - 104°F). Pozwól, aby gorąca bateria ostygła
zanim rozpoczniesz jej ładowanie.
4. Jeśli akumulator nie jest używany, należy wyjąć go z
urządzenia lub ładowarki.
5. Naładuj baterię, jeżeli nie będziesz jej używać przez
dłuższy okres czasu (więcej niż sześć miesięcy).
Wkładanie akumulatora
Uwaga:
Trzymanie zapasowych baterii wewnątrz komory
zapobiega utracie przechowywanych w pamięci danych.
Instalowanie baterii zapasowych
(RYS. 2 & 8)
1. Pociągnij blokadę komory baterii, aby uwolnić baterie.
Wbudowana jest komora baterii głównych i komora
baterii zapasowych.
2. Usuń pokrywę komory baterii zapasowych i włóż
2 nowe baterie UM-3 (rozmiar AA). Upewnij
się, że baterie włożone są zgodnie z biegunami
zaznaczonymi wewnątrz komory. Załóż pokrywę
komory baterii.
3. Po włożeniu baterii zapasowych, włóż również zestaw
baterii głównych, aby uruchomić radio. Odpowiednie
zestawy baterii dla tego radia są wymienione w
poniższej tabeli.

18 POLSKI
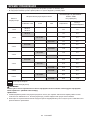
CZAS PRACY
* Odpowiednie zestawy baterii dla tego radia są wymienione w poniższej tabeli.
* Poniższa tabela wskazuje czas pracy na jednym ładowaniu w trybie radiowym.
Pojemność baterii
Napięcie akumulatora
NA WYJŚCIU Z GŁOŚNIKA =
50mW + 50mW
Jednostka: Godzina (około)
10.8V - 12V maks 14.4V 18V Radio/AUX Odtwarzanie
Bluetooth
1.3Ah BL1013
BL1014 8.0 1.5
1.5Ah
BL1016 9.0 2.0
BL1415N 8.0 2.0
BL1815N 8.5 2.5
2.0Ah
BL1021B 12.0 2.5
BL1820B 11.0 3.5
3.0Ah
BL1430B 13.0 4.0
BL1830B 16.0 5.0
4.0Ah
BL1041B 24.0 5.0
BL1440 21.0 5.5
BL1840B 22.0 7.0
5.0Ah BL1850B 28.0 9.0
6.0Ah
BL1460B 28.0 8.0
BL1860B 34.0 11.0
: Akumulator klastrowy
: Bateria wsuwana
OSTRZEŻENIE:
Używaj wyłącznie baterii wymienionych powyżej. Korzystanie z jakichkolwiek innych baterii może
powodować obrażenia lub pożar.
Uwaga:
● Tabela dotycząca czasu pracy na baterii powyżej jest tylko poglądowa. Faktyczny czas pracy baterii może się
różnić w zależności od typu baterii, warunków ładowania oraz środowiska użytkowania.
● Niektóre z wyżej wymienionych baterii mogą być niedostępne w zależności od regionu zamieszkania.

19 POLSKI
INSTALACJA I ZASILANIE
MONTAŻ LUB DEMONTAŻ
AKUMULATORA WSUWANEGO
(RYS. 3 & 4)
● Zawsze wyłączaj urządzenie przed zamontowaniem
lub wyjęciem akumulatora.
●Podczas instalowania lub wyjmowania akumulatora
mocno trzymaj urządzenie i akumulator.
● Aby zamontować akumulator, należy wyrównać
występ na akumulatorze z rowkiem w obudowie i
wsunąć go na swoje miejsce. Akumulator należy
zawsze wsunąć do oporu, do momentu jego
zablokowania na miejscu, co jest sygnalizowane
delikatnym kliknięciem.
● Jeśli czerwony wskaźnik w górnej części przycisku
jest nadal widoczny, oznacza to, że nie został on
całkowicie zablokowany. Należy go zamontować
całkowicie, tak aby czerwony wskaźnik nie był
widoczny. W przeciwnym razie akumulator może
przypadkowo wysunąć się z odbiornika radiowego,
raniąc operatora lub osoby postronne.
● Podczas montażu akumulatora nie używać
nadmiernej siły. Jeśli nie można go swobodnie
wsunąć, prawdopodobnie został on nieprawidłowo
włożony.
● Aby wyjąć kasetę akumulatora, wyjmij ją z
urządzenia, przesuwając przycisk z przodu kasety
lub naciskając przyciski po obu stronach kasety.
● Uważaj, aby nie przygnieść palców podczas
otwierania i zamykania osłony na baterię.
Wkładanie lub wyjmowanie kasety
akumulatora klastrowego (Rys. 5)
● Aby włożyć kasetę akumulatora, wyrównaj występ na
akumulatorze z rowkiem w obudowie i wsuń go na
miejsce.
● Aby wyjąć kasetę akumulatora, wyjmij akumulator z
terminala, naciskając przyciski z boku kasety.
Przywróć komorę na akumulator do pierwotnej pozycji.
Zmniejszona moc, zniekształcenie, czy „jąkający dźwięk”
lub gdy na wyświetlaczu pojawia się symbol niskiego
poziomu akumulatora oraz „POWERFAIL”,
wskazują na to, że główny zestaw akumulatorowy musi
zostać wymieniony.
Uwaga:
Nie można ładować akumulatora za pomocą
dołączonego zasilacza sieciowego.
Kiedy pojawia się znak niskiego poziomu baterii
i „EMPTY” stale miga, oznacza to czas wymiany
akumulatora zapasowego.
WSKAZUJE STAN NAŁADOWANIA
AKUMULATORA (RYS. 6 & 7)
1. Lampki wskaźnikowe 2. Przycisk kontrolny
Tylko dla akumulatorów z literą „B” na końcu
numeru modelu
Nacisnąć przycisk Check (Sprawdź) na akumulatorze,
aby sprawdzić stan naładowania akumulatora. Na kilka
sekund zaświecą się kontrolki.
Lampki wskaźnikowe
Pozostało baterii
Zapalony Wyłączony Mruga
75% ~ 100%
50% ~ 75%
25% ~ 50%
0% ~ 25%
(Tylko dla wkładów
akumulatorowych LXT)
Naładuj baterię
(Tylko dla wkładów
akumulatorowych LXT)
Bateria może
nie działać
prawidłowo
015658
UWAGA:
● W zależności od warunków używania oraz
temperatury zewnętrznej, wskaźnik może się
nieznacznie różnić od faktycznej pozostałej ilości
zasilania.
● Pierwsza (najdalej po lewej) lampka kontrolna będzie
migać, gdy aktywny jest system ochrony akumulatora.
(Tylko dla wkładów akumulatorowych LXT)
Stosowanie giętkiej anteny prętowej
(Rys. 9)
Wyprostuj giętką antenę prętową, jak pokazano na
rysunku.
KORZYSTANIE Z ZASILACZA AC
(RYS. 10)
Zdejmij gumową osłonę i włóż wtyczkę zasilacza do
gniazda prądu stałego po lewej stronie radia.
Podłącz adapter do standardowego gniazdka.
Kiedykolwiek używany jest adapter, bateria jest
automatycznie odłączana.
Zasilacz sieciowy należy odłączyć od głównego źródła

20 POLSKI
zasilania, gdy nie jest używany.
UWAGA:
Jeśli radio wykazuje jakąkolwiek ingerencję pasma
AM przez przejściówkę, to odsuń radio od zasilacza
sieciowego o ponad 30cm.
DZIAŁANIE
1. Naciśnij przycisk zasilania , aby włączyć
radio.
2. Naciśnij przycisk Źródło , aby wybrać tryb
radiowy AM lub FM.
3. Naciśnij i przytrzymaj pokrętło kontroli strojenia ,
aby przeprowadzić automatyczne strojenie. Radio
przeskanuje pasma AM/FM od aktualnej
częstotliwości i zatrzyma skanowanie automatycznie,
kiedy znajdzie stację o wystarczającej mocy.
4. Po kilku sekundach wyświetlacz zaktualizuje się.
Wyświetlacz pokaże częstotliwość znalezionego
sygnału.
5. Aby wyszukać inną stację, naciśnij I przytrzymaj
pokrętło kontroli strojenia , jak wcześniej.
6. Po dotarciu do końca zakresu fal radio rozpocznie
strojenie z przeciwnego końca zakresu fal.
7. Przekręć pokrętło strojenia , aby dostosować
poziom dźwięku według własnego uznania.
Uwaga:
● Podczas ustawiania poziomu głośności, upewnij
się, że na wyświetlaczu NIE miga FM/AM.
● Jeśli AM/FM miga na wyświetlaczu, to aktywne
jest ręczne strojenie stacji (zobacz sekcję „Ręczne
strojenie – AM/FM”, aby uzyskać więcej informacji).
8. Aby wyłączyć radio, naciśnij przycisk zasilania .
Ręczne strojenie – AM/FM
1. Naciśnij przycisk zasilania , aby włączyć
radio.
2. Naciśnij przycisk Źródło , aby wybrać tryb
radiowy AM lub FM.
3. Naciśnij pokrętło kontroli strojenia i zobaczysz
FM lub AM migające na wyświetlaczu.
Uwaga:
● FM/AM będzie migać przez ok. 10 sekund. Przez
ten czas możliwe jest tylko strojenie ręczne.
● Jeśli wymagane jest dostosowanie poziomu
głośności, podczas gdy miga FM/AM, naciśnij
pokrętło kontroli strojenia, aby zatrzymać
miganie i przekręć pokrętło kontroli strojenia, aby
dostosować poziom dźwięku.
4. Przekręć pokrętło kontroli sterowania , aby
dostroić stację.
5. Po dotarciu do końca zakresu fal radio rozpocznie
strojenie z przeciwnego końca zakresu fal.
6. Używając pokrętła kontroli Strojenia dostosuj
poziom dźwięku.
Programowanie stacji w trybie AM/FM
Dostępnych jest 5 zaprogramowanych stacji dla radia
AM i FM. Są one używane w taki sam sposób dla
każdego zakresu fal.
1. Naciśnij przycisk zasilania , aby włączyć
radio.
2. Naciśnij przycisk Źródło , aby wybrać żądany
zakres fal. Ustaw żądaną stację radiową, jak opisano
wyżej.
3. Naciśnij i przytrzymaj żądany przycisk ustawień
wstępnych (od 1 do 5) , do
momentu, aż na wyświetlaczu pojawi się np. „P4” po
częstotliwości. Stacja zostanie zapisana używając
numeru ustawienia wstępnego. Powtórz tę procedurę
dla pozostałych ustawień wstępnych, według
uznania.
4. Zaprogramowane stacje, które zostały już zapisane,
mogą zostać nadpisane przez wykonanie powyższej
procedury, jeśli jest to wymagane.
TRYBY WYŚWIETLANIA – FM
Niniejszy odbiornik radiowy posiada kilka opcji
wyświetlania dla trybu FM:
1. Naciskaj przycisk Menu/Info , aby zobaczyć
informację stacji RDS, której w danej chwili słuchasz.
a. Nazwa stacji Wyświetla nazwę słuchanej stacji.
b. Typ programu Wyświetla typ słchanej stacji, taki
jak Pop, Classic, Wiadomości, itp.
c. Tekst radiowy Wyświetla wiadomość radiową,
taką jak nowe element, itp.
d. Rok/Dzień Wyświetla rok i dzien tygodnia
według ustawień daty radia.
e. Data/Dzień Wyśwetla datę i dzień tygodnia
według ustawień daty radia.
f. Częstotliwość Wyświetla częstotliwość FM
słuchanej stacji.
Stereo FM (auto)/mono
Jeśli słuchana stacja radiowa FM ma słaby sygnał, to
mogą być słyszane zakłócenia. Można zredukować te
zakłócenia, odtwarzając radio w trybie mono, zamiast
stereo.
1. Naciśnij przycisk Zasilania , aby wybrać
pasmo FM i dostroić żądaną stację FM, jak wcześniej
wspomniano.
2. Naciśnij i przytrzymaj przycisk Menu/Info , aby
uzyskać opcje menu.
3. Przekręcaj pokrętło kontroli Strojenia , aż na
wyświetlaczu pojawi się ustawienie FM Auto/Mono.
Jeśli ustawienie jest w pozycji Auto, naciśnij pokrętło
kontroli Strojenia, aby przełączyć się w tryb Mono i
zmniejszyć syczenie. Naciśnij pokrętło kontroli
Strojenia, aby wybrać opcje.
Pagina se încarcă...
Pagina se încarcă...
Pagina se încarcă...
Pagina se încarcă...
Pagina se încarcă...
Pagina se încarcă...
Pagina se încarcă...
Pagina se încarcă...
Pagina se încarcă...
Pagina se încarcă...
Pagina se încarcă...
Pagina se încarcă...
Pagina se încarcă...
Pagina se încarcă...
Pagina se încarcă...
Pagina se încarcă...
Pagina se încarcă...
Pagina se încarcă...
Pagina se încarcă...
Pagina se încarcă...
Pagina se încarcă...
Pagina se încarcă...
Pagina se încarcă...
Pagina se încarcă...
Pagina se încarcă...
Pagina se încarcă...
Pagina se încarcă...
Pagina se încarcă...
Pagina se încarcă...
Pagina se încarcă...
Pagina se încarcă...
Pagina se încarcă...
Pagina se încarcă...
Pagina se încarcă...
Pagina se încarcă...
Pagina se încarcă...
Pagina se încarcă...
Pagina se încarcă...
Pagina se încarcă...
Pagina se încarcă...
Pagina se încarcă...
Pagina se încarcă...
Pagina se încarcă...
Pagina se încarcă...
Pagina se încarcă...
Pagina se încarcă...
Pagina se încarcă...
Pagina se încarcă...
Pagina se încarcă...
Pagina se încarcă...
Pagina se încarcă...
Pagina se încarcă...
Pagina se încarcă...
Pagina se încarcă...
Pagina se încarcă...
Pagina se încarcă...
Pagina se încarcă...
Pagina se încarcă...
Pagina se încarcă...
Pagina se încarcă...
Pagina se încarcă...
Pagina se încarcă...
Pagina se încarcă...
Pagina se încarcă...
Pagina se încarcă...
Pagina se încarcă...
Pagina se încarcă...
Pagina se încarcă...
Pagina se încarcă...
Pagina se încarcă...
Pagina se încarcă...
Pagina se încarcă...
Pagina se încarcă...
Pagina se încarcă...
Pagina se încarcă...
Pagina se încarcă...
Pagina se încarcă...
Pagina se încarcă...
Pagina se încarcă...
Pagina se încarcă...
Pagina se încarcă...
Pagina se încarcă...
Pagina se încarcă...
Pagina se încarcă...
Pagina se încarcă...
Pagina se încarcă...
Pagina se încarcă...
Pagina se încarcă...
Pagina se încarcă...
Pagina se încarcă...
Pagina se încarcă...
Pagina se încarcă...
Pagina se încarcă...
Pagina se încarcă...
Pagina se încarcă...
Pagina se încarcă...
Pagina se încarcă...
Pagina se încarcă...
Pagina se încarcă...
Pagina se încarcă...
Pagina se încarcă...
Pagina se încarcă...
Pagina se încarcă...
Pagina se încarcă...
Pagina se încarcă...
Pagina se încarcă...
Pagina se încarcă...
Pagina se încarcă...
Pagina se încarcă...
Pagina se încarcă...
Pagina se încarcă...
Pagina se încarcă...
Pagina se încarcă...
Pagina se încarcă...
Pagina se încarcă...
Pagina se încarcă...
Pagina se încarcă...
Pagina se încarcă...
Pagina se încarcă...
Pagina se încarcă...
Pagina se încarcă...
Pagina se încarcă...
Pagina se încarcă...
Pagina se încarcă...
Pagina se încarcă...
Pagina se încarcă...
Pagina se încarcă...
Pagina se încarcă...
Pagina se încarcă...
Pagina se încarcă...
Pagina se încarcă...
Pagina se încarcă...
Pagina se încarcă...
Pagina se încarcă...
Pagina se încarcă...
Pagina se încarcă...
Pagina se încarcă...
Pagina se încarcă...
Pagina se încarcă...
-
 1
1
-
 2
2
-
 3
3
-
 4
4
-
 5
5
-
 6
6
-
 7
7
-
 8
8
-
 9
9
-
 10
10
-
 11
11
-
 12
12
-
 13
13
-
 14
14
-
 15
15
-
 16
16
-
 17
17
-
 18
18
-
 19
19
-
 20
20
-
 21
21
-
 22
22
-
 23
23
-
 24
24
-
 25
25
-
 26
26
-
 27
27
-
 28
28
-
 29
29
-
 30
30
-
 31
31
-
 32
32
-
 33
33
-
 34
34
-
 35
35
-
 36
36
-
 37
37
-
 38
38
-
 39
39
-
 40
40
-
 41
41
-
 42
42
-
 43
43
-
 44
44
-
 45
45
-
 46
46
-
 47
47
-
 48
48
-
 49
49
-
 50
50
-
 51
51
-
 52
52
-
 53
53
-
 54
54
-
 55
55
-
 56
56
-
 57
57
-
 58
58
-
 59
59
-
 60
60
-
 61
61
-
 62
62
-
 63
63
-
 64
64
-
 65
65
-
 66
66
-
 67
67
-
 68
68
-
 69
69
-
 70
70
-
 71
71
-
 72
72
-
 73
73
-
 74
74
-
 75
75
-
 76
76
-
 77
77
-
 78
78
-
 79
79
-
 80
80
-
 81
81
-
 82
82
-
 83
83
-
 84
84
-
 85
85
-
 86
86
-
 87
87
-
 88
88
-
 89
89
-
 90
90
-
 91
91
-
 92
92
-
 93
93
-
 94
94
-
 95
95
-
 96
96
-
 97
97
-
 98
98
-
 99
99
-
 100
100
-
 101
101
-
 102
102
-
 103
103
-
 104
104
-
 105
105
-
 106
106
-
 107
107
-
 108
108
-
 109
109
-
 110
110
-
 111
111
-
 112
112
-
 113
113
-
 114
114
-
 115
115
-
 116
116
-
 117
117
-
 118
118
-
 119
119
-
 120
120
-
 121
121
-
 122
122
-
 123
123
-
 124
124
-
 125
125
-
 126
126
-
 127
127
-
 128
128
-
 129
129
-
 130
130
-
 131
131
-
 132
132
-
 133
133
-
 134
134
-
 135
135
-
 136
136
-
 137
137
-
 138
138
-
 139
139
-
 140
140
-
 141
141
-
 142
142
-
 143
143
-
 144
144
-
 145
145
-
 146
146
-
 147
147
-
 148
148
-
 149
149
-
 150
150
-
 151
151
-
 152
152
-
 153
153
-
 154
154
-
 155
155
-
 156
156
-
 157
157
-
 158
158
-
 159
159


Makita DMR108N Manual de utilizare
- Categorie
- Ceasuri cu alarmă
- Tip
- Manual de utilizare
în alte limbi
- slovenčina: Makita DMR108N Používateľská príručka