Philips HD6141/80 Manual de utilizare
- Categorie
- Friteuze adânci
- Tip
- Manual de utilizare
Acest manual este potrivit și pentru

HD6145, HD6143, HD6141

2

3

4


Introduction
Dear customer, congratulations on acquiring the new Philips Cucina fryer.Your new fryer allows you
to prepare all kinds of fried foods safely and easily!
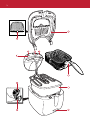
General description
A Lid
B Removable, washable filter
C Frying basket
D Removable inner bowl
E Lid release button
F Digital timer (HD6145 only)
G Temperature control
H Temperature light
I On/off switch
J Cord storage compartment
K Cord
Important
Read these instructions for use carefully before using the appliance and save them for future
reference.
◗ Check if the voltage indicated on the appliance corresponds to the local mains voltage before
you connect the appliance.
◗ Only connect the appliance to an earthed wall socket.
◗ If the mains cord is damaged, it must be replaced by Philips, a service centre authorised by
Philips or similarly qualified persons in order to avoid a hazard.
◗ Always return the appliance to a service centre authorised by Philips for examination or
repair. Do not attempt to repair the appliance yourself, otherwise your guarantee will
become invalid.
◗ Clean the separate parts of the fryer thoroughly before using the appliance for the first time
(see chapter 'Cleaning'). Make sure all parts are completely dry before you fill the fryer with
oil or liquid fat.
◗ Never immerse the control panel with the heating element attached to it in water nor rinse
it under the tap.The control panel may only be cleaned with a moist cloth and some
washing-up liquid.
◗ Do not switch the appliance on before you have filled it with oil or fat. Make sure the fryer is
always filled to a level between the two indication marks on the inside of the inner bowl.
◗ During frying, hot steam is released through the filter. Keep your hands and face at a safe
distance from the steam.You should also be careful of the hot steam when you open the lid.
◗ Keep the appliance out of the reach of children. Do not let the mains cord hang over the
edge of the table or worktop on which the appliance is standing.
◗ This appliance is intended for household use only. If the appliance is used improperly or for
(semi-)professional purposes or if it is used in a way that is not in accordance with the
instructions for use, the guarantee will become invalid and Philips will not accept liability for
any damage caused.
◗ Fry food golden-yellow instead of dark or brown and remove burnt remnants! Do not fry
starchy foods, especially potato and cereal products, at a temperature above 175cC (to
minimise the production of acrylamide).
ENGLISH6

Safety features
Safety cut-out
This appliance is equipped with a safety cut-out that switches the appliance off if it overheats.This
may happen if there is not enough oil or fat in the fryer or if blocks of solid fat are being melted in
the fryer, which will prevent the heating element from being able to give off its heat.
Take the following measures if the fryer doesn't work anymore:
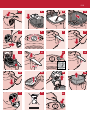
1 Let the appliance cool down.This will take approx. 15 minutes.
2 Carefully press the reset button at the back of the control panel with a small screwdriver
(fig. 1).
Now the appliance is ready for use again.
Auto-shut off (HD6145 only)
The fryer will switch off automatically after 2 hours. When this happens, the power-on light in the
on/off switch will go out.
◗ To switch the appliance back on, press the on/off switch again.
Safety switch
The safety switch in the control panel ensures that the heating element can only be switched on if
the control panel has been placed correctly.
◗ Always make sure that the control panel is correctly placed (click) (fig. 2).
Cool zone
During frying, loose food particles collect on the bottom of the inner bowl. As the heating element
has been placed some distance above the bottom of the inner bowl and primarily heats the oil or
fat above it, the oil or fat between the bottom of the inner bowl and the heating element remains
relatively cool (cool zone).This prevents the food particles that end up in this zone from burning,
increasing the number of times you can re-use the oil or fat.
Preparing for use
1 Put the appliance on a horizontal, even and stable surface out of the reach of children.
If you want to place the fryer on top of the cooker, make sure the rings of the cooker have been
turned off and are cold.
2 Fill the dry fryer with oil, liquid fat or melted solid fat up to the MAX indication on the inside
of the inner bowl (see section 'Oil and fat' for instructions on how to use solid fat) (fig. 4).
ENGLISH 7
Solid fat
1925 grams
2200 grams
Oil
2.2 litres
2.5 litres
HD6141
Min.
Max.
HD6145,
HD6143
Min.
Max.
Solid fat
2800grams
3050 grams
Oil
3.2 litres
3.5 litres

Frozen French
fries
900 grams
500 grams
Home-made
French fries
1250 grams
650 grams
HD6145,
HD6143
Maximum quantity
Recommended
quantity for best
end result
Frozen
French fries
700 grams
400 grams
Home-made
French fries
1000 grams
450 grams
HD6141
Maximum
quantity
Recommended
quantity for best
end result
Oil and fat
Never mix different kinds of oil or fat!
We advise you to use frying oil or liquid frying fat, preferably vegetable oil or fat that is rich in
unsaturated fats (e.g. linoleic acid).
It is possible to use solid frying fat, but in that case extra precautions are necessary to prevent the
fat from spattering and the heating element from overheating or becoming damaged.
1 If you want to use new blocks of fat, melt them slowly over a low heat in a normal pan.
2 Pour the melted fat carefully into the fryer.
3 Store the fryer with the resolidified fat still in it at room temperature.
4 If the fat gets very cold, it may start spattering when melted. Punch some holes into the
resolidified fat with a fork to prevent this (fig. 3).
Be careful not to damage the inner bowl with the fork.
Using the appliance
Frying
Be careful: hot steam will escape from the filter in the lid during frying.
1 Take the entire cord from the cord storage compartment and put the plug in the wall socket
(fig. 5).
Make sure the mains cord does not come into contact with hot parts of the appliance.
2 Switch the fryer on by pressing the on/off switch.
The power-on light in the on/off switch goes on.
3 Set the temperature control to the required temperature (150-190cC) (fig. 6).
The temperature light goes on.
- For information about which temperature to select, check the package of the food to be fried
or the table at the end of these instructions for use.
- The oil or fat will be heated to the selected temperature in 10 to 15 minutes.
- When the temperature light stays out for some time, the oil or fat has reached the preset
temperature.
- After a batch has been fried, the temperature light also goes on. Wait until it stays out for some
time before frying the next batch.
B
You can leave the basket in the fryer while the fryer is heating up.
4 Lift the handle to raise the basket to its highest position (fig. 7).
5 Open the lid by pressing the release button.The lid will open automatically (fig. 8).
6 Remove the basket from the fryer and put the food to be fried in the basket.
B
For the best frying results, we advise you not to exceed the maximum quantities mentioned below.
ENGLISH8

Do not fry Asian rice cakes (or similar types of food) in this appliance as this might cause heavy
spattering or violent bubbling of the oil or fat.
7 Carefully put the basket in the fryer without lowering it into the oil or fat (fig. 9).
Make sure the basket has been inserted properly.
8 Close the lid.
9 HD6145 only: Set the required frying time (see section 'Timer' in this chapter).
You can also use the fryer without setting the timer.
10 Press the release button on the handle of the basket and carefully lower the basket to its
lowest position (fig. 10).
B
For a good end result, stick to the preparation time indicated on the package of the food to be fried
or the preparation time mentioned in the table at the end of these instructions for use.
B
For a uniform golden frying result, lift the basket out of the oil or fat a few times during frying and
gently shake the contents.
Timer (HD6145 only)
The timer indicates the end of the frying time, but does NOT switch the fryer off.
Setting the timer
1 Press the timer button to set the frying time in minutes (fig. 11).
The set time will become visible on the display.
2 Keep the button pressed to set the minutes forward quickly. Release the button once the
required frying time has been reached.
B
The maximum time that can be set is 99 minutes.
B
A few seconds after you have set the frying time, the timer will start counting down.
B
While the timer is counting down, the remaining frying time blinks on the display.The last minute is
displayed in seconds.
3 If the preset time is not correct, you can erase it by pressing the timer button for 2 seconds
at the moment the timer starts counting down (i.e. when the time starts to blink). Keep the
button pressed until '00' appears on the display.You can now set the correct frying time.
4 When the preset time has elapsed you will hear an audible signal.After 10 seconds the
audible signal will be repeated.You can stop the audible signal by pressing the timer button.
After frying
1 Lift the handle to raise the basket to its highest position, i.e. the draining position (fig. 12).
2 Open the lid by pressing the release button (fig. 13).
Beware of the hot steam and possible spattering of the oil.
3 Carefully remove the basket from the fryer.
To remove excess oil or fat, shake the basket over the fryer or put the basket in the draining
position by placing it in the bracket on the inside of the bowl. Put the fried food in a bowl or
colander containing grease-absorbing paper, e.g. kitchen paper.
4 Switch the fryer off by means of the on/off switch.
The power-on light in the on/off switch goes out.
5 Unplug the appliance after use.
Do not move the fryer until the oil or fat has cooled down sufficiently, which takes
approximately 60 minutes.
ENGLISH 9

B
If you do not use the fryer regularly, we advise you to remove the oil or liquid fat and to store it in
well-closed containers, preferably in the refrigerator or in a cool place. Fill the containers by pouring
the oil or fat through a fine sieve to remove food particles. Remove the frying basket before emptying
the inner bowl.
B
If the fryer contains solid fat, let the fat solidify in the fryer and store the fryer with the fat still in it
(see chapter 'Preparing for use', section 'Oil and fat').
Cleaning
Wait until the oil or fat has cooled down sufficiently.
Do not use any abrasive (liquid) cleaning agents or materials (e.g scouring pads) to clean the
appliance.
1 Remove the filter from the lid by pulling it upwards (fig. 14).
2 Open the lid.
3 Remove the lid by pulling it upwards (fig. 15).
4 Lift the frying basket out of the appliance.
5 Remove the control panel with the heating element from the fryer and put it in a safe, dry
place.
Never immerse the control panel with the heating element in water nor rinse it under the tap!
If necessary, clean this part with a moist cloth.
6 Lift the inner bowl out of the appliance and remove the oil or fat (fig. 16).
◗ All parts except the control panel with the heating element can be cleaned in the dishwasher
or in hot water with some washing-up liquid.
7 Clean the housing, the inner bowl, the lid, the filter and the frying basket in hot water with
some washing-up liquid or in the dishwasher.
NB:You can also clean the filter by leaving it in the lid when you clean the lid.
8 Rinse the parts with fresh water and dry them thoroughly.
You can shake the filter over the sink to remove most of the water.
Dishwasher-proof parts
- Lid
- Inner bowl
- Removable filter
- Frying basket
- Housing
Changing oil or fat
Because oil and fat lose their favourable properties rather quickly, you should change the oil or fat
regularly.To do so, follow the instructions below.
If you mainly use the fryer to prepare French fries and if you sieve the oil or fat after each use, you
can re-use the oil or fat 10 to 12 times before it needs to be changed. If you use the fryer to
prepare food that is rich in proteins (such as meat or fish), you should change the oil or fat more
often.
◗ Never use the same oil longer than 6 months and always follow the instructions on the
package.
◗ Never add fresh oil or fat to used oil or fat.
ENGLISH10

◗ Never mix different types of oil or fat.
◗ Always change the oil or fat if it starts foaming when it is heated, if it has a strong smell or
taste or if it turns dark and/or syrupy.
Disposing of used oil or fat
Pour used oil or liquid fat back into its original (resealable) plastic bottle.You can dispose of used fat
by letting it solidify in the fryer (without the basket in it) and subsequently scooping it out of the
fryer by means of a spatula and wrapping it in a newspaper. If applicable, you can put the bottle or
newspaper in the bin for non-compostable waste (not in the compostable waste bin) or dispose of
it in accordance with the regulations in your country.
Storage
1 Put all parts back into/onto the fryer and close the lid.
2 Roll up the cord, put it into the cord storage compartment and insert the plug in the plug
fixing facility (fig. 17).
3 Lift the fryer by its handles.
Frying tips
For an overview of preparation times and temperature settings, see the table at the end of these
instructions for use.
Home-made French fries
You will make the tastiest and crispiest French fries in the following way:
1 Use firm potatoes and cut them into sticks. Rinse the sticks with cold water.
This will prevent them from sticking to each other during frying.
B
Dry the sticks thoroughly.
2 Fry the French fries twice: the first time for 4-6 minutes at a temperature of 160cC, the
second time for 5-8 minutes at a temperature of 175cC.
3 Put the home-made French fries in a bowl and shake them. Let the fries cool down before
frying them for the second time.
Frozen food
Frozen fries have already been precooked, so you will only have to fry them once in accordance
with the instructions on the package.
Food from the freezer (-16 to -18cC) will cause the oil or fat to cool down considerably when it is
immersed in it. Because the food does not sear right away, it may also absorb too much oil or fat.
Take the following measures to prevent this:
- Preferably allow frozen food to defrost at room temperature before frying, unless stated
otherwise on the package of the food to be fried.
- Carefully shake off as much ice and water as possible and dab the food to be fried until it is
properly dry.
- Do not fry very large quantities at one time (consult the relevant table in these instructions for
use).
ENGLISH 11

- Select the frying temperature mentioned in the table at the end of these instructions for use or
on the package of the food to be fried. If there are no instructions, select a temperature of
175cC.
- Lower the food into the oil or fat very gently, since frozen food may cause the hot oil or fat to
start bubbling violently.
Getting rid of unwanted flavours
Certain types of food, particularly fish, can give the oil or fat an unpleasant flavour.To neutralise the
taste of the oil or fat:
1 Heat the oil or fat to a temperature of 160cC.
2 Put two thin slices of bread or a few sprigs of parsley in the oil.
3 Wait until no more bubbles appear and then scoop the bread or the parsley out of the fryer
with a spatula.
The oil or fat will now have a neutral taste again.
Environment
◗ Do not throw the appliance away with the normal household waste at the end of its life, but
hand it in at an official collection point for recycling. By doing this you will help to preserve
the environment (fig. 18).
Remove the battery of the timer (type HD6145 only) before you discard the appliance (fig. 19).
1 Use a small flat-blade screwdriver to remove the timer panel.
2 Remove the battery. Do not throw the battery away with the normal household waste, but
hand it in at an official collection point.
Guarantee & service
If you need information or if you have a problem, please visit the Philips website at www.philips.com
or contact the Philips Customer Care Centre in your country (you will find its phone number in the
worldwide guarantee leaflet). If there is no Customer Care Centre in your country, turn to your
local Philips dealer or contact the Service Department of Philips Domestic Appliances and Personal
Care BV.
ENGLISH12

Solution
Check on the package of the food or in the table at
the end of these instructions for use whether the
temperature and/or preparation time you have
selected is/are correct. Set the temperature control to
the correct temperature.
Never fry more food at one time than the quantity
mentioned in the relevant table.
The fuse of the temperature control may have blown,
causing the safety cut-out to switch the appliance off.
Carefully press the reset button at the back of the
control panel with a small screwdriver.
Make sure the oil or fat is hot enough before you put
the food to be fried in the basket (see chapter 'Using
the appliance').
Remove the filter and clean it in hot water with some
washing-up liquid or in the dishwasher.
Change the oil or fat. Regularly sieve the oil or fat to
keep it fresh longer.
Use frying oil or liquid frying fat of good quality. Never
mix different types of oil or fat.
Check whether the lid has been closed properly.
Remove the filter and clean it in hot water with some
washing-up liquid or in the dishwasher.
Make sure the oil or fat in the fryer does not exceed
the maximum level.
Dry the food thoroughly before you start frying it and
fry the food in accordance with these instructions for
use.
Do not fry more food at one time than the quantity
mentioned in the relevant table.
Dry the food thoroughly before frying it.
Use frying oil or liquid frying fat of good quality. Never
mix different types of oil or fat.
Clean the inner bowl as described in these instructions
for use.
Make sure the control panel is placed correctly.You
should hear a click when the control panel locks into
position.
Possible cause
The selected temperature is too
low and/or the food has not
been fried long enough.
There is too much food in the
basket.
The oil or fat does not become
hot enough.
The removable filter is
saturated.
The oil or fat is no longer fresh.
The type of oil or fat used is not
suitable for deep-frying food.
The lid has not been closed
properly.
The removable filter is
saturated.
There is too much oil or fat in
the fryer.
The food contains too much
moisture.
There is too much food in the
frying basket.
The food contains too much
moisture.
The type of oil or fat used is
unsuitable for deep-frying food.
The inner bowl has not been
cleaned properly.
Please visit the Philips website at
www.philips.com or turn to
your local Philips dealer.
The control panel has not been
assembled properly.
Problem
The fried food does
not have a golden
brown colour and/or
is not crispy.
The fryer gives off a
strong unpleasant
smell.
Steam escapes from
other places than
the filter.
Oil or fat spills over
the edge of the fryer
during frying.
The oil or fat foams
strongly during
frying.
There is no filter
present or the filter
is damaged.
The fryer does not
work.
Troubleshooting
ENGLISH 13

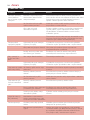
Frying time
(minutes)
frozen food
-
-
15-20
6-7
4-5
-
-
5-6
-
6-7
10-12
8-10
4-5
4-5
4-5
3-4
4-5
4-5
-
-
-
-
Frying time (minutes)
fresh or (partly)
defrosted food
4-6 (go to 175cC in this
table for instructions about
the 2nd cycle)
5-7
12-15
4-5
3-4
2-3
5-8
-
4
4-5
6-7
5-6
3-4
3-4
3-4
2-3
3-4
3-4
3-4
5-6
2-3
3-4
Recommended
quantity per
batch
600g
450g
3-5 pieces
5 pieces
4 pieces
8-10 pieces
600 g
450 g
600 g
4-5 pieces
2-3 pieces
5-6 pieces
8-10 pieces
8-10 pieces
8-10 pieces
12-15 pieces
8-10 pieces
5 pieces
600 g
3-4 pieces
2-4 pieces
2 pieces
Type of food
Home-made French
fries*) 1st frying
cycle
Fresh fish
Chicken (drumsticks)
Cheese croquettes
Mini potato pancakes
Vegetable fritters
(mushrooms,
cauliflower)
Home-made French
fries*) 2nd frying
cycle
Frozen French fries
Crisps (very thin
potato slices)
Potato croquettes
Chinese spring rolls
Vietnamese spring
rolls
Chicken nuggets
Mini snacks
Meatballs (small)
Mussels
Prawns
Apple fritters
Aubergine (slices)
Doughnuts
Camembert
(breadcrumbed)
Wiener schnitzel
Temperature
160cC
170cC
175cC
180cC
190cC
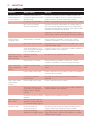
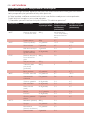
Preparation times and temperature settings
The table below indicates how much of a particular type of food you can prepare at one time and which frying
temperature and preparation time you should select.
If the instructions on the package of the food to be prepared differ from those in the table, always follow the
instructions on the package.
*) Also see 'Frying tips' for the preparation of home-made French fries.
Solution
Let the oil cool down and then press the reset button
(see chapter 'Safety features'). If the appliance still does
not work, turn to your Philips dealer or a service
centre authorised by Philips.
Possible cause
The safety cut-out has switched
the appliance off.
Problem
ENGLISH14

Wstęp
Drogi Kliencie, gratulujemy zakupu nowej frytownicy Philips Cucina. Nowa frytownica pozwala bez
najmniejszych trudności przygotowywać wszystkie rodzaje smażonej żywności!
Opis ogólny
A Pokrywa
B Zdejmowany, filtr nadający się do mycia
C Kosz do smażenia
D Zdejmowana misa wewnętrzna
E Przycisk zwalniający pokrywę
F Cyfrowy wyłącznik czasowy (tylko dla modelu HD6145)
G Regulator temperatury
H Lampka kontrolna temperatury
I Przełącznik on/off
J Magazynek na przewód sieciowy
K Kabel zasilający
Ważne
Przed pierwszym użyciem urządzenia zapoznaj się dokładnie z instrukcją jego obsługi i zachowaj ją
na przyszłość, do ewentualnej konsultacji.
◗ Przed podłączeniem urządzenia upewnij się, czy podane na nim napięcie jest zgodne z
napięciem w sieci elektrycznej.
◗ Wetknij wtyczkę przewodu zasilającego do uziemionego gniazdka.
◗ Jeśli przewód zasilający ulegnie uszkodzeniu, musi zostać wymieniony w autoryzowanym
punkcie serwisowym firmy Philips lub przez osobę o podobnych kwalifikacjach, co pozwoli
uniknąć ewentualnego niebezpieczeństwa.
◗ Konieczność przeglądu lub naprawy urządzenia zawsze zgłaszaj do autoryzowanego punktu
serwisowego firmy Philips. Nie próbuj naprawiać urządzenia samodzielnie, gdyż spowoduje to
unieważnienie gwarancji.
◗ Przed pierwszym użyciem dokładnie umyj wszystkie części frytownicy (patrz: rozdział
"Czyszczenie"). Zanim napełnisz frytownicę olejem lub roztopionym tłuszczem, upewnij się,
czy wszystkie jej części są zupełnie suche.
◗ Nigdy nie zanurzaj w wodzie panelu sterowania wraz z przymocowaną do niego grzałką, ani
nie spłukuj go pod kranem! Obudowę czyścić można wilgotną szmatką z dodatkiem płynu do
mycia naczyń.
◗ Nie włączaj urządzenia przed napełnieniem go olejem lub tłuszczem. Upewnij się, że
frytownica jest zawsze wypełniona do poziomu, leżącego pomiędzy dwoma znakami na
wewnętrznej stronie wewnętrznej misy.
◗ Podczas smażenia przez filtr wydobywa się gorąca para. Pamiętaj, aby twarz i ręce znajdowały
się w bezpiecznej odległości od wydobywającej się pary. Powinieneś na nią uważać również
podczas otwierania pokrywy.
◗ Przechowuj urządzenie i korzystaj z niego w miejscu niedostępnym dla małych dzieci. Nie
pozwól, aby przewód zasilający zwisał nad krawędzią stołu czy blatu, na którym ustawiona
jest frytownica.
◗ Niniejsze urządzenie przeznaczone jest wyłącznie do użytku domowego. Jeśli urządzenie
wykorzystywane jest w sposób niewłaściwy lub do celów profesjonalnych, czy też
półprofesjonalnych, lub też w sposób niezgodny z instrukcją obsługi, gwarancja traci ważność,
a firma Philips nie bierze odpowiedzialności za wszelkie wyrządzone szkody.
◗ Smaż potrawy na kolor złoto-żółty, a nie ciemny lub brązowy i usuwaj spalone resztki! Potraw
o dużej zawartości skrobi, szczególnie produktów ziemniaczanych i zbożowych nie smaż w
temperaturze przewyższającej 175cC (aby zminimalizować wytwarzanie akryloamidu).
15
POLSKI

16
Funkcje zabezpieczające
Wyłącznik bezpieczeństwa
Niniejsze urządzenie wyposażone jest w wyłącznik bezpieczeństwa, wyłączający je w przypadku
przegrzania. Sytuacja taka może zaistnieć wtedy, gdy we frytkownicy nie ma wystarczająco dużo oleju
lub tłuszczu, lub gdy kostki stałego tłuszczu roztapiają się wewnątrz frytownicy, uniemożliwiając
grzałce oddawanie ciepła.
Jeśli frytownica przestała funkcjonować, podejmij następujące środki zaradcze:
1 Odczekaj, aż urządzenie ostygnie. Zajmie to od około 15 minut.
2 Używając cienkiego wkrętaka, ostrożnie wciśnij przycisk resetowania znajdujący się w tylnej
ściance panelu sterowania (rys. 1).
Teraz urządzenie jest ponownie gotowe do użycia.
Automatyczne wyłączanie (tylko dla modelu HD6145)
Frytownica wyłącza się automatycznie po dwóch godzinach pracy.Wówczas zgaśnie lampka
kontrolna przełącznika on/off.
◗ Aby ponownie włączyć urządzenie, wciśnij jeszcze raz przełącznik on/off.
Wyłącznik bezpieczeństwa
Znajdujący się na panelu sterowania wyłącznik bezpieczeństwa umożliwia włączenie grzałki tylko
wówczas, gdy prawidłowo został zainstalowany panel sterowania.
◗ Zawsze sprawdzaj, czy prawidłowo został zainstalowany panel sterowania (towarzyszy temu
charakterystyczne kliknięcie) (rys. 2).
Strefa chłodna
Na dnie wewnętrznej misy zbierają się podczas smażenia drobne cząstki żywności. Ponieważ grzałka
umieszczona jest w pewnej odległości od dna misy wewnętrznej i najpierw podgrzewa ona tę
warstwę oleju lub tłuszczu, która jest ponad nią, dlatego olej lub tłuszcz znajdujący się pomiędzy
dnem misy wewnętrznej i grzałką pozostaje względnie chłodny (strefa chłodna). Nie dopuszcza to
do spalenia cząstek żywności, które znalazły się w tej strefie i umożliwia wielokrotne użycie oleju lub
tłuszczu.
Przygotowanie do użycia
1 Należy ustawić urządzenie na chłodnej, płaskiej i stabilnej powierzchni, w miejscu
niedostępnym dla dzieci.
Jeśli chcesz ustawić frytownicę na kuchence, zawsze sprawdź, czy zostały wyłączone i są już zimne
jej palniki.
2 Napełnij suchą frytownicę olejem, płynnym tłuszczem lub roztopionym tłuszczem stałym do
poziomu MAX wskazanego przez kreskę na wewnętrznej powierzchni misy (patrz: punkt "Olej
i tłuszcz", gdzie znajdziesz wskazówki dotyczące sposobu użycia stałego tłuszczu) (rys. 4).
POLSKI
Tłuszcz stały
2800 g
3050 g
Olej
3,2 l
3,5 l
HD6145, HD6143
Minimalnie
Maksymalnie
Tłuszcz stały
1925 g
2200 g
Olej
2,2 litra
2,5 litra
HD6141
Minimalnie
Maksymalnie

17
Olej i inny tłuszcz
Nigdy nie wolno mieszać ze sobą różnych rodzajów oleju lub tłuszczu!
Zaleca się używanie oleju lub innego płynnego tłuszczu do smażenia, najlepiej oleju roślinnego lub
tłuszczu bogatego w tłuszcze nienasycone (np kwas linolowy).
Do smażenia można używać tłuszczu stałego, jednak należy wówczas zastosować dodatkowe środki
bezpieczeństwa zapobiegające rozpryskiwaniu się tłuszczu oraz przegrzaniu lub uszkodzeniu grzałki.
1 Jeśli chcesz użyć nowej kostki tłuszczu, roztop ją powoli na małym ogniu, w zwykłej patelni.
2 Roztopiony tłuszcz wlej ostrożnie do frytownicy.
3 Frytownicę z zastygłym wewnątrz tłuszczem przechowuj w temperaturze pokojowej.
4 Zbytnio oziębiony tłuszcz mocno rozpryskuje się podczas smażenia.Aby do tego nie
dopuścić, zestalony tłuszcz nakłuj w kilku miejscach widelcem (rys. 3).
Uważaj, aby nakłuwając tłuszcz widelcem, nie zniszczyć wewnętrznej misy.
Korzystanie z urządzenia
Smażenie
Zachowaj ostrożność: podczas smażenia rozgrzany tłuszcz wydostaje się przez filtr z frytownicy.
1 Wyciągnij cały przewód zasilający ze schowka i włóż wtyczkę do gniazdka ściennego (rys. 5).
Upewnij się, że przewód zasilający nie styka się z rozgrzanymi powierzchniami urządzenia.
2 Należy włączyć frytownicę, wciskając przełącznik on/off.
Zgaśnie lampka kontrolna przełącznika on/off.
3 Ustaw regulator temperatury na żądanej wartości (150-190cC) (rys. 6).
Zaświeci się lampka kontrolna temperatury.
- Informację dotyczącą wyboru temperatury znajdziesz na opakowaniu żywności przeznaczonej
do smażenia lub w tabeli zamieszczonej przy końcu niniejszej instrukcji obsługi.
- W ciągu 10 do 15 minut olej lub tłuszcz zostaną rozgrzane do wybranej temperatury.
- Gdy lampka kontrolna temperatury gaśnie na dłuższą chwilę, oznacza to, że olej lub tłuszcz
osiągnął zadaną temperaturę.
- Po usmażeniu porcji zaświeci się również lampka kontrolna temperatury. Przed usmażeniem
następnej porcji poczekaj, aż zgaśnie na dłuższą chwilę.
B
Podczas rozgrzewania frytownicy możesz pozostawić w niej kosz.
4 Unieś uchwyt, unosząc kosz do najwyższego położenia (rys. 7).
5 Otwórz pokrywę, zwalniając przycisk blokujący. Pokrywa otworzy się automatycznie (rys. 8).
6 Wyjmij kosz z frytownicy i umieść w nim żywność przeznaczoną do smażenia.
B
Aby uzyskać najlepsze rezultaty, nie należy przekraczać wymienionych niżej maksymalnych ilości.
POLSKI
Mrożone
frytki
900 g
500 g
Domowe
frytki
1250 g
650 g
HD6145,
HD6143
Maksymalna ilość
Zalecana ilość w
celu uzyskania
najlepszego wyniku
końcowego
Mrożone
frytki
700 g
400 g
Domowe
frytki
1000 g
450 g
HD6141
Maksymalna ilość
Zalecana ilość w celu uzyskania
najlepszego wyniku końcowego

18
W urządzeniu tym nie należy smażyć azjatyckich ciastek ryżowych (ani innych podobnych
rodzajów żywności), gdyż może to spowodować silne rozpryskiwanie, czy też gwałtowne wrzenie
oleju lub tłuszczu.
7 Ostrożnie włóż koszyk do frytownicy, nie zanurzając go w oleju lub tłuszczu (rys. 9).
Upewnij się, że kosz został umieszczony prawidłowo.
8 Zamknij pokrywkę.
9 Tylko dla modelu HD6145: Ustaw żądany czas smażenia (patrz w niniejszym rozdziale: punkt
"Wyłącznik czasowy").
Możesz również korzystać z frytownicy nie ustawiając wyłącznika czasowego.
10 Wciśnij przycisk zwalniający na uchwycie koszyka i ostrożnie opuść koszyk do jego
najniższego położenia (rys. 10).
B
Aby uzyskać oczekiwane rezultaty, przestrzegaj podanych na opakowaniu przeznaczonej do
smażenia żywności czasów przygotowywania potraw lub czasów podanych w tabeli zamieszczonej
przy końcu niniejszej instrukcji obsługi.
B
Aby żywność usmażyła się równomiernie na złocisty kolor, w trakcie smażenia wyjmij kilkakrotnie kosz
z oleju lub tłuszczu i delikatnie potrząśnij jego zawartością.
Wyłącznik czasowy (tylko dla modelu HD6145)
Wyłącznik czasowy jedynie informuje o upływie czasu smażenia, jednak NIE wyłącza frytownicy.
Ustawianie wyłącznika czasowego
1 Aby ustawić w minutach czas smażenia, wciśnij przycisk wyłącznika czasowego (rys. 11).
Na wyświetlaczu pojawi się ustawiona wartość czasu.
2 Przytrzymuj wciśnięty przycisk, aby przyspieszyć przesuwanie się kolejnych minut. Z chwilą
osiągnięcia żądanego czasu smażenia zwolnij przycisk.
B
Maksymalna długość czasu, który można ustawić, wynosi 99 minut.
B
Po upływie kilku sekund od ustawienia czasu smażenia zacznie się odliczanie czasu.
B
Podczas odliczania czasu przez wyłącznik czasowy na wyświetlaczu migocze wartość, oznaczająca
czas pozostały do zakończenia smażenia. Ostatnia minuta smażenia wskazywana jest w sekundach.
3 Jeśli ustalona wcześniej wartość czasu nie jest prawidłowa, możesz ją skasować, wciskając na
2 sekundy przycisk wyłącznika czasowego w chwili, w której wyłącznik czasowy rozpoczyna
odliczanie (tzn. w chwili, w której wartość na wyświetlaczu zaczyna migotać). Przytrzymaj
wciśnięty przycisk do chwili, w której na wyświetlaczu pojawi się symbol "00".Możesz teraz
ustawić właściwy czas smażenia.
4 Po upływie ustawionego czasu usłyszysz sygnał dźwiękowy. Po 10 sekundach sygnał
dźwiękowy powtórzy się.Wciskając przycisk wyłącznika czasowego, możesz wyłączyć sygnał
dźwiękowy.
Po zakończeniu smażenia
1 Unieś uchwyt ku górze, unosząc koszyk do jego najwyższego położenia, to znaczy do
położenia odcedzania (rys. 12).
2 Otwórz pokrywę, wciskając przycisk zwalniający (rys. 13).
Uważaj na gorącą parę i możliwe rozpryskiwanie się oleju.
3 Ostrożnie wyjmij koszyk z frytownicy.
Aby usunąć nadmierną ilość oleju lub tłuszczu, potrząśnij koszykiem nad frytkownicą lub umieść
koszyk w położeniu odsączania, umieszczając go w uchwytach wewnątrz misy. Umieść usmażoną
POLSKI

19
potrawę w misie lub cedzaku, wyłożonych papierem wchłaniającym tłuszcz, na przykład papierowym
ręcznikiem kuchennym.
4 Korzystając z przełącznika on/off, wyłącz frytownicę.
Zgaśnie lampka kontrolna zasilania.
5 Po zakończeniu korzystania z urządzenia wyjmij wtyczkę z gniazdka ściennego.
Nie przesuwaj frytownicy, zanim olej lub tłuszcz nie ostudzą się wystarczająco, co zajmie około
60 minut.
B
Jeśli nie korzystasz z frytownicy regularnie, wówczas przechowuj olej lub inny płynny tłuszcz w
szczelnie zamkniętych pojemnikach, najlepiej w lodówce lub jakimkolwiek innym chłodnym miejscu.
Napełnij pojemniki, wlewając do nich olej lub inny tłuszcz przez drobne sitko zatrzymujące cząstki
żywności. Przed opróżnieniem wewnętrznej misy wyjmij kosz z frytownicy.
B
Jeśli we frytownicy znajduje się stały tłuszcz, pozwól, aby zestalił się i przechowuj frytownicę wraz z
pozostałym w niej tłuszczem (patrz: rozdział "Przygotowanie do użycia", punkt "Olej i tłuszcz").
Mycie
Odczekaj, aż użyty tłuszcz wystarczająco wystygnie.
Do czyszczenia frytownicy nie używaj żadnych płynnych środków zawierających elementy ścierne
ani też druciaków.
1 Wyjmij z pokrywy filtr, pociągając go ku górze (rys. 14).
2 Otwórz pokrywę.
3 Wyjmij pokrywę, pociągając ją ku górze (rys. 15).
4 Wyjmij koszyk z frytownicy.
5 Wyjmij z frytownicy panel sterowania wraz z grzałką i umieść je w bezpiecznym, suchym
miejscu.
Nigdy nie zanurzaj w wodzie panelu sterowania wraz z grzałką, ani też nie spłukuj go pod
kranem!
W razie potrzeby oczyść tę część wilgotną szmatką.
6 Wysuń wewnętrzną misę z urządzenia i usuń olej lub tłuszcz (rys. 16).
◗ Wszystkie części, z wyjątkiem panelu sterowania zawierającego grzałkę, można umyć w
zmywarce lub w gorącej wodzie z dodatkiem płynu do mycia naczyń.
7 Umyj obudowę, wewnętrzną misę, pokrywę, filtr i kosz do smażenia w gorącej wodzie z
dodatkiem płynu do mycia naczyń lub umyj je w zmywarce.
Uwaga: Możesz również oczyścić filtr, pozostawiając go w pokrywie podczas czyszczenia jej.
8 Opłucz starannie części frytownicy i dokładnie je osusz.
Aby usunąć nadmiar wody, możesz potrząsnąć filtrem nad zlewem.
Części, które można myć w zmywarce
- Pokrywa
- Wewnętrzna misa
- Zdejmowany filtr
- Kosz do smażenia
- Obudowa
POLSKI

20
Zmiana oleju lub innego tłuszczu
Ponieważ olej lub inny tłuszcz dosyć szybko tracą swoje wartości, trzeba je regularnie zmieniać.W
tym celu należy postępować w niżej opisany sposób.
Jeśli korzystasz z frytownicy głównie do przygotowywania frytek i odcedzasz po każdym użyciu olej
lub tłuszcz, możesz użyć ich ponownie, od 10 do 12 razy, zanim stanie się konieczna wymiana oleju
lub tłuszczu. Jeśli używasz frytownicy do przygotowywania żywności bogatej w białko (mięsa lub
ryby), olej lub tłuszcz musisz wymieniać częściej.
◗ Nigdy nie korzystaj z tego samego oleju lub tłuszczu przez okres dłuższy niż 6 miesięcy i
zawsze stosuj się do instrukcji podanych na opakowaniu.
◗ Nowego tłuszczu lub oleju nigdy nie dodawaj do starego.
◗ Nigdy nie wolno mieszać ze sobą różnych rodzajów oleju lub tłuszczu.
◗ Zawsze zmieniaj olej lub tłuszcz jeśli zaczynają pienić się przy podgrzewaniu, gdy mają
intensywny zapach lub smak, lub gdy stają się ciemne i/lub o konsystencji syropu.
Pozbywanie się zużytego oleju lub tłuszczu.
Wlej użyty olej lub tłuszcz do oryginalnej (szczelnej) butelki z tworzywa sztucznego. Zużytego
tłuszczu możesz również pozbyć się, pozwalając na jego zastygnięcie we frytownicy (bez kosza
wewnątrz) i następnie usuwając go ze ścianek frytownicy łopatką oraz zawijając go w gazetę. Butelkę
lub tłuszcz zawinięty w gazetę możesz umieścić w odpadach niepodlegających kompostowaniu (tzn.
w pojemniku nie przeznaczonym na odpady kompostowane) lub pozbyć się ich w inny sposób,
zgodny z obowiązującymi przepisami.
Przechowywanie
1 Włóż ponownie wszystkie części do frytownicy i zamknij pokrywę.
2 Zwiń przewód zasilający, umieść go ponownie w schowku i włóż wtyczkę w przeznaczony dla
niej uchwyt.Wykaz czasów i ustawień temperatury zamieszczony jest w tabeli na końcu
niniejszej instrukcji (rys. 17).
3 Podnoś frytownicę za uchwyty.
Wskazówki przydatne podczas smażenia
Wykaz czasów i ustawień temperatury zamieszczony jest w tabeli na końcu niniejszej instrukcji.
Smażenie frytek przygotowanych w domu
Frytki będą smaczniejsze i bardziej kruche, jeśli przygotujesz je w następujący sposób:
1 Twarde obrane ziemniaki pokrój na kostki. Opłucz je w zimnej wodzie.
Zapobiegnie to sklejaniu się kostek ziemniaków podczas smażenia.
B
Dokładnie osusz kostki ziemniaków.
2 Frytki smażone są w dwóch etapach: po raz pierwszy przez 4-6 minut w temperaturze
160cC i po raz drugi - przez 5-8 minut w temperaturze 175cC.
3 Umieść w misie frytki przygotowane w domu i potrząśnij nimi. Przed smażeniem ich po raz
drugi odczekaj, aż ochłodzą się.
POLSKI
Pagina se încarcă...
Pagina se încarcă...
Pagina se încarcă...
Pagina se încarcă...
Pagina se încarcă...
Pagina se încarcă...
Pagina se încarcă...
Pagina se încarcă...
Pagina se încarcă...
Pagina se încarcă...
Pagina se încarcă...
Pagina se încarcă...
Pagina se încarcă...
Pagina se încarcă...
Pagina se încarcă...
Pagina se încarcă...
Pagina se încarcă...
Pagina se încarcă...
Pagina se încarcă...
Pagina se încarcă...
Pagina se încarcă...
Pagina se încarcă...
Pagina se încarcă...
Pagina se încarcă...
Pagina se încarcă...
Pagina se încarcă...
Pagina se încarcă...
Pagina se încarcă...
Pagina se încarcă...
Pagina se încarcă...
Pagina se încarcă...
Pagina se încarcă...
Pagina se încarcă...
Pagina se încarcă...
Pagina se încarcă...
Pagina se încarcă...
Pagina se încarcă...
Pagina se încarcă...
Pagina se încarcă...
Pagina se încarcă...
Pagina se încarcă...
Pagina se încarcă...
Pagina se încarcă...
Pagina se încarcă...
Pagina se încarcă...
Pagina se încarcă...
Pagina se încarcă...
Pagina se încarcă...
Pagina se încarcă...
Pagina se încarcă...
Pagina se încarcă...
Pagina se încarcă...
Pagina se încarcă...
Pagina se încarcă...
Pagina se încarcă...
Pagina se încarcă...
Pagina se încarcă...
Pagina se încarcă...
Pagina se încarcă...
Pagina se încarcă...
Pagina se încarcă...
Pagina se încarcă...
Pagina se încarcă...
Pagina se încarcă...
Pagina se încarcă...
Pagina se încarcă...
Pagina se încarcă...
Pagina se încarcă...
Pagina se încarcă...
Pagina se încarcă...
Pagina se încarcă...
Pagina se încarcă...
Pagina se încarcă...
Pagina se încarcă...
Pagina se încarcă...
Pagina se încarcă...
Pagina se încarcă...
Pagina se încarcă...
Pagina se încarcă...
Pagina se încarcă...
Pagina se încarcă...
Pagina se încarcă...
Pagina se încarcă...
Pagina se încarcă...
Pagina se încarcă...
Pagina se încarcă...
Pagina se încarcă...
Pagina se încarcă...
Pagina se încarcă...
Pagina se încarcă...
Pagina se încarcă...
Pagina se încarcă...
Pagina se încarcă...
Pagina se încarcă...
Pagina se încarcă...
Pagina se încarcă...
Pagina se încarcă...
Pagina se încarcă...
Pagina se încarcă...
Pagina se încarcă...
Pagina se încarcă...
Pagina se încarcă...
Pagina se încarcă...
Pagina se încarcă...
Pagina se încarcă...
Pagina se încarcă...
Pagina se încarcă...
Pagina se încarcă...
Pagina se încarcă...
Pagina se încarcă...
Pagina se încarcă...
Pagina se încarcă...
Pagina se încarcă...
Pagina se încarcă...
Pagina se încarcă...
Pagina se încarcă...
Pagina se încarcă...
Pagina se încarcă...
Pagina se încarcă...
Pagina se încarcă...
Pagina se încarcă...
Pagina se încarcă...
Pagina se încarcă...
Pagina se încarcă...
Pagina se încarcă...
Pagina se încarcă...
Pagina se încarcă...
Pagina se încarcă...
Pagina se încarcă...
Pagina se încarcă...
Pagina se încarcă...
Pagina se încarcă...
Pagina se încarcă...
Pagina se încarcă...
Pagina se încarcă...
Pagina se încarcă...
Pagina se încarcă...
Pagina se încarcă...
Pagina se încarcă...
Pagina se încarcă...
-
 1
1
-
 2
2
-
 3
3
-
 4
4
-
 5
5
-
 6
6
-
 7
7
-
 8
8
-
 9
9
-
 10
10
-
 11
11
-
 12
12
-
 13
13
-
 14
14
-
 15
15
-
 16
16
-
 17
17
-
 18
18
-
 19
19
-
 20
20
-
 21
21
-
 22
22
-
 23
23
-
 24
24
-
 25
25
-
 26
26
-
 27
27
-
 28
28
-
 29
29
-
 30
30
-
 31
31
-
 32
32
-
 33
33
-
 34
34
-
 35
35
-
 36
36
-
 37
37
-
 38
38
-
 39
39
-
 40
40
-
 41
41
-
 42
42
-
 43
43
-
 44
44
-
 45
45
-
 46
46
-
 47
47
-
 48
48
-
 49
49
-
 50
50
-
 51
51
-
 52
52
-
 53
53
-
 54
54
-
 55
55
-
 56
56
-
 57
57
-
 58
58
-
 59
59
-
 60
60
-
 61
61
-
 62
62
-
 63
63
-
 64
64
-
 65
65
-
 66
66
-
 67
67
-
 68
68
-
 69
69
-
 70
70
-
 71
71
-
 72
72
-
 73
73
-
 74
74
-
 75
75
-
 76
76
-
 77
77
-
 78
78
-
 79
79
-
 80
80
-
 81
81
-
 82
82
-
 83
83
-
 84
84
-
 85
85
-
 86
86
-
 87
87
-
 88
88
-
 89
89
-
 90
90
-
 91
91
-
 92
92
-
 93
93
-
 94
94
-
 95
95
-
 96
96
-
 97
97
-
 98
98
-
 99
99
-
 100
100
-
 101
101
-
 102
102
-
 103
103
-
 104
104
-
 105
105
-
 106
106
-
 107
107
-
 108
108
-
 109
109
-
 110
110
-
 111
111
-
 112
112
-
 113
113
-
 114
114
-
 115
115
-
 116
116
-
 117
117
-
 118
118
-
 119
119
-
 120
120
-
 121
121
-
 122
122
-
 123
123
-
 124
124
-
 125
125
-
 126
126
-
 127
127
-
 128
128
-
 129
129
-
 130
130
-
 131
131
-
 132
132
-
 133
133
-
 134
134
-
 135
135
-
 136
136
-
 137
137
-
 138
138
-
 139
139
-
 140
140
-
 141
141
-
 142
142
-
 143
143
-
 144
144
-
 145
145
-
 146
146
-
 147
147
-
 148
148
-
 149
149
-
 150
150
-
 151
151
-
 152
152
-
 153
153
-
 154
154
-
 155
155
-
 156
156
-
 157
157
-
 158
158
-
 159
159
-
 160
160


Philips HD6141/80 Manual de utilizare
- Categorie
- Friteuze adânci
- Tip
- Manual de utilizare
- Acest manual este potrivit și pentru
în alte limbi
- slovenčina: Philips HD6141/80 Používateľská príručka
- eesti: Philips HD6141/80 Kasutusjuhend
Lucrări înrudite
-
Philips HD6155/80 Manual de utilizare
-
-
-
Philips HD6110/10 Manual de utilizare
-
-
Philips HD6161/00 Manual de utilizare
-
Philips HD6146/55 Manual de utilizare
-
Philips HD6107/70 Manual de utilizare
-
-
Philips HD9226 Manual de utilizare