HOTPOINT/ARISTON 9YOKT 998ED 0 X /HA Manualul utilizatorului
- Categorie
- Cuptoare
- Tip
- Manualul utilizatorului

English
Operating Instructions
OVEN
Contents
Operating Instructions,1
Warnings,2
Assistance,4
Description of the appliance,6
Description of the appliance,7
Installation,10
Oven structure,12
Start-up and use,13
Modes,14
Precautions and tips,20
Maintenance and care,20
Troubleshooting,22
9YOKT 998ED 0 X /HA
Български
Инструкции за употреба
ФУРНА
Съдържание
Инструкции за употреба,1
Предупреждения,2
Техническо обслужване,4
Описание на уреда,6
Описание на уреда,7
Монтиране,23
Структура на фурната,25
Пуск и експлоатация,26
Режими,27
Предпазни мерки и препоръки,33
Поддръжка и почистване,33
Отстраняване на неизправности,35
Magyar
Használati útmutató
SÜTŐ
Tartalomjegyzék
Használati útmutató,1
Figyelmeztetések,2
Szerviz,4
A készülék leírása,6
A készülék leírása,8
Beszerelés,36
A sütő felépítése,38
Bekapcsolás és használat,39
Üzemmódok,40
Óvintézkedések és tanácsok,46
Karbantartás és ápolás,46
Hibaelhárítás,48
Română
Instrucţiuni de utilizare
CUPTOR
Sumar
Instrucţiuni de utilizare,1
Avertismente,3
Asistenţă,4
Descrierea aparatului,6
Descrierea aparatului,8
Instalare,49
Structura cuptorului,51
Pornirea şi utilizarea,52
Moduri de funcţionare,53
Măsuri de precauţie şi recomandări,59
Întreţinerea şi îngrijirea aparatului,59
Identicarea şi remedierea problemelor,61
Cрпски
Радна упутства
РЕРНА
Содержание
Радна упутства,1
Упозорења,3
Помоћ,5
Опис апарата,6
Опис апарата,9
Инсталација,62
Структура рерне,64
Покретање и употреба,65
Режими,66
Мере опреза и савети,72
Одржавање и нега,72
Решавање проблема,74

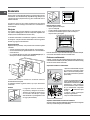
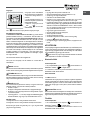
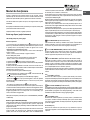
Warnings
WARNING: The appliance and its accessible parts
become hot during use. Care should be taken to
avoid touching heating elements. Children less than 8
years of age shall be kept away unless continuously
supervised. This appliance can be used by children
aged from 8 years and above and persons with
reduced physical, sensory or mental capabilities or
lack of experience and knowledge if they have been
given supervision or instruction concerning use of the
appliance in a safe way and understand the hazards
involved. Children shall not play with the appliance.
Cleaning and user maintenance shall not be made
by children without supervision.
Do not use harsh abrasive cleaners or sharp metal
scrapers to clean the oven door glass since they can
scratch the surface, which may result in shattering
of the glass.
Never use steam cleaners or pressure cleaners on
the appliance.
WARNING: Ensure that the appliance is switched
off before replacing the lamp to avoid the possibility
of electric shock.
! When you place the rack inside, make sure that the
stop is directed upwards and in the back of the cavity.
Предупреждения
ПРЕДУПРЕЖДЕНИЕ: Уредът и достъпните му
части се нагорещяват по време на употреба.
Трябва да се избягва контакт с нагревателите.
Деца под 8 години трябва да бъдат държани
настрана, освен ако не са под непрекъснат
надзор. Уредът може да бъде използван от деца
над 8 години и от хора с ограничени физически,
сетивни или умствени способности или без опит
и познания, ако са наблюдавани, или са им
дадени указания относно използването на уреда
по безопасен начин, и са запознати с възможните
опасности. Децата не трябва да играят с уреда.
Почистването и поддръжката от потребителя не
трябва да се извършва от деца без надзор.
Не използвайте груби абразивни почистващи
препарати или остри метални шпатули за
почистване на стъклото на вратата на фурната,
тъй като могат да надраскат повърхността, което
може да доведе до счупване на стъклото.
Никога не използвайте водочистачки или
парочистачки върху уреда.
ПРЕДУПРЕЖДЕНИЕ: Преди да подмените
лампата се уверете, че уредът е изключен, за да
избегнете риска от токов удар.
! Когато поставяте решетката вътре се уверете,
че стоперът е насочен нагоре и в задната част
на фурната.
Figyelmeztetések
FIGYELMEZTETÉS: A készülék és a hozzáférhető
részei felforrósodnak a használat során. Ügyeljen
rá, hogy ne érjen a fűtőelemekhez. A 8 évnél
atalabb gyermekeket távol kell tartani, ha nincsenek
folyamatos felügyelet alatt. Ezt a berendezést
használhatják 8 évnél idősebb gyermekek és
csökkent zikai, szenzoros vagy mentális képességű,
illetve tapasztalattal és tudással nem rendelkező
személyek, ha felügyelet alatt álnak, vagy ha
megfelelő útmutatást kaptak a készülék biztonságos
működtetéséről, valamint megértették a fennálló
veszélyeket. A gyermekek nem játszhatnak a
készülékkel. A tisztítást és a felhasználó által
elvégezhető karbantartást nem végezhetik felügyelet
nélküli gyermekek.
Ne használjon durva súroló anyagokat vagy éles fém
kaparókat a sütő üveg ajtajának tisztításához, mert
megkarcolhatják a felületet, ami az üveg töréséhez
vezethet.
2

A készülék tisztításához soha ne használjon
gőztisztítót vagy nagynyomású tisztítót.
FIGYELMEZTETÉS: Győződjön meg róla, hogy a
készülék ki van-e kapcsolva, mielőtt kicseréli az izzót,
hogy elkerülje az áramütést.
! Amikor behelyezi a rácsot, ügyeljen arra, hogy az
ütköző felfelé nézzen, a sütő belsejének hátuljában.
Avertismente
AVERTISMENT: Aparatul şi componentele sale
accesibile deveni erbinţi în timpul utilizării. Trebuie
luate măsuri pentru a evita atingerea elementelor
de încălzire. Copiii cu vârste mai mici de 8 ani
vor ţinuţi la distanţă, cu excepţia cazului în care
sunt supravegheaţi continuu. Acest aparat poate
utilizat de către copii cu vârstă mai mare de 8 şi
de către persoane cu capacităţi zice, senzoriale
sau mentale reduse sau de persoane lipsite de
experienţă şi cunoştinţe numai sub supraveghere şi
după realizarea unui instructaj cu privire la utilizarea
aparatului în condiţii de siguranţă şi după înţelegerea
riscurilor implicate. Copiii nu trebuie să se joace cu
aparatul. Copiii nu trebuie să efectueze operaţiuni de
curăţare şi întreţinere fără supraveghere.
Nu folosiţi agenţi de curăţare abrazivi sau raclete
metalice ascuţite pentru a curăţa uşa de sticlă a
cuptorului, deoarece acestea pot zgâria suprafaţa,
ceea ce poate duce la spargerea sticlei.
Nu folosiţi niciodată aparate de curăţare cu abur sau
sub presiune pe aparat.
AVERTISMENT: Asiguraţi-vă aparatul este oprit
înainte de înlocuirea lămpii, pentru a evita posibilitatea
unui şoc electric.
! Când plasaţi grilajul în interior, asiguraţi-vă că
opritorul este îndreptat în sus şi în partea din spate
a cavităţii.
Упозорења
УПОЗОРЕЊЕ: Овај апарат и његови доступни
делови загревају се током употребе. Водите
рачуна да избегнете додиривање грејних
елемената. Деца млађа од 8 година треба да
се држе подаље осим ако нису под сталним
надзором. Овај апарат могу да користе деца од
8 година и више и особе са умањеним физичким,
сензорним или менталним способностима
или са недостатком искуства и знања ако су
под надзором или су добили упутства у вези
са употребом апарата на безбедан начин и
ако разумеју пратеће опасности. Деца се неће
играти са овим апаратом. Чишћење и корисничко
одржавање неће обављати деца без надзора.
Не користите груба абразивна средства или
оштре металне стругаче да очистите стакло на
вратима рерне јер они могу да изгребу површину,
што може да доведе до ломљаве стакла.
Никада не користите парочистаче или чистаче
под притиском на овом апарату.
УПОЗОРЕЊЕ: Проверите да ли је апарат
искључен пре замене лампе како бисте избегли
могућност електричног удара.
! Када поставите полицу унутра, проверите да
ли је блокада окренута нагоре и да ли је у усеку.
3

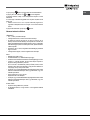
Assistance
Warning:
The appliance is tted with an automatic diagnostic system which detects any
malfunctions. Malfunctions are signalled through messages of the following
type: “F—” followed by numbers.
Call for technical assistance in the event of a malfunction.
Before calling for Assistance:
• check whether you can x the problem yourself.
• restart the programme to check whether the malfunction has disappeared.
• if it has not, contact the Authorised Technical Assistance Service.
! Never use the services of an unauthorised technician.
Please have the following information to hand:
• the type of problem encountered.
• the message shown on the TEMPERATURE display.
• the appliance model (Mod.).
• the serial number (S/N).
The latter two pieces of information can be found on the data plate located
on the appliance.
Техническо обслужване
Предупреждение:
Уредът е снабден с автоматична система за диагностициране, която
установява повреди. Повредите се оповестяват чрез съобщения от
следния тип: „F—“, последвано от цифри.
Повикайте представител на технически сервиз в случай на повреда.
Преди да позвъните в техническия сервиз:
• проверете дали не може да отстраните проблема сами.
• pестартирайте програмата, за да проверите дали повредата е
отстранена.
• aко не е, се свържете с оторизиран сервизен център за техническо
обслужване.
! Никога не използвайте услугите на неоторизиран техник.
Подгответе следната информация:
• вид на възникналия проблем.
• cъобщението, което излиза на ТЕМПЕРАТУРНИЯ дисплей.
• модел на уреда (Mod.).
• cериен номер (S/N).
Последните два елемента се намират на табелката с данни на уреда.
Szerviz
Figyelmeztetés:
A készülék automatikus diagnosztikai rendszerrel van ellátva, amely észleli a
meghibásodásokat. A meghibásodások kijelzése a következő típusú üzenetek
útján történik: “F—” melyet számok követnek.
Meghibásodás esetén forduljon a Szervizhez.
Mielőtt felhívná a szervizt:
• győződjön meg arról, hogy Ön nem képes-e elhárítani a hibát.
• indítsa újra a programot és ellenőrizze, hogy a meghibásodás
megszűnt-e.
• ha nem, vegye fel a kapcsolatot a szakszervizzel.
! Soha ne vegye igénybe nem felhatalmazott szervizszemélyzet szolgáltatásait.
Adja meg az alábbi adatokat:
• a felmerült probléma jellege.
• a HŐMÉRSÉKLET kijelzőn látható üzenet.
• a készülék modellje (Mod.)
• a készülék sorozatszáma (S/H)
Az utolsó két információt a készüléken található adattábláról olvashatja le.
Asistenţă
Avertisment:
Aparatul este echipat cu un sistem automat de diagnosticare care detectează
orice defecţiune. Defecţiunile sunt semnalate prin mesaje de tipul următor:
"F-" urmat de numere.
Solicitaţi asistenţă tehnică în cazul unei defecţiuni.
Înainte de a lua solicita asistenţă:
• vericaţi dacă puteţi rezolva singur problema.
• reporniţi programul pentru a verica dacă defecţiunea a dispărut.
• dacă defecţiunea nu a dispărut, contactaţi Serviciul autorizat de asistenţă
tehnică.
! Nu apelaţi niciodată la serviciile unui tehnician neautorizat.
Vă rugăm să aveţi următoarele informaţii la îndemână:
• tipul problemei întâlnite.
• mesajul aşat pe ecranul TEMPERATURE (TEMPERATURĂ).
• modelul aparatului (Mod.).
• seria aparatului (S/N).
Aceste ultime două informaţii pot găsite pe plăcuţa cu date tehnice montată
pe aparat.
4

Помоћ
Упозорење:
Апарат има аутоматски дијагностички систем који детектује све кварове.
Кварови се сигнализирају кроз поруке следећег типа: "Ф—" у пратњи
бројева.
У случају квара, позовите техничку помоћ.
Пре позивања подршке:
• проверите да ли можете сами да исправите проблем.
• pестартујте програм да проверите да ли је квар нестао.
• aко није, контактирајте овлашћени сервис за техничку подршку.
! Никада не користите услуге неовлашћеног техничара.
Располажите следећим информацијама:
• врста проблема до ког је дошло.
• порука приказана на дисплеју ТЕМПЕРАТУРА.
• модел апарата (Мод.).
• cеријски број (С/Н).
Последње две информације могу да се нађу на плочици са подацима
која се налази на апарату.
5

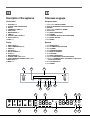
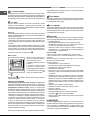
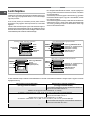
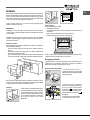
Description of the appliance
Overall view
1 POSITION 1
2 POSITION 2
3 POSITION 3
4 POSITION 4
5 POSITION 5
6 DIVIDER “D” POSITION
7 POSITION 6
8 POSITION 7
9 GUIDES for the sliding racks
10 DRIPPING PAN
11 RACK shelf
12 DIVIDER shelf
13 Control panel
Описание на уреда
Общ преглед
1 ПОЗИЦИЯ 1
2 ПОЗИЦИЯ 2
3 ПОЗИЦИЯ 3
4 ПОЗИЦИЯ 4
5 ПОЗИЦИЯ 5
6 “D” ПОЗИЦИЯ НА РАЗДЕЛИТЕЛЯ
7 ПОЗИЦИЯ 6
8 ПОЗИЦИЯ 7
9 ВОДАЧИ за плъзгане на решетките
10 ТАВИЧКА ЗА ОТТИЧАНЕ
11 позиция на СКАРАТА
12 позиция на РАЗДЕЛИТЕЛЯ
13 Контролен панел
A készülék leírása
A készülék áttekintése
1 1. POZÍCIÓ
2 2. POZÍCIÓ
3 3. POZÍCIÓ
4 4. POZÍCIÓ
5 5. POZÍCIÓ
6 OSZTÓELEM „D” POZÍCIÓ
7 6. POZÍCIÓ
8 7. POZÍCIÓ
9 SÍNEK a csúszó rácsokhoz
10 ZSÍRFOGÓ TÁLCA
11 RÁCS polc
12 OSZTÓELEM polc
13 Kezelőpanel
Descrierea aparatului
Prezentare de ansamblu
1POZIŢIA 1
2POZIŢIA 2
3POZIŢIA 3
4POZIŢIA 4
5POZIŢIA 5
6RAFT DIVIDER POZIŢIA "D"
7POZIŢIA 6
8POZIŢIA 7
9INSTRUCŢIUNI pentru grilajele culisante
10TAVĂ SCURGERE
11GRILAJ
12RAFT DESPĂRŢITOR
13Panou de control
Опис апарата
Укупни преглед
1 ПОЛОЖАЈ 1
2 ПОЛОЖАЈ 2
3 ПОЛОЖАЈ 3
4 ПОЛОЖАЈ 4
5 ПОЛОЖАЈ 5
6 Положај делитеља "д"
7 ПОЛОЖАЈ 6
8 ПОЛОЖАЈ 7
9 ВОЂИЦЕ за клизне полице
10 ПЛЕХ ЗА КАПАЊЕ
11 ПОЛИЦА
12 Делитељ полица
13 Контролна табла
13
12
11
10
1
2
3
5
7
4
6
8
9
6

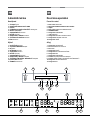
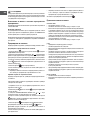
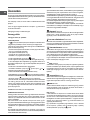
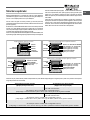
Description of the appliance
Control panel
1. SELECTOR knob
2. CONTROL PANEL POWER BUTTON
3. DISPLAY
4. THERMOSTAT / TIMER knob
5. START / STOP
6. MINUTE MINDER icon
7. TIMER icon
8. CONTROL PANEL LOCKED icon
9. SELECT CAVITY icon
10. LIGHT icon
Display
1. SMALL CAVITY icon
2. CAVITY TEMPERATURE display
3. TIME display
4. DURATION icon
5. END OF COOKING icon
6. CLOCK icon
7. MINUTE MINDER icon
8. CONTROL PANEL LOCK indicator
9. CAVITY PREHEATING / RESIDUAL HEAT indicator
10. MAIN CAVITY icon
11. MODE icons
11
1 2 43
5
6
9
10
7
8
1
2
43 5
6910 78
Описание на уреда
Контролен панел
1. Превключвател ИЗБОР НА РЕЖИМ
2. БУТОН ЗА ЗАХРАНВАНЕТО КОНТРОЛЕН ПАНЕЛ
3. ДИСПЛЕЙ
4. Превключвател ТЕРМОСТАТ / ТАЙМЕР
5. СТАРТ / СТОП
6. Икона БРОЯЧ НА МИНУТИТЕ
7. Икона ТАЙМЕР
8. Икона ЗАКЛЮЧЕН БУТОН НА КОНТРОЛЕН ПАНЕЛ
9. Икона ИЗБОР НА ФУРНА
10. Икона ЛАМПА
Дисплей
1. Икона МАЛКА ФУРНА
2. Дисплей ТЕМПЕРАТУРА НА ФУРНАТА
3. Дисплей ВРЕМЕ
4. Икона ПРОДЪЛЖИТЕЛНОСТ
5. Икона КРАЙ НА ГОТВЕНЕТО
6. Икона ЧАСОВНИК
7. Икона БРОЯЧ НА МИНУТИТЕ
8. Индикатор ЗАКЛЮЧВАНЕ НА КОНТРОЛЕН ПАНЕЛ
9. Индикатор ПРЕДВАРИТЕЛНО ЗАГРЯВАНЕ НА ФУРНАТА /
ОСТАТЪЧНА ТОПЛИНА
10. Икона ОСНОВНА ФУРНА
11. Икони РЕЖИМ
7

A készülék leírása
Kezelőpanel
1. VÁLASZTÓ gomb
2. KEZELŐPANEL BEKAPCSOLÓ GOMB
3. KIJELZŐ
4. HŐMÉRSÉKLET-SZABÁLYZÓ/IDŐZÍTŐ választógomb
5. INDÍTÁS / LEÁLLÍTÁS
6. VISSZASZÁMLÁLÓ szimbólum
7. IDŐZÍTŐ szimbólum
8. KEZELŐPANEL LEZÁRVA szimbólum
9. SÜTŐTÉR KIVÁLASZTÁSA szimbólum
10. FÉNY szimbólum
Kijelző
1. KIS SÜTŐTÉR szimbólum
2. SÜTŐTÉR HŐMÉRSÉKLET kijelző
3. IDŐ kijelző
4. IDŐTARTAM szimbólum
5. SÜTÉS VÉGE szimbólum
6. IDŐZÍTŐ szimbólum
7. VISSZASZÁMLÁLÓ szimbólum
8. KEZELŐPANEL LEZÁRVA visszajelző
9. SÜTŐTÉR ELŐMELEGÍTÉS / MARADÉKHŐ visszajelző
10. FŐ SÜTŐTÉR szimbólum
11. ÜZEMMÓD szimbólumok
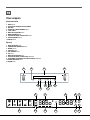
Descrierea aparatului
Panoul de control
1. Buton rotativ SELECTOR
2. BUTON DE PORNIRE A PANOULUI DE CONTROL
3. AFIŞAJ
4. Buton rotativ TERMOSTAT/TEMPORIZATOR
5. PORNIRE/OPRIRE
6. Pictogramă CRONOMETRU
7. TEMPORIZATOR
8. Pictogramă PANOU DE CONTROL BLOCAT
9. Pictogramă SELECTARE CAVITATE
10. Pictogramă LUMINĂ
Aşaj
1. Pictogramă CAVITATE MICĂ
2. Ecran TEMPERATURĂ CAVITATE
3. Ecran TIMP
4. Pictogramă DURATĂ
5. Pictogramă FINAL PROCES DE GĂTIRE
6. Pictogramă CEAS
7. Pictogramă CRONOMETRU
8. Indicator BLOCARE PANOU DE CONTROL
9. Indicator PREÎNCĂLZIRE CAVITATE/CĂLDURĂ REZIDUALĂ
10. Pictogramă CAVITATE PRINCIPALĂ
11. Pictograme MOD
11
1 2 43
5
6
9
10
7
8
1
2
43 5
6910 78
8

11
1 2 43
5
6
9
10
7
8
1
2
43 5
6910 78
Опис апарата
Контролна табла
1. БИРАЧ дугме
2. КОНТРОЛНА ТАБЛА ДУГМЕ ЗА ПАЉЕЊЕ
3. ДИСПЛЕЈ
4. ТЕРМОСТАТ / МЕРАЧ ВРЕМЕНА дугме
5. СТОП / СТАРТ
6. МИНУТНИ ПОДСЕТНИК икона
7. МЕРАЧ ВРЕМЕНА икона
8. КОНТРОЛНА ТАБЛА ЈЕ ЗАКЉУЧАНА икона
9. ИЗБОР ШУПЉИНЕ икона
10. СВЕТЛО икона
Дисплеј
1. МАЛА ШУПЉИНА икона
2. ТЕМПЕРАТУРА ШУПЉИНЕ дисплеј
3. ВРЕМЕ дисплеј
4. ТРАЈАЊЕ икона
5. КРАЈ КУВАЊА икона
6. САТ икона
7. МИНУТНИ ПОДСЕТНИК икона
8. КОНТРОЛНА ТАБЛА ЈЕ ЗАКЉУЧАНА индикатор
9. ПРИПРЕМНО ЗАГРЕВАЊЕ / ЗАОСТАЛА ТОПЛОТА индикатор
10. ГЛАВНА ШУПЉИНА икона
11. РЕЖИМ иконе
9

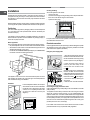
Installation
! Please keep this instruction booklet in a safe place for future reference. If
the appliance is sold, given away or moved, please make sure the booklet is
also passed on to the new owners so that they may benet from the advice
contained within it.
! Please read this instruction manual carefully: it contains important information
concerning the safe operation, installation and maintenance of the appliance.
Positioning
! Do not let children play with the packaging material; it should be disposed
of in accordance with local separated waste collection standards (see
Precautions and tips).
! The appliance must be installed by a qualied professional in accordance
with the instructions provided. Incorrect installation may damage property or
cause harm to people or animals.
Built-in appliances
Use an appropriate cabinet to ensure that the appliance operates properly:
• the panels adjacent to the oven must be made of heat-resistant material.
• cabinets with a veneer exterior must be assembled with glues which can
withstand temperatures of up to 100°C.
• to install the oven under the counter (see diagram) or in a kitchen unit,
the cabinet must have the following dimensions:
590 mm.
595 mm.
22,5 mm.*
20,5 mm.
550 mm.
570 mm.
20 mm.
575-585 mm.
45 mm.
560 mm.
550 mm.
min.
! The appliance must not come into contact with electrical parts once it has
been installed. The indications for consumption given on the data plate have
been calculated for this type of installation.
Ventilation
To ensure adequate ventilation, the back panel
of the cabinet must be removed. It is advisable
to install the oven so that it rests on two strips
of wood, or on a completely at surface with
an opening of at least 45 x 560 mm (see
diagrams).
560 mm.
45 mm.
min. 20 mm
min. 45 mm
FAN ASSISTED
MODE
Centring and xing
Secure the appliance to the cabinet:
• open the oven door.
• remove the 2 rubber plugs covering the xing holes on the perimeter frame.
• x the oven to the cabinet using the 2 wood screws.
• replace the rubber plugs.
! All parts which ensure the safe operation of the appliance must not be
removable without the aid of a tool.
Electrical connection
Ovens equipped with a three-pole power supply cable are designed to operate
with alternating current at the voltage and frequency indicated on the data
plate located on the appliance (see below).
Fitting the power supply cable
1. Open the terminal board by inserting a
screwdriver into the side tabs of the cover.
Use the screwdriver as a lever by pushing
it down to open the cover (see diagram).
2. Install the power supply cable by
loosening the cable clamp screw
and the three wire contact screws
L-N- .
Connect the wires to the corresponding
terminals: the Blue wire to the terminal
marked (N), the Brown wire to the terminal
marked (L) and the Yellow/Green wire to
the terminal marked
(see diagram).
3. Secure the cable by fastening the
clamp screw.
4. Close the cover of the terminal board.
Connecting the supply cable to the mains
Install a standardised plug corresponding to the load indicated on the data
plate (see table).
The appliance must be directly connected to the mains using an omnipolar
switch with a minimum contact opening of 3 mm installed between the
appliance and the mains. The switch must be suitable for the charge indicated
and must comply with current electrical regulations (the earthing wire must not
be interrupted by the switch). The supply cable must be positioned so that it
does not come into contact with temperatures higher than 50°C at any point
(the back panel of the oven, for example).
! The installer must ensure that the correct electrical connection has been
performed and that it is fully compliant with safety regulations.
L
N
N
L
10
GB

Before connecting the appliance to the power supply, make sure that
• the appliance is earthed and the plug is compliant with the law.
• the socket can withstand the maximum power of the appliance, which is
indicated on the data plate.
• the voltage is in the range between the values indicated on the data plate.
• the socket is compatible with the plug of the appliance. If the socket is
incompatible with the plug, ask an authorised technician to replace it. Do
not use extension cords or multiple sockets.
! Once the appliance has been installed, the power supply cable and the
electrical socket must be easily accessible.
! The cable must not be bent or compressed.
! The cable must be checked regularly and replaced by authorised technicians
only (see Assistance).
! The manufacturer declines any liability should these safety measures
not be observed.
APPLIANCE SPECIFICATIONS
Dimensions*
width 43.5 cm
height 41 cm
depth 41 cm
Volume*
74 l
Dimensions**
width 45.6 cm
height 41 cm
depth 41 cm
Volume**
77 l
Electrical
connections
voltage: 220-240V~ 50/60Hz or 50Hz
maximum power absorbed 2600W
(see data plate)
* Only for models with drawn rails.
** Only for models with wire rails.
EU Directive no 65/2014
supplementing Directive 2010/30/EU.
EU Regulation no 66/2014
implementing Directive 2009/125/EC.
Standard EN 60350-1
Standard EN 50564
Declared energy consumption
for Forced convection Class –
heating mode: ECO.
ENERGY LABEL
and
ECODESIGN
This appliance conforms to the
following European Economic
Community directives:
- 2006/95/EC of 12/12/06 (Low
Voltage) and subsequent
amendments;
- 2004/108/EC of 15/12/04
(Electromagnetic Compatibility) and
subsequent amendments;
- 93/68/EEC of 22/07/93 and
subsequent amendments.
-
2012/19/
EU and subsequent
amendments.
- 1275/2008 Stand-by/off mode
GB
11

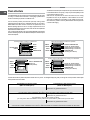
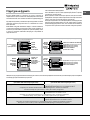
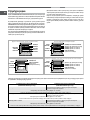
Oven structure
The OPEN SPACE oven has a capacity of 70 litres and offers users the option
of cooking on 4 shelves at the same time or cooking large quantities which
would not necessarily be possible in a traditional oven.
The 56 universal (Creation) and automatic (Success) cooking modes
guarantee perfect results every time, regardless of the dish you are cooking.
OPEN SPACE also offers maximum comfort for all requirements, with 4
different operating options: the oven is one large compartment but can be
divided into separate spaces of various sizes, each with its own independent
temperature and duration controls.
This is made possible thanks to the heat-insulating DIVIDER, which divides
the whole ExtraLarge Space into two different-sized spaces: the Main Space
and the Small Space.
The two Main and Small Space compartments may be used at the same time
to cook different dishes more quickly, or they may be used separately so that
only the space necessary is used.
When the two compartments are used at the same time, the cooking
temperature of each may be adjusted to a value between 30° and 300°.
There may be a difference in temperature of 100° between the two zones,
which means it is possible to cook very different dishes without any avours
or aromas intermingling.
RACK
DRIPPING PAN
RACK
RACK
EXTRALARGE
SPACE
ExtraLarge Space: cooking on 4 shelf levels
RACK or DRIPPING PAN
DRIPPING PAN
(cooking on 3 shelves)
Divider "D" (fixed position)
RACK (cooking on 3 shelves)
RACK (cooking on 3 shelves)
SMALL
SPACE
MAIN
SPACE
DRIPPING PAN
(cooking on 3 shelves)
Divider "D" (fixed position)
RACK (cooking on 3 shelves)
RACK (cooking on 3 shelves)
SMALL
SPACE
MAIN
SPACE
Main and Small Space: simultaneous operation
RACK or DRIPPING PAN
Divider "D"
(fixed position)
SMALL
SPACE
MAIN
SPACE
Cooking using the Small Space only
Cooking using the Main Space only: cooking on 3 shelf levels
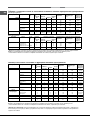
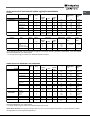
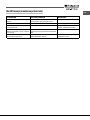
Temperature in the first cavity
(Main or Small Space)
Temperature in the second cavity
(Small or Main Space)
Between 40°C and 150°C
The temperature difference in relation to the first recess
selected is no greater than 50°C
For example: if you set one recess to 90°C,
you may set a value of between 40°C (90°C-50°C) and 140°C (90°C+50°C) for the other.
Between 155°C and 200°C
The temperature difference in relation to the first recess
selected is no greater than 70°C
For example: if you set one recess to 180°C,
you may set a value of between 110°C (180°C-70°C) and 250°C (180°C+70°C) for the other.
Between 205°C and 250°C The temperature difference in relation to the first recess
selected is no greater than 100°C
For example: if you set one recess to 210°C,
you may set a value of between 110°C (210°C-100°C) and 250°C (maximum temperature setting) for the other.
The table below lists the possible temperature values which may be set. The intelligent display will guide you through the correct procedure used to adjust
the temperature of the two cavities.
12
GB

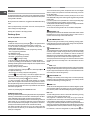
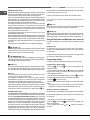
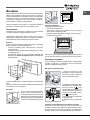
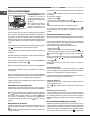
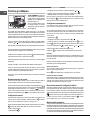
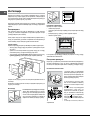
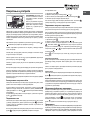
Start-up and use
WARNING! The oven is provided
with a stop system to extract the
racks and prevent them from
coming out of the oven (1).
As shown in the drawing, to extract
them completely, simply lift the
racks, holding them on the front
part, and pull (2).
! The rst time you use your appliance, heat the empty oven with its door
closed at its maximum temperature for at least half an hour. Make sure that
the room is well ventilated before switching the oven off and opening the
oven door. The appliance may emit a slightly unpleasant odour caused by
protective substances used during the manufacturing process burning away.
! To make the setting process easier, press and hold the “
” and “ ” icons
to scroll through the numbers on the display rapidly.
! Each setting will automatically be stored in the appliance memory after 10
seconds.
! During operation, we recommend the removal of any crockery or delicate
foodstuffs from the cavities not being used.
! Once cooking has begun, before the DIVIDER is removed, the oven must
be switched off using the
icon.
! Every time the oven is switched on it is set to the CREATION cooking mode.
! The touch controls cannot be activated if the user is wearing gloves.
! In order to optimise the cooking performance, when starting the selected
function, product settings will be applied that could cause a delayed start of
the fan and heating elements.
! The oven will begin its preheating phase after 2 seconds from selecting
the desired cycle.
Control panel lock
! The control panel can be locked while the oven is off, once cooking has
started or nished and during programming.
To lock the oven controls, press and hold the icon for at least 2 seconds.
A buzzer will sound and the TEMPERATURE display shows the key symbol
“O—n”. The icon will light up to indicate lock activation.
To deactivate the lock, press and hold the icon again for at least 2
seconds.
Setting the clock
! The clock can only be set when the oven is switched off. If the oven is
in standby mode, pressing the
icon once will display the current time
setting. Press it again to set the time.
After connection to the power supply network or after a blackout, the
icon and the digits on the TIME display will ash for 10 seconds.
To set the clock:
1. Press icon
.
2. Adjust the hour gure using the “
” and “ ” icons.
3. Once you have reached the correct hour value, press the icon.
4. Repeat the above process to set the minutes.
If a blackout occurs, it will be necessary to reset the clock. If the
icon
ashes on the display, this indicates that the clock has not been set correctly.
Setting the minute minder
! The minute minder may be set regardless of whether the oven is switched
on or off. It does not switch the oven on or off.
When the set time has elapsed, the minute minder emits a buzzer that will
automatically stop after 30 seconds or when any active button on the control
panel is pressed.
To adjust the minute minder, proceed as follows:
1. Press icon
.
2. Set the desired time using icons “
” and “ ”.
3. Once you have reached the desired value, press the
icon again. The lit
symbol will remind you that the minute minder is on. To cancel the minute
minder, press the
icon and use the “ ” and “ ” icons to set the time to
00:00. Press the
icon again.
The
icon will switch off to indicate that the minute minder has been
disabled.
Cooling ventilation
In order to cool down the external temperature of the oven, a cooling fan
blows a stream of air between the control panel and the oven door, as well
as towards the bottom of the oven door.
! Once cooking has been completed, the cooling fan continues to operate
until the oven has cooled down sufciently.
Oven light
The light comes on when the oven door is opened or when a cooking mode
starts.
The
icon can be used to switch on the light at any time.
Residual heat indicators
The appliance is tted with a residual heat indicator. When the oven is off, the
“residual heat” light on the display comes on to indicate high temperatures
inside the oven cavity. The indicator light switches off when the inside of the
oven has cooled down.
Restoring the factory settings
The oven factory settings can be restored to reset all selections made by
the user (clock and customised durations). To carry out a reset, switch off
the oven, then press and hold the button corresponding to the rst manual
cooking mode (top left) and the
icon simultaneously for 6 seconds.
Once the restore procedure is complete, a buzzer will sound. The rst time
the
icon is pressed, the oven will behave as if it is being switched on
for the rst time.
Standby
This product complies with the requirements of the latest European Directive on
the limitation of power consumption in standby mode. If no buttons are pressed for
30 minutes and the control panel/door lock has not been activated, the appliance
automatically reverts to standby mode. Standby mode is indicated by the high
luminosity “Clock button” light. As soon as interaction with the machine resumes,
system operation is restored.
GB
13

Modes
! To guarantee perfectly soft or crispy food, the oven releases water contained
within the food in the form of steam. This means it is possible to achieve optimal
cooking results for all dishes.
! Every time the oven is switched on, it suggests the rst CREATION cooking
mode.
! Never put objects directly on the bottom of the oven; this will prevent the
enamel coating from being damaged.
! Always place cookware on the rack(s) provided.
ExtraLarge Space
! Do not use position “D” for racks.
Starting the oven
1. Switch the control panel on by pressing the
icon. The appliance buzzer
sounds three times (ascending) and all buttons light up in sequence.
2. Press the button corresponding to the desired cooking mode. The
TEMPERATURE display shows:
- the temperature associated with the mode, if programming manually;
- “Auto”, if programming is automatic.
The TIME display shows:
- the current time, if programming manually;
- the duration, if programming is automatic.
3. Press the
icon to begin cooking.
4. The oven will begin its preheating stage: the preheating light ashes.
5. When the preheating process has nished, a buzzer sounds and the
preheating indicator light shows that this stage has been completed: the food
can then be placed in the oven.
6. During cooking it is always possible to:
- change the temperature by pressing the
icon, followed by the and
icons (manual modes only);
- set the duration of a cooking mode (see Cooking Modes);
- press the
icon to stop cooking. In this case the appliance stores the
temperature modied previously in its memory (manual modes only);
- switch off the oven by pressing the
icon for 3 seconds.
7. In case of a blackout, if the oven was already operating, an automatic
system within the appliance will reactivate the cooking mode from where it
was interrupted as long as the temperature did not drop below a certain level.
Programmed cooking modes which have not yet started will not be restored
and must be reprogrammed.
! There is no preheating stage for the BARBECUE mode.
CREATION cooking modes
! All cooking modes have a default cooking temperature which may be adjusted
manually to a value between 30°C and 250°C as desired (300°C for GRILL
mode). CREATION cooking modes include all manual programmes.
The oven controls all essential aspects of each of these cooking modes and
makes it easier for you to create the perfect dish, from the simplest recipe
to the most sophisticated culinary delights: the temperature, heat source,
humidity and fan assisted operation are all controlled automatically.
This chapter was written with the help of our very own culinary expert. We
invite you to follow his advice so you can benet from his experience and
perfect your cooking skills.
The recommended cooking modes, temperatures and oven shelf heights
reect our expert’s own experience in the kitchen and will help you achieve
the very best results.
The table below species whether it is best to pre-heat your oven or not for
each CREATION cooking mode. Observing these suggestions will guarantee
perfect results.
If you wish to place food in a preheated oven, wait for the preheating stage
to be completed (this will be signalled by a series of beeps).
The temperature is set automatically, according to the cooking mode selected;
however, you may adjust it to suit your recipe.
You can also set a cooking duration with an immediate or delayed start.
MULTILEVEL mode
All heating elements and the fan are activated. Since the heat remains constant
throughout the oven, the air cooks and browns food in a uniform manner. A
maximum of two racks may be used at the same time.
LOW TEMPERATURE modes
This type of cooking can be used for proving, defrosting, preparing yoghurt,
heating dishes at the required speed and slow cooking at low temperatures.
The temperature options are: 40, 65 and 90°C.
FAN GRILLING mode
The top heating element and the rotisserie spit (where present) are activated
and the fan begins to operate. During part of the cycle the circular heating
element is also activated. This combination of features increases the
effectiveness of the unidirectional thermal radiation provided by the heating
elements through the forced circulation of the air throughout the oven.
This helps prevent food from burning on the surface and allows the heat to
penetrate right into the food. Always cook in this mode with the oven door
closed.
GRILL mode
The top heating element and the rotisserie spit (where present) are activated.
The high and direct temperature of the grill is recommended for food which
requires a high surface temperature. Always cook in this mode with the oven
door closed (see “Practical cooking advice”).
FAST COOKING mode
Preheating is not necessary for this cooking mode. This mode is particularly
suitable for cooking pre-packed food quickly (frozen or pre-cooked). The best
results are achieved using one cooking rack only.
PIZZA mode
The top and circular heating elements switch on and the fan begins to operate.
This combination heats the oven rapidly. If you use more than one rack at a
time, switch the position of the dishes halfway through the cooking process.
ECO mode
The back heating element is turned on and the fan starts working, ensuring
a smooth and uniform heat level inside the oven.
This programme is indicated for slow cooking of any type of food with
temperatures which can be set up to a maximum of 200°C; the programme
is also suitable for heating food and to complete the cooking process.
The programme is particularly suitable for the slow cooking of meat and sh, as
it allows you to have softer meat and save energy at the same time. For a better
energy effectiveness, when the product is turned on, the light stays on only
for 30 seconds; in order to turn the light back on, please press the
icon.
14
GB

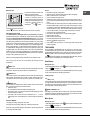
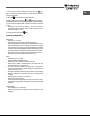
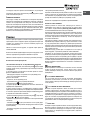
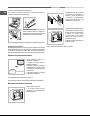
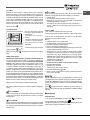
Rotisserie spit
To operate the rotisserie function (see
diagram) proceed as follows:
1. Place the dripping pan in position 1.
2. Place the rotisserie support in
position 3 and insert the spit in the hole
provided on the back panel of the oven.
3. Start the rotisserie function by
selecting the
or modes.
! When
mode is on, the rotisserie will stop if the door is opened.
SUCCESS cooking modes
! The temperature and cooking duration are pre-set values, guaranteeing
a perfect result every time - automatically. These values cannot be adjusted
and use the C.O.P.® (Programmed Optimal Cooking) system. The cooking
cycle stops automatically and the oven indicates when the dish is cooked. You
may start cooking whether the oven has been preheated or not. The cooking
duration can be customised according to personal tastes, modifying it - before
the start time - by ±5/20 minutes depending on the selected programme.
Once cooking has begun, it is still possible to modify its duration. If the value
is modied before cooking begins, it is stored in the appliance memory and
suggested again when that cooking mode is next used. If the temperature
inside the oven is higher than the suggested value for the selected mode, the
text “Hot” appears on the TEMPERATURE display and it will not be possible
to begin cooking; wait for the oven to cool.
! When the cooking stage has been reached, the oven buzzer sounds.
! Do not open the oven door as this will disrupt the cooking time and
temperature.
BEEF mode
Use this function to cook beef and pork. Place the food inside the oven while
it is still cold. The dish may also be placed in a preheated oven.
CAKES mode
This function is ideal for cooking desserts which are made using natural yeast,
baking powder and desserts which contain no yeast. Place the dish in the
oven while it is still cold. The dish may also be placed in a preheated oven.
BREAD mode
Use this function to bake bread. To obtain the best results, we recommend
that you carefully observe the instructions below:
• Follow the recipe.
• Do not exceed the maximum weight of the dripping pan.
• Remember to pour 100 g (1dl) of cold water into the dripping pan, which
should be placed in position 7.
• The dough must be left to rise at room temperature for 1 – 1 ½ hours
(depending on the room temperature) or until the dough has doubled in
size.
Recipe for BREAD:
1 dripping pan holding 1000 g max, lower level
2 dripping pans each holding 1000 g max, middle and lower levels
Recipe for 1000 g of dough: 600 g our, 360 g water, 11g salt, 25 g fresh yeast
(or 2 sachets of powder yeast)
Method:
• Mix the our and salt in a large bowl.
• Dilute the yeast in lukewarm water (approximately 35 degrees).
• Make a small well in the mound of our.
• Pour in the water and yeast mixture.
• Knead the dough by stretching and folding it over itself with the palm of
your hand for 10 minutes until it has a uniform consistency and is not too
sticky.
• Form the dough into a ball shape, place it in a large bowl and cover it with
transparent plastic wrap to prevent the surface of the dough from drying
out. Select the manual LOW TEMPERATURE function on the oven and
set the temperature to 40°C. Place the bowl inside and leave the dough
to rise for approximately 1 hour (the dough should double in volume).
• Cut the dough into equal sized loaves.
• Place them in the dripping pan, on a sheet of baking paper.
• Dust the loaves with our.
• Make incisions on the loaves.
• Place the food inside the oven while it is still cold.
• Start the
BREAD cooking mode.
• Once baked, leave the loaves on one of the grill racks until they have
cooled completely.
THE DIVIDER
Fit the DIVIDER to the DIVIDER shelf “D” using the pin, with the arrows
turned towards the rear part of the oven. A buzzer will sound to conrm that
the DIVIDER has been tted correctly; it will then be possible to use the two
MAIN and SMALL Space compartments separately or at the same time.
The
button will be enabled. The selected cavity alternates every time the
button is pressed. The MAIN cavity is selected by default.
Small Space
Starting the oven
1. With the DIVIDER inserted, use the
button to select the SMALL Space
cavity. The
icon will light up.
2. Follow the above instructions for the EXTRALARGE cavity when carrying
out the various adjustment and setting procedures.
Cooking modes
GRILL mode
The top heating element and the rotisserie spit (where present) are activated.
The high and direct temperature of the grill is recommended for food which
requires a high surface temperature. Always cook in this mode with the oven
door closed (see “Practical cooking advice”).
FAST COOKING mode
Preheating is not necessary for this cooking mode. This mode is particularly
suitable for cooking pre-packed food quickly (frozen or pre-cooked). The best
results are achieved using one cooking rack only.
Main Space
Starting the oven
1. With the DIVIDER inserted, use the
button to select the SMALL Space
cavity. The
icon will light up.
2. Follow the above instructions for the EXTRALARGE cavity when carrying
out the various adjustment and setting procedures.
GB
15

CREATION cooking modes
! All cooking modes have a default cooking temperature which may be adjusted
manually to a value between 30°C and 250°C as desired (300°C for GRILL
mode). CREATION cooking modes include all manual programmes.
The oven controls all essential aspects of each of these cooking modes and
makes it easier for you to create the perfect dish, from the simplest recipe to the
most sophisticated culinary delights: the temperature, heat source, humidity
and fan assisted operation are all controlled automatically.
This chapter was written with the help of our very own culinary expert. We
invite you to follow his advice so you can benet from his experience and
perfect your cooking skills. The recommended cooking modes, temperatures
and oven shelf heights reect our expert’s own experience in the kitchen and
will help you achieve the very best results.
The table below species whether it is best to pre-heat your oven or not for
each CREATION cooking mode.
Observing these suggestions will guarantee perfect results. If you wish to place
food in a preheated oven, wait for the preheating stage to be completed (this
will be signalled by a series of beeps). The temperature is set automatically,
according to the cooking mode selected; however, you may adjust it to suit
your recipe.
You can also set a cooking duration with an immediate or delayed start.
MULTILEVEL mode
All heating elements and the fan are activated. Since the heat remains constant
throughout the oven, the air cooks and browns food in a uniform manner. A
maximum of two racks may be used at the same time.
LOW TEMPERATURE modes
This type of cooking can be used for proving, defrosting, preparing yoghurt,
heating dishes at the required speed and slow cooking at low temperatures.
The temperature options are: 40, 65 and 90°C.
PIZZA mode
The top and circular heating elements switch on and the fan begins to operate.
This combination heats the oven rapidly. If you use more than one rack at a
time, switch the position of the dishes halfway through the cooking process.
ECO mode
The back heating element is turned on and the fan starts working, ensuring
a smooth and uniform heat level inside the oven.
This programme is indicated for slow cooking of any type of food with
temperatures which can be set up to a maximum of 200°C; the programme
is also suitable for heating food and to complete the cooking process.
The programme is particularly suitable for the slow cooking of meat and sh, as
it allows you to have softer meat and save energy at the same time. For a better
energy effectiveness, when the product is turned on, the light stays on only
for 30 seconds; in order to turn the light back on, please press the
icon.
SUCCESS cooking modes
! The temperature and cooking duration are pre-set values, guaranteeing
a perfect result every time - automatically. These values cannot be adjusted
and use the C.O.P.® (Programmed Optimal Cooking) system. The cooking
cycle stops automatically and the oven indicates when the dish is cooked. You
may start cooking whether the oven has been preheated or not. The cooking
duration can be customised according to personal tastes, modifying it - before
the start time - by ±5/20 minutes depending on the selected programme.
Once cooking has begun, it is still possible to modify its duration. If the value
is modied before cooking begins, it is stored in the appliance memory and
suggested again when that cooking mode is next used. If the temperature
inside the oven is higher than the suggested value for the selected mode, the
text “Hot” appears on the TEMPERATURE display and it will not be possible
to begin cooking; wait for the oven to cool.
! When the cooking stage has been reached, the oven buzzer sounds.
! Do not open the oven door as this will disrupt the cooking time and
temperature.
BEEF mode
Use this function to cook beef and pork. Place the food inside the oven while
it is still cold. The dish may also be placed in a preheated oven.
CAKES mode
This function is ideal for cooking desserts which are made using natural yeast,
baking powder and desserts which contain no yeast. Place the dish in the
oven while it is still cold. The dish may also be placed in a preheated oven.
Using the Small Space and Main Space at the same time
! Simultaneous operation is only possible when using CREATION cooking
modes.
Starting the oven
For simultaneous use, simply start a cooking mode for both cavities in
succession. The TEMPERATURE display shows the cooking parameters
for both cavities.
! Thanks to the high energy efciency of the appliance, it only takes around
15 minutes for the SMALL SPACE cavity to preheat.
Programming cooking
! A cooking mode must be selected before programming can take place.
Programming the cooking duration
1. Press the
icon until the icon and the numerical digits on the
display begin to ash.
2. Turn the TIMER knob towards “ ” and “ ” to adjust the time as desired;
keep the knob in position to scroll through the numbers more quickly and
make the setting process easier.
3. Once you have reached the desired duration, press the
icon again.
The display will show the duration and set temperature alternately.
4. Press the
icon to begin cooking.
5. When cooking has nished, “END” appears on the display and a buzzer
sounds.
• For example: it is 9:00 a.m. and a duration of 1 hour and 15 minutes is
programmed. The programme will stop automatically at 10:15 a.m.
Setting the end time for a cooking mode
! A cooking duration must be set before the cooking end time can be scheduled.
! For the delayed programming to work properly, the clock should be set to
the correct time.
1. Follow steps 1 to 3 to set the duration as detailed above.
2. Press the
icon twice: the icon and the numerical digits on the
display will begin to ash.
3. Turn the TIMER knob towards “ ” and “ ” to adjust the cooking end
time value.
16
GB

4. Once you have reached the desired end time, press the icon
again. The display will show the duration, the cooking end time and the set
temperature alternately.
5. Press the
icon to activate the programmed mode.
Programming has been set when the
and icons are illuminated.
The DISPLAY shows the cooking end time and the cooking duration alternately.
6. Once cooking has nished, “END” appears on the display and a buzzer
sounds.
• For example: it is 9:00 a.m. and a time of 1 hour and 15 minutes is
programmed, while the end time is set to 12:30. The programme will
start automatically at 11:15 a.m.
To cancel programming press the
icon.
Practical cooking advice
MULTILEVEL
• Use positions 1, 3, 5 and 6.
• Place the dripping pan at the bottom and the rack at the top.
• When cooking pizzas or focaccia breads, use a lightweight aluminium tray
with a maximum diameter of 30 cm, placing it on top of the rack supplied.
If the pizza has a lot of toppings, we recommend adding the mozzarella
cheese to the top of the pizza halfway through the cooking process. During
the cooking process, it is advisable to change the order of the shelves.
• Use positions 2 and 4, placing the food which requires more heat on 2.
• Place the dripping pan on the bottom and the rack on top.
GRILL
• Preheat the oven for 5 minutes.
• Fit the DIVIDER to the DIVIDER rack “D”.
• Keep the oven door closed when cooking in this mode.
• Place the rack in position 7. Position the food in the centre of the rack.
Position the dripping pan on shelf level 6.
• This function is recommended for: browning food, cooking gratins,
colouring meringues, making toasted sandwiches and grilling small
quantities of thin, lean meat.
• We recommend that the power level is set to maximum. The top heating
element is regulated by a thermostat and may not always operate
constantly.
• Place the grill rack in position 3 or 4 and place
the food in the centre of the rack.
• We recommend that the temperature is set to its maximum level. The top
heating element is regulated by a thermostat and may not always operate
constantly.
FAST COOKING
• Use the dripping pan on shelf level 6.
• When cooking frozen foods, always follow the instructions on the
packaging.
GB
17

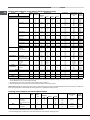
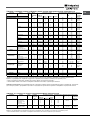
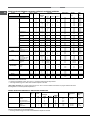
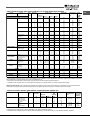
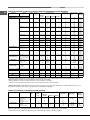
Cooking advice table for ovens with an ExtraLarge Space cavity
Function Food Weight
(Kg)
Cook on
shelf no.
Shelf position Preheating Recommended
temperature
(°C)
Cooking
duration
(minutes)
Dripping
pan
Rack 1Rack 2Rack 3
Fast cooking*
Kebabs
Fish fillets
Frozen potatoes
1
1
1
1
1
5
5
5
No
No
No
210
200
230
20-25
15-20
25-30
Bread
Bread (see recipe) 2
2
2
1
2
3
7**
7**
7**
2
1
1
4
3
5
No
No
No
Beef
Roast1,2-1,5 5
No
Cakes
Cakes 1
2
No
No
* The cooking times listed above are intended as guidelines only and may be modified according to personal tastes. Oven preheating times are
set as standard and may not be modified manually.
** As stated in the recipe, pour 100 g water into the dripping pan in position 7.
*** Use the dripping pan to collect any oil or fat produced as a result of the cooking process.
! ECO cooking mode:
This programme can be used for slow cooking of any type of food with temperatures which can be set up to a maximum
of 200°C; the programme is also suitable for heating food and to complete the cooking process
1
2
3
4
2 or 3
1 or 2
1
1
3 or 5
3
3
5
56
Yes
Yes
Yes
Yes
220
220
220
220
15-25
20-30
25-35
30-40
Fan grilling*
Roast meats
Gratin
Large roasting joint
Large game roasting joint
1
1
1
1
3
2
2
No
No
No
No
200
190
200
200
35-75
40-60
90-120
90-120
Grill*
Beef ribs
Sausages
Pork ribs
Bacon
1
1
1
1
4 or 5
5 or 7
5 or 7
5 or 7
Yes
Yes
Yes
Yes
270-300
270-300
270-300
270-300
20-30
10-20
15-25
3-6
Low
temperature*
Proving/Defrosting
White meringues
Meat/Fish
1
4
3
2
1
1
3
3
5
5
6
No
No
No
40
65
90
8-12 hours
90-180
Pizza*
Pizza/Focaccia
Creation
Success
Multilevel*
Tarts 1
2
3
4
Yes
Yes
Yes
Yes
190
180
180
180
25-30
35-45
40-50
45-55
Cream puffs 1
2
3
4
2 or 3
1 to 2
1
1
3 to 5
3
3
5
5 6
Yes
Yes
Yes
Yes
1
2
3
4
2 or 3
1 to 2
1
1
3 to 5
3
3
5
5 6
Yes
Yes
Yes
Yes
190
190
190
190
25-35
25-35
30-40
30-40
Biscuits 180
180
180
180
15-25
15-25
20-30
20-30
Small pastries 1
2
3
2 or 3
2
1
5
4 6
Yes
Yes
Yes
200
200
200
30-40
35-45
40-50
Crème Caramel
(bain-marie)
1
2
3
2 or 3
2
1
5
46
Yes
Yes
Yes
170
170
170
35-45
35-45
40-50
Panettone 11 or 2 Yes 160 45-60
Cake 1
2
Yes
Yes
160
160
60-75
60-75
Sponge cake
1
2
3
2 or 3
2
1
5
4
6
Yes
Yes
Yes
190
190
190
30-35
35-40
40-45
Roast
1,5-22
Yes160 90-240
1
2 or 3
1 or 2
1
3
3 or 5
3
5
5
6
2 or 3
14 or 5
1***
2***
3 or 4
1***
1***
3***
3***
3***
3***
11***
5
2
2
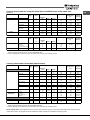
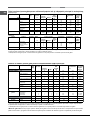
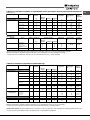
Cooking advice table for the Small Space feature
Function Food Weight
(Kg)
Cook on
shelf
Shelf position Preheating Recommended
temperature
(°C)
Cooking
duration
(minutes)
no.
Dripping
pan
Rack 1Divider
Fast cooking*
Fish fillets
Meat fillets
Frozen pizza
Frozen prepared foods
1
1
1
1
6
6
6
6
D
D
D
D
D
D
D
Yes
Yes
Yes
Yes
160-180
180-200
20-30
30-40
* The cooking times listed above are intended as guidelines only and may be modified according to personal tastes. Oven preheating
times are set as standard and may not be modified manually.
** Use the dripping pan to collect any oil or fat produced as a result of the cooking process.
Grill*
Toast
Bacon
Pork steaks
1
1
1
6**
6**
6
7
7
Yes
Yes
Yes
270-300
270-300
270-300
3-5
3-6
15-25
18
GB

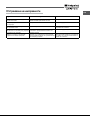
Cooking advice table for using the Small Space and Main Space at the same time
Main Space
Small Space
Function Food Weight
(kg)
Cook on
shelf
Shelf position Preheating Recommended
temperature
(°C)
Cooking
duration
(minutes)
no.
Dripping
pan
Rack 1Divider
Fast cooking*
Fish fillets
Meat fillets
Frozen pizza
Frozen prepared foods
1
1
1
1
6
6
6
6
D
D
D
D
D
Yes
Yes
Yes
Yes
160-180
180-200
20-30
30-40
* The cooking times listed above are intended as guidelines only and may be modified according to personal tastes. Oven preheating
times are set as standard and may not be modified manually.
** Use the dripping pan to collect any oil or fat produced as a result of the cooking process.
Grill*
Pork steaks16** 7Yes 270-300 15-25
Function Food Weight
(kg)
Cook on
shelf
Rack position Preheating Recommended
temperature
(°C)
Cooking
duration
(minutes)
no.
Dripping
pan
Rack 1Divider
1
2
2 or 3
1 or 23 or 5
D
D
Yes
Yes
220
220
15-25
20-30
Pizza*
Pizza
Creation
Multilevel*
Tarts1
2
2
13
D
D
Yes
Yes
200
200
30-40
35-45
1
2
2
13
D
D
Yes
Yes
Biscuits 180
180
15-25
15-25
Small pastries 1
2
2
13
D
D
Yes
Yes
200
200
30-40
35-45
Crème Caramel
(bain-marie)
12 DYes 17
03
5-45
Cake 12 DYes 160 60-75
Cooking advice table for the Main Space feature
Function Food Weight
(Kg)
Cook on
shelf no.
Shelf position Preheating
Recommended
temperature
(°C)
Cooking
duration
(minutes)
Dripping
pan
Rack 1Divider
Beef
Roast1,2-1,5 11** 2
D
No
Cakes
Cakes 1
2
2
13
No
No
1
2
2 or 3
1 or 23 or 5
D
D
D
D
Yes
Yes
220
220
15-25
20-30
Low
temperature*
Proving/
Defrosting
White meringues
Meat/Fish
1
2
2
2
1
1
3
3
D
D
D
No
No
No
40
65
90
8-12 hours
90-180
Pizza*
Pizza/Focaccia
Creation
Success
Multilevel*
Tarts1
2
2
13
D
D
Yes
Yes
200
200
30-40
35-45
Cream puffs 1
2
2
13
D
D
Yes
Yes
1
2
2
13
D
D
Yes
Yes
190
190
25-35
25-35
Biscuits 180
180
15-25
15-25
Small pastries 1
2
2
13
D
D
Yes
Yes
200
200
30-40
35-45
Crème Caramel
(bain-marie)
12 DYes 170 35-45
Cake 12 DYes 16060-75
Sponge cake
1
2
2
13
D
D
Yes
Yes
190
190
30-35
35-40
* The cooking times listed above are intended as guidelines only and may be modified according to personal tastes. Oven preheating
times are set as standard and may not be modified manually.
** Use the dripping pan to collect any oil or fat produced as a result of the cooking process.
! ECO cooking mode:
This programme can be used for slow cooking of any type of food with temperatures which can be set up to
a maximum of 200°C; the programme is also suitable for heating food and to complete the cooking process.
GB
19

Precautions and tips
! This appliance has been designed and manufactured in compliance with
international safety standards. The following warnings are provided for safety
reasons and must be read carefully.
General safety
• The appliance was designed for domestic use inside the home and is
not intended for commercial or industrial use.
• The appliance must not be installed outdoors, even in covered areas. It is
extremely dangerous to leave the appliance exposed to rain and storms.
• When moving or positioning the appliance, always use the handles
provided on the sides of the oven.
• Do not touch the appliance while barefoot or with wet or damp hands and
feet.
• The appliance must be used by adults only for the preparation of
food, in accordance with the instructions provided in this booklet.
Any other use of the appliance (e.g. for heating the room) constitutes
improper use and is dangerous. The manufacturer may not be held
responsible for any damage caused as a result of improper, incorrect
and unreasonable use of the appliance.
• Do not touch the heating elements or certain parts of the oven door
when the appliance is in use; these parts become extremely hot.
Keep children well away from the appliance.
• Make sure that the power supply cables of other electrical appliances do
not come into contact with the hot parts of the oven.
• The ventilation and heat dispersal openings must never be obstructed.
• Always grip the oven door handle in the centre: the ends may be hot.
• Always use oven gloves when placing cookware in the oven or when
removing it.
• Do not use aluminium foil to line the bottom of the oven.
• Do not place ammable materials in the oven: if the appliance is switched
on accidentally, the materials could catch re.
• When unplugging the appliance, always pull the plug from the mains
socket; do not pull on the cable.
• Do not perform any cleaning or maintenance work without having
disconnected the appliance from the electricity mains.
• If the event of malfunctions, under no circumstances should you attempt
to perform the repairs yourself. Contact an authorised Service Centre (see
Assistance).
• Do not rest objects on the open oven door.
• Do not let children play with the appliance.
• The appliance should not be operated by people (including children)
with reduced physical, sensory or mental capacities, by inexperienced
individuals or by anyone who is not familiar with the product. These
individuals should, at the very least, be supervised by someone who
assumes responsibility for their safety or receive preliminary instructions
relating to the operation of the appliance.
• The appliance is not intended to be operated by means of an external
timer or separate remote-control system.
Disposal
• When disposing of packaging material: observe local legislation so that
the packaging may be reused.
• The European Directive 2012/19/EU on Waste Electrical and
Electronic Equipment (WEEE), requires that old household electrical
appliances must not be disposed of in the normal unsorted municipal
waste stream. Old appliances must be collected separately in order
to optimise the recovery and recycling of the materials they contain
and reduce the impact on human health and the environment.
The crossed out “wheeled bin” symbol on the product reminds you of your
obligation, that when you dispose of the appliance it must be separately
collected.
Consumers should contact their local authority or retailer for information
concerning the correct disposal of their old appliance.
Respecting and conserving the environment
• Whenever possible, avoid pre-heating the oven and always try to ll it.
Open the oven door as little as possible because heat is lost every time
it is opened. To save a substantial amount of energy, simply switch off
the oven 5 to 10 minutes before the end of your planned cooking time
and use the heat the oven continues to generate.
• Automatic programmes are based on standard food product.
• Keep gaskets clean and tidy to prevent any door energy losses
• If you have a timed tariff electricity contract, the “delay cooking” option
will make it easier to save money by moving operation to cheaper time
periods.
! This product complies with the requirements of the latest European Directive
on the limitation of power consumption of the standby mode.
Maintenance and care
Switching the appliance off
Disconnect your appliance from the electricity supply before carrying out
any work on it.
Cleaning the appliance
• Slight differences in colour on the front of the oven are due to the different
materials used, i.e. glass, plastic or metal.
• Any shady areas resembling grooves on the oven door glass are caused
by reections from the oven light.
• The enamel is branded at very high temperatures. This process may cause
colour variations. This is normal and will not affect appliance operation in
any way. The thin edges of the sheet metal cannot be entirely enamelled
and may therefore appear to be unnished. This will not affect the rust
protection.
• The stainless steel or enamel-coated external parts and the rubber seals
may be cleaned using a sponge that has been soaked in lukewarm water
and neutral soap. Use specialised products for the removal of stubborn
stains. After cleaning, rinse and dry thoroughly. Do not use abrasive
powders or corrosive substances.
• The inside of the oven should ideally be cleaned after each use, while it is
still lukewarm. Use hot water and detergent, then rinse well and dry with
a soft cloth. Do not use abrasive products.
• All accessories - with the exception of the sliding racks - can be washed
like everyday crockery, and are even dishwasher safe.
• We recommend that detergents are not sprayed directly onto the control
panel, but that a sponge is used instead.
! Never use steam cleaners or pressure cleaners on the appliance.
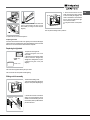
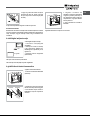
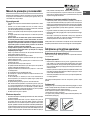
Cleaning the oven door
Clean the glass part of the oven door using a sponge and a non-abrasive
cleaning product, then dry thoroughly with a soft cloth. Do not use rough
abrasive material or sharp metal scrapers as these could scratch the surface
and cause the glass to crack.
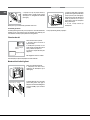
For more thorough cleaning purposes, the oven door may be removed:
1. Open the oven door fully (see diagram).
2. Use a screwdriver to lift up and turn the small levers F located on the two
hinges (see diagram).
20
GB
Pagina se încarcă...
Pagina se încarcă...
Pagina se încarcă...
Pagina se încarcă...
Pagina se încarcă...
Pagina se încarcă...
Pagina se încarcă...
Pagina se încarcă...
Pagina se încarcă...
Pagina se încarcă...
Pagina se încarcă...
Pagina se încarcă...
Pagina se încarcă...
Pagina se încarcă...
Pagina se încarcă...
Pagina se încarcă...
Pagina se încarcă...
Pagina se încarcă...
Pagina se încarcă...
Pagina se încarcă...
Pagina se încarcă...
Pagina se încarcă...
Pagina se încarcă...
Pagina se încarcă...
Pagina se încarcă...
Pagina se încarcă...
Pagina se încarcă...
Pagina se încarcă...
Pagina se încarcă...
Pagina se încarcă...
Pagina se încarcă...
Pagina se încarcă...
Pagina se încarcă...
Pagina se încarcă...
Pagina se încarcă...
Pagina se încarcă...
Pagina se încarcă...
Pagina se încarcă...
Pagina se încarcă...
Pagina se încarcă...
Pagina se încarcă...
Pagina se încarcă...
Pagina se încarcă...
Pagina se încarcă...
Pagina se încarcă...
Pagina se încarcă...
Pagina se încarcă...
Pagina se încarcă...
Pagina se încarcă...
Pagina se încarcă...
Pagina se încarcă...
Pagina se încarcă...
Pagina se încarcă...
Pagina se încarcă...
Pagina se încarcă...
Pagina se încarcă...
-
 1
1
-
 2
2
-
 3
3
-
 4
4
-
 5
5
-
 6
6
-
 7
7
-
 8
8
-
 9
9
-
 10
10
-
 11
11
-
 12
12
-
 13
13
-
 14
14
-
 15
15
-
 16
16
-
 17
17
-
 18
18
-
 19
19
-
 20
20
-
 21
21
-
 22
22
-
 23
23
-
 24
24
-
 25
25
-
 26
26
-
 27
27
-
 28
28
-
 29
29
-
 30
30
-
 31
31
-
 32
32
-
 33
33
-
 34
34
-
 35
35
-
 36
36
-
 37
37
-
 38
38
-
 39
39
-
 40
40
-
 41
41
-
 42
42
-
 43
43
-
 44
44
-
 45
45
-
 46
46
-
 47
47
-
 48
48
-
 49
49
-
 50
50
-
 51
51
-
 52
52
-
 53
53
-
 54
54
-
 55
55
-
 56
56
-
 57
57
-
 58
58
-
 59
59
-
 60
60
-
 61
61
-
 62
62
-
 63
63
-
 64
64
-
 65
65
-
 66
66
-
 67
67
-
 68
68
-
 69
69
-
 70
70
-
 71
71
-
 72
72
-
 73
73
-
 74
74
-
 75
75
-
 76
76


HOTPOINT/ARISTON 9YOKT 998ED 0 X /HA Manualul utilizatorului
- Categorie
- Cuptoare
- Tip
- Manualul utilizatorului
Lucrări înrudite
-
HOTPOINT/ARISTON 9YOKT 998ED X /HA Manualul utilizatorului
-
-
-
-