HOTPOINT/ARISTON 9YFTR 85.1 (AV) /HA Manualul utilizatorului
- Categorie
- Cuptoare
- Tip
- Manualul utilizatorului
Acest manual este potrivit și pentru

Magyar
Használati útmutató
SÜTÕ
TROUBA
Használati útmutató,1
Figyelmeztetések,4
Szerviz,7
A készülék leírása,8
A készülék leírása,10
Üzembe helyezés,32
Bekapcsolás és használat,34
Program,34
Óvintézkedések és tanácsok,37
Karbantartás és ápolás,38
Obsah
Pokyny pro použití,1
Upozornění,4
Servisní služba,7
Popis zařízení,8
Popis zařízení,10
Instalace,25
Spuštění a použití,27
Programy,27
Opatření a rady,30
Údržba a péče,31
9YFTR 85.1 (AN) /HA
9YFTR 85.1 (AV) /HA
9YFTR 85.1 (OW) /HA
English
OVEN
Operating Instructions,1
Warnings,3
Assistance,7
Description of the appliance,8
Description of the appliance,10
Installation,11
Start-up and use,13
Modes,13
Precautions and tips,16
Maintenance and care,17
CUPTOR
Instrucţiuni de folosire,1
Avertizări,5
Asistenţă,7
Descrierea aparatului,9
Descrierea aparatului,10
Instalarea,39
Pornirea şi folosirea,41
Programe,41
Precauţii şi sfaturi,44
Întreţinerea şi îngrijirea,45
Инструкции за употреба,1
Предупреждения,3
Техническо обслужване,7
Описание на уреда,8
Описание на уреда,10
Монтиране,18
Пуск и експлоатация,20
Режими,20
Предпазни мерки и препоръки,23
Поддръжка и почистване,24

Obsah
Návod na použitie,2
Upozornenia,6
Servisná služba,7
Popis zariadenia,9
Popis zariadenia,10
Inštalácia,53
Uvedenie do činnosti a použitie,55
Režimy,55
Opatrenia a rady,58
Údržba a starostlivosť,59
Радна упутства,2
Упозорења,5
Помоћ,7
Опис апарата,9
Опис апарата,10
Инсталација,46
Покретање и употреба,48
Режими,48
Мере опреза и савети,51
Одржавање и нега,52
Українскою
Довідник користувача,2
Запобіжні заходи,6
Допомога,7
Опис приладу,9
Опис приладу,10
Установлення,60
Запуск і використання,62
Програми,62
Запобіжні заходи та поради,65
Технічне обслуговування та догляд,66

3
Warnings
WARNING: The appliance and its accessible parts
become hot during use. Care should be taken to
avoid touching heating elements. Children less than 8
years of age shall be kept away unless continuously
supervised. This appliance can be used by children
aged from 8 years and above and persons with
reduced physical, sensory or mental capabilities or
lack of experience and knowledge if they have been
given supervision or instruction concerning use of the
appliance in a safe way and understand the hazards
involved. Children shall not play with the appliance.
Cleaning and user maintenance shall not be made
by children without supervision.
Do not use harsh abrasive cleaners or sharp metal
scrapers to clean the oven door glass since they can
scratch the surface, which may result in shattering of
the glass.
Never use steam cleaners or pressure cleaners on
the appliance.
WARNING: Ensure that the appliance is switched
off before replacing the lamp to avoid the possibility
of electric shock.
! When you place the rack inside, make sure that the
stop is directed upwards and in the back of the cavity.
ПРЕДУПРЕЖДЕНИЕ: Уредът и достъпните му
части се нагорещяват по време на употреба.
Трябва да се избягва контакт с нагревателите.
Деца под 8 години трябва да бъдат държани
настрана, освен ако не са под непрекъснат
надзор. Уредът може да бъде използван от деца
над 8 години и от хора с ограничени физически,
сетивни или умствени способности или без
опит и познания, ако са наблюдавани или са им
дадени указания относно използването на уреда
по безопасен начин и са запознати с възможните
опасности. Децата не трябва да играят с уреда.
Почистването и поддръжката от потребителя не
трябва да се извършва от деца без надзор.
Не използвайте груби абразивни почистващи
препарати или остри метални шпатули за
почистване на стъклото на вратата на фурната,
тъй като могат да надраскат повърхността, което
може да доведе до счупване на стъклото.
Никога не използвайте водочистачки или
парочистачки върху уреда.
ПРЕДУПРЕЖДЕНИЕ: Проверете дали уредът
е изключен, преди да смените крушката, за да
избегнете риска от токов удар.
! Когато поставяте решетката вътре се уверете,
че стоперът е насочен нагоре и в задната част
на фурната.

4
UPOZORNĚNÍ: Toto zařízení a jeho přístupné části
dosahují během použití velmi vysoké teploty. Je třeba
dávat pozor a zabránit styku s topnými články.
Udržujte děti mladší 8 let v dostatečné vzdálenosti,
pokud nejsou pod neustálým dohledem.Toto zařízení
mohou používat děti od 8 let a osoby se sníženými
fyzickými, senzorickými nebo duševními schopnostmi
nebo osoby bez zkušeností a znalostí, které se
nacházejí pod náležitým dohledem nebo které
byly poučeny ohledně použití zařízení bezpečným
způsobem a které si uvědomují související nebezpečí.
Děti si nesmí hrát se zařízením. Děti nesmí provádět
operace čištění a údržby bez dohledu.
K čištění skleněných dvířek trouby nepoužívejte
abrazivní výrobky ani ostré kovové špachtle, protože
by mohly poškrábat povrch a způsobit tak prasknutí
skla.
Nikdy nepoužívejte k čištění zařízení vysokotlaký
parní čistič.
UPOZORNĚNÍ: Před výměnou žárovky se ujistěte,
že je zařízení vypnuté, aby se zabránilo možnosti
zásahu elektrickým proudem.
! Při vložení mřížky se ujistěte, že se doraz nachází
v zadní části prohloubeniny a je obrácen směrem
nahoru.
FIGYELEM: A készülék és annak hozzáférhető
részei a használat közben rendkívüli módon
felmelegedhetnek.Vigyázzon, hogy nehogy
hozzáérjen a fűtőelemekhez.Ha a gyermekek
nincsenek folyamatos felügyelet alatt, tartsa távol a
8 éven aluli gyermekeket.
Ezt a készüléket a 8 éves kort betöltött gyermekek,
valamint a testileg, érzékszervileg vagy szellemileg
korlátozott, nem hozzáértő, illetve a terméket
nem ismerő személyek csak megfelelő felügyelet
mellett, vagy a készülék biztonságos használatával
kapcsolatos alapvető utasítások és a kapcsolódó
veszélyek ismeretében használhatják. Vigyázzon,
hogy a gyermekek ne játsszanak a készülékkel. A
tisztítási és karbantartási műveleteket gyermekek
felügyelet nélkül nem végezhetik.
Az üveg sütőajtó tisztításához ne használjon
súrolószereket vagy vágóéllel rendelkező fémspatulát,
mivel azok összekaristolhatják az ajtó felületét, ami
pedig az üveg összetöréséhez vezethet.
A készülék tisztításához soha ne használjon
gőztisztítót vagy nagynyomású tisztítót.
FIGYELEM: Az esetleges áramütések elkerülése
érdekében a lámpa kicserélése előtt győződjön meg
arról, hogy a készülék ki van kapcsolva.
! A rács behelyezésekor győződjön meg arról, hogy
a kallantyú felfele néz és a sütőtér hátsó részén van.

5
ATENŢIE: Acest aparat şi părţile sale accesibile devin
foarte calde în timpul folosirii.Trebuie să ţi atenţi şi
să nu atingeţi elementele de încălzire.
Îndepărtaţi copiii sub 8 ani dacă nu sunt supravegheaţi
continuu.Acest aparat poate utilizat de copiii de
peste 8 ani şi de persoane cu capacităţi fizice,
senzoriale sau mentale reduse sau fără experienţă
şi cunoştinţe dacă se află sub o supraveghere
corespunzătoare sau dacă au fost instruiţi cu privire
la folosirea aparatului în mod sigur şi dacă îşi dau
seama de pericolele corelate. Copiii nu trebuie să
se joace cu aparatul. Operaţiunile de curăţare şi de
întreţinere nu trebuie să e efectuate de copii fără
supraveghere.
Nu folosiţi produse abrazive, nici perii de metal
tăioase pentru a curăţa uşa de sticlă a cuptorului,
deoarece ar putea zgâria suprafaţa, provocând astfel
spargerea geamului.
Nu folosiţi niciodată aparate cu aburi sau sub
presiune pentru a curăţa aparatul.
ATENŢIE: Asiguraţi-vă că aparatul este stins înainte
de a înlocui lampa pentru a evita posibilitatea
electrocutărilor.
! Când introduceţi grătarul, asiguraţi-vă că opritorul
este îndreptat în sus şi în partea din spate a cavităţii.
УПОЗОРЕЊЕ: Овај апарат и његови доступни
делови загревају се током употребе. Водите
рачуна да избегнете додиривање грејних
елемената. Деца млађа од 8 година треба да
се држе подаље осим ако нису под сталним
надзором. Овај апарат могу да користе деца од
8 година и више и особе са умањеним физичким,
сензорним или менталним способностима
или са недостатком искуства и знања ако су
под надзором или су добили упутства у вези
са употребом апарата на безбедан начин и
ако разумеју пратеће опасности. Деца се неће
играти са овим апаратом. Чишћење и корисничко
одржавање неће обављати деца без надзора.
Не користите груба абразивна средства или оштре
металне стругаче да очистите стакло на вратима
рерне јер они могу да изгребу површину, што може
да доведе до ломљаве стакла.
Никада не користите парочистаче или чистаче
под притиском на овом апарату.
УПОЗОРЕЊЕ: Проверите да ли је апарат
искључен пре замене лампе како бисте избегли
могућност електричног удара.
! Када поставите полицу унутра, проверите да
ли је блокада окренута нагоре и да ли је у усеку.

6
VAROVANIE: Zariadenie a jeho prístupné časti sa
môžu počas použitia ohriať. Dávajte pozor, aby ste
sa nedotkli horúcich častí. Deti mladšie ako 8 rokov
musia byť udržiavané v bezpečnej vzdialenosti,
alebo musia byť nepretržite pod dohľadom. Toto
zariadenie môžu používať deti nad 8 rokov a osoby
s obmedzenými fyzickými, zmyslovými alebo
duševnými schopnosťami, alebo s nedostatočnými
skúsenosťami, len ak sú pod dohľadom, alebo ak
boli náležite poučené ohľadne bezpečného použitia
zariadenia a ak pochopili možné nebezpečenstvá.
Deti sa nesmú so zariadením hrať. Čistenie a
údržbu zverenú užívateľovi nesmú vykonávať deti
bez dohľadu.
Na čistenie skla dvierok rúry nepoužívajte drsné
abrazívne čistiace prostriedky alebo zahrotené
kovové škrabky, pretože by mohli poškriabať povrch
a spôsobiť tak prasknutie skla.
Nikdy nepoužívajte na čistenie zariadenia parný
alebo vysokotlakový čistič.
VAROVANIE: Pred výmenou žiarovky sa ubezpečte,
že je zariadenie vypnuté, aby ste sa vyhli zásahu
elektrickým prúdom.
! Pri vkladaní roštu dovnútra sa uistite, že doraz je
obrátený smerom nahor a v zadnej časti priestoru
rúry.
УВАГА! Під час роботи цей прилад, а також
його доступні частини нагріваються до високих
температур.
Слід бути особливо обережними, щоб не
торкатися нагрівальних елементів.
Діти віком до 8 років мають знаходитися на
небезпечній відстані від приладу, якщо неможливо
забезпечити постійний контроль над ними.
Дозволяється користування цим приладом дітьми
віком від 8 років, а також особами з обмеженими
фізичними, сенсорними або розумовими
можливостями або особами без належного
досвіду і знань, якщо вони перебувають під
постійним контролем або проінструктовані щодо
правил з небезпечного користування приладу
і усвідомлюють ступені ризику. Не дозволяйте
дітям гратися з приладом. Операції з очищення
і догляду не повинні виконуватися дітьми без
належного контролю.
Не використовувати абразивні засоби ані металеві
загострені шпателі для очищення скляних дверцях
духовки, тому що вони можуть пошкрябати
поверхню, призводячи до розтріскування скла.
Забороняється використання апаратів для
очищення парою або високим тиском.
УВАГА! Щоб запобігти враженню електричним
струмом переконайтеся в тому, що прилад
вимкнений, перш ніж заміняти лампочку.
! Під част вставляння решітки слід переконатися,
що стопор повернутий вгору і всередину ніші.

7
! Never use the services of an unauthorised technician.
Please have the following information to hand:
• the type of problem encountered.
• the appliance model (Mod.).
• the serial number (S/N).
The latter two pieces of information can be found on the data plate located
on the appliance.
! Никога не използвайте услугите на неоторизиран техник.
Подгответе следната информация:
• Вид на възникналия проблем.
• Модел на уреда (Mod.).
• Сериен номер (S/N).
Последните два елемента се намират на табелката с данни на уреда.
! Nikdy se neobracejte na neautorizované techniky.
Uveďte:
• druh poruchy;
• model zařízení (Mod.);
• výrobní číslo (S/N).
Tyto informace se nacházejí na štítku s jmenovitými údaji, umístěném na
zařízení.
! Sohase hívjon engedéllyel nem rendelkező szakembert!
Adja meg az alábbiakat:
• az anomália típusa;
• a készülék modellje (Mod.)
• a készülék szériaszáma (S/N)
Az utóbbi információk a készüléken elhelyezett adattáblán találhatók.
! Nu apelaţi niciodată la serviciile unui tehnician neautorizat.
Vă rugăm să aveţi următoarele informaţii la îndemână:
• Tipul problemei constatate.
• Modelul aparatului (Mod.).
• Numărul de serie (S/N).
Aceste informaţii pot găsite pe plăcuţa cu datele tehnice de pe aparat.
! Никада не користите услуге неовлашћеног техничара.
Располажите следећим информацијама:
• Врста проблема до ког је дошло.
• Модел апарата (Мод.).
• Серијски број (С/Н).
Последње две информације могу да се нађу на плочици са подацима
која се налази на апарату.
! Nikdy nevyužívajte služby nekvalikovaných technikov.
Pripravte si nasledujúce informácie:
• Druh zisteného problému.
• Model zariadenia (Mod.).
• Výrobné číslo (S/N).
Posledné dve uvedené informácie je možné nájsť na identikačnom štítku,
ktorý sa nachádza na zariadení.
! Не звертайтеся по допомогу до не уповноваженого персоналу.
Повідомити:
• тип несправності;
• модель приладу (Mod.)
• серійний номер (S/N)
Ці дані знаходяться на табличці з даними на самому приладі.

8
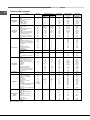
1
2
3
4
5
6 for the sliding racks
7
8
9
1
2
3
4
5
6 за плъзгане на решетките
7
8
9
1
2
3
4
5
6 pro posuv na jednotlivých úrovních
7 Úroveň
8 Úroveň ROTU
9
1
2
3
4
5
6
7 tálca
8
9
7
8
9 6
1
2
3
4
5

9
1
2
3
4
5
6 pentru rafturile glisante
7
8
9
1
2
3
4
5
6 за клизне полице
7
8
9
7
8
9 6
1
2
3
4
5
1
2
3
4
5
6 pre posuvné rošty
7
8
9
1
2
3
4
5
6 для дек та Граток
7 Рівень
8 Рівень
9

10
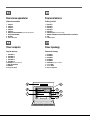
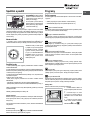
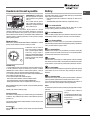
knob
knob
3 THERMOSTAT knob
4 THERMOSTAT indicator light
1 Превключвател
2 Превключвател
3 Превключвател
4 Cветлинен индикатор
1 Otočný ovladač
2 Otočný ovladač
3 Otočný ovladač TERMOSTATU
4 Kontrolka TERMOSTATU
tekerőgomb
tekerőgomb
tekerőgomb
lámpa
1 Buton
2 Buton
3 Buton TERMOSTAT
4 Indicator luminos TERMOSTAT
дугме
дугме
дугме
индикаторска лампица
1 Otočný ovládač
2 Otočný ovládač
3 Otočný ovládač TERMOSTATU
4 Kontrolka TERMOSTATU
1 Реґулятор
2 Реґулятор
3 Реґулятор
4 Індикатор
1
2
4 3
12
3
6
9

GB
11
! Please keep this instruction booklet in a safe place for future reference. If
the appliance is sold, given away or moved, please make sure the booklet is
also passed on to the new owners so that they may benet from the advice
contained within it.
! Please read this instruction manual carefully: it contains important information
concerning the safe operation, installation and maintenance of the appliance.
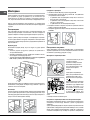
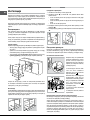
Positioning
! Do not let children play with the packaging material; it should be disposed
of in accordance with local separated waste collection standards (see
Precautions and tips).
! The appliance must be installed by a qualied professional in accordance
with the instructions provided. Incorrect installation may damage property or
cause harm to people or animals.
Use an appropriate cabinet to ensure that the appliance operates properly:
• the panels adjacent to the oven must be made of heat-resistant material.
• cabinets with a veneer exterior must be assembled with glues which can
withstand temperatures of up to 100°C.
• to install the oven (see diagram) or in a ,
the cabinet must have the following dimensions:
595 mm.
595 mm.
25 mm.
545 mm.
5 mm.
567 mm.
23 mm.
575-585 mm.
45 mm.
560 mm.
547 mm. min.
! The appliance must not come into contact with electrical parts once it has
been installed. The indications for consumption given on the data plate have
been calculated for this type of installation.
To ensure adequate ventilation, the back panel of the cabinet must be
removed. It is advisable to install the oven so that it rests on two strips of
wood, or on a completely at surface with an opening of at least 45 x 560
mm (see diagrams).
560 mm.
45 mm.
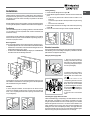
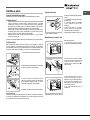
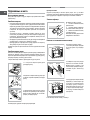
1. Position brackets “A” against oven support “B”.
2. Position tabs “C” against brackets “A”. If the thickness of the cabinet side
panel:
• is 16 mm thick: place the tab so that the number 16 written on it is
facing you;
• is 18 mm thick: place the tab so that the part without any text is facing
you;
• is 20 mm thick: do not t the tab.
3. Fix the brackets and tabs onto the edge of the cabinet side panel using
screws “D”.
4. Fix the oven to the cabinet using the screws and plastic washers “E”.
D
A
B
D
D
16
16
C
C
E
E
Ovens equipped with a three-pole power supply cable are designed to operate
with alternating current at the voltage and frequency indicated on the data
plate located on the appliance (see below).
1. Open the terminal board by
inserting a screwdriver into the side
tabs of the cover. Use the screwdriver
as a lever by pushing it down to open
the cover (see diagram).
2. Install the power supply cable by
loosening the cable clamp screw
and the three wire contact screws
L-N- .
Connect the wires to the
corresponding terminals: the Blue
wire to the terminal marked (N), the
Brown wire to the terminal marked
(L) and the Yellow/Green wire to the
terminal marked
(see diagram).
3. Secure the cable by fastening the
clamp screw.
4. Close the cover of the terminal
board.
Install a standardised plug corresponding to the load indicated on the data
plate (see table). The appliance must be directly connected to the mains
using an omnipolar switch with a minimum contact opening of 3 mm installed
between the appliance and the mains. The switch must be suitable for the
charge indicated and must comply with current electrical regulations (the
earthing wire must not be interrupted by the switch). The supply cable must
be positioned so that it does not come into contact with temperatures higher
than 50°C at any point (the back panel of the oven, for example).
L
N
N
L

12
GB
! The installer must ensure that the correct electrical connection has been
performed and that it is fully compliant with safety regulations.
Before connecting the appliance to the power supply, make sure that:
• the appliance is earthed and the plug is compliant with the law.
• the socket can withstand the maximum power of the appliance, which is
indicated on the data plate.
• the voltage is in the range between the values indicated on the data plate.
• the socket is compatible with the plug of the appliance. If the socket is
incompatible with the plug, ask an authorised technician to replace it. Do
not use extension cords or multiple sockets.
! Once the appliance has been installed, the power supply cable and the
electrical socket must be easily accessible.
! The cable must not be bent or compressed.
! The cable must be checked regularly and replaced by authorised technicians
only (see Assistance).
!
APPLIANCE SPECIFICATIONS
Dimensions*
width 43.5 cm
height 32,4 cm
depth 40.6 cm
Volume*
58 l
Dimensions**
width 45.5 cm
height 32,4 cm
depth 40.6 cm
Volume**
60 l
Electrical
connections
voltage: 220-230V~ 220-240V~
50/60Hz (see data plate)
maximum power absorbed 2800 W
* Only for models with drawn rails.
** Only for models with wire rails.
Energy
Label e
Ecodesign
Energy consumption for Natural
convection – heating mode:
Traditional mode
Declared energy consumption for
Forced convection Class
mode: Baking
This appliance conforms to the
following European Economic
Community directives:
- 2006/95/EC dated 12/12/06 (Low
Voltage) and subsequent amendments.
- 2004/108/EC dated 03/05/89
(Electromagnetic Compatibility) and
subsequent amendments.
- 93/68/EEC dated 22/07/93 and
subsequent amendments.
- 2012/19/EU and subsequent
amendments.
- 1275/2008 standby/off mode.
EU Directive no 65/2014
supplementing Directive 2010/30/EU.
EU Regulation no 66/2014
implementing Directive 2009/125/EC.
Standard EN 60350-1
Standard EN 50564

GB
13
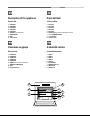
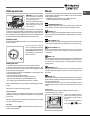
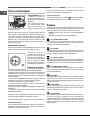
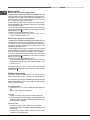
The oven is provided
with a stop system to extract the
racks and prevent them from
coming out of the oven (1).
As shown in the drawing, to extract
them completely, simply lift the
racks, holding them on the front
part, and pull (2).
! The rst time you use your appliance, heat the empty oven with its door
closed at its maximum temperature for at least half an hour. Ensure that the
room is well ventilated before switching the oven off and opening the oven
door. The appliance may emit a slightly unpleasant odour caused by protective
substances used during the manufacturing process burning away.
Press the PROGRAMMER knob and turn it in an anticlockwise direction to
set the correct time.
! The clock can only be set if the
oven is connected to the electricity
mains. In case of a power failure, the
PROGRAMMER will stop: the correct
time will need to be reset once the
power has returned.
1. Select the desired cooking mode by turning the SELECTOR knob.
2. Select the desired temperature with the THERMOSTAT knob. See
the Cooking advice table for cooking modes and the suggested cooking
temperatures (see Cooking Modes).
3. When preheating is nished, the THERMOSTAT indicator light will stay
on: place the food in the oven.
4. You may do the following during cooking:
- change the cooking mode by turning the SELECTOR knob.
- change the temperature by turning the THERMOSTAT knob.
- stop cooking by turning the SELECTOR knob to the “0” position.
! Never put objects directly on the oven bottom to avoid damaging the enamel
coating.
! Always place cookware on the rack(s) provided.
In order to cool down the external temperature of the oven, some models
are tted with a cooling fan that blows out air between the control panel and
the oven door.
! Once the cooking has been completed, the cooling fan remains on until the
oven has cooled down sufciently.
It goes on when selecting
with the SELECTOR knob. It stays on when a
cooking mode is selected.
12
3
6
9
! A temperature value between 60°C and MAX can be set for all cooking
modes except the following:
• BARBECUE (recommended: set only to MAX power level)
• GRATIN (recommended: do not exceed 200°C).
mode
When using this traditional cooking mode, it is best to use one cooking rack
only. if more than one rack is used, the heat will be distributed unevenly.
mode
This mode is ideal for baking temperature sensitive foods (such as cakes,
which need to rise) and for the preparation of “bitesize pastries” on 3 shelves
simultaneously.
mode
This mode is particularly suitable for cooking pre-packed food quickly (frozen
or pre-cooked). The best results are achieved using one cooking rack only.
mode
Since the heat remains constant throughout the oven, the air cooks and
browns food in a uniform manner. A maximum of two racks may be used at
the same time.
modes
This combination heats the oven rapidly by producing a considerable amount
of heat, particularly from the element at the bottom. If you use more than
one rack at a time, switch the position of the dishes halfway through the
cooking process.
BARBECUE mode
The high and direct temperature of the grill is recommended for food which
requires a high surface temperature. Always cook in this mode with the oven
door closed.
mode
This combination of features increases the effectiveness of the unidirectional
thermal radiation provided by the heating elements through forced circulation
of the air throughout the oven.
This helps prevent food from burning on the surface and allows the heat to
penetrate right into the food. Always cook in this mode with the oven door
closed.
To operate the rotisserie function (see diagram) proceed as follows:
1. Place the dripping pan in position 1.
2. Place the rotisserie support in
position 3 and insert the spit in the
hole provided on the back panel of
the oven.
3. Start the rotisserie function by
selecting the
or modes;

14
GB
1. Turn the PROGRAMMER knob in an anticlockwise direction until the desired
cooking time is displayed.
2. Pull the PROGRAMMER knob and turn it in an anticlockwise direction
until the marker corresponds with the current time. A click will indicate the
end of the programming phase.
3. Select the desired cooking mode using the SELECTOR knob. The oven
switches on immediately and remains on for the entire duration of the set
cooking time.
4. When the set time has elapsed, a buzzer will sound. To stop the cooking
process, turn the PROGRAMMER knob in an anticlockwise direction until
the symbol “ ” is displayed.
5. Turn the SELECTOR knob to the “0” position.
• For example: it is 9:00 a.m. and a time of 1 hour and 15 minutes is
programmed. The programme will stop automatically at 10:15 a.m.
1. Turn the PROGRAMMER knob in an anticlockwise direction until the desired
cooking time is displayed.
2. Pull the PROGRAMMER knob and turn it in an anticlockwise direction until
the marker corresponds with the desired cooking start time.
3. Select the desired cooking mode using the SELECTOR knob. The oven
will switch on at the set cooking start time and will remain on for the entire
duration of the set cooking time.
4. When the set time has elapsed, a buzzer will sound. To stop the cooking
process, turn the PROGRAMMER knob in an anticlockwise direction until
the symbol “ ” is displayed.
5. Turn the SELECTOR knob to the “0” position.
• For example: it is 9:00 a.m., a time of 1 hour and 15 minutes is
programmed and the start time is set to 11:00 a.m. The programme will
start automatically at 11:00 and will end at 12:15.
! To cancel programming, turn the PROGRAMMER knob anticlockwise until
the symbol “ ” is displayed.
! Do not place racks in position 1 and 5 during fan-assisted cooking. This is
because excessive direct heat can burn temperature sensitive foods.
! In the BARBECUE and GRATIN cooking modes, particularly when using
the rotisserie spit, place the dripping pan in position 2 to collect cooking
residues (fat and/or grease).
MULTI-COOKING
• Use positions 2 and 4, placing the food which requires more heat on 2.
• Place the dripping pan on the bottom and the rack on top.
BARBECUE
• Place the rack in position 3 or 4. Position the food in the centre of the rack.
• We recommend that the power level is set to maximum. The top heating
element is regulated by a thermostat and may not always operate
constantly.
PIZZA OVEN
• Use a light aluminium pizza pan. Place it on the rack provided.
For a crispy crust, do not use the dripping pan as it prevents the crust from
forming by extending the total cooking time.
• If the pizza has a lot of toppings, we recommend adding the mozzarella
cheese on top of the pizza halfway through the cooking process.

GB
15
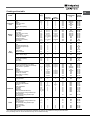
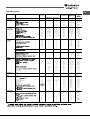
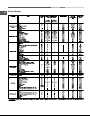
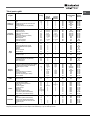
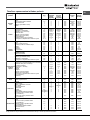
Cooking
modes
Convection
Oven
Baking
mode
Fast
cooking
Multilevel
Pizza Mode
Barbecue
Gratin
Weight
(Kg)
1,5
1,5
1
1
-
1
0,5
1
0,7
0,7
0,6
0,7
0,7
0,8
0,5
0, 5
0,3
0,4
0,5
0,3
0,5
0,4
0,4
0,4
0,3
0,6
0,2
1+1
1
1
1
0,5
0,5
1
0,7
0,7
0,7
0,5
0,8
0,7
n°4 or 5
n°4 or 6
1
1
1,5
1
1,5
1,5
1
1
1
Preheating
Yes
Yes
Yes
Yes
Yes
Yes
Yes
Yes
Yes
Yes
Yes
Yes
Yes
Yes
Yes
Yes
-
-
-
-
-
-
-
-
-
-
-
Yes
Yes
Yes
Yes
Yes
Yes
Yes
Yes
Yes
Yes
Yes
Yes
Yes
no
no
no
no
no
no
no
no
no
no
no
no
no
no
no
no
no
no
Recommended
Temperature
(°C)
200-210
200-210
200
200-210
180
180
180
180
170-180
180-190
160-170
180-190
180
200
90
210
250
200
220
200
200
180
220
200
200
180
210
220-230
180
170
200-210
190-200
180
190-200
190
190
210
200
220
200
Max
Max
Max
Max
Max
Max
Max
Max
Max
Max
Max
210
200
210
210
210
210
210
Cooking
duration
(minutes)
70-80
60-70
70-75
70-80
15-20
30-35
25-35
40-50
45-55
20-25
30-40
20-25
20-25
30-35
180
20-25
12
20
30-35
25
35
25-30
15-20
20-25
15-18
45
10-12
20-25
30-35
20-25
65-75
45-50
30-35
35-40
20-25
10-20
20-25
20-30
15-20
20-25
15-20
10-15
8-10
10-15
15-20
15-20
15-20
10-12
3-5
70-80
70-80
55-60
30-35
70-80
60-70
60-75
70-80
40-45
standard
guide rails
2
2
2
2
2
2
2 or 3
2 or 3
2 or 3
2 and 4
2 or 3
1, 3 and 5
1, 3 and 5
2
1, 3 and 5
2
2
2
2
2
2
2
2
2
2
2
2
2 and 4
2 and 4
2 and 4
1 and 2/3
2
1 or 2
2
2 and 4
2 and 4
2 and 4
1 and 3
2
2
4
4
4
4
3 or 4
4
4
4
4
-
-
2
2
-
-
2
2
2
sliding
guide rails
1
1
1
1
1
1
1 or 2
1 or 2
1 or 2
1 and 3
1 or 2
1, 2 and 4
1, 2 and 4
1
1, 2 and 4
1
1
1
1
1
1
1
1
1
1
1
1
1 and 3
1 and 3
1 and 3
1 and 3
1
1
1 and 3
1 and 3
1 and 3
1 and 3
1
1
3
3
3
3
2 or 3
3
3
3
3
3
-
-
2
2
-
-
2
2
2
Rack poYestionFoods
Duck
Chicken
Roast veal o beef
Pork roast
Biscuits (short pastry)
Tarts
Tarts
Fruits cakes
Plum-cake
Small cake (on 2 racks)
Sponge cake
Cream puffs (on 3 racks)
Biscuits (on 3 racks)
Stuffed pancakes
Meringues (on 3 racks)
Chees puffs
Frozen food
Pizza
Courgette and prawn pie
Country style spinach pie
Turnovers
Lasagne
Golden Rolls
Chicken morsels
Pre-cooked food
Golden chicken wings
Fresh food
Biscuits (short pastry)
Plum-cake
Chees puffs
Pizza (on 2 racks)
Tarts (on 2 racks)/Pies (on 2 racks)
Sponge cake (on 2 racks) (su leccarda)
Roast chicken + potatoes
Lamb
Mackerel
Lasagne
Cream puffs (on 2 racks)
Biscuits (on 2 racks)
Chees puffs (on 2 racks)
Savoury pies
Pizza
Focaccia bread
Mackerels
Soles and cuttlefish
Squid and prawn kebabs
Cod filet
Grilled vegetables
Veal steak
Sausages
Hamburger
Toast (o toasted sandwiches)
Spit-roast chicken using rotisserie spit
(where present)
Spit-roast lamb using rotisserie spit
(where present)
Grilled chicken
Cuttlefish
Spit-roast chicken using rotisserie spit
(where present)
Spit-roast duck using rotisserie spit
(where present)
Roast veal o beef
Pork roast
Lamb
* The cooking times listed above are intended as guidelines only and may be modified according to personal tastes.
Oven preheating times are set as standard and may not be modified manually.
Cooking advice table

16
GB
! This appliance has been designed and manufactured in compliance with
international safety standards. The following warnings are provided for safety
reasons and must be read carefully.
• The appliance was designed for domestic use inside the home and is
not intended for commercial or industrial use.
• The appliance must not be installed outdoors, even in covered areas. It is
extremely dangerous to leave the appliance exposed to rain and storms.
• When moving or positioning the appliance, always use the handles
provided on the sides of the oven.
• Do not touch the appliance while barefoot or with wet or damp hands and
feet.
•
•
• Make sure that the power supply cables of other electrical appliances do
not come into contact with the hot parts of the oven.
• The ventilation and heat dispersal openings must never be obstructed.
• Always grip the oven door handle in the centre: the ends may be hot.
• Always use oven gloves when placing cookware in the oven or when
removing it.
• Do not use aluminium foil to line the bottom of the oven.
• Do not place ammable materials in the oven: if the appliance is switched
on accidentally, the materials could catch re.
• Always make sure the knobs are in the “●”/“” position when the appliance
is not in use.
• When unplugging the appliance, always pull the plug from the mains
socket; do not pull on the cable.
• Do not perform any cleaning or maintenance work without having
disconnected the appliance from the electricity mains.
• If the event of malfunctions, under no circumstances should you attempt
to perform the repairs yourself. Contact an authorised Service Centre (see
Assistance).
• Do not rest objects on the open oven door.
• Do not let children play with the appliance.
• The appliance should not be operated by people (including children)
with reduced physical, sensory or mental capacities, by inexperienced
individuals or by anyone who is not familiar with the product. These
individuals should, at the very least, be supervised by someone who
assumes responsibility for their safety or receive preliminary instructions
relating to the operation of the appliance.
• When disposing of packaging material: observe local legislation so that
the packaging may be reused.
• The European Directive 2012/19/EU on Waste Electrical and
Electronic Equipment (WEEE), requires that old household electrical
appliances must not be disposed of in the normal unsorted municipal
waste stream. Old appliances must be collected separately in order
to optimise the recovery and recycling of the materials they contain
and reduce the impact on human health and the environment.
The crossed out “wheeled bin” symbol on the product reminds you of your
obligation, that when you dispose of the appliance it must be separately
collected.
Consumers should contact their local authority or retailer for information
concerning the correct disposal of their old appliance.
• Whenever possible, avoid pre-heating the oven and always try to ll it.
Open the oven door as little as possible because heat is lost every time
it is opened. To save a substantial amount of energy, simply switch off
the oven 5 to 10 minutes before the end of your planned cooking time
and use the heat the oven continues to generate.
• Automatic programmes are based on standard food product.
• Keep gaskets clean and tidy to prevent any door energy losses
• If you have a timed tariff electricity contract, the “delay cooking” option
will make it easier to save money by moving operation to cheaper time
periods.
! This product complies with the requirements of the latest European Directive
on the limitation of power consumption of the standby mode.

GB
17
Disconnect your appliance from the electricity supply before carrying out
any work on it.
• The stainless steel or enamel-coated external parts and the rubber seals
may be cleaned using a sponge that has been soaked in lukewarm water
and neutral soap. Use specialised products for the removal of stubborn
stains. After cleaning, rinse and dry thoroughly. Do not use abrasive
powders or corrosive substances.
• The inside of the oven should ideally be cleaned after each use, while it is
still lukewarm. Use hot water and detergent, then rinse well and dry with
a soft cloth. Do not use abrasive products.
• All accessories - with the exception of the sliding racks - can be washed
like everyday crockery, and are even dishwasher safe.
• We recommend that detergents are not sprayed directly onto the control
panel, but that a sponge is used instead.
! Never use steam cleaners or pressure cleaners on the appliance.
Clean the glass part of the oven door using a sponge and a non-abrasive
cleaning product, then dry thoroughly with a soft cloth. Do not use rough
abrasive material or sharp metal scrapers as these could scratch the surface
and cause the glass to crack.
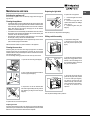
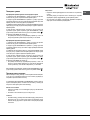
For more thorough cleaning purposes, the oven door may be removed:
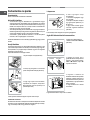
1. Open the oven door fully (see diagram);
2. Lift up and turn the small levers located on
the two hinges (see diagram);
3. Grip the door on the two external sides
and close it approximately half way. Pull the
door towards you, lifting it out of its slot (see
diagram).
To replace the door, reverse this sequence.
Check the door seals around the oven regularly. If the seals are damaged,
please contact your nearest Service Centre (see Assistance). We recommend
that the oven is not used until the seals have been replaced.
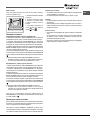
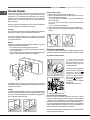
To replace the oven light bulb:
1. Remove the glass cover of the
lamp-holder.
2. Remove the light bulb and
replace it with a similar one: Wattage
25 W, cap E 14.
3. Replace the glass cover (see
diagram).
! Do not use the oven lamp as/for ambient lighting.
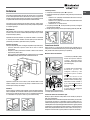
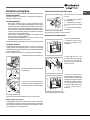
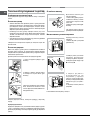
To assemble the sliding racks:
1. Remove the two frames, lifting
them away from the spacers A (see
gure).
2. Choose which shelf to use with the
sliding rack. Paying attention to the
direction in which the sliding rack is
to be extracted, position joint B and
then joint C on the frame.
3. Secure the two frames with the
guide rails using the holes provided
on the oven walls (see diagram).
The holes for the left frame are
situated at the top, while the holes
for the right frame are at the bottom.
4. Finally, fit the frames on the
spacers A.
! Do not place the sliding racks in position 5.
A
B
C
Left
guide rail
Right guide
rail
Direction
of extraction
D

18
BG
! Пазете книжката с инструкции на сигурно място за справка в бъдеще.
При продажба на уреда, при даването му за ползване или при
преместването му се уверете, че книжката с инструкциите е заедно с
него, за да се възползват и новите собственици от информацията в нея.
! Моля, прочетете внимателно това ръководство: то съдържа важна
информация относно безопасното използване, монтиране и поддържане
на уреда.
! Не позволявайте на деца да си играят с опаковъчния материал. Той
трябва да бъде депониран в съответствие с местните стандарти за
разделно събиране на отпадъци (вж. Предпазни мерки и препоръки).
! Уредът трябва да бъде инсталиран от квалифициран специалист
съгласно предоставените инструкции. Неправилното монтиране може
да доведе до повреда на имущество или да предизвика наранявате на
хора или животни.
Използвайте подходящ шкаф, за да сте сигурни, че уредът работи
правилно:
• панелите, допрени до фурната, трябва да са изработени от
топлоустойчив материал.
• шкафовете, облицовани с фурнир, трябва да се сглобяват с лепило,
което издържа на температури до 100°C.
• за да монтирате фурната (вижте схемата) или в
, шкафът трябва да има следните размери:
595 mm.
595 mm.
25 mm.
545 mm.
5 mm.
567 mm.
23 mm.
575-585 mm.
45 mm.
560 mm.
547 mm. min.
! След монтирането уредът не трябва да е в контакт с електрически части.
Показателите за консумация на енергия върху табелката с данни са
изчислени за този тип монтиране.
За да се осигури достатъчна вентилация, задната стена на шкафа трябва
да се отстрани. Препоръчително е да се монтира фурната така, че да
лежи върху две дървени летви или върху напълно гладка повърхност с
отвор от поне 45 x 560 мм (вижте схемите).
560 mm.
45 mm.
1. Поставете скобите “A” срещу опората на фурната “B”.
2. Позиционирайте отворите “C” срещу скобите “A”. Ако дебелината
на страничния панел на шкафа:
• е с дебелина 16 мм: позиционирайте отвора така, че числото 16
върху него да е с лице към вас;
• е с дебелина 18 мм: позиционирайте отвора така, че частта без
текст да е с лице към вас;
• е с дебелина 20 мм: не позиционирайте отвора.
3. Фиксирайте скобите и отворите към ръба на страничния панел на
шкафа с помощта на винтове “D”.
4. Фиксирайте фурната към шкафа с помощта на винтове и пластмасови
шайби “E”.
D
A
B
D
D
16
16
C
C
E
E
Фурни, оборудвани с триполюсен захранващ кабел, са предназначени
за работа с променлив ток с честота и напрежение, каквито са посочени
на табелката с данни върху уреда (вж. по-долу).
1. Отворете клемната кутия, като
поставите отвертка в
страничните отвори на капака.
Използвайте отвертката като
лост и натиснете надолу, за да
отворите капака (вижте
схемата).
2. Монтирайте захранващия
кабел, като разхлабите винта на
придържащата скоба и трите
винта на контактния проводник
L-N-
.
Свържете жиците към съответните
клеми: синята жица към клема,
обозначена с (N), кафявата жица
към клема, обозначена с (L) и
жълто/зелена жица към клема,
обозначена с
(вижте схемата).
3. Подсигурете кабела, като
затегнете винта на придържащата
скоба.
4. Затворете капака на клемната кутия.
Монтирайте стандартизиран щепсел, съответстващ на електрическото
натоварване, посочено върху табелката с данни за уреда (вижте
таблицата).
Уредът трябва да бъде директно свързан с мрежата чрез многополюсен
превключвател с междуконтактно разстояние минимум от 3 mm, поставен
между уреда и мрежата. Превключвателят трябва да е подходящ за
посоченото натоварване и да отговаря на нормите за електричество
L
N
N
L

BG
19
(заземителният кабел не трябва да се прекъсва от превключвателя).
Захранващият кабел трябва да бъде разположен така, че в нито една
точка да не бъде в контакт с горещи повърхности над 50°C (задния панел
на фурната например).
! Лицето, монтиращо уреда, трябва да се увери, че е извършено правилно
свързване и че уредът напълно отговаря на регламентите
за безопасност.
Преди да свържете захранването към уреда, се уверете, че:
• уредът е заземен, а щепселът отговаря на законовите разпоредби.
• контактът може да издържи максималната мощност на уреда,
посочена на табелката с данните.
• напрежението е в допустимите граници на стойностите, посочени на
табелката с данните за уреда.
• контактът е съвместим с щепсела на уреда. Ако контактът е
несъвместим с щепсела, се обърнете към оторизиран техник, за да
го замени Не използвайте удължители или разклонители.
! След инсталирането на уреда трябва да има лесен достъп до
захранващия кабел и електрическия контакт.
! Кабелът не трябва да бъде прегъван или притискан.
! Кабелът трябва периодично да бъде проверяван и подменян само от
оторизирани техници (вж. Техническо обслужване).
!
Електрически
свързвания
напрежение: 220-230V~ или 220-240V~
50Hz или 50/60 Hz максимално
използвана мощност 2800 W
СПЕЦИФИКАЦИИ НА УРЕДА
Размери*
Ширина 43,5 cm
Височина 32,4 cm
Дълбочина 40,6 cm
Размери**
Ширина 45,5 cm
Височина 32,4 cm
Дълбочина 40,6 cm
Обем*
58 л
Обем**
60 л
* Само за модели с изтеглящи се водачи.
* Само за модели с релсови водачи.
Този уред съответства на следните
директиви на EО: 2006/95/ЕИО от
дата 12/12/06 (ниско напрежение)
и последващите изменения
- 2004/108/ЕО от дата 03/05/89
(Електромагнитна съвместимост)
и последващите изменения
- 93/68/ЕИО от дата 22/07/93
и последващите изменения.
- 2012/19/ЕC и последващите
изменения.
- 1275/2008
режим на
готовност/изключване
Маркировка за
Енергийна
Ефективност и
еко Дизайн
Директива 65/2014/ЕС, включваща
директива 2010/30/EС.
Наредба 66/2014/ЕС, включваща
Директива 2009/125/EC.
Наредба EN 60350-1
Наредба EN 50564
Потребление на консумация за
Eстествена конвекция - режим на
загряване: Традиционен режим
Декларирана енергийна
консумация за клас Принудителна
конвекция – режим на загряване:
Печене

20
BG
Фурната
е снабдена със система за
блокиране на решетките, която
им пречи да излязат докрай извън
фурната (1).
Както е показано на чертежа, за
да ги извадите докрай, трябва
само да ги повдигнете, да ги
задържите в предната част и да
ги изтеглите навън (2).
! Когато ползвате уреда за първи път, най-напред загрейте фурната,
докато е празна, при затворена врата и максимална температура за
поне половин час. Преди да изключите уреда и да отворите вратата
на фурната, се уверете, че помещението може да се проветри добре.
Възможно е да се разпространи леко неприятна миризма от уреда
поради изгаряне на защитните вещества, използвани по време на
производствения процес.
Натиснете превключвателя за ПРОГРАМИРАНЕ и го завъртете в посока
обратна на часовниковата стрелка, за да зададете точния час.
! Часовникът може да се
настройва само ако фурната е
включена към електрическата
мрежа. В случай на проблем със
захранването, Програматорът
ще спре: правилното време
трябва да се настрои отново след
възстановяване на захранването.
1. Изберете желания режим на
готвене чрез завъртане на превключвателя ИЗБОР НА РЕЖИМ.
2. Изберете желаната температура чрез завъртане на превключвателя
ТЕРМОСТАТ. Вижте таблицата „Съвети за готвене“ за режимите за
готвене и предложенията за подходяща температура за готвене (вижте
Режими на готвене).
3. Когато приключи предварителното загряване, светлинният индикатор
ТЕРМОСТАТ остава включен: поставете храната във фурната.
4. По време на готвене може да правите следното:
- да промените желаният режим на готвене чрез завъртане на
превключвателя ИЗБОР НА РЕЖИМ.
- да промените желаната температура чрез завъртане на превключвателя
ТЕРМОСТАТ.
- да прекратите готвенето чрез завъртане на превключвателя ИЗБОР
НА РЕЖИМ НА позиция „0“.
! Никога не поставяйте предмети директно на дъното на фурната; по този
начин ще избегнете увреждане на емайлираното покритие.
! Винаги поставяйте съдовете за готвене върху наличната решетка(и).
За да се охлади външната температура на фурната, някои модели са
оборудвани с охлаждащ вентилатор, който издухва струя въздух между
контролния панел и вратата на фурната.
12
3
6
9
! След като приключи готвенето, охлаждащият вентилатор остава
включен, докато фурната се охлади достатъчно.
Осветлението се включва, когато изберете
с превключвателя ИЗБОР
НА РЕЖИМ. Остава включено, когато изберете режим на готвене.
! Температурна стойност между 60°C и MAX (максимална) може да се
задава при всички режими на готвене с изключение на следните:
• БАРБЕКЮ (препоръчително: настроена е само на МАКСИМАЛНА
мощност);
• ЗАПИЧАНЕ (препоръчително: да не надвишава 200°C).
Режим
Когато прилагате този традиционен режим на готвене, по-добре е да
използвате само една решетка. Ако се използват повече решетки,
топлината ще се разпределя неравномерно.
Режим
Този режим е идеален за печене и готвене на чувствителни на топлинна
обработка храни (например сладкиши, които трябва да се надигнат) и за
приготвяне на дребни сладкиши на 3 нива едновременно
Режим
Този режим е изключително подходящ за приготвяне на предварително
обработена храна (замразена или с предварителна термична обработка).
Най-добри резултати се постигат при използване само на една решетка.
Режим
Тъй като топлината остава постоянна във фурната, топлият въздух
готви и запича храната равномерно. Може да се използват най-много
две решетки едновременно.
С тази комбинация фурната се загрява бързо, като се отделя значително
количество топлина, особено от долния нагревател. Ако използвате
повече от една решетка едновременно, разменете позициите на ястията
по средата на готвенето.
Режим
Високата и директна температура на грила се препоръчва за храна, която
изисква висока температура на повърхността. При този режим винаги
гответе със затворена врата на фурната.
Режим
Тази комбинация от функции повишава ефективността на еднопосочното
излъчване на топлина от нагревателите чрез увеличаване на
циркулацията на въздуха в цялата фурна. По този начин се предотвратява
изгарянето на повърхността и се позволява на топлината да проникне
директно в продуктите. При този режим винаги гответе със затворена
врата на фурната.
Pagina se încarcă...
Pagina se încarcă...
Pagina se încarcă...
Pagina se încarcă...
Pagina se încarcă...
Pagina se încarcă...
Pagina se încarcă...
Pagina se încarcă...
Pagina se încarcă...
Pagina se încarcă...
Pagina se încarcă...
Pagina se încarcă...
Pagina se încarcă...
Pagina se încarcă...
Pagina se încarcă...
Pagina se încarcă...
Pagina se încarcă...
Pagina se încarcă...
Pagina se încarcă...
Pagina se încarcă...
Pagina se încarcă...
Pagina se încarcă...
Pagina se încarcă...
Pagina se încarcă...
Pagina se încarcă...
Pagina se încarcă...
Pagina se încarcă...
Pagina se încarcă...
Pagina se încarcă...
Pagina se încarcă...
Pagina se încarcă...
Pagina se încarcă...
Pagina se încarcă...
Pagina se încarcă...
Pagina se încarcă...
Pagina se încarcă...
Pagina se încarcă...
Pagina se încarcă...
Pagina se încarcă...
Pagina se încarcă...
Pagina se încarcă...
Pagina se încarcă...
Pagina se încarcă...
Pagina se încarcă...
Pagina se încarcă...
Pagina se încarcă...
Pagina se încarcă...
Pagina se încarcă...
-
 1
1
-
 2
2
-
 3
3
-
 4
4
-
 5
5
-
 6
6
-
 7
7
-
 8
8
-
 9
9
-
 10
10
-
 11
11
-
 12
12
-
 13
13
-
 14
14
-
 15
15
-
 16
16
-
 17
17
-
 18
18
-
 19
19
-
 20
20
-
 21
21
-
 22
22
-
 23
23
-
 24
24
-
 25
25
-
 26
26
-
 27
27
-
 28
28
-
 29
29
-
 30
30
-
 31
31
-
 32
32
-
 33
33
-
 34
34
-
 35
35
-
 36
36
-
 37
37
-
 38
38
-
 39
39
-
 40
40
-
 41
41
-
 42
42
-
 43
43
-
 44
44
-
 45
45
-
 46
46
-
 47
47
-
 48
48
-
 49
49
-
 50
50
-
 51
51
-
 52
52
-
 53
53
-
 54
54
-
 55
55
-
 56
56
-
 57
57
-
 58
58
-
 59
59
-
 60
60
-
 61
61
-
 62
62
-
 63
63
-
 64
64
-
 65
65
-
 66
66
-
 67
67
-
 68
68


HOTPOINT/ARISTON 9YFTR 85.1 (AV) /HA Manualul utilizatorului
- Categorie
- Cuptoare
- Tip
- Manualul utilizatorului
- Acest manual este potrivit și pentru
în alte limbi
Lucrări înrudite
-
HOTPOINT/ARISTON 9YFTR 85.1 (AV) /HA Manualul utilizatorului
-
-
-
-
-
-