Zelmer ZAF3500 Manual de utilizare
- Categorie
- Friteuze adânci
- Tip
- Manual de utilizare

ZAF3500
INSTRUKCJA UŻYTKOWANIA
Frytkownica beztłuszczowa
ИНСТРУКЦИЯ ПО ЭКСПЛУАТАЦИИ
Аэрогриль
NÁVOD K POUŽITÍ
Horkovzdušná fritéza
ИНСТРУКЦИИ ЗА УПОТРЕБА
Уред за готвене с горещ въздух
NÁVOD NA UOBSLUHU
Teplovzdušná fritéza
ІНСТРУКЦІЯ ПО ЗАСТОСУВАННЮ
Повітряна фритюрниця
USER MANUAL
Air fryer
BENUTZERHANDBUCH
Heißluftfritteuse
HASZNÁLATI UTASÍTÁS
Air Fryer
INSTRUCȚIUNI DE UTILIZARE
Friteuză cu aer cald
PL
EN
DE
CZ
SK
HU
RO
RU
UA
BG
ZAF3500
Unplug the product immediately from the mains in the event of any breakdown or damage and contact an official
technical support service. In order to prevent any risk of danger, do not open the device. Only qualified technical
personnel from the brand´s Official technical support service may carry out repairs or procedures on the device.
B&B TRENDS SL. disclaims all liability for damages that may occur to people, animals or objects, for the non-ob-
servance of these warnings.
BEFORE ITS FIRST USE
1. Remove all packing materials and stickers from the inside and outside of the Air Fryer. Gently wipe down
exterior with a damp cloth or paper towel.
WARNING: Never immerse the Air Fryer or its plug in water or any other liquids.
2. Pull the basket handle to remove the basket from the Air Fryer. Use the tray handle, in the center of the
tray, to remove the tray. Use a sponge and warm, soapy water to wash the inside and outside of the basket
and tray. The basket and the tray are top-rack dishwasher safe.
3. WARNING: Do not use abrasive cleaning agents or scouring pads.
4. Dry thoroughly.
HOW TO USE
1. Prepare the basket and desired food.
Use the tray handle to insert the tray into the basket. Push down to ensure it is secure and in a leveled
position. There should be a small amount of space between the tray and bottom of the basket.
Warning: Never fill the basket with oil. Unlike deep fryers, air fryers require little to no oil to produce crispy
results. If you choose to use oil, toss food with oil in a separate bowl and then transfer food to the tray
inside the basket.
2. Put food on tray.
Refer to the chart on “more cooking tips” for recommended maximum amounts of food, cooking times,
temperatures and tips.
3. Put the basket into the Air Fryer.
Use the Basket Handle to insert the basket into the Air Fryer. Push to close.
4. Plug in the Air Fryer.
The power indicator light will illuminate when the Air Fryer is plugged in. The heating indicator light will
NOT illuminate until the timer dial is turned past zero.
Note: The Air Fryer will not operate if the basket is not fully pushed into place.
5. Set desired cooking temperature and time.
Adjust the temperature: Turn the temperature dial to the desired temperature between 90ºC and 200ºC.
Keep the appliance and its cord out of reach of children
less than 8 years.
Appliances are not intended to be operated by means of
an external timer or separate remote-control system.
Disconnect the appliance when it is not in use and before
cleaning it. Let it cool before putting on, taking off parts
and cleaning it
Do not submerge the appliance in water or any other
liquid.
This appliance is intended for use at a maximum altitude
of 2000m above sea level.
IMPORTANT WARNINGS
This appliance is designed exclusively for domestic use, in no case should be a commercial or industrial use.
Any incorrect use or improper handling of the product shall render the warranty null and void.
Prior to plugging in the product, check that your mains voltage is the same as the one indicated on the product
label.
Place the appliance on a flat even surface
The mains connection cable must not be tangled or wrapped around the product during use.
Do not use the device, or connect and disconnect to the supply mains with the hands and/or feet wet. Do not pull
on the connection cord in order to unplug it or use it as a handle
IMPORTANT. When operating this Air Fryer, keep at least ten centimeters of free space on all sides of the oven to
allow for adequate air circulation.
DO NOT place your Air Fryer under cupboards, blinds or curtains. Risk of overheating / fire.
Do not cover any part of the Fryer with a cloth or similar, it will cause overheating. Risk of fire.
This is an AIR FRYER. It requires very little oil to cook. Do not fill the pot with oil or fat as this may cause a fire
hazard.
Do not use any accessories other than manufacturer recommended accessories in this Air Fryer.
Always wear protective, insulated oven gloves when inserting or removing items from the hot Air Fryer.
The appliance must be used on a level, stable heat-resistant surface. The first time you use your Air Fryer there
may be a slight odor or a small amount of smoke given off. This is normal and is just the manufacturing residues
burning off.
Always place the ingredients to be fried in the basket to prevent it from coming into contact with the heating
elements.
WE WOULD LIKE TO THANKS YOU FOR CHOOSING ZELMER,
WE WISH THE PRODUCT PERFORMS TO YOUR SATISFACTION AND PLEASURE.
WARNING
PLEASE READ THE INSTRUCTIONS FOR USE CAREFULLY PRIOR TO USING THE PRODUCT.
STORE THESE IN A SAFE PLACE FOR FUTURE REFERENCE.
DESCRIPTION
1. Heating indicator light (blue light)
2. Power indicator light (red light)
3. Timer dial (0-60 minutes)
4. Temperature dial (90ºC - 200ºC)
5. Fryer vents
6. Basket vents
7. Basket handle
8. Basket (1)
9. Tray
10. Tray handle
11. Silicon pad
SAFETY INSTRUCTIONS
If the supply cord is damaged it must be replaced by the
manufacturer, its service agent or similarly qualified
persons in order to avoid a hazard.
This appliance can be used by children aged from 8 years
and above and persons with reduced physical, sensory or
mental capabilities or lack of experience and knowledge if
they have been given supervision or instruction
concerning use of the appliance in a safe way and
understand the hazards involved. Children shall not play
with the appliance. Cleaning and user maintenance shall
not be made by children unless they are older than 8 and
supervised.
Adjust the time: Turn the timer dial to the desired time. Once a time is selected, the Air Fryer will begin to
tick, indicating the time is counting down.
Note: Maximum cooking time is 60 minutes.
6. Start cooking.
After setting the temperature and time, the power indicator light and the heating indicator light will illumina-
te and the Air Fryer will begin cooking.
To check food while the Air Fryer is cooking:
A) Use the basket handle to pull out the basket.
Note: The power indicator light and the heating indicator light will turn off once the basket is pulled out, but
the timer will continue to count down.
B) Use the basket handle to shake and redistribute the food inside the basket (or use tongs to flip food) if
necessary, then push the basket back into the unit. The unit will automatically resume cooking when the
basket is replaced.
7. Enjoy your air-fried food.
Once the timer completely counts down, the Air Fryer will ding once and turn off.
Use the basket handle to pull out the basket. Remove basket carefully by pulling out straight to prevent oil
spillage. Use protective gloves and/or tongs to carefully transfer the hot food to a serving plate.
Caution: The basket, tray and contents will be HOT after cooking.
Place the hot basket on a wire rack or trivet to cool.
8. Unplug the Air Fryer and let cool completely before cleaning.
9. Clean the basket and tray after every use.
COOKING TIPS
• Almost any food that is traditionally cooked in the oven can be air fried.
• Foods cook best and most evenly when they are of similar size and thickness.
• Smaller pieces of food require less cooking time than larger pieces.
• For best results in the shortest amount of time, air fry food in small batches. Avoid stacking or layering
when possible.
• Most prepackaged foods do not need to be tossed in oil before air frying. Most already contain oil and
other ingredients that enhance browning and crispiness
• Frozen appetizers and hors d’oeuvres air fry very well. For best results, arrange them on the tray in a
single layer.
• If layering foods, be sure to shake the basket halfway through (or flip food) to promote even cooking.
• Toss foods you are preparing from scratch, such as French fries or other vegetables, with a small amount
of oil to promote browning and crispiness.
• When air frying fresh vegetables, make sure to pat them dry completely before tossing with oil and air
frying to ensure maximum crispiness.
• Air fryers are great for reheating food, including pizza. To reheat your food, set the temperature to 150
for up to 10 minutes.

FIG. 1 FIG. 2
2
Unplug the product immediately from the mains in the event of any breakdown or damage and contact an official
technical support service. In order to prevent any risk of danger, do not open the device. Only qualified technical
personnel from the brand´s Official technical support service may carry out repairs or procedures on the device.
B&B TRENDS SL. disclaims all liability for damages that may occur to people, animals or objects, for the non-ob-
servance of these warnings.
BEFORE ITS FIRST USE
1. Remove all packing materials and stickers from the inside and outside of the Air Fryer. Gently wipe down
exterior with a damp cloth or paper towel.
WARNING: Never immerse the Air Fryer or its plug in water or any other liquids.
2. Pull the basket handle to remove the basket from the Air Fryer. Use the tray handle, in the center of the
tray, to remove the tray. Use a sponge and warm, soapy water to wash the inside and outside of the basket
and tray. The basket and the tray are top-rack dishwasher safe.
3. WARNING: Do not use abrasive cleaning agents or scouring pads.
4. Dry thoroughly.
HOW TO USE
1. Prepare the basket and desired food.
Use the tray handle to insert the tray into the basket. Push down to ensure it is secure and in a leveled
position. There should be a small amount of space between the tray and bottom of the basket.
Warning: Never fill the basket with oil. Unlike deep fryers, air fryers require little to no oil to produce crispy
results. If you choose to use oil, toss food with oil in a separate bowl and then transfer food to the tray
inside the basket.
2. Put food on tray.
Refer to the chart on “more cooking tips” for recommended maximum amounts of food, cooking times,
temperatures and tips.
3. Put the basket into the Air Fryer.
Use the Basket Handle to insert the basket into the Air Fryer. Push to close.
4. Plug in the Air Fryer.
The power indicator light will illuminate when the Air Fryer is plugged in. The heating indicator light will
NOT illuminate until the timer dial is turned past zero.
Note: The Air Fryer will not operate if the basket is not fully pushed into place.
5. Set desired cooking temperature and time.
Adjust the temperature: Turn the temperature dial to the desired temperature between 90ºC and 200ºC.
Keep the appliance and its cord out of reach of children
less than 8 years.
Appliances are not intended to be operated by means of
an external timer or separate remote-control system.
Disconnect the appliance when it is not in use and before
cleaning it. Let it cool before putting on, taking off parts
and cleaning it
Do not submerge the appliance in water or any other
liquid.
This appliance is intended for use at a maximum altitude
of 2000m above sea level.
IMPORTANT WARNINGS
This appliance is designed exclusively for domestic use, in no case should be a commercial or industrial use.
Any incorrect use or improper handling of the product shall render the warranty null and void.
Prior to plugging in the product, check that your mains voltage is the same as the one indicated on the product
label.
Place the appliance on a flat even surface
The mains connection cable must not be tangled or wrapped around the product during use.
Do not use the device, or connect and disconnect to the supply mains with the hands and/or feet wet. Do not pull
on the connection cord in order to unplug it or use it as a handle
IMPORTANT. When operating this Air Fryer, keep at least ten centimeters of free space on all sides of the oven to
allow for adequate air circulation.
DO NOT place your Air Fryer under cupboards, blinds or curtains. Risk of overheating / fire.
Do not cover any part of the Fryer with a cloth or similar, it will cause overheating. Risk of fire.
This is an AIR FRYER. It requires very little oil to cook. Do not fill the pot with oil or fat as this may cause a fire
hazard.
Do not use any accessories other than manufacturer recommended accessories in this Air Fryer.
Always wear protective, insulated oven gloves when inserting or removing items from the hot Air Fryer.
The appliance must be used on a level, stable heat-resistant surface. The first time you use your Air Fryer there
may be a slight odor or a small amount of smoke given off. This is normal and is just the manufacturing residues
burning off.
Always place the ingredients to be fried in the basket to prevent it from coming into contact with the heating
elements.
WE WOULD LIKE TO THANKS YOU FOR CHOOSING ZELMER,
WE WISH THE PRODUCT PERFORMS TO YOUR SATISFACTION AND PLEASURE.
WARNING
PLEASE READ THE INSTRUCTIONS FOR USE CAREFULLY PRIOR TO USING THE PRODUCT.
STORE THESE IN A SAFE PLACE FOR FUTURE REFERENCE.
DESCRIPTION
1. Heating indicator light (blue light)
2. Power indicator light (red light)
3. Timer dial (0-60 minutes)
4. Temperature dial (90ºC - 200ºC)
5. Fryer vents
6. Basket vents
7. Basket handle
8. Basket (1)
9. Tray
10. Tray handle
11. Silicon pad
SAFETY INSTRUCTIONS
If the supply cord is damaged it must be replaced by the
manufacturer, its service agent or similarly qualified
persons in order to avoid a hazard.
This appliance can be used by children aged from 8 years
and above and persons with reduced physical, sensory or
mental capabilities or lack of experience and knowledge if
they have been given supervision or instruction
concerning use of the appliance in a safe way and
understand the hazards involved. Children shall not play
with the appliance. Cleaning and user maintenance shall
not be made by children unless they are older than 8 and
supervised.
Adjust the time: Turn the timer dial to the desired time. Once a time is selected, the Air Fryer will begin to
tick, indicating the time is counting down.
Note: Maximum cooking time is 60 minutes.
6. Start cooking.
After setting the temperature and time, the power indicator light and the heating indicator light will illumina-
te and the Air Fryer will begin cooking.
To check food while the Air Fryer is cooking:
A) Use the basket handle to pull out the basket.
Note: The power indicator light and the heating indicator light will turn off once the basket is pulled out, but
the timer will continue to count down.
B) Use the basket handle to shake and redistribute the food inside the basket (or use tongs to flip food) if
necessary, then push the basket back into the unit. The unit will automatically resume cooking when the
basket is replaced.
7. Enjoy your air-fried food.
Once the timer completely counts down, the Air Fryer will ding once and turn off.
Use the basket handle to pull out the basket. Remove basket carefully by pulling out straight to prevent oil
spillage. Use protective gloves and/or tongs to carefully transfer the hot food to a serving plate.
Caution: The basket, tray and contents will be HOT after cooking.
Place the hot basket on a wire rack or trivet to cool.
8. Unplug the Air Fryer and let cool completely before cleaning.
9. Clean the basket and tray after every use.
COOKING TIPS
• Almost any food that is traditionally cooked in the oven can be air fried.
• Foods cook best and most evenly when they are of similar size and thickness.
• Smaller pieces of food require less cooking time than larger pieces.
• For best results in the shortest amount of time, air fry food in small batches. Avoid stacking or layering
when possible.
• Most prepackaged foods do not need to be tossed in oil before air frying. Most already contain oil and
other ingredients that enhance browning and crispiness
• Frozen appetizers and hors d’oeuvres air fry very well. For best results, arrange them on the tray in a
single layer.
• If layering foods, be sure to shake the basket halfway through (or flip food) to promote even cooking.
• Toss foods you are preparing from scratch, such as French fries or other vegetables, with a small amount
of oil to promote browning and crispiness.
• When air frying fresh vegetables, make sure to pat them dry completely before tossing with oil and air
frying to ensure maximum crispiness.
• Air fryers are great for reheating food, including pizza. To reheat your food, set the temperature to 150
for up to 10 minutes.

3
DZIĘKUJEMY, ŻE ZDECYDOWALI SIĘ PAŃSTWO NA ZAKUP FRYTKOWNICY BEZTŁUSZCZOWEJ
MARKI ZELMER. MAMY NADZIEJĘ, ŻE PRODUKT SPEŁNI PAŃSTWA OCZEKIWANIA.
OSTRZEŻENIE
Przed użyciem produktu należy dokładnie zapoznać się z niniejszą instrukcją obsługi. Należy ją
przechowywać w bezpiecznym miejscu do użytku w przyszłości.
OPIS
1. Lampka kontrolna nagrzewania (niebieska lampka)
2. Lampka kontrolna zasilania (czerwona lampka)
3. Pokrętło wyłącznika czasowego (0–60 minut)
4. Pokrętło regulacji temperatury (90ºC–200ºC)
5. Otwory wentylacyjne frytkownicy
6. Otwory wentylacyjne kosza
7. Uchwyt kosza
8. Kosz
9. Tacka
10. Uchwyt tacki
11. Podkładka silikonowa
INSTRUKCJE BEZPIECZEŃSTWA
Jeżeli przewód zasilający jest uszkodzony, musi zostać
wymieniony przez producenta, jego punkt serwisowy lub
osobę o podobnych kwalifikacjach, aby uniknąć
zagrożenia.
Urządzenie może być używane przez dzieci w wieku od 8
lat, a także osoby o obniżonych zdolnościach fizycznych,
sensorycznych i umysłowych oraz bez doświadczenia i
wiedzy, jeśli są nadzorowane lub zostały poinstruowane w
zakresie użytkowania urządzenia w bezpieczny sposób
oraz zrozumiały związane z tym zagrożenia. Dzieciom nie
wolno bawić się urządzeniem. Czyszczenie oraz
konserwacja urządzenia nie powinny być
przeprowadzane przez dzieci, chyba że mają więcej niż 8
lat i znajdują się pod nadzorem.
Urządzenie oraz jego przewód należy przechowywać
poza zasięgiem dzieci w wieku poniżej 8 lat.
Urządzenie nie jest przeznaczone do obsługi za pomocą
zewnętrznego wyłącznika czasowego lub oddzielnego
systemu zdalnego sterowania.
Gdy urządzenie nie jest używane oraz przed jego
czyszczeniem, należy odłączyć je od zasilania.
Pozostawić do ostygnięcia przed założeniem lub zdjęciem
części i czyszczeniem.
Nie zanurzać urządzenia w wodzie ani innej cieczy.
To urządzenie jest przeznaczone do użytku na
maksymalnej wysokości 2000 m powyżej poziomu morza.
WAŻNE OSTRZEŻENIA
Urządzenie zostało zaprojektowane wyłącznie do użytku domowego i nigdy nie powinno być wykorzys-
tywane do użytku komercyjnego lub przemysłowego.
Każde nieprawidłowe użycie lub niewłaściwa obsługa produktu spowoduje unieważnienie gwarancji.
Przed podłączeniem produktu do sieci należy sprawdzić, czy napięcie sieciowe jest takie samo, jak
wskazane na etykiecie produktu.
Ustawić urządzenie na płaskiej, równej powierzchni.
Podczas użytkowania przewód zasilania nie może być splątany ani okręcony wokół produktu.
Nie używaj, nie podłączaj ani nie odłączaj urządzenia od sieci mając mokre dłonie lub/i stopy. Nie ciągnąć
za przewód zasilania w celu odłączenia urządzenia od sieci. Nie używaj przewodu do przenoszenia
urządzenia.
WAŻNE. Podczas obsługi frytkownicy Air Fryer należy utrzymywać co najmniej centymetrowy odstęp z
każdej strony, aby umożliwić odpowiedni przepływ powietrza.
NIE ustawiać frytkownicy Air Fryer pod szafkami, za żaluzjami lub zasłonami. Istnieje ryzyko przegrza-
nia/pożaru.
Nie przykrywać żadnych części frytkownicy ścierką itp., może to spowodować przegrzanie. Istnieje ryzyko
pożaru.
To jest frytkownica AIR FRYER. Do gotowania wymagana jest niewielka ilość oleju. Nie napełniać pojem-
nika olejem lub tłuszczem, ponieważ może to spowodować zagrożenie pożarowe.
Nie należy używać żadnych innych akcesoriów niż zalecane przez producenta.
Zawsze zakładaj ochronne, izolowane rękawice kuchenne podczas wkładania lub wyjmowania rzeczy z
frytkownicy.
Urządzenia należy używać na poziomej, stabilnej, odpornej na nagrzewanie powierzchni. Przy pierwszym
użyciu frytkownicy Air Fryer może się pojawić delikatny nieprzyjemny zapach lub niewielka ilość dymu.
Jest to normalne, po prostu wypalają się pozostałości produkcyjne.
Składniki przeznaczone do smażenia należy zawsze umieszczać w koszyku, aby zapobiec ich kontaktowi
z elementami grzejnymi.
W przypadku awarii lub uszkodzenia należy natychmiast odłączyć produkt od sieci i skontaktować się z
oficjalnym działem serwisowym wsparcia technicznego. Nie otwierać urządzenia, aby zapobiec ryzyku
powstania niebezpieczeństwa. Tylko wykwalifikowany personel techniczny z oficjalnego działu serwisowe-
go marki może przeprowadzać naprawy urządzenia i inne procedury.
Firma Eurogama Sp. z o.o. zrzeka się wszelkiej odpowiedzialności za szkody, które mogą wystąpić u
ludzi, zwierząt lub w przedmiotach z powodu nieprzestrzegania niniejszych ostrzeżeń.
PRZED ROZPOCZĘCIEM UŻYTKOWANIA
1. Usunąć wszystkie materiały opakowaniowe i naklejki znajdujące się wewnątrz i na zewnątrz frytkownicy
Air Fryer. Delikatnie przetrzeć wnętrze wilgotną ścierką lub ręcznikiem papierowym.
OSTRZEŻENIE: Nigdy nie zanurzać frytkownicy Air Fryer lub jej wtyczki w wodzie ani innych cieczach.
2. Pociągnąć za uchwyt kosza, aby wyjąć go z frytkownicy Air Fryer. Wyjąć tackę, używając uchwytu
znajdującego się na jej środku. Umyć kosz i tackę wewnątrz i na zewnątrz gąbką oraz ciepłą wodą z
mydłem. Kosz i tackę można myć na górnej półce zmywarki.
3. OSTRZEŻENIE: Nie używać szorstkich środków do czyszczenia ani ściereczek do szorowania.
4. Dokładnie osuszyć.
SPOSÓB UŻYTKOWANIA
1. Przygotować kosz i żądaną żywność
Za pomocą uchwytu tacki włożyć ją do kosza. Popchnąć w dół, aby zapewnić bezpieczne i poziome
położenie. Między tacką a dnem kosza powinna być niewielka przestrzeń.
Ostrzeżenie: Nigdy nie nalewać oleju do kosza. W przeciwieństwie do frytkownic do głębokiego smażenia
frytkownice Air Fryer wymagają niewielkiej ilości oleju, aby uzyskać efekt chrupkości. W przypadku korzys-
tania z oleju należy obtoczyć żywność w oleju w oddzielnej misce, a następnie przenieść żywność na
tackę wewnątrz kosza.
2. Układanie żywności na tacce
Aby uzyskać więcej informacji o zalecanej maksymalnej ilości żywności, czasie gotowania, temperaturach
i wskazówkach, należy zapoznać się z rozdziałem „więcej wskazówek dotyczących gotowania”.
3. Wkładanie kosza do frytkownicy Air Fryer.
Włożyć kosz do frytkownicy Air Fryer za pomocą jego uchwytu. Popchnąć, aby zamknąć.
4. Podłączanie frytkownicy Air Fryer do sieci.
Jeżeli frytkownica Air Fryer jest podłączona do sieci, kontrolka zasilania będzie świecić. Kontrolka
nagrzewania NIE będzie świecić, dopóki pokrętło wyłącznika czasowego jest obrócone poza zero.
Uwaga: frytkownica Air Fryer nie będzie działać, jeżeli kosz nie zostanie całkowicie wsunięty w swoje
miejsce.
5. Ustawianie żądanej temperatury i czasu gotowania.
Ustawianie temperatury: obrócić pokrętło temperatury na żądaną temperaturę między 90ºC a 200ºC.
Ustawianie czasu: obrócić pokrętło wyłącznika czasowego na żądany czas. Po wybraniu czasu frytkowni-
ca Air Fryer zacznie tykać, wskazując odliczanie czasu.
Uwaga: maksymalny czas gotowania wynosi 60 minut.
6. Rozpoczęcie gotowania.
Po ustawieniu temperatury i czasu kontrolki zasilania i nagrzewania będą się świecić, a frytkownica Air
Fryer będzie gotować.
Sprawdzanie żywności podczas gotowania we frytkownicy Air Fryer:
A) Wyciągnąć kosz za pomocą uchwytu.
Uwaga: kontrolki zasilania i nagrzewania zgasną po wyciągnięciu kosza, ale wyłącznik czasowy będzie
nadal odliczał czas.
B) W razie potrzeby za pomocą uchwytu kosza wstrząsnąć i rozłożyć żywność wewnątrz kosza (lub użyć
szczypiec do obracania żywności), następnie włożyć kosz do urządzenia. Po ponownym umieszczeniu
kosza urządzenie automatycznie wznowi gotowanie.
7. Gotowa żywność usmażona na parze
Po zakończeniu przez wyłącznik czasowy odliczania frytkownica Air Fryer wyda pojedynczy dźwięk i się
wyłączy.
Wyciągnąć kosz za pomocą uchwytu. Wyjąć kosz ostrożnie, wyciągając prosto, aby zapobiec rozlaniu
oleju. Użyć rękawic ochronnych i/lub szczypiec, aby ostrożnie przenieść gorącą żywność na półmisek.
Przestroga: Kosz, tacka i zawartość po gotowaniu będą GORĄCE.
Gorący kosz umieścić do ostygnięcia na drucianej półce lub podkładce pod naczynia.
8. Przed czyszczeniem odłączyć frytkownicę Air Fryer od sieci i pozwolić na jej ostygnięcie.
9. Wyczyścić kosz i tackę po każdym użyciu.
WSKAZÓWKI DOTYCZĄCE GOTOWANIA
• Prawie każdą żywność, która jest tradycyjnie pieczona w piekarniku, można usmażyć na parze.
• Żywność zostanie najlepiej i najbardziej równomiernie ugotowana, jeżeli ma podobne wymiary i grubość.
• Mniejsze kawałki wymagają krótszego czasu gotowania niż większe.
• W celu osiągnięcia najlepszych rezultatów w jak najkrótszym czasie żywność należy smażyć na parze
partiami. Jeżeli to możliwe, unikać układania w stosy lub warstwowo.
• Większość gotowej do podgrzania żywności nie musi być obtaczana w oleju przed smażeniem na parze.
Większość już zawiera olej i inne składniki poprawiające zarumienienie i chrupkość.
• Mrożone przekąski i przystawki bardzo dobrze smażą się na parze. W celu osiągnięcia najlepszych
rezultatów ułożyć je na tacce w pojedynczej warstwie.
• W przypadku układania żywności warstwowo należy pamiętać, by potrząsnąć koszem w połowie gotowa-
nia (lub obrócić żywność), aby umożliwić równomierne gotowanie.
• Żywność przygotowywaną od podstaw, taką jak frytki czy inne warzywa, należy obtoczyć w małej ilości
oleju, aby poprawić zarumienienie i chrupkość.
• Podczas smażenia na parze świeżych warzyw należy się upewnić, że są one całkowicie suche przed
obtoczeniem ich w oleju i smażeniem na parze, aby zapewnić maksymalną chrupkość.
• Frytkownice Air Fryer są doskonałe do rozmrażania żywności, łącznie z pizzą. W celu rozmrożenia
żywności należy ustawić temperaturę na 150ºC na maks. 10 minut.
Unplug the product immediately from the mains in the event of any breakdown or damage and contact an official
technical support service. In order to prevent any risk of danger, do not open the device. Only qualified technical
personnel from the brand´s Official technical support service may carry out repairs or procedures on the device.
B&B TRENDS SL. disclaims all liability for damages that may occur to people, animals or objects, for the non-ob-
servance of these warnings.
BEFORE ITS FIRST USE
1. Remove all packing materials and stickers from the inside and outside of the Air Fryer. Gently wipe down
exterior with a damp cloth or paper towel.
WARNING: Never immerse the Air Fryer or its plug in water or any other liquids.
2. Pull the basket handle to remove the basket from the Air Fryer. Use the tray handle, in the center of the
tray, to remove the tray. Use a sponge and warm, soapy water to wash the inside and outside of the basket
and tray. The basket and the tray are top-rack dishwasher safe.
3. WARNING: Do not use abrasive cleaning agents or scouring pads.
4. Dry thoroughly.
HOW TO USE
1. Prepare the basket and desired food.
Use the tray handle to insert the tray into the basket. Push down to ensure it is secure and in a leveled
position. There should be a small amount of space between the tray and bottom of the basket.
Warning: Never fill the basket with oil. Unlike deep fryers, air fryers require little to no oil to produce crispy
results. If you choose to use oil, toss food with oil in a separate bowl and then transfer food to the tray
inside the basket.
2. Put food on tray.
Refer to the chart on “more cooking tips” for recommended maximum amounts of food, cooking times,
temperatures and tips.
3. Put the basket into the Air Fryer.
Use the Basket Handle to insert the basket into the Air Fryer. Push to close.
4. Plug in the Air Fryer.
The power indicator light will illuminate when the Air Fryer is plugged in. The heating indicator light will
NOT illuminate until the timer dial is turned past zero.
Note: The Air Fryer will not operate if the basket is not fully pushed into place.
5. Set desired cooking temperature and time.
Adjust the temperature: Turn the temperature dial to the desired temperature between 90ºC and 200ºC.
Keep the appliance and its cord out of reach of children
less than 8 years.
Appliances are not intended to be operated by means of
an external timer or separate remote-control system.
Disconnect the appliance when it is not in use and before
cleaning it. Let it cool before putting on, taking off parts
and cleaning it
Do not submerge the appliance in water or any other
liquid.
This appliance is intended for use at a maximum altitude
of 2000m above sea level.
IMPORTANT WARNINGS
This appliance is designed exclusively for domestic use, in no case should be a commercial or industrial use.
Any incorrect use or improper handling of the product shall render the warranty null and void.
Prior to plugging in the product, check that your mains voltage is the same as the one indicated on the product
label.
Place the appliance on a flat even surface
The mains connection cable must not be tangled or wrapped around the product during use.
Do not use the device, or connect and disconnect to the supply mains with the hands and/or feet wet. Do not pull
on the connection cord in order to unplug it or use it as a handle
IMPORTANT. When operating this Air Fryer, keep at least ten centimeters of free space on all sides of the oven to
allow for adequate air circulation.
DO NOT place your Air Fryer under cupboards, blinds or curtains. Risk of overheating / fire.
Do not cover any part of the Fryer with a cloth or similar, it will cause overheating. Risk of fire.
This is an AIR FRYER. It requires very little oil to cook. Do not fill the pot with oil or fat as this may cause a fire
hazard.
Do not use any accessories other than manufacturer recommended accessories in this Air Fryer.
Always wear protective, insulated oven gloves when inserting or removing items from the hot Air Fryer.
The appliance must be used on a level, stable heat-resistant surface. The first time you use your Air Fryer there
may be a slight odor or a small amount of smoke given off. This is normal and is just the manufacturing residues
burning off.
Always place the ingredients to be fried in the basket to prevent it from coming into contact with the heating
elements.
PL
WE WOULD LIKE TO THANKS YOU FOR CHOOSING ZELMER,
WE WISH THE PRODUCT PERFORMS TO YOUR SATISFACTION AND PLEASURE.
WARNING
PLEASE READ THE INSTRUCTIONS FOR USE CAREFULLY PRIOR TO USING THE PRODUCT.
STORE THESE IN A SAFE PLACE FOR FUTURE REFERENCE.
DESCRIPTION
1. Heating indicator light (blue light)
2. Power indicator light (red light)
3. Timer dial (0-60 minutes)
4. Temperature dial (90ºC - 200ºC)
5. Fryer vents
6. Basket vents
7. Basket handle
8. Basket (1)
9. Tray
10. Tray handle
11. Silicon pad
SAFETY INSTRUCTIONS
If the supply cord is damaged it must be replaced by the
manufacturer, its service agent or similarly qualified
persons in order to avoid a hazard.
This appliance can be used by children aged from 8 years
and above and persons with reduced physical, sensory or
mental capabilities or lack of experience and knowledge if
they have been given supervision or instruction
concerning use of the appliance in a safe way and
understand the hazards involved. Children shall not play
with the appliance. Cleaning and user maintenance shall
not be made by children unless they are older than 8 and
supervised.
Adjust the time: Turn the timer dial to the desired time. Once a time is selected, the Air Fryer will begin to
tick, indicating the time is counting down.
Note: Maximum cooking time is 60 minutes.
6. Start cooking.
After setting the temperature and time, the power indicator light and the heating indicator light will illumina-
te and the Air Fryer will begin cooking.
To check food while the Air Fryer is cooking:
A) Use the basket handle to pull out the basket.
Note: The power indicator light and the heating indicator light will turn off once the basket is pulled out, but
the timer will continue to count down.
B) Use the basket handle to shake and redistribute the food inside the basket (or use tongs to flip food) if
necessary, then push the basket back into the unit. The unit will automatically resume cooking when the
basket is replaced.
7. Enjoy your air-fried food.
Once the timer completely counts down, the Air Fryer will ding once and turn off.
Use the basket handle to pull out the basket. Remove basket carefully by pulling out straight to prevent oil
spillage. Use protective gloves and/or tongs to carefully transfer the hot food to a serving plate.
Caution: The basket, tray and contents will be HOT after cooking.
Place the hot basket on a wire rack or trivet to cool.
8. Unplug the Air Fryer and let cool completely before cleaning.
9. Clean the basket and tray after every use.
COOKING TIPS
• Almost any food that is traditionally cooked in the oven can be air fried.
• Foods cook best and most evenly when they are of similar size and thickness.
• Smaller pieces of food require less cooking time than larger pieces.
• For best results in the shortest amount of time, air fry food in small batches. Avoid stacking or layering
when possible.
• Most prepackaged foods do not need to be tossed in oil before air frying. Most already contain oil and
other ingredients that enhance browning and crispiness
• Frozen appetizers and hors d’oeuvres air fry very well. For best results, arrange them on the tray in a
single layer.
• If layering foods, be sure to shake the basket halfway through (or flip food) to promote even cooking.
• Toss foods you are preparing from scratch, such as French fries or other vegetables, with a small amount
of oil to promote browning and crispiness.
• When air frying fresh vegetables, make sure to pat them dry completely before tossing with oil and air
frying to ensure maximum crispiness.
• Air fryers are great for reheating food, including pizza. To reheat your food, set the temperature to 150
for up to 10 minutes.

4
DZIĘKUJEMY, ŻE ZDECYDOWALI SIĘ PAŃSTWO NA ZAKUP FRYTKOWNICY BEZTŁUSZCZOWEJ
MARKI ZELMER. MAMY NADZIEJĘ, ŻE PRODUKT SPEŁNI PAŃSTWA OCZEKIWANIA.
OSTRZEŻENIE
Przed użyciem produktu należy dokładnie zapoznać się z niniejszą instrukcją obsługi. Należy ją
przechowywać w bezpiecznym miejscu do użytku w przyszłości.
OPIS
1. Lampka kontrolna nagrzewania (niebieska lampka)
2. Lampka kontrolna zasilania (czerwona lampka)
3. Pokrętło wyłącznika czasowego (0–60 minut)
4. Pokrętło regulacji temperatury (90ºC–200ºC)
5. Otwory wentylacyjne frytkownicy
6. Otwory wentylacyjne kosza
7. Uchwyt kosza
8. Kosz
9. Tacka
10. Uchwyt tacki
11. Podkładka silikonowa
INSTRUKCJE BEZPIECZEŃSTWA
Jeżeli przewód zasilający jest uszkodzony, musi zostać
wymieniony przez producenta, jego punkt serwisowy lub
osobę o podobnych kwalifikacjach, aby uniknąć
zagrożenia.
Urządzenie może być używane przez dzieci w wieku od 8
lat, a także osoby o obniżonych zdolnościach fizycznych,
sensorycznych i umysłowych oraz bez doświadczenia i
wiedzy, jeśli są nadzorowane lub zostały poinstruowane w
zakresie użytkowania urządzenia w bezpieczny sposób
oraz zrozumiały związane z tym zagrożenia. Dzieciom nie
wolno bawić się urządzeniem. Czyszczenie oraz
konserwacja urządzenia nie powinny być
przeprowadzane przez dzieci, chyba że mają więcej niż 8
lat i znajdują się pod nadzorem.
Urządzenie oraz jego przewód należy przechowywać
poza zasięgiem dzieci w wieku poniżej 8 lat.
Urządzenie nie jest przeznaczone do obsługi za pomocą
zewnętrznego wyłącznika czasowego lub oddzielnego
systemu zdalnego sterowania.
Gdy urządzenie nie jest używane oraz przed jego
czyszczeniem, należy odłączyć je od zasilania.
Pozostawić do ostygnięcia przed założeniem lub zdjęciem
części i czyszczeniem.
Nie zanurzać urządzenia w wodzie ani innej cieczy.
To urządzenie jest przeznaczone do użytku na
maksymalnej wysokości 2000 m powyżej poziomu morza.
WAŻNE OSTRZEŻENIA
Urządzenie zostało zaprojektowane wyłącznie do użytku domowego i nigdy nie powinno być wykorzys-
tywane do użytku komercyjnego lub przemysłowego.
Każde nieprawidłowe użycie lub niewłaściwa obsługa produktu spowoduje unieważnienie gwarancji.
Przed podłączeniem produktu do sieci należy sprawdzić, czy napięcie sieciowe jest takie samo, jak
wskazane na etykiecie produktu.
Ustawić urządzenie na płaskiej, równej powierzchni.
Podczas użytkowania przewód zasilania nie może być splątany ani okręcony wokół produktu.
Nie używaj, nie podłączaj ani nie odłączaj urządzenia od sieci mając mokre dłonie lub/i stopy. Nie ciągnąć
za przewód zasilania w celu odłączenia urządzenia od sieci. Nie używaj przewodu do przenoszenia
urządzenia.
WAŻNE. Podczas obsługi frytkownicy Air Fryer należy utrzymywać co najmniej centymetrowy odstęp z
każdej strony, aby umożliwić odpowiedni przepływ powietrza.
NIE ustawiać frytkownicy Air Fryer pod szafkami, za żaluzjami lub zasłonami. Istnieje ryzyko przegrza-
nia/pożaru.
Nie przykrywać żadnych części frytkownicy ścierką itp., może to spowodować przegrzanie. Istnieje ryzyko
pożaru.
To jest frytkownica AIR FRYER. Do gotowania wymagana jest niewielka ilość oleju. Nie napełniać pojem-
nika olejem lub tłuszczem, ponieważ może to spowodować zagrożenie pożarowe.
Nie należy używać żadnych innych akcesoriów niż zalecane przez producenta.
Zawsze zakładaj ochronne, izolowane rękawice kuchenne podczas wkładania lub wyjmowania rzeczy z
frytkownicy.
Urządzenia należy używać na poziomej, stabilnej, odpornej na nagrzewanie powierzchni. Przy pierwszym
użyciu frytkownicy Air Fryer może się pojawić delikatny nieprzyjemny zapach lub niewielka ilość dymu.
Jest to normalne, po prostu wypalają się pozostałości produkcyjne.
Składniki przeznaczone do smażenia należy zawsze umieszczać w koszyku, aby zapobiec ich kontaktowi
z elementami grzejnymi.
W przypadku awarii lub uszkodzenia należy natychmiast odłączyć produkt od sieci i skontaktować się z
oficjalnym działem serwisowym wsparcia technicznego. Nie otwierać urządzenia, aby zapobiec ryzyku
powstania niebezpieczeństwa. Tylko wykwalifikowany personel techniczny z oficjalnego działu serwisowe-
go marki może przeprowadzać naprawy urządzenia i inne procedury.
Firma Eurogama Sp. z o.o. zrzeka się wszelkiej odpowiedzialności za szkody, które mogą wystąpić u
ludzi, zwierząt lub w przedmiotach z powodu nieprzestrzegania niniejszych ostrzeżeń.
PRZED ROZPOCZĘCIEM UŻYTKOWANIA
1. Usunąć wszystkie materiały opakowaniowe i naklejki znajdujące się wewnątrz i na zewnątrz frytkownicy
Air Fryer. Delikatnie przetrzeć wnętrze wilgotną ścierką lub ręcznikiem papierowym.
OSTRZEŻENIE: Nigdy nie zanurzać frytkownicy Air Fryer lub jej wtyczki w wodzie ani innych cieczach.
2. Pociągnąć za uchwyt kosza, aby wyjąć go z frytkownicy Air Fryer. Wyjąć tackę, używając uchwytu
znajdującego się na jej środku. Umyć kosz i tackę wewnątrz i na zewnątrz gąbką oraz ciepłą wodą z
mydłem. Kosz i tackę można myć na górnej półce zmywarki.
3. OSTRZEŻENIE: Nie używać szorstkich środków do czyszczenia ani ściereczek do szorowania.
4. Dokładnie osuszyć.
SPOSÓB UŻYTKOWANIA
1. Przygotować kosz i żądaną żywność
Za pomocą uchwytu tacki włożyć ją do kosza. Popchnąć w dół, aby zapewnić bezpieczne i poziome
położenie. Między tacką a dnem kosza powinna być niewielka przestrzeń.
Ostrzeżenie: Nigdy nie nalewać oleju do kosza. W przeciwieństwie do frytkownic do głębokiego smażenia
frytkownice Air Fryer wymagają niewielkiej ilości oleju, aby uzyskać efekt chrupkości. W przypadku korzys-
tania z oleju należy obtoczyć żywność w oleju w oddzielnej misce, a następnie przenieść żywność na
tackę wewnątrz kosza.
2. Układanie żywności na tacce
Aby uzyskać więcej informacji o zalecanej maksymalnej ilości żywności, czasie gotowania, temperaturach
i wskazówkach, należy zapoznać się z rozdziałem „więcej wskazówek dotyczących gotowania”.
3. Wkładanie kosza do frytkownicy Air Fryer.
Włożyć kosz do frytkownicy Air Fryer za pomocą jego uchwytu. Popchnąć, aby zamknąć.
4. Podłączanie frytkownicy Air Fryer do sieci.
Jeżeli frytkownica Air Fryer jest podłączona do sieci, kontrolka zasilania będzie świecić. Kontrolka
nagrzewania NIE będzie świecić, dopóki pokrętło wyłącznika czasowego jest obrócone poza zero.
Uwaga: frytkownica Air Fryer nie będzie działać, jeżeli kosz nie zostanie całkowicie wsunięty w swoje
miejsce.
5. Ustawianie żądanej temperatury i czasu gotowania.
Ustawianie temperatury: obrócić pokrętło temperatury na żądaną temperaturę między 90ºC a 200ºC.
Ustawianie czasu: obrócić pokrętło wyłącznika czasowego na żądany czas. Po wybraniu czasu frytkowni-
ca Air Fryer zacznie tykać, wskazując odliczanie czasu.
Uwaga: maksymalny czas gotowania wynosi 60 minut.
6. Rozpoczęcie gotowania.
Po ustawieniu temperatury i czasu kontrolki zasilania i nagrzewania będą się świecić, a frytkownica Air
Fryer będzie gotować.
Sprawdzanie żywności podczas gotowania we frytkownicy Air Fryer:
A) Wyciągnąć kosz za pomocą uchwytu.
Uwaga: kontrolki zasilania i nagrzewania zgasną po wyciągnięciu kosza, ale wyłącznik czasowy będzie
nadal odliczał czas.
B) W razie potrzeby za pomocą uchwytu kosza wstrząsnąć i rozłożyć żywność wewnątrz kosza (lub użyć
szczypiec do obracania żywności), następnie włożyć kosz do urządzenia. Po ponownym umieszczeniu
kosza urządzenie automatycznie wznowi gotowanie.
7. Gotowa żywność usmażona na parze
Po zakończeniu przez wyłącznik czasowy odliczania frytkownica Air Fryer wyda pojedynczy dźwięk i się
wyłączy.
Wyciągnąć kosz za pomocą uchwytu. Wyjąć kosz ostrożnie, wyciągając prosto, aby zapobiec rozlaniu
oleju. Użyć rękawic ochronnych i/lub szczypiec, aby ostrożnie przenieść gorącą żywność na półmisek.
Przestroga: Kosz, tacka i zawartość po gotowaniu będą GORĄCE.
Gorący kosz umieścić do ostygnięcia na drucianej półce lub podkładce pod naczynia.
8. Przed czyszczeniem odłączyć frytkownicę Air Fryer od sieci i pozwolić na jej ostygnięcie.
9. Wyczyścić kosz i tackę po każdym użyciu.
WSKAZÓWKI DOTYCZĄCE GOTOWANIA
• Prawie każdą żywność, która jest tradycyjnie pieczona w piekarniku, można usmażyć na parze.
• Żywność zostanie najlepiej i najbardziej równomiernie ugotowana, jeżeli ma podobne wymiary i grubość.
• Mniejsze kawałki wymagają krótszego czasu gotowania niż większe.
• W celu osiągnięcia najlepszych rezultatów w jak najkrótszym czasie żywność należy smażyć na parze
partiami. Jeżeli to możliwe, unikać układania w stosy lub warstwowo.
• Większość gotowej do podgrzania żywności nie musi być obtaczana w oleju przed smażeniem na parze.
Większość już zawiera olej i inne składniki poprawiające zarumienienie i chrupkość.
• Mrożone przekąski i przystawki bardzo dobrze smażą się na parze. W celu osiągnięcia najlepszych
rezultatów ułożyć je na tacce w pojedynczej warstwie.
• W przypadku układania żywności warstwowo należy pamiętać, by potrząsnąć koszem w połowie gotowa-
nia (lub obrócić żywność), aby umożliwić równomierne gotowanie.
• Żywność przygotowywaną od podstaw, taką jak frytki czy inne warzywa, należy obtoczyć w małej ilości
oleju, aby poprawić zarumienienie i chrupkość.
• Podczas smażenia na parze świeżych warzyw należy się upewnić, że są one całkowicie suche przed
obtoczeniem ich w oleju i smażeniem na parze, aby zapewnić maksymalną chrupkość.
• Frytkownice Air Fryer są doskonałe do rozmrażania żywności, łącznie z pizzą. W celu rozmrożenia
żywności należy ustawić temperaturę na 150ºC na maks. 10 minut.
Unplug the product immediately from the mains in the event of any breakdown or damage and contact an official
technical support service. In order to prevent any risk of danger, do not open the device. Only qualified technical
personnel from the brand´s Official technical support service may carry out repairs or procedures on the device.
B&B TRENDS SL. disclaims all liability for damages that may occur to people, animals or objects, for the non-ob-
servance of these warnings.
BEFORE ITS FIRST USE
1. Remove all packing materials and stickers from the inside and outside of the Air Fryer. Gently wipe down
exterior with a damp cloth or paper towel.
WARNING: Never immerse the Air Fryer or its plug in water or any other liquids.
2. Pull the basket handle to remove the basket from the Air Fryer. Use the tray handle, in the center of the
tray, to remove the tray. Use a sponge and warm, soapy water to wash the inside and outside of the basket
and tray. The basket and the tray are top-rack dishwasher safe.
3. WARNING: Do not use abrasive cleaning agents or scouring pads.
4. Dry thoroughly.
HOW TO USE
1. Prepare the basket and desired food.
Use the tray handle to insert the tray into the basket. Push down to ensure it is secure and in a leveled
position. There should be a small amount of space between the tray and bottom of the basket.
Warning: Never fill the basket with oil. Unlike deep fryers, air fryers require little to no oil to produce crispy
results. If you choose to use oil, toss food with oil in a separate bowl and then transfer food to the tray
inside the basket.
2. Put food on tray.
Refer to the chart on “more cooking tips” for recommended maximum amounts of food, cooking times,
temperatures and tips.
3. Put the basket into the Air Fryer.
Use the Basket Handle to insert the basket into the Air Fryer. Push to close.
4. Plug in the Air Fryer.
The power indicator light will illuminate when the Air Fryer is plugged in. The heating indicator light will
NOT illuminate until the timer dial is turned past zero.
Note: The Air Fryer will not operate if the basket is not fully pushed into place.
5. Set desired cooking temperature and time.
Adjust the temperature: Turn the temperature dial to the desired temperature between 90ºC and 200ºC.
PL
Keep the appliance and its cord out of reach of children
less than 8 years.
Appliances are not intended to be operated by means of
an external timer or separate remote-control system.
Disconnect the appliance when it is not in use and before
cleaning it. Let it cool before putting on, taking off parts
and cleaning it
Do not submerge the appliance in water or any other
liquid.
This appliance is intended for use at a maximum altitude
of 2000m above sea level.
IMPORTANT WARNINGS
This appliance is designed exclusively for domestic use, in no case should be a commercial or industrial use.
Any incorrect use or improper handling of the product shall render the warranty null and void.
Prior to plugging in the product, check that your mains voltage is the same as the one indicated on the product
label.
Place the appliance on a flat even surface
The mains connection cable must not be tangled or wrapped around the product during use.
Do not use the device, or connect and disconnect to the supply mains with the hands and/or feet wet. Do not pull
on the connection cord in order to unplug it or use it as a handle
IMPORTANT. When operating this Air Fryer, keep at least ten centimeters of free space on all sides of the oven to
allow for adequate air circulation.
DO NOT place your Air Fryer under cupboards, blinds or curtains. Risk of overheating / fire.
Do not cover any part of the Fryer with a cloth or similar, it will cause overheating. Risk of fire.
This is an AIR FRYER. It requires very little oil to cook. Do not fill the pot with oil or fat as this may cause a fire
hazard.
Do not use any accessories other than manufacturer recommended accessories in this Air Fryer.
Always wear protective, insulated oven gloves when inserting or removing items from the hot Air Fryer.
The appliance must be used on a level, stable heat-resistant surface. The first time you use your Air Fryer there
may be a slight odor or a small amount of smoke given off. This is normal and is just the manufacturing residues
burning off.
Always place the ingredients to be fried in the basket to prevent it from coming into contact with the heating
elements.
WE WOULD LIKE TO THANKS YOU FOR CHOOSING ZELMER,
WE WISH THE PRODUCT PERFORMS TO YOUR SATISFACTION AND PLEASURE.
WARNING
PLEASE READ THE INSTRUCTIONS FOR USE CAREFULLY PRIOR TO USING THE PRODUCT.
STORE THESE IN A SAFE PLACE FOR FUTURE REFERENCE.
DESCRIPTION
1. Heating indicator light (blue light)
2. Power indicator light (red light)
3. Timer dial (0-60 minutes)
4. Temperature dial (90ºC - 200ºC)
5. Fryer vents
6. Basket vents
7. Basket handle
8. Basket (1)
9. Tray
10. Tray handle
11. Silicon pad
SAFETY INSTRUCTIONS
If the supply cord is damaged it must be replaced by the
manufacturer, its service agent or similarly qualified
persons in order to avoid a hazard.
This appliance can be used by children aged from 8 years
and above and persons with reduced physical, sensory or
mental capabilities or lack of experience and knowledge if
they have been given supervision or instruction
concerning use of the appliance in a safe way and
understand the hazards involved. Children shall not play
with the appliance. Cleaning and user maintenance shall
not be made by children unless they are older than 8 and
supervised.
Adjust the time: Turn the timer dial to the desired time. Once a time is selected, the Air Fryer will begin to
tick, indicating the time is counting down.
Note: Maximum cooking time is 60 minutes.
6. Start cooking.
After setting the temperature and time, the power indicator light and the heating indicator light will illumina-
te and the Air Fryer will begin cooking.
To check food while the Air Fryer is cooking:
A) Use the basket handle to pull out the basket.
Note: The power indicator light and the heating indicator light will turn off once the basket is pulled out, but
the timer will continue to count down.
B) Use the basket handle to shake and redistribute the food inside the basket (or use tongs to flip food) if
necessary, then push the basket back into the unit. The unit will automatically resume cooking when the
basket is replaced.
7. Enjoy your air-fried food.
Once the timer completely counts down, the Air Fryer will ding once and turn off.
Use the basket handle to pull out the basket. Remove basket carefully by pulling out straight to prevent oil
spillage. Use protective gloves and/or tongs to carefully transfer the hot food to a serving plate.
Caution: The basket, tray and contents will be HOT after cooking.
Place the hot basket on a wire rack or trivet to cool.
8. Unplug the Air Fryer and let cool completely before cleaning.
9. Clean the basket and tray after every use.
COOKING TIPS
• Almost any food that is traditionally cooked in the oven can be air fried.
• Foods cook best and most evenly when they are of similar size and thickness.
• Smaller pieces of food require less cooking time than larger pieces.
• For best results in the shortest amount of time, air fry food in small batches. Avoid stacking or layering
when possible.
• Most prepackaged foods do not need to be tossed in oil before air frying. Most already contain oil and
other ingredients that enhance browning and crispiness
• Frozen appetizers and hors d’oeuvres air fry very well. For best results, arrange them on the tray in a
single layer.
• If layering foods, be sure to shake the basket halfway through (or flip food) to promote even cooking.
• Toss foods you are preparing from scratch, such as French fries or other vegetables, with a small amount
of oil to promote browning and crispiness.
• When air frying fresh vegetables, make sure to pat them dry completely before tossing with oil and air
frying to ensure maximum crispiness.
• Air fryers are great for reheating food, including pizza. To reheat your food, set the temperature to 150
for up to 10 minutes.

5
DZIĘKUJEMY, ŻE ZDECYDOWALI SIĘ PAŃSTWO NA ZAKUP FRYTKOWNICY BEZTŁUSZCZOWEJ
MARKI ZELMER. MAMY NADZIEJĘ, ŻE PRODUKT SPEŁNI PAŃSTWA OCZEKIWANIA.
OSTRZEŻENIE
Przed użyciem produktu należy dokładnie zapoznać się z niniejszą instrukcją obsługi. Należy ją
przechowywać w bezpiecznym miejscu do użytku w przyszłości.
OPIS
1. Lampka kontrolna nagrzewania (niebieska lampka)
2. Lampka kontrolna zasilania (czerwona lampka)
3. Pokrętło wyłącznika czasowego (0–60 minut)
4. Pokrętło regulacji temperatury (90ºC–200ºC)
5. Otwory wentylacyjne frytkownicy
6. Otwory wentylacyjne kosza
7. Uchwyt kosza
8. Kosz
9. Tacka
10. Uchwyt tacki
11. Podkładka silikonowa
INSTRUKCJE BEZPIECZEŃSTWA
Jeżeli przewód zasilający jest uszkodzony, musi zostać
wymieniony przez producenta, jego punkt serwisowy lub
osobę o podobnych kwalifikacjach, aby uniknąć
zagrożenia.
Urządzenie może być używane przez dzieci w wieku od 8
lat, a także osoby o obniżonych zdolnościach fizycznych,
sensorycznych i umysłowych oraz bez doświadczenia i
wiedzy, jeśli są nadzorowane lub zostały poinstruowane w
zakresie użytkowania urządzenia w bezpieczny sposób
oraz zrozumiały związane z tym zagrożenia. Dzieciom nie
wolno bawić się urządzeniem. Czyszczenie oraz
konserwacja urządzenia nie powinny być
przeprowadzane przez dzieci, chyba że mają więcej niż 8
lat i znajdują się pod nadzorem.
Urządzenie oraz jego przewód należy przechowywać
poza zasięgiem dzieci w wieku poniżej 8 lat.
Urządzenie nie jest przeznaczone do obsługi za pomocą
zewnętrznego wyłącznika czasowego lub oddzielnego
systemu zdalnego sterowania.
Gdy urządzenie nie jest używane oraz przed jego
czyszczeniem, należy odłączyć je od zasilania.
Pozostawić do ostygnięcia przed założeniem lub zdjęciem
części i czyszczeniem.
Nie zanurzać urządzenia w wodzie ani innej cieczy.
To urządzenie jest przeznaczone do użytku na
maksymalnej wysokości 2000 m powyżej poziomu morza.
WAŻNE OSTRZEŻENIA
Urządzenie zostało zaprojektowane wyłącznie do użytku domowego i nigdy nie powinno być wykorzys-
tywane do użytku komercyjnego lub przemysłowego.
Każde nieprawidłowe użycie lub niewłaściwa obsługa produktu spowoduje unieważnienie gwarancji.
Przed podłączeniem produktu do sieci należy sprawdzić, czy napięcie sieciowe jest takie samo, jak
wskazane na etykiecie produktu.
Ustawić urządzenie na płaskiej, równej powierzchni.
Podczas użytkowania przewód zasilania nie może być splątany ani okręcony wokół produktu.
Nie używaj, nie podłączaj ani nie odłączaj urządzenia od sieci mając mokre dłonie lub/i stopy. Nie ciągnąć
za przewód zasilania w celu odłączenia urządzenia od sieci. Nie używaj przewodu do przenoszenia
urządzenia.
WAŻNE. Podczas obsługi frytkownicy Air Fryer należy utrzymywać co najmniej centymetrowy odstęp z
każdej strony, aby umożliwić odpowiedni przepływ powietrza.
NIE ustawiać frytkownicy Air Fryer pod szafkami, za żaluzjami lub zasłonami. Istnieje ryzyko przegrza-
nia/pożaru.
Nie przykrywać żadnych części frytkownicy ścierką itp., może to spowodować przegrzanie. Istnieje ryzyko
pożaru.
To jest frytkownica AIR FRYER. Do gotowania wymagana jest niewielka ilość oleju. Nie napełniać pojem-
nika olejem lub tłuszczem, ponieważ może to spowodować zagrożenie pożarowe.
Nie należy używać żadnych innych akcesoriów niż zalecane przez producenta.
Zawsze zakładaj ochronne, izolowane rękawice kuchenne podczas wkładania lub wyjmowania rzeczy z
frytkownicy.
Urządzenia należy używać na poziomej, stabilnej, odpornej na nagrzewanie powierzchni. Przy pierwszym
użyciu frytkownicy Air Fryer może się pojawić delikatny nieprzyjemny zapach lub niewielka ilość dymu.
Jest to normalne, po prostu wypalają się pozostałości produkcyjne.
Składniki przeznaczone do smażenia należy zawsze umieszczać w koszyku, aby zapobiec ich kontaktowi
z elementami grzejnymi.
W przypadku awarii lub uszkodzenia należy natychmiast odłączyć produkt od sieci i skontaktować się z
oficjalnym działem serwisowym wsparcia technicznego. Nie otwierać urządzenia, aby zapobiec ryzyku
powstania niebezpieczeństwa. Tylko wykwalifikowany personel techniczny z oficjalnego działu serwisowe-
go marki może przeprowadzać naprawy urządzenia i inne procedury.
Firma Eurogama Sp. z o.o. zrzeka się wszelkiej odpowiedzialności za szkody, które mogą wystąpić u
ludzi, zwierząt lub w przedmiotach z powodu nieprzestrzegania niniejszych ostrzeżeń.
PRZED ROZPOCZĘCIEM UŻYTKOWANIA
1. Usunąć wszystkie materiały opakowaniowe i naklejki znajdujące się wewnątrz i na zewnątrz frytkownicy
Air Fryer. Delikatnie przetrzeć wnętrze wilgotną ścierką lub ręcznikiem papierowym.
OSTRZEŻENIE: Nigdy nie zanurzać frytkownicy Air Fryer lub jej wtyczki w wodzie ani innych cieczach.
2. Pociągnąć za uchwyt kosza, aby wyjąć go z frytkownicy Air Fryer. Wyjąć tackę, używając uchwytu
znajdującego się na jej środku. Umyć kosz i tackę wewnątrz i na zewnątrz gąbką oraz ciepłą wodą z
mydłem. Kosz i tackę można myć na górnej półce zmywarki.
3. OSTRZEŻENIE: Nie używać szorstkich środków do czyszczenia ani ściereczek do szorowania.
4. Dokładnie osuszyć.
SPOSÓB UŻYTKOWANIA
1. Przygotować kosz i żądaną żywność
Za pomocą uchwytu tacki włożyć ją do kosza. Popchnąć w dół, aby zapewnić bezpieczne i poziome
położenie. Między tacką a dnem kosza powinna być niewielka przestrzeń.
Ostrzeżenie: Nigdy nie nalewać oleju do kosza. W przeciwieństwie do frytkownic do głębokiego smażenia
frytkownice Air Fryer wymagają niewielkiej ilości oleju, aby uzyskać efekt chrupkości. W przypadku korzys-
tania z oleju należy obtoczyć żywność w oleju w oddzielnej misce, a następnie przenieść żywność na
tackę wewnątrz kosza.
2. Układanie żywności na tacce
Aby uzyskać więcej informacji o zalecanej maksymalnej ilości żywności, czasie gotowania, temperaturach
i wskazówkach, należy zapoznać się z rozdziałem „więcej wskazówek dotyczących gotowania”.
3. Wkładanie kosza do frytkownicy Air Fryer.
Włożyć kosz do frytkownicy Air Fryer za pomocą jego uchwytu. Popchnąć, aby zamknąć.
4. Podłączanie frytkownicy Air Fryer do sieci.
Jeżeli frytkownica Air Fryer jest podłączona do sieci, kontrolka zasilania będzie świecić. Kontrolka
nagrzewania NIE będzie świecić, dopóki pokrętło wyłącznika czasowego jest obrócone poza zero.
Uwaga: frytkownica Air Fryer nie będzie działać, jeżeli kosz nie zostanie całkowicie wsunięty w swoje
miejsce.
5. Ustawianie żądanej temperatury i czasu gotowania.
Ustawianie temperatury: obrócić pokrętło temperatury na żądaną temperaturę między 90ºC a 200ºC.
Ustawianie czasu: obrócić pokrętło wyłącznika czasowego na żądany czas. Po wybraniu czasu frytkowni-
ca Air Fryer zacznie tykać, wskazując odliczanie czasu.
Uwaga: maksymalny czas gotowania wynosi 60 minut.
6. Rozpoczęcie gotowania.
Po ustawieniu temperatury i czasu kontrolki zasilania i nagrzewania będą się świecić, a frytkownica Air
Fryer będzie gotować.
Sprawdzanie żywności podczas gotowania we frytkownicy Air Fryer:
A) Wyciągnąć kosz za pomocą uchwytu.
Uwaga: kontrolki zasilania i nagrzewania zgasną po wyciągnięciu kosza, ale wyłącznik czasowy będzie
nadal odliczał czas.
B) W razie potrzeby za pomocą uchwytu kosza wstrząsnąć i rozłożyć żywność wewnątrz kosza (lub użyć
szczypiec do obracania żywności), następnie włożyć kosz do urządzenia. Po ponownym umieszczeniu
kosza urządzenie automatycznie wznowi gotowanie.
7. Gotowa żywność usmażona na parze
Po zakończeniu przez wyłącznik czasowy odliczania frytkownica Air Fryer wyda pojedynczy dźwięk i się
wyłączy.
Wyciągnąć kosz za pomocą uchwytu. Wyjąć kosz ostrożnie, wyciągając prosto, aby zapobiec rozlaniu
oleju. Użyć rękawic ochronnych i/lub szczypiec, aby ostrożnie przenieść gorącą żywność na półmisek.
Przestroga: Kosz, tacka i zawartość po gotowaniu będą GORĄCE.
Gorący kosz umieścić do ostygnięcia na drucianej półce lub podkładce pod naczynia.
8. Przed czyszczeniem odłączyć frytkownicę Air Fryer od sieci i pozwolić na jej ostygnięcie.
9. Wyczyścić kosz i tackę po każdym użyciu.
WSKAZÓWKI DOTYCZĄCE GOTOWANIA
• Prawie każdą żywność, która jest tradycyjnie pieczona w piekarniku, można usmażyć na parze.
• Żywność zostanie najlepiej i najbardziej równomiernie ugotowana, jeżeli ma podobne wymiary i grubość.
• Mniejsze kawałki wymagają krótszego czasu gotowania niż większe.
• W celu osiągnięcia najlepszych rezultatów w jak najkrótszym czasie żywność należy smażyć na parze
partiami. Jeżeli to możliwe, unikać układania w stosy lub warstwowo.
• Większość gotowej do podgrzania żywności nie musi być obtaczana w oleju przed smażeniem na parze.
Większość już zawiera olej i inne składniki poprawiające zarumienienie i chrupkość.
• Mrożone przekąski i przystawki bardzo dobrze smażą się na parze. W celu osiągnięcia najlepszych
rezultatów ułożyć je na tacce w pojedynczej warstwie.
• W przypadku układania żywności warstwowo należy pamiętać, by potrząsnąć koszem w połowie gotowa-
nia (lub obrócić żywność), aby umożliwić równomierne gotowanie.
• Żywność przygotowywaną od podstaw, taką jak frytki czy inne warzywa, należy obtoczyć w małej ilości
oleju, aby poprawić zarumienienie i chrupkość.
• Podczas smażenia na parze świeżych warzyw należy się upewnić, że są one całkowicie suche przed
obtoczeniem ich w oleju i smażeniem na parze, aby zapewnić maksymalną chrupkość.
• Frytkownice Air Fryer są doskonałe do rozmrażania żywności, łącznie z pizzą. W celu rozmrożenia
żywności należy ustawić temperaturę na 150ºC na maks. 10 minut.
PL
Unplug the product immediately from the mains in the event of any breakdown or damage and contact an official
technical support service. In order to prevent any risk of danger, do not open the device. Only qualified technical
personnel from the brand´s Official technical support service may carry out repairs or procedures on the device.
B&B TRENDS SL. disclaims all liability for damages that may occur to people, animals or objects, for the non-ob-
servance of these warnings.
BEFORE ITS FIRST USE
1. Remove all packing materials and stickers from the inside and outside of the Air Fryer. Gently wipe down
exterior with a damp cloth or paper towel.
WARNING: Never immerse the Air Fryer or its plug in water or any other liquids.
2. Pull the basket handle to remove the basket from the Air Fryer. Use the tray handle, in the center of the
tray, to remove the tray. Use a sponge and warm, soapy water to wash the inside and outside of the basket
and tray. The basket and the tray are top-rack dishwasher safe.
3. WARNING: Do not use abrasive cleaning agents or scouring pads.
4. Dry thoroughly.
HOW TO USE
1. Prepare the basket and desired food.
Use the tray handle to insert the tray into the basket. Push down to ensure it is secure and in a leveled
position. There should be a small amount of space between the tray and bottom of the basket.
Warning: Never fill the basket with oil. Unlike deep fryers, air fryers require little to no oil to produce crispy
results. If you choose to use oil, toss food with oil in a separate bowl and then transfer food to the tray
inside the basket.
2. Put food on tray.
Refer to the chart on “more cooking tips” for recommended maximum amounts of food, cooking times,
temperatures and tips.
3. Put the basket into the Air Fryer.
Use the Basket Handle to insert the basket into the Air Fryer. Push to close.
4. Plug in the Air Fryer.
The power indicator light will illuminate when the Air Fryer is plugged in. The heating indicator light will
NOT illuminate until the timer dial is turned past zero.
Note: The Air Fryer will not operate if the basket is not fully pushed into place.
5. Set desired cooking temperature and time.
Adjust the temperature: Turn the temperature dial to the desired temperature between 90ºC and 200ºC.
Keep the appliance and its cord out of reach of children
less than 8 years.
Appliances are not intended to be operated by means of
an external timer or separate remote-control system.
Disconnect the appliance when it is not in use and before
cleaning it. Let it cool before putting on, taking off parts
and cleaning it
Do not submerge the appliance in water or any other
liquid.
This appliance is intended for use at a maximum altitude
of 2000m above sea level.
IMPORTANT WARNINGS
This appliance is designed exclusively for domestic use, in no case should be a commercial or industrial use.
Any incorrect use or improper handling of the product shall render the warranty null and void.
Prior to plugging in the product, check that your mains voltage is the same as the one indicated on the product
label.
Place the appliance on a flat even surface
The mains connection cable must not be tangled or wrapped around the product during use.
Do not use the device, or connect and disconnect to the supply mains with the hands and/or feet wet. Do not pull
on the connection cord in order to unplug it or use it as a handle
IMPORTANT. When operating this Air Fryer, keep at least ten centimeters of free space on all sides of the oven to
allow for adequate air circulation.
DO NOT place your Air Fryer under cupboards, blinds or curtains. Risk of overheating / fire.
Do not cover any part of the Fryer with a cloth or similar, it will cause overheating. Risk of fire.
This is an AIR FRYER. It requires very little oil to cook. Do not fill the pot with oil or fat as this may cause a fire
hazard.
Do not use any accessories other than manufacturer recommended accessories in this Air Fryer.
Always wear protective, insulated oven gloves when inserting or removing items from the hot Air Fryer.
The appliance must be used on a level, stable heat-resistant surface. The first time you use your Air Fryer there
may be a slight odor or a small amount of smoke given off. This is normal and is just the manufacturing residues
burning off.
Always place the ingredients to be fried in the basket to prevent it from coming into contact with the heating
elements.
WE WOULD LIKE TO THANKS YOU FOR CHOOSING ZELMER,
WE WISH THE PRODUCT PERFORMS TO YOUR SATISFACTION AND PLEASURE.
WARNING
PLEASE READ THE INSTRUCTIONS FOR USE CAREFULLY PRIOR TO USING THE PRODUCT.
STORE THESE IN A SAFE PLACE FOR FUTURE REFERENCE.
DESCRIPTION
1. Heating indicator light (blue light)
2. Power indicator light (red light)
3. Timer dial (0-60 minutes)
4. Temperature dial (90ºC - 200ºC)
5. Fryer vents
6. Basket vents
7. Basket handle
8. Basket (1)
9. Tray
10. Tray handle
11. Silicon pad
SAFETY INSTRUCTIONS
If the supply cord is damaged it must be replaced by the
manufacturer, its service agent or similarly qualified
persons in order to avoid a hazard.
This appliance can be used by children aged from 8 years
and above and persons with reduced physical, sensory or
mental capabilities or lack of experience and knowledge if
they have been given supervision or instruction
concerning use of the appliance in a safe way and
understand the hazards involved. Children shall not play
with the appliance. Cleaning and user maintenance shall
not be made by children unless they are older than 8 and
supervised.
Adjust the time: Turn the timer dial to the desired time. Once a time is selected, the Air Fryer will begin to
tick, indicating the time is counting down.
Note: Maximum cooking time is 60 minutes.
6. Start cooking.
After setting the temperature and time, the power indicator light and the heating indicator light will illumina-
te and the Air Fryer will begin cooking.
To check food while the Air Fryer is cooking:
A) Use the basket handle to pull out the basket.
Note: The power indicator light and the heating indicator light will turn off once the basket is pulled out, but
the timer will continue to count down.
B) Use the basket handle to shake and redistribute the food inside the basket (or use tongs to flip food) if
necessary, then push the basket back into the unit. The unit will automatically resume cooking when the
basket is replaced.
7. Enjoy your air-fried food.
Once the timer completely counts down, the Air Fryer will ding once and turn off.
Use the basket handle to pull out the basket. Remove basket carefully by pulling out straight to prevent oil
spillage. Use protective gloves and/or tongs to carefully transfer the hot food to a serving plate.
Caution: The basket, tray and contents will be HOT after cooking.
Place the hot basket on a wire rack or trivet to cool.
8. Unplug the Air Fryer and let cool completely before cleaning.
9. Clean the basket and tray after every use.
COOKING TIPS
• Almost any food that is traditionally cooked in the oven can be air fried.
• Foods cook best and most evenly when they are of similar size and thickness.
• Smaller pieces of food require less cooking time than larger pieces.
• For best results in the shortest amount of time, air fry food in small batches. Avoid stacking or layering
when possible.
• Most prepackaged foods do not need to be tossed in oil before air frying. Most already contain oil and
other ingredients that enhance browning and crispiness
• Frozen appetizers and hors d’oeuvres air fry very well. For best results, arrange them on the tray in a
single layer.
• If layering foods, be sure to shake the basket halfway through (or flip food) to promote even cooking.
• Toss foods you are preparing from scratch, such as French fries or other vegetables, with a small amount
of oil to promote browning and crispiness.
• When air frying fresh vegetables, make sure to pat them dry completely before tossing with oil and air
frying to ensure maximum crispiness.
• Air fryers are great for reheating food, including pizza. To reheat your food, set the temperature to 150
for up to 10 minutes.

6
DZIĘKUJEMY, ŻE ZDECYDOWALI SIĘ PAŃSTWO NA ZAKUP FRYTKOWNICY BEZTŁUSZCZOWEJ
MARKI ZELMER. MAMY NADZIEJĘ, ŻE PRODUKT SPEŁNI PAŃSTWA OCZEKIWANIA.
OSTRZEŻENIE
Przed użyciem produktu należy dokładnie zapoznać się z niniejszą instrukcją obsługi. Należy ją
przechowywać w bezpiecznym miejscu do użytku w przyszłości.
OPIS
1. Lampka kontrolna nagrzewania (niebieska lampka)
2. Lampka kontrolna zasilania (czerwona lampka)
3. Pokrętło wyłącznika czasowego (0–60 minut)
4. Pokrętło regulacji temperatury (90ºC–200ºC)
5. Otwory wentylacyjne frytkownicy
6. Otwory wentylacyjne kosza
7. Uchwyt kosza
8. Kosz
9. Tacka
10. Uchwyt tacki
11. Podkładka silikonowa
INSTRUKCJE BEZPIECZEŃSTWA
Jeżeli przewód zasilający jest uszkodzony, musi zostać
wymieniony przez producenta, jego punkt serwisowy lub
osobę o podobnych kwalifikacjach, aby uniknąć
zagrożenia.
Urządzenie może być używane przez dzieci w wieku od 8
lat, a także osoby o obniżonych zdolnościach fizycznych,
sensorycznych i umysłowych oraz bez doświadczenia i
wiedzy, jeśli są nadzorowane lub zostały poinstruowane w
zakresie użytkowania urządzenia w bezpieczny sposób
oraz zrozumiały związane z tym zagrożenia. Dzieciom nie
wolno bawić się urządzeniem. Czyszczenie oraz
konserwacja urządzenia nie powinny być
przeprowadzane przez dzieci, chyba że mają więcej niż 8
lat i znajdują się pod nadzorem.
Urządzenie oraz jego przewód należy przechowywać
poza zasięgiem dzieci w wieku poniżej 8 lat.
Urządzenie nie jest przeznaczone do obsługi za pomocą
zewnętrznego wyłącznika czasowego lub oddzielnego
systemu zdalnego sterowania.
Gdy urządzenie nie jest używane oraz przed jego
czyszczeniem, należy odłączyć je od zasilania.
Pozostawić do ostygnięcia przed założeniem lub zdjęciem
części i czyszczeniem.
Nie zanurzać urządzenia w wodzie ani innej cieczy.
To urządzenie jest przeznaczone do użytku na
maksymalnej wysokości 2000 m powyżej poziomu morza.
WAŻNE OSTRZEŻENIA
Urządzenie zostało zaprojektowane wyłącznie do użytku domowego i nigdy nie powinno być wykorzys-
tywane do użytku komercyjnego lub przemysłowego.
Każde nieprawidłowe użycie lub niewłaściwa obsługa produktu spowoduje unieważnienie gwarancji.
Przed podłączeniem produktu do sieci należy sprawdzić, czy napięcie sieciowe jest takie samo, jak
wskazane na etykiecie produktu.
Ustawić urządzenie na płaskiej, równej powierzchni.
Podczas użytkowania przewód zasilania nie może być splątany ani okręcony wokół produktu.
Nie używaj, nie podłączaj ani nie odłączaj urządzenia od sieci mając mokre dłonie lub/i stopy. Nie ciągnąć
za przewód zasilania w celu odłączenia urządzenia od sieci. Nie używaj przewodu do przenoszenia
urządzenia.
WAŻNE. Podczas obsługi frytkownicy Air Fryer należy utrzymywać co najmniej centymetrowy odstęp z
każdej strony, aby umożliwić odpowiedni przepływ powietrza.
NIE ustawiać frytkownicy Air Fryer pod szafkami, za żaluzjami lub zasłonami. Istnieje ryzyko przegrza-
nia/pożaru.
Nie przykrywać żadnych części frytkownicy ścierką itp., może to spowodować przegrzanie. Istnieje ryzyko
pożaru.
To jest frytkownica AIR FRYER. Do gotowania wymagana jest niewielka ilość oleju. Nie napełniać pojem-
nika olejem lub tłuszczem, ponieważ może to spowodować zagrożenie pożarowe.
Nie należy używać żadnych innych akcesoriów niż zalecane przez producenta.
Zawsze zakładaj ochronne, izolowane rękawice kuchenne podczas wkładania lub wyjmowania rzeczy z
frytkownicy.
Urządzenia należy używać na poziomej, stabilnej, odpornej na nagrzewanie powierzchni. Przy pierwszym
użyciu frytkownicy Air Fryer może się pojawić delikatny nieprzyjemny zapach lub niewielka ilość dymu.
Jest to normalne, po prostu wypalają się pozostałości produkcyjne.
Składniki przeznaczone do smażenia należy zawsze umieszczać w koszyku, aby zapobiec ich kontaktowi
z elementami grzejnymi.
W przypadku awarii lub uszkodzenia należy natychmiast odłączyć produkt od sieci i skontaktować się z
oficjalnym działem serwisowym wsparcia technicznego. Nie otwierać urządzenia, aby zapobiec ryzyku
powstania niebezpieczeństwa. Tylko wykwalifikowany personel techniczny z oficjalnego działu serwisowe-
go marki może przeprowadzać naprawy urządzenia i inne procedury.
Firma Eurogama Sp. z o.o. zrzeka się wszelkiej odpowiedzialności za szkody, które mogą wystąpić u
ludzi, zwierząt lub w przedmiotach z powodu nieprzestrzegania niniejszych ostrzeżeń.
PRZED ROZPOCZĘCIEM UŻYTKOWANIA
1. Usunąć wszystkie materiały opakowaniowe i naklejki znajdujące się wewnątrz i na zewnątrz frytkownicy
Air Fryer. Delikatnie przetrzeć wnętrze wilgotną ścierką lub ręcznikiem papierowym.
OSTRZEŻENIE: Nigdy nie zanurzać frytkownicy Air Fryer lub jej wtyczki w wodzie ani innych cieczach.
2. Pociągnąć za uchwyt kosza, aby wyjąć go z frytkownicy Air Fryer. Wyjąć tackę, używając uchwytu
znajdującego się na jej środku. Umyć kosz i tackę wewnątrz i na zewnątrz gąbką oraz ciepłą wodą z
mydłem. Kosz i tackę można myć na górnej półce zmywarki.
3. OSTRZEŻENIE: Nie używać szorstkich środków do czyszczenia ani ściereczek do szorowania.
4. Dokładnie osuszyć.
SPOSÓB UŻYTKOWANIA
1. Przygotować kosz i żądaną żywność
Za pomocą uchwytu tacki włożyć ją do kosza. Popchnąć w dół, aby zapewnić bezpieczne i poziome
położenie. Między tacką a dnem kosza powinna być niewielka przestrzeń.
Ostrzeżenie: Nigdy nie nalewać oleju do kosza. W przeciwieństwie do frytkownic do głębokiego smażenia
frytkownice Air Fryer wymagają niewielkiej ilości oleju, aby uzyskać efekt chrupkości. W przypadku korzys-
tania z oleju należy obtoczyć żywność w oleju w oddzielnej misce, a następnie przenieść żywność na
tackę wewnątrz kosza.
2. Układanie żywności na tacce
Aby uzyskać więcej informacji o zalecanej maksymalnej ilości żywności, czasie gotowania, temperaturach
i wskazówkach, należy zapoznać się z rozdziałem „więcej wskazówek dotyczących gotowania”.
3. Wkładanie kosza do frytkownicy Air Fryer.
Włożyć kosz do frytkownicy Air Fryer za pomocą jego uchwytu. Popchnąć, aby zamknąć.
4. Podłączanie frytkownicy Air Fryer do sieci.
Jeżeli frytkownica Air Fryer jest podłączona do sieci, kontrolka zasilania będzie świecić. Kontrolka
nagrzewania NIE będzie świecić, dopóki pokrętło wyłącznika czasowego jest obrócone poza zero.
Uwaga: frytkownica Air Fryer nie będzie działać, jeżeli kosz nie zostanie całkowicie wsunięty w swoje
miejsce.
5. Ustawianie żądanej temperatury i czasu gotowania.
Ustawianie temperatury: obrócić pokrętło temperatury na żądaną temperaturę między 90ºC a 200ºC.
Ustawianie czasu: obrócić pokrętło wyłącznika czasowego na żądany czas. Po wybraniu czasu frytkowni-
ca Air Fryer zacznie tykać, wskazując odliczanie czasu.
Uwaga: maksymalny czas gotowania wynosi 60 minut.
6. Rozpoczęcie gotowania.
Po ustawieniu temperatury i czasu kontrolki zasilania i nagrzewania będą się świecić, a frytkownica Air
Fryer będzie gotować.
Sprawdzanie żywności podczas gotowania we frytkownicy Air Fryer:
A) Wyciągnąć kosz za pomocą uchwytu.
Uwaga: kontrolki zasilania i nagrzewania zgasną po wyciągnięciu kosza, ale wyłącznik czasowy będzie
nadal odliczał czas.
B) W razie potrzeby za pomocą uchwytu kosza wstrząsnąć i rozłożyć żywność wewnątrz kosza (lub użyć
szczypiec do obracania żywności), następnie włożyć kosz do urządzenia. Po ponownym umieszczeniu
kosza urządzenie automatycznie wznowi gotowanie.
7. Gotowa żywność usmażona na parze
Po zakończeniu przez wyłącznik czasowy odliczania frytkownica Air Fryer wyda pojedynczy dźwięk i się
wyłączy.
Wyciągnąć kosz za pomocą uchwytu. Wyjąć kosz ostrożnie, wyciągając prosto, aby zapobiec rozlaniu
oleju. Użyć rękawic ochronnych i/lub szczypiec, aby ostrożnie przenieść gorącą żywność na półmisek.
Przestroga: Kosz, tacka i zawartość po gotowaniu będą GORĄCE.
Gorący kosz umieścić do ostygnięcia na drucianej półce lub podkładce pod naczynia.
8. Przed czyszczeniem odłączyć frytkownicę Air Fryer od sieci i pozwolić na jej ostygnięcie.
9. Wyczyścić kosz i tackę po każdym użyciu.
WSKAZÓWKI DOTYCZĄCE GOTOWANIA
• Prawie każdą żywność, która jest tradycyjnie pieczona w piekarniku, można usmażyć na parze.
• Żywność zostanie najlepiej i najbardziej równomiernie ugotowana, jeżeli ma podobne wymiary i grubość.
• Mniejsze kawałki wymagają krótszego czasu gotowania niż większe.
• W celu osiągnięcia najlepszych rezultatów w jak najkrótszym czasie żywność należy smażyć na parze
partiami. Jeżeli to możliwe, unikać układania w stosy lub warstwowo.
• Większość gotowej do podgrzania żywności nie musi być obtaczana w oleju przed smażeniem na parze.
Większość już zawiera olej i inne składniki poprawiające zarumienienie i chrupkość.
• Mrożone przekąski i przystawki bardzo dobrze smażą się na parze. W celu osiągnięcia najlepszych
rezultatów ułożyć je na tacce w pojedynczej warstwie.
• W przypadku układania żywności warstwowo należy pamiętać, by potrząsnąć koszem w połowie gotowa-
nia (lub obrócić żywność), aby umożliwić równomierne gotowanie.
• Żywność przygotowywaną od podstaw, taką jak frytki czy inne warzywa, należy obtoczyć w małej ilości
oleju, aby poprawić zarumienienie i chrupkość.
• Podczas smażenia na parze świeżych warzyw należy się upewnić, że są one całkowicie suche przed
obtoczeniem ich w oleju i smażeniem na parze, aby zapewnić maksymalną chrupkość.
• Frytkownice Air Fryer są doskonałe do rozmrażania żywności, łącznie z pizzą. W celu rozmrożenia
żywności należy ustawić temperaturę na 150ºC na maks. 10 minut.
PL
Unplug the product immediately from the mains in the event of any breakdown or damage and contact an official
technical support service. In order to prevent any risk of danger, do not open the device. Only qualified technical
personnel from the brand´s Official technical support service may carry out repairs or procedures on the device.
B&B TRENDS SL. disclaims all liability for damages that may occur to people, animals or objects, for the non-ob-
servance of these warnings.
BEFORE ITS FIRST USE
1. Remove all packing materials and stickers from the inside and outside of the Air Fryer. Gently wipe down
exterior with a damp cloth or paper towel.
WARNING: Never immerse the Air Fryer or its plug in water or any other liquids.
2. Pull the basket handle to remove the basket from the Air Fryer. Use the tray handle, in the center of the
tray, to remove the tray. Use a sponge and warm, soapy water to wash the inside and outside of the basket
and tray. The basket and the tray are top-rack dishwasher safe.
3. WARNING: Do not use abrasive cleaning agents or scouring pads.
4. Dry thoroughly.
HOW TO USE
1. Prepare the basket and desired food.
Use the tray handle to insert the tray into the basket. Push down to ensure it is secure and in a leveled
position. There should be a small amount of space between the tray and bottom of the basket.
Warning: Never fill the basket with oil. Unlike deep fryers, air fryers require little to no oil to produce crispy
results. If you choose to use oil, toss food with oil in a separate bowl and then transfer food to the tray
inside the basket.
2. Put food on tray.
Refer to the chart on “more cooking tips” for recommended maximum amounts of food, cooking times,
temperatures and tips.
3. Put the basket into the Air Fryer.
Use the Basket Handle to insert the basket into the Air Fryer. Push to close.
4. Plug in the Air Fryer.
The power indicator light will illuminate when the Air Fryer is plugged in. The heating indicator light will
NOT illuminate until the timer dial is turned past zero.
Note: The Air Fryer will not operate if the basket is not fully pushed into place.
5. Set desired cooking temperature and time.
Adjust the temperature: Turn the temperature dial to the desired temperature between 90ºC and 200ºC.
Keep the appliance and its cord out of reach of children
less than 8 years.
Appliances are not intended to be operated by means of
an external timer or separate remote-control system.
Disconnect the appliance when it is not in use and before
cleaning it. Let it cool before putting on, taking off parts
and cleaning it
Do not submerge the appliance in water or any other
liquid.
This appliance is intended for use at a maximum altitude
of 2000m above sea level.
IMPORTANT WARNINGS
This appliance is designed exclusively for domestic use, in no case should be a commercial or industrial use.
Any incorrect use or improper handling of the product shall render the warranty null and void.
Prior to plugging in the product, check that your mains voltage is the same as the one indicated on the product
label.
Place the appliance on a flat even surface
The mains connection cable must not be tangled or wrapped around the product during use.
Do not use the device, or connect and disconnect to the supply mains with the hands and/or feet wet. Do not pull
on the connection cord in order to unplug it or use it as a handle
IMPORTANT. When operating this Air Fryer, keep at least ten centimeters of free space on all sides of the oven to
allow for adequate air circulation.
DO NOT place your Air Fryer under cupboards, blinds or curtains. Risk of overheating / fire.
Do not cover any part of the Fryer with a cloth or similar, it will cause overheating. Risk of fire.
This is an AIR FRYER. It requires very little oil to cook. Do not fill the pot with oil or fat as this may cause a fire
hazard.
Do not use any accessories other than manufacturer recommended accessories in this Air Fryer.
Always wear protective, insulated oven gloves when inserting or removing items from the hot Air Fryer.
The appliance must be used on a level, stable heat-resistant surface. The first time you use your Air Fryer there
may be a slight odor or a small amount of smoke given off. This is normal and is just the manufacturing residues
burning off.
Always place the ingredients to be fried in the basket to prevent it from coming into contact with the heating
elements.
WE WOULD LIKE TO THANKS YOU FOR CHOOSING ZELMER,
WE WISH THE PRODUCT PERFORMS TO YOUR SATISFACTION AND PLEASURE.
WARNING
PLEASE READ THE INSTRUCTIONS FOR USE CAREFULLY PRIOR TO USING THE PRODUCT.
STORE THESE IN A SAFE PLACE FOR FUTURE REFERENCE.
DESCRIPTION
1. Heating indicator light (blue light)
2. Power indicator light (red light)
3. Timer dial (0-60 minutes)
4. Temperature dial (90ºC - 200ºC)
5. Fryer vents
6. Basket vents
7. Basket handle
8. Basket (1)
9. Tray
10. Tray handle
11. Silicon pad
SAFETY INSTRUCTIONS
If the supply cord is damaged it must be replaced by the
manufacturer, its service agent or similarly qualified
persons in order to avoid a hazard.
This appliance can be used by children aged from 8 years
and above and persons with reduced physical, sensory or
mental capabilities or lack of experience and knowledge if
they have been given supervision or instruction
concerning use of the appliance in a safe way and
understand the hazards involved. Children shall not play
with the appliance. Cleaning and user maintenance shall
not be made by children unless they are older than 8 and
supervised.
Adjust the time: Turn the timer dial to the desired time. Once a time is selected, the Air Fryer will begin to
tick, indicating the time is counting down.
Note: Maximum cooking time is 60 minutes.
6. Start cooking.
After setting the temperature and time, the power indicator light and the heating indicator light will illumina-
te and the Air Fryer will begin cooking.
To check food while the Air Fryer is cooking:
A) Use the basket handle to pull out the basket.
Note: The power indicator light and the heating indicator light will turn off once the basket is pulled out, but
the timer will continue to count down.
B) Use the basket handle to shake and redistribute the food inside the basket (or use tongs to flip food) if
necessary, then push the basket back into the unit. The unit will automatically resume cooking when the
basket is replaced.
7. Enjoy your air-fried food.
Once the timer completely counts down, the Air Fryer will ding once and turn off.
Use the basket handle to pull out the basket. Remove basket carefully by pulling out straight to prevent oil
spillage. Use protective gloves and/or tongs to carefully transfer the hot food to a serving plate.
Caution: The basket, tray and contents will be HOT after cooking.
Place the hot basket on a wire rack or trivet to cool.
8. Unplug the Air Fryer and let cool completely before cleaning.
9. Clean the basket and tray after every use.
COOKING TIPS
• Almost any food that is traditionally cooked in the oven can be air fried.
• Foods cook best and most evenly when they are of similar size and thickness.
• Smaller pieces of food require less cooking time than larger pieces.
• For best results in the shortest amount of time, air fry food in small batches. Avoid stacking or layering
when possible.
• Most prepackaged foods do not need to be tossed in oil before air frying. Most already contain oil and
other ingredients that enhance browning and crispiness
• Frozen appetizers and hors d’oeuvres air fry very well. For best results, arrange them on the tray in a
single layer.
• If layering foods, be sure to shake the basket halfway through (or flip food) to promote even cooking.
• Toss foods you are preparing from scratch, such as French fries or other vegetables, with a small amount
of oil to promote browning and crispiness.
• When air frying fresh vegetables, make sure to pat them dry completely before tossing with oil and air
frying to ensure maximum crispiness.
• Air fryers are great for reheating food, including pizza. To reheat your food, set the temperature to 150
for up to 10 minutes.

7
Unplug the product immediately from the mains in the event of any breakdown or damage and contact an official
technical support service. In order to prevent any risk of danger, do not open the device. Only qualified technical
personnel from the brand´s Official technical support service may carry out repairs or procedures on the device.
B&B TRENDS SL. disclaims all liability for damages that may occur to people, animals or objects, for the non-ob-
servance of these warnings.
BEFORE ITS FIRST USE
1. Remove all packing materials and stickers from the inside and outside of the Air Fryer. Gently wipe down
exterior with a damp cloth or paper towel.
WARNING: Never immerse the Air Fryer or its plug in water or any other liquids.
2. Pull the basket handle to remove the basket from the Air Fryer. Use the tray handle, in the center of the
tray, to remove the tray. Use a sponge and warm, soapy water to wash the inside and outside of the basket
and tray. The basket and the tray are top-rack dishwasher safe.
3. WARNING: Do not use abrasive cleaning agents or scouring pads.
4. Dry thoroughly.
HOW TO USE
1. Prepare the basket and desired food.
Use the tray handle to insert the tray into the basket. Push down to ensure it is secure and in a leveled
position. There should be a small amount of space between the tray and bottom of the basket.
Warning: Never fill the basket with oil. Unlike deep fryers, air fryers require little to no oil to produce crispy
results. If you choose to use oil, toss food with oil in a separate bowl and then transfer food to the tray
inside the basket.
2. Put food on tray.
Refer to the chart on “more cooking tips” for recommended maximum amounts of food, cooking times,
temperatures and tips.
3. Put the basket into the Air Fryer.
Use the Basket Handle to insert the basket into the Air Fryer. Push to close.
4. Plug in the Air Fryer.
The power indicator light will illuminate when the Air Fryer is plugged in. The heating indicator light will
NOT illuminate until the timer dial is turned past zero.
Note: The Air Fryer will not operate if the basket is not fully pushed into place.
5. Set desired cooking temperature and time.
Adjust the temperature: Turn the temperature dial to the desired temperature between 90ºC and 200ºC.
PL
Keep the appliance and its cord out of reach of children
less than 8 years.
Appliances are not intended to be operated by means of
an external timer or separate remote-control system.
Disconnect the appliance when it is not in use and before
cleaning it. Let it cool before putting on, taking off parts
and cleaning it
Do not submerge the appliance in water or any other
liquid.
This appliance is intended for use at a maximum altitude
of 2000m above sea level.
IMPORTANT WARNINGS
This appliance is designed exclusively for domestic use, in no case should be a commercial or industrial use.
Any incorrect use or improper handling of the product shall render the warranty null and void.
Prior to plugging in the product, check that your mains voltage is the same as the one indicated on the product
label.
Place the appliance on a flat even surface
The mains connection cable must not be tangled or wrapped around the product during use.
Do not use the device, or connect and disconnect to the supply mains with the hands and/or feet wet. Do not pull
on the connection cord in order to unplug it or use it as a handle
IMPORTANT. When operating this Air Fryer, keep at least ten centimeters of free space on all sides of the oven to
allow for adequate air circulation.
DO NOT place your Air Fryer under cupboards, blinds or curtains. Risk of overheating / fire.
Do not cover any part of the Fryer with a cloth or similar, it will cause overheating. Risk of fire.
This is an AIR FRYER. It requires very little oil to cook. Do not fill the pot with oil or fat as this may cause a fire
hazard.
Do not use any accessories other than manufacturer recommended accessories in this Air Fryer.
Always wear protective, insulated oven gloves when inserting or removing items from the hot Air Fryer.
The appliance must be used on a level, stable heat-resistant surface. The first time you use your Air Fryer there
may be a slight odor or a small amount of smoke given off. This is normal and is just the manufacturing residues
burning off.
Always place the ingredients to be fried in the basket to prevent it from coming into contact with the heating
elements.
WE WOULD LIKE TO THANKS YOU FOR CHOOSING ZELMER,
WE WISH THE PRODUCT PERFORMS TO YOUR SATISFACTION AND PLEASURE.
WARNING
PLEASE READ THE INSTRUCTIONS FOR USE CAREFULLY PRIOR TO USING THE PRODUCT.
STORE THESE IN A SAFE PLACE FOR FUTURE REFERENCE.
DESCRIPTION
1. Heating indicator light (blue light)
2. Power indicator light (red light)
3. Timer dial (0-60 minutes)
4. Temperature dial (90ºC - 200ºC)
5. Fryer vents
6. Basket vents
7. Basket handle
8. Basket (1)
9. Tray
10. Tray handle
11. Silicon pad
SAFETY INSTRUCTIONS
If the supply cord is damaged it must be replaced by the
manufacturer, its service agent or similarly qualified
persons in order to avoid a hazard.
This appliance can be used by children aged from 8 years
and above and persons with reduced physical, sensory or
mental capabilities or lack of experience and knowledge if
they have been given supervision or instruction
concerning use of the appliance in a safe way and
understand the hazards involved. Children shall not play
with the appliance. Cleaning and user maintenance shall
not be made by children unless they are older than 8 and
supervised.
Adjust the time: Turn the timer dial to the desired time. Once a time is selected, the Air Fryer will begin to
tick, indicating the time is counting down.
Note: Maximum cooking time is 60 minutes.
6. Start cooking.
After setting the temperature and time, the power indicator light and the heating indicator light will illumina-
te and the Air Fryer will begin cooking.
To check food while the Air Fryer is cooking:
A) Use the basket handle to pull out the basket.
Note: The power indicator light and the heating indicator light will turn off once the basket is pulled out, but
the timer will continue to count down.
B) Use the basket handle to shake and redistribute the food inside the basket (or use tongs to flip food) if
necessary, then push the basket back into the unit. The unit will automatically resume cooking when the
basket is replaced.
7. Enjoy your air-fried food.
Once the timer completely counts down, the Air Fryer will ding once and turn off.
Use the basket handle to pull out the basket. Remove basket carefully by pulling out straight to prevent oil
spillage. Use protective gloves and/or tongs to carefully transfer the hot food to a serving plate.
Caution: The basket, tray and contents will be HOT after cooking.
Place the hot basket on a wire rack or trivet to cool.
8. Unplug the Air Fryer and let cool completely before cleaning.
9. Clean the basket and tray after every use.
COOKING TIPS
• Almost any food that is traditionally cooked in the oven can be air fried.
• Foods cook best and most evenly when they are of similar size and thickness.
• Smaller pieces of food require less cooking time than larger pieces.
• For best results in the shortest amount of time, air fry food in small batches. Avoid stacking or layering
when possible.
• Most prepackaged foods do not need to be tossed in oil before air frying. Most already contain oil and
other ingredients that enhance browning and crispiness
• Frozen appetizers and hors d’oeuvres air fry very well. For best results, arrange them on the tray in a
single layer.
• If layering foods, be sure to shake the basket halfway through (or flip food) to promote even cooking.
• Toss foods you are preparing from scratch, such as French fries or other vegetables, with a small amount
of oil to promote browning and crispiness.
• When air frying fresh vegetables, make sure to pat them dry completely before tossing with oil and air
frying to ensure maximum crispiness.
• Air fryers are great for reheating food, including pizza. To reheat your food, set the temperature to 150
for up to 10 minutes.
WIĘCEJ WSKAZÓWEK DOTYCZĄCYCH GOTOWANIA
Rodzaj Ilość Wskazówka dotycząca gotowania
Czas
(min) Temp Cº Wstrząsnąć/
Obrócić
Bekon
Pierś z kurczaka
(gruba, około 8 uncji)
Pałki z kurczaka / Udka
(5 uncji każde)"
Kawałki kurczaka
Skrzydełka z kurczaka
(skrzydełka i podudzia oddzielnie)
Paluszki rybne
(zamrożone)
Frytki
(zamrożone/ cienkie)
Frytki
(zamrożone/grube)
Frytki
(domowe pokrojone
na kawałki 1/4 × 1/4 cala)
Hamburgery
(4 uncje / 120 g każdy)"
Paluszki z sera mozzarella
(zamrożone)
Kotlety (z kością, około
8 uncji / 220 g)
Kotlety (bez kości,
około 3 uncje / 90 g)
Stek
Łosoś (o szerokości 1 cala,
4,5 uncji)
Krewetki (duże)
4 kawałki
Około
3 kawałki
Około
5 kawałków
Około 20
kawałków
12 kawałków
20 kawałków
350–450 g
350–500 g
350–500 g
2 kawałki
20 kawałków
2 kawałki
4 kawałki
450 g
3 kawałki
900g
6 (ciągnący się)
8 (chrupki)
25-30
16-18
10
18-20
7
16-20
18-22
20-25
12-15
7
12-15
15
12-15
10-12
12
200
190
200
200
200
200
200
200
200
190
200
200
200
200
200
200
Nie
Tak
Nie
Tak
Tak
Tak
Tak
Tak
Tak
Tak
Tak
Tak
Nie
Nie
Nie
Tak
Po ugotowaniu za pomocą szczypiec
przenieść bekon na talerz wyłożony
ręcznikiem papierowym..
Nasmarować olejem, dodać sól i
ulubione przyprawy.
Przyprawić solą i wybranymi
przyprawami
Przyprawić solą; jeść same lub, po
upieczeniu, podawać w ulubionym
sosie do skrzydełek z kurczaka..
Wstrząsnąć dwukrotnie.s
Wstrząsnąć dwukrotnie.
Wypłukać w zimnej wodzie, osuszyć,
obtoczyć w 1 łyżeczce oliwy z oliwek,
przyprawić solą i ulubionymi
przyprawami; za pomocą szczypiec
obracać podczas gotowania
Nasmarować olejem, przyprawić solą
i ulubionymi przyprawami, takimi jak
świeżo mielony czarny pieprz i
sproszkowany czosnek.
Przyprawić solą i ulubionymi
przyprawami.
Przyprawić solą i ulubionymi
przyprawami.
Przyprawić solą i ulubionymi
przyprawami.
Nasmarować skórę olejem i umieścić
na tacce skórą do dołu. Przyprawić
solą i ulubionymi przyprawami.
Osuszyć, obtoczyć w 1/2 łyżeczki
oliwy z oliwek, przyprawić solą i
ulubionymi przyprawami; często
wstrząsać.
Zalecane temperatury i czasy są oparte na zalecanych ilościach i masach. W przypadku użycia mniejszej
ilości lub masy należy sprawdzać żywność przed zalecanym czasem, ponieważ prawdopodobnie ugotuje
się szybciej.
Uwaga: ta tabela jest tylko poradnikiem i nie zawiera dokładnych przepisów.
Uwaga: należy zachować szczególną ostrożność podczas obchodzenia się z gorąca żywnością w
koszu frytkownicy. Podczas przygotowywania tłustej żywności nadmiar oleju będzie kapał do kosza.
Opróżnić kosz po każdym użyciu.

Unplug the product immediately from the mains in the event of any breakdown or damage and contact an official
technical support service. In order to prevent any risk of danger, do not open the device. Only qualified technical
personnel from the brand´s Official technical support service may carry out repairs or procedures on the device.
B&B TRENDS SL. disclaims all liability for damages that may occur to people, animals or objects, for the non-ob-
servance of these warnings.
BEFORE ITS FIRST USE
1. Remove all packing materials and stickers from the inside and outside of the Air Fryer. Gently wipe down
exterior with a damp cloth or paper towel.
WARNING: Never immerse the Air Fryer or its plug in water or any other liquids.
2. Pull the basket handle to remove the basket from the Air Fryer. Use the tray handle, in the center of the
tray, to remove the tray. Use a sponge and warm, soapy water to wash the inside and outside of the basket
and tray. The basket and the tray are top-rack dishwasher safe.
3. WARNING: Do not use abrasive cleaning agents or scouring pads.
4. Dry thoroughly.
HOW TO USE
1. Prepare the basket and desired food.
Use the tray handle to insert the tray into the basket. Push down to ensure it is secure and in a leveled
position. There should be a small amount of space between the tray and bottom of the basket.
Warning: Never fill the basket with oil. Unlike deep fryers, air fryers require little to no oil to produce crispy
results. If you choose to use oil, toss food with oil in a separate bowl and then transfer food to the tray
inside the basket.
2. Put food on tray.
Refer to the chart on “more cooking tips” for recommended maximum amounts of food, cooking times,
temperatures and tips.
3. Put the basket into the Air Fryer.
Use the Basket Handle to insert the basket into the Air Fryer. Push to close.
4. Plug in the Air Fryer.
The power indicator light will illuminate when the Air Fryer is plugged in. The heating indicator light will
NOT illuminate until the timer dial is turned past zero.
Note: The Air Fryer will not operate if the basket is not fully pushed into place.
5. Set desired cooking temperature and time.
Adjust the temperature: Turn the temperature dial to the desired temperature between 90ºC and 200ºC.
Keep the appliance and its cord out of reach of children
less than 8 years.
Appliances are not intended to be operated by means of
an external timer or separate remote-control system.
Disconnect the appliance when it is not in use and before
cleaning it. Let it cool before putting on, taking off parts
and cleaning it
Do not submerge the appliance in water or any other
liquid.
This appliance is intended for use at a maximum altitude
of 2000m above sea level.
IMPORTANT WARNINGS
This appliance is designed exclusively for domestic use, in no case should be a commercial or industrial use.
Any incorrect use or improper handling of the product shall render the warranty null and void.
Prior to plugging in the product, check that your mains voltage is the same as the one indicated on the product
label.
Place the appliance on a flat even surface
The mains connection cable must not be tangled or wrapped around the product during use.
Do not use the device, or connect and disconnect to the supply mains with the hands and/or feet wet. Do not pull
on the connection cord in order to unplug it or use it as a handle
IMPORTANT. When operating this Air Fryer, keep at least ten centimeters of free space on all sides of the oven to
allow for adequate air circulation.
DO NOT place your Air Fryer under cupboards, blinds or curtains. Risk of overheating / fire.
Do not cover any part of the Fryer with a cloth or similar, it will cause overheating. Risk of fire.
This is an AIR FRYER. It requires very little oil to cook. Do not fill the pot with oil or fat as this may cause a fire
hazard.
Do not use any accessories other than manufacturer recommended accessories in this Air Fryer.
Always wear protective, insulated oven gloves when inserting or removing items from the hot Air Fryer.
The appliance must be used on a level, stable heat-resistant surface. The first time you use your Air Fryer there
may be a slight odor or a small amount of smoke given off. This is normal and is just the manufacturing residues
burning off.
Always place the ingredients to be fried in the basket to prevent it from coming into contact with the heating
elements.
8
WE WOULD LIKE TO THANKS YOU FOR CHOOSING ZELMER,
WE WISH THE PRODUCT PERFORMS TO YOUR SATISFACTION AND PLEASURE.
WARNING
PLEASE READ THE INSTRUCTIONS FOR USE CAREFULLY PRIOR TO USING THE PRODUCT.
STORE THESE IN A SAFE PLACE FOR FUTURE REFERENCE.
DESCRIPTION
1. Heating indicator light (blue light)
2. Power indicator light (red light)
3. Timer dial (0-60 minutes)
4. Temperature dial (90ºC - 200ºC)
5. Fryer vents
6. Basket vents
7. Basket handle
8. Basket (1)
9. Tray
10. Tray handle
11. Silicon pad
SAFETY INSTRUCTIONS
If the supply cord is damaged it must be replaced by the
manufacturer, its service agent or similarly qualified
persons in order to avoid a hazard.
This appliance can be used by children aged from 8 years
and above and persons with reduced physical, sensory or
mental capabilities or lack of experience and knowledge if
they have been given supervision or instruction
concerning use of the appliance in a safe way and
understand the hazards involved. Children shall not play
with the appliance. Cleaning and user maintenance shall
not be made by children unless they are older than 8 and
supervised.
UTYLIZACJA PRODUKTU
Produkt ten jest zgodny z europejską dyrektywą 2012/19/UE w sprawie urządzeń elektryczn-
ych i elektronicznych, znaną jako WEEE (Waste Electrical and Electronic Equipment), która
stanowi ramy prawne obowiązujące w Unii Europejskiej w zakresie utylizacji i ponownego
użycia zużytych urządzeń elektronicznych i elektrycznych. Nie wyrzucać produktu do kosza –
zamiast tego należy się udać do najbliższego punktu zbiórki odpadów elektrycznych i
elektronicznych.
Adjust the time: Turn the timer dial to the desired time. Once a time is selected, the Air Fryer will begin to
tick, indicating the time is counting down.
Note: Maximum cooking time is 60 minutes.
6. Start cooking.
After setting the temperature and time, the power indicator light and the heating indicator light will illumina-
te and the Air Fryer will begin cooking.
To check food while the Air Fryer is cooking:
A) Use the basket handle to pull out the basket.
Note: The power indicator light and the heating indicator light will turn off once the basket is pulled out, but
the timer will continue to count down.
B) Use the basket handle to shake and redistribute the food inside the basket (or use tongs to flip food) if
necessary, then push the basket back into the unit. The unit will automatically resume cooking when the
basket is replaced.
7. Enjoy your air-fried food.
Once the timer completely counts down, the Air Fryer will ding once and turn off.
Use the basket handle to pull out the basket. Remove basket carefully by pulling out straight to prevent oil
spillage. Use protective gloves and/or tongs to carefully transfer the hot food to a serving plate.
Caution: The basket, tray and contents will be HOT after cooking.
Place the hot basket on a wire rack or trivet to cool.
8. Unplug the Air Fryer and let cool completely before cleaning.
9. Clean the basket and tray after every use.
COOKING TIPS
• Almost any food that is traditionally cooked in the oven can be air fried.
• Foods cook best and most evenly when they are of similar size and thickness.
• Smaller pieces of food require less cooking time than larger pieces.
• For best results in the shortest amount of time, air fry food in small batches. Avoid stacking or layering
when possible.
• Most prepackaged foods do not need to be tossed in oil before air frying. Most already contain oil and
other ingredients that enhance browning and crispiness
• Frozen appetizers and hors d’oeuvres air fry very well. For best results, arrange them on the tray in a
single layer.
• If layering foods, be sure to shake the basket halfway through (or flip food) to promote even cooking.
• Toss foods you are preparing from scratch, such as French fries or other vegetables, with a small amount
of oil to promote browning and crispiness.
• When air frying fresh vegetables, make sure to pat them dry completely before tossing with oil and air
frying to ensure maximum crispiness.
• Air fryers are great for reheating food, including pizza. To reheat your food, set the temperature to 150
for up to 10 minutes.
PL
Frytkownica Air Fryer
nie działa / nie włącza się.
1. Frytkownica Air Fryer nie jest
prawidłowo podłączona do sieci.
2. Wyłącznik czasowy nie jest
obrócony poza zero.
3. Kosz nie jest całkowicie wsunięty
na miejsce.
1. Frytkownica Air Fryer jest
używana po raz pierwszy.
2. Na lub w smażonej na parze
żywności znajduje się zbyt dużo
tłuszczu.
3. W koszu znajduje się resztka
tłuszczu.
1. Żywność nie miała wystarczającej
ilości oleju.
2. Żywność pokryto zbyt dużą
ilością oleju i rozmokła.
Żywność o dużej zawartości
tłuszczu, taka jak kiełbasa, podczas
gotowania w wysokiej
temperaturze wytwarza znaczną
ilość dymu.
1. Upewnić się, że wtyczka jest
prawidłowo zabezpieczona w
gniazdku ściennym.
2. Obrócić pokrętło wyłącznika
czasowego poza zero, aby rozpocząć
gotowanie.
3. Za pomocą uchwytu kosza wsunąć
go mocno w obudowę frytkownicy Air
Fryer.
1. Dym ustąpi po pierwszym użyciu.
2. Delikatnie pokrywać żywność
olejem.
3. Wyczyścić kosz po każdym użyciu.
1. Żywność nie miała wystarczającej
ilości oleju.
2. Żywność pokryto zbyt dużą ilością
oleju i rozmokła.
Nie uszkodzi to frytkownicy Air Fryer
ani nie wpłynie na ostateczny efekt
żywności, ale aby uniknąć dymu,
należy smażyć w niższej
temperaturze.
Problem Możliwa przyczyna Rozwiązanie
PORADNIK ROZWIĄZYWANIA PROBLEMÓW
Z frytkownicy Air Fryer
wydobywa się dym.
Żywność smażona na parze
nie jest chrupka.
Frytkownica Air Fryer
wytwarza znaczną ilość dymu.
CZYSZCZENIE I KONSERWACJA
• Przed czyszczeniem upewnić się, że frytkownica Air Fryer jest odłączona od sieci i zimna.
• Jeżeli frytkownica Air Fryer i kosz są zimne, wyjąć kosz (jeśli nie został już wyjęty). Wyjąć tackę za pomocą
jej uchwytu. Umyć kosz i tackę wewnątrz i na zewnątrz gąbką oraz ciepłą wodą z mydłem.
Ostrzeżenie: Nie używać szorstkich środków do czyszczenia ani ściereczek do szorowania.
• Kosz i tackę można myć na górnej półce zmywarki.
• Delikatnie przetrzeć wnętrze wilgotną ścierką lub ręcznikiem papierowym.
• Nigdy nie zanurzać frytkownicy Air Fryer lub jej wtyczki w wodzie ani innej cieczy.
• Dokładnie wysuszyć wszystkie części przed przechowywaniem.
• Przechowywać frytkownicę Air Fryer w chłodnym, suchym miejscu.

Unplug the product immediately from the mains in the event of any breakdown or damage and contact an official
technical support service. In order to prevent any risk of danger, do not open the device. Only qualified technical
personnel from the brand´s Official technical support service may carry out repairs or procedures on the device.
B&B TRENDS SL. disclaims all liability for damages that may occur to people, animals or objects, for the non-ob-
servance of these warnings.
BEFORE ITS FIRST USE
1. Remove all packing materials and stickers from the inside and outside of the Air Fryer. Gently wipe down
exterior with a damp cloth or paper towel.
WARNING: Never immerse the Air Fryer or its plug in water or any other liquids.
2. Pull the basket handle to remove the basket from the Air Fryer. Use the tray handle, in the center of the
tray, to remove the tray. Use a sponge and warm, soapy water to wash the inside and outside of the basket
and tray. The basket and the tray are top-rack dishwasher safe.
3. WARNING: Do not use abrasive cleaning agents or scouring pads.
4. Dry thoroughly.
HOW TO USE
1. Prepare the basket and desired food.
Use the tray handle to insert the tray into the basket. Push down to ensure it is secure and in a leveled
position. There should be a small amount of space between the tray and bottom of the basket.
Warning: Never fill the basket with oil. Unlike deep fryers, air fryers require little to no oil to produce crispy
results. If you choose to use oil, toss food with oil in a separate bowl and then transfer food to the tray
inside the basket.
2. Put food on tray.
Refer to the chart on “more cooking tips” for recommended maximum amounts of food, cooking times,
temperatures and tips.
3. Put the basket into the Air Fryer.
Use the Basket Handle to insert the basket into the Air Fryer. Push to close.
4. Plug in the Air Fryer.
The power indicator light will illuminate when the Air Fryer is plugged in. The heating indicator light will
NOT illuminate until the timer dial is turned past zero.
Note: The Air Fryer will not operate if the basket is not fully pushed into place.
5. Set desired cooking temperature and time.
Adjust the temperature: Turn the temperature dial to the desired temperature between 90ºC and 200ºC.
9
Keep the appliance and its cord out of reach of children
less than 8 years.
Appliances are not intended to be operated by means of
an external timer or separate remote-control system.
Disconnect the appliance when it is not in use and before
cleaning it. Let it cool before putting on, taking off parts
and cleaning it
Do not submerge the appliance in water or any other
liquid.
This appliance is intended for use at a maximum altitude
of 2000m above sea level.
IMPORTANT WARNINGS
This appliance is designed exclusively for domestic use, in no case should be a commercial or industrial use.
Any incorrect use or improper handling of the product shall render the warranty null and void.
Prior to plugging in the product, check that your mains voltage is the same as the one indicated on the product
label.
Place the appliance on a flat even surface
The mains connection cable must not be tangled or wrapped around the product during use.
Do not use the device, or connect and disconnect to the supply mains with the hands and/or feet wet. Do not pull
on the connection cord in order to unplug it or use it as a handle
IMPORTANT. When operating this Air Fryer, keep at least ten centimeters of free space on all sides of the oven to
allow for adequate air circulation.
DO NOT place your Air Fryer under cupboards, blinds or curtains. Risk of overheating / fire.
Do not cover any part of the Fryer with a cloth or similar, it will cause overheating. Risk of fire.
This is an AIR FRYER. It requires very little oil to cook. Do not fill the pot with oil or fat as this may cause a fire
hazard.
Do not use any accessories other than manufacturer recommended accessories in this Air Fryer.
Always wear protective, insulated oven gloves when inserting or removing items from the hot Air Fryer.
The appliance must be used on a level, stable heat-resistant surface. The first time you use your Air Fryer there
may be a slight odor or a small amount of smoke given off. This is normal and is just the manufacturing residues
burning off.
Always place the ingredients to be fried in the basket to prevent it from coming into contact with the heating
elements.
WE WOULD LIKE TO THANKS YOU FOR CHOOSING ZELMER,
WE WISH THE PRODUCT PERFORMS TO YOUR SATISFACTION AND PLEASURE.
WARNING
PLEASE READ THE INSTRUCTIONS FOR USE CAREFULLY PRIOR TO USING THE PRODUCT.
STORE THESE IN A SAFE PLACE FOR FUTURE REFERENCE.
DESCRIPTION
1. Heating indicator light (blue light)
2. Power indicator light (red light)
3. Timer dial (0-60 minutes)
4. Temperature dial (90ºC - 200ºC)
5. Fryer vents
6. Basket vents
7. Basket handle
8. Basket (1)
9. Tray
10. Tray handle
11. Silicon pad
SAFETY INSTRUCTIONS
If the supply cord is damaged it must be replaced by the
manufacturer, its service agent or similarly qualified
persons in order to avoid a hazard.
This appliance can be used by children aged from 8 years
and above and persons with reduced physical, sensory or
mental capabilities or lack of experience and knowledge if
they have been given supervision or instruction
concerning use of the appliance in a safe way and
understand the hazards involved. Children shall not play
with the appliance. Cleaning and user maintenance shall
not be made by children unless they are older than 8 and
supervised.
EN
Adjust the time: Turn the timer dial to the desired time. Once a time is selected, the Air Fryer will begin to
tick, indicating the time is counting down.
Note: Maximum cooking time is 60 minutes.
6. Start cooking.
After setting the temperature and time, the power indicator light and the heating indicator light will illumina-
te and the Air Fryer will begin cooking.
To check food while the Air Fryer is cooking:
A) Use the basket handle to pull out the basket.
Note: The power indicator light and the heating indicator light will turn off once the basket is pulled out, but
the timer will continue to count down.
B) Use the basket handle to shake and redistribute the food inside the basket (or use tongs to flip food) if
necessary, then push the basket back into the unit. The unit will automatically resume cooking when the
basket is replaced.
7. Enjoy your air-fried food.
Once the timer completely counts down, the Air Fryer will ding once and turn off.
Use the basket handle to pull out the basket. Remove basket carefully by pulling out straight to prevent oil
spillage. Use protective gloves and/or tongs to carefully transfer the hot food to a serving plate.
Caution: The basket, tray and contents will be HOT after cooking.
Place the hot basket on a wire rack or trivet to cool.
8. Unplug the Air Fryer and let cool completely before cleaning.
9. Clean the basket and tray after every use.
COOKING TIPS
• Almost any food that is traditionally cooked in the oven can be air fried.
• Foods cook best and most evenly when they are of similar size and thickness.
• Smaller pieces of food require less cooking time than larger pieces.
• For best results in the shortest amount of time, air fry food in small batches. Avoid stacking or layering
when possible.
• Most prepackaged foods do not need to be tossed in oil before air frying. Most already contain oil and
other ingredients that enhance browning and crispiness
• Frozen appetizers and hors d’oeuvres air fry very well. For best results, arrange them on the tray in a
single layer.
• If layering foods, be sure to shake the basket halfway through (or flip food) to promote even cooking.
• Toss foods you are preparing from scratch, such as French fries or other vegetables, with a small amount
of oil to promote browning and crispiness.
• When air frying fresh vegetables, make sure to pat them dry completely before tossing with oil and air
frying to ensure maximum crispiness.
• Air fryers are great for reheating food, including pizza. To reheat your food, set the temperature to 150
for up to 10 minutes.

10
Unplug the product immediately from the mains in the event of any breakdown or damage and contact an official
technical support service. In order to prevent any risk of danger, do not open the device. Only qualified technical
personnel from the brand´s Official technical support service may carry out repairs or procedures on the device.
B&B TRENDS SL. disclaims all liability for damages that may occur to people, animals or objects, for the non-ob-
servance of these warnings.
BEFORE ITS FIRST USE
1. Remove all packing materials and stickers from the inside and outside of the Air Fryer. Gently wipe down
exterior with a damp cloth or paper towel.
WARNING: Never immerse the Air Fryer or its plug in water or any other liquids.
2. Pull the basket handle to remove the basket from the Air Fryer. Use the tray handle, in the center of the
tray, to remove the tray. Use a sponge and warm, soapy water to wash the inside and outside of the basket
and tray. The basket and the tray are top-rack dishwasher safe.
3. WARNING: Do not use abrasive cleaning agents or scouring pads.
4. Dry thoroughly.
HOW TO USE
1. Prepare the basket and desired food.
Use the tray handle to insert the tray into the basket. Push down to ensure it is secure and in a leveled
position. There should be a small amount of space between the tray and bottom of the basket.
Warning: Never fill the basket with oil. Unlike deep fryers, air fryers require little to no oil to produce crispy
results. If you choose to use oil, toss food with oil in a separate bowl and then transfer food to the tray
inside the basket.
2. Put food on tray.
Refer to the chart on “more cooking tips” for recommended maximum amounts of food, cooking times,
temperatures and tips.
3. Put the basket into the Air Fryer.
Use the Basket Handle to insert the basket into the Air Fryer. Push to close.
4. Plug in the Air Fryer.
The power indicator light will illuminate when the Air Fryer is plugged in. The heating indicator light will
NOT illuminate until the timer dial is turned past zero.
Note: The Air Fryer will not operate if the basket is not fully pushed into place.
5. Set desired cooking temperature and time.
Adjust the temperature: Turn the temperature dial to the desired temperature between 90ºC and 200ºC.
Keep the appliance and its cord out of reach of children
less than 8 years.
Appliances are not intended to be operated by means of
an external timer or separate remote-control system.
Disconnect the appliance when it is not in use and before
cleaning it. Let it cool before putting on, taking off parts
and cleaning it
Do not submerge the appliance in water or any other
liquid.
This appliance is intended for use at a maximum altitude
of 2000m above sea level.
IMPORTANT WARNINGS
This appliance is designed exclusively for domestic use, in no case should be a commercial or industrial use.
Any incorrect use or improper handling of the product shall render the warranty null and void.
Prior to plugging in the product, check that your mains voltage is the same as the one indicated on the product
label.
Place the appliance on a flat even surface
The mains connection cable must not be tangled or wrapped around the product during use.
Do not use the device, or connect and disconnect to the supply mains with the hands and/or feet wet. Do not pull
on the connection cord in order to unplug it or use it as a handle
IMPORTANT. When operating this Air Fryer, keep at least ten centimeters of free space on all sides of the oven to
allow for adequate air circulation.
DO NOT place your Air Fryer under cupboards, blinds or curtains. Risk of overheating / fire.
Do not cover any part of the Fryer with a cloth or similar, it will cause overheating. Risk of fire.
This is an AIR FRYER. It requires very little oil to cook. Do not fill the pot with oil or fat as this may cause a fire
hazard.
Do not use any accessories other than manufacturer recommended accessories in this Air Fryer.
Always wear protective, insulated oven gloves when inserting or removing items from the hot Air Fryer.
The appliance must be used on a level, stable heat-resistant surface. The first time you use your Air Fryer there
may be a slight odor or a small amount of smoke given off. This is normal and is just the manufacturing residues
burning off.
Always place the ingredients to be fried in the basket to prevent it from coming into contact with the heating
elements.
EN
WE WOULD LIKE TO THANKS YOU FOR CHOOSING ZELMER,
WE WISH THE PRODUCT PERFORMS TO YOUR SATISFACTION AND PLEASURE.
WARNING
PLEASE READ THE INSTRUCTIONS FOR USE CAREFULLY PRIOR TO USING THE PRODUCT.
STORE THESE IN A SAFE PLACE FOR FUTURE REFERENCE.
DESCRIPTION
1. Heating indicator light (blue light)
2. Power indicator light (red light)
3. Timer dial (0-60 minutes)
4. Temperature dial (90ºC - 200ºC)
5. Fryer vents
6. Basket vents
7. Basket handle
8. Basket (1)
9. Tray
10. Tray handle
11. Silicon pad
SAFETY INSTRUCTIONS
If the supply cord is damaged it must be replaced by the
manufacturer, its service agent or similarly qualified
persons in order to avoid a hazard.
This appliance can be used by children aged from 8 years
and above and persons with reduced physical, sensory or
mental capabilities or lack of experience and knowledge if
they have been given supervision or instruction
concerning use of the appliance in a safe way and
understand the hazards involved. Children shall not play
with the appliance. Cleaning and user maintenance shall
not be made by children unless they are older than 8 and
supervised.
Adjust the time: Turn the timer dial to the desired time. Once a time is selected, the Air Fryer will begin to
tick, indicating the time is counting down.
Note: Maximum cooking time is 60 minutes.
6. Start cooking.
After setting the temperature and time, the power indicator light and the heating indicator light will illumina-
te and the Air Fryer will begin cooking.
To check food while the Air Fryer is cooking:
A) Use the basket handle to pull out the basket.
Note: The power indicator light and the heating indicator light will turn off once the basket is pulled out, but
the timer will continue to count down.
B) Use the basket handle to shake and redistribute the food inside the basket (or use tongs to flip food) if
necessary, then push the basket back into the unit. The unit will automatically resume cooking when the
basket is replaced.
7. Enjoy your air-fried food.
Once the timer completely counts down, the Air Fryer will ding once and turn off.
Use the basket handle to pull out the basket. Remove basket carefully by pulling out straight to prevent oil
spillage. Use protective gloves and/or tongs to carefully transfer the hot food to a serving plate.
Caution: The basket, tray and contents will be HOT after cooking.
Place the hot basket on a wire rack or trivet to cool.
8. Unplug the Air Fryer and let cool completely before cleaning.
9. Clean the basket and tray after every use.
COOKING TIPS
• Almost any food that is traditionally cooked in the oven can be air fried.
• Foods cook best and most evenly when they are of similar size and thickness.
• Smaller pieces of food require less cooking time than larger pieces.
• For best results in the shortest amount of time, air fry food in small batches. Avoid stacking or layering
when possible.
• Most prepackaged foods do not need to be tossed in oil before air frying. Most already contain oil and
other ingredients that enhance browning and crispiness
• Frozen appetizers and hors d’oeuvres air fry very well. For best results, arrange them on the tray in a
single layer.
• If layering foods, be sure to shake the basket halfway through (or flip food) to promote even cooking.
• Toss foods you are preparing from scratch, such as French fries or other vegetables, with a small amount
of oil to promote browning and crispiness.
• When air frying fresh vegetables, make sure to pat them dry completely before tossing with oil and air
frying to ensure maximum crispiness.
• Air fryers are great for reheating food, including pizza. To reheat your food, set the temperature to 150
for up to 10 minutes.

Unplug the product immediately from the mains in the event of any breakdown or damage and contact an official
technical support service. In order to prevent any risk of danger, do not open the device. Only qualified technical
personnel from the brand´s Official technical support service may carry out repairs or procedures on the device.
B&B TRENDS SL. disclaims all liability for damages that may occur to people, animals or objects, for the non-ob-
servance of these warnings.
BEFORE ITS FIRST USE
1. Remove all packing materials and stickers from the inside and outside of the Air Fryer. Gently wipe down
exterior with a damp cloth or paper towel.
WARNING: Never immerse the Air Fryer or its plug in water or any other liquids.
2. Pull the basket handle to remove the basket from the Air Fryer. Use the tray handle, in the center of the
tray, to remove the tray. Use a sponge and warm, soapy water to wash the inside and outside of the basket
and tray. The basket and the tray are top-rack dishwasher safe.
3. WARNING: Do not use abrasive cleaning agents or scouring pads.
4. Dry thoroughly.
HOW TO USE
1. Prepare the basket and desired food.
Use the tray handle to insert the tray into the basket. Push down to ensure it is secure and in a leveled
position. There should be a small amount of space between the tray and bottom of the basket.
Warning: Never fill the basket with oil. Unlike deep fryers, air fryers require little to no oil to produce crispy
results. If you choose to use oil, toss food with oil in a separate bowl and then transfer food to the tray
inside the basket.
2. Put food on tray.
Refer to the chart on “more cooking tips” for recommended maximum amounts of food, cooking times,
temperatures and tips.
3. Put the basket into the Air Fryer.
Use the Basket Handle to insert the basket into the Air Fryer. Push to close.
4. Plug in the Air Fryer.
The power indicator light will illuminate when the Air Fryer is plugged in. The heating indicator light will
NOT illuminate until the timer dial is turned past zero.
Note: The Air Fryer will not operate if the basket is not fully pushed into place.
5. Set desired cooking temperature and time.
Adjust the temperature: Turn the temperature dial to the desired temperature between 90ºC and 200ºC.
EN
Keep the appliance and its cord out of reach of children
less than 8 years.
Appliances are not intended to be operated by means of
an external timer or separate remote-control system.
Disconnect the appliance when it is not in use and before
cleaning it. Let it cool before putting on, taking off parts
and cleaning it
Do not submerge the appliance in water or any other
liquid.
This appliance is intended for use at a maximum altitude
of 2000m above sea level.
IMPORTANT WARNINGS
This appliance is designed exclusively for domestic use, in no case should be a commercial or industrial use.
Any incorrect use or improper handling of the product shall render the warranty null and void.
Prior to plugging in the product, check that your mains voltage is the same as the one indicated on the product
label.
Place the appliance on a flat even surface
The mains connection cable must not be tangled or wrapped around the product during use.
Do not use the device, or connect and disconnect to the supply mains with the hands and/or feet wet. Do not pull
on the connection cord in order to unplug it or use it as a handle
IMPORTANT. When operating this Air Fryer, keep at least ten centimeters of free space on all sides of the oven to
allow for adequate air circulation.
DO NOT place your Air Fryer under cupboards, blinds or curtains. Risk of overheating / fire.
Do not cover any part of the Fryer with a cloth or similar, it will cause overheating. Risk of fire.
This is an AIR FRYER. It requires very little oil to cook. Do not fill the pot with oil or fat as this may cause a fire
hazard.
Do not use any accessories other than manufacturer recommended accessories in this Air Fryer.
Always wear protective, insulated oven gloves when inserting or removing items from the hot Air Fryer.
The appliance must be used on a level, stable heat-resistant surface. The first time you use your Air Fryer there
may be a slight odor or a small amount of smoke given off. This is normal and is just the manufacturing residues
burning off.
Always place the ingredients to be fried in the basket to prevent it from coming into contact with the heating
elements.
WE WOULD LIKE TO THANKS YOU FOR CHOOSING ZELMER,
WE WISH THE PRODUCT PERFORMS TO YOUR SATISFACTION AND PLEASURE.
WARNING
PLEASE READ THE INSTRUCTIONS FOR USE CAREFULLY PRIOR TO USING THE PRODUCT.
STORE THESE IN A SAFE PLACE FOR FUTURE REFERENCE.
DESCRIPTION
1. Heating indicator light (blue light)
2. Power indicator light (red light)
3. Timer dial (0-60 minutes)
4. Temperature dial (90ºC - 200ºC)
5. Fryer vents
6. Basket vents
7. Basket handle
8. Basket (1)
9. Tray
10. Tray handle
11. Silicon pad
SAFETY INSTRUCTIONS
If the supply cord is damaged it must be replaced by the
manufacturer, its service agent or similarly qualified
persons in order to avoid a hazard.
This appliance can be used by children aged from 8 years
and above and persons with reduced physical, sensory or
mental capabilities or lack of experience and knowledge if
they have been given supervision or instruction
concerning use of the appliance in a safe way and
understand the hazards involved. Children shall not play
with the appliance. Cleaning and user maintenance shall
not be made by children unless they are older than 8 and
supervised.
11
Adjust the time: Turn the timer dial to the desired time. Once a time is selected, the Air Fryer will begin to
tick, indicating the time is counting down.
Note: Maximum cooking time is 60 minutes.
6. Start cooking.
After setting the temperature and time, the power indicator light and the heating indicator light will illumina-
te and the Air Fryer will begin cooking.
To check food while the Air Fryer is cooking:
A) Use the basket handle to pull out the basket.
Note: The power indicator light and the heating indicator light will turn off once the basket is pulled out, but
the timer will continue to count down.
B) Use the basket handle to shake and redistribute the food inside the basket (or use tongs to flip food) if
necessary, then push the basket back into the unit. The unit will automatically resume cooking when the
basket is replaced.
7. Enjoy your air-fried food.
Once the timer completely counts down, the Air Fryer will ding once and turn off.
Use the basket handle to pull out the basket. Remove basket carefully by pulling out straight to prevent oil
spillage. Use protective gloves and/or tongs to carefully transfer the hot food to a serving plate.
Caution: The basket, tray and contents will be HOT after cooking.
Place the hot basket on a wire rack or trivet to cool.
8. Unplug the Air Fryer and let cool completely before cleaning.
9. Clean the basket and tray after every use.
COOKING TIPS
• Almost any food that is traditionally cooked in the oven can be air fried.
• Foods cook best and most evenly when they are of similar size and thickness.
• Smaller pieces of food require less cooking time than larger pieces.
• For best results in the shortest amount of time, air fry food in small batches. Avoid stacking or layering
when possible.
• Most prepackaged foods do not need to be tossed in oil before air frying. Most already contain oil and
other ingredients that enhance browning and crispiness
• Frozen appetizers and hors d’oeuvres air fry very well. For best results, arrange them on the tray in a
single layer.
• If layering foods, be sure to shake the basket halfway through (or flip food) to promote even cooking.
• Toss foods you are preparing from scratch, such as French fries or other vegetables, with a small amount
of oil to promote browning and crispiness.
• When air frying fresh vegetables, make sure to pat them dry completely before tossing with oil and air
frying to ensure maximum crispiness.
• Air fryers are great for reheating food, including pizza. To reheat your food, set the temperature to 150
for up to 10 minutes.

Unplug the product immediately from the mains in the event of any breakdown or damage and contact an official
technical support service. In order to prevent any risk of danger, do not open the device. Only qualified technical
personnel from the brand´s Official technical support service may carry out repairs or procedures on the device.
B&B TRENDS SL. disclaims all liability for damages that may occur to people, animals or objects, for the non-ob-
servance of these warnings.
BEFORE ITS FIRST USE
1. Remove all packing materials and stickers from the inside and outside of the Air Fryer. Gently wipe down
exterior with a damp cloth or paper towel.
WARNING: Never immerse the Air Fryer or its plug in water or any other liquids.
2. Pull the basket handle to remove the basket from the Air Fryer. Use the tray handle, in the center of the
tray, to remove the tray. Use a sponge and warm, soapy water to wash the inside and outside of the basket
and tray. The basket and the tray are top-rack dishwasher safe.
3. WARNING: Do not use abrasive cleaning agents or scouring pads.
4. Dry thoroughly.
HOW TO USE
1. Prepare the basket and desired food.
Use the tray handle to insert the tray into the basket. Push down to ensure it is secure and in a leveled
position. There should be a small amount of space between the tray and bottom of the basket.
Warning: Never fill the basket with oil. Unlike deep fryers, air fryers require little to no oil to produce crispy
results. If you choose to use oil, toss food with oil in a separate bowl and then transfer food to the tray
inside the basket.
2. Put food on tray.
Refer to the chart on “more cooking tips” for recommended maximum amounts of food, cooking times,
temperatures and tips.
3. Put the basket into the Air Fryer.
Use the Basket Handle to insert the basket into the Air Fryer. Push to close.
4. Plug in the Air Fryer.
The power indicator light will illuminate when the Air Fryer is plugged in. The heating indicator light will
NOT illuminate until the timer dial is turned past zero.
Note: The Air Fryer will not operate if the basket is not fully pushed into place.
5. Set desired cooking temperature and time.
Adjust the temperature: Turn the temperature dial to the desired temperature between 90ºC and 200ºC.
Keep the appliance and its cord out of reach of children
less than 8 years.
Appliances are not intended to be operated by means of
an external timer or separate remote-control system.
Disconnect the appliance when it is not in use and before
cleaning it. Let it cool before putting on, taking off parts
and cleaning it
Do not submerge the appliance in water or any other
liquid.
This appliance is intended for use at a maximum altitude
of 2000m above sea level.
IMPORTANT WARNINGS
This appliance is designed exclusively for domestic use, in no case should be a commercial or industrial use.
Any incorrect use or improper handling of the product shall render the warranty null and void.
Prior to plugging in the product, check that your mains voltage is the same as the one indicated on the product
label.
Place the appliance on a flat even surface
The mains connection cable must not be tangled or wrapped around the product during use.
Do not use the device, or connect and disconnect to the supply mains with the hands and/or feet wet. Do not pull
on the connection cord in order to unplug it or use it as a handle
IMPORTANT. When operating this Air Fryer, keep at least ten centimeters of free space on all sides of the oven to
allow for adequate air circulation.
DO NOT place your Air Fryer under cupboards, blinds or curtains. Risk of overheating / fire.
Do not cover any part of the Fryer with a cloth or similar, it will cause overheating. Risk of fire.
This is an AIR FRYER. It requires very little oil to cook. Do not fill the pot with oil or fat as this may cause a fire
hazard.
Do not use any accessories other than manufacturer recommended accessories in this Air Fryer.
Always wear protective, insulated oven gloves when inserting or removing items from the hot Air Fryer.
The appliance must be used on a level, stable heat-resistant surface. The first time you use your Air Fryer there
may be a slight odor or a small amount of smoke given off. This is normal and is just the manufacturing residues
burning off.
Always place the ingredients to be fried in the basket to prevent it from coming into contact with the heating
elements.
WE WOULD LIKE TO THANKS YOU FOR CHOOSING ZELMER,
WE WISH THE PRODUCT PERFORMS TO YOUR SATISFACTION AND PLEASURE.
WARNING
PLEASE READ THE INSTRUCTIONS FOR USE CAREFULLY PRIOR TO USING THE PRODUCT.
STORE THESE IN A SAFE PLACE FOR FUTURE REFERENCE.
DESCRIPTION
1. Heating indicator light (blue light)
2. Power indicator light (red light)
3. Timer dial (0-60 minutes)
4. Temperature dial (90ºC - 200ºC)
5. Fryer vents
6. Basket vents
7. Basket handle
8. Basket (1)
9. Tray
10. Tray handle
11. Silicon pad
SAFETY INSTRUCTIONS
If the supply cord is damaged it must be replaced by the
manufacturer, its service agent or similarly qualified
persons in order to avoid a hazard.
This appliance can be used by children aged from 8 years
and above and persons with reduced physical, sensory or
mental capabilities or lack of experience and knowledge if
they have been given supervision or instruction
concerning use of the appliance in a safe way and
understand the hazards involved. Children shall not play
with the appliance. Cleaning and user maintenance shall
not be made by children unless they are older than 8 and
supervised.
12
Adjust the time: Turn the timer dial to the desired time. Once a time is selected, the Air Fryer will begin to
tick, indicating the time is counting down.
Note: Maximum cooking time is 60 minutes.
6. Start cooking.
After setting the temperature and time, the power indicator light and the heating indicator light will illumina-
te and the Air Fryer will begin cooking.
To check food while the Air Fryer is cooking:
A) Use the basket handle to pull out the basket.
Note: The power indicator light and the heating indicator light will turn off once the basket is pulled out, but
the timer will continue to count down.
B) Use the basket handle to shake and redistribute the food inside the basket (or use tongs to flip food) if
necessary, then push the basket back into the unit. The unit will automatically resume cooking when the
basket is replaced.
7. Enjoy your air-fried food.
Once the timer completely counts down, the Air Fryer will ding once and turn off.
Use the basket handle to pull out the basket. Remove basket carefully by pulling out straight to prevent oil
spillage. Use protective gloves and/or tongs to carefully transfer the hot food to a serving plate.
Caution: The basket, tray and contents will be HOT after cooking.
Place the hot basket on a wire rack or trivet to cool.
8. Unplug the Air Fryer and let cool completely before cleaning.
9. Clean the basket and tray after every use.
COOKING TIPS
• Almost any food that is traditionally cooked in the oven can be air fried.
• Foods cook best and most evenly when they are of similar size and thickness.
• Smaller pieces of food require less cooking time than larger pieces.
• For best results in the shortest amount of time, air fry food in small batches. Avoid stacking or layering
when possible.
• Most prepackaged foods do not need to be tossed in oil before air frying. Most already contain oil and
other ingredients that enhance browning and crispiness
• Frozen appetizers and hors d’oeuvres air fry very well. For best results, arrange them on the tray in a
single layer.
• If layering foods, be sure to shake the basket halfway through (or flip food) to promote even cooking.
• Toss foods you are preparing from scratch, such as French fries or other vegetables, with a small amount
of oil to promote browning and crispiness.
• When air frying fresh vegetables, make sure to pat them dry completely before tossing with oil and air
frying to ensure maximum crispiness.
• Air fryers are great for reheating food, including pizza. To reheat your food, set the temperature to 150
for up to 10 minutes.
EN

Unplug the product immediately from the mains in the event of any breakdown or damage and contact an official
technical support service. In order to prevent any risk of danger, do not open the device. Only qualified technical
personnel from the brand´s Official technical support service may carry out repairs or procedures on the device.
B&B TRENDS SL. disclaims all liability for damages that may occur to people, animals or objects, for the non-ob-
servance of these warnings.
BEFORE ITS FIRST USE
1. Remove all packing materials and stickers from the inside and outside of the Air Fryer. Gently wipe down
exterior with a damp cloth or paper towel.
WARNING: Never immerse the Air Fryer or its plug in water or any other liquids.
2. Pull the basket handle to remove the basket from the Air Fryer. Use the tray handle, in the center of the
tray, to remove the tray. Use a sponge and warm, soapy water to wash the inside and outside of the basket
and tray. The basket and the tray are top-rack dishwasher safe.
3. WARNING: Do not use abrasive cleaning agents or scouring pads.
4. Dry thoroughly.
HOW TO USE
1. Prepare the basket and desired food.
Use the tray handle to insert the tray into the basket. Push down to ensure it is secure and in a leveled
position. There should be a small amount of space between the tray and bottom of the basket.
Warning: Never fill the basket with oil. Unlike deep fryers, air fryers require little to no oil to produce crispy
results. If you choose to use oil, toss food with oil in a separate bowl and then transfer food to the tray
inside the basket.
2. Put food on tray.
Refer to the chart on “more cooking tips” for recommended maximum amounts of food, cooking times,
temperatures and tips.
3. Put the basket into the Air Fryer.
Use the Basket Handle to insert the basket into the Air Fryer. Push to close.
4. Plug in the Air Fryer.
The power indicator light will illuminate when the Air Fryer is plugged in. The heating indicator light will
NOT illuminate until the timer dial is turned past zero.
Note: The Air Fryer will not operate if the basket is not fully pushed into place.
5. Set desired cooking temperature and time.
Adjust the temperature: Turn the temperature dial to the desired temperature between 90ºC and 200ºC.
Keep the appliance and its cord out of reach of children
less than 8 years.
Appliances are not intended to be operated by means of
an external timer or separate remote-control system.
Disconnect the appliance when it is not in use and before
cleaning it. Let it cool before putting on, taking off parts
and cleaning it
Do not submerge the appliance in water or any other
liquid.
This appliance is intended for use at a maximum altitude
of 2000m above sea level.
IMPORTANT WARNINGS
This appliance is designed exclusively for domestic use, in no case should be a commercial or industrial use.
Any incorrect use or improper handling of the product shall render the warranty null and void.
Prior to plugging in the product, check that your mains voltage is the same as the one indicated on the product
label.
Place the appliance on a flat even surface
The mains connection cable must not be tangled or wrapped around the product during use.
Do not use the device, or connect and disconnect to the supply mains with the hands and/or feet wet. Do not pull
on the connection cord in order to unplug it or use it as a handle
IMPORTANT. When operating this Air Fryer, keep at least ten centimeters of free space on all sides of the oven to
allow for adequate air circulation.
DO NOT place your Air Fryer under cupboards, blinds or curtains. Risk of overheating / fire.
Do not cover any part of the Fryer with a cloth or similar, it will cause overheating. Risk of fire.
This is an AIR FRYER. It requires very little oil to cook. Do not fill the pot with oil or fat as this may cause a fire
hazard.
Do not use any accessories other than manufacturer recommended accessories in this Air Fryer.
Always wear protective, insulated oven gloves when inserting or removing items from the hot Air Fryer.
The appliance must be used on a level, stable heat-resistant surface. The first time you use your Air Fryer there
may be a slight odor or a small amount of smoke given off. This is normal and is just the manufacturing residues
burning off.
Always place the ingredients to be fried in the basket to prevent it from coming into contact with the heating
elements.
WE WOULD LIKE TO THANKS YOU FOR CHOOSING ZELMER,
WE WISH THE PRODUCT PERFORMS TO YOUR SATISFACTION AND PLEASURE.
WARNING
PLEASE READ THE INSTRUCTIONS FOR USE CAREFULLY PRIOR TO USING THE PRODUCT.
STORE THESE IN A SAFE PLACE FOR FUTURE REFERENCE.
DESCRIPTION
1. Heating indicator light (blue light)
2. Power indicator light (red light)
3. Timer dial (0-60 minutes)
4. Temperature dial (90ºC - 200ºC)
5. Fryer vents
6. Basket vents
7. Basket handle
8. Basket (1)
9. Tray
10. Tray handle
11. Silicon pad
SAFETY INSTRUCTIONS
If the supply cord is damaged it must be replaced by the
manufacturer, its service agent or similarly qualified
persons in order to avoid a hazard.
This appliance can be used by children aged from 8 years
and above and persons with reduced physical, sensory or
mental capabilities or lack of experience and knowledge if
they have been given supervision or instruction
concerning use of the appliance in a safe way and
understand the hazards involved. Children shall not play
with the appliance. Cleaning and user maintenance shall
not be made by children unless they are older than 8 and
supervised.
13
EN
Adjust the time: Turn the timer dial to the desired time. Once a time is selected, the Air Fryer will begin to
tick, indicating the time is counting down.
Note: Maximum cooking time is 60 minutes.
6. Start cooking.
After setting the temperature and time, the power indicator light and the heating indicator light will illumina-
te and the Air Fryer will begin cooking.
To check food while the Air Fryer is cooking:
A) Use the basket handle to pull out the basket.
Note: The power indicator light and the heating indicator light will turn off once the basket is pulled out, but
the timer will continue to count down.
B) Use the basket handle to shake and redistribute the food inside the basket (or use tongs to flip food) if
necessary, then push the basket back into the unit. The unit will automatically resume cooking when the
basket is replaced.
7. Enjoy your air-fried food.
Once the timer completely counts down, the Air Fryer will ding once and turn off.
Use the basket handle to pull out the basket. Remove basket carefully by pulling out straight to prevent oil
spillage. Use protective gloves and/or tongs to carefully transfer the hot food to a serving plate.
Caution: The basket, tray and contents will be HOT after cooking.
Place the hot basket on a wire rack or trivet to cool.
8. Unplug the Air Fryer and let cool completely before cleaning.
9. Clean the basket and tray after every use.
COOKING TIPS
• Almost any food that is traditionally cooked in the oven can be air fried.
• Foods cook best and most evenly when they are of similar size and thickness.
• Smaller pieces of food require less cooking time than larger pieces.
• For best results in the shortest amount of time, air fry food in small batches. Avoid stacking or layering
when possible.
• Most prepackaged foods do not need to be tossed in oil before air frying. Most already contain oil and
other ingredients that enhance browning and crispiness
• Frozen appetizers and hors d’oeuvres air fry very well. For best results, arrange them on the tray in a
single layer.
• If layering foods, be sure to shake the basket halfway through (or flip food) to promote even cooking.
• Toss foods you are preparing from scratch, such as French fries or other vegetables, with a small amount
of oil to promote browning and crispiness.
• When air frying fresh vegetables, make sure to pat them dry completely before tossing with oil and air
frying to ensure maximum crispiness.
• Air fryers are great for reheating food, including pizza. To reheat your food, set the temperature to 150
for up to 10 minutes.
MORE COOKING TIPS
The temperatures and times recommended below are based off of the listed recommended amounts and
weights. If using a smaller amount or weight, check food sooner than the recommended time because it
will likely cook faster.
Note: This table is only a guide and does not contain exact recipes.
Note: Use extreme caution while handling hot food in fryer basket. Excess oil will drip into basket
when preparing greasy foods. Empty the basket after every use.
Type Amount Cooking Tip
Time
(mins) Temp Cº Shake/
Flip
Bacon
Chicken Breast
(Thick, about 8 oz)
Chicken Drumsticks/ Thighs
(5 oz each)
Chicken Nuggets
Chicken Wings
(Flats and drumettes
separated)
Fish Sticks
(Frozen)"
French Fries
(Frozen/Thin)
French Fries
(Frozen/Thick)
French Fries
(Homemade cut into
1/4 x 1/4 inch pieces)
Hamburgers
(4 oz/120g each)
Mozzarella Sticks
(Frozen)
Chops (Bone-in, about
8 oz/220g)
Chops (Boneless,
about 3 oz/90g)
Steak
Salmon (1 inch wide, 4.5 oz)
Shrimp (large)
4 pieces
About
3 pieces
About
5 pieces
About
20 pieces
12 pieces
20 pieces
350-450g
350-500g
350-500g
2 pieces
20 pieces
2 pieces
4 pieces
450g
3 pieces
900g
6 (stringy)
8 (crispy)
25-30
16-18
10
18-20
7
16-20
18-22
20-25
12-15
7
12-15
15
12-15
10-12
12
200
190
200
200
200
200
200
200
200
190
200
200
200
200
200
200
No
Yes
No
Yes
Si
Yes
Yes
Yes
Yes
Yes
Yes
Yes
No
No
No
Yes
After cooking, use tongs to
transfer bacon to a paper
towel lined plate..
Brush with oil, season with salt
and desired spices..
Season with salt and desires
spices
Season with salt; enjoy as is or,
when done, toss in favorite
chicken wing sauce
Shake twice.
Shake twice.
Rinse with cold water, pat dry,
toss with 1tbsp olive oil,
season with salt and desired
spices; use tongs to toss
during cooking
Brush with oil, season with salt
and desired spices such as
freshly ground black pepper
and garlic powder.
Season with salt and desired
spices
Season with salt and desired
spices
Season with salt and desired
spices
Brush skin with oil and place
on tray skin-side down.
Season with salt and desired
spices
Pat dry, toss with 1/2 tbsp
olive oil, season with salt and
desired spices; shake often.

Unplug the product immediately from the mains in the event of any breakdown or damage and contact an official
technical support service. In order to prevent any risk of danger, do not open the device. Only qualified technical
personnel from the brand´s Official technical support service may carry out repairs or procedures on the device.
B&B TRENDS SL. disclaims all liability for damages that may occur to people, animals or objects, for the non-ob-
servance of these warnings.
BEFORE ITS FIRST USE
1. Remove all packing materials and stickers from the inside and outside of the Air Fryer. Gently wipe down
exterior with a damp cloth or paper towel.
WARNING: Never immerse the Air Fryer or its plug in water or any other liquids.
2. Pull the basket handle to remove the basket from the Air Fryer. Use the tray handle, in the center of the
tray, to remove the tray. Use a sponge and warm, soapy water to wash the inside and outside of the basket
and tray. The basket and the tray are top-rack dishwasher safe.
3. WARNING: Do not use abrasive cleaning agents or scouring pads.
4. Dry thoroughly.
HOW TO USE
1. Prepare the basket and desired food.
Use the tray handle to insert the tray into the basket. Push down to ensure it is secure and in a leveled
position. There should be a small amount of space between the tray and bottom of the basket.
Warning: Never fill the basket with oil. Unlike deep fryers, air fryers require little to no oil to produce crispy
results. If you choose to use oil, toss food with oil in a separate bowl and then transfer food to the tray
inside the basket.
2. Put food on tray.
Refer to the chart on “more cooking tips” for recommended maximum amounts of food, cooking times,
temperatures and tips.
3. Put the basket into the Air Fryer.
Use the Basket Handle to insert the basket into the Air Fryer. Push to close.
4. Plug in the Air Fryer.
The power indicator light will illuminate when the Air Fryer is plugged in. The heating indicator light will
NOT illuminate until the timer dial is turned past zero.
Note: The Air Fryer will not operate if the basket is not fully pushed into place.
5. Set desired cooking temperature and time.
Adjust the temperature: Turn the temperature dial to the desired temperature between 90ºC and 200ºC.
Keep the appliance and its cord out of reach of children
less than 8 years.
Appliances are not intended to be operated by means of
an external timer or separate remote-control system.
Disconnect the appliance when it is not in use and before
cleaning it. Let it cool before putting on, taking off parts
and cleaning it
Do not submerge the appliance in water or any other
liquid.
This appliance is intended for use at a maximum altitude
of 2000m above sea level.
IMPORTANT WARNINGS
This appliance is designed exclusively for domestic use, in no case should be a commercial or industrial use.
Any incorrect use or improper handling of the product shall render the warranty null and void.
Prior to plugging in the product, check that your mains voltage is the same as the one indicated on the product
label.
Place the appliance on a flat even surface
The mains connection cable must not be tangled or wrapped around the product during use.
Do not use the device, or connect and disconnect to the supply mains with the hands and/or feet wet. Do not pull
on the connection cord in order to unplug it or use it as a handle
IMPORTANT. When operating this Air Fryer, keep at least ten centimeters of free space on all sides of the oven to
allow for adequate air circulation.
DO NOT place your Air Fryer under cupboards, blinds or curtains. Risk of overheating / fire.
Do not cover any part of the Fryer with a cloth or similar, it will cause overheating. Risk of fire.
This is an AIR FRYER. It requires very little oil to cook. Do not fill the pot with oil or fat as this may cause a fire
hazard.
Do not use any accessories other than manufacturer recommended accessories in this Air Fryer.
Always wear protective, insulated oven gloves when inserting or removing items from the hot Air Fryer.
The appliance must be used on a level, stable heat-resistant surface. The first time you use your Air Fryer there
may be a slight odor or a small amount of smoke given off. This is normal and is just the manufacturing residues
burning off.
Always place the ingredients to be fried in the basket to prevent it from coming into contact with the heating
elements.
14
WE WOULD LIKE TO THANKS YOU FOR CHOOSING ZELMER,
WE WISH THE PRODUCT PERFORMS TO YOUR SATISFACTION AND PLEASURE.
WARNING
PLEASE READ THE INSTRUCTIONS FOR USE CAREFULLY PRIOR TO USING THE PRODUCT.
STORE THESE IN A SAFE PLACE FOR FUTURE REFERENCE.
DESCRIPTION
1. Heating indicator light (blue light)
2. Power indicator light (red light)
3. Timer dial (0-60 minutes)
4. Temperature dial (90ºC - 200ºC)
5. Fryer vents
6. Basket vents
7. Basket handle
8. Basket (1)
9. Tray
10. Tray handle
11. Silicon pad
SAFETY INSTRUCTIONS
If the supply cord is damaged it must be replaced by the
manufacturer, its service agent or similarly qualified
persons in order to avoid a hazard.
This appliance can be used by children aged from 8 years
and above and persons with reduced physical, sensory or
mental capabilities or lack of experience and knowledge if
they have been given supervision or instruction
concerning use of the appliance in a safe way and
understand the hazards involved. Children shall not play
with the appliance. Cleaning and user maintenance shall
not be made by children unless they are older than 8 and
supervised.
PRODUCT DISPOSAL
EN
This product complies with European Directive 2012/19/EU on electrical and electronic
devices, known as WEEE (Waste Electrical and Electronic Equipment), provides the legal
framework applicable in the European Union for the disposal and reuse of waste electronic
and electrical devices. Do not dispose of this product in the bin, instead going to the electrical
and electronic waste collection centre closest to your home.
Adjust the time: Turn the timer dial to the desired time. Once a time is selected, the Air Fryer will begin to
tick, indicating the time is counting down.
Note: Maximum cooking time is 60 minutes.
6. Start cooking.
After setting the temperature and time, the power indicator light and the heating indicator light will illumina-
te and the Air Fryer will begin cooking.
To check food while the Air Fryer is cooking:
A) Use the basket handle to pull out the basket.
Note: The power indicator light and the heating indicator light will turn off once the basket is pulled out, but
the timer will continue to count down.
B) Use the basket handle to shake and redistribute the food inside the basket (or use tongs to flip food) if
necessary, then push the basket back into the unit. The unit will automatically resume cooking when the
basket is replaced.
7. Enjoy your air-fried food.
Once the timer completely counts down, the Air Fryer will ding once and turn off.
Use the basket handle to pull out the basket. Remove basket carefully by pulling out straight to prevent oil
spillage. Use protective gloves and/or tongs to carefully transfer the hot food to a serving plate.
Caution: The basket, tray and contents will be HOT after cooking.
Place the hot basket on a wire rack or trivet to cool.
8. Unplug the Air Fryer and let cool completely before cleaning.
9. Clean the basket and tray after every use.
COOKING TIPS
• Almost any food that is traditionally cooked in the oven can be air fried.
• Foods cook best and most evenly when they are of similar size and thickness.
• Smaller pieces of food require less cooking time than larger pieces.
• For best results in the shortest amount of time, air fry food in small batches. Avoid stacking or layering
when possible.
• Most prepackaged foods do not need to be tossed in oil before air frying. Most already contain oil and
other ingredients that enhance browning and crispiness
• Frozen appetizers and hors d’oeuvres air fry very well. For best results, arrange them on the tray in a
single layer.
• If layering foods, be sure to shake the basket halfway through (or flip food) to promote even cooking.
• Toss foods you are preparing from scratch, such as French fries or other vegetables, with a small amount
of oil to promote browning and crispiness.
• When air frying fresh vegetables, make sure to pat them dry completely before tossing with oil and air
frying to ensure maximum crispiness.
• Air fryers are great for reheating food, including pizza. To reheat your food, set the temperature to 150
for up to 10 minutes.
TROUBLESHOOTING GUIDE
CLEANING AND MAINTENANCE
• Ensure the Air Fryer is unplugged and cool before cleaning.
• Once the Air Fryer and basket are cool, remove the basket from the Air Fryer (if it is not already removed).
Use the tray handle to remove tray. Use a sponge and warm, soapy water to wash the inside and outside of
the basket and tray.
Warning: Do not use abrasive cleaning agents or scouring pads.
• The basket and the tray are top-rack dishwasher safe.
• Gently wipe down exterior with a damp cloth or paper towel.
• Never immerse the Air Fryer or its plug in water or any other liquid.
• Dry all parts thoroughly before storage.
• Store the Air Fryer in a cool, dry place.
The Air Fryer is not
working/will not turn on.
1. Air Fryer is not properly
plugged in.
2. The timer has not been
turned past zero.
3. The basket is not fully
pushed into place.
1. Air Fryer is being used for the
rst time.
2. There is either too much
grease in or on the food being
air fried.
3. There is leftover grease in
the basket.
1.The food didn’t have enough
oil.
2. The food was coated in too
much oil and became soggy.
High fat content foods, such as
sausage, tend to produce a
signicant amount of smoke
when cooked at a high
temperature setting.
1. Ensure that the plug is
properly secured in wall outlet.
2. Turn the timer dial past zero to
initiate cooking.
3. Use the basket handle to push
basket rmly into Air Fryer’s
housing.
1. Smoke will subside after rst
use.
2. Lightly coat food with oil.
3. Clean the basket after every
use.
Only toss oil-free fresh foods in
a small amount of oil to achieve
the maximum crispiness
This will not harm the air fryer
or aect the nal result of the
food, but in order to avoid
smoke, fry at a lower
temperature.
Problem Possible Cause Solution
There is smoke coming
out of the Air Fryer.
Air fried foods are not crispy.
Air Fryer is producing a
signicant amount of
smoke.

Unplug the product immediately from the mains in the event of any breakdown or damage and contact an official
technical support service. In order to prevent any risk of danger, do not open the device. Only qualified technical
personnel from the brand´s Official technical support service may carry out repairs or procedures on the device.
B&B TRENDS SL. disclaims all liability for damages that may occur to people, animals or objects, for the non-ob-
servance of these warnings.
BEFORE ITS FIRST USE
1. Remove all packing materials and stickers from the inside and outside of the Air Fryer. Gently wipe down
exterior with a damp cloth or paper towel.
WARNING: Never immerse the Air Fryer or its plug in water or any other liquids.
2. Pull the basket handle to remove the basket from the Air Fryer. Use the tray handle, in the center of the
tray, to remove the tray. Use a sponge and warm, soapy water to wash the inside and outside of the basket
and tray. The basket and the tray are top-rack dishwasher safe.
3. WARNING: Do not use abrasive cleaning agents or scouring pads.
4. Dry thoroughly.
HOW TO USE
1. Prepare the basket and desired food.
Use the tray handle to insert the tray into the basket. Push down to ensure it is secure and in a leveled
position. There should be a small amount of space between the tray and bottom of the basket.
Warning: Never fill the basket with oil. Unlike deep fryers, air fryers require little to no oil to produce crispy
results. If you choose to use oil, toss food with oil in a separate bowl and then transfer food to the tray
inside the basket.
2. Put food on tray.
Refer to the chart on “more cooking tips” for recommended maximum amounts of food, cooking times,
temperatures and tips.
3. Put the basket into the Air Fryer.
Use the Basket Handle to insert the basket into the Air Fryer. Push to close.
4. Plug in the Air Fryer.
The power indicator light will illuminate when the Air Fryer is plugged in. The heating indicator light will
NOT illuminate until the timer dial is turned past zero.
Note: The Air Fryer will not operate if the basket is not fully pushed into place.
5. Set desired cooking temperature and time.
Adjust the temperature: Turn the temperature dial to the desired temperature between 90ºC and 200ºC.
nur auf das Verbrennen von Herstellungsrückständen zurückzuführen.
Legen Sie die zu frittierenden Zutaten immer in den Korb, damit sie nicht mit den Heizelementen in Berührung
kommen.
Ziehen Sie im Falle einer Störung oder Beschädigung sofort den Netzstecker und wenden Sie sich an einen
offiziellen technischen Kundendienst. Um jegliches Gefahrenrisiko zu vermeiden, darf die Maschine nicht geöffnet
werden. Nur qualifiziertes technisches Personal des offiziellen technischen Kundendienstes der Marke darf
Reparaturen oder Eingriffe an dieser Maschine vornehmen.
B&B TRENDS SL. übernimmt keine Haftung für Schäden an Personen, Tieren oder Gegenständen, die durch die
Nichtbeachtung dieser Warnhinweise entstehen.
VOR DEM ERSTEN EINSATZ
1. Entfernen Sie alle Verpackungsmaterialien und Aufkleber von der Innen- und Außenseite der Heißluftfri-
tteuse. Wischen Sie die Außenseite vorsichtig mit einem feuchten Tuch oder Papiertuch ab.
WARNHINWEIS: Tauchen Sie die Fritteuse niemals in Wasser oder andere Flüssigkeiten ein.
2. Ziehen Sie den Korb an seinem Griff aus der Heißluftfritteuse. Nehmen Sie die Einlegschale am Griff in
ihrer Mitte heraus. Reinigen Sie die Innen- und Außenseite von Korb und Schale mit einem Schwamm und
warmem Seifenwasser. Korb und Schale können oben im Geschirrspüler gereinigt werden.
3. WARNHINWEIS: Verwenden Sie keine scheuernden Reinigungsmittel oder Schwämme.
4. Trocknen Sie alles gründlich ab.
VERWENDUNG
1. Den Korb und die gewünschten Lebensmittel vorbereiten.
Setzen Sie die Schale mithilfe ihres Griffs in den Korb ein. Drücken Sie sie ganz nach unten und eben in
den Korb hinein. Dabei bleibt noch ein kleiner Abstand zwischen Schale und Korbboden.
Warnhinweis: Füllen Sie den Korb niemals mit Öl. Im Gegensatz zu Ölfritteusen benötigen Luftfritteusen
wenig bis gar kein Öl, um knusprige Ergebnisse zu erzielen. Wenn Sie trotzdem Öl verwenden möchten,
schwenken Sie die Speisen in einer separaten Schüssel mit etwas Öl und geben Sie sie Speisen dann in
die Schale im Korb.
2. Das Gargut auf die Schale legen.
Entnehmen Sie der Tabelle “Weitere Gartipps” die empfohlenen maximalen Gargutmengen, Garzeiten,
Temperaturen und einige Tipps.
3. Den Korb in die Heißluftfritteuse einsetzen.
Schieben Sie den Korb an seinem Griff in die Heißluftfritteuse ein. Achten Sie auf kompletten Verschluss.
4. Die Heißluftfritteuse anschließen.
Die Betriebskontrollleuchte leuchtet, wenn die Fritteuse eingesteckt ist. Die Heiz-Kontrollleuchte leuchtet
erst auf, wenn der Timer-Einstellknopf aus der Nullstellung gedreht wird.
Hinweis: Die Heißluftfritteuse geht nicht in Betrieb, wenn der Korb nicht vollständig eingeschoben ist.
Keep the appliance and its cord out of reach of children
less than 8 years.
Appliances are not intended to be operated by means of
an external timer or separate remote-control system.
Disconnect the appliance when it is not in use and before
cleaning it. Let it cool before putting on, taking off parts
and cleaning it
Do not submerge the appliance in water or any other
liquid.
This appliance is intended for use at a maximum altitude
of 2000m above sea level.
IMPORTANT WARNINGS
This appliance is designed exclusively for domestic use, in no case should be a commercial or industrial use.
Any incorrect use or improper handling of the product shall render the warranty null and void.
Prior to plugging in the product, check that your mains voltage is the same as the one indicated on the product
label.
Place the appliance on a flat even surface
The mains connection cable must not be tangled or wrapped around the product during use.
Do not use the device, or connect and disconnect to the supply mains with the hands and/or feet wet. Do not pull
on the connection cord in order to unplug it or use it as a handle
IMPORTANT. When operating this Air Fryer, keep at least ten centimeters of free space on all sides of the oven to
allow for adequate air circulation.
DO NOT place your Air Fryer under cupboards, blinds or curtains. Risk of overheating / fire.
Do not cover any part of the Fryer with a cloth or similar, it will cause overheating. Risk of fire.
This is an AIR FRYER. It requires very little oil to cook. Do not fill the pot with oil or fat as this may cause a fire
hazard.
Do not use any accessories other than manufacturer recommended accessories in this Air Fryer.
Always wear protective, insulated oven gloves when inserting or removing items from the hot Air Fryer.
The appliance must be used on a level, stable heat-resistant surface. The first time you use your Air Fryer there
may be a slight odor or a small amount of smoke given off. This is normal and is just the manufacturing residues
burning off.
Always place the ingredients to be fried in the basket to prevent it from coming into contact with the heating
elements.
Halten Sie das Gerät und sein Kabel außerhalb der
Reichweite von Kindern unter 8 Jahren.
Dieses Gerät ist nicht dafür vorgesehen, mit einer
externen Zeitschaltuhr oder einem separaten
Fernsteuerungssystem betrieben zu werden.
Trennen Sie das Gerät von der Stromversorgung, wenn
es nicht in Gebrauch ist und bevor Sie es reinigen. Lassen
Sie es abkühlen, bevor Sie Teile anbringen, abnehmen
oder reinigen.
Tauchen Sie das Gerät niemals in Wasser oder andere
Flüssigkeiten ein.
Dieses Gerät ist für den Einsatz in einer maximalen Höhe
von 2000 m über dem Meeresspiegel vorgesehen.
WICHTIGE WARNUNGEN
Dieses Gerät ist ausschließlich für den privaten Hausgebrauch bestimmt, es darf auf keinen Fall für gewerbliche
oder industrielle Zwecke verwendet werden.
Jegliche unsachgemäße Verwendung oder Handhabung des Geräts führt zum Erlöschen der Garantie.
Überprüfen Sie vor dem Anschließen des Geräts, ob die Netzspannung mit den Werten auf dem Geräteschild
übereinstimmt.
Stellen Sie das Gerät immer auf eine flache, ebene Oberfläche.
Das Netzkabel darf während des Gebrauchs nicht zusammengerollt oder um das Gerät gewickelt sein.
Benutzen oder stecken Sie das Gerät nicht mit nassen Händen und/oder Füßen ein- oder aus. Ziehen Sie nicht
am Netzkabel, um den Stecker zu ziehen und benutzen Sie es nicht zum Tragen des Geräts.
WICHTIG: Halten Sie beim Betrieb dieser Heißluftfritteuse an allen Seiten mindestens zehn Zentimeter Freiraum,
um eine ausreichende Luftzirkulation zu ermöglichen.
Stellen Sie Ihre Heißluftfritteuse NICHT unter Schränke, Jalousien oder Vorhänge. Überhitzungs- und Brandge-
fahr.
Bedecken Sie keinen Teil der Fritteuse mit einem Tuch oder Ähnlichem, da dies zu Überhitzung führt. Feuergefahr.
Dieses Gerät ist eine HEISSLUFTFRITTEUSE. Es benötigt sehr wenig Öl zum Garen. Füllen Sie den Topf nicht
mit Öl oder Fett, da dies Brandgefahr darstellen würde.
Verwenden Sie mit dieser Heißluftfritteuse nur das vom Hersteller empfohlene Zubehör.
Tragen Sie immer schützende, Ofenhandschuhe, wenn Sie etwas in die heiße Heißluftfritteuse einlegen oder aus
ihr entnehmen.
Verwenden Sie das Gerät auf einer ebenen, stabilen und hitzebeständigen Oberfläche. Wenn Sie die Fritteuse
zum ersten Mal benutzen, kann etwas Geruch oder eine gewisse Rauchentwicklung auftreten. Dies ist normal und
WE WOULD LIKE TO THANKS YOU FOR CHOOSING ZELMER,
WE WISH THE PRODUCT PERFORMS TO YOUR SATISFACTION AND PLEASURE.
WARNING
PLEASE READ THE INSTRUCTIONS FOR USE CAREFULLY PRIOR TO USING THE PRODUCT.
STORE THESE IN A SAFE PLACE FOR FUTURE REFERENCE.
DESCRIPTION
1. Heating indicator light (blue light)
2. Power indicator light (red light)
3. Timer dial (0-60 minutes)
4. Temperature dial (90ºC - 200ºC)
5. Fryer vents
6. Basket vents
7. Basket handle
8. Basket (1)
9. Tray
10. Tray handle
11. Silicon pad
SAFETY INSTRUCTIONS
If the supply cord is damaged it must be replaced by the
manufacturer, its service agent or similarly qualified
persons in order to avoid a hazard.
This appliance can be used by children aged from 8 years
and above and persons with reduced physical, sensory or
mental capabilities or lack of experience and knowledge if
they have been given supervision or instruction
concerning use of the appliance in a safe way and
understand the hazards involved. Children shall not play
with the appliance. Cleaning and user maintenance shall
not be made by children unless they are older than 8 and
supervised.
15
DANKE DASS SIE SICH FÜR ZELMER ENTSCHIEDEN HABEN WIR WÜNSCHEN IHNEN, DASS
UNSER PRODUKT IHRE ERWARTUNGEN ERFÜLLT UND SIE ZUFRIEDEN STELLT.
WARNUNG
LESEN SIE DIE GEBRAUCHSANWEISUNG SORGFÄLTIG DURCH, BEVOR SIE DAS PRODUKT
VERWENDEN. BEWAHREN SIE ES AN EINEM SICHEREN ORT FÜR DEN ZUKÜNFTIGEN
GEBRAUCH AUF
BESCHREIBUNG
1. Heizkontrollleuchte (blaues Licht)
2. Netzkontrollleuchte (rotes Licht)
3. Timer-Einstellknopf (0 - 60 Minuten)
4. Temperaturregler (90 - 200 °C)
5. Fritteusenentlüftungen
6. Korbentlüftungen
7. Korbgriff
8. Korb (1)
9. Schale
10. Schalengriff
11. Silikon-Pad
SICHERHEITSHINWEISE
Wenn das Netzkabel beschädigt ist, muss es vom
Hersteller, seinem Servicevertreter oder ähnlich
qualifizierten Personen ersetzt werden, um eine
Gefährdung zu vermeiden.
Dieses Gerät darf von Kindern ab 8 Jahren und von
Personen mit eingeschränkten körperlichen,
sensorischen oder geistigen Fähigkeiten oder
mangelnder Erfahrung und Kenntnissen verwendet
werden, wenn sie beaufsichtigt werden oder bezüglich
des sicheren Gebrauchs des Gerätes unterwiesen
wurden und die daraus resultierenden Gefahren
verstanden haben. Kinder dürfen nicht mit dem Gerät
spielen. Reinigung und Wartung dürfen nicht von Kindern
vorgenommen werden, es sei denn, sie sind älter als 8
Jahre und werden beaufsichtigt.
DE
Adjust the time: Turn the timer dial to the desired time. Once a time is selected, the Air Fryer will begin to
tick, indicating the time is counting down.
Note: Maximum cooking time is 60 minutes.
6. Start cooking.
After setting the temperature and time, the power indicator light and the heating indicator light will illumina-
te and the Air Fryer will begin cooking.
To check food while the Air Fryer is cooking:
A) Use the basket handle to pull out the basket.
Note: The power indicator light and the heating indicator light will turn off once the basket is pulled out, but
the timer will continue to count down.
B) Use the basket handle to shake and redistribute the food inside the basket (or use tongs to flip food) if
necessary, then push the basket back into the unit. The unit will automatically resume cooking when the
basket is replaced.
7. Enjoy your air-fried food.
Once the timer completely counts down, the Air Fryer will ding once and turn off.
Use the basket handle to pull out the basket. Remove basket carefully by pulling out straight to prevent oil
spillage. Use protective gloves and/or tongs to carefully transfer the hot food to a serving plate.
Caution: The basket, tray and contents will be HOT after cooking.
Place the hot basket on a wire rack or trivet to cool.
8. Unplug the Air Fryer and let cool completely before cleaning.
9. Clean the basket and tray after every use.
COOKING TIPS
• Almost any food that is traditionally cooked in the oven can be air fried.
• Foods cook best and most evenly when they are of similar size and thickness.
• Smaller pieces of food require less cooking time than larger pieces.
• For best results in the shortest amount of time, air fry food in small batches. Avoid stacking or layering
when possible.
• Most prepackaged foods do not need to be tossed in oil before air frying. Most already contain oil and
other ingredients that enhance browning and crispiness
• Frozen appetizers and hors d’oeuvres air fry very well. For best results, arrange them on the tray in a
single layer.
• If layering foods, be sure to shake the basket halfway through (or flip food) to promote even cooking.
• Toss foods you are preparing from scratch, such as French fries or other vegetables, with a small amount
of oil to promote browning and crispiness.
• When air frying fresh vegetables, make sure to pat them dry completely before tossing with oil and air
frying to ensure maximum crispiness.
• Air fryers are great for reheating food, including pizza. To reheat your food, set the temperature to 150
for up to 10 minutes.
5. Die gewünschte Gartemperatur und -zeit einstellen.
Stellen Sie die gewünschte Temperatur durch Drehen des Temperaturreglers zwischen 90 und 200 °C ein.
Stellen Sie die gewünschte Zeit durch Drehen des Timer-Knopfs ein. Nach Auswahl einer Zeit beginnt die
Heißluftfritteuse zu ticken und zeigt damit an, dass die Zeit herunterzählt.
Hinweis: Die maximale Garzeit beträgt 60 Minuten.
6. Das Frittieren starten.
Nach Einstellen von Temperatur und Zeit leuchten die Betriebs- und die Heizkontrollleuchte auf und
beginnt die Fritteuse mit dem Garvorgang.
Zum Überprüfen der Lebensmittel, während des Heißluftfrittierens:
A) Ziehen Sie den Korb am Korbgriff heraus.
Hinweis: Die Netz- und Heizkontrollleuchte erlöschen, sobald der Korb herausgezogen wird, der Timer
zählt jedoch weiter herunter.
B) Sie können die Speisen im Korb mit dem Korbgriff schütteln und umverteilen (oder mit einer Zange
umdrehen), und dann den Korb wieder in das Gerät schieben. Das Gerät setzt den Garvorgang automa-
tisch fort, sobald der Korb wieder eingesetzt ist.
7. Genießen Sie Ihre luftftrittierten Speisen.
Sobald der Timer vollständig heruntergezählt hat, gibt die Fritteuse einen Ton ab und schaltet sich aus.
Ziehen Sie den Korb am Korbgriff heraus. Ziehen Sie den Korb vorsichtig gerade heraus, damit kein Öl
verschüttet wird. Legen Sie mit Schutzhandschuhen und/oder einer Zange die heißen Speisen vorsichtig
auf einen Servierteller.
Vorsicht: Korb, Schale und Inhalt sind nach dem Garen HEISS.
Stellen Sie den heißen Korb zum Abkühlen auf ein Drahtgitter oder einen Untersetzer.
8. Ziehen Sie den Netzstecker der Fritteuse und lassen Sie sie vor der Reinigung vollständig
abkühlen.
9. Reinigen Sie Korb und Schale nach jedem Gebrauch.
GARTIPPS
• Fast alle traditionell im Backofen zubereiteten Speisen können mit heißer Luft frittiert werden
• Lebensmittel garen am besten und gleichmäßigsten, wenn sie ähnlich groß und dick sind
• Kleinere Lebensmittelstücke benötigen weniger Garzeit als größere
• Für beste Ergebnisse in kürzester Zeit frittieren Sie Ihre Lebensmittel in kleinen Mengen. Vermeiden Sie
nach Möglichkeit, sie zu stapeln oder zu schichten
• Die meisten vorverpackten Lebensmittel müssen vor dem Heißluftfrittieren nicht in Öl geschwenkt
werden. Die meisten enthalten bereits Öl und andere Zutaten, die eine gute Bräunung und Knusprigkeit
ermöglichen
• Tiefgekühlte Häppchen und Vorspeisen lassen sich sehr gut mit Heißluft frittieren. Die besten Ergebnisse
erzielen Sie, wenn Sie sie in einer einzigen Schicht auf der Schale anordnen
• Wenn Sie Speisen schichten, schütteln Sie den Korb oder wenden seinen Inhalt nach halber Zeit, um ein
gleichmäßiges Frittieren zu fördern
• Schwenken Sie Lebensmittel, die Sie frisch zubereiten, wie z. B. Pommes frites oder anderes Gemüse,
mit einer kleinen Menge Öl, damit sie knusprig braun werden
• Tupfen Sie frisches Gemüse vollständig trocken, bevor Sie es in Öl schwenken und luftfrittieren, um
maximale Knusprigkeit zu erzielen
• Heißluftfritteusen eignen sich hervorragend zum Aufwärmen, auch von Pizza. Stellen Sie zum Aufwär-
men Ihrer Speisen die Temperatur auf 150 °C und die Zeit auf 10 Minuten ein

Unplug the product immediately from the mains in the event of any breakdown or damage and contact an official
technical support service. In order to prevent any risk of danger, do not open the device. Only qualified technical
personnel from the brand´s Official technical support service may carry out repairs or procedures on the device.
B&B TRENDS SL. disclaims all liability for damages that may occur to people, animals or objects, for the non-ob-
servance of these warnings.
BEFORE ITS FIRST USE
1. Remove all packing materials and stickers from the inside and outside of the Air Fryer. Gently wipe down
exterior with a damp cloth or paper towel.
WARNING: Never immerse the Air Fryer or its plug in water or any other liquids.
2. Pull the basket handle to remove the basket from the Air Fryer. Use the tray handle, in the center of the
tray, to remove the tray. Use a sponge and warm, soapy water to wash the inside and outside of the basket
and tray. The basket and the tray are top-rack dishwasher safe.
3. WARNING: Do not use abrasive cleaning agents or scouring pads.
4. Dry thoroughly.
HOW TO USE
1. Prepare the basket and desired food.
Use the tray handle to insert the tray into the basket. Push down to ensure it is secure and in a leveled
position. There should be a small amount of space between the tray and bottom of the basket.
Warning: Never fill the basket with oil. Unlike deep fryers, air fryers require little to no oil to produce crispy
results. If you choose to use oil, toss food with oil in a separate bowl and then transfer food to the tray
inside the basket.
2. Put food on tray.
Refer to the chart on “more cooking tips” for recommended maximum amounts of food, cooking times,
temperatures and tips.
3. Put the basket into the Air Fryer.
Use the Basket Handle to insert the basket into the Air Fryer. Push to close.
4. Plug in the Air Fryer.
The power indicator light will illuminate when the Air Fryer is plugged in. The heating indicator light will
NOT illuminate until the timer dial is turned past zero.
Note: The Air Fryer will not operate if the basket is not fully pushed into place.
5. Set desired cooking temperature and time.
Adjust the temperature: Turn the temperature dial to the desired temperature between 90ºC and 200ºC.
nur auf das Verbrennen von Herstellungsrückständen zurückzuführen.
Legen Sie die zu frittierenden Zutaten immer in den Korb, damit sie nicht mit den Heizelementen in Berührung
kommen.
Ziehen Sie im Falle einer Störung oder Beschädigung sofort den Netzstecker und wenden Sie sich an einen
offiziellen technischen Kundendienst. Um jegliches Gefahrenrisiko zu vermeiden, darf die Maschine nicht geöffnet
werden. Nur qualifiziertes technisches Personal des offiziellen technischen Kundendienstes der Marke darf
Reparaturen oder Eingriffe an dieser Maschine vornehmen.
B&B TRENDS SL. übernimmt keine Haftung für Schäden an Personen, Tieren oder Gegenständen, die durch die
Nichtbeachtung dieser Warnhinweise entstehen.
VOR DEM ERSTEN EINSATZ
1. Entfernen Sie alle Verpackungsmaterialien und Aufkleber von der Innen- und Außenseite der Heißluftfri-
tteuse. Wischen Sie die Außenseite vorsichtig mit einem feuchten Tuch oder Papiertuch ab.
WARNHINWEIS: Tauchen Sie die Fritteuse niemals in Wasser oder andere Flüssigkeiten ein.
2. Ziehen Sie den Korb an seinem Griff aus der Heißluftfritteuse. Nehmen Sie die Einlegschale am Griff in
ihrer Mitte heraus. Reinigen Sie die Innen- und Außenseite von Korb und Schale mit einem Schwamm und
warmem Seifenwasser. Korb und Schale können oben im Geschirrspüler gereinigt werden.
3. WARNHINWEIS: Verwenden Sie keine scheuernden Reinigungsmittel oder Schwämme.
4. Trocknen Sie alles gründlich ab.
VERWENDUNG
1. Den Korb und die gewünschten Lebensmittel vorbereiten.
Setzen Sie die Schale mithilfe ihres Griffs in den Korb ein. Drücken Sie sie ganz nach unten und eben in
den Korb hinein. Dabei bleibt noch ein kleiner Abstand zwischen Schale und Korbboden.
Warnhinweis: Füllen Sie den Korb niemals mit Öl. Im Gegensatz zu Ölfritteusen benötigen Luftfritteusen
wenig bis gar kein Öl, um knusprige Ergebnisse zu erzielen. Wenn Sie trotzdem Öl verwenden möchten,
schwenken Sie die Speisen in einer separaten Schüssel mit etwas Öl und geben Sie sie Speisen dann in
die Schale im Korb.
2. Das Gargut auf die Schale legen.
Entnehmen Sie der Tabelle “Weitere Gartipps” die empfohlenen maximalen Gargutmengen, Garzeiten,
Temperaturen und einige Tipps.
3. Den Korb in die Heißluftfritteuse einsetzen.
Schieben Sie den Korb an seinem Griff in die Heißluftfritteuse ein. Achten Sie auf kompletten Verschluss.
4. Die Heißluftfritteuse anschließen.
Die Betriebskontrollleuchte leuchtet, wenn die Fritteuse eingesteckt ist. Die Heiz-Kontrollleuchte leuchtet
erst auf, wenn der Timer-Einstellknopf aus der Nullstellung gedreht wird.
Hinweis: Die Heißluftfritteuse geht nicht in Betrieb, wenn der Korb nicht vollständig eingeschoben ist.
Keep the appliance and its cord out of reach of children
less than 8 years.
Appliances are not intended to be operated by means of
an external timer or separate remote-control system.
Disconnect the appliance when it is not in use and before
cleaning it. Let it cool before putting on, taking off parts
and cleaning it
Do not submerge the appliance in water or any other
liquid.
This appliance is intended for use at a maximum altitude
of 2000m above sea level.
IMPORTANT WARNINGS
This appliance is designed exclusively for domestic use, in no case should be a commercial or industrial use.
Any incorrect use or improper handling of the product shall render the warranty null and void.
Prior to plugging in the product, check that your mains voltage is the same as the one indicated on the product
label.
Place the appliance on a flat even surface
The mains connection cable must not be tangled or wrapped around the product during use.
Do not use the device, or connect and disconnect to the supply mains with the hands and/or feet wet. Do not pull
on the connection cord in order to unplug it or use it as a handle
IMPORTANT. When operating this Air Fryer, keep at least ten centimeters of free space on all sides of the oven to
allow for adequate air circulation.
DO NOT place your Air Fryer under cupboards, blinds or curtains. Risk of overheating / fire.
Do not cover any part of the Fryer with a cloth or similar, it will cause overheating. Risk of fire.
This is an AIR FRYER. It requires very little oil to cook. Do not fill the pot with oil or fat as this may cause a fire
hazard.
Do not use any accessories other than manufacturer recommended accessories in this Air Fryer.
Always wear protective, insulated oven gloves when inserting or removing items from the hot Air Fryer.
The appliance must be used on a level, stable heat-resistant surface. The first time you use your Air Fryer there
may be a slight odor or a small amount of smoke given off. This is normal and is just the manufacturing residues
burning off.
Always place the ingredients to be fried in the basket to prevent it from coming into contact with the heating
elements.
Halten Sie das Gerät und sein Kabel außerhalb der
Reichweite von Kindern unter 8 Jahren.
Dieses Gerät ist nicht dafür vorgesehen, mit einer
externen Zeitschaltuhr oder einem separaten
Fernsteuerungssystem betrieben zu werden.
Trennen Sie das Gerät von der Stromversorgung, wenn
es nicht in Gebrauch ist und bevor Sie es reinigen. Lassen
Sie es abkühlen, bevor Sie Teile anbringen, abnehmen
oder reinigen.
Tauchen Sie das Gerät niemals in Wasser oder andere
Flüssigkeiten ein.
Dieses Gerät ist für den Einsatz in einer maximalen Höhe
von 2000 m über dem Meeresspiegel vorgesehen.
WICHTIGE WARNUNGEN
Dieses Gerät ist ausschließlich für den privaten Hausgebrauch bestimmt, es darf auf keinen Fall für gewerbliche
oder industrielle Zwecke verwendet werden.
Jegliche unsachgemäße Verwendung oder Handhabung des Geräts führt zum Erlöschen der Garantie.
Überprüfen Sie vor dem Anschließen des Geräts, ob die Netzspannung mit den Werten auf dem Geräteschild
übereinstimmt.
Stellen Sie das Gerät immer auf eine flache, ebene Oberfläche.
Das Netzkabel darf während des Gebrauchs nicht zusammengerollt oder um das Gerät gewickelt sein.
Benutzen oder stecken Sie das Gerät nicht mit nassen Händen und/oder Füßen ein- oder aus. Ziehen Sie nicht
am Netzkabel, um den Stecker zu ziehen und benutzen Sie es nicht zum Tragen des Geräts.
WICHTIG: Halten Sie beim Betrieb dieser Heißluftfritteuse an allen Seiten mindestens zehn Zentimeter Freiraum,
um eine ausreichende Luftzirkulation zu ermöglichen.
Stellen Sie Ihre Heißluftfritteuse NICHT unter Schränke, Jalousien oder Vorhänge. Überhitzungs- und Brandge-
fahr.
Bedecken Sie keinen Teil der Fritteuse mit einem Tuch oder Ähnlichem, da dies zu Überhitzung führt. Feuergefahr.
Dieses Gerät ist eine HEISSLUFTFRITTEUSE. Es benötigt sehr wenig Öl zum Garen. Füllen Sie den Topf nicht
mit Öl oder Fett, da dies Brandgefahr darstellen würde.
Verwenden Sie mit dieser Heißluftfritteuse nur das vom Hersteller empfohlene Zubehör.
Tragen Sie immer schützende, Ofenhandschuhe, wenn Sie etwas in die heiße Heißluftfritteuse einlegen oder aus
ihr entnehmen.
Verwenden Sie das Gerät auf einer ebenen, stabilen und hitzebeständigen Oberfläche. Wenn Sie die Fritteuse
zum ersten Mal benutzen, kann etwas Geruch oder eine gewisse Rauchentwicklung auftreten. Dies ist normal und
DE
WE WOULD LIKE TO THANKS YOU FOR CHOOSING ZELMER,
WE WISH THE PRODUCT PERFORMS TO YOUR SATISFACTION AND PLEASURE.
WARNING
PLEASE READ THE INSTRUCTIONS FOR USE CAREFULLY PRIOR TO USING THE PRODUCT.
STORE THESE IN A SAFE PLACE FOR FUTURE REFERENCE.
DESCRIPTION
1. Heating indicator light (blue light)
2. Power indicator light (red light)
3. Timer dial (0-60 minutes)
4. Temperature dial (90ºC - 200ºC)
5. Fryer vents
6. Basket vents
7. Basket handle
8. Basket (1)
9. Tray
10. Tray handle
11. Silicon pad
SAFETY INSTRUCTIONS
If the supply cord is damaged it must be replaced by the
manufacturer, its service agent or similarly qualified
persons in order to avoid a hazard.
This appliance can be used by children aged from 8 years
and above and persons with reduced physical, sensory or
mental capabilities or lack of experience and knowledge if
they have been given supervision or instruction
concerning use of the appliance in a safe way and
understand the hazards involved. Children shall not play
with the appliance. Cleaning and user maintenance shall
not be made by children unless they are older than 8 and
supervised.
16
DANKE DASS SIE SICH FÜR ZELMER ENTSCHIEDEN HABEN WIR WÜNSCHEN IHNEN, DASS
UNSER PRODUKT IHRE ERWARTUNGEN ERFÜLLT UND SIE ZUFRIEDEN STELLT.
WARNUNG
LESEN SIE DIE GEBRAUCHSANWEISUNG SORGFÄLTIG DURCH, BEVOR SIE DAS PRODUKT
VERWENDEN. BEWAHREN SIE ES AN EINEM SICHEREN ORT FÜR DEN ZUKÜNFTIGEN
GEBRAUCH AUF
BESCHREIBUNG
1. Heizkontrollleuchte (blaues Licht)
2. Netzkontrollleuchte (rotes Licht)
3. Timer-Einstellknopf (0 - 60 Minuten)
4. Temperaturregler (90 - 200 °C)
5. Fritteusenentlüftungen
6. Korbentlüftungen
7. Korbgriff
8. Korb (1)
9. Schale
10. Schalengriff
11. Silikon-Pad
SICHERHEITSHINWEISE
Wenn das Netzkabel beschädigt ist, muss es vom
Hersteller, seinem Servicevertreter oder ähnlich
qualifizierten Personen ersetzt werden, um eine
Gefährdung zu vermeiden.
Dieses Gerät darf von Kindern ab 8 Jahren und von
Personen mit eingeschränkten körperlichen,
sensorischen oder geistigen Fähigkeiten oder
mangelnder Erfahrung und Kenntnissen verwendet
werden, wenn sie beaufsichtigt werden oder bezüglich
des sicheren Gebrauchs des Gerätes unterwiesen
wurden und die daraus resultierenden Gefahren
verstanden haben. Kinder dürfen nicht mit dem Gerät
spielen. Reinigung und Wartung dürfen nicht von Kindern
vorgenommen werden, es sei denn, sie sind älter als 8
Jahre und werden beaufsichtigt.
Adjust the time: Turn the timer dial to the desired time. Once a time is selected, the Air Fryer will begin to
tick, indicating the time is counting down.
Note: Maximum cooking time is 60 minutes.
6. Start cooking.
After setting the temperature and time, the power indicator light and the heating indicator light will illumina-
te and the Air Fryer will begin cooking.
To check food while the Air Fryer is cooking:
A) Use the basket handle to pull out the basket.
Note: The power indicator light and the heating indicator light will turn off once the basket is pulled out, but
the timer will continue to count down.
B) Use the basket handle to shake and redistribute the food inside the basket (or use tongs to flip food) if
necessary, then push the basket back into the unit. The unit will automatically resume cooking when the
basket is replaced.
7. Enjoy your air-fried food.
Once the timer completely counts down, the Air Fryer will ding once and turn off.
Use the basket handle to pull out the basket. Remove basket carefully by pulling out straight to prevent oil
spillage. Use protective gloves and/or tongs to carefully transfer the hot food to a serving plate.
Caution: The basket, tray and contents will be HOT after cooking.
Place the hot basket on a wire rack or trivet to cool.
8. Unplug the Air Fryer and let cool completely before cleaning.
9. Clean the basket and tray after every use.
COOKING TIPS
• Almost any food that is traditionally cooked in the oven can be air fried.
• Foods cook best and most evenly when they are of similar size and thickness.
• Smaller pieces of food require less cooking time than larger pieces.
• For best results in the shortest amount of time, air fry food in small batches. Avoid stacking or layering
when possible.
• Most prepackaged foods do not need to be tossed in oil before air frying. Most already contain oil and
other ingredients that enhance browning and crispiness
• Frozen appetizers and hors d’oeuvres air fry very well. For best results, arrange them on the tray in a
single layer.
• If layering foods, be sure to shake the basket halfway through (or flip food) to promote even cooking.
• Toss foods you are preparing from scratch, such as French fries or other vegetables, with a small amount
of oil to promote browning and crispiness.
• When air frying fresh vegetables, make sure to pat them dry completely before tossing with oil and air
frying to ensure maximum crispiness.
• Air fryers are great for reheating food, including pizza. To reheat your food, set the temperature to 150
for up to 10 minutes.
5. Die gewünschte Gartemperatur und -zeit einstellen.
Stellen Sie die gewünschte Temperatur durch Drehen des Temperaturreglers zwischen 90 und 200 °C ein.
Stellen Sie die gewünschte Zeit durch Drehen des Timer-Knopfs ein. Nach Auswahl einer Zeit beginnt die
Heißluftfritteuse zu ticken und zeigt damit an, dass die Zeit herunterzählt.
Hinweis: Die maximale Garzeit beträgt 60 Minuten.
6. Das Frittieren starten.
Nach Einstellen von Temperatur und Zeit leuchten die Betriebs- und die Heizkontrollleuchte auf und
beginnt die Fritteuse mit dem Garvorgang.
Zum Überprüfen der Lebensmittel, während des Heißluftfrittierens:
A) Ziehen Sie den Korb am Korbgriff heraus.
Hinweis: Die Netz- und Heizkontrollleuchte erlöschen, sobald der Korb herausgezogen wird, der Timer
zählt jedoch weiter herunter.
B) Sie können die Speisen im Korb mit dem Korbgriff schütteln und umverteilen (oder mit einer Zange
umdrehen), und dann den Korb wieder in das Gerät schieben. Das Gerät setzt den Garvorgang automa-
tisch fort, sobald der Korb wieder eingesetzt ist.
7. Genießen Sie Ihre luftftrittierten Speisen.
Sobald der Timer vollständig heruntergezählt hat, gibt die Fritteuse einen Ton ab und schaltet sich aus.
Ziehen Sie den Korb am Korbgriff heraus. Ziehen Sie den Korb vorsichtig gerade heraus, damit kein Öl
verschüttet wird. Legen Sie mit Schutzhandschuhen und/oder einer Zange die heißen Speisen vorsichtig
auf einen Servierteller.
Vorsicht: Korb, Schale und Inhalt sind nach dem Garen HEISS.
Stellen Sie den heißen Korb zum Abkühlen auf ein Drahtgitter oder einen Untersetzer.
8. Ziehen Sie den Netzstecker der Fritteuse und lassen Sie sie vor der Reinigung vollständig
abkühlen.
9. Reinigen Sie Korb und Schale nach jedem Gebrauch.
GARTIPPS
• Fast alle traditionell im Backofen zubereiteten Speisen können mit heißer Luft frittiert werden
• Lebensmittel garen am besten und gleichmäßigsten, wenn sie ähnlich groß und dick sind
• Kleinere Lebensmittelstücke benötigen weniger Garzeit als größere
• Für beste Ergebnisse in kürzester Zeit frittieren Sie Ihre Lebensmittel in kleinen Mengen. Vermeiden Sie
nach Möglichkeit, sie zu stapeln oder zu schichten
• Die meisten vorverpackten Lebensmittel müssen vor dem Heißluftfrittieren nicht in Öl geschwenkt
werden. Die meisten enthalten bereits Öl und andere Zutaten, die eine gute Bräunung und Knusprigkeit
ermöglichen
• Tiefgekühlte Häppchen und Vorspeisen lassen sich sehr gut mit Heißluft frittieren. Die besten Ergebnisse
erzielen Sie, wenn Sie sie in einer einzigen Schicht auf der Schale anordnen
• Wenn Sie Speisen schichten, schütteln Sie den Korb oder wenden seinen Inhalt nach halber Zeit, um ein
gleichmäßiges Frittieren zu fördern
• Schwenken Sie Lebensmittel, die Sie frisch zubereiten, wie z. B. Pommes frites oder anderes Gemüse,
mit einer kleinen Menge Öl, damit sie knusprig braun werden
• Tupfen Sie frisches Gemüse vollständig trocken, bevor Sie es in Öl schwenken und luftfrittieren, um
maximale Knusprigkeit zu erzielen
• Heißluftfritteusen eignen sich hervorragend zum Aufwärmen, auch von Pizza. Stellen Sie zum Aufwär-
men Ihrer Speisen die Temperatur auf 150 °C und die Zeit auf 10 Minuten ein

Unplug the product immediately from the mains in the event of any breakdown or damage and contact an official
technical support service. In order to prevent any risk of danger, do not open the device. Only qualified technical
personnel from the brand´s Official technical support service may carry out repairs or procedures on the device.
B&B TRENDS SL. disclaims all liability for damages that may occur to people, animals or objects, for the non-ob-
servance of these warnings.
BEFORE ITS FIRST USE
1. Remove all packing materials and stickers from the inside and outside of the Air Fryer. Gently wipe down
exterior with a damp cloth or paper towel.
WARNING: Never immerse the Air Fryer or its plug in water or any other liquids.
2. Pull the basket handle to remove the basket from the Air Fryer. Use the tray handle, in the center of the
tray, to remove the tray. Use a sponge and warm, soapy water to wash the inside and outside of the basket
and tray. The basket and the tray are top-rack dishwasher safe.
3. WARNING: Do not use abrasive cleaning agents or scouring pads.
4. Dry thoroughly.
HOW TO USE
1. Prepare the basket and desired food.
Use the tray handle to insert the tray into the basket. Push down to ensure it is secure and in a leveled
position. There should be a small amount of space between the tray and bottom of the basket.
Warning: Never fill the basket with oil. Unlike deep fryers, air fryers require little to no oil to produce crispy
results. If you choose to use oil, toss food with oil in a separate bowl and then transfer food to the tray
inside the basket.
2. Put food on tray.
Refer to the chart on “more cooking tips” for recommended maximum amounts of food, cooking times,
temperatures and tips.
3. Put the basket into the Air Fryer.
Use the Basket Handle to insert the basket into the Air Fryer. Push to close.
4. Plug in the Air Fryer.
The power indicator light will illuminate when the Air Fryer is plugged in. The heating indicator light will
NOT illuminate until the timer dial is turned past zero.
Note: The Air Fryer will not operate if the basket is not fully pushed into place.
5. Set desired cooking temperature and time.
Adjust the temperature: Turn the temperature dial to the desired temperature between 90ºC and 200ºC.
17
nur auf das Verbrennen von Herstellungsrückständen zurückzuführen.
Legen Sie die zu frittierenden Zutaten immer in den Korb, damit sie nicht mit den Heizelementen in Berührung
kommen.
Ziehen Sie im Falle einer Störung oder Beschädigung sofort den Netzstecker und wenden Sie sich an einen
offiziellen technischen Kundendienst. Um jegliches Gefahrenrisiko zu vermeiden, darf die Maschine nicht geöffnet
werden. Nur qualifiziertes technisches Personal des offiziellen technischen Kundendienstes der Marke darf
Reparaturen oder Eingriffe an dieser Maschine vornehmen.
B&B TRENDS SL. übernimmt keine Haftung für Schäden an Personen, Tieren oder Gegenständen, die durch die
Nichtbeachtung dieser Warnhinweise entstehen.
VOR DEM ERSTEN EINSATZ
1. Entfernen Sie alle Verpackungsmaterialien und Aufkleber von der Innen- und Außenseite der Heißluftfri-
tteuse. Wischen Sie die Außenseite vorsichtig mit einem feuchten Tuch oder Papiertuch ab.
WARNHINWEIS: Tauchen Sie die Fritteuse niemals in Wasser oder andere Flüssigkeiten ein.
2. Ziehen Sie den Korb an seinem Griff aus der Heißluftfritteuse. Nehmen Sie die Einlegschale am Griff in
ihrer Mitte heraus. Reinigen Sie die Innen- und Außenseite von Korb und Schale mit einem Schwamm und
warmem Seifenwasser. Korb und Schale können oben im Geschirrspüler gereinigt werden.
3. WARNHINWEIS: Verwenden Sie keine scheuernden Reinigungsmittel oder Schwämme.
4. Trocknen Sie alles gründlich ab.
VERWENDUNG
1. Den Korb und die gewünschten Lebensmittel vorbereiten.
Setzen Sie die Schale mithilfe ihres Griffs in den Korb ein. Drücken Sie sie ganz nach unten und eben in
den Korb hinein. Dabei bleibt noch ein kleiner Abstand zwischen Schale und Korbboden.
Warnhinweis: Füllen Sie den Korb niemals mit Öl. Im Gegensatz zu Ölfritteusen benötigen Luftfritteusen
wenig bis gar kein Öl, um knusprige Ergebnisse zu erzielen. Wenn Sie trotzdem Öl verwenden möchten,
schwenken Sie die Speisen in einer separaten Schüssel mit etwas Öl und geben Sie sie Speisen dann in
die Schale im Korb.
2. Das Gargut auf die Schale legen.
Entnehmen Sie der Tabelle “Weitere Gartipps” die empfohlenen maximalen Gargutmengen, Garzeiten,
Temperaturen und einige Tipps.
3. Den Korb in die Heißluftfritteuse einsetzen.
Schieben Sie den Korb an seinem Griff in die Heißluftfritteuse ein. Achten Sie auf kompletten Verschluss.
4. Die Heißluftfritteuse anschließen.
Die Betriebskontrollleuchte leuchtet, wenn die Fritteuse eingesteckt ist. Die Heiz-Kontrollleuchte leuchtet
erst auf, wenn der Timer-Einstellknopf aus der Nullstellung gedreht wird.
Hinweis: Die Heißluftfritteuse geht nicht in Betrieb, wenn der Korb nicht vollständig eingeschoben ist.
DE
Keep the appliance and its cord out of reach of children
less than 8 years.
Appliances are not intended to be operated by means of
an external timer or separate remote-control system.
Disconnect the appliance when it is not in use and before
cleaning it. Let it cool before putting on, taking off parts
and cleaning it
Do not submerge the appliance in water or any other
liquid.
This appliance is intended for use at a maximum altitude
of 2000m above sea level.
IMPORTANT WARNINGS
This appliance is designed exclusively for domestic use, in no case should be a commercial or industrial use.
Any incorrect use or improper handling of the product shall render the warranty null and void.
Prior to plugging in the product, check that your mains voltage is the same as the one indicated on the product
label.
Place the appliance on a flat even surface
The mains connection cable must not be tangled or wrapped around the product during use.
Do not use the device, or connect and disconnect to the supply mains with the hands and/or feet wet. Do not pull
on the connection cord in order to unplug it or use it as a handle
IMPORTANT. When operating this Air Fryer, keep at least ten centimeters of free space on all sides of the oven to
allow for adequate air circulation.
DO NOT place your Air Fryer under cupboards, blinds or curtains. Risk of overheating / fire.
Do not cover any part of the Fryer with a cloth or similar, it will cause overheating. Risk of fire.
This is an AIR FRYER. It requires very little oil to cook. Do not fill the pot with oil or fat as this may cause a fire
hazard.
Do not use any accessories other than manufacturer recommended accessories in this Air Fryer.
Always wear protective, insulated oven gloves when inserting or removing items from the hot Air Fryer.
The appliance must be used on a level, stable heat-resistant surface. The first time you use your Air Fryer there
may be a slight odor or a small amount of smoke given off. This is normal and is just the manufacturing residues
burning off.
Always place the ingredients to be fried in the basket to prevent it from coming into contact with the heating
elements.
Halten Sie das Gerät und sein Kabel außerhalb der
Reichweite von Kindern unter 8 Jahren.
Dieses Gerät ist nicht dafür vorgesehen, mit einer
externen Zeitschaltuhr oder einem separaten
Fernsteuerungssystem betrieben zu werden.
Trennen Sie das Gerät von der Stromversorgung, wenn
es nicht in Gebrauch ist und bevor Sie es reinigen. Lassen
Sie es abkühlen, bevor Sie Teile anbringen, abnehmen
oder reinigen.
Tauchen Sie das Gerät niemals in Wasser oder andere
Flüssigkeiten ein.
Dieses Gerät ist für den Einsatz in einer maximalen Höhe
von 2000 m über dem Meeresspiegel vorgesehen.
WICHTIGE WARNUNGEN
Dieses Gerät ist ausschließlich für den privaten Hausgebrauch bestimmt, es darf auf keinen Fall für gewerbliche
oder industrielle Zwecke verwendet werden.
Jegliche unsachgemäße Verwendung oder Handhabung des Geräts führt zum Erlöschen der Garantie.
Überprüfen Sie vor dem Anschließen des Geräts, ob die Netzspannung mit den Werten auf dem Geräteschild
übereinstimmt.
Stellen Sie das Gerät immer auf eine flache, ebene Oberfläche.
Das Netzkabel darf während des Gebrauchs nicht zusammengerollt oder um das Gerät gewickelt sein.
Benutzen oder stecken Sie das Gerät nicht mit nassen Händen und/oder Füßen ein- oder aus. Ziehen Sie nicht
am Netzkabel, um den Stecker zu ziehen und benutzen Sie es nicht zum Tragen des Geräts.
WICHTIG: Halten Sie beim Betrieb dieser Heißluftfritteuse an allen Seiten mindestens zehn Zentimeter Freiraum,
um eine ausreichende Luftzirkulation zu ermöglichen.
Stellen Sie Ihre Heißluftfritteuse NICHT unter Schränke, Jalousien oder Vorhänge. Überhitzungs- und Brandge-
fahr.
Bedecken Sie keinen Teil der Fritteuse mit einem Tuch oder Ähnlichem, da dies zu Überhitzung führt. Feuergefahr.
Dieses Gerät ist eine HEISSLUFTFRITTEUSE. Es benötigt sehr wenig Öl zum Garen. Füllen Sie den Topf nicht
mit Öl oder Fett, da dies Brandgefahr darstellen würde.
Verwenden Sie mit dieser Heißluftfritteuse nur das vom Hersteller empfohlene Zubehör.
Tragen Sie immer schützende, Ofenhandschuhe, wenn Sie etwas in die heiße Heißluftfritteuse einlegen oder aus
ihr entnehmen.
Verwenden Sie das Gerät auf einer ebenen, stabilen und hitzebeständigen Oberfläche. Wenn Sie die Fritteuse
zum ersten Mal benutzen, kann etwas Geruch oder eine gewisse Rauchentwicklung auftreten. Dies ist normal und
WE WOULD LIKE TO THANKS YOU FOR CHOOSING ZELMER,
WE WISH THE PRODUCT PERFORMS TO YOUR SATISFACTION AND PLEASURE.
WARNING
PLEASE READ THE INSTRUCTIONS FOR USE CAREFULLY PRIOR TO USING THE PRODUCT.
STORE THESE IN A SAFE PLACE FOR FUTURE REFERENCE.
DESCRIPTION
1. Heating indicator light (blue light)
2. Power indicator light (red light)
3. Timer dial (0-60 minutes)
4. Temperature dial (90ºC - 200ºC)
5. Fryer vents
6. Basket vents
7. Basket handle
8. Basket (1)
9. Tray
10. Tray handle
11. Silicon pad
SAFETY INSTRUCTIONS
If the supply cord is damaged it must be replaced by the
manufacturer, its service agent or similarly qualified
persons in order to avoid a hazard.
This appliance can be used by children aged from 8 years
and above and persons with reduced physical, sensory or
mental capabilities or lack of experience and knowledge if
they have been given supervision or instruction
concerning use of the appliance in a safe way and
understand the hazards involved. Children shall not play
with the appliance. Cleaning and user maintenance shall
not be made by children unless they are older than 8 and
supervised.
DANKE DASS SIE SICH FÜR ZELMER ENTSCHIEDEN HABEN WIR WÜNSCHEN IHNEN, DASS
UNSER PRODUKT IHRE ERWARTUNGEN ERFÜLLT UND SIE ZUFRIEDEN STELLT.
WARNUNG
LESEN SIE DIE GEBRAUCHSANWEISUNG SORGFÄLTIG DURCH, BEVOR SIE DAS PRODUKT
VERWENDEN. BEWAHREN SIE ES AN EINEM SICHEREN ORT FÜR DEN ZUKÜNFTIGEN
GEBRAUCH AUF
BESCHREIBUNG
1. Heizkontrollleuchte (blaues Licht)
2. Netzkontrollleuchte (rotes Licht)
3. Timer-Einstellknopf (0 - 60 Minuten)
4. Temperaturregler (90 - 200 °C)
5. Fritteusenentlüftungen
6. Korbentlüftungen
7. Korbgriff
8. Korb (1)
9. Schale
10. Schalengriff
11. Silikon-Pad
SICHERHEITSHINWEISE
Wenn das Netzkabel beschädigt ist, muss es vom
Hersteller, seinem Servicevertreter oder ähnlich
qualifizierten Personen ersetzt werden, um eine
Gefährdung zu vermeiden.
Dieses Gerät darf von Kindern ab 8 Jahren und von
Personen mit eingeschränkten körperlichen,
sensorischen oder geistigen Fähigkeiten oder
mangelnder Erfahrung und Kenntnissen verwendet
werden, wenn sie beaufsichtigt werden oder bezüglich
des sicheren Gebrauchs des Gerätes unterwiesen
wurden und die daraus resultierenden Gefahren
verstanden haben. Kinder dürfen nicht mit dem Gerät
spielen. Reinigung und Wartung dürfen nicht von Kindern
vorgenommen werden, es sei denn, sie sind älter als 8
Jahre und werden beaufsichtigt.
Adjust the time: Turn the timer dial to the desired time. Once a time is selected, the Air Fryer will begin to
tick, indicating the time is counting down.
Note: Maximum cooking time is 60 minutes.
6. Start cooking.
After setting the temperature and time, the power indicator light and the heating indicator light will illumina-
te and the Air Fryer will begin cooking.
To check food while the Air Fryer is cooking:
A) Use the basket handle to pull out the basket.
Note: The power indicator light and the heating indicator light will turn off once the basket is pulled out, but
the timer will continue to count down.
B) Use the basket handle to shake and redistribute the food inside the basket (or use tongs to flip food) if
necessary, then push the basket back into the unit. The unit will automatically resume cooking when the
basket is replaced.
7. Enjoy your air-fried food.
Once the timer completely counts down, the Air Fryer will ding once and turn off.
Use the basket handle to pull out the basket. Remove basket carefully by pulling out straight to prevent oil
spillage. Use protective gloves and/or tongs to carefully transfer the hot food to a serving plate.
Caution: The basket, tray and contents will be HOT after cooking.
Place the hot basket on a wire rack or trivet to cool.
8. Unplug the Air Fryer and let cool completely before cleaning.
9. Clean the basket and tray after every use.
COOKING TIPS
• Almost any food that is traditionally cooked in the oven can be air fried.
• Foods cook best and most evenly when they are of similar size and thickness.
• Smaller pieces of food require less cooking time than larger pieces.
• For best results in the shortest amount of time, air fry food in small batches. Avoid stacking or layering
when possible.
• Most prepackaged foods do not need to be tossed in oil before air frying. Most already contain oil and
other ingredients that enhance browning and crispiness
• Frozen appetizers and hors d’oeuvres air fry very well. For best results, arrange them on the tray in a
single layer.
• If layering foods, be sure to shake the basket halfway through (or flip food) to promote even cooking.
• Toss foods you are preparing from scratch, such as French fries or other vegetables, with a small amount
of oil to promote browning and crispiness.
• When air frying fresh vegetables, make sure to pat them dry completely before tossing with oil and air
frying to ensure maximum crispiness.
• Air fryers are great for reheating food, including pizza. To reheat your food, set the temperature to 150
for up to 10 minutes.
5. Die gewünschte Gartemperatur und -zeit einstellen.
Stellen Sie die gewünschte Temperatur durch Drehen des Temperaturreglers zwischen 90 und 200 °C ein.
Stellen Sie die gewünschte Zeit durch Drehen des Timer-Knopfs ein. Nach Auswahl einer Zeit beginnt die
Heißluftfritteuse zu ticken und zeigt damit an, dass die Zeit herunterzählt.
Hinweis: Die maximale Garzeit beträgt 60 Minuten.
6. Das Frittieren starten.
Nach Einstellen von Temperatur und Zeit leuchten die Betriebs- und die Heizkontrollleuchte auf und
beginnt die Fritteuse mit dem Garvorgang.
Zum Überprüfen der Lebensmittel, während des Heißluftfrittierens:
A) Ziehen Sie den Korb am Korbgriff heraus.
Hinweis: Die Netz- und Heizkontrollleuchte erlöschen, sobald der Korb herausgezogen wird, der Timer
zählt jedoch weiter herunter.
B) Sie können die Speisen im Korb mit dem Korbgriff schütteln und umverteilen (oder mit einer Zange
umdrehen), und dann den Korb wieder in das Gerät schieben. Das Gerät setzt den Garvorgang automa-
tisch fort, sobald der Korb wieder eingesetzt ist.
7. Genießen Sie Ihre luftftrittierten Speisen.
Sobald der Timer vollständig heruntergezählt hat, gibt die Fritteuse einen Ton ab und schaltet sich aus.
Ziehen Sie den Korb am Korbgriff heraus. Ziehen Sie den Korb vorsichtig gerade heraus, damit kein Öl
verschüttet wird. Legen Sie mit Schutzhandschuhen und/oder einer Zange die heißen Speisen vorsichtig
auf einen Servierteller.
Vorsicht: Korb, Schale und Inhalt sind nach dem Garen HEISS.
Stellen Sie den heißen Korb zum Abkühlen auf ein Drahtgitter oder einen Untersetzer.
8. Ziehen Sie den Netzstecker der Fritteuse und lassen Sie sie vor der Reinigung vollständig
abkühlen.
9. Reinigen Sie Korb und Schale nach jedem Gebrauch.
GARTIPPS
• Fast alle traditionell im Backofen zubereiteten Speisen können mit heißer Luft frittiert werden
• Lebensmittel garen am besten und gleichmäßigsten, wenn sie ähnlich groß und dick sind
• Kleinere Lebensmittelstücke benötigen weniger Garzeit als größere
• Für beste Ergebnisse in kürzester Zeit frittieren Sie Ihre Lebensmittel in kleinen Mengen. Vermeiden Sie
nach Möglichkeit, sie zu stapeln oder zu schichten
• Die meisten vorverpackten Lebensmittel müssen vor dem Heißluftfrittieren nicht in Öl geschwenkt
werden. Die meisten enthalten bereits Öl und andere Zutaten, die eine gute Bräunung und Knusprigkeit
ermöglichen
• Tiefgekühlte Häppchen und Vorspeisen lassen sich sehr gut mit Heißluft frittieren. Die besten Ergebnisse
erzielen Sie, wenn Sie sie in einer einzigen Schicht auf der Schale anordnen
• Wenn Sie Speisen schichten, schütteln Sie den Korb oder wenden seinen Inhalt nach halber Zeit, um ein
gleichmäßiges Frittieren zu fördern
• Schwenken Sie Lebensmittel, die Sie frisch zubereiten, wie z. B. Pommes frites oder anderes Gemüse,
mit einer kleinen Menge Öl, damit sie knusprig braun werden
• Tupfen Sie frisches Gemüse vollständig trocken, bevor Sie es in Öl schwenken und luftfrittieren, um
maximale Knusprigkeit zu erzielen
• Heißluftfritteusen eignen sich hervorragend zum Aufwärmen, auch von Pizza. Stellen Sie zum Aufwär-
men Ihrer Speisen die Temperatur auf 150 °C und die Zeit auf 10 Minuten ein

Unplug the product immediately from the mains in the event of any breakdown or damage and contact an official
technical support service. In order to prevent any risk of danger, do not open the device. Only qualified technical
personnel from the brand´s Official technical support service may carry out repairs or procedures on the device.
B&B TRENDS SL. disclaims all liability for damages that may occur to people, animals or objects, for the non-ob-
servance of these warnings.
BEFORE ITS FIRST USE
1. Remove all packing materials and stickers from the inside and outside of the Air Fryer. Gently wipe down
exterior with a damp cloth or paper towel.
WARNING: Never immerse the Air Fryer or its plug in water or any other liquids.
2. Pull the basket handle to remove the basket from the Air Fryer. Use the tray handle, in the center of the
tray, to remove the tray. Use a sponge and warm, soapy water to wash the inside and outside of the basket
and tray. The basket and the tray are top-rack dishwasher safe.
3. WARNING: Do not use abrasive cleaning agents or scouring pads.
4. Dry thoroughly.
HOW TO USE
1. Prepare the basket and desired food.
Use the tray handle to insert the tray into the basket. Push down to ensure it is secure and in a leveled
position. There should be a small amount of space between the tray and bottom of the basket.
Warning: Never fill the basket with oil. Unlike deep fryers, air fryers require little to no oil to produce crispy
results. If you choose to use oil, toss food with oil in a separate bowl and then transfer food to the tray
inside the basket.
2. Put food on tray.
Refer to the chart on “more cooking tips” for recommended maximum amounts of food, cooking times,
temperatures and tips.
3. Put the basket into the Air Fryer.
Use the Basket Handle to insert the basket into the Air Fryer. Push to close.
4. Plug in the Air Fryer.
The power indicator light will illuminate when the Air Fryer is plugged in. The heating indicator light will
NOT illuminate until the timer dial is turned past zero.
Note: The Air Fryer will not operate if the basket is not fully pushed into place.
5. Set desired cooking temperature and time.
Adjust the temperature: Turn the temperature dial to the desired temperature between 90ºC and 200ºC.
nur auf das Verbrennen von Herstellungsrückständen zurückzuführen.
Legen Sie die zu frittierenden Zutaten immer in den Korb, damit sie nicht mit den Heizelementen in Berührung
kommen.
Ziehen Sie im Falle einer Störung oder Beschädigung sofort den Netzstecker und wenden Sie sich an einen
offiziellen technischen Kundendienst. Um jegliches Gefahrenrisiko zu vermeiden, darf die Maschine nicht geöffnet
werden. Nur qualifiziertes technisches Personal des offiziellen technischen Kundendienstes der Marke darf
Reparaturen oder Eingriffe an dieser Maschine vornehmen.
B&B TRENDS SL. übernimmt keine Haftung für Schäden an Personen, Tieren oder Gegenständen, die durch die
Nichtbeachtung dieser Warnhinweise entstehen.
VOR DEM ERSTEN EINSATZ
1. Entfernen Sie alle Verpackungsmaterialien und Aufkleber von der Innen- und Außenseite der Heißluftfri-
tteuse. Wischen Sie die Außenseite vorsichtig mit einem feuchten Tuch oder Papiertuch ab.
WARNHINWEIS: Tauchen Sie die Fritteuse niemals in Wasser oder andere Flüssigkeiten ein.
2. Ziehen Sie den Korb an seinem Griff aus der Heißluftfritteuse. Nehmen Sie die Einlegschale am Griff in
ihrer Mitte heraus. Reinigen Sie die Innen- und Außenseite von Korb und Schale mit einem Schwamm und
warmem Seifenwasser. Korb und Schale können oben im Geschirrspüler gereinigt werden.
3. WARNHINWEIS: Verwenden Sie keine scheuernden Reinigungsmittel oder Schwämme.
4. Trocknen Sie alles gründlich ab.
VERWENDUNG
1. Den Korb und die gewünschten Lebensmittel vorbereiten.
Setzen Sie die Schale mithilfe ihres Griffs in den Korb ein. Drücken Sie sie ganz nach unten und eben in
den Korb hinein. Dabei bleibt noch ein kleiner Abstand zwischen Schale und Korbboden.
Warnhinweis: Füllen Sie den Korb niemals mit Öl. Im Gegensatz zu Ölfritteusen benötigen Luftfritteusen
wenig bis gar kein Öl, um knusprige Ergebnisse zu erzielen. Wenn Sie trotzdem Öl verwenden möchten,
schwenken Sie die Speisen in einer separaten Schüssel mit etwas Öl und geben Sie sie Speisen dann in
die Schale im Korb.
2. Das Gargut auf die Schale legen.
Entnehmen Sie der Tabelle “Weitere Gartipps” die empfohlenen maximalen Gargutmengen, Garzeiten,
Temperaturen und einige Tipps.
3. Den Korb in die Heißluftfritteuse einsetzen.
Schieben Sie den Korb an seinem Griff in die Heißluftfritteuse ein. Achten Sie auf kompletten Verschluss.
4. Die Heißluftfritteuse anschließen.
Die Betriebskontrollleuchte leuchtet, wenn die Fritteuse eingesteckt ist. Die Heiz-Kontrollleuchte leuchtet
erst auf, wenn der Timer-Einstellknopf aus der Nullstellung gedreht wird.
Hinweis: Die Heißluftfritteuse geht nicht in Betrieb, wenn der Korb nicht vollständig eingeschoben ist.
Keep the appliance and its cord out of reach of children
less than 8 years.
Appliances are not intended to be operated by means of
an external timer or separate remote-control system.
Disconnect the appliance when it is not in use and before
cleaning it. Let it cool before putting on, taking off parts
and cleaning it
Do not submerge the appliance in water or any other
liquid.
This appliance is intended for use at a maximum altitude
of 2000m above sea level.
IMPORTANT WARNINGS
This appliance is designed exclusively for domestic use, in no case should be a commercial or industrial use.
Any incorrect use or improper handling of the product shall render the warranty null and void.
Prior to plugging in the product, check that your mains voltage is the same as the one indicated on the product
label.
Place the appliance on a flat even surface
The mains connection cable must not be tangled or wrapped around the product during use.
Do not use the device, or connect and disconnect to the supply mains with the hands and/or feet wet. Do not pull
on the connection cord in order to unplug it or use it as a handle
IMPORTANT. When operating this Air Fryer, keep at least ten centimeters of free space on all sides of the oven to
allow for adequate air circulation.
DO NOT place your Air Fryer under cupboards, blinds or curtains. Risk of overheating / fire.
Do not cover any part of the Fryer with a cloth or similar, it will cause overheating. Risk of fire.
This is an AIR FRYER. It requires very little oil to cook. Do not fill the pot with oil or fat as this may cause a fire
hazard.
Do not use any accessories other than manufacturer recommended accessories in this Air Fryer.
Always wear protective, insulated oven gloves when inserting or removing items from the hot Air Fryer.
The appliance must be used on a level, stable heat-resistant surface. The first time you use your Air Fryer there
may be a slight odor or a small amount of smoke given off. This is normal and is just the manufacturing residues
burning off.
Always place the ingredients to be fried in the basket to prevent it from coming into contact with the heating
elements.
Halten Sie das Gerät und sein Kabel außerhalb der
Reichweite von Kindern unter 8 Jahren.
Dieses Gerät ist nicht dafür vorgesehen, mit einer
externen Zeitschaltuhr oder einem separaten
Fernsteuerungssystem betrieben zu werden.
Trennen Sie das Gerät von der Stromversorgung, wenn
es nicht in Gebrauch ist und bevor Sie es reinigen. Lassen
Sie es abkühlen, bevor Sie Teile anbringen, abnehmen
oder reinigen.
Tauchen Sie das Gerät niemals in Wasser oder andere
Flüssigkeiten ein.
Dieses Gerät ist für den Einsatz in einer maximalen Höhe
von 2000 m über dem Meeresspiegel vorgesehen.
WICHTIGE WARNUNGEN
Dieses Gerät ist ausschließlich für den privaten Hausgebrauch bestimmt, es darf auf keinen Fall für gewerbliche
oder industrielle Zwecke verwendet werden.
Jegliche unsachgemäße Verwendung oder Handhabung des Geräts führt zum Erlöschen der Garantie.
Überprüfen Sie vor dem Anschließen des Geräts, ob die Netzspannung mit den Werten auf dem Geräteschild
übereinstimmt.
Stellen Sie das Gerät immer auf eine flache, ebene Oberfläche.
Das Netzkabel darf während des Gebrauchs nicht zusammengerollt oder um das Gerät gewickelt sein.
Benutzen oder stecken Sie das Gerät nicht mit nassen Händen und/oder Füßen ein- oder aus. Ziehen Sie nicht
am Netzkabel, um den Stecker zu ziehen und benutzen Sie es nicht zum Tragen des Geräts.
WICHTIG: Halten Sie beim Betrieb dieser Heißluftfritteuse an allen Seiten mindestens zehn Zentimeter Freiraum,
um eine ausreichende Luftzirkulation zu ermöglichen.
Stellen Sie Ihre Heißluftfritteuse NICHT unter Schränke, Jalousien oder Vorhänge. Überhitzungs- und Brandge-
fahr.
Bedecken Sie keinen Teil der Fritteuse mit einem Tuch oder Ähnlichem, da dies zu Überhitzung führt. Feuergefahr.
Dieses Gerät ist eine HEISSLUFTFRITTEUSE. Es benötigt sehr wenig Öl zum Garen. Füllen Sie den Topf nicht
mit Öl oder Fett, da dies Brandgefahr darstellen würde.
Verwenden Sie mit dieser Heißluftfritteuse nur das vom Hersteller empfohlene Zubehör.
Tragen Sie immer schützende, Ofenhandschuhe, wenn Sie etwas in die heiße Heißluftfritteuse einlegen oder aus
ihr entnehmen.
Verwenden Sie das Gerät auf einer ebenen, stabilen und hitzebeständigen Oberfläche. Wenn Sie die Fritteuse
zum ersten Mal benutzen, kann etwas Geruch oder eine gewisse Rauchentwicklung auftreten. Dies ist normal und
WE WOULD LIKE TO THANKS YOU FOR CHOOSING ZELMER,
WE WISH THE PRODUCT PERFORMS TO YOUR SATISFACTION AND PLEASURE.
WARNING
PLEASE READ THE INSTRUCTIONS FOR USE CAREFULLY PRIOR TO USING THE PRODUCT.
STORE THESE IN A SAFE PLACE FOR FUTURE REFERENCE.
DESCRIPTION
1. Heating indicator light (blue light)
2. Power indicator light (red light)
3. Timer dial (0-60 minutes)
4. Temperature dial (90ºC - 200ºC)
5. Fryer vents
6. Basket vents
7. Basket handle
8. Basket (1)
9. Tray
10. Tray handle
11. Silicon pad
SAFETY INSTRUCTIONS
If the supply cord is damaged it must be replaced by the
manufacturer, its service agent or similarly qualified
persons in order to avoid a hazard.
This appliance can be used by children aged from 8 years
and above and persons with reduced physical, sensory or
mental capabilities or lack of experience and knowledge if
they have been given supervision or instruction
concerning use of the appliance in a safe way and
understand the hazards involved. Children shall not play
with the appliance. Cleaning and user maintenance shall
not be made by children unless they are older than 8 and
supervised.
DANKE DASS SIE SICH FÜR ZELMER ENTSCHIEDEN HABEN WIR WÜNSCHEN IHNEN, DASS
UNSER PRODUKT IHRE ERWARTUNGEN ERFÜLLT UND SIE ZUFRIEDEN STELLT.
WARNUNG
LESEN SIE DIE GEBRAUCHSANWEISUNG SORGFÄLTIG DURCH, BEVOR SIE DAS PRODUKT
VERWENDEN. BEWAHREN SIE ES AN EINEM SICHEREN ORT FÜR DEN ZUKÜNFTIGEN
GEBRAUCH AUF
BESCHREIBUNG
1. Heizkontrollleuchte (blaues Licht)
2. Netzkontrollleuchte (rotes Licht)
3. Timer-Einstellknopf (0 - 60 Minuten)
4. Temperaturregler (90 - 200 °C)
5. Fritteusenentlüftungen
6. Korbentlüftungen
7. Korbgriff
8. Korb (1)
9. Schale
10. Schalengriff
11. Silikon-Pad
SICHERHEITSHINWEISE
Wenn das Netzkabel beschädigt ist, muss es vom
Hersteller, seinem Servicevertreter oder ähnlich
qualifizierten Personen ersetzt werden, um eine
Gefährdung zu vermeiden.
Dieses Gerät darf von Kindern ab 8 Jahren und von
Personen mit eingeschränkten körperlichen,
sensorischen oder geistigen Fähigkeiten oder
mangelnder Erfahrung und Kenntnissen verwendet
werden, wenn sie beaufsichtigt werden oder bezüglich
des sicheren Gebrauchs des Gerätes unterwiesen
wurden und die daraus resultierenden Gefahren
verstanden haben. Kinder dürfen nicht mit dem Gerät
spielen. Reinigung und Wartung dürfen nicht von Kindern
vorgenommen werden, es sei denn, sie sind älter als 8
Jahre und werden beaufsichtigt.
Adjust the time: Turn the timer dial to the desired time. Once a time is selected, the Air Fryer will begin to
tick, indicating the time is counting down.
Note: Maximum cooking time is 60 minutes.
6. Start cooking.
After setting the temperature and time, the power indicator light and the heating indicator light will illumina-
te and the Air Fryer will begin cooking.
To check food while the Air Fryer is cooking:
A) Use the basket handle to pull out the basket.
Note: The power indicator light and the heating indicator light will turn off once the basket is pulled out, but
the timer will continue to count down.
B) Use the basket handle to shake and redistribute the food inside the basket (or use tongs to flip food) if
necessary, then push the basket back into the unit. The unit will automatically resume cooking when the
basket is replaced.
7. Enjoy your air-fried food.
Once the timer completely counts down, the Air Fryer will ding once and turn off.
Use the basket handle to pull out the basket. Remove basket carefully by pulling out straight to prevent oil
spillage. Use protective gloves and/or tongs to carefully transfer the hot food to a serving plate.
Caution: The basket, tray and contents will be HOT after cooking.
Place the hot basket on a wire rack or trivet to cool.
8. Unplug the Air Fryer and let cool completely before cleaning.
9. Clean the basket and tray after every use.
COOKING TIPS
• Almost any food that is traditionally cooked in the oven can be air fried.
• Foods cook best and most evenly when they are of similar size and thickness.
• Smaller pieces of food require less cooking time than larger pieces.
• For best results in the shortest amount of time, air fry food in small batches. Avoid stacking or layering
when possible.
• Most prepackaged foods do not need to be tossed in oil before air frying. Most already contain oil and
other ingredients that enhance browning and crispiness
• Frozen appetizers and hors d’oeuvres air fry very well. For best results, arrange them on the tray in a
single layer.
• If layering foods, be sure to shake the basket halfway through (or flip food) to promote even cooking.
• Toss foods you are preparing from scratch, such as French fries or other vegetables, with a small amount
of oil to promote browning and crispiness.
• When air frying fresh vegetables, make sure to pat them dry completely before tossing with oil and air
frying to ensure maximum crispiness.
• Air fryers are great for reheating food, including pizza. To reheat your food, set the temperature to 150
for up to 10 minutes.
18
5. Die gewünschte Gartemperatur und -zeit einstellen.
Stellen Sie die gewünschte Temperatur durch Drehen des Temperaturreglers zwischen 90 und 200 °C ein.
Stellen Sie die gewünschte Zeit durch Drehen des Timer-Knopfs ein. Nach Auswahl einer Zeit beginnt die
Heißluftfritteuse zu ticken und zeigt damit an, dass die Zeit herunterzählt.
Hinweis: Die maximale Garzeit beträgt 60 Minuten.
6. Das Frittieren starten.
Nach Einstellen von Temperatur und Zeit leuchten die Betriebs- und die Heizkontrollleuchte auf und
beginnt die Fritteuse mit dem Garvorgang.
Zum Überprüfen der Lebensmittel, während des Heißluftfrittierens:
A) Ziehen Sie den Korb am Korbgriff heraus.
Hinweis: Die Netz- und Heizkontrollleuchte erlöschen, sobald der Korb herausgezogen wird, der Timer
zählt jedoch weiter herunter.
B) Sie können die Speisen im Korb mit dem Korbgriff schütteln und umverteilen (oder mit einer Zange
umdrehen), und dann den Korb wieder in das Gerät schieben. Das Gerät setzt den Garvorgang automa-
tisch fort, sobald der Korb wieder eingesetzt ist.
7. Genießen Sie Ihre luftftrittierten Speisen.
Sobald der Timer vollständig heruntergezählt hat, gibt die Fritteuse einen Ton ab und schaltet sich aus.
Ziehen Sie den Korb am Korbgriff heraus. Ziehen Sie den Korb vorsichtig gerade heraus, damit kein Öl
verschüttet wird. Legen Sie mit Schutzhandschuhen und/oder einer Zange die heißen Speisen vorsichtig
auf einen Servierteller.
Vorsicht: Korb, Schale und Inhalt sind nach dem Garen HEISS.
Stellen Sie den heißen Korb zum Abkühlen auf ein Drahtgitter oder einen Untersetzer.
8. Ziehen Sie den Netzstecker der Fritteuse und lassen Sie sie vor der Reinigung vollständig
abkühlen.
9. Reinigen Sie Korb und Schale nach jedem Gebrauch.
GARTIPPS
• Fast alle traditionell im Backofen zubereiteten Speisen können mit heißer Luft frittiert werden
• Lebensmittel garen am besten und gleichmäßigsten, wenn sie ähnlich groß und dick sind
• Kleinere Lebensmittelstücke benötigen weniger Garzeit als größere
• Für beste Ergebnisse in kürzester Zeit frittieren Sie Ihre Lebensmittel in kleinen Mengen. Vermeiden Sie
nach Möglichkeit, sie zu stapeln oder zu schichten
• Die meisten vorverpackten Lebensmittel müssen vor dem Heißluftfrittieren nicht in Öl geschwenkt
werden. Die meisten enthalten bereits Öl und andere Zutaten, die eine gute Bräunung und Knusprigkeit
ermöglichen
• Tiefgekühlte Häppchen und Vorspeisen lassen sich sehr gut mit Heißluft frittieren. Die besten Ergebnisse
erzielen Sie, wenn Sie sie in einer einzigen Schicht auf der Schale anordnen
• Wenn Sie Speisen schichten, schütteln Sie den Korb oder wenden seinen Inhalt nach halber Zeit, um ein
gleichmäßiges Frittieren zu fördern
• Schwenken Sie Lebensmittel, die Sie frisch zubereiten, wie z. B. Pommes frites oder anderes Gemüse,
mit einer kleinen Menge Öl, damit sie knusprig braun werden
• Tupfen Sie frisches Gemüse vollständig trocken, bevor Sie es in Öl schwenken und luftfrittieren, um
maximale Knusprigkeit zu erzielen
• Heißluftfritteusen eignen sich hervorragend zum Aufwärmen, auch von Pizza. Stellen Sie zum Aufwär-
men Ihrer Speisen die Temperatur auf 150 °C und die Zeit auf 10 Minuten ein
DE

Unplug the product immediately from the mains in the event of any breakdown or damage and contact an official
technical support service. In order to prevent any risk of danger, do not open the device. Only qualified technical
personnel from the brand´s Official technical support service may carry out repairs or procedures on the device.
B&B TRENDS SL. disclaims all liability for damages that may occur to people, animals or objects, for the non-ob-
servance of these warnings.
BEFORE ITS FIRST USE
1. Remove all packing materials and stickers from the inside and outside of the Air Fryer. Gently wipe down
exterior with a damp cloth or paper towel.
WARNING: Never immerse the Air Fryer or its plug in water or any other liquids.
2. Pull the basket handle to remove the basket from the Air Fryer. Use the tray handle, in the center of the
tray, to remove the tray. Use a sponge and warm, soapy water to wash the inside and outside of the basket
and tray. The basket and the tray are top-rack dishwasher safe.
3. WARNING: Do not use abrasive cleaning agents or scouring pads.
4. Dry thoroughly.
HOW TO USE
1. Prepare the basket and desired food.
Use the tray handle to insert the tray into the basket. Push down to ensure it is secure and in a leveled
position. There should be a small amount of space between the tray and bottom of the basket.
Warning: Never fill the basket with oil. Unlike deep fryers, air fryers require little to no oil to produce crispy
results. If you choose to use oil, toss food with oil in a separate bowl and then transfer food to the tray
inside the basket.
2. Put food on tray.
Refer to the chart on “more cooking tips” for recommended maximum amounts of food, cooking times,
temperatures and tips.
3. Put the basket into the Air Fryer.
Use the Basket Handle to insert the basket into the Air Fryer. Push to close.
4. Plug in the Air Fryer.
The power indicator light will illuminate when the Air Fryer is plugged in. The heating indicator light will
NOT illuminate until the timer dial is turned past zero.
Note: The Air Fryer will not operate if the basket is not fully pushed into place.
5. Set desired cooking temperature and time.
Adjust the temperature: Turn the temperature dial to the desired temperature between 90ºC and 200ºC.
Keep the appliance and its cord out of reach of children
less than 8 years.
Appliances are not intended to be operated by means of
an external timer or separate remote-control system.
Disconnect the appliance when it is not in use and before
cleaning it. Let it cool before putting on, taking off parts
and cleaning it
Do not submerge the appliance in water or any other
liquid.
This appliance is intended for use at a maximum altitude
of 2000m above sea level.
IMPORTANT WARNINGS
This appliance is designed exclusively for domestic use, in no case should be a commercial or industrial use.
Any incorrect use or improper handling of the product shall render the warranty null and void.
Prior to plugging in the product, check that your mains voltage is the same as the one indicated on the product
label.
Place the appliance on a flat even surface
The mains connection cable must not be tangled or wrapped around the product during use.
Do not use the device, or connect and disconnect to the supply mains with the hands and/or feet wet. Do not pull
on the connection cord in order to unplug it or use it as a handle
IMPORTANT. When operating this Air Fryer, keep at least ten centimeters of free space on all sides of the oven to
allow for adequate air circulation.
DO NOT place your Air Fryer under cupboards, blinds or curtains. Risk of overheating / fire.
Do not cover any part of the Fryer with a cloth or similar, it will cause overheating. Risk of fire.
This is an AIR FRYER. It requires very little oil to cook. Do not fill the pot with oil or fat as this may cause a fire
hazard.
Do not use any accessories other than manufacturer recommended accessories in this Air Fryer.
Always wear protective, insulated oven gloves when inserting or removing items from the hot Air Fryer.
The appliance must be used on a level, stable heat-resistant surface. The first time you use your Air Fryer there
may be a slight odor or a small amount of smoke given off. This is normal and is just the manufacturing residues
burning off.
Always place the ingredients to be fried in the basket to prevent it from coming into contact with the heating
elements.
WE WOULD LIKE TO THANKS YOU FOR CHOOSING ZELMER,
WE WISH THE PRODUCT PERFORMS TO YOUR SATISFACTION AND PLEASURE.
WARNING
PLEASE READ THE INSTRUCTIONS FOR USE CAREFULLY PRIOR TO USING THE PRODUCT.
STORE THESE IN A SAFE PLACE FOR FUTURE REFERENCE.
DESCRIPTION
1. Heating indicator light (blue light)
2. Power indicator light (red light)
3. Timer dial (0-60 minutes)
4. Temperature dial (90ºC - 200ºC)
5. Fryer vents
6. Basket vents
7. Basket handle
8. Basket (1)
9. Tray
10. Tray handle
11. Silicon pad
SAFETY INSTRUCTIONS
If the supply cord is damaged it must be replaced by the
manufacturer, its service agent or similarly qualified
persons in order to avoid a hazard.
This appliance can be used by children aged from 8 years
and above and persons with reduced physical, sensory or
mental capabilities or lack of experience and knowledge if
they have been given supervision or instruction
concerning use of the appliance in a safe way and
understand the hazards involved. Children shall not play
with the appliance. Cleaning and user maintenance shall
not be made by children unless they are older than 8 and
supervised.
19
DE
Adjust the time: Turn the timer dial to the desired time. Once a time is selected, the Air Fryer will begin to
tick, indicating the time is counting down.
Note: Maximum cooking time is 60 minutes.
6. Start cooking.
After setting the temperature and time, the power indicator light and the heating indicator light will illumina-
te and the Air Fryer will begin cooking.
To check food while the Air Fryer is cooking:
A) Use the basket handle to pull out the basket.
Note: The power indicator light and the heating indicator light will turn off once the basket is pulled out, but
the timer will continue to count down.
B) Use the basket handle to shake and redistribute the food inside the basket (or use tongs to flip food) if
necessary, then push the basket back into the unit. The unit will automatically resume cooking when the
basket is replaced.
7. Enjoy your air-fried food.
Once the timer completely counts down, the Air Fryer will ding once and turn off.
Use the basket handle to pull out the basket. Remove basket carefully by pulling out straight to prevent oil
spillage. Use protective gloves and/or tongs to carefully transfer the hot food to a serving plate.
Caution: The basket, tray and contents will be HOT after cooking.
Place the hot basket on a wire rack or trivet to cool.
8. Unplug the Air Fryer and let cool completely before cleaning.
9. Clean the basket and tray after every use.
COOKING TIPS
• Almost any food that is traditionally cooked in the oven can be air fried.
• Foods cook best and most evenly when they are of similar size and thickness.
• Smaller pieces of food require less cooking time than larger pieces.
• For best results in the shortest amount of time, air fry food in small batches. Avoid stacking or layering
when possible.
• Most prepackaged foods do not need to be tossed in oil before air frying. Most already contain oil and
other ingredients that enhance browning and crispiness
• Frozen appetizers and hors d’oeuvres air fry very well. For best results, arrange them on the tray in a
single layer.
• If layering foods, be sure to shake the basket halfway through (or flip food) to promote even cooking.
• Toss foods you are preparing from scratch, such as French fries or other vegetables, with a small amount
of oil to promote browning and crispiness.
• When air frying fresh vegetables, make sure to pat them dry completely before tossing with oil and air
frying to ensure maximum crispiness.
• Air fryers are great for reheating food, including pizza. To reheat your food, set the temperature to 150
for up to 10 minutes.
WEITERE GARTIPPS
Typ Menge Gartipp
Zeit
(Min.) Temp Cº Schütteln/
Wenden
Speck
Hähnchenbrust
(Dick, ca. 250 g)
Hähnchenkeulen/ -schenkel
(je 150 g)
Hähnchen-Nuggets
Hähnchenügel
(Anfangs- und Endteile getrennt)
Fischstäbchen
(Gefroren)
Pommes frites
(Gefroren/schmal)
Pommes frites
(Gefroren/breit)
Pommes frites
(Hausgemacht, geschnitten
in 6 x 6 mm Breite)
Hamburger
(je 120 g)
Mozzarella-Sticks
(Gefroren)
Koteletts (mit Knochen, ca. 220 g)
Koteletts (ohne Knochen, ca. 90 g)
Steak
Lachs (2,5 cm breit, 130 g)
Garnelen (große)
4 Scheiben
Etwa 3 Stücke
Etwa 5 Stücke
Etwa 20 Stücke
12 Stücke
20 Stück
350 - 450 g
350 - 500 g
350 - 500 g
2 Stück
20 Stück
2 Stück
4 Scheiben
450 g
3 Scheiben
900 g
6 (glasig)
8 (knusprig)
25-30
16-18
10
18-20
7
16-20
18-22
20-25
12-15
7
12-15
15
12-15
10-12
12
200
190
200
200
200
200
200
200
200
190
200
200
200
200
200
200
Nie
Tak
Nie
Tak
Tak
Tak
Tak
Tak
Tak
Tak
Tak
Tak
Nie
Nie
Nie
Tak
Legen Sie den Speck nach dem
Garen mit einer Zange auf einen mit
Papiertüchern ausgelegten Teller.
Mit Öl bepinseln, salzen und nach
Belieben würzen.
Salzen und nach
Belieben würzen
Leicht salzen und genießen, oder
frisch zubereitet in Ihrer
Lieblings-Hähnchenügelsauce
schwenken.
Zweimal schütteln
Zweimal schütteln
Mit kaltem Wasser abspülen, trocken
tupfen, mit 1 EL Olivenöl schwenken,
mit Salz und den gewünschten
Gewürzen abschmecken; während
des Frittierens mit einer Zange
wenden.
Mit Öl bepinseln, mit Salz und
gewünschten Gewürzen wie frisch
gemahlenem schwarzen Pfeer und
Knoblauchpulver würzen
Salzen und nach
Belieben würzen.
Salzen und nach
Belieben würzen.
Salzen und nach
Belieben würzen.
Haut mit Öl bepinseln und mit der
Hautseite nach unten auf die Schale
legen. Salzen und nach Belieben
würzen.
Trocken tupfen, mit 1/2 EL Olivenöl
benetzen, salzen und nach Wunsch
würzen; mehrmals schütteln.
Die empfohlenen Temperaturen und Zeiten beziehen sich auf die genannten Mengen und Gewichte. Wenn
Sie kleinere Mengen oder weniger Gewicht garen, prüfen Sie das Ergebnis früher als empfohlen, da die
Speisen wahrscheinlich schneller fertig sein werden.
Hinweis: Diese Tabelle gilt nur als Richtlinie und enthält keine genauen Rezepte.
Hinweis: Seien Sie beim Umgang mit heißen Lebensmitteln im Frittierkorb äußerst vorsichtig. Bei
der Zubereitung von fettigen Speisen tropft überschüssiges Öl in den Korb. Entleeren Sie den Korb
nach jedem Gebrauch.

Unplug the product immediately from the mains in the event of any breakdown or damage and contact an official
technical support service. In order to prevent any risk of danger, do not open the device. Only qualified technical
personnel from the brand´s Official technical support service may carry out repairs or procedures on the device.
B&B TRENDS SL. disclaims all liability for damages that may occur to people, animals or objects, for the non-ob-
servance of these warnings.
BEFORE ITS FIRST USE
1. Remove all packing materials and stickers from the inside and outside of the Air Fryer. Gently wipe down
exterior with a damp cloth or paper towel.
WARNING: Never immerse the Air Fryer or its plug in water or any other liquids.
2. Pull the basket handle to remove the basket from the Air Fryer. Use the tray handle, in the center of the
tray, to remove the tray. Use a sponge and warm, soapy water to wash the inside and outside of the basket
and tray. The basket and the tray are top-rack dishwasher safe.
3. WARNING: Do not use abrasive cleaning agents or scouring pads.
4. Dry thoroughly.
HOW TO USE
1. Prepare the basket and desired food.
Use the tray handle to insert the tray into the basket. Push down to ensure it is secure and in a leveled
position. There should be a small amount of space between the tray and bottom of the basket.
Warning: Never fill the basket with oil. Unlike deep fryers, air fryers require little to no oil to produce crispy
results. If you choose to use oil, toss food with oil in a separate bowl and then transfer food to the tray
inside the basket.
2. Put food on tray.
Refer to the chart on “more cooking tips” for recommended maximum amounts of food, cooking times,
temperatures and tips.
3. Put the basket into the Air Fryer.
Use the Basket Handle to insert the basket into the Air Fryer. Push to close.
4. Plug in the Air Fryer.
The power indicator light will illuminate when the Air Fryer is plugged in. The heating indicator light will
NOT illuminate until the timer dial is turned past zero.
Note: The Air Fryer will not operate if the basket is not fully pushed into place.
5. Set desired cooking temperature and time.
Adjust the temperature: Turn the temperature dial to the desired temperature between 90ºC and 200ºC.
Keep the appliance and its cord out of reach of children
less than 8 years.
Appliances are not intended to be operated by means of
an external timer or separate remote-control system.
Disconnect the appliance when it is not in use and before
cleaning it. Let it cool before putting on, taking off parts
and cleaning it
Do not submerge the appliance in water or any other
liquid.
This appliance is intended for use at a maximum altitude
of 2000m above sea level.
IMPORTANT WARNINGS
This appliance is designed exclusively for domestic use, in no case should be a commercial or industrial use.
Any incorrect use or improper handling of the product shall render the warranty null and void.
Prior to plugging in the product, check that your mains voltage is the same as the one indicated on the product
label.
Place the appliance on a flat even surface
The mains connection cable must not be tangled or wrapped around the product during use.
Do not use the device, or connect and disconnect to the supply mains with the hands and/or feet wet. Do not pull
on the connection cord in order to unplug it or use it as a handle
IMPORTANT. When operating this Air Fryer, keep at least ten centimeters of free space on all sides of the oven to
allow for adequate air circulation.
DO NOT place your Air Fryer under cupboards, blinds or curtains. Risk of overheating / fire.
Do not cover any part of the Fryer with a cloth or similar, it will cause overheating. Risk of fire.
This is an AIR FRYER. It requires very little oil to cook. Do not fill the pot with oil or fat as this may cause a fire
hazard.
Do not use any accessories other than manufacturer recommended accessories in this Air Fryer.
Always wear protective, insulated oven gloves when inserting or removing items from the hot Air Fryer.
The appliance must be used on a level, stable heat-resistant surface. The first time you use your Air Fryer there
may be a slight odor or a small amount of smoke given off. This is normal and is just the manufacturing residues
burning off.
Always place the ingredients to be fried in the basket to prevent it from coming into contact with the heating
elements.
20
WE WOULD LIKE TO THANKS YOU FOR CHOOSING ZELMER,
WE WISH THE PRODUCT PERFORMS TO YOUR SATISFACTION AND PLEASURE.
WARNING
PLEASE READ THE INSTRUCTIONS FOR USE CAREFULLY PRIOR TO USING THE PRODUCT.
STORE THESE IN A SAFE PLACE FOR FUTURE REFERENCE.
DESCRIPTION
1. Heating indicator light (blue light)
2. Power indicator light (red light)
3. Timer dial (0-60 minutes)
4. Temperature dial (90ºC - 200ºC)
5. Fryer vents
6. Basket vents
7. Basket handle
8. Basket (1)
9. Tray
10. Tray handle
11. Silicon pad
SAFETY INSTRUCTIONS
If the supply cord is damaged it must be replaced by the
manufacturer, its service agent or similarly qualified
persons in order to avoid a hazard.
This appliance can be used by children aged from 8 years
and above and persons with reduced physical, sensory or
mental capabilities or lack of experience and knowledge if
they have been given supervision or instruction
concerning use of the appliance in a safe way and
understand the hazards involved. Children shall not play
with the appliance. Cleaning and user maintenance shall
not be made by children unless they are older than 8 and
supervised.
ENTSORGUNG DES GERÄTS
Dieses Gerät entspricht der Europäischen Richtlinie 2012/19/EU über elektrische und
elektronische Geräte, bekannt als WEEE (Waste Electrical and Electronic Equipment), die den
in der Europäischen Union geltenden gesetzlichen Rahmen für die Entsorgung und Wieder-
verwendung von elektronischen und elektrischen Altgeräten darstellt. Entsorgen Sie dieses
Gerät nicht in der Mülltonne, sondern übergeben Sie es einer zugelassenen Sammelstelle für
elektrischen und elektronischen Abfall.
Adjust the time: Turn the timer dial to the desired time. Once a time is selected, the Air Fryer will begin to
tick, indicating the time is counting down.
Note: Maximum cooking time is 60 minutes.
6. Start cooking.
After setting the temperature and time, the power indicator light and the heating indicator light will illumina-
te and the Air Fryer will begin cooking.
To check food while the Air Fryer is cooking:
A) Use the basket handle to pull out the basket.
Note: The power indicator light and the heating indicator light will turn off once the basket is pulled out, but
the timer will continue to count down.
B) Use the basket handle to shake and redistribute the food inside the basket (or use tongs to flip food) if
necessary, then push the basket back into the unit. The unit will automatically resume cooking when the
basket is replaced.
7. Enjoy your air-fried food.
Once the timer completely counts down, the Air Fryer will ding once and turn off.
Use the basket handle to pull out the basket. Remove basket carefully by pulling out straight to prevent oil
spillage. Use protective gloves and/or tongs to carefully transfer the hot food to a serving plate.
Caution: The basket, tray and contents will be HOT after cooking.
Place the hot basket on a wire rack or trivet to cool.
8. Unplug the Air Fryer and let cool completely before cleaning.
9. Clean the basket and tray after every use.
COOKING TIPS
• Almost any food that is traditionally cooked in the oven can be air fried.
• Foods cook best and most evenly when they are of similar size and thickness.
• Smaller pieces of food require less cooking time than larger pieces.
• For best results in the shortest amount of time, air fry food in small batches. Avoid stacking or layering
when possible.
• Most prepackaged foods do not need to be tossed in oil before air frying. Most already contain oil and
other ingredients that enhance browning and crispiness
• Frozen appetizers and hors d’oeuvres air fry very well. For best results, arrange them on the tray in a
single layer.
• If layering foods, be sure to shake the basket halfway through (or flip food) to promote even cooking.
• Toss foods you are preparing from scratch, such as French fries or other vegetables, with a small amount
of oil to promote browning and crispiness.
• When air frying fresh vegetables, make sure to pat them dry completely before tossing with oil and air
frying to ensure maximum crispiness.
• Air fryers are great for reheating food, including pizza. To reheat your food, set the temperature to 150
for up to 10 minutes.
DE
Die Heißluftfritteuse
funktioniert nicht/lässt sich
nicht einschalten.
1. Das Gerät ist nicht richtig
eingesteckt.
2. Der Timerknopf wurde nicht aus
der Nullstellung gedreht.
3. Der Korb ist nicht komplett
eingeschoben.
1. Das Gerät wird zum ersten Mal
benutzt.
2. Es bendet sich entweder zu viel
Fett in oder auf den zu frittierenden
Lebensmitteln.
3. Es benden sich Fettreste im
Korb.
1. Es ist nicht genug Öl auf den
Zutaten.
2. Die Zutaten haben zu viel Öl und
wurden matschig.
Lebensmittel mit hohem Fettgehalt
wie Würstchen neigen dazu, viel
Rauch zu erzeugen, wenn sie bei
hohen Temperaturen gegart
werden.
1. Stellen Sie sicher, dass der Stecker
richtig in der Steckdose sitzt.
2. Drehen Sie den Timer-Einstellknopf
über Null hinaus, um den Garvorgang
zu starten.
3. Schieben Sie den Korb an seinem
Gri fest in das Gehäuse der
Heißluftfritteuse hinein.
1. Der Rauch verschwindet nach dem
ersten Gebrauch.
2. Beschichten Sie die Lebensmittel
nur leicht mit Öl.
3. Reinigen Sie den Korb nach jedem
Gebrauch.
Schwenken Sie ölfreie frische
Lebensmittel nur in einer kleinen
Menge Öl, um die maximale
Knusprigkeit zu erreichen.
Dies schadet der Heißluftfritteuse
nicht und hat keinen Einuss auf das
Endergebnis der Speisen, aber um
Rauch zu vermeiden, stellen Sie eine
niedrigere Temperatur ein.
Problem Mögliche Ursache Lösung
ANLEITUNG ZUR FEHLERBEHEBUNG
Rauch tritt aus der
Heißluftfritteuse aus.
Die luftfrittierten Speisen
werden nicht knusprig.
Die Heißluftfritteuse erzeugt
eine erhebliche Menge Rauch.
REINIGUNG UND WARTUNG
• Stellen Sie sicher, dass die Heißluftfritteuse vor der Reinigung ausgesteckt und abgekühlt ist.
• Sobald Gerät und Korb abgekühlt sind, nehmen Sie den Korb heraus (falls er nicht bereits entfernt wurde).
Ziehen Sie den Korb am Griff heraus. Reinigen Sie die Innen- und Außenseite von Korb und Schale mit
einem Schwamm und warmem Seifenwasser.
Warnhinweis: Verwenden Sie keine scheuernden Reinigungsmittel oder Schwämme.
• Korb und Schale können oben im Geschirrspüler gereinigt werden.
• Wischen Sie die Außenseite vorsichtig mit einem feuchten Tuch oder Papiertuch ab.
• Tauchen Sie die Fritteuse niemals in Wasser oder andere Flüssigkeiten ein.
• Trocknen Sie alle Teile gründlich ab, bevor Sie sie wegstellen.
• Lagern Sie die Heißluftfritteuse an einem kühlen, trockenen Ort.
Pagina se încarcă...
Pagina se încarcă...
Pagina se încarcă...
Pagina se încarcă...
Pagina se încarcă...
Pagina se încarcă...
Pagina se încarcă...
Pagina se încarcă...
Pagina se încarcă...
Pagina se încarcă...
Pagina se încarcă...
Pagina se încarcă...
Pagina se încarcă...
Pagina se încarcă...
Pagina se încarcă...
Pagina se încarcă...
Pagina se încarcă...
Pagina se încarcă...
Pagina se încarcă...
Pagina se încarcă...
Pagina se încarcă...
Pagina se încarcă...
Pagina se încarcă...
Pagina se încarcă...
Pagina se încarcă...
Pagina se încarcă...
Pagina se încarcă...
Pagina se încarcă...
Pagina se încarcă...
Pagina se încarcă...
Pagina se încarcă...
Pagina se încarcă...
Pagina se încarcă...
Pagina se încarcă...
Pagina se încarcă...
Pagina se încarcă...
Pagina se încarcă...
Pagina se încarcă...
Pagina se încarcă...
Pagina se încarcă...
Pagina se încarcă...
Pagina se încarcă...
Pagina se încarcă...
Pagina se încarcă...
Pagina se încarcă...
Pagina se încarcă...
Pagina se încarcă...
Pagina se încarcă...
Pagina se încarcă...
Pagina se încarcă...
Pagina se încarcă...
Pagina se încarcă...
-
 1
1
-
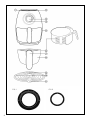 2
2
-
 3
3
-
 4
4
-
 5
5
-
 6
6
-
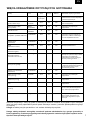 7
7
-
 8
8
-
 9
9
-
 10
10
-
 11
11
-
 12
12
-
 13
13
-
 14
14
-
 15
15
-
 16
16
-
 17
17
-
 18
18
-
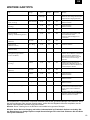 19
19
-
 20
20
-
 21
21
-
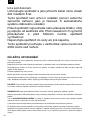 22
22
-
 23
23
-
 24
24
-
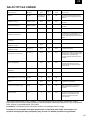 25
25
-
 26
26
-
 27
27
-
 28
28
-
 29
29
-
 30
30
-
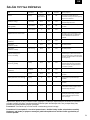 31
31
-
 32
32
-
 33
33
-
 34
34
-
 35
35
-
 36
36
-
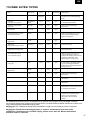 37
37
-
 38
38
-
 39
39
-
 40
40
-
 41
41
-
 42
42
-
 43
43
-
 44
44
-
 45
45
-
 46
46
-
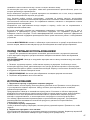 47
47
-
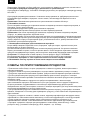 48
48
-
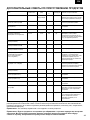 49
49
-
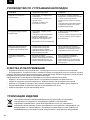 50
50
-
 51
51
-
 52
52
-
 53
53
-
 54
54
-
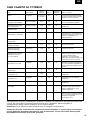 55
55
-
 56
56
-
 57
57
-
 58
58
-
 59
59
-
 60
60
-
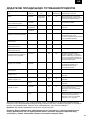 61
61
-
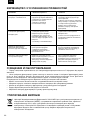 62
62
-
 63
63
-
 64
64
-
 65
65
-
 66
66
-
 67
67
-
 68
68
-
 69
69
-
 70
70
-
 71
71
-
 72
72


Zelmer ZAF3500 Manual de utilizare
- Categorie
- Friteuze adânci
- Tip
- Manual de utilizare
în alte limbi
- slovenčina: Zelmer ZAF3500 Používateľská príručka
- polski: Zelmer ZAF3500 Instrukcja obsługi
Lucrări înrudite
-
Zelmer ZAF3550 Manual de utilizare
-
Zelmer ZAF3551W Manual de utilizare
-
Zelmer ZAF5500B Manual de utilizare
-
-
Zelmer ZAF6500 Manual de utilizare
-
Zelmer 04Z011 Manual de utilizare
-
Zelmer ZAF2000B FanFryer Manual de utilizare
-
Zelmer 04Z010 Manual de utilizare
-
Alte documente
-
Sharp GS404A Manual de utilizare
-
Beko FRL 5388 B Manual de utilizare
-
Philips NA352/00 Manual de utilizare
-
Tesla AirCook Q40 Manual de utilizare
-
Delimano Air Fryer Pro Manual de utilizare
-
Clatronic fr 2786 Manualul proprietarului
-
FIRST FA-5058-1 Manual de utilizare
-
Taurus 973980000 Manual de utilizare
-
Clatronic FR 2667 Manualul proprietarului