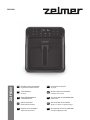
Zelmer ZAF6500 Manual de utilizare
- Categorie
- Friteuze adânci
- Tip
- Manual de utilizare

ZAF6500
INSTRUKCJE UŻYTKOWANIA
Frytkownica beztłuszczowa
ИНСТРУКЦИЯ ПО ПРИМЕНЕНИЮ
Аэрогриль
NÁVOD K POUŽITÍ
Horkovzdušná fritéza
ИНСТРУКЦИИ ЗА УПОТРЕБА
Уред за готвене с горещ въздух
NAVODILA ZA UPORABO
Teplovzdušná fritéza
ІНСТРУКЦІЯ ПО ЗАСТОСУВАННЮ
повітрянa фритюрниця
USER MANUAL
Air fryer
BENUTZERHANDBUCH
Heißluftfritteuse
HASZNÁLATI UTASÍTÁS
Air Fryer
INSTRUCȚIUNI DE UTILIZARE
Friteuza cu aer cald
PL
EN
DE
CZ
SK
HU
RO
RU
UA
BG
ZAF6500

2

3
PL
PL
DZIĘKUJEMY ZA WYBÓR MARKI ZELMER. ŻYCZYMY SATYSFAKCJI Z UŻYTKOWANIA URZĄDZENIA.
OSTRZEŻENIE
PRZED UŻYCIEM PRODUKTU NALEŻY UWAŻNIE PRZECZYTAĆ INSTRUKCJĘ UŻYTKOWANIA.
PRZECHOWUJ JĄ W BEZPIECZNYM MIEJSCU DO WYKORZYSTANIA W PRZYSZŁOŚCI.
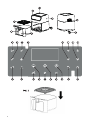
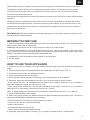
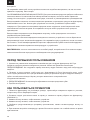
OPIS
1. Wlot powietrza
2. Korpus urządzenia
3. Panel sterowania
4. Kosz
5. Uchwyt
6. Okienko rewizyjne
7. Taca ociekowa
8. Wylot powietrza
9. Przewód zasilający
OPIS PANELU STEROWANIA
1: Przełącznik zasilania
2: Światło,
3: Funkcja obracania
4: Temperatura +
5: Temperatura -
6: Wskaźnik temperatury
7: Czas +
8: Czas –
9: Wskaźnik czasu
10: Wskaźnik temperatury
11: Lampka wyświetlacza jednostki temperatury (ºC)
12: Podświetlenie wyświetlacza zegara
13: Wskaźnik jednostki czasu (minuty)
14: Frytki
15: Stek
16: Ryba,
17: Owoce morza,
18: Udko z kurczaka (kurczak)
19: Pieczenie (ciasta)
20: Cały kurczak
21: Suszone owoce
22: Podgrzewanie
23: Rozmrażanie
24: Kontrolka pracy
INSTRUKCJE BEZPIECZEŃSTWA
Jeżeli przewód zasilający jest uszkodzony, aby uniknąć
zagrożenia musi on zostać wymieniony przez producenta,
autoryzowany serwis lub odpowiednio wykwalikowaną
osobę.

4
PL
PL
Z tego urządzenia mogą korzystać dzieci w wieku 8
lat i starsze oraz osoby o zmniejszonych zdolnościach
zycznych, czuciowych lub umysłowych lub nieposiadające
doświadczenia i wiedzy, jeśli są one pod nadzorem lub
wcześniej otrzymały instrukcje dotyczące korzystania z
urządzenia w sposób bezpieczny i rozumieją związane z
tym zagrożenia. Dzieci nie mogą bawić się urządzeniem.
Czyszczenie i konserwacja urządzenia nie mogą być
dokonywane przez dzieci młodsze niż 8 lat i pozostawione
bez nadzoru.
Urządzenie i kabel zasilający trzymaj poza zasięgiem
dzieci w wieku poniżej 8 lat.
Urządzenie nie jest przeznaczone do pracy z użyciem
zewnętrznych wyłączników czasowych lub oddzielnego
układu zdalnej regulacji.
Odłączaj urządzenie od zasilania, jeżeli nie jest ono
używane, a także przed jego czyszczeniem. Przed
założeniem lub zdjęciem części oraz czyszczeniem
urządzenia należy pozostawić je do ostygnięcia. Nie
należy zanurzać urządzenia w wodzie ani w żadnym
innym płynie.
Urządzenie jest przeznaczone do użytku na maksymalnej
wysokości 2000m n.p.m..
WAŻNE OSTRZEŻENIA
To urządzenie jest przeznaczone wyłącznie do użytku domowego i w żadnym wypadku nie powinno być
wykorzystywane do użytku komercyjnego lub przemysłowego.
Nieprawidłowe użycie lub niewłaściwe obchodzenie się z urządzeniem spowoduje unieważnienie gwarancji.
Przed podłączeniem urządzenia do sieci sprawdź, czy napięcie zasilania jest takie samo, jak wskazane na
tabliczce znamionowej urządzenia.
Umieść urządzenie na płaskiej i równej powierzchni. W trakcie korzystania z urządzenia przewód zasilający
nie może być zaplątany ani owinięty wokół urządzenia.
Nie używaj, nie podłączaj ani nie odłączaj urządzenia od sieci, mając mokre dłonie i/lub stopy. Nie ciągnij za
przewód zasilający w celu odłączenia urządzenia. Nie używaj przewodu jako uchwytu.
WAŻNE Podczas korzystania urządzenia należy zachować co najmniej dziesięć centymetrów wolnej

5
PL
PL
przestrzeni po wszystkich jego stronach, aby umożliwić odpowiednią cyrkulację powietrza.
NIE umieszczaj urządzenia pod szafkami, za żaluzjami lub zasłonami. Ryzyko przegrzania / pożaru.
Nie przykrywaj żadnej części urządzenia szmatką lub podobnym materiałem, ponieważ spowoduje to
przegrzanie. Ryzyko pożaru.
To jest FRYTKOWNICA BEZTŁUSZCZOWA AIR FRYER. Do przygotowania produktów wymaga niewielkiej
ilość oleju. Nie napełniaj pojemnika olejem lub tłuszczem, ponieważ może to spowodować zagrożenie
pożarowe.
Nie używaj z urządzeniem akcesoriów innych niż zalecane przez producenta.
Zawsze zakładaj ochronne, izolowane rękawice kuchenne podczas wkładania lub wyjmowania rzeczy z
frytkownicy.
Z urządzenia korzystaj na płaskiej, stabilnej i odpornej na ciepło powierzchni. Przy pierwszym użyciu
frytkownicy Air Fryer może się pojawić delikatny nieprzyjemny zapach lub niewielka ilość dymu. Jest to
normalne w przypadku nowych urządzeń po procesie produkcji.
Zawsze umieszczaj składniki przeznaczone do smażenia w koszyku, aby zapobiec ich kontaktowi z
elementami grzejnymi.
W przypadku jakiejkolwiek awarii lub uszkodzenia natychmiast odłącz urządzenie od sieci i skontaktuj się
z autoryzowanym działem wsparcia technicznego. Nie otwieraj obudowy urządzenia, ponieważ grozi to
niebezpieczeństwem. Jedynie wykwalikowany personel z ocjalnego działu wsparcia technicznego marki
może przeprowadzać naprawy lub procedury na urządzeniu.
Firma Eurogama Sp. z o.o. nie ponosi odpowiedzialności za jakiekolwiek szkody, które mogą wystąpić na
osobach, zwierzętach lub przedmiotach z powodu nieprzestrzegania tych ostrzeżeń.
PRZED PIERWSZYM UŻYCIEM
1. Usuń wszystkie materiały opakowaniowe i naklejki wewnątrz i na zewnątrz urządzenia Air Fryer.
Delikatnie wytrzyj powierzchnię zewnętrzną wilgotną szmatką lub ręcznikiem papierowym.
OSTRZEŻENIE: Nie zanurzaj urządzenia ani wtyczki przewodu zasilającego w wodzie ani w żadnym innym
płynie.
2. Pociągnij za uchwyt kosza, aby wyjąć go z urządzenia Air Fryer. Aby wyjąć tackę użyj uchwytu
znajdującego się w jej środkowej części Umyj kosz i tackę wewnątrz i na zewnątrz używając gąbki i ciepłej
wody z mydłem. Kosz i tackę można myć na górnej półce zmywarki.
3. OSTRZEŻENIE: Nie używaj szorstkich środków do czyszczenia ani ściereczek do szorowania.
4. Dokładnie osusz.
JAK KORZYSTAĆ Z URZĄDZENIA
1. Umieść frytkownicę na stabilnej, równej, odpornej na ciepło powierzchni, z dala od obszarów, które mogą
zostać uszkodzone przez parę.
2. Włóż tackę ociekową do kosza i włóż kosz z powrotem do frytownicy. (FIG. 1)
3. Naciśnij przycisk zasilania, aby włączyć urządzenie.
4. Naciśnij przycisk zasilania, aby włączyć urządzenie.
5. Wybierz jeden z automatycznych program gotowania, naciskając odpowiednią ikonę na wyświetlaczu.
6. Opcjonalnie dostosuj temperaturę i czas. Możesz to zrobić w dowolnym momencie podczas gotowania.
• Naciśnij raz Temp./Czas. Temperatura będzie migać na wyświetlaczu. Naciśnij przycisk (+) lub (-), aby
ustawić temperaturę. (po każdym naciśnięciu jest 5ºC)
• Naciśnij Temp/Time po raz drugi. Czas będzie migał na wyświetlaczu. Naciśnij przycisk (+) lub (-), aby
ustawić czas (1-60 minut). (każde naciśnięcie to 1 minuta)

6
PL
PL
Uwaga: Aby szybko zwiększyć lub zmniejszyć czas lub temperaturę, naciśnij i przytrzymaj przycisk (+) lub (-).
7. Naciśnij przycisk (PLAY/PAUSE), aby rozpocząć gotowanie.
8. Podczas korzystania z niektórych ustawień wstępnych przypomnienie o potrząśnięciu pojawi się
w połowie czasu gotowania. Frytownica wyemituje sygnał dźwiękowy, a na wyświetlaczu będzie migać
(SHAKE).
• Wyjmij kosz z frytownicy uważając na gorącą parę.
• Frytkownica automatycznie wstrzyma gotowanie.
• Wstrząśnij lub przewróć jedzenie.
• Włóż kosz z powrotem do frytownicy.
• Frytownica wyemituje sygnał dźwiękowy po zakończeniu gotowania.
9. Opcjonalnie naciśnij Utrzymuj ciepło. Naciśnij przycisk (+) lub (-), aby ustawić czas. (1-60 minut).
10. Wyjmij kosz z frytownicy uważając na gorącą parę.
11. Usuń żywność, wyrzucając ją lub używając rękawic kuchennych lub szczypiec/przyborów z silikonowymi
końcówkami.
12. Pamiętaj aby schłodzić kosz przed czyszczeniem.
PRZEWODNIK GOTOWANIA
1. Jeśli kosz jest przepełniony, potrawy będą się nierównomiernie gotować.
2. Dodanie niewielkiej ilości oleju do potraw sprawi, że będą one bardziej chrupiące. Użyj nie więcej niż 2
łyżki oleju.
3. Spraye olejowe doskonale nadają się do równomiernego nakładania niewielkich ilości oleju na wszystkie
produkty spożywcze.
4. Możesz smażyć na powietrzu dowolne mrożonki lub produkty, które można upiec w piekarniku.
5. Smażenie potraw o dużej zawartości tłuszczu na powietrzu spowoduje skapywanie tłuszczu na dno
koszy. Aby uniknąć nadmiernego dymu podczas gotowania, po zakończeniu gotowania wylej tłuszcz.
6. Żywność marynowana w płynie powoduje rozpryski i nadmiar dymu. Wytrzyj te produkty do sucha przed
smażeniem na powietrzu.
WSTRZYMANIE
1. Naciśnij przycisk Play/Pause, aby wstrzymać gotowanie. Frytkownica przestanie się nagrzewać i będzie
migać, dopóki nie naciśniesz, aby wznowić gotowanie.
2. Po 30 minutach bezczynności frytkownica wyłączy się.
3. Ta funkcja umożliwia wstrzymanie programu gotowania bez wyjmowania koszy z frytownicy.
AUTOMATYCZNIE WZNÓW GOTOWANIE
1. Jeśli wyciągniesz kosz, frytkownica automatycznie wstrzyma gotowanie. Wyświetlacz wyłączy się
tymczasowo jako funkcja bezpieczeństwa.
2. Po zwróceniu koszy frytkownica automatycznie wznowi gotowanie w oparciu o poprzednie ustawienia
AUTOMATYCZNE WYŁĄCZANIE
Jeśli frytkownica nie ma aktywnych programów gotowania, usunie wszystkie ustawienia i przejdzie w tryb
czuwania po 3 minutach bezczynności.
OCHRONA PRZED PRZEGRZANIEM
1. Jeśli frytkownica przegrzeje się, wyłączy się automatycznie ze względów bezpieczeństwa.
2. Przed ponownym użyciem pozwól frytkownicy ostygnąć.

7
PL
PL
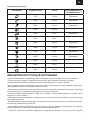
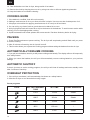
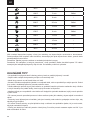
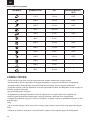
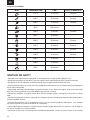
Automatyczne programy
PROGRAM TEMPERATIRA CZAS PRZYPOMNIENIE O
POTRZĄŚNIĘCIU
175ºC 12 min Potrząsnąć
180ºC 20 min Potrząsnąć
200ºC 15 min Potrząsnąć
80ºC 120 min /
180ºC 5 min Potrząsnąć
80ºC 8 min /
200ºC 20 min Potrząsnąć
180ºC 15 min Potrząsnąć
150ºC 8 min Potrząsnąć
180ºC 12 min Potrząsnąć
180ºC 15 min /
200ºC 3 min /
80ºC 30 min /
WSKAZÓWKI DOTYCZĄCE GOTOWANIA
• Niemal każda potrawa tradycyjnie pieczona w piekarniku może być smażona na wolnym powietrzu.
• Potrawy gotują się najlepiej i najbardziej równomiernie, gdy są podobnej wielkości i grubości.
• Mniejsze kawałki żywności wymagają krótszego czasu gotowania niż większe kawałki.
• Aby uzyskać najlepsze rezultaty w jak najkrótszym czasie, smaż żywność w małych partiach na powietrzu.
Unikaj układania w stosy lub warstwami, jeśli to możliwe.
• Większości paczkowanej żywności nie trzeba zanurzać w oleju przed smażeniem na powietrzu. Większość
już zawierają olej i inne składniki poprawiające brązowienie i chrupkość
• Mrożone przekąski bardzo dobrze smażą się na powietrzu. Aby uzyskać najlepsze rezultaty, ułóż je
pojedynczo na tacy warstwa.
• Jeśli układasz jedzenie warstwami, potrząśnij koszem w połowie (lub obróć jedzenie), aby równomiernie
się rozłożyło gotowanie.
• Dodawaj potrawy, które przygotowujesz od podstaw, takie jak frytki lub inne warzywa niewielka ilość oleju,
aby zwiększyć brązowienie i chrupkość.
• W przypadku smażenia świeżych warzyw na powietrzu należy je dokładnie osuszyć przed wrzuceniem z
olejem i smażeniem na powietrzu, aby zapewnić maksymalną chrupkość.
• Frytownice powietrzne doskonale nadają się do podgrzewania żywności, w tym pizzy. Aby podgrzać

8
PL
PL
jedzenie, ustaw temperaturę do 150ºC przez maksymalnie 10 minut.
CZYSZCZENIE I KONSERWACJA
• Przed czyszczeniem upewnij się, że frytkownica jest odłączona od zasilania i ostygła.
• Do czyszczenia wnętrza używaj czystej, suchej szmatki. Nie używaj mokrej szmatki, aby zapobiec
przedostawaniu się wody do wnętrza urządzenia.
Ostrzeżenie: Nie używaj ściernych środków czyszczących ani szorstkich gąbek.
• Delikatnie wytrzyj obudowę wilgotną ściereczką lub papierowym ręcznikiem.
• Nigdy nie zanurzaj frytownicy ani jej wtyczki w wodzie ani żadnym innym płynie.
• Dokładnie wysusz wszystkie części przed przechowywaniem.
• Przechowuj frytkownicę w chłodnym, suchym miejscu.
UTYLIZACJA PRODUKTU
To urządzenie jest oznaczone zgodnie z Dyrektywą Europejską 2012/19/UE oraz polską Ustawą
z dnia 11 września 2015r. „o zużytym sprzęcie elektrycznym i elektronicznym” (Dz.U. z dn.
23.10.2015 poz.1688) symbolem przekreślonego kontenera na odpady.
Takie oznakowanie informuje, że sprzęt ten, po okresie jego użytkowania nie może być
umieszczany łącznie z innymi odpadami pochodzącymi z gospodarstwa domowego.
Użytkownik jest zobowiązany do oddania go prowadzącym zbieranie zużytego sprzętu elektrycznego i
elektronicznego/. Prowadzący zbieranie, w tym lokalne punkty zbiórki, sklepy oraz gminne jednostki, tworzą
odpowiedni system umożliwiający oddanie tego sprzętu.
Właściwe postępowanie ze zużytym sprzętem elektrycznym i elektronicznym przyczynia się do uniknięcia
szkodliwych dla zdrowia ludzi i środowiska naturalnego konsekwencji, wynikających z obecności składników
niebezpiecznych oraz niewłaściwego składowania i przetwarzania takiego sprzętu.
Mamy nadzieję, że produkt przyniesie Państwu wiele satysfakcji.

9
PL EN
WE WOULD LIKE TO THANKS YOUR FOR CHOOSING ZELMER, WE WISH THE PRODUCT
PERFORMS TO YOUR SATISFACTION AND PLEASURE
WARNING
PLEASE READ THE INSTRUCTIONS FOR USE CAREFULLY PRIOR TO USING THE PRODUCT.
STORE THESE IN A SAFE PLACE FOR FUTURE REFERENCE.
DESCRIPTION
1. Air inlet
2. Body of the device
3. Control Panel
4. Frying basket
5. Handle
6. Visible window
7. Drip oil tray
8. Air Outlet
9. Power cord
CONTROL PANEL DESCRIPTION
1. Power button
2. Start/Pause button
3. Selection of Time/Temperature button
4. Increase (Time/temperature) button
5. Decrease (Time/temperature) button
6. Steak
7. Chicken
8. Fish
9. Dehydrate
10. Bacon
11. Pre-heat
12. Defrost
13. French fries
14. Vegetables
15. Pizza
16. Sea food
17. Bake
18. Keep warm
SAFETY INSTRUCTIONS
If the supply cord is damaged it must be replaced by
the manufacturer, its service agent or similarly qualied
persons in order to avoid a hazard.
This appliance can be used by children aged from 8 years
and above and persons with reduced physical, sensory or
mental capabilities or lack of experience and knowledge if

10
PL
EN
they have been given supervision or instruction concerning
use of the appliance in a safe way
and understand the hazards involved. Children shall not
play with the appliance. Cleaning and user maintenance
shall not be made by children unless they are older than
8 and supervised.
Keep the appliance and its cord out of reach of children
less than 8 years.
Appliances are not intended to be operated by means of
an external timer or separate remote-control system.
Disconnect the appliance when it is not in use and before
cleaning it. Let it cool before putting on, taking off parts
and cleaning it Do not submerge the appliance in water
or any other liquid.
This appliance is intended for use at a maximum altitude
of 2000m above sea level.
IMPORTANT WARNINGS
This appliance is designed exclusively for domestic use, in no case should be a commercial or industrial
use.
Any incorrect use or improper handling of the product shall render the warranty null and void.
Prior to plugging in the product, check that your mains voltage is the same as the one indicated on the
product label.
Place the appliance on a at even surface
The mains connection cable must not be tangled or wrapped around the product during use.
Do not use the device, or connect and disconnect to the supply mains with the hands and/or feet wet. Do
not pull on the connection cord in order to unplug it or use it as a handle
IMPORTANT. When operating this Air Fryer, keep at least ten centimeters of free space on all sides of the
oven to allow for adequate air circulation.
DO NOT place your Air Fryer under cupboards, blinds or curtains. Risk of overheating / re.
Do not cover any part of the Fryer with a cloth or similar, it will cause overheating. Risk of re.
This is an AIR FRYER. It requires very little oil to cook. Do not ll the pot with oil or fat as this may cause
a re hazard.
Do not use any accessories other than manufacturer recommended accessories in this Air Fryer.

11
PL EN
Always wear protective, insulated oven gloves when inserting or removing items from the hot Air Fryer.
The appliance must be used on a level, stable heat-resistant surface. The rst time you use your Air
Fryer there may be a slight odor or a small amount of smoke given off. This is normal and is just the
manufacturing residues burning off.
Always place the ingredients to be fried in the basket to prevent it from coming into contact with the heating
elements.
Unplug the product immediately from the mains in the event of any breakdown or damage and contact
an ofcial technical support service. In order to prevent any risk of danger, do not open the device. Only
qualied technical personnel from the brand´s Ofcial technical support service may carry out repairs or
procedures on the device.
B&B TRENDS SL. disclaims all liability for damages that may occur to people, animals or objects, for the
non-observance of these warnings.
BEFORE ITS FIRST USE
1. Remove all packing materials and stickers from the inside and outside of the Air Fryer. Gently wipe down
exterior with a damp cloth or paper towel.
WARNING: Never immerse the Air Fryer or its plug in water or any other liquids.
2. Pull the basket handle to remove the basket from the Air Fryer. Use the tray handle, in the center of the
tray, to remove the tray. Use a sponge and warm, soapy water to wash the inside and outside of the basket
and tray. The basket and the tray are top-rack dishwasher safe.
3. WARNING: Do not use abrasive cleaning agents or scouring pads.
4. Dry thoroughly.
HOW TO USE YOUR APPLIANCE
1. Place the air fryer on a stable, level, heat-resistant surface, away from areas that can be damaged by
steam.
2. Insert the drip oil tray into the basket and put the basket back into the air fryer. (FIG. 1)
3. Connect the mains plug to an earthed wall socket.
4. Press power button to turn on the device.
5. Select a preset cooking program by pressing in the corresponding icon of the display.
6. Optionally, customize the temperature and time. You can do this anytime during cooking.
• Press Temp/Time once. The temperature will be ashing on the display. Press the (+) or (-) buttons to
adjust the temperature. (each time you press it is 5ºC)
• Press Temp/Time a second time. The time will be ashing on the display. Press the (+) or (-) buttons to
adjust the time (1-60 minutes). (each time you press it is 1 minute)
Note: To rapidly increase or decrease time or temperature, press and hold the the (+) or (-) buttons.
7. Press (PLAY/PAUSE) to start cooking.
8. When using certain presets, the Shake Reminder will appear halfway through cooking time. The air fryer
will beep, and (SHAKE) will be ashing on the display.
• Take the basket out of the air fryer, being careful of hot steam.
• The air fryer will pause cooking automatically.
• Shake or ip the food.
• Put the basket back into the air fryer.
• The air fryer will beep when nished cooking.
9. Optionally, press Keep Warm. Press the (+) or (-) buttons to adjust the time. (1-60 minutes).

12
PL
EN
10. Take the basket out of the air fryer, being careful of hot steam.
11. Remove the food by dumping them out or by using oven mitts or silicone tipped tongs/utensils.
12. Keep the basket to cool before cleaning.
COOKING GUIDE
1. If the basket is overlled, food will cook unevenly.
2. Adding a small amount of oil to your food will make it crispier. Use no more than 2 tablespoons of oil.
3. Oil sprays are excellent for applying small amounts of oil evenly to all food items.
4. You can air fry any frozen foods or goods that can be baked in an oven.
5. Air frying high-fat foods will cause fat to drip to the bottom of the baskets. To avoid excess smoke while
cooking, pour out fat drippings after cooking.
6. Liquid-marinated foods create splatter and excess smoke. Pat these foods dry before air frying.
PAUSING
1. Press Play/Pause button to pause cooking. The air fryer will stop heating and will ash until you press
to resume cooking.
2. After 30 minutes of inactivity, the air fryer will turn off.
3. This function allows you to pause the cooking program without taking the baskets from the air fryer.
AUTOMATICALLY RESUME COOKING
1. If you pull out the basket, the air fryer will pause cooking automatically. The display will turn off temporarily
as a safety feature.
2. When you return the baskets, the air fryer will automatically resume cooking based on your previous
settings
AUTOMATIC SHUTOFF
If the air fryer has no active cooking programs, the air fryer will clear all settings and enter standby mode
after 3 minutes of inactivity.
OVERHEAT PROTECTION
1. If the air fryer overheats, it will automatically shut down as a safety feature.
2. Allow the air fryer to cool down before using it again.
Preset programs
FOOD SETTING TEMPERA-
TURE
SET TIME SHAKE REMINDER
175ºC 12 min Shake
180ºC 20 min Shake
200ºC 15 min Shake
80ºC 120 min /
180ºC 5 min Shake

13
PL EN
80ºC 8 min /
200ºC 20 min Shake
180ºC 15 min Shake
150ºC 8 min Shake
180ºC 12 min Shake
180ºC 15 min /
200ºC 3 min /
80ºC 30 min /
COOKING TIPS
• Almost any food that is traditionally cooked in the oven can be air fried.
• Foods cook best and most evenly when they are of similar size and thickness.
• Smaller pieces of food require less cooking time than larger pieces.
• For best results in the shortest amount of time, air fry food in small batches. Avoid stacking or layering
when possible.
• Most prepackaged foods do not need to be tossed in oil before air frying. Most already contain oil and
other ingredients that enhance browning and crispiness
• Frozen appetizers air fry very well. For best results, arrange them on the tray in a single layer.
• If layering foods, be sure to shake the basket halfway through (or ip food) to promote even cooking.
• Toss foods you are preparing from scratch, such as French fries or other vegetables, with a small amount
of oil to promote browning and crispiness.
• When air frying fresh vegetables, make sure to pat them dry completely before tossing with oil and air
frying to ensure maximum crispiness.
• Air fryers are great for reheating food, including pizza. To reheat your food, set the temperature to 150ºC
for up to 10 minutes.
CLEANING AND MAINTENANCE
• Ensure the Air Fryer is unplugged and cool before cleaning.
• Use a clean, dry cloth to clean the inside. Do not use a wet cloth to prevent water from getting inside the
appliance.
Warning: Do not use abrasive cleaning agents or scouring pads.
• Gently wipe down exterior with a damp cloth or paper towel.
• Never immerse the Air Fryer or its plug in water or any other liquid.
• Dry all parts thoroughly before storage.
• Store the Air Fryer in a cool, dry place.

14
PL
EN
PRODUCT DISPOSAL
This product complies with European Directive 2012/19/EU on electrical and
electronic devices, known as WEEE (Waste Electrical and Electronic Equipment),
provides the legal framework applicable in the European Union for the
disposal and reuse of waste electronic and electrical devices. Do not dispose
of this product in the bin, instead going to the electrical and electronic waste
collection center closest to your home.

15
PL
DE
WIR DANKEN IHNEN, DASS SIE SICH FUR ZELMER ENTSCHIEDEN HABEN UND WUNSCHEN
IHNEN VIEL FREUDE UND ZUFRIEDENHEIT MIT IHREM GERAT.
WARNUNG
BITTE LESEN SIE DIE GEBRAUCHSANWEISUNG VOR DER VERWENDUNG DES GERATS
SORGFALTIG DURCH. BEWAHREN SIE DIESE AN EINEM SICHEREN ORT ZUR SPATEREN
VERWENDUNG AUF.
BESCHREIBUNG
1. Lufteinlass
2. Hauptteil des Gerats
3. Bedienfeld
4. Frittierkorb
5. Griff
6. Sichtfenster
7. Auffangwannen fur Ol
8. Luftauslass
9. Stromkabel
BESCHREIBUNG DES BEDIENFELDES
1. Einschalttaste
2. Start-/Pause-Taste
3. Taste zum Wechsel zwischen Zeit und Temperatur
4. Zeit/Temperatur-Erhöhung (+)
5. Zeit/Temperatur-Verringerung (+)
6. Steak
7. Hähnchen
8. Fisch
9. Entwässern
10. Speck
11. Vorheizen
12. Auftauen
13. Pommes frites
14. Gemüse
15. Pizza
16. Meeresfrüchte
17. Backen
18. Warmhalten
SICHERHEITSHINWEISE
Wenn das Netzkabel beschadigt wird, muss es durch den
Hersteller, seinen Kundendienst oder ahnlich qualizierte
Personen ersetzt werden, um
eine Gefahrdung zu vermeiden.
Dieses Gerat darf von Kindern ab 8 Jahren sowie von
Personen mit verringerten physischen, sensorischen

16
PL
DE
oder mentalen Fahigkeiten oder Mangel an Erfahrung
und Wissen nur benutzt werden, wenn sie beaufsichtigt
oder bezuglich des sicheren Gebrauchs des Gerats
unterwiesen wurden und die daraus resultierenden
Gefahren verstehen. Kinder durfen nicht mit dem Gerat
spielen. Reinigung und Wartung durfen nicht von Kindern
vorgenommen werden - es sei denn, sie sind alter als 8
Jahre und werden beaufsichtigt.
Halten Sie das Gerat und sein Kabel auserhalb der
Reichweite von Kindern unter 8 Jahren.
Dieses Gerat ist nicht fur den Betrieb uber eine externe
Zeitschaltuhr oder ein separates Fernsteuersystem
vorgesehen.
Trennen Sie das Gerat von der Stromversorgung, wenn
es nicht in Gebrauch ist und bevor Sie es reinigen.
Lassen Sie es abkuhlen, bevor Sie Teile anbringen,
abnehmen oder reinigen.
Tauchen Sie das Gerat niemals in Wasser oder andere
Flussigkeiten ein.
Dieses Gerat ist fur den Einsatz in einer maximalen Hohe
von 2.000 m uber dem Meeresspiegel vorgesehen.
WICHTIGE WARNHINWEISE
Dieses Gerat ist ausschlieslich fur den hauslichen Gebrauch bestimmt, keinesfalls fur einen gewerblichen
oder industriellen Einsatz.
Bei unsachgemasem Gebrauch oder falscher Handhabung des Gerats erlischt die Garantie. Prufen Sie
vor dem Einstecken des Produkts, ob Ihre Netzspannung mit der auf dem Produktetikett angegebenen
Spannung ubereinstimmt.
Stellen Sie das Gerat immer auf eine ache, ebene Oberache.
Das Stromkabel darf wahrend des Betriebs nicht verwickelt oder um das Produkt gewickelt werden.

17
PL
DE
Benutzen oder stecken Sie das Gerat nicht mit nassen Handen und/oder Fusen ein oder aus.
Ziehen Sie nicht am Anschlusskabel, um es auszustecken oder es als Griff zu verwenden.
WICHTIG. Stellen Sie beim Betrieb dieser Heisluftfritteuse an allen Seiten mindestens zehn Zentimeter
Freiraum sicher, um eine ausreichende Luftzirkulation zu ermoglichen. Stellen Sie Ihre Heisluftfritteuse
NICHT unter Schranke, Jalousien oder Vorhange. Uberhitzungs und
Brandgefahr.
Bedecken Sie keinen Teil der Fritteuse mit einem Tuch oder Ahnlichem, da dies zu Uberhitzung fuhrt.
Feuergefahr.
Dieses Gerat ist eine HEISSLUFTFRITTEUSE. Es benotigt sehr wenig Ol zum Kochen. Befullen Sie den
Topf nicht mit Ol oder Fett, da dies eine Brandgefahr birgt.
Verwenden Sie fur diese Heisluftfritteuse nur das vom Hersteller empfohlene Zubehor.
Tragen Sie immer schutzende, isolierte Ofenhandschuhe, wenn Sie etwas in die heise Heisluftfritteuse
einlegen oder aus ihr entnehmen.
Verwenden Sie das Gerat auf einer ebenen, stabilen und hitzebestandigen Oberache.
Wenn Sie die Fritteuse zum ersten Mal benutzen, kann etwas Geruch oder eine gewisse Rauchentwicklung
auftreten. Dies ist normal und nur auf das Verbrennen von Herstellungsruckstanden zuruckzufuhren.
Legen Sie die zu frittierenden Speisen immer in den Korb, damit sie nicht mit den Heizelementen in
Beruhrung kommen.
Ziehen Sie im Falle einer Storung oder Beschadigung sofort den Netzstecker und wenden Sie sich an einen
ofziellen technischen Kundendienst. Um eine Gefahrdung zu vermeiden, darf das Gerat nicht geoffnet
werden. Nur qualiziertes technisches Personal des ofziellen technischen Kundendienstes der Marke darf
Reparaturen oder Eingriffe am Gerat vornehmen.
B&B TRENDS SL. ubernimmt keine Haftung fur Schaden an Personen, Tieren oder Gegenstanden, die
durch die Nichtbeachtung dieser Warnhinweise entstehen.
VOR DEM ERSTEN EINSATZ
1. Entfernen Sie alle Verpackungsmaterialien und Aufkleber von der Innen- und Ausenseite der
Heisluftfritteuse. Wischen Sie die Ausenseite vorsichtig mit einem feuchten Stoffoder Papiertuch ab.
WARNUNG: Tauchen Sie die Heisluftfritteuse oder ihren Stecker niemals in Wasser oder andere
Flussigkeiten.
2. Ziehen Sie den Korb an seinem Griff aus der Heisluftfritteuse heraus. Nehmen Sie die Schale am
Griff in ihrer Mitte heraus. Reinigen Sie die Innen- und Ausenseite des Korbs und der Schale mit einem
Schwamm und warmem Seifenwasser. Korb und Schale konnen oben im oberen Fach des Geschirrspulers
gewaschen werden.
3. WARNUNG: Verwenden Sie keine scheuernden Reinigungsmittel oder Schwamme.
4. Trocknen Sie alles grundlich ab.
BEDIENUNG DER HEISSLUFTFRITTEUSE
1. Stellen Sie die Heisluftfritteuse auf eine stabile, ebene, Hitzebestandige Oberache,
und nicht in die Nahe von Bereichen, die durch Dampf beschadigt werden konnten.
2. Setzen Sie die Auffangwanne fur Ol in den Frittierkorb, und stellen Sie diesen anschliesend zuruck in die
Heisluftfritteuse. (FIG. 1)
3. Verbinden Sie den Netzstecker mit einer geerdeten Steckdose.

18
PL
DE
4. Betatigen Sie die Einschalttaste, um das Gerat einzuschalten.
5. Wahlen Sie ein voreingestelltes Kochprogramm, indem Sie das entsprechende Symbol
auf der Anzeige betatigen.
6. Passen Sie Temperatur und Zeit an, falls gewunscht. Dies konnen Sie auch jederzeit
wahrend des Kochens machen.
- Betatigen Sie die Taste Temp./Zeit einmal. Die Temperaturanzeige auf dem Display blinkt
danach auf. Betatigen Sie die Tasten (+) oder (-) um die Temperatur wie gewunscht einzustellen.
(die Temperatureinstellung erfolgt in 5oC-Schritten)
- Betatigen Sie die Taste Temp./Zeit erneut. Jetzt blinkt die Zeitanzeige auf dem Display
auf. Betatigen Sie die Tasten (+) oder (-) um die Zeit (1 - 60 Minuten) wie gewunscht einzustellen.
(die Zeiteinstellung erfolgt in Schritten von je 1 Minute)
Hinweis: Um die Zeit oder Temperatur schnell zu verandern, betatigen und halten Sie die
Taste (+) oder (-) .
7. Betatigen Sie die Taste (START/PAUSE) ; um mit dem Kochen zu beginnen.
8. Bei der Nutzung von bestimmten Voreinstellungen beginnt in der Halfte der Kochzeit die
Leuchte zur Schuttel-Erinnerung zu leuchten. Die Heisluftfritteuse piept, und die Leuchte
zur Schuttel-Erinnerung am Display beginnt zu blinken.
- Nehmen Sie den Frittierkorb aus der Heisluftfritteuse. Seien Sie vorsichtig vor heisem
Dampf.
- Die Heisluftfritteuse pausiert das Kochen automatisch.
- Schutteln oder wenden Sie das Essen.
- Setzen Sie den Korb dann wieder in die Heisluftfritteuse ein.
- Die Heisluftfritteuse piept, sobald der Kochvorgang abgeschlossen ist.
9. Alternativ konnen Sie auch die Taste Warmhalten betatigen. Betatigen Sie die Taste (+)
oder (-) , um die Zeit einzustellen. (1-60 Minuten).
10. Nehmen Sie den Frittierkorb aus der Heisluftfritteuse. Seien Sie vorsichtig vor heisem
Dampf.
11. Entnehmen Sie das Essen, indem Sie es ausschutteln oder Ofenhandschuhe oder eine
mit Silikon uberzogene Zange nutzen.
12. Lassen Sie den Frittierkorb abkuhlen, bevor Sie ihn reinigen.
KOCHANLEITUNG
1. Wenn der Frittierkorb uberfullt ist, wird das Essen ungleichmasig gekocht.
2. Wenn Sie dem Essen etwas Ol beigeben, wird das Essen knuspriger. Verwenden Sie aber
nicht mehr als 2 Essloffel Ol.
3. Olspruher sind bestens dazu geeignet, kleine Mengen von Ol gleichmasig uber alle Zutaten
zu verteilen.
4. Sie konnen alle tiefgefrorenen Speisen oder Gerichte, die man in einem Backofen zubereiten
kann, auch in der Heisluftfritteuse frittieren.
5. Wenn Sie Speisen frittieren, die viel Fett enthalten, tropft dieses auf den Boden des Frittierkorbs.
Um zu vermeiden, dass bei der Nutzung der Heisluftfritteuse jedes Mal starker Rauch entsteht, entleeren
Sie das abgetropfte Ol nach dem Kochen.
6. Speisen mit Marinade verursachen Spritzer und starke Rauchentwicklung. Tupfen Sie
solche Speisen trocken, bevor Sie sie frittieren.

19
PL
DE
KOCHPAUSE
1. Betatigen Sie die Start/Pause-Taste, um das Kochen zu unterbrechen. Die Heisluftfritteuse
pausiert das Aufwarmen, und die Taste blinkt so lange, bis Sie sie wieder betatigen,
um das Kochen fortzusetzen.
2. Nach 30 Minuten Inaktivitat schaltet sich die Heisluftfritteuse dann automatisch ab.
3. Diese Funktion ermoglicht es Ihnen, das Kochen zu unterbrechen, ohne die Frittierkorbe
aus dem Gerat nehmen zu mussen.
DAS KOCHEN AUTOMATISCH FORTSETZEN
1. Wenn Sie den Frittierkorb herausnehmen, unterbricht die Heisluftfritteuse das Kochen
automatisch. Aus Sicherheitsgrunden schaltet sich das Display vorubergehend ab.
2. Sobald Sie die Frittierkorbe wieder in das Gerat stellen, setzt die Heisluftfritteuse das
Kochen mit den vorherigen Einstellungen fort.
AUTOMATISCHES ABSCHALTEN
Falls keine Kochprogramme aktiv sind, loscht die Heisluftfritteuse alle Einstellungen und
geht nach 3 Minuten Inaktivitat in den Standby-Modus.
ÜBERHITZUNGSSCHUTZ
1. Falls sich die Heisluftfritteuse uberhitzt, schaltet sie sich aus Sicherheitsgrunden automatisch ab.
2. Lassen Sie die Heisluftfritteuse abkuhlen, bevor Sie sie erneut verwenden.
VOREINGESTELLTE PROGRAMME
VOREINSTELLUNG TEMPERATUR ZEIT SCHUTTEL- ERIN-
NERUNG
175ºC 12 min Shake
180ºC 20 min Shake
200ºC 15 min Shake
80ºC 120 min /
180ºC 5 min Shake
80ºC 8 min /
200ºC 20 min Shake
180ºC 15 min Shake
150ºC 8 min Shake

20
PL
DE
180ºC 12 min Shake
180ºC 15 min /
200ºC 3 min /
80ºC 30 min /
ZUBEREITUNGSTIPPS
• Fast alle traditionell im Backofen zubereiteten Speisen konnen auch mit heiser Luft frittiert
werden.
• Lebensmittel garen am besten und gleichmasigsten, wenn sie ahnlich gros und dick sind
• Kleinere Lebensmittelstucke benotigen weniger Garzeit als grosere.
• Fur beste Ergebnisse in kurzester Zeit frittieren Sie Ihre Lebensmittel in kleinen Mengen.
Vermeiden Sie nach Moglichkeit, sie zu stapeln oder zu schichten.
• Die meisten vorverpackten Lebensmittel mussen vor dem Heisluftfrittieren nicht in Ol
geschwenkt werden. Die meisten enthalten bereits Ol und andere Zutaten, die eine gute
Braunung und Knusprigkeit ermoglichen.
• Tiefgekuhlte Happchen und Vorspeisen lassen sich sehr gut mit Heisluft frittieren. Die besten
Ergebnisse erzielen Sie, wenn Sie sie in einer einzigen Schicht auf der Schale anordnen.
• Wenn Sie Speisen schichten, schutteln Sie den Korb oder wenden Sie seinen Inhalt nach
halber Zeit, um ein gleichmasiges Frittieren zu fordern.
• Schwenken Sie Lebensmittel, die Sie frisch zubereiten, wie z. B. Pommes frites oder anderes
Gemuse, mit einer kleinen Menge Ol, damit sie knusprig braun werden.
• Tupfen Sie frisches Gemuse vollstandig trocken, bevor Sie es in Ol schwenken und mit
Luft frittieren, um maximale Knusprigkeit zu erzielen.
• Heisluftfritteusen eignen sich hervorragend zum Aufwarmen, auch von Pizza. Stellen Sie
zum Aufwarmen Ihrer Speisen die Temperatur auf 150 °C und die Zeit auf 10 Minuten ein.
REINIGUNG UND WARTUNG
• Stellen Sie sicher, dass die Heisluftfritteuse vor der Reinigung ausgesteckt und abgekuhlt
ist.
• Verwenden Sie ein sauberes, trockenes Tuch, um das Innere zu reinigen. Verwenden Się kein nasses
Tuch, damit kein Wasser in das Innere des Gerats gelangt.
Warnung: Verwenden Sie keine scheuernden Reinigungsmittel oder Schwamme.
• Wischen Sie die Ausenseite vorsichtig mit einem feuchten Stoff- oder Papiertuch ab.
• Tauchen Sie die Fritteuse niemals in Wasser oder andere Flussigkeiten ein
• Trocknen Sie alle Teile grundlich ab, bevor Sie sie wegstellen.
• Lagern Sie die Heisluftfritteuse an einem kuhlen, trockenen Ort.
Pagina se încarcă...
Pagina se încarcă...
Pagina se încarcă...
Pagina se încarcă...
Pagina se încarcă...
Pagina se încarcă...
Pagina se încarcă...
Pagina se încarcă...
Pagina se încarcă...
Pagina se încarcă...
Pagina se încarcă...
Pagina se încarcă...
Pagina se încarcă...
Pagina se încarcă...
Pagina se încarcă...
Pagina se încarcă...
Pagina se încarcă...
Pagina se încarcă...
Pagina se încarcă...
Pagina se încarcă...
Pagina se încarcă...
Pagina se încarcă...
Pagina se încarcă...
Pagina se încarcă...
Pagina se încarcă...
Pagina se încarcă...
Pagina se încarcă...
Pagina se încarcă...
Pagina se încarcă...
Pagina se încarcă...
Pagina se încarcă...
Pagina se încarcă...
Pagina se încarcă...
Pagina se încarcă...
Pagina se încarcă...
Pagina se încarcă...
Pagina se încarcă...
Pagina se încarcă...
Pagina se încarcă...
Pagina se încarcă...
Pagina se încarcă...
Pagina se încarcă...
Pagina se încarcă...
Pagina se încarcă...
Pagina se încarcă...
Pagina se încarcă...
Pagina se încarcă...
Pagina se încarcă...
Pagina se încarcă...
Pagina se încarcă...
Pagina se încarcă...
Pagina se încarcă...
Pagina se încarcă...
Pagina se încarcă...
Pagina se încarcă...
Pagina se încarcă...
-
 1
1
-
 2
2
-
 3
3
-
 4
4
-
 5
5
-
 6
6
-
 7
7
-
 8
8
-
 9
9
-
 10
10
-
 11
11
-
 12
12
-
 13
13
-
 14
14
-
 15
15
-
 16
16
-
 17
17
-
 18
18
-
 19
19
-
 20
20
-
 21
21
-
 22
22
-
 23
23
-
 24
24
-
 25
25
-
 26
26
-
 27
27
-
 28
28
-
 29
29
-
 30
30
-
 31
31
-
 32
32
-
 33
33
-
 34
34
-
 35
35
-
 36
36
-
 37
37
-
 38
38
-
 39
39
-
 40
40
-
 41
41
-
 42
42
-
 43
43
-
 44
44
-
 45
45
-
 46
46
-
 47
47
-
 48
48
-
 49
49
-
 50
50
-
 51
51
-
 52
52
-
 53
53
-
 54
54
-
 55
55
-
 56
56
-
 57
57
-
 58
58
-
 59
59
-
 60
60
-
 61
61
-
 62
62
-
 63
63
-
 64
64
-
 65
65
-
 66
66
-
 67
67
-
 68
68
-
 69
69
-
 70
70
-
 71
71
-
 72
72
-
 73
73
-
 74
74
-
 75
75
-
 76
76


Zelmer ZAF6500 Manual de utilizare
- Categorie
- Friteuze adânci
- Tip
- Manual de utilizare
în alte limbi
- slovenčina: Zelmer ZAF6500 Používateľská príručka
- polski: Zelmer ZAF6500 Instrukcja obsługi