Parkside 339108 1910 Translation Of The Original Instructions
- Categorie
- Unelte electrice
- Tip
- Translation Of The Original Instructions
Acest manual este potrivit și pentru

AKKU-MULTIFUNKTIONS-
WERKZEUG
Originalbetriebsanleitung
IAN 339108_1910
CORDLESS MULTI-PURPOSE TOOL
Translation of the original instructions
АКУМУЛАТОРЕН МНОГОФУНК-
ЦИОНАЛЕН ИНСТРУМЕНТ
Превод на оригиналното ръководство за експлоатация
UNEALTĂ MULTIFUNCŢIONALĂ
CUACUMULATOR
Traducerea instrucţiunilor de utilizare original
ΕΠΑΝΑΦΟΡΤΙΖΟΜΕΝΟ
ΠΟΛΥΕΡΓΑΛΕΙΟ
Μετάφραση των αυθεντικών οδηγιών λειτουργίας
AKU VIŠENAMJENSKI ALAT
Prijevod originalnih uputa za uporabu
AKU VIŠENAMENSKI ALAT
Prevod originalnog uputstva za upotrebu
CORDLESS MULTI-PURPOSE TOOL PAMFW 20-Li A1

GB / CY Translation of the original instructions Page 1
HR Prijevod originalnih uputa za uporabu Stranica 15
RS Prevod originalnog uputstva za upotrebu Strana 29
RO Traducerea instrucţiunilor de utilizare original Pagina 43
BG Превод на оригиналното ръководство за експлоатация Cтраница 57
GR / CY Μετάφραση των αυθεντικών οδηγιών λειτουργίας Σελίδα 73
DE / AT / CH Originalbetriebsanleitung Seite 89
Before reading, unfold the page containing the illustrations and familiarise yourself with all functions of
the device.
Prije nego što pročitate tekst, otvorite stranicu sa slikama i upoznajte se na osnovu toga sa svim funkcijama
uređaja.
Pre čitanja rasklopite obe strane sa slikama te se upoznajte sa svim funkcijama uređaja.
Înainte de a citi instrucţiunile, priviţi imaginile şi familiarizaţi-vă cu toate funcţiile aparatului.
Преди да прочетете отворете страницата с фигурите и след това се запознайте с всички функции
на уреда.
Πριν ξεκινήσετε την ανάγνωση, ανοίξτε τη σελίδα με τις εικόνες και εξοικειωθείτε με όλες τις λειτουργίες
της συσκευής.
Klappen Sie vor dem Lesen die Seite mit den Abbildungen aus und machen Sie sich anschließend mit allen
Funktionen des Gerätes vertraut.

654
Z52 A1
Z64 B2
HCS
C
A

20V max.
18V
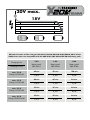
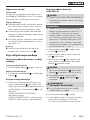
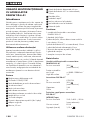
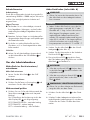
All Parkside tools and the chargers PLG 20 A1/PLG 20 A2/PLG 20 A3/PDSLG 20 A1 of the
X20V Team series are compatible with the PAP 20 A1/PAP 20 A2/PAP 20 A3 battery pack.
Charging times
Charging currents
2 Ah
Battery pack
PAP 20 A1
3 Ah
Battery pack
PAP 20 A2
4 Ah
Battery pack
PAP 20 A3
max. 2.4 A
Charger PLG 20 A1
60 min
2,4 A
90 min
2,4 A
120 min
2,4 A
max. 3.5 A
Charger PLG 20 A2
60 min
2,4 A
60 min
3,5 A
80 min
3,5 A
max. 4.5 A
Charger PLG 20 A3
35 min
3,5 A
45 min
4,5 A
60 min
4,5 A
max. 4.5 A
Charger PDSLG 20 A1
35 min
3,5 A
45 min
4,5 A
60 min
4,5 A

PAMFW 20-Li A1
GB
│
CY
│
1 ■
Contents
Introduction .........................................................2
Intended use .................................................................... 2
Features ........................................................................ 2
Package contents ................................................................. 2
Technical data ................................................................... 2
General power tool safety warnings .....................................3
1. Work area safety .............................................................. 3
2. Electrical safety ................................................................ 4
3. Personal safety ................................................................ 4
4. Power tool use and care ......................................................... 5
5. Battery tool use and care ........................................................ 5
6. Service ....................................................................... 6
Appliance-specific safety instructions for grinders ........................................ 6
Safety guidelines for battery chargers ................................................. 6
Working procedures .............................................................. 7
Before use ...........................................................7
Attaching/disconnecting the battery pack to/from the appliance ........................... 7
Checking the battery charge level .................................................... 7
Charging the battery pack (seefig.A) ................................................ 7
Dust/chip extraction .............................................................. 8
Connecting a dust extraction unit .................................................... 8
Selecting a tool .................................................................. 8
Fitting the sanding sheet onto the sanding plate ......................................... 9
Changing tools .................................................................. 9
Use ................................................................10
Switching on and off .............................................................10
Selecting oscillation speed ........................................................10
Maintenance and cleaning ............................................10
Kompernass Handels GmbH warranty ..................................11
Service .............................................................12
Importer ...........................................................12
Disposal ............................................................12
Translation of the original Conformity Declaration .........................13
Ordering a replacement battery ........................................14
Telephone ordering ..............................................................14
IB_339108_PAMFW20-LiA1_LB7.indb 1 09.03.20 11:50

PAMFW 20-Li A1
■ 2
│
GB
│
CY
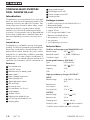
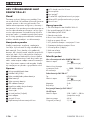
CORDLESS MULTI-PURPOSE
TOOL PAMFW 20-Li A1
Introduction
Congratulations on the purchase of your new appli-
ance. You have chosen a high-quality product. The
operating instructions are part of this product. They
contain important information about safety, usage
and disposal. Before using the product, please
familiarise yourself with all operating and safety
instructions. Use the product only as described and
for the range of applications specified. Please also
pass these operating instructions on to any future
owner.
Intended use
The appliance is intended for sawing, cutting and
grinding. The following materials are preferable for
processing: wood, plastic, drywall elements, light
and non-ferrous metals, fasteners (e.g. nails, screws)
and wall tiles. It is particularly suitable for near-edge
and flush work. Any other usage or modification of
the appliance is considered improper and carries a
significant risk of accidents. Not for commercial use.
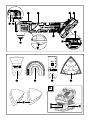
Features
Tool release lever
ON/OFF switch
Release button for battery pack
Battery pack*
Battery charge level button
Battery display LED
Speed adjustment wheel
LED work light
Tensioning screw
Dust extraction unit (2 pcs.)
Angle adapter
Scraper 52 mm
Diamond saw blade 65 mm
HCS plunge saw blade 32 mm
Sanding plate
High-speed charger*
Red charge control LED
Green charge control LED
Sanding sheets
Package contents
1 cordless multi-purpose tool PAMFW 20-Li A1
1 delta sanding plate
6 sanding sheets 80 mm flange
1 scraper 52 mm
1 HCS plunge saw blade 32 mm
1 diamond saw blade 65 mm
1 dust extraction unit (2 pcs.)
1 carrying case
1 set of operating instructions
Technical data
Cordless multi-purpose tool PAMFW 20-Li A1
Rated voltage 20 V (DC)
Rated idle speed n
0
5000–19000 rpm
Oscillation angle 3.2°
Rechargeable battery PAP 20 A1*
Type LITHIUM ION
Rated voltage 20 V
(DC)
Capacity 2 Ah
Cells 5
High-speed battery charger PLG 20 A1*
INPUT
Rated voltage 230–240 V ∼, 50 Hz
(AC)
Rated power
consumption 65 W
Fuse (internal) 3.15 A
T3.15A
OUTPUT
Rated voltage 21.5 V (DC)
Rated current 2.4 A
Charging time approx. 60 min
Protection class II /
(double insulation)
* BATTERY AND CHARGER ARE NOT INCLUDED
IB_339108_PAMFW20-LiA1_LB7.indb 2 09.03.20 11:50

PAMFW 20-Li A1
GB
│
CY
│
3 ■
Noise and vibration data
Noise measurement value determined in accord-
ance with EN 62841. The A-rated noise level of
the power tool is typically as follows:
Noise emission values
Sound pressure level L
pA
= 78 dB (A)
Uncertainty K
pA
= 3 dB
Sound power level L
WA
= 89 dB (A)
Uncertainty K
WA
= 3 dB
Wear hearing protection!
Total vibration value (vector total of three
directions) determined in accordance with
EN62841:
Sanding
Vibration emission value a
h
= 9.1 m/s
2
Uncertainty K = 1.5 m/s
2
NOTE
► The vibration emission values and the noise
emission values given in these instructions
have been measured in accordance with a
standardised test procedure and can be used
for comparison of the power tool with
another tool.
► The specified total vibration values and the
noise emission values can also be used to
make a provisional load estimate.
WARNING!
► Depending on the manner in which the
power tool is being used, and in particular
the kind of workpiece that is being worked,
the vibration and noise emission values can
deviate from the values given in these
instructions during actual use of the power
tool.
► Try to keep the load as low as possible.
Measures to reduce the vibration load are,
e.g. wearing gloves and limiting the working
time. Wherein all states of operation must be
included (e.g. times when the power tool is
switched off and times where the power tool
is switched on but running without load).
General power tool
safety warnings
WARNING!
► Read all safety warnings, instructions,
illustrations and specifications provided
with this power tool. Failure to follow all
instructions listed below may result in electric
shock, fire and/or serious injury.
Save all warnings and instructions for future
reference.
The term „power tool“ in the warnings refers
to your mains-operated (corded) power tool or
battery-operated (cordless) power tool.
1. Work area safety
a) Keep work area clean and well lit. Cluttered
or dark areas invite accidents.
b) Do not operate power tools in explosive
atmospheres, such as in the presence of
flammable liquids, gases or dust. Power tools
create sparks which may ignite the dust or
fumes.
c) Keep children and bystanders away while
operating a power tool. Distractions can cause
you to lose control.
IB_339108_PAMFW20-LiA1_LB7.indb 3 09.03.20 11:50

PAMFW 20-Li A1
■ 4
│
GB
│
CY
2. Electrical safety
a) Power tool plugs must match the outlet. Never
modify the plug in any way. Do not use any
adapter plugs with earthed (grounded)
power tools. Unmodified plugs and matching
outlets will reduce risk of electric shock.
b) Avoid body contact with earthed or
grounded surfaces, such as pipes, radiators,
ranges and refrigerators. There is an
increased risk of electric shock if your body is
earthed or grounded.
c) Do not expose power tools to rain or wet
conditions. Water entering a power tool will
increase the risk of electric shock.
d) Do not abuse the cord. Never use the cord
for carrying, pulling or unplugging the power
tool. Keep cord away from heat, oil, sharp
edges or moving parts. Damaged or
entangled cords increase the risk of electric
shock.
e) When operating a power tool outdoors, use
an extension cord suitable for outdoor use.
Use of a cord suitable for outdoor use reduces
the risk of electric shock.
f) If operating a power tool in a damp location
is unavoidable, use a residual current device
(RCD) protected supply. Use of an RCD
reduces the risk of electric shock.
3. Personal safety
a) Stay alert, watch what you are doing and use
common sense when operating a power tool.
Do not use a power tool while you are tired
or under the influence of drugs, alcohol or
medication. A moment of inattention while
operating power tools may result in serious
personal injury.
b) Use personal protective equipment. Always
wear eye protection.
Protective equipment
such as a dust mask, non-skid safety shoes, hard
hat or hearing protection used for appropriate
conditions will reduce personal injuries.
c) Prevent unintentional starting. Ensure the
switch is in the off-position before connecting
to power source and/or battery pack, picking
up or carrying the tool. Carrying power tools
with your finger on the switch or energising
power tools that have the switch on invites
accidents.
d) Remove any adjusting key or wrench before
turning the power tool on. A wrench or a key
left attached to a rotating part of the power tool
may result in personal injury.
e) Do not overreach. Keep proper footing and
balance at all times. This enables better control
of the power tool in unexpected situations.
f) Dress properly. Do not wear loose clothing or
jewellery. Keep your hair and clothing away
from moving parts. Loose clothes, jewellery or
long hair can be caught in moving parts.
g) If devices are provided for the connection of
dust extraction and collection facilities, ensure
these are connected and properly used. Use
of dust collection can reduce dust-related
hazards.
h) Do not let familiarity gained from frequent
use of tools allow you to become complacent
and ignore tool safety principles. A careless
action can cause severe injury within a fraction
of a second.
IB_339108_PAMFW20-LiA1_LB7.indb 4 09.03.20 11:50

PAMFW 20-Li A1
GB
│
CY
│
5 ■
4. Power tool use and care
a) Do not force the power tool. Use the correct
power tool for your application. The correct
power tool will do the job better and safer at
the rate for which it was designed.
b) Do not use the power tool if the switch does
not turn it on and off. Any power tool that
cannot be controlled with the switch is
dangerous and must be repaired.
c) Disconnect the plug from the power source
and/or remove the battery pack, if detach-
able, from the power tool before making any
adjustments, changing accessories, or storing
power tools. Such preventive safety measures
reduce the risk of starting the power tool
accidentally.
d) Store idle power tools out of the reach of
children and do not allow persons unfamiliar
with the power tool or these instructions to
operate the power tool. Power tools are
dangerous in the hands of untrained users.
e) Maintain power tools and accessories. Check
for misalignment or binding of moving parts,
breakage of parts and any other condition
that may affect the power tool’s operation. If
damaged, have the power tool repaired
before use. Many accidents are caused by
poorly maintained power tools.
f) Keep cutting tools sharp and clean. Properly
maintained cutting tools with sharp cutting
edges are less likely to bind and are easier to
control.
g) Use the power tool, accessories and tool bits
etc. in accordance with these instructions,
taking into account the working conditions
and the work to be performed. Use of the
power tool for operations different from those
intended could result in a hazardous situation.
h) Keep handles and grasping surfaces dry,
clean and free from oil and grease. Slippery
handles and grasping surfaces do not allow for
safe handling and control of the tool in
unexpected situations.
5. Battery tool use and care
a) Recharge only with the charger specified by
the manufacturer. A charger that is suitable for
one type of battery pack may create a risk of
fire when used with another battery pack.
b) Use power tools only with specifically
designated battery packs. Use of any other
battery packs may create a risk of injury and
fire.
c) When battery pack is not in use, keep it away
from other metal objects, like paper clips,
coins, keys, nails, screws or other small metal
objects, that can make a connection from one
terminal to another. Shorting the battery
terminals together may cause burns or a fire.
d) Under abusive conditions, liquid may be
ejected from the battery; avoid contact. If
contact accidentally occurs, flush with water.
If liquid contacts eyes, additionally seek
medical help. Liquid ejected from the battery
may cause irritation or burns.
e) Do not use a battery pack or tool that is
damaged or modified. Damaged or modified
batteries may exhibit unpredictable behaviour
resulting in fire, explosion or risk of injury.
f) Do not expose a battery pack or tool to fire
or excessive temperature. Exposure to fire or
temperature above 130 °C (265°F) may
cause explosion.
g) Follow all charging instructions and do not
charge the battery pack or tool outside the
temperature range specified in the instruc-
tions. Charging improperly or at temperatures
outside the specified range may damage the
battery and increase the risk of fire.
IB_339108_PAMFW20-LiA1_LB7.indb 5 09.03.20 11:50

PAMFW 20-Li A1
■ 6
│
GB
│
CY
CAUTION! RISK OF EXPLOSION!
Never charge non-rechargeable
batteries!
Protect the rechargeable battery
from heat, for example from
continuous exposure to sunlight,
fire, water and moisture.
There is a risk of explosion.
6. Service
a) Have your power tool serviced by a qualified
repair person using only identical replace-
ment parts. This will ensure that the safety of
the power tool is maintained.
b) Never service damaged battery packs.
Service of battery packs should only be
performed by the manufacturer or authorized
service providers.
Appliance-specific safety instructions
for grinders
WARNING!
■ Dusts from materials such as leaded paint,
some types of wood and metal can be
harmful to your health.
■ Contact with or inhalation of these dusts can
represent a health hazard for the person
operating the appliance and other people in
the vicinity.
■ Wear safety goggles and a protective dust
mask!
Safety guidelines for battery chargers
■ This appliance may be used by
children aged 8 years and above
and by persons with limited phys-
ical, sensory or mental capabilities
or lack of experience and know-
ledge, provided that they are under
supervision or have been told how
to use the appliance safely and are
aware of the potential risks. Do not
allow children to use the appliance
as a toy. Cleaning and user mainte-
nance tasks must not be carried out
by children unless they are super-
vised.
■ To avoid potential risks, damaged
mains cables should be replaced
by the manufacturer, their customer
service department or a similarly
qualified person.
The charger is suitable for
indoor use only.
ATTENTION!
♦ This charger can only charge the following
batteries: PAP 20 A1/PAP 20 A2/PAP 20 A3
.
♦ A current list of battery compatibility can be
found at www.lidl.de/Akku.
WARNING!
■ Do not operate the appliance with a
damaged cable, power cable or power plug.
A damaged power cable poses a threat of a
fatal electric shock.
■ Do not use any accessories which are not
recommended by PARKSIDE. This can lead to
an electric shock and fire.
IB_339108_PAMFW20-LiA1_LB7.indb 6 09.03.20 11:50

PAMFW 20-Li A1
GB
│
CY
│
7 ■
Working procedures
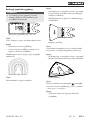
Working principle
The oscillating drive causes the application tool to
move back and forth at a speed of 5000–19000
times per minute. This allows for precision work
even in confined spaces.
Sawing/cutting
■ Use only undamaged saw blades that are in
perfect working order. Bent, blunt or otherwise
damaged saw blades may break.
■ When sawing lightweight construction mate-
rials, follow the statutory regulations and all
recommendations from the material manufac-
turers.
■ Only soft materials such as wood, plasterboard
or similar should be processed using the plunge
saw process.
Sanding
■ To prolong the service life of the sanding
sheets
, ensure that you apply even pressure.
Before use
Attaching/disconnecting the battery
pack to/from the appliance
Inserting the battery pack
♦ Push the battery pack
into the handle until it
clicks into place.
Removing the battery pack
♦ Press the release button
and remove the
battery pack .
Checking the battery charge level
♦ Press the battery charge level button to
check the status of the battery (see also main
diagram).
The status/remaining charge will be shown on
the battery display LED as follows:
RED/ORANGE/GREEN = maximum charge
RED/ORANGE = medium charge
RED = low charge – charge the battery
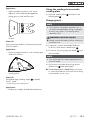
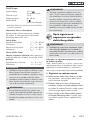
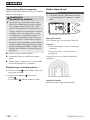
Charging the battery pack
(seefig.A)
CAUTION!
► Always unplug the appliance before you
remove the battery pack from or connect the
battery pack to the charger.
NOTE
► Never charge the battery pack if the ambient
temperature is below 10°C or above 40°C.
If a lithium-ion battery is to be stored for an
extended period, the charge level should be
checked regularly. The optimum charge level
is between 50% and 80%. The storage climate
should be cool and dry and the ambient
temperature should be between 0°C and
50°C.
♦ Connect the battery pack
to the high-speed
battery charger (see Fig. A).
♦ Insert the power plug into the socket.
The control LED
lights up red.
♦ The green LED
indicates that the charging
process is complete and the battery pack is
ready.
CAUTION!
♦ If the red control LED
flashes, this means
that the battery pack has overheated and
cannot be charged.
♦ If the red and green control LEDs both
flash, this means that the battery pack is
defective.
WARNING! RISK OF INJURY!
■ Always remove the battery before working on
the power tool.
♦ Push the battery pack
into the appliance.
♦ Switch off the charger for at least 15 minutes
between successive charging sessions. Also
disconnect the power plug from the mains
power socket.
IB_339108_PAMFW20-LiA1_LB7.indb 7 09.03.20 11:50

PAMFW 20-Li A1
■ 8
│
GB
│
CY
Dust/chip extraction
Materials containing asbestos must not be
processed. Asbestos is a known carcinogen.
WARNING! RISK OF FIRE!
■ When working with electrical appliances
which can be connected to a vacuum cleaner
via a vacuum cleaner adapter, there is a risk
of fire! In unfavourable conditions, e.g. when
sparks are flying while sanding metal or
metal residues in wood, wood dust in the bag
of the vacuum cleaner can spontaneously
ignite. This is a particular risk if the wood dust
is mixed with paint residues or other
chemicals and the workpiece has become hot
after being worked for a long time. Therefore,
avoid overheating of the material being
sanded as well as the appliance. Always
empty the vacuum cleaner’s dust bag before
taking work breaks.
■ Always use dust extraction.
■ Ensure that your workplace is adequately
ventilated.
■ Observe the regulations applicable in your
country regarding the materials to be worked.
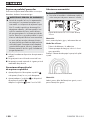
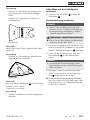
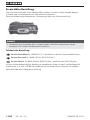
Connecting a dust extraction unit
♦ Place the dust extraction unit under the
appliance and fix it into place on the appliance
with the screw.
♦ Fit the angle adapter
onto the dust extraction
unit .
The angle adapter can be turned by up to
180°.
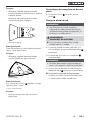
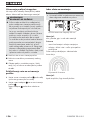
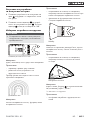
Selecting a tool
NOTE
► The universal fitting with its easy tool change
function is suitable for standard accessories.
HC
S
HCS plunge saw blade 32 mm
Materials
wood, plastic, gypsum (plaster) and other soft
materials
Application
– separation and plunge saw cuts
– sawing close to edges, even in hard-to-reach
areas
Example sawing recesses in lightweight walls.
Diamond saw blade
Materials
Tile adhesives, tile joints
IB_339108_PAMFW20-LiA1_LB7.indb 8 09.03.20 11:50

PAMFW 20-Li A1
GB
│
CY
│
9 ■
Application
– removing material residues, such as tile
adhesive, when replacing damaged tiles
– milling grout on wall and floor tiles.
Scraper
Materials
mortar/concrete residues, tile/carpet glue, paint/
silicone residues
Application
– removing material residues, such as carpet glue
residue on the floor.
Sanding plate
Materials
Wood and metal (sanding sheets
supplied),
wood*, metal*
* Depending on the sanding sheet
Application
– sanding up to edges and hard-to-reach areas.
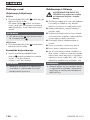
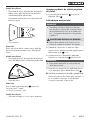
Fitting the sanding sheet onto the
sanding plate
♦ Place the sanding sheet centrally on the
sanding plate
.
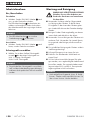
Changing tools
NOTE
► If you plan to use the dust extraction unit, it
must be connected before fitting or changing
the tool (see. section "Connecting a dust
extraction unit").
WARNING! RISK OF INJURY!
■ Always remove the battery before working on
the power tool.
♦ If necessary, remove an already fitted tool.
To do this, raise the tool release lever
.
♦ Fit the tool (e.g. the plunge saw blade
) onto
the tool holder.
NOTE
► You can fit the tools in any snap position on
the tool holder.
♦ Lock the tool into place by pushing the tool
release lever
back down again.
■ Check that the tool is fitted firmly. Incorrectly
or insecurely fitted tools can come loose during
use and cause you an injury.
IB_339108_PAMFW20-LiA1_LB7.indb 9 09.03.20 11:50

PAMFW 20-Li A1
■ 10
│
GB
│
CY
Use
Switching on and off
Switching on
♦ Push the ON/OFF switch
forwards to switch
the appliance on.
The LED work light
lights up when the
appliance is switched on to light up the working
area in low light conditions.
NOTE
► The LED work light
can only be used when
the dust extraction unit is not fitted.
Switching off
♦ Push the ON/OFF switch
backwards to
switch the appliance off.
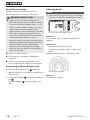
Selecting oscillation speed
♦ Use the speed adjustment wheel to set the
required oscillation speed.
Level 1: low speed
Level 6: high speed
NOTE
► The required speed depends on the material
being worked and on the working conditions
and can be determined through practical tests.
Maintenance and cleaning
WARNING! RISK OF INJURY! Always
switch the appliance off and remove
the battery before carrying out any
work on the appliance.
■ Do not use any sharp objects to clean the
appliance. Do not allow any liquids to get into
the appliance. This can damage the appliance.
■ Clean the appliance regularly, preferably
immediately after completion of the work.
■ Use a soft, dry cloth to clean the housing.
Never use petrol, solvents or cleansers which
can damage plastic.
■ A vacuum cleaner is required for thorough
cleaning of the appliance.
■ Ventilation openings must never be obstructed.
■ Remove any sanding dust stuck to the appliance
with a brush.
■ If a lithium-ion battery is to be stored for an
extended period, the charge level should be
checked regularly. The optimum charge level is
between 50% and 80%. The optimum storage
environment is cool and dry.
NOTE
► Replacement parts not listed (such as carbon
brushes, switches and replacement batteries)
can be ordered via our service hotline.
IB_339108_PAMFW20-LiA1_LB7.indb 10 09.03.20 11:50

PAMFW 20-Li A1
GB
│
CY
│
11 ■
Kompernass Handels GmbH
warranty
Dear Customer,
This appliance has a 3-year warranty valid from the
date of purchase. If this product has any faults, you,
the buyer, have certain statutory rights. Your statu-
tory rights are not restricted in any way by the
warranty described below.
Warranty conditions
The warranty period starts on the date of purchase.
Please keep your receipt in a safe place. This will
be required as proof of purchase.
If any material or manufacturing fault occurs within
three years of the date of purchase of the product,
we will either repair or replace the product for you
or refund the purchase price (at our discretion).
This warranty service requires that you present the
defective appliance and the proof of purchase
(receipt) within the three-year warranty period,
along with a brief written description of the fault
and of when it occurred.
If the defect is covered by the warranty, your
product will either be repaired or replaced by us.
The repair or replacement of a product does not
signify the beginning of a new warranty period.
Warranty period and statutory claims for
defects
The warranty period is not prolonged by repairs
effected under the warranty. This also applies to
replaced and repaired components. Any damage
and defects present at the time of purchase must be
reported immediately after unpacking. Repairs
carried out after expiry of the warranty period shall
be subject to a fee.
Scope of the warranty
This appliance has been manufactured in accord-
ance with strict quality guidelines and inspected
meticulously prior to delivery.
The warranty covers material faults or production
faults. The warranty does not extend to product
parts subject to normal wear and tear or to fragile
parts which could be considered as consumable
parts such as switches or parts made of glass.
The warranty does not apply if the product has
been damaged, improperly used or improperly
maintained. The directions in the operating
instructions for the product regarding proper use of
the product are to be strictly followed. Uses and
actions that are discouraged in the operating
instructions or which are warned against must be
avoided.
This product is intended solely for private use and
not for commercial purposes. The warranty shall be
deemed void in cases of misuse or improper
handling, use of force and modifications/repairs
which have not been carried out by one of our
authorised Service centres.
The warranty period does not apply to
■ Normal reduction of the battery capacity
overtime
■ Commercial use of the product
■ Damage to or alteration of the product by the
customer
■ Non-compliance with safety and maintenance
instructions, operating errors
■ Damage caused by natural hazards
Warranty claim procedure
To ensure quick processing of your case, please
observe the following instructions:
■ Please have the till receipt and the item number
(e.g.IAN12345) available as proof of purchase.
■ You will find the item number on the type plate
on the product, an engraving on the product,
on the front page of the operating instructions
(below left) or on the sticker on the rear or
bottom of the product.
■ If functional or other defects occur, please
contact the service department listed either by
telephone or by e-mail.
■ You can return a defective product to us free of
charge to the service address that will be
provided to you. Ensure that you enclose the
proof of purchase (till receipt) and information
about what the defect is and when it occurred.
IB_339108_PAMFW20-LiA1_LB7.indb 11 09.03.20 11:50

PAMFW 20-Li A1
■ 12
│
GB
│
CY
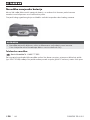
You can download these instructions
along with many other manuals,
product videos and installation
software at www.lidl-service.com.
This QR code will take you directly to
the Lidl service page (www.lidl-service.com) where
you can open your operating instructions by
entering the item number (IAN) 123456.
Service
Service Great Britain
Tel.: 0800 404 7657
E-Mail: [email protected]
CY
Service Cyprus
Tel.: 8009 4409
E-Mail: [email protected]
IAN 339108_1910
Importer
Please note that the following address is not the
service address. Please use the service address
provided in the operating instructions.
KOMPERNASS HANDELS GMBH
BURGSTRASSE 21
44867 BOCHUM
GERMANY
www.kompernass.com
Disposal
The packaging is made from environ-
mentally friendly material and can be
disposed of at your local recycling plant.
Do not dispose of power tools
in your normal domestic waste!
European Directive 2012/19/EU
requires that worn-out power tools be
collected separately and recycled in an environ-
mentally compatible manner.
Do not dispose of batteries in
your normal household waste!
Defective or worn-out rechargeable
batteries must be recycled according
to Directive 2006/66/EC. Take the battery pack
and/or appliance to a nearby collection facility.
Please consult your local authorities regarding
suitable disposal of worn out power tools/battery
packs.
Dispose of the packaging in an
environmentally friendly manner.
Note the labelling on the packaging
and separate the packaging material
components for disposal if necessary. The pack-
aging material is labelled with abbreviations (a)
and numbers (b) with the following meanings:
1–7: plastics, 20–22: paper and cardboard,
80–98: composites.
Your local community or municipal
authorities can provide information
on how to dispose of the worn-out
product.
The product is recyclable, subject to
extended producer responsibility and
is collected separately.
IB_339108_PAMFW20-LiA1_LB7.indb 12 09.03.20 11:50

PAMFW 20-Li A1
GB
│
CY
│
13 ■
Translation of the original Conformity Declaration
We, KOMPERNASS HANDELS GMBH, document officer: Mr. Semi Uguzlu, BURGSTR. 21,
44867 BOCHUM, GERMANY, hereby declare that this product complies with the following
standards, normative documents and EC directives:
Machinery Directive
(2006/42/EC)
EMC (Electromagnetic Compatibility)
(2014/30/EU)
RoHS Directive
(2011/65/EU)*
* The manufacturer bears the full responsibility for compliance with this conformity declaration. The object of the
declaration described above complies with the requirements of the Directive 2011/65/EU of the European Parliament
and Council of 8 June 2011 on the limitations of use of certain dangerous substances in electrical and electronic
appliances.
Applied harmonised standards:
EN 62841-1:2015
EN 62841-2-4:2014
EN 55014-1:2017
EN 55014-2:2015
EN 61000-3-3:2013
EN 61000-3-2:2014
EN 62233:2008
EN 50581: 2012
Type/appliance designation: Cordless multi-purpose tool PAMFW 20-Li A1
Year of manufacture: 01–2020
Serial number: IAN 339108_1910
Bochum, 23/01/2020
Semi Uguzlu
- Quality Manager -
We reserve the right to make technical changes in the context of further product development.
IB_339108_PAMFW20-LiA1_LB7.indb 13 09.03.20 11:50

PAMFW 20-Li A1
■ 14
│
GB
│
CY
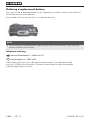
Ordering a replacement battery
If you want to order a replacement battery for your appliance, you can do so easily via the Internet on
www.kompernass.com or by telephone.
Due to limited stocks, this item may sell out in a relatively short time.
NOTE
► Online ordering of replacement parts might not be possible in some countries. In this is the case,
please contact the Service hotline.
Telephone ordering
Service Great Britain Tel.: 0800 404 7657
CY
Service Cyprus Tel.: 8009 4409
To ensure fast processing of your order, have the article number of your appliance to hand
(e.g. IAN 339108) in case of questions. The article number can be found on the type plate
or the title page of these instructions.
IB_339108_PAMFW20-LiA1_LB7.indb 14 09.03.20 11:50

PAMFW 20-Li A1
HR
│
15 ■
Sadržaj
Uvod ..............................................................16
Namjenska uporaba .............................................................16
Oprema .......................................................................16
Opseg isporuke .................................................................16
Tehnički podaci .................................................................16
Opće sigurnosne napomene za uporabu električnog alata ..................17
1. Sigurnost na radnom mjestu .....................................................17
2. Električna sigurnost ............................................................18
3. Sigurnost osoba. . . . . . . . . . . . . . . . . . . . . . . . . . . . . . . . . . . . . . . . . . . . . . . . . . . . . . . . . . . . . . . 18
4. Korištenje i rukovanje električnim alatom ............................................19
5. Korištenje i rukovanje baterijskim alatom ............................................19
6. Servis .......................................................................20
Sigurnosne napomene specifične zabrusilice ..........................................20
Sigurnosne napomene za punjače ..................................................20
Napomene za rad ...............................................................21
Prije uključivanja uređaja .............................................21
Umetanje paketa baterija u uređaj/vađenje ...........................................21
Provjera stanja baterije ...........................................................21
Punjenje paketa baterije (vidislikuA) ................................................21
Usisavanje prašine/strugotina ......................................................22
Priključivanje usisivača prašine .....................................................22
Odabir alata za rad .............................................................22
Postavljanje brusnog lista na brusnu ploču ............................................23
Zamjena alata za rad ............................................................23
Puštanje u rad. . . . . . . . . . . . . . . . . . . . . . . . . . . . . . . . . . . . . . . . . . . . . . . . . . . . . . . 24
Uključivanje/Isključivanje. . . . . . . . . . . . . . . . . . . . . . . . . . . . . . . . . . . . . . . . . . . . . . . . . . . . . . . . . . 24
Predodabir broja vibracija .........................................................24
Održavanje i čišćenje .................................................24
Jamstvo tvrtke Kompernass Handels GmbH ..............................25
Servis ..............................................................26
Uvoznik ............................................................26
Zbrinjavanje ........................................................26
Prijevod originalne izjave o sukladnosti .................................27
Narudžba zamjenske baterije .........................................28
Telefonska narudžba .............................................................28
IB_339108_PAMFW20-LiA1_LB7.indb 15 09.03.20 11:50

PAMFW 20-Li A1
■ 16
│
HR
AKU VIŠENAMJENSKI ALAT
PAMFW 20-Li A1
Uvod
Čestitamo na kupnji Vašeg novog uređaja. Time
ste se odlučili za vrlo kvalitetan proizvod. Upute za
uporabu sastavni su dio ovog proizvoda. One
sadrže važne napomene za sigurnost, rukovanje i
zbrinjavanje. Prije uporabe proizvoda upoznajte se
sa svim napomenama za rukovanje i sa svim sigur-
nosnim napomenama. Proizvod koristite isključivo
na opisani način i u navedenim područjima upora-
be. U slučaju predaje proizvoda trećim osobama,
priložite i također predajte i svu dokumentaciju.
Namjenska uporaba
Uređaj je namijenjen za piljenje, razdvajanje
i brušenje. U prvom redu se mogu obrađivati slje-
deći materijali: Drvo, plastika, suhi građevinski
elementi, laki i obojeni metali, elementi za pričvršći-
vanje (npr. čavli i vijci) i zidne pločice. Alat je po-
sebno prikladan za radove blizu rubova i radove
na poravnatim elementima. Svaki drugi način upo-
rabe i svaka izmjena uređaja smatra se nenamjen-
skom i krije znatnu opasnost od nezgode. Uređaj
nije namijenjen za uporabu u gospodarske svrhe.
Oprema
Poluga za deblokadu alata
Prekidač UKLJ/ISKLJ
Tipka za deblokadu paketa baterija
Paket baterija*
Tipka za stanje baterije
LED indikator baterije
Kotačić za odabir broja vibracija
LED radna svjetiljka
Stezni vijak
Usisivač prašine (2-djelni)
Kutni adapter
Strugač 52 mm
Dijamantna ploča za rezanje 65 mm
HCS ubodni rezni list 32 mm
Brusna ploča
Brzi punjač*
Crvena LED svjetiljka za kontrolu punjenja
Zelena LED svjetiljka za kontrolu punjenja
Brusni listovi
Opseg isporuke
1 Aku višenamjenski alat PAMFW 20-Li A1
1 Brzi punjač baterija PLG 20 A1
1 Paket baterija PAP 20 A1
1 Delta brusna ploča
6 Brusni listovi veličine 80 mm
1 Nož za struganje 52 mm
1 HCS ploča za rezanje s uranjanjem 32 mm
1 Dijamantna ploča za rezanje 65 mm
1 Usisivač prašine (2-djelni)
1 Kofer za nošenje
1 Upute za uporabu
Tehnički podaci
Aku višenamjenski alat PAMFW 20-Li A1
Nazivni napon 20 V
(istosmjerna struja)
Nazivni broj okretaja
u praznom hodu n
0
5000 –19000 min
-1
Kut oscilacije 3,2°
Paket baterija PAP 20 A1*
Tip LITIJ-IONSKA
Nazivni napon 20 V
(istosmjerna struja)
Kapacitet 2 Ah
Broj ćelija 5
Brzi punjač baterija PLG 20 A1*
ULAZ/Input
Nazivni napon 230 – 240 V ∼, 50 Hz
(izmjenična struja)
Nazivna snaga 65 W
Osigurač (unutarnji) 3,15 A
T3.15A
IB_339108_PAMFW20-LiA1_LB7.indb 16 09.03.20 11:50
Pagina se încarcă ...
Pagina se încarcă ...
Pagina se încarcă ...
Pagina se încarcă ...
Pagina se încarcă ...
Pagina se încarcă ...
Pagina se încarcă ...
Pagina se încarcă ...
Pagina se încarcă ...
Pagina se încarcă ...
Pagina se încarcă ...
Pagina se încarcă ...
Pagina se încarcă ...
Pagina se încarcă ...
Pagina se încarcă ...
Pagina se încarcă ...
Pagina se încarcă ...
Pagina se încarcă ...
Pagina se încarcă ...
Pagina se încarcă ...
Pagina se încarcă ...
Pagina se încarcă ...
Pagina se încarcă ...
Pagina se încarcă ...
Pagina se încarcă ...
Pagina se încarcă ...
Pagina se încarcă ...
Pagina se încarcă ...
Pagina se încarcă ...
Pagina se încarcă ...
Pagina se încarcă ...
Pagina se încarcă ...
Pagina se încarcă ...
Pagina se încarcă ...
Pagina se încarcă ...
Pagina se încarcă ...
Pagina se încarcă ...
Pagina se încarcă ...
Pagina se încarcă ...
Pagina se încarcă ...
Pagina se încarcă ...
Pagina se încarcă ...
Pagina se încarcă ...
Pagina se încarcă ...
Pagina se încarcă ...
Pagina se încarcă ...
Pagina se încarcă ...
Pagina se încarcă ...
Pagina se încarcă ...
Pagina se încarcă ...
Pagina se încarcă ...
Pagina se încarcă ...
Pagina se încarcă ...
Pagina se încarcă ...
Pagina se încarcă ...
Pagina se încarcă ...
Pagina se încarcă ...
Pagina se încarcă ...
Pagina se încarcă ...
Pagina se încarcă ...
Pagina se încarcă ...
Pagina se încarcă ...
Pagina se încarcă ...
Pagina se încarcă ...
Pagina se încarcă ...
Pagina se încarcă ...
Pagina se încarcă ...
Pagina se încarcă ...
Pagina se încarcă ...
Pagina se încarcă ...
Pagina se încarcă ...
Pagina se încarcă ...
Pagina se încarcă ...
Pagina se încarcă ...
Pagina se încarcă ...
Pagina se încarcă ...
Pagina se încarcă ...
Pagina se încarcă ...
Pagina se încarcă ...
Pagina se încarcă ...
Pagina se încarcă ...
Pagina se încarcă ...
Pagina se încarcă ...
Pagina se încarcă ...
Pagina se încarcă ...
Pagina se încarcă ...
Pagina se încarcă ...
-
 1
1
-
 2
2
-
 3
3
-
 4
4
-
 5
5
-
 6
6
-
 7
7
-
 8
8
-
 9
9
-
 10
10
-
 11
11
-
 12
12
-
 13
13
-
 14
14
-
 15
15
-
 16
16
-
 17
17
-
 18
18
-
 19
19
-
 20
20
-
 21
21
-
 22
22
-
 23
23
-
 24
24
-
 25
25
-
 26
26
-
 27
27
-
 28
28
-
 29
29
-
 30
30
-
 31
31
-
 32
32
-
 33
33
-
 34
34
-
 35
35
-
 36
36
-
 37
37
-
 38
38
-
 39
39
-
 40
40
-
 41
41
-
 42
42
-
 43
43
-
 44
44
-
 45
45
-
 46
46
-
 47
47
-
 48
48
-
 49
49
-
 50
50
-
 51
51
-
 52
52
-
 53
53
-
 54
54
-
 55
55
-
 56
56
-
 57
57
-
 58
58
-
 59
59
-
 60
60
-
 61
61
-
 62
62
-
 63
63
-
 64
64
-
 65
65
-
 66
66
-
 67
67
-
 68
68
-
 69
69
-
 70
70
-
 71
71
-
 72
72
-
 73
73
-
 74
74
-
 75
75
-
 76
76
-
 77
77
-
 78
78
-
 79
79
-
 80
80
-
 81
81
-
 82
82
-
 83
83
-
 84
84
-
 85
85
-
 86
86
-
 87
87
-
 88
88
-
 89
89
-
 90
90
-
 91
91
-
 92
92
-
 93
93
-
 94
94
-
 95
95
-
 96
96
-
 97
97
-
 98
98
-
 99
99
-
 100
100
-
 101
101
-
 102
102
-
 103
103
-
 104
104
-
 105
105
-
 106
106
-
 107
107


Parkside 339108 1910 Translation Of The Original Instructions
- Categorie
- Unelte electrice
- Tip
- Translation Of The Original Instructions
- Acest manual este potrivit și pentru
Lucrări conexe
-
Parkside PAP 20 A3 Operating Instructions Manual
-
-
-
-
Parkside 331791 1907 Translation Of The Original Instructions
-
Parkside IAN 102866 Translation Of Original Operation Manual
-
-
Parkside 326393 1904 Instrucțiuni de utilizare
-
Parkside PWSA 20-Li B3 Instructions Manual
-
Parkside PAAS 20-Li Manual de utilizare
Alte documente
-
Hikoki CR 12DA Cordless Reciprocating Saw Manual de utilizare
-
-
FEIN AMM500 Plus 18V StarlockPlus MultiMaster Multi-Tool Manual de utilizare
-
Flymo C-Link 20V Hedge Trimmer Manual de utilizare
-
-
Bosch 18V-10 Universal Cordless Palm Sander Manual de utilizare
-
-
EGO CH5500E 56 VOLT Rapid Charger Manual de utilizare
-
-
Vonroc PS502DC Manual de utilizare