Logitech Ultrathin Keyboard Folio for Samsung Galaxy Tab 3 10.1 Ghid de instalare
- Categorie
- Tastaturi pentru dispozitive mobile
- Tip
- Ghid de instalare

Ultrathin Keyboard Folio S310
for Samsung Galaxy Tab3™ (10.1")
Setup Guide

Logitech Ultrathin Keyboard Folio S310
2
Contents
English 3
Deutsch 17
Français 32
Italiano 46
Español 61
Português 75
Nederlands 89
Svenska 103
Dansk 117
Norsk 131
Suomi 145
Ελληνικά 159
По-русски 174
Magyar 189
Česká verze 204
Po polsku 218
Eesti 232
Latviski 246
Lietuvių 260
Hrvatski 274
Srpski 288
Slovenščina 302
Slovenčina 316
Română 330
Български 344
Українська 358
Türkçe 372
386
www.logitech.com/support 400

Logitech Ultrathin Keyboard Folio S310
3 English
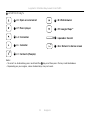
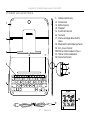
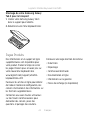
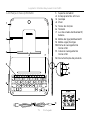
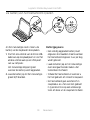
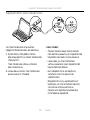
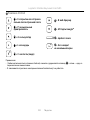
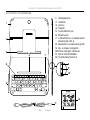
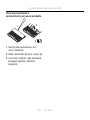
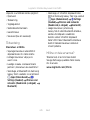
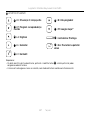
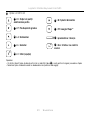
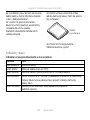
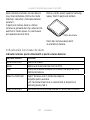
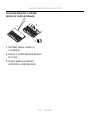
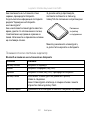
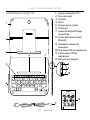
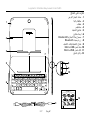
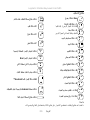
Know your product
12
11
8
7
9
10
1
2
5
3
6
4
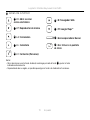
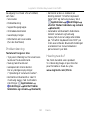
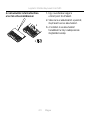
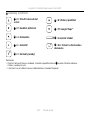
1. Tablet holder
2. Protective folio
3. Hook
4. Magnet
5. Function keys
6. Keyboard
7. Bluetooth/battery status light
8. Bluetooth connect button
9. On/o switch
10. Micro-USB charging port
11. Micro-USB charging cable
12. Product documentation
Ultrathin Keyboard Folio S310
12
54
PDF
www.logitech.com/support/ultrathin-keyboard-folio-s310
3
®

Logitech Ultrathin Keyboard Folio S310
4 English
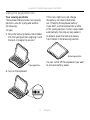
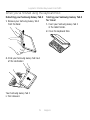
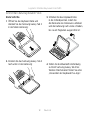
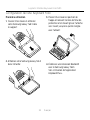
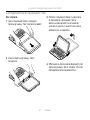
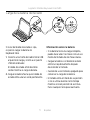
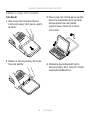
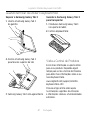
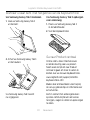
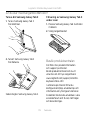
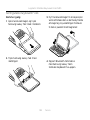
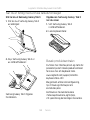
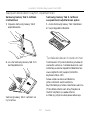
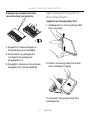
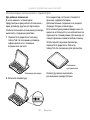
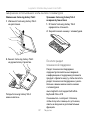
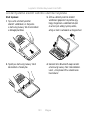
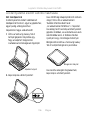
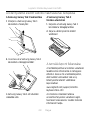
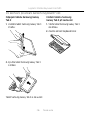
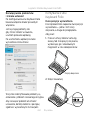
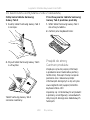
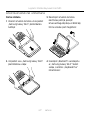
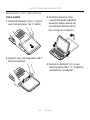
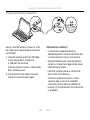
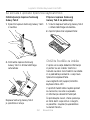
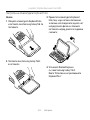
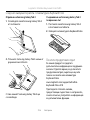
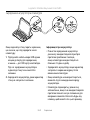
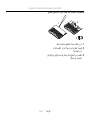
Setting up the keyboard folio
Getting started
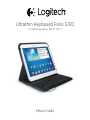
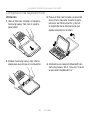
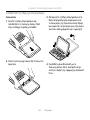
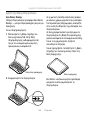
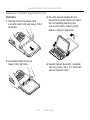
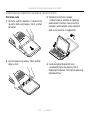
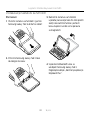
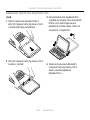
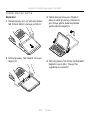
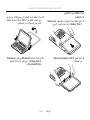
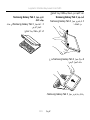
1. Open the keyboard folio and push
your Samsung Galaxy Tab 3 into
the tablet holder:
2. Push your Samsung Galaxy Tab 3 down
into the hook:
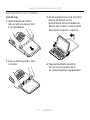
3. Move the keyboard folio into the typing
position by lifting the back of the
protective folio and sliding the hook
forwards until it aligns with the magnet:
4. Establish Bluetooth connection
with your Samsung Galaxy Tab 3.
See “Using the Keyboard Plus app.”

Logitech Ultrathin Keyboard Folio S310
5 English
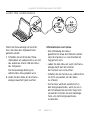
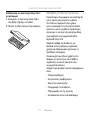
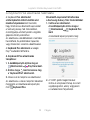
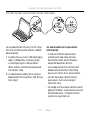
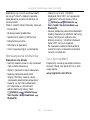
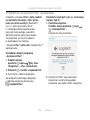
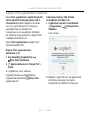
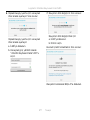
Using the Keyboard Plus app
You use the Keyboard Plus app when first
setting up your keyboard folio, to establish
Bluetooth connection with your Samsung
Galaxy Tab 3 and configure the keyboard
to get the best typing experience.
You can use the app at any point in
the future if you experience issues, or want
to change your settings.
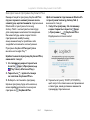
The Keyboard Plus app is available on
the Google Play™ Store.
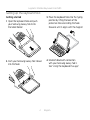
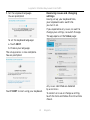
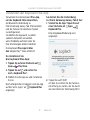
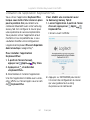
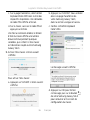
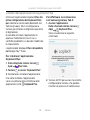
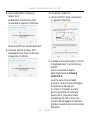
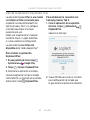
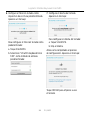
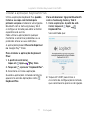
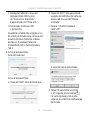
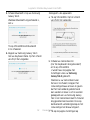
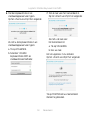
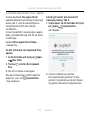
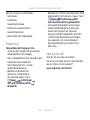
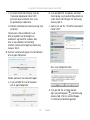
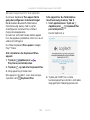
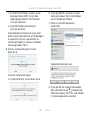
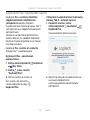
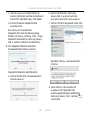
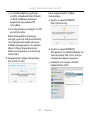
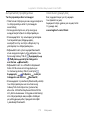
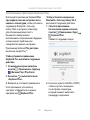
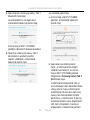
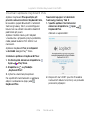
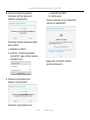
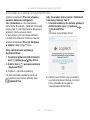
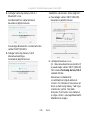
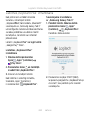
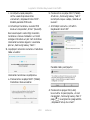
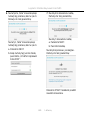
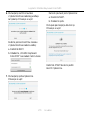
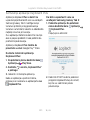
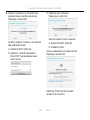
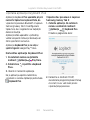
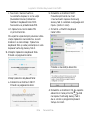
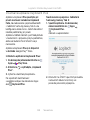
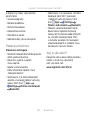
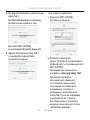
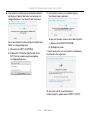
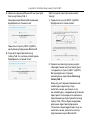
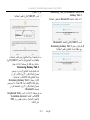
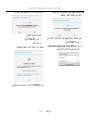
To install the Keyboard Plus app:
1. From a Home screen, touch Apps
Play Store.
2. Touch and search for ‘Keyboard Plus’.
3. Select and install the app.
When the app is successfully installed
it is displayed on the Apps screen as
Keyboard Plus.
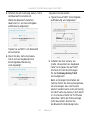
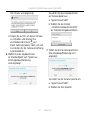
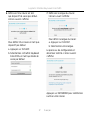
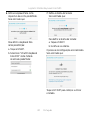
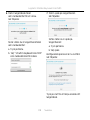
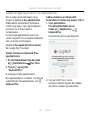
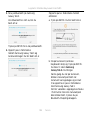
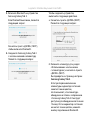
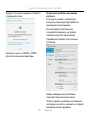
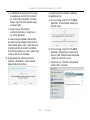
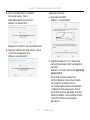
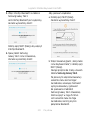
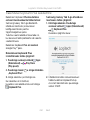
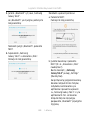
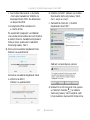
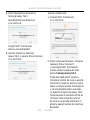
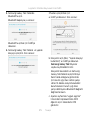
To establish connection with
your Samsung Galaxy Tab 3:
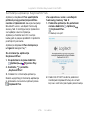
1. Launch the app. From a Home screen,
touch Apps Keyboard Plus.
You are prompted:
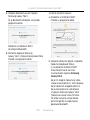
2. Touch START to start the Keyboard
Setup Assistant which guides you
through the connection process.
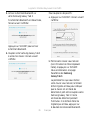
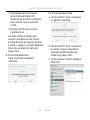
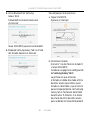
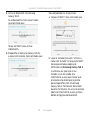
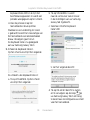
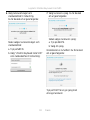
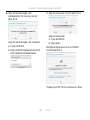
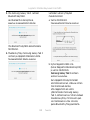
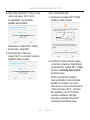
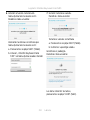
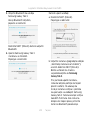
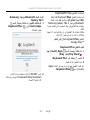
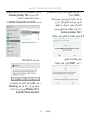
3. Turn on Bluetooth on your Samsung
Galaxy Tab 3.
If Bluetooth is turned o you are
prompted:

Logitech Ultrathin Keyboard Folio S310
6 English
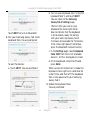
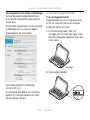
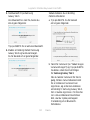
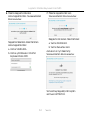
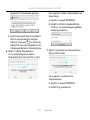
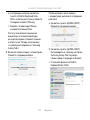
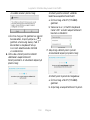
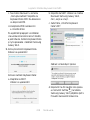
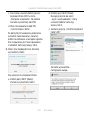
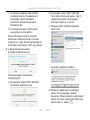
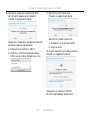
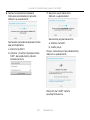
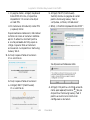
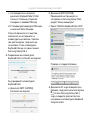
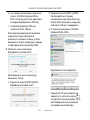
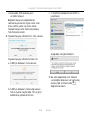
Touch NEXT to turn on Bluetooth.
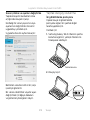
4. Pair your Samsung Galaxy Tab 3 and
keyboard folio. You are prompted:
To pair the devices:
a. Touch NEXT. You are prompted:
b. Turn on your keyboard (see “Using the
keyboard folio”), and touch NEXT.
You are taken to the Samsung
Galaxy Tab 3 Settings page.
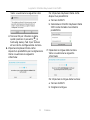
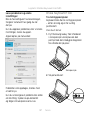
The first time you turn on your
keyboard the status light blinks
blue to indicate that the keyboard
is discoverable, ready for pairing
with your Samsung Galaxy Tab 3.
It remains discoverable for 15 minutes.
If the status light doesn’t blink blue,
press the Bluetooth connect button.
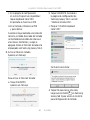
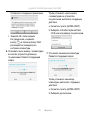
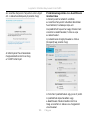
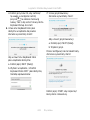
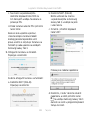
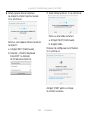
c. In the Settings page, touch Keyboard
Folio S310 from the list of ‘Available
devices’. A PIN is displayed on screen.
d. On the keyboard, enter the PIN and
press Enter.
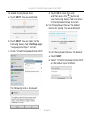
When successful connection is made the
keyboard status light turns solid blue for
a short time, and then o. The keyboard
folio is now paired with your Samsung
Galaxy Tab 3.
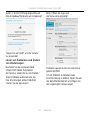
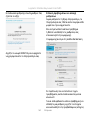
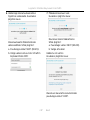
5. Enable the keyboard folio.
You are prompted:

Logitech Ultrathin Keyboard Folio S310
7 English
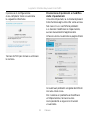
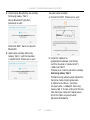
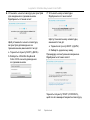
To enable the keyboard folio:
a. Touch NEXT. You are prompted:
b. Touch NEXT. You are taken to the
Samsung Galaxy Tab 3 Settings page,
“Language and input” section.
c. Check “Ultrathin Keyboard Folio S310”:
The following note is displayed:
d. Touch OK to close this note,
and then press the button on
your Samsung Galaxy Tab 3 to return
to the Keyboard Setup Assistant.
6. Set the keyboard folio as the default
device for typing. You are prompted:
To set the keyboard folio as the default:
a. Touch NEXT.
b. Select “Ultrathin Keyboard Folio S310”
as the default input method:

Logitech Ultrathin Keyboard Folio S310
8 English
7. Set the keyboard language.
You are prompted:
To set the keyboard language:
a. Touch NEXT.
b. Choose your language.
The setup process is now complete.
You are prompted:
Touch START to start using your keyboard.
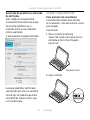
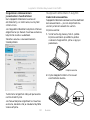
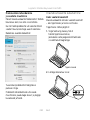
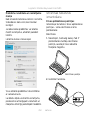
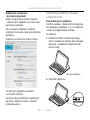
Resolving issues and changing
settings
Having set up your keyboard folio,
your keyboard works each time
you turn it on.
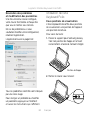
If you experience any issues, or want to
change your settings, re-launch the app.
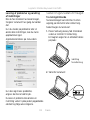
The app opens on the Status page:
Any issues identified are denoted
by a red cross.
To correct an issue or change a setting,
touch the item and follow the instructions
shown.

Logitech Ultrathin Keyboard Folio S310
9 English
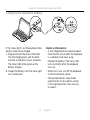
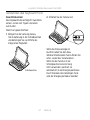
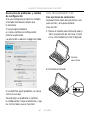
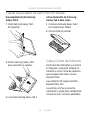
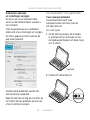
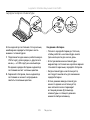
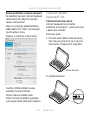
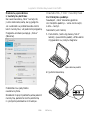
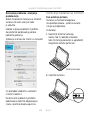
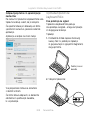
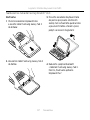
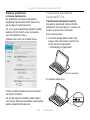
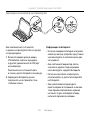
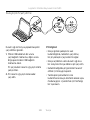
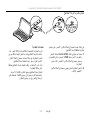
Using the keyboard folio
Two viewing positions
The keyboard folio provides two viewing
positions—one for typing and another
for browsing.
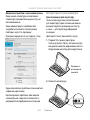
To type:
1. Move the Samsung Galaxy Tab 3 holder
into the typing position, aligning it with
the built-in magnet to secure it:
2. Turn on the keyboard:
If the status light turns red, charge
the battery. For more information,
see “Charging the keyboard battery.”
If you don’t use the keyboard for a while
in the typing position, it enters sleep mode
automatically. Pressing any key wakes it.
To browse, place the Samsung Galaxy
Tab 3 holder in the browsing position:
You can switch o the keyboard if you want
to conserve battery power.
Typing position
Browsing position

Logitech Ultrathin Keyboard Folio S310
10 English
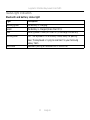
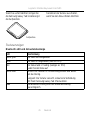
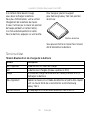
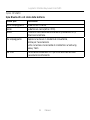
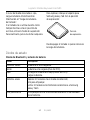
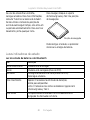
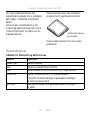
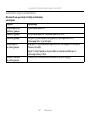
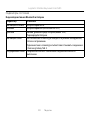
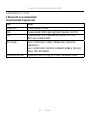
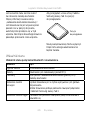
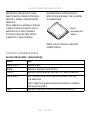
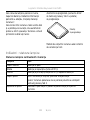
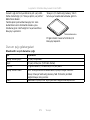
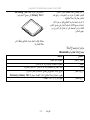
Status light indicators
Bluetooth and battery status light
Light Description
Blinking green The battery is charging.
Green The battery is charged (more than 10%).
Red Battery power is low (less than 10%). Recharge the battery.
Blinking blue Fast: The keyboard is in discovery mode, ready for pairing.
Slow: The keyboard is trying to reconnect to your Samsung
Galaxy Tab 3.
Solid blue Bluetooth pairing or reconnection is successful.

Logitech Ultrathin Keyboard Folio S310
11 English
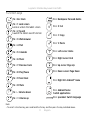
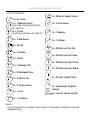
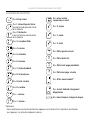
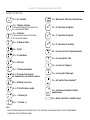
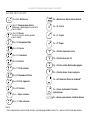
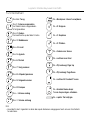
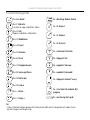
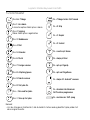
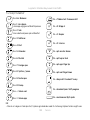
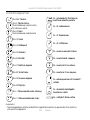
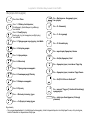
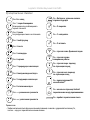
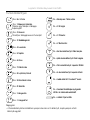
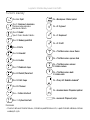
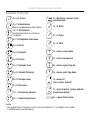
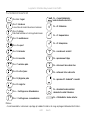
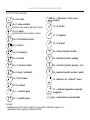
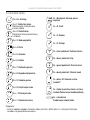
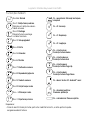
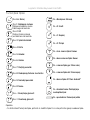
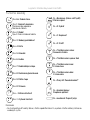
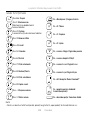
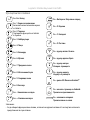
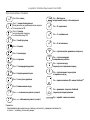
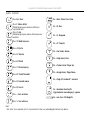
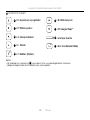
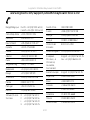
Function keys
Esc
Fn + Esc: Back
Fn + 1: Lock screen
Lock or unlock the tablet screen
Fn + 2: Search
Launch the tablet search function
Fn + 3: Web browser
Fn + 4: Mail
31
Fn + 5: Calendar
Fn + 6: Music
Fn + 7: Previous track
Fn + 8: Play/Pause
Fn + 9: Next track
Fn + 0: Mute
Fn + -: Volume down
Fn + =: Volume up
Fn + Backspace: Forward delete
Fn + X: Cut
Fn + C: Copy
Fn + V: Paste
Fn + Left cursor: Home
Fn + Right cursor: End
Fn + Up cursor: Page Up
Fn + Down cursor: Page Down
Fn + Right Alt: Android™ menu
Fn + Android home:
Switch applications
Fn + spacebar: Switch language
Note:
• To select a function key, press and hold the Fn key, and then press the key indicated above.

Logitech Ultrathin Keyboard Folio S310
12 English
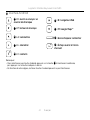
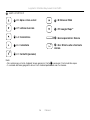
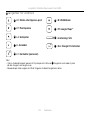
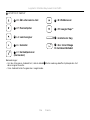
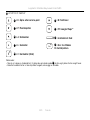
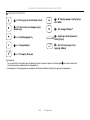
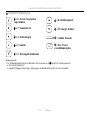
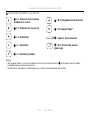
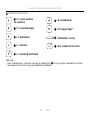
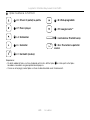
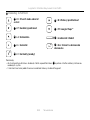
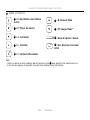
Android keys
+ E: Open or send email
+ P: Music player
+ A: Calculator
+ L: Calendar
+ C: Contacts (People)
+ B: Web browser
+ M: Google Maps™
+ spacebar: Search
Esc
+ Esc: Return to Home screen
Notes:
• To select an Android key, press and hold the key, and then press the key indicated above.
• Depending on your region, some Android keys may not work.

Logitech Ultrathin Keyboard Folio S310
13 English
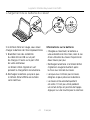
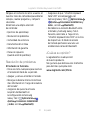
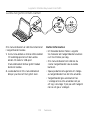
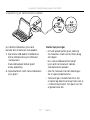
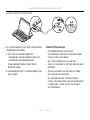
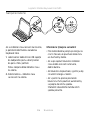
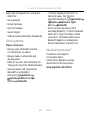
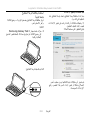
Charging the keyboard battery
If the status light is red the keyboard folio
battery needs to be charged.
1. Plug one end of the micro-USB cable
into the charging port, and the other
end into a USB port on your computer.
The status light blinks green as the
battery charges.
2. Charge the battery until the status light
turns solid green.
Battery information
•A fully charged battery provides about
three months of use when the keyboard
is used about two hours a day.
•Charge the battery if the status light
turns red briefly after the keyboard
turns on.
•When not in use, turn o the keyboard
to conserve battery power.
•The keyboard enters sleep mode
automatically if not used for a while
in the typing position. Press any key
to wake it.
USB

Logitech Ultrathin Keyboard Folio S310
14 English
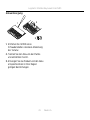
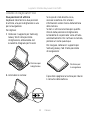
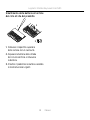
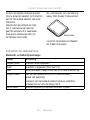
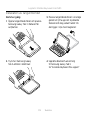
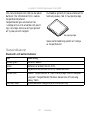
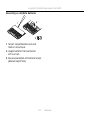
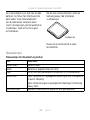
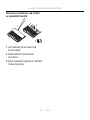
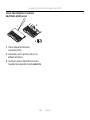
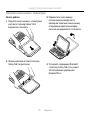
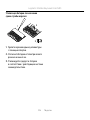
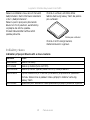
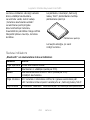
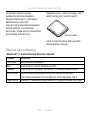
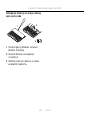
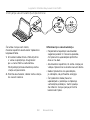
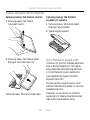
Battery disposal at product
end of life
1. Pry o top cover of keyboard
with screwdriver.
2. Detach battery from circuit board
and remove battery.
3. Dispose of your product and its battery
according to local laws.
3
2
1

Logitech Ultrathin Keyboard Folio S310
15 English
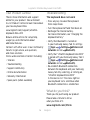
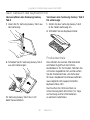
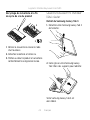
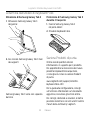
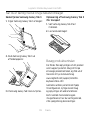
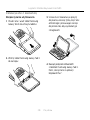
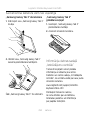
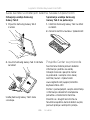
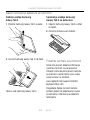
When you’ve finished using the keyboard folio
Detaching your Samsung Galaxy Tab 3
1. Release your Samsung Galaxy Tab 3
from the hook:
2. Slide your Samsung Galaxy Tab 3 out
of the tab holders:
Your Samsung Galaxy Tab 3
is then released.
Storing your Samsung Galaxy Tab 3
for travel
1. Insert your Samsung Galaxy Tab 3
in the tablet holder.
2. Close the keyboard folio:

Logitech Ultrathin Keyboard Folio S310
16 English
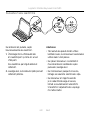
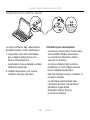
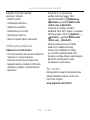
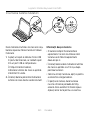
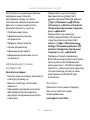
Visit Product Central
There’s more information and support
online for your product. Take a moment
to visit Product Central to learn more about
your new keyboard folio.
www.logitech.com/support/ultrathin-
keyboard-folio-s310
Browse online articles for setup help,
usage tips, and information about
additional features.
Connect with other users in our Community
Forums to get advice, ask questions,
and share solutions.
Find a wide selection of content including:
•Tutorials
•Troubleshooting
•Support community
•Online documentation
•Warranty information
•Spare parts (when available)
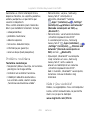
Troubleshooting
The keyboard does not work
•Press any key to wake the keyboard
from sleep mode.
•Turn the keyboard o and then back on.
•Recharge the internal battery.
For more information, see “Charging the
keyboard battery.”
•Verify that Bluetooth is turned on
in your Samsung Galaxy Tab 3’s settings
( Apps Settings Wireless and
networks section Bluetooth).
•Verify that “Ultrathin Keyboard Folio S310”
is paired with your Samsung Galaxy Tab 3
( Apps Settings Wireless and
networks section Bluetooth).
•Re-establish Bluetooth connection
between the keyboard and your Samsung
Galaxy Tab 3 by selecting, or clicking on,
“Ultrathin Keyboard Folio S310”
in the devices list. The status light on
your keyboard turns solid blue when
Bluetooth connection is established.
What do you think?
Thank you for purchasing our product.
Please take a minute to tell us
what you think of it.
www.logitech.com/ithink

Logitech Ultrathin Keyboard Folio S310
17 Deutsch
Produkt auf einen Blick
12
11
8
7
9
10
1
2
5
3
6
4
1. Tablet-Halterung
2. Foliocover
3. Befestigung
4. Magnet
5. Funktionstasten
6. Tastatur
7. Statusanzeige Bluetooth/
Akku
8. Bluetooth-Verbindungstaste
9. Ein-/Ausschalter
10. Mikro-USB-Ladeanschluss
11. Mikro-USB-Ladekabel
12. Dokumentation
Ultrathin Keyboard Folio S310
12
54
PDF
www.logitech.com/support/ultrathin-keyboard-folio-s310
3
®

Logitech Ultrathin Keyboard Folio S310
18 Deutsch
Einrichten des Keyboard Folio
Erste Schritte
1. Önen Sie das Keyboard Folio und
drücken Sie das Samsung Galaxy Tab 3
in die Tablet-Halterung:
2. Drücken Sie das Samsung Galaxy Tab 3
nach unten in die Halterung:
3. Schieben Sie das Keyboard Folio
in die Schreibposition, indem Sie
die Rückseite des Foliocovers anheben
und die Halterung nach vorne schieben,
bis sie am Magneten ausgerichtet ist:
4. Stellen Sie die Bluetooth-Verbindung
zu Ihrem Samsung Galaxy Tab 3 her.
Weitere Informationen finden Sie unter
„Verwenden der Keyboard Plus-App“.

Logitech Ultrathin Keyboard Folio S310
19 Deutsch
Verwenden der Keyboard Plus-App
Verwenden Sie die Keyboard Plus-App,
um das Keyboard Folio einzurichten,
die Bluetooth-Verbindung zu
Ihrem Samsung Galaxy Tab 3 herzustellen
und die Tastatur für optimales Tippen
zu konfigurieren.
Sie können die App auch zu jedem
späteren Zeitpunkt verwenden,
wenn Probleme auftreten oder Sie
Ihre Einstellungen ändern möchten.
Die Keyboard Plus-App ist über
den Google Play™ Store erhältlich.
So installieren Sie
die Keyboard Plus-App:
1. Tippen Sie auf einer Startseite auf
Apps Play Store.
2. Tippen Sie auf und suchen Sie
nach „Keyboard Plus“.
3. Wählen Sie die App aus und installieren
Sie sie.
Nach erfolgreicher Installation wird die App
auf der Seite „Apps“ als Keyboard Plus
angezeigt.
So stellen Sie die Verbindung
zu Ihrem Samsung Galaxy Tab 3 her:
1. Starten Sie die App. Tippen Sie auf
einer Startseite auf Apps
Keyboard Plus.
Eine Eingabeauorderung wird
angezeigt:
2. Tippen Sie auf START,
um den Assistenten für die Tastatur-
einrichtung zu starten, der Sie durch
das Herstellen der Verbindung führt.

Logitech Ultrathin Keyboard Folio S310
20 Deutsch
3. Schalten Sie am Samsung Galaxy Tab 3
die Bluetooth-Funktion ein.
Wenn die Bluetooth-Funktion
deaktiviert ist, wird eine Eingabe-
auorderung angezeigt:
Tippen Sie auf NEXT, um Bluetooth
einzuschalten.
4. Pairen Sie das Samsung Galaxy
Tab 3 und das Keyboard Folio.
Eine Eingabeauorderung
wird angezeigt:
So pairen Sie die Geräte:
a. Tippen Sie auf NEXT. Eine Eingabe-
auorderung wird angezeigt:
b. Schalten Sie Ihre Tastatur ein
(siehe „Verwenden des Keyboard
Folio“) und tippen Sie auf NEXT.
Die Seite mit den Einstellungen
für das Samsung Galaxy Tab 3
wird aufgerufen.
Beim erstmaligen Einschalten der
Tastatur blinkt die Statusanzeige blau,
um anzuzeigen, dass die Tastatur
erkannt werden kann und zum Pairing
mit dem Samsung Galaxy Tab 3 bereit
ist. Die Tastatur bleibt für 15 Minuten
erkennbar. Wenn die Statusanzeige
nicht blau blinkt, drücken Sie
die Bluetooth-Verbindungstaste.
Pagina se încarcă ...
Pagina se încarcă ...
Pagina se încarcă ...
Pagina se încarcă ...
Pagina se încarcă ...
Pagina se încarcă ...
Pagina se încarcă ...
Pagina se încarcă ...
Pagina se încarcă ...
Pagina se încarcă ...
Pagina se încarcă ...
Pagina se încarcă ...
Pagina se încarcă ...
Pagina se încarcă ...
Pagina se încarcă ...
Pagina se încarcă ...
Pagina se încarcă ...
Pagina se încarcă ...
Pagina se încarcă ...
Pagina se încarcă ...
Pagina se încarcă ...
Pagina se încarcă ...
Pagina se încarcă ...
Pagina se încarcă ...
Pagina se încarcă ...
Pagina se încarcă ...
Pagina se încarcă ...
Pagina se încarcă ...
Pagina se încarcă ...
Pagina se încarcă ...
Pagina se încarcă ...
Pagina se încarcă ...
Pagina se încarcă ...
Pagina se încarcă ...
Pagina se încarcă ...
Pagina se încarcă ...
Pagina se încarcă ...
Pagina se încarcă ...
Pagina se încarcă ...
Pagina se încarcă ...
Pagina se încarcă ...
Pagina se încarcă ...
Pagina se încarcă ...
Pagina se încarcă ...
Pagina se încarcă ...
Pagina se încarcă ...
Pagina se încarcă ...
Pagina se încarcă ...
Pagina se încarcă ...
Pagina se încarcă ...
Pagina se încarcă ...
Pagina se încarcă ...
Pagina se încarcă ...
Pagina se încarcă ...
Pagina se încarcă ...
Pagina se încarcă ...
Pagina se încarcă ...
Pagina se încarcă ...
Pagina se încarcă ...
Pagina se încarcă ...
Pagina se încarcă ...
Pagina se încarcă ...
Pagina se încarcă ...
Pagina se încarcă ...
Pagina se încarcă ...
Pagina se încarcă ...
Pagina se încarcă ...
Pagina se încarcă ...
Pagina se încarcă ...
Pagina se încarcă ...
Pagina se încarcă ...
Pagina se încarcă ...
Pagina se încarcă ...
Pagina se încarcă ...
Pagina se încarcă ...
Pagina se încarcă ...
Pagina se încarcă ...
Pagina se încarcă ...
Pagina se încarcă ...
Pagina se încarcă ...
Pagina se încarcă ...
Pagina se încarcă ...
Pagina se încarcă ...
Pagina se încarcă ...
Pagina se încarcă ...
Pagina se încarcă ...
Pagina se încarcă ...
Pagina se încarcă ...
Pagina se încarcă ...
Pagina se încarcă ...
Pagina se încarcă ...
Pagina se încarcă ...
Pagina se încarcă ...
Pagina se încarcă ...
Pagina se încarcă ...
Pagina se încarcă ...
Pagina se încarcă ...
Pagina se încarcă ...
Pagina se încarcă ...
Pagina se încarcă ...
Pagina se încarcă ...
Pagina se încarcă ...
Pagina se încarcă ...
Pagina se încarcă ...
Pagina se încarcă ...
Pagina se încarcă ...
Pagina se încarcă ...
Pagina se încarcă ...
Pagina se încarcă ...
Pagina se încarcă ...
Pagina se încarcă ...
Pagina se încarcă ...
Pagina se încarcă ...
Pagina se încarcă ...
Pagina se încarcă ...
Pagina se încarcă ...
Pagina se încarcă ...
Pagina se încarcă ...
Pagina se încarcă ...
Pagina se încarcă ...
Pagina se încarcă ...
Pagina se încarcă ...
Pagina se încarcă ...
Pagina se încarcă ...
Pagina se încarcă ...
Pagina se încarcă ...
Pagina se încarcă ...
Pagina se încarcă ...
Pagina se încarcă ...
Pagina se încarcă ...
Pagina se încarcă ...
Pagina se încarcă ...
Pagina se încarcă ...
Pagina se încarcă ...
Pagina se încarcă ...
Pagina se încarcă ...
Pagina se încarcă ...
Pagina se încarcă ...
Pagina se încarcă ...
Pagina se încarcă ...
Pagina se încarcă ...
Pagina se încarcă ...
Pagina se încarcă ...
Pagina se încarcă ...
Pagina se încarcă ...
Pagina se încarcă ...
Pagina se încarcă ...
Pagina se încarcă ...
Pagina se încarcă ...
Pagina se încarcă ...
Pagina se încarcă ...
Pagina se încarcă ...
Pagina se încarcă ...
Pagina se încarcă ...
Pagina se încarcă ...
Pagina se încarcă ...
Pagina se încarcă ...
Pagina se încarcă ...
Pagina se încarcă ...
Pagina se încarcă ...
Pagina se încarcă ...
Pagina se încarcă ...
Pagina se încarcă ...
Pagina se încarcă ...
Pagina se încarcă ...
Pagina se încarcă ...
Pagina se încarcă ...
Pagina se încarcă ...
Pagina se încarcă ...
Pagina se încarcă ...
Pagina se încarcă ...
Pagina se încarcă ...
Pagina se încarcă ...
Pagina se încarcă ...
Pagina se încarcă ...
Pagina se încarcă ...
Pagina se încarcă ...
Pagina se încarcă ...
Pagina se încarcă ...
Pagina se încarcă ...
Pagina se încarcă ...
Pagina se încarcă ...
Pagina se încarcă ...
Pagina se încarcă ...
Pagina se încarcă ...
Pagina se încarcă ...
Pagina se încarcă ...
Pagina se încarcă ...
Pagina se încarcă ...
Pagina se încarcă ...
Pagina se încarcă ...
Pagina se încarcă ...
Pagina se încarcă ...
Pagina se încarcă ...
Pagina se încarcă ...
Pagina se încarcă ...
Pagina se încarcă ...
Pagina se încarcă ...
Pagina se încarcă ...
Pagina se încarcă ...
Pagina se încarcă ...
Pagina se încarcă ...
Pagina se încarcă ...
Pagina se încarcă ...
Pagina se încarcă ...
Pagina se încarcă ...
Pagina se încarcă ...
Pagina se încarcă ...
Pagina se încarcă ...
Pagina se încarcă ...
Pagina se încarcă ...
Pagina se încarcă ...
Pagina se încarcă ...
Pagina se încarcă ...
Pagina se încarcă ...
Pagina se încarcă ...
Pagina se încarcă ...
Pagina se încarcă ...
Pagina se încarcă ...
Pagina se încarcă ...
Pagina se încarcă ...
Pagina se încarcă ...
Pagina se încarcă ...
Pagina se încarcă ...
Pagina se încarcă ...
Pagina se încarcă ...
Pagina se încarcă ...
Pagina se încarcă ...
Pagina se încarcă ...
Pagina se încarcă ...
Pagina se încarcă ...
Pagina se încarcă ...
Pagina se încarcă ...
Pagina se încarcă ...
Pagina se încarcă ...
Pagina se încarcă ...
Pagina se încarcă ...
Pagina se încarcă ...
Pagina se încarcă ...
Pagina se încarcă ...
Pagina se încarcă ...
Pagina se încarcă ...
Pagina se încarcă ...
Pagina se încarcă ...
Pagina se încarcă ...
Pagina se încarcă ...
Pagina se încarcă ...
Pagina se încarcă ...
Pagina se încarcă ...
Pagina se încarcă ...
Pagina se încarcă ...
Pagina se încarcă ...
Pagina se încarcă ...
Pagina se încarcă ...
Pagina se încarcă ...
Pagina se încarcă ...
Pagina se încarcă ...
Pagina se încarcă ...
Pagina se încarcă ...
Pagina se încarcă ...
Pagina se încarcă ...
Pagina se încarcă ...
Pagina se încarcă ...
Pagina se încarcă ...
Pagina se încarcă ...
Pagina se încarcă ...
Pagina se încarcă ...
Pagina se încarcă ...
Pagina se încarcă ...
Pagina se încarcă ...
Pagina se încarcă ...
Pagina se încarcă ...
Pagina se încarcă ...
Pagina se încarcă ...
Pagina se încarcă ...
Pagina se încarcă ...
Pagina se încarcă ...
Pagina se încarcă ...
Pagina se încarcă ...
Pagina se încarcă ...
Pagina se încarcă ...
Pagina se încarcă ...
Pagina se încarcă ...
Pagina se încarcă ...
Pagina se încarcă ...
Pagina se încarcă ...
Pagina se încarcă ...
Pagina se încarcă ...
Pagina se încarcă ...
Pagina se încarcă ...
Pagina se încarcă ...
Pagina se încarcă ...
Pagina se încarcă ...
Pagina se încarcă ...
Pagina se încarcă ...
Pagina se încarcă ...
Pagina se încarcă ...
Pagina se încarcă ...
Pagina se încarcă ...
Pagina se încarcă ...
Pagina se încarcă ...
Pagina se încarcă ...
Pagina se încarcă ...
Pagina se încarcă ...
Pagina se încarcă ...
Pagina se încarcă ...
Pagina se încarcă ...
Pagina se încarcă ...
Pagina se încarcă ...
Pagina se încarcă ...
Pagina se încarcă ...
Pagina se încarcă ...
Pagina se încarcă ...
Pagina se încarcă ...
Pagina se încarcă ...
Pagina se încarcă ...
Pagina se încarcă ...
Pagina se încarcă ...
Pagina se încarcă ...
Pagina se încarcă ...
Pagina se încarcă ...
Pagina se încarcă ...
Pagina se încarcă ...
Pagina se încarcă ...
Pagina se încarcă ...
Pagina se încarcă ...
Pagina se încarcă ...
Pagina se încarcă ...
Pagina se încarcă ...
Pagina se încarcă ...
Pagina se încarcă ...
Pagina se încarcă ...
Pagina se încarcă ...
Pagina se încarcă ...
Pagina se încarcă ...
Pagina se încarcă ...
Pagina se încarcă ...
Pagina se încarcă ...
Pagina se încarcă ...
Pagina se încarcă ...
Pagina se încarcă ...
Pagina se încarcă ...
Pagina se încarcă ...
Pagina se încarcă ...
Pagina se încarcă ...
Pagina se încarcă ...
Pagina se încarcă ...
Pagina se încarcă ...
Pagina se încarcă ...
Pagina se încarcă ...
Pagina se încarcă ...
Pagina se încarcă ...
Pagina se încarcă ...
Pagina se încarcă ...
Pagina se încarcă ...
Pagina se încarcă ...
Pagina se încarcă ...
Pagina se încarcă ...
Pagina se încarcă ...
Pagina se încarcă ...
Pagina se încarcă ...
Pagina se încarcă ...
Pagina se încarcă ...
Pagina se încarcă ...
Pagina se încarcă ...
Pagina se încarcă ...
Pagina se încarcă ...
Pagina se încarcă ...
Pagina se încarcă ...
Pagina se încarcă ...
Pagina se încarcă ...
Pagina se încarcă ...
Pagina se încarcă ...
Pagina se încarcă ...
Pagina se încarcă ...
Pagina se încarcă ...
Pagina se încarcă ...
Pagina se încarcă ...
Pagina se încarcă ...
Pagina se încarcă ...
Pagina se încarcă ...
-
 1
1
-
 2
2
-
 3
3
-
 4
4
-
 5
5
-
 6
6
-
 7
7
-
 8
8
-
 9
9
-
 10
10
-
 11
11
-
 12
12
-
 13
13
-
 14
14
-
 15
15
-
 16
16
-
 17
17
-
 18
18
-
 19
19
-
 20
20
-
 21
21
-
 22
22
-
 23
23
-
 24
24
-
 25
25
-
 26
26
-
 27
27
-
 28
28
-
 29
29
-
 30
30
-
 31
31
-
 32
32
-
 33
33
-
 34
34
-
 35
35
-
 36
36
-
 37
37
-
 38
38
-
 39
39
-
 40
40
-
 41
41
-
 42
42
-
 43
43
-
 44
44
-
 45
45
-
 46
46
-
 47
47
-
 48
48
-
 49
49
-
 50
50
-
 51
51
-
 52
52
-
 53
53
-
 54
54
-
 55
55
-
 56
56
-
 57
57
-
 58
58
-
 59
59
-
 60
60
-
 61
61
-
 62
62
-
 63
63
-
 64
64
-
 65
65
-
 66
66
-
 67
67
-
 68
68
-
 69
69
-
 70
70
-
 71
71
-
 72
72
-
 73
73
-
 74
74
-
 75
75
-
 76
76
-
 77
77
-
 78
78
-
 79
79
-
 80
80
-
 81
81
-
 82
82
-
 83
83
-
 84
84
-
 85
85
-
 86
86
-
 87
87
-
 88
88
-
 89
89
-
 90
90
-
 91
91
-
 92
92
-
 93
93
-
 94
94
-
 95
95
-
 96
96
-
 97
97
-
 98
98
-
 99
99
-
 100
100
-
 101
101
-
 102
102
-
 103
103
-
 104
104
-
 105
105
-
 106
106
-
 107
107
-
 108
108
-
 109
109
-
 110
110
-
 111
111
-
 112
112
-
 113
113
-
 114
114
-
 115
115
-
 116
116
-
 117
117
-
 118
118
-
 119
119
-
 120
120
-
 121
121
-
 122
122
-
 123
123
-
 124
124
-
 125
125
-
 126
126
-
 127
127
-
 128
128
-
 129
129
-
 130
130
-
 131
131
-
 132
132
-
 133
133
-
 134
134
-
 135
135
-
 136
136
-
 137
137
-
 138
138
-
 139
139
-
 140
140
-
 141
141
-
 142
142
-
 143
143
-
 144
144
-
 145
145
-
 146
146
-
 147
147
-
 148
148
-
 149
149
-
 150
150
-
 151
151
-
 152
152
-
 153
153
-
 154
154
-
 155
155
-
 156
156
-
 157
157
-
 158
158
-
 159
159
-
 160
160
-
 161
161
-
 162
162
-
 163
163
-
 164
164
-
 165
165
-
 166
166
-
 167
167
-
 168
168
-
 169
169
-
 170
170
-
 171
171
-
 172
172
-
 173
173
-
 174
174
-
 175
175
-
 176
176
-
 177
177
-
 178
178
-
 179
179
-
 180
180
-
 181
181
-
 182
182
-
 183
183
-
 184
184
-
 185
185
-
 186
186
-
 187
187
-
 188
188
-
 189
189
-
 190
190
-
 191
191
-
 192
192
-
 193
193
-
 194
194
-
 195
195
-
 196
196
-
 197
197
-
 198
198
-
 199
199
-
 200
200
-
 201
201
-
 202
202
-
 203
203
-
 204
204
-
 205
205
-
 206
206
-
 207
207
-
 208
208
-
 209
209
-
 210
210
-
 211
211
-
 212
212
-
 213
213
-
 214
214
-
 215
215
-
 216
216
-
 217
217
-
 218
218
-
 219
219
-
 220
220
-
 221
221
-
 222
222
-
 223
223
-
 224
224
-
 225
225
-
 226
226
-
 227
227
-
 228
228
-
 229
229
-
 230
230
-
 231
231
-
 232
232
-
 233
233
-
 234
234
-
 235
235
-
 236
236
-
 237
237
-
 238
238
-
 239
239
-
 240
240
-
 241
241
-
 242
242
-
 243
243
-
 244
244
-
 245
245
-
 246
246
-
 247
247
-
 248
248
-
 249
249
-
 250
250
-
 251
251
-
 252
252
-
 253
253
-
 254
254
-
 255
255
-
 256
256
-
 257
257
-
 258
258
-
 259
259
-
 260
260
-
 261
261
-
 262
262
-
 263
263
-
 264
264
-
 265
265
-
 266
266
-
 267
267
-
 268
268
-
 269
269
-
 270
270
-
 271
271
-
 272
272
-
 273
273
-
 274
274
-
 275
275
-
 276
276
-
 277
277
-
 278
278
-
 279
279
-
 280
280
-
 281
281
-
 282
282
-
 283
283
-
 284
284
-
 285
285
-
 286
286
-
 287
287
-
 288
288
-
 289
289
-
 290
290
-
 291
291
-
 292
292
-
 293
293
-
 294
294
-
 295
295
-
 296
296
-
 297
297
-
 298
298
-
 299
299
-
 300
300
-
 301
301
-
 302
302
-
 303
303
-
 304
304
-
 305
305
-
 306
306
-
 307
307
-
 308
308
-
 309
309
-
 310
310
-
 311
311
-
 312
312
-
 313
313
-
 314
314
-
 315
315
-
 316
316
-
 317
317
-
 318
318
-
 319
319
-
 320
320
-
 321
321
-
 322
322
-
 323
323
-
 324
324
-
 325
325
-
 326
326
-
 327
327
-
 328
328
-
 329
329
-
 330
330
-
 331
331
-
 332
332
-
 333
333
-
 334
334
-
 335
335
-
 336
336
-
 337
337
-
 338
338
-
 339
339
-
 340
340
-
 341
341
-
 342
342
-
 343
343
-
 344
344
-
 345
345
-
 346
346
-
 347
347
-
 348
348
-
 349
349
-
 350
350
-
 351
351
-
 352
352
-
 353
353
-
 354
354
-
 355
355
-
 356
356
-
 357
357
-
 358
358
-
 359
359
-
 360
360
-
 361
361
-
 362
362
-
 363
363
-
 364
364
-
 365
365
-
 366
366
-
 367
367
-
 368
368
-
 369
369
-
 370
370
-
 371
371
-
 372
372
-
 373
373
-
 374
374
-
 375
375
-
 376
376
-
 377
377
-
 378
378
-
 379
379
-
 380
380
-
 381
381
-
 382
382
-
 383
383
-
 384
384
-
 385
385
-
 386
386
-
 387
387
-
 388
388
-
 389
389
-
 390
390
-
 391
391
-
 392
392
-
 393
393
-
 394
394
-
 395
395
-
 396
396
-
 397
397
-
 398
398
-
 399
399
-
 400
400
-
 401
401


Logitech Ultrathin Keyboard Folio for Samsung Galaxy Tab 3 10.1 Ghid de instalare
- Categorie
- Tastaturi pentru dispozitive mobile
- Tip
- Ghid de instalare
în alte limbi
Lucrări conexe
-
Logitech Folio Protective Case for Samsung Galaxy Tab 3 10.1 Ghid de inițiere rapidă
-
Logitech K120 Manualul proprietarului
-
Logitech Keyboard Folio Ghid de instalare
-
-
Logitech Ultrathin Keyboard Cover for iPad Air Ghid de instalare
-
-
-
-
Logitech Bluetooth Audio Receiver Manualul utilizatorului
-
Logitech Ultrathin Keyboard Folio Ghid de instalare
Alte documente
-
Samsung EJ-FT810 Manual de utilizare
-
-
-
ACME BK03 EN/LT/RU Manual de utilizare
-
Samsung EJ-FT720 Manual de utilizare
-
Trust 19043 Ghid de instalare
-
-
Hama 00125131 Manual de utilizare
-
Samsung EF-DT870 Manual de utilizare
-
Samsung BOOK COVER BLUE TAB S6 Manual de utilizare