Samsung BOOK COVER BLUE TAB S6 Manual de utilizare
- Categorie
- Tastaturi
- Tip
- Manual de utilizare


Table of Contents
English (UK)
Français
Deutsch
Italiano
Español
Magyar
Polski
Română
Български
Hrvatski
Srpski
Português
Latviešu
Lietuvių kalba
Eesti
Nederlands
Svenska
Norsk
Suomi
Dansk
Ελληνικά
Slovenščina
Slovenčina
Čeština
Türkçe
Русский
Українська
Қазақ тілі
Español (Castellano)
Français (Canada)
简体中文
繁體中文 (台灣)
한국어

1
1
English (UK)
Read me first
•
Please read this manual before using the device to ensure safe and proper use.
•
Images may differ in appearance from the actual product.
•
Some content may differ from your device depending on the region, and is subject to
change without prior notice.
•
For the latest version of the manual, refer to the Samsung website, www.samsung.com.
•
The keyboard is optimised to connect with the SAMSUNG Galaxy Tab S6 and may not be
compatible with other devices. Before connecting the keyboard with devices other than
the SAMSUNG Galaxy Tab S6, make sure they are compatible with the keyboard.
•
This product includes certain free/open source software. To see the instructions for
viewing the open source licence, go to the Samsung website (opensource.samsung.com).
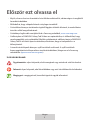
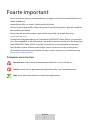
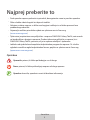
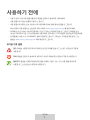
Instructional icons
Warning: situations that could cause injury to yourself or others
Caution: situations that could cause damage to your device or other equipment
Note: notes, usage tips, or additional information

2
2
English (UK)
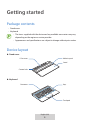
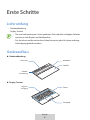
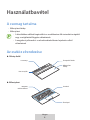
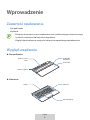
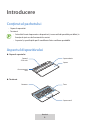
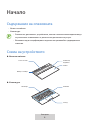
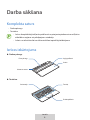
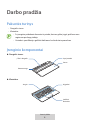
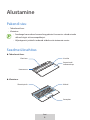
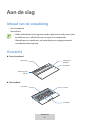
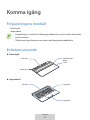
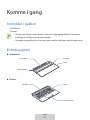
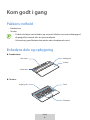
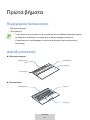
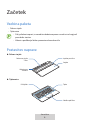
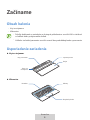
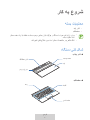
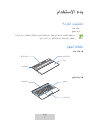
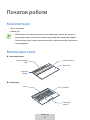
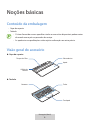
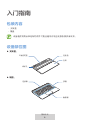
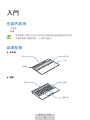
Getting started
Package contents
•
Stand cover
•
Keyboard
•
The items supplied with the device and any available accessories may vary
depending on the region or service provider.
•
Appearances and specifications are subject to change without prior notice.
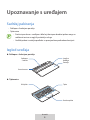
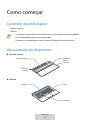
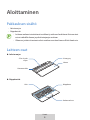
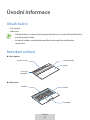
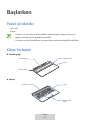
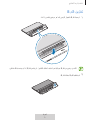
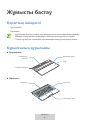
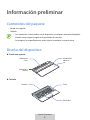
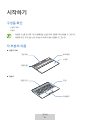
Device layout
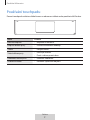
►
Stand cover:
Camera hole
Stand
Adhesive padS Pen cover
►
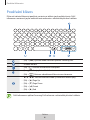
Keyboard:
Touchpad
Keys
Connector

3
3
English (UK)
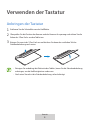
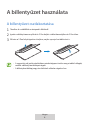
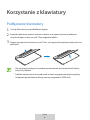
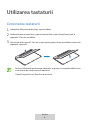
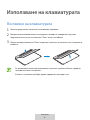
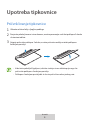
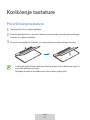
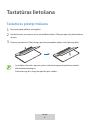
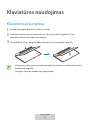
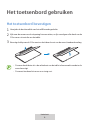
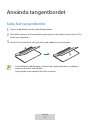
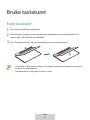
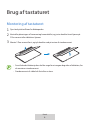
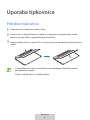
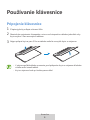
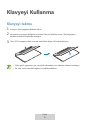
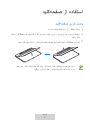
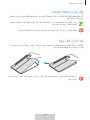
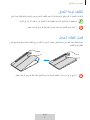
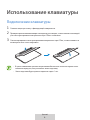
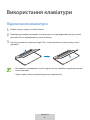
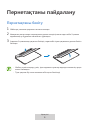
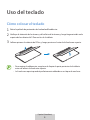
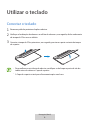
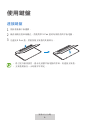
Using the Keyboard
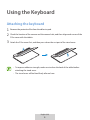
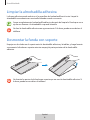
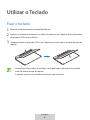
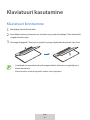
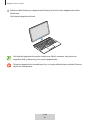
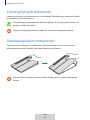
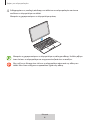
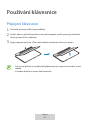
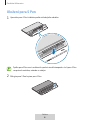
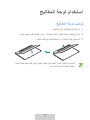
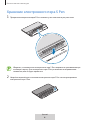
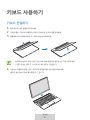
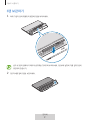
Attaching the keyboard
1
Remove the protective film from the adhesive pad.
2
Check the location of the camera and the camera hole, and then align each corner of the
S Pen cover with the tablets.
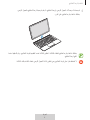
3
Attach the S Pen cover first, and then press down the rest part of the stand cover.
•
To improve adhesive strength, make sure to clean the back of the tablet before
attaching the stand cover.
•
The stand cover will be fixed firmly after an hour.

Using the Keyboard
4
4
English (UK)
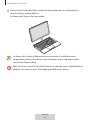
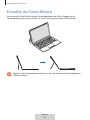
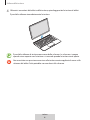
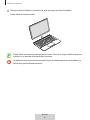
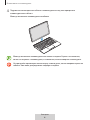
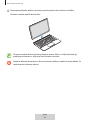
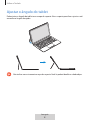
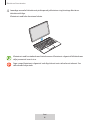
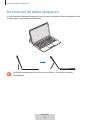
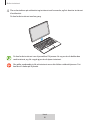
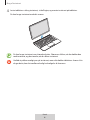
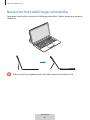
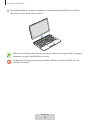
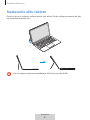
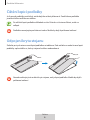
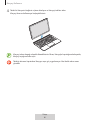
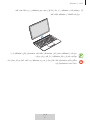
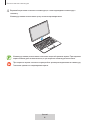
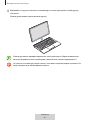
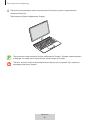
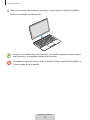
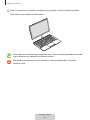
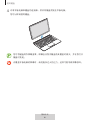
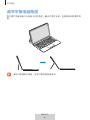
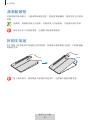
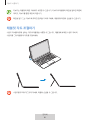
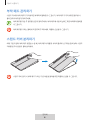
4
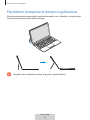
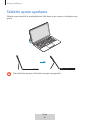
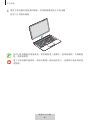
Line up the connectors of the tablet and the keyboard, and then attach the keyboard to
the tablet.
You can use the keyboard instantly.
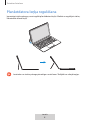
You can use the keyboard as a screen cover. The screen turns off when you cover it
with the keyboard, and it turns on when you open the keyboard.
Do not apply excessive pressure on the keyboard while covering the tablet’s screen.
Doing so may cause screen damage.

Using the Keyboard
5
5
English (UK)
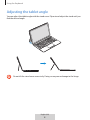
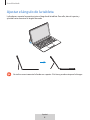
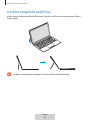
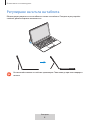
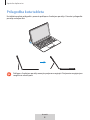
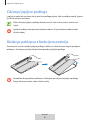
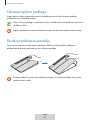
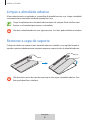
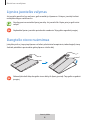
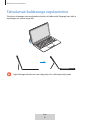
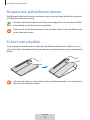
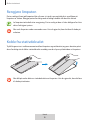
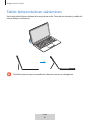
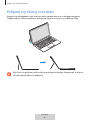
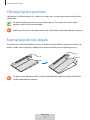
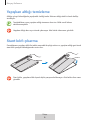
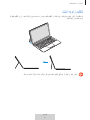
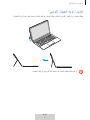
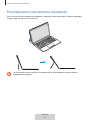
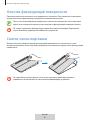
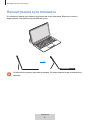
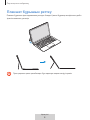
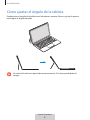
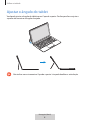
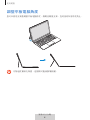
Adjusting the tablet angle
You can adjust the tablet angle with the stand cover. Flip out and adjust the stand until you
find the desired angle.
Do not tilt the stand cover excessively. Doing so may cause damage to the hinge.

Using the Keyboard
6
6
English (UK)
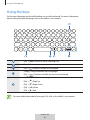
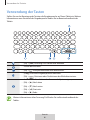
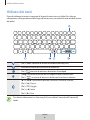
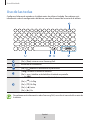
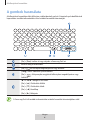
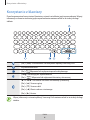
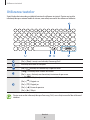
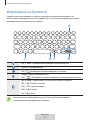
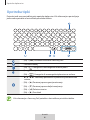
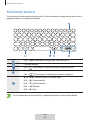
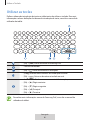
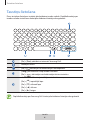
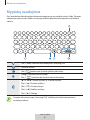
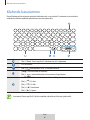
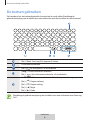
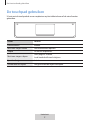
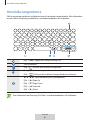
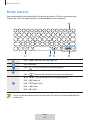
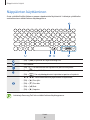
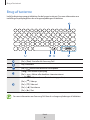
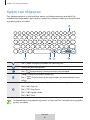
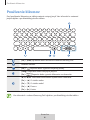
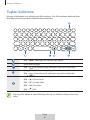
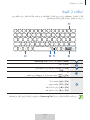
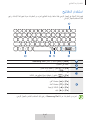
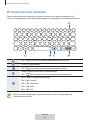
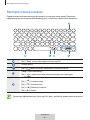
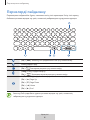
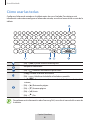
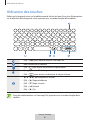
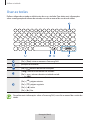
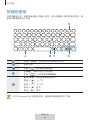
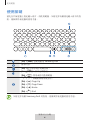
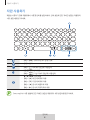
Using the keys
Set the input language on the tablet before you use the keyboard. For more information
about setting the input language, refer to the tablet's user manual.
•
[
Fn
] + [
Dex
]: Launch or close Samsung DeX.
•
Search the contents.
•
[
Fn
] + : Enable or disable the touchpad.
•
[
Lang
]: Change between input languages.
•
[
Fn
] + : Enable or disable the on-screen keyboard.
•
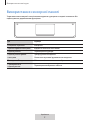
▲
/
▼
/
◄
/
►
: Move cursor or system caret;
•
[
Fn
] + [
▲
]: Page Up
•
[
Fn
] + [
▼
]: Page Down
•
[
Fn
] + [
◄
]: Home
•
[
Fn
] + [
►
]: End
For more information about Samsung DeX, refer to the tablet's user manual.

Using the Keyboard
7
7
English (UK)
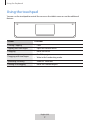
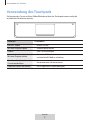
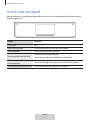
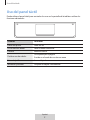
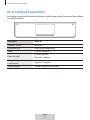
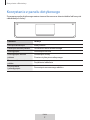
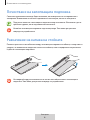
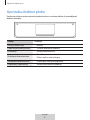
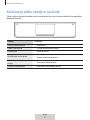
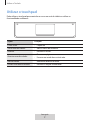
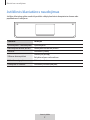
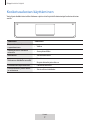
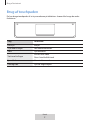
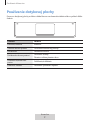
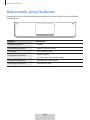
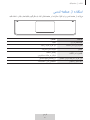
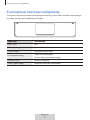
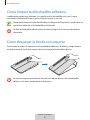
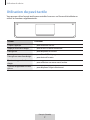
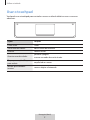
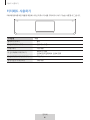
Using the touchpad
You can use the touchpad to control the cursor on the tablet screen or use the additional
features.
Actions Functions
Clicking/ Tapping
•
Click
Tapping with two fingers
•
Open the context menu.
Dragging
•
Move the cursor.
Dragging with two fingers
•
Scroll the page.
•
Write in the handwriting mode.
Spreading/ Pinching
•
Zoom in/ Zoom out
Holding and dragging
•
Move the selected object.

Using the Keyboard
8
8
English (UK)
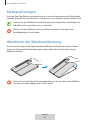
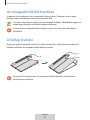
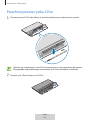
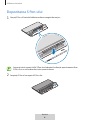
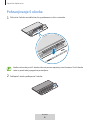
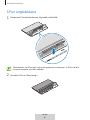
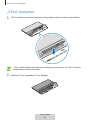
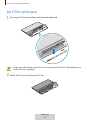
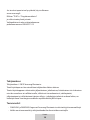
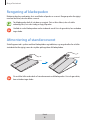
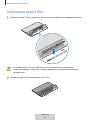
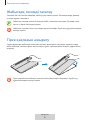
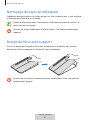
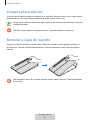
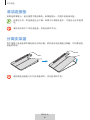
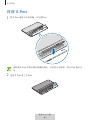
Storing the S Pen
1
Attach the S Pen to the tablet as shown in the image below.
Make sure to place the nib of the S Pen to face the opposite side of the camera. The
S Pen will not charge if it is misplaced.
2
Cover the S Pen with the S Pen cover.

Using the Keyboard
9
9
English (UK)
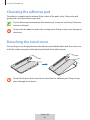
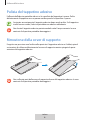
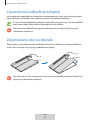
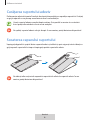
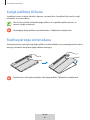
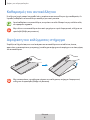
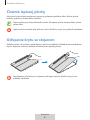
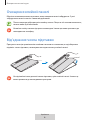
Cleansing the adhesive pad
The adhesive strength may be reduced if the surface of the pad is dirty. Cleanse the pad
gently with a wet towel when it gets dirty.
Dry the adhesive pad completely after cleansing it. It may not stay firmly if moisture
remains in the pad.
Do not wash the adhesive pad under running water. Doing so may cause damage to
the device.
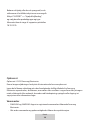
Detaching the stand cover
Push the fingers into the gap between the adhesive pad and the tablet, and then make sure
to lift the stand cover gently while pushing the back of the adhesive pad.
Do not lift the parts of the stand cover other than the adhesive pad. Doing so may
cause damage to the device.

10
10
English (UK)
Copyright
Copyright © 2019 Samsung Electronics
This user manual is protected under international copyright laws.
No part of this user manual may be reproduced, distributed, translated, or transmitted in
any form or by any means, electronic or mechanical, including photocopying, recording, or
storing in any information storage and retrieval system, without the prior written permission
of Samsung Electronics.
Trademarks
•
SAMSUNG and the SAMSUNG logo are registered trademarks of Samsung Electronics.
•
All other trademarks and copyrights are the property of their respective owners.

1
Français
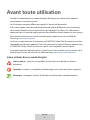
Avant toute utilisation
•
Veuillez lire attentivement ce mode d'emploi, afin de pouvoir utiliser votre appareil
correctement et en toute sécurité.
•
Les illustrations peuvent différer par rapport à l’aspect réel du produit.
•
Selon votre région, vous constaterez peut-être de légères différences entre le contenu
de ce mode d'emploi et les caractéristiques de l’appareil. Par ailleurs, les informations
contenues dans ce mode d'emploi peuvent être modifiées à tout moment et sans préavis.
•
Pour obtenir la dernière version du mode d’emploi, reportez-vous au site Web de
Samsung, www.samsung.com.
•
Le clavier est optimisé pour la connexion au SAMSUNG Galaxy Tab S6 et peut ne pas être
compatible avec d'autres appareils. Avant de connecter le clavier à d'autres appareils que
le SAMSUNG Galaxy Tab S6, assurez-vous qu'ils sont compatibles avec le clavier.
•
Ce produit inclut des logiciels gratuits/ Open Source. Pour accéder aux instructions de la
licence Open Source, consultez le site Web Samsung (opensource.samsung.com).
Icônes utilisées dans ce mode d’emploi
Avertissement: situations susceptibles de vous blesser ou de blesser d’autres
personnes
Attention: situations susceptibles d’endommager votre stylet ou d’autres appareils
Remarque: remarques, conseils d’utilisation ou informations complémentaires

2
Français
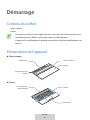
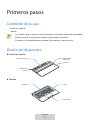
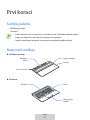
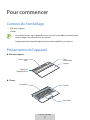
Démarrage
Contenu du coffret
•
Capot support
•
Clavier
•
Les accessoires fournis avec l'appareil et tous ceux que vous trouverez chez votre
revendeur peuvent différer en fonction du pays ou de l'opérateur.
•
L'aspect et les spécifications du produit peuvent faire l'objet de modifications sans
préavis.
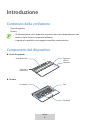
Présentation de l'appareil
►
Capot support:
Emplacement pour
objectif
Support
Coussinet adhésifSupport S Pen
►
Clavier:
Pavé tactile
Touches
Connecteur pour
appareil mobile

3
Français
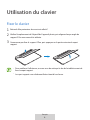
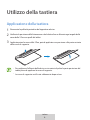
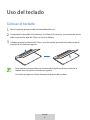
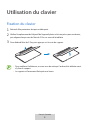
Utilisation du clavier
Fixer le clavier
1
Retirez le film protecteur du coussinet adhésif.
2
Vérifiez l'emplacement de l'objectif de l'appareil photo, puis alignez chaque angle du
support S Pen avec ceux de la tablette.
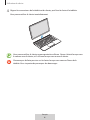
3
Commencez par fixer le support S Pen, puis appuyez sur la partie restante du capot
support.
•
Pour améliorer l'adhérence, assurez-vous de nettoyer le dos de la tablette avant de
fixer le capot support.
•
Le capot support sera solidement fixé au bout d'une heure.

Utilisation du clavier
4
Français
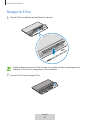
4
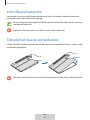
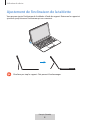
Alignez les connecteurs de la tablette et du clavier, puis fixez le clavier à la tablette.
Vous pouvez utiliser le clavier immédiatement.
Vous pouvez utiliser le clavier comme protection d'écran. L'écran s'éteint lorsque vous
le couvrez avec le clavier, et il s'allume lorsque vous ouvrez le clavier.
N'exercez pas de forte pression sur le clavier lorsque vous couvrez l'écran de la
tablette. Vous risqueriez de provoquer des dommages.

Utilisation du clavier
5
Français
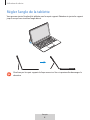
Régler l'angle de la tablette
Vous pouvez ajuster l'angle de la tablette avec le capot support. Rabattez et ajustez le support
jusqu'à ce que vous trouviez l'angle désiré.
N'inclinez pas le capot support de façon excessive. Vous risqueriez d’endommager la
charnière.

Utilisation du clavier
6
Français
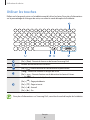
Utiliser les touches
Définissez la langue de saisie sur la tablette avant d'utiliser le clavier. Pour plus d'informations
sur le paramétrage de la langue de saisie, consultez le mode d'emploi de la tablette.
[
Fn
] + [
Dex
]: Permet de lancer ou de fermer Samsung DeX.
Permet de rechercher des contenus.
[
Fn
] + : Permet d'activer ou de désactiver le pavé tactile.
[
Lang
]: Permet de modifier la langue de saisie.
[
Fn
] + : Permet d'activer ou de désactiver le clavier à l'écran.
▲
/
▼
/
◄
/
►
: Permet de déplacer le curseur.
[
Fn
] + [
▲
]: Page précédente
[
Fn
] + [
▼
]: Page suivante
[
Fn
] + [
◄
]: Accueil
[
Fn
] + [
►
]: Fin
Pour plus d'informations sur Samsung DeX, consultez le mode d'emploi de la tablette.

Utilisation du clavier
7
Français
Utiliser le pavé tactile
Vous pouvez utiliser le pavé tactile pour contrôler le curseur sur l'écran de la tablette ou
utiliser des fonctions supplémentaires.
Actions Fonctions
Cliquer/Appuyer Permet de faire une sélection.
Appuyer avec deux doigts Permet d'ouvrir le menu contextuel.
Faire glisser Permet de déplacer le curseur.
Faire glisser avec deux doigts
Permet de faire défiler les pages.
Permet d'écrire de manière manuscrite.
Ouvrir/Pincer Permet d'effectuer un zoom avant/zoom arrière.
Maintenir et faire glisser Permet de déplacer l'objet sélectionné.

Utilisation du clavier
8
Français
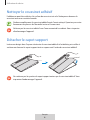
Ranger le S Pen
1
Fixez le S Pen à la tablette, comme illustré ci-dessous.
Veillez à placer la pointe du S Pen de façon à ce qu'elle soit face au côté opposé de
l'objectif. Le S Pen ne se chargera pas s'il est mal placé.
2
Couvrez le S Pen avec le capot S Pen.
Pagina se încarcă ...
Pagina se încarcă ...
Pagina se încarcă ...
Pagina se încarcă ...
Pagina se încarcă ...
Pagina se încarcă ...
Pagina se încarcă ...
Pagina se încarcă ...
Pagina se încarcă ...
Pagina se încarcă ...
Pagina se încarcă ...
Pagina se încarcă ...
Pagina se încarcă ...
Pagina se încarcă ...
Pagina se încarcă ...
Pagina se încarcă ...
Pagina se încarcă ...
Pagina se încarcă ...
Pagina se încarcă ...
Pagina se încarcă ...
Pagina se încarcă ...
Pagina se încarcă ...
Pagina se încarcă ...
Pagina se încarcă ...
Pagina se încarcă ...
Pagina se încarcă ...
Pagina se încarcă ...
Pagina se încarcă ...
Pagina se încarcă ...
Pagina se încarcă ...
Pagina se încarcă ...
Pagina se încarcă ...
Pagina se încarcă ...
Pagina se încarcă ...
Pagina se încarcă ...
Pagina se încarcă ...
Pagina se încarcă ...
Pagina se încarcă ...
Pagina se încarcă ...
Pagina se încarcă ...
Pagina se încarcă ...
Pagina se încarcă ...
Pagina se încarcă ...
Pagina se încarcă ...
Pagina se încarcă ...
Pagina se încarcă ...
Pagina se încarcă ...
Pagina se încarcă ...
Pagina se încarcă ...
Pagina se încarcă ...
Pagina se încarcă ...
Pagina se încarcă ...
Pagina se încarcă ...
Pagina se încarcă ...
Pagina se încarcă ...
Pagina se încarcă ...
Pagina se încarcă ...
Pagina se încarcă ...
Pagina se încarcă ...
Pagina se încarcă ...
Pagina se încarcă ...
Pagina se încarcă ...
Pagina se încarcă ...
Pagina se încarcă ...
Pagina se încarcă ...
Pagina se încarcă ...
Pagina se încarcă ...
Pagina se încarcă ...
Pagina se încarcă ...
Pagina se încarcă ...
Pagina se încarcă ...
Pagina se încarcă ...
Pagina se încarcă ...
Pagina se încarcă ...
Pagina se încarcă ...
Pagina se încarcă ...
Pagina se încarcă ...
Pagina se încarcă ...
Pagina se încarcă ...
Pagina se încarcă ...
Pagina se încarcă ...
Pagina se încarcă ...
Pagina se încarcă ...
Pagina se încarcă ...
Pagina se încarcă ...
Pagina se încarcă ...
Pagina se încarcă ...
Pagina se încarcă ...
Pagina se încarcă ...
Pagina se încarcă ...
Pagina se încarcă ...
Pagina se încarcă ...
Pagina se încarcă ...
Pagina se încarcă ...
Pagina se încarcă ...
Pagina se încarcă ...
Pagina se încarcă ...
Pagina se încarcă ...
Pagina se încarcă ...
Pagina se încarcă ...
Pagina se încarcă ...
Pagina se încarcă ...
Pagina se încarcă ...
Pagina se încarcă ...
Pagina se încarcă ...
Pagina se încarcă ...
Pagina se încarcă ...
Pagina se încarcă ...
Pagina se încarcă ...
Pagina se încarcă ...
Pagina se încarcă ...
Pagina se încarcă ...
Pagina se încarcă ...
Pagina se încarcă ...
Pagina se încarcă ...
Pagina se încarcă ...
Pagina se încarcă ...
Pagina se încarcă ...
Pagina se încarcă ...
Pagina se încarcă ...
Pagina se încarcă ...
Pagina se încarcă ...
Pagina se încarcă ...
Pagina se încarcă ...
Pagina se încarcă ...
Pagina se încarcă ...
Pagina se încarcă ...
Pagina se încarcă ...
Pagina se încarcă ...
Pagina se încarcă ...
Pagina se încarcă ...
Pagina se încarcă ...
Pagina se încarcă ...
Pagina se încarcă ...
Pagina se încarcă ...
Pagina se încarcă ...
Pagina se încarcă ...
Pagina se încarcă ...
Pagina se încarcă ...
Pagina se încarcă ...
Pagina se încarcă ...
Pagina se încarcă ...
Pagina se încarcă ...
Pagina se încarcă ...
Pagina se încarcă ...
Pagina se încarcă ...
Pagina se încarcă ...
Pagina se încarcă ...
Pagina se încarcă ...
Pagina se încarcă ...
Pagina se încarcă ...
Pagina se încarcă ...
Pagina se încarcă ...
Pagina se încarcă ...
Pagina se încarcă ...
Pagina se încarcă ...
Pagina se încarcă ...
Pagina se încarcă ...
Pagina se încarcă ...
Pagina se încarcă ...
Pagina se încarcă ...
Pagina se încarcă ...
Pagina se încarcă ...
Pagina se încarcă ...
Pagina se încarcă ...
Pagina se încarcă ...
Pagina se încarcă ...
Pagina se încarcă ...
Pagina se încarcă ...
Pagina se încarcă ...
Pagina se încarcă ...
Pagina se încarcă ...
Pagina se încarcă ...
Pagina se încarcă ...
Pagina se încarcă ...
Pagina se încarcă ...
Pagina se încarcă ...
Pagina se încarcă ...
Pagina se încarcă ...
Pagina se încarcă ...
Pagina se încarcă ...
Pagina se încarcă ...
Pagina se încarcă ...
Pagina se încarcă ...
Pagina se încarcă ...
Pagina se încarcă ...
Pagina se încarcă ...
Pagina se încarcă ...
Pagina se încarcă ...
Pagina se încarcă ...
Pagina se încarcă ...
Pagina se încarcă ...
Pagina se încarcă ...
Pagina se încarcă ...
Pagina se încarcă ...
Pagina se încarcă ...
Pagina se încarcă ...
Pagina se încarcă ...
Pagina se încarcă ...
Pagina se încarcă ...
Pagina se încarcă ...
Pagina se încarcă ...
Pagina se încarcă ...
Pagina se încarcă ...
Pagina se încarcă ...
Pagina se încarcă ...
Pagina se încarcă ...
Pagina se încarcă ...
Pagina se încarcă ...
Pagina se încarcă ...
Pagina se încarcă ...
Pagina se încarcă ...
Pagina se încarcă ...
Pagina se încarcă ...
Pagina se încarcă ...
Pagina se încarcă ...
Pagina se încarcă ...
Pagina se încarcă ...
Pagina se încarcă ...
Pagina se încarcă ...
Pagina se încarcă ...
Pagina se încarcă ...
Pagina se încarcă ...
Pagina se încarcă ...
Pagina se încarcă ...
Pagina se încarcă ...
Pagina se încarcă ...
Pagina se încarcă ...
Pagina se încarcă ...
Pagina se încarcă ...
Pagina se încarcă ...
Pagina se încarcă ...
Pagina se încarcă ...
Pagina se încarcă ...
Pagina se încarcă ...
Pagina se încarcă ...
Pagina se încarcă ...
Pagina se încarcă ...
Pagina se încarcă ...
Pagina se încarcă ...
Pagina se încarcă ...
Pagina se încarcă ...
Pagina se încarcă ...
Pagina se încarcă ...
Pagina se încarcă ...
Pagina se încarcă ...
Pagina se încarcă ...
Pagina se încarcă ...
Pagina se încarcă ...
Pagina se încarcă ...
Pagina se încarcă ...
Pagina se încarcă ...
Pagina se încarcă ...
Pagina se încarcă ...
Pagina se încarcă ...
Pagina se încarcă ...
Pagina se încarcă ...
Pagina se încarcă ...
Pagina se încarcă ...
Pagina se încarcă ...
Pagina se încarcă ...
Pagina se încarcă ...
Pagina se încarcă ...
Pagina se încarcă ...
Pagina se încarcă ...
Pagina se încarcă ...
Pagina se încarcă ...
Pagina se încarcă ...
Pagina se încarcă ...
Pagina se încarcă ...
Pagina se încarcă ...
Pagina se încarcă ...
Pagina se încarcă ...
Pagina se încarcă ...
Pagina se încarcă ...
Pagina se încarcă ...
Pagina se încarcă ...
Pagina se încarcă ...
Pagina se încarcă ...
Pagina se încarcă ...
Pagina se încarcă ...
Pagina se încarcă ...
Pagina se încarcă ...
Pagina se încarcă ...
Pagina se încarcă ...
Pagina se încarcă ...
Pagina se încarcă ...
Pagina se încarcă ...
Pagina se încarcă ...
Pagina se încarcă ...
Pagina se încarcă ...
Pagina se încarcă ...
Pagina se încarcă ...
Pagina se încarcă ...
Pagina se încarcă ...
Pagina se încarcă ...
Pagina se încarcă ...
Pagina se încarcă ...
Pagina se încarcă ...
Pagina se încarcă ...
Pagina se încarcă ...
Pagina se încarcă ...
Pagina se încarcă ...
Pagina se încarcă ...
Pagina se încarcă ...
Pagina se încarcă ...
Pagina se încarcă ...
Pagina se încarcă ...
Pagina se încarcă ...
Pagina se încarcă ...
Pagina se încarcă ...
Pagina se încarcă ...
Pagina se încarcă ...
Pagina se încarcă ...
Pagina se încarcă ...
Pagina se încarcă ...
Pagina se încarcă ...
Pagina se încarcă ...
Pagina se încarcă ...
Pagina se încarcă ...
Pagina se încarcă ...
Pagina se încarcă ...
Pagina se încarcă ...
Pagina se încarcă ...
Pagina se încarcă ...
Pagina se încarcă ...
Pagina se încarcă ...
Pagina se încarcă ...
Pagina se încarcă ...
Pagina se încarcă ...
Pagina se încarcă ...
Pagina se încarcă ...
Pagina se încarcă ...
Pagina se încarcă ...
Pagina se încarcă ...
Pagina se încarcă ...
Pagina se încarcă ...
Pagina se încarcă ...
Pagina se încarcă ...
Pagina se încarcă ...
Pagina se încarcă ...
Pagina se încarcă ...
Pagina se încarcă ...
-
 1
1
-
 2
2
-
 3
3
-
 4
4
-
 5
5
-
 6
6
-
 7
7
-
 8
8
-
 9
9
-
 10
10
-
 11
11
-
 12
12
-
 13
13
-
 14
14
-
 15
15
-
 16
16
-
 17
17
-
 18
18
-
 19
19
-
 20
20
-
 21
21
-
 22
22
-
 23
23
-
 24
24
-
 25
25
-
 26
26
-
 27
27
-
 28
28
-
 29
29
-
 30
30
-
 31
31
-
 32
32
-
 33
33
-
 34
34
-
 35
35
-
 36
36
-
 37
37
-
 38
38
-
 39
39
-
 40
40
-
 41
41
-
 42
42
-
 43
43
-
 44
44
-
 45
45
-
 46
46
-
 47
47
-
 48
48
-
 49
49
-
 50
50
-
 51
51
-
 52
52
-
 53
53
-
 54
54
-
 55
55
-
 56
56
-
 57
57
-
 58
58
-
 59
59
-
 60
60
-
 61
61
-
 62
62
-
 63
63
-
 64
64
-
 65
65
-
 66
66
-
 67
67
-
 68
68
-
 69
69
-
 70
70
-
 71
71
-
 72
72
-
 73
73
-
 74
74
-
 75
75
-
 76
76
-
 77
77
-
 78
78
-
 79
79
-
 80
80
-
 81
81
-
 82
82
-
 83
83
-
 84
84
-
 85
85
-
 86
86
-
 87
87
-
 88
88
-
 89
89
-
 90
90
-
 91
91
-
 92
92
-
 93
93
-
 94
94
-
 95
95
-
 96
96
-
 97
97
-
 98
98
-
 99
99
-
 100
100
-
 101
101
-
 102
102
-
 103
103
-
 104
104
-
 105
105
-
 106
106
-
 107
107
-
 108
108
-
 109
109
-
 110
110
-
 111
111
-
 112
112
-
 113
113
-
 114
114
-
 115
115
-
 116
116
-
 117
117
-
 118
118
-
 119
119
-
 120
120
-
 121
121
-
 122
122
-
 123
123
-
 124
124
-
 125
125
-
 126
126
-
 127
127
-
 128
128
-
 129
129
-
 130
130
-
 131
131
-
 132
132
-
 133
133
-
 134
134
-
 135
135
-
 136
136
-
 137
137
-
 138
138
-
 139
139
-
 140
140
-
 141
141
-
 142
142
-
 143
143
-
 144
144
-
 145
145
-
 146
146
-
 147
147
-
 148
148
-
 149
149
-
 150
150
-
 151
151
-
 152
152
-
 153
153
-
 154
154
-
 155
155
-
 156
156
-
 157
157
-
 158
158
-
 159
159
-
 160
160
-
 161
161
-
 162
162
-
 163
163
-
 164
164
-
 165
165
-
 166
166
-
 167
167
-
 168
168
-
 169
169
-
 170
170
-
 171
171
-
 172
172
-
 173
173
-
 174
174
-
 175
175
-
 176
176
-
 177
177
-
 178
178
-
 179
179
-
 180
180
-
 181
181
-
 182
182
-
 183
183
-
 184
184
-
 185
185
-
 186
186
-
 187
187
-
 188
188
-
 189
189
-
 190
190
-
 191
191
-
 192
192
-
 193
193
-
 194
194
-
 195
195
-
 196
196
-
 197
197
-
 198
198
-
 199
199
-
 200
200
-
 201
201
-
 202
202
-
 203
203
-
 204
204
-
 205
205
-
 206
206
-
 207
207
-
 208
208
-
 209
209
-
 210
210
-
 211
211
-
 212
212
-
 213
213
-
 214
214
-
 215
215
-
 216
216
-
 217
217
-
 218
218
-
 219
219
-
 220
220
-
 221
221
-
 222
222
-
 223
223
-
 224
224
-
 225
225
-
 226
226
-
 227
227
-
 228
228
-
 229
229
-
 230
230
-
 231
231
-
 232
232
-
 233
233
-
 234
234
-
 235
235
-
 236
236
-
 237
237
-
 238
238
-
 239
239
-
 240
240
-
 241
241
-
 242
242
-
 243
243
-
 244
244
-
 245
245
-
 246
246
-
 247
247
-
 248
248
-
 249
249
-
 250
250
-
 251
251
-
 252
252
-
 253
253
-
 254
254
-
 255
255
-
 256
256
-
 257
257
-
 258
258
-
 259
259
-
 260
260
-
 261
261
-
 262
262
-
 263
263
-
 264
264
-
 265
265
-
 266
266
-
 267
267
-
 268
268
-
 269
269
-
 270
270
-
 271
271
-
 272
272
-
 273
273
-
 274
274
-
 275
275
-
 276
276
-
 277
277
-
 278
278
-
 279
279
-
 280
280
-
 281
281
-
 282
282
-
 283
283
-
 284
284
-
 285
285
-
 286
286
-
 287
287
-
 288
288
-
 289
289
-
 290
290
-
 291
291
-
 292
292
-
 293
293
-
 294
294
-
 295
295
-
 296
296
-
 297
297
-
 298
298
-
 299
299
-
 300
300
-
 301
301
-
 302
302
-
 303
303
-
 304
304
-
 305
305
-
 306
306
-
 307
307
-
 308
308
-
 309
309
-
 310
310
-
 311
311
-
 312
312
-
 313
313
-
 314
314
-
 315
315
-
 316
316
-
 317
317
-
 318
318
-
 319
319
-
 320
320
-
 321
321
-
 322
322
-
 323
323
-
 324
324
-
 325
325
-
 326
326
-
 327
327
-
 328
328
-
 329
329
-
 330
330
-
 331
331
-
 332
332
-
 333
333
-
 334
334
-
 335
335
-
 336
336
-
 337
337
-
 338
338
-
 339
339
-
 340
340
-
 341
341
-
 342
342
-
 343
343
-
 344
344
-
 345
345
-
 346
346
-
 347
347
-
 348
348
-
 349
349
-
 350
350
-
 351
351
-
 352
352
-
 353
353
-
 354
354
-
 355
355
-
 356
356
-
 357
357
-
 358
358
-
 359
359
-
 360
360
-
 361
361
-
 362
362
-
 363
363


Samsung BOOK COVER BLUE TAB S6 Manual de utilizare
- Categorie
- Tastaturi
- Tip
- Manual de utilizare
Lucrări conexe
-
Samsung EF-DT870 Manual de utilizare
-
Samsung EJ-FT830 Manual de utilizare
-
-
-
Samsung EJ-FT820 Manual de utilizare
-
-
-
-
-
Samsung EJ-FT810 Manual de utilizare
Alte documente
-
Logitech Type-S Keyboard Case for Samsung Galaxy Tab S2 Ghid de instalare
-
-
Genius i405X Manual de utilizare
-
Trust FLEX DESIGN TABLET Manualul proprietarului
-
HP Elite x2 1011 G1 Travel Keyboard Ghid de inițiere rapidă
-