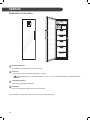
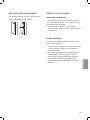
LG GF5137PZJZ Manual de utilizare
- Categorie
- Frigidere-congelatoare
- Tip
- Manual de utilizare

www.lg.com
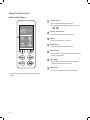
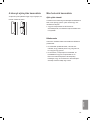
OWNER’S MANUAL
FREEZER
Read this owner's manual thoroughly before operating the appliance
and keep it handy for reference at all times.
MFL68864503_00
ENGLISH DEUTSCH FRANÇAIS NEDERLANDS ESPAÑOL PORTUGUÊS ITALIANO POLSKI MAGYAR
SRPSKI ROMÂNÂ HRVATSKI SHQIP

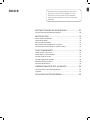
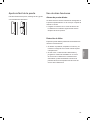
TABLE OF CONTENTS
This manual is produced for a group of products
and may contain images or content different from
the model you purchased.
This manual is subject to revision by the
manufacturer.
SAFETY INSTRUCTIONS ......................................03
Important Safety Instructions ...............................................................06
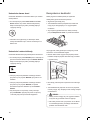
INSTALLATION .......................................................12
Notes for Installation ...........................................................................12
Leg Adjustment ...................................................................................12
To Reverse the Doors .......................................................................... 13
To Install Refrigerators in Pairs............................................................13
Electrical Connections (In the UK Only) ..............................................13
OPERATION ...........................................................14
Parts and Functions.............................................................................14
Notes for Operation ............................................................................15
Using Control Panel.............................................................................16
Using Ice Maker...................................................................................18
Using Easy Open Door ........................................................................19
Using Other Functions ........................................................................19
PRODUCT MANAGEMENT ....................................20
Using the Smart Diagnosis™ Function ...............................................20
Cleaning .............................................................................................21
TROUBLESHOOTING ............................................22

03
ENGLISH
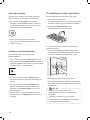
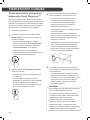
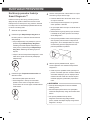
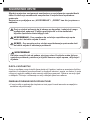
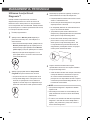
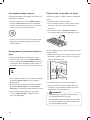
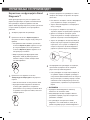
SAFETY INSTRUCTIONS
The following safety guidelines are intended to prevent unforeseen risks or
damage from unsafe or incorrect operation of the product.
The guidelines are separated into ‘WARNING’ and ‘CAUTION’ as described
below.
This symbol is displayed to the indicate matters and operations that
can cause risk. Read the part with this symbol carefully and follow the
instructions in order to avoid risk.
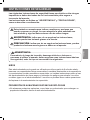
WARNING
- This indicates that the failure to follow the instructions
can cause serious injury or death.
CAUTION
- This indicates that the failure to follow the instructions
can cause the minor injury or damage the product.
following.
WARNING
CHILDREN IN THE HOUSEHOLD
This appliance can be used by children aged from 8 years and above and persons with
reduced physical, sensory or mental capabilities or lack of experience and knowledge if
they have been given supervision or instruction concerning use of the appliance in a safe
way and understand the hazards involved. Children shall not play with the appliance.
Cleaning and user maintenance shall not be made by children without supervision.
PROHIBITION OF STORAGE OF EXPLOSIVE SUBSTANCES
•
Do not store explosive substances such as aerosol cans with a ammable propellant in
this appliance.

04
TECHNICAL SAFETY
•
Keep ventilation openings, in the appliance enclosure or in the built-in structure, clear
of obstruction.
•
Do not use mechanical devices or other means to accelerate the defrosting process,
other than those recommended by the manufacturer.
•
Do not damage the refrigerant circuit.
•
Do not use electrical appliances inside the food storage compartments of the appliance,
unless they are of the type recommended by the manufacturer.
•
The refrigerant and insulation blowing gas used in the appliance require special
disposal procedures. Consult with service agent or a similarly qualied person before
disposing of them.
•
This appliance contains a small amount of isobutane refrigerant (R600a), natural gas
with high environmental compatibility, but it is also combustible. When transporting and
installing the appliance, care should be taken to ensure that no parts of the refrigerating
circuit are damaged.
•
Refrigerant squirting out of the pipes could ignite or cause an eye injury.
•
If a leak is detected, avoid any naked ames or potential sources of ignition and air
the room in which the appliance is standing for several minutes. In order to avoid the
creation of a ammable gas air mixture if a leak in the refrigerating circuit occurs, the
size of the room in which the appliance is used should correspond to the amount of
refrigerant used. The room must be 1 m
2
in size for every 8 g of R600a refrigerant
inside the appliance.
•
The amount of refrigerant in your particular appliance is shown on the identication
plate inside the appliance.
•
Never start up an appliance showing any signs of damage. If in doubt, consult your
dealer.
APPLIANCE USAGE RANGE
This appliance is intended to be used in household and similar applications such as
•
staff kitchen areas in shops, ofces and other working environments;
•
farm houses and by clients in hotels, motels and other residential type environments;
•
bed and breakfast type environments;
•
catering and similar non-retail applications.

05
ENGLISH
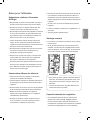
DISPOSAL OF YOUR OLD APPLIANCE
1. All electrical and electronic products should be disposed of separately from
the municipal waste stream via designated collection facilities appointed
by the government or the local authorities.
2. The correct disposal or your old appliance will help prevent potential
negative consequences for the environment and human health.
3. For more detailed information about disposal of your old appliance, please
contact your city ofce, waste disposal service or the shop where you
purchased the product.

06
Important Safety Instructions
following.
WARNING
Installation
•
Be careful not to let the door fall during
assembly or disassembly. This can
cause injury.
•
Be careful not to puncture or tear the
cable during assembly or disassembly
of the product door. This can cause
electric shock or re.
•
Ground the product for safety. For more
details on grounding, inquire at an LG
Electronics service centre. Improper
grounding of the product can cause
product failure or electric shock due to
short circuit.
•
Install the product on a solid and at
area. If the product is installed on an
uneven oor, it can generate vibration
and noise or cause misalignment of the
door. If the product is not installed on an
even oor, it may fall, causing injury or
death.
•
Do not install the product in a damp
area and keep away from splashing
rain or water. Water can damage the
insulation causing the electric shock or
re.
•
Be careful not to expose the rear of the
product during the installation. Exposure
can cause electric shock or injury.

07
ENGLISH
Power
•
This appliance is equipped with a
cord having an equipment-grounding
conductor and grounding plug. The plug
must be plugged into an appropriate
outlet that is properly installed and
grounded in accordance with all local
codes and ordinances.
•
Use only grounded extension socket
outlets. Using an ungrounded extension
socket outlet can cause electric shock
or injury.
•
Do not plug multiple products into
multiple socket-outlets or extension
cords. This can cause a re.
•
Be careful not to point the power plug
up or let the product lean against the
plug. This may allow moisture into the
power plug or damage the power plug
causing the electric shock or re.
•
Remove the power plug when you
clean the product or replace the inside
lamp. Not removing the plug can cause
electric shock or injury.
•
Do not touch the power plug with wet
hands. It can cause the electric shock
or injury.
•
Plug the power in the outlet tightly
after removing the moisture and dust
completely. Improper contact can cause
the electric shock or re.
•
When pulling out the power plug from
an outlet, hold the power plug, not the
cable. Damage of the cable can cause
the electric shock or injury.
•
If the power cable or power plug is
damaged or the hole of the outlet socket
is loose, do not use the power plug and
contact LG Electronics service centre.
Improper contact can cause electric
shock or re.
•
Unplug the power plug during thunder
or lightening or when not in use for a
long period of time. Storms can cause
electric shock or re.
•
Do not bend the power cable
excessively or place a heavy object on
top of it. Damage of the power cable
can cause electric shock or re.
•
Do not extend the length of the power
cable or alter it. Electrical damage of the
power cable can cause electric shock or
re.

08
•
Do not use the product for any purpose
(storage of medical or experimental
materials or shipping) other than
household use. Improper use can cause
electric shock, re or explosion.
•
Do not place hands or metallic objects
inside the area emitting the cold air,
cover or heat releasing grill on the back.
The bottom and back of the product are
made of steel, and may cause electric
shock or injury.
•
Be careful of nearby children when you
open or close the product door. The
door may bump the child and cause
injury.
•
Be careful of a child being trapped
inside the product. A child trapped inside
the product can suffocate and die.
•
Only an authorized repair person from
LG Electronics service centre should
disassemble, repair, or modify the
product. Contact an LG Electronics
service centre if you move the product.
Improper service may cause injury,
electric shock or re.
•
Do not place heavy or fragile objects,
liquids, combustible substances, or
ammable objects (such as candles and
lamps) on the product. This can cause
electric shock, injury or re.
Operation
•
In case of ood, stop using the product
and contact the LG Electronics service
centre. Contact with water can cause
electric shock or re.
•
If there is a gas leakage (isobutane,
propane, natural gas, etc.), do not touch
the product or power plug and ventilate
the area immediately. Sparks can cause
explosion, re or injury. This product
uses a very eco-friendly gas (isobutane,
R600a) as the refrigerant. Although
it uses a small amount of the gas, it
is still combustible gas. Gas leakage
during product transport, installation or
operation can cause re, explosion or
injury if sparks are caused.
•
Do not spray the water inside or outside
the product to clean it. Water can
damage the insulation to cause electric
shock or re.
•
Do not clean the product with brushes,
cloths or sponges with rough surfaces
or which are made of metallic material.
This can damage the insulation and
cause electric shock or re.
•
Immediately unplug the power plug and
contact an LG Electronics service centre
if you detect any abnormal noise, odour
or smoke. This may indicate re danger.

09
ENGLISH
•
Do not use or store ammable or
combustible substances (ether,
benzene, alcohol, chemical, LPG,
combustible spray, insecticide, air
freshener, cosmetics, etc.) near the
product. This can cause explosion or
re.
•
Do not use a hair drier to dry the inside
of the product or place a candle inside
to remove the odours. This can cause
electric shock or re.
•
If moisture penetrates inside the
product, unplug the power and contact
an LG Electronics service centre. This
can cause electric shock or re.
•
Do not apply excessive force or impact
to the back cover of the product.
This can cause electric shock, re,
malfunction or explosion.
Disposal
•
When you dispose the product, remove
the door gasket while all parts are
where they should be and keep children
away from the product. A child trapped
inside the product can be killed.
•
Dispose of the packaging material (such
as vinyl and styrofoam) away from
children. The packaging material can
suffocate a child.

10
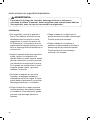
Violating this direction may cause injury or damage to house or contents.
CAUTION
Operation
•
Do not touch the contents of the freezer
with a wet hand. This can cause
frostbite.
•
Do not place glass containers or bottles
inside the freezer or shelf or ice storage
bucket that can fall below 0 ºC. The
glass container may break and cause
injury.
•
Do not place a living animal inside the
product. The animal can suffocate.
•
Do not cling to the product door,
storage room or shelf or climb up on
it. The product can fall down or pinch
the hand in the door causing injury.
Be particularly cautious of children
operating the product.
•
Keep food organized inside the product.
Items may fall down when you open or
close the product door causing injury.
•
Prevent animals or pets from nibbling
on the power cable or water hose. This
can cause electric shock to the animal
or damage the product or property.
Installation
•
Do not tilt the product to pull or push it
when transporting. The product can fall
down and cause injury.
•
The product should only be transported
by multiple people and while holding
handles on the front bottom and the rear
top of the product securely. Accidently
dropping the product may cause product
damage or body injury.

11
ENGLISH
•
Do not open or close the product door
with excessive force. Food stored inside
may fall causing injury.
•
If the hinge of the product door is
damaged or operates improperly, stop
using it and contact an LG Electronics
service centre. If products fall down, it
can cause the product damage or injury.
•
Supervise a child or a person with poor
cognitive skills to ensure they use the
product safely. This can cause injury.
•
To remove frost from inside the product,
contact an LG Electronics service
centre. Defrosting improperly can cause
product damage.
•
Be careful not to damage the refrigerant
line while using. Otherwise, it may
cause product damage.
•
Do not place another electronic product
(such as heater and mobile phone)
inside the product during use. Using
the product for any purpose other than
storing food can cause re or product
damage.
•
Dispose of the ice inside the ice storage
bucket in the freezer during extended
power outage. The melting ice can
damage the product.

12
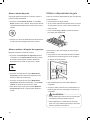
INSTALLATION
Notes for Installation
Install the product on a solid and at area.
•
If the product is installed on an uneven oor, it can
cause vibration and noise causing the product to fall
resulting in injury.
•
If the product front or rear are not level, put a solid
object (such as a ruler) underneath, x it with tape,
and push the product to level it horizontally.
Avoid placing the unit near heat sources, direct sunlight
or moisture.
Install accessories such as ice cube box, etc., in their
proper places. They are packed together to prevent
possible damage during shipment.
Connect the power supply cord (or plug) to the outlet.
Don't double up with other appliances on the same
outlet.
Product with handle shall be located at least 55 mm from
the wall on the hinge side to open door by 90°.
The warm air under and behind the product must be
able to escape or power consumption will increase.
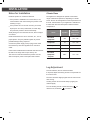
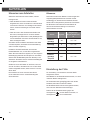
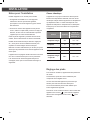
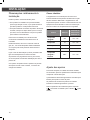
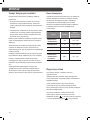
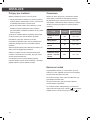
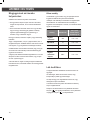
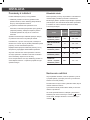
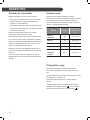
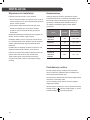
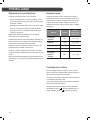
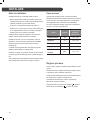
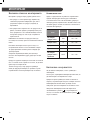
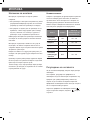
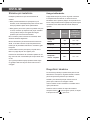
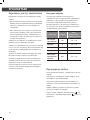
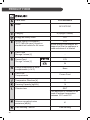
Climate Class
The appliance is designed to operate at the limited
range of ambient temperature, depending on climate
zones. Do not use the appliance at the temperature over
the limit. Climate class of your appliance is indicated on
the label with technical description inside the freezer
compartment.
Class Symbol
Ambient
temperature
range ºC
Extended
temperate
SN +10 – +32
Temperate
N +16 – +32
Subtropical
ST +16 – +38
Tropical
T +16 – +43
Extended
temperate
-Tropical
SN-T +10 – +43
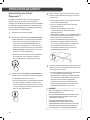
Leg Adjustment
To avoid vibration, the unit must be leveled.
If required, adjust the leveling screws to compensate for
the uneven oor.
The front should be slightly higher than the rear to aid in
door closing.
Leveling screws can be turned easily by tipping the
cabinet slightly.
Turn the leveling screws counterclockwise (
) to
raise the unit, clockwise (
) to lower it.

13
ENGLISH
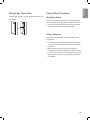
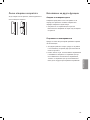
To Reverse the Doors
Your freezer is designed with reversible doors, do that
they may open from either the left of right hand side to
suit your kitchen design.
NOTE
•
However when you want to reverse the doors
your refrigerators in pairs, you must call to service
center. Revising the doors is not covered by the
warranty.
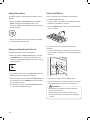
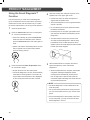
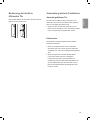
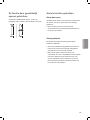
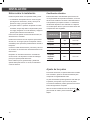
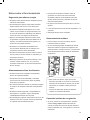
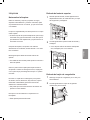
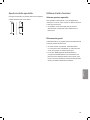
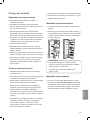
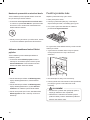
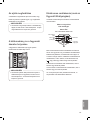
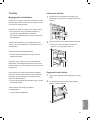
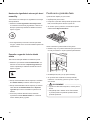
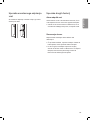
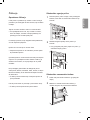
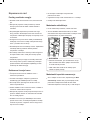
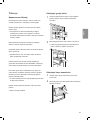
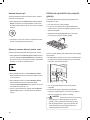
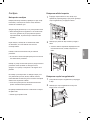
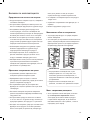
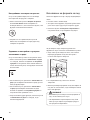
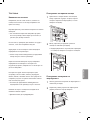
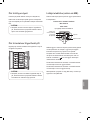
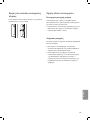
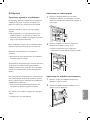
To Install Refrigerators in Pairs
Your freezer can be installed with fridge in pairs as the
below image.
NOTE
•
However when you want to install your
refrigerators in pairs, you must call to service
center. Installation condition is not covered by the
warranty.
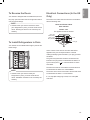
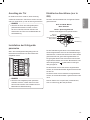
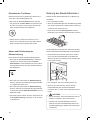
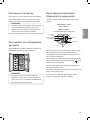
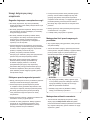
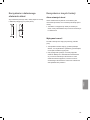
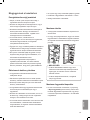
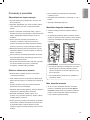
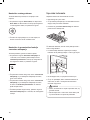
Electrical Connections (In the UK
Only)
The wires in the mains lead are coloured in accordance
with the following code:
Green and Yellow: Earth
Blue: Neutral
Brown: Live
This appliance must be earthed.
Green and
Yellow (Earth)
Brown (Live)
Blue (Neutral)
Fuse
Cord grip
As the colours of the wires in the mains lead of this
apparatus may not correspond with the coloured
markings identifying the terminals in your plug, proceed
as follows:
The green and yellow wire must be connected to the
terminal in the plug which is marked with the letter E or
by the earth symbol (
) or coloured Green or Green
and Yellow.
The blue wire must be connected to the terminal which
is marked with the letter N or coloured Black.
The brown wire must be connected to the terminal which
is marked with the letter L or coloured Red.
If a 13 amp (BS 1363) plug is used, t a 13 amp BS
1362 fuse.

14
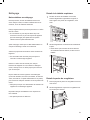
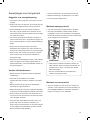
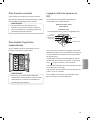
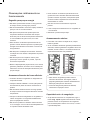
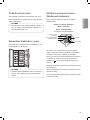
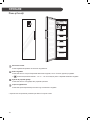
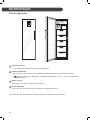
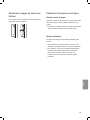
OPERATION
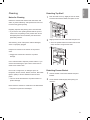
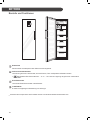
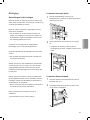
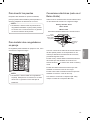
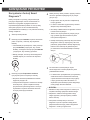
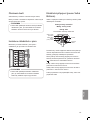
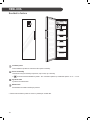
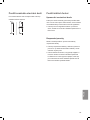
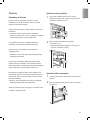
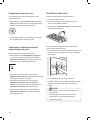
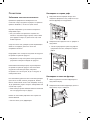
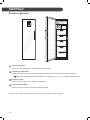
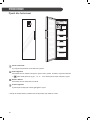
Parts and Functions
Control Panel
This adjusts the inside temperature of the freezer.
Freezer Shelf
This is where frozen foods such as the meat, sh, and ice cream, can be stored.
•
What is Two Star Section? : -12 ºC – -18 ºC is maintained to store frozen foods.
Ice Maker
This is where ice is made and stored.
Freezer Basket
This is for long-term storage of frozen items.
•
The appearance or components of the product may differ from model to model.

15
ENGLISH
Notes for Operation
Suggestion for Energy Saving
•
Please do not keep the door open for a long time,
close door in the shortest time.
•
Do not overll. Enough space should be kept for cool
air circulating freely.
•
Do not set the temperature of product lower than
needed. Do not put the food near the temperature
sensor. Keep the distance of least 5 mm from the
sensors.
•
Allow hot food to cool prior to storing. Placing hot
food in the product could spoil other food, and lead to
higher electric bills.
•
Do not block air vents with food. Smooth circulation of
cold air keeps product temperature even.
•
Do not open the door frequently. Opening the door lets
warm air enter the product, and cause temperature to
rise.
•
To keep a position of inner parts like as baskets,
drawers, shelves and Fridge Supplied by manufacturer
is the most efcient usage for energy saving.
Storing Foods Effectively
•
Store frozen food or refrigerated food inside sealed
containers.
•
Check the expiration date and label (storage
instructions) before storing food in the product.
•
Do not store food for a long period of time if it spoils
easily at a low temperature.
•
Place the refrigerated food or frozen food inside each
fridge or freezer immediately after purchasing.
•
Do not overll the product. Fill less than 70 % of the
space. Cold air cannot circulate properly if the product
is overlled.
•
Cool hot food before storing. If too much hot food is
placed inside, the internal temperature of the product
can increase and negatively affect other foods stored
in the product.
•
Do not open or close the product door excessively.
•
Limit storage inside the freezer to 1–3 weeks.
•
Always keep the product clean.
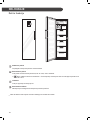
Maximum Storage
•
To get better air circulation, insert all drawers.
•
If large quantities of food are to be stored, all the
freezer drawers shall be taken out of the appliance
except the bottom one and the food shall be stacked
directly on the freezer shelves.
NOTE
•
To remove the drawers, rst pick the food out of
drawers. Then use the handle of drawers, pull out
the drawers carefully. It may cause injury.
•
The shape of each drawer may be different, insert
in the right position.
Max Freezing Capacity
•
If there is already food in the compartment, button
on Express Frz. several hours before placing fresh
produce in the freezer compartment to get maximum
capacity, As a rule, 7 hours is adequate.

16
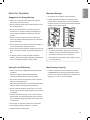
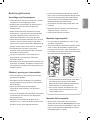
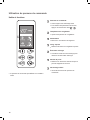
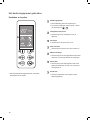
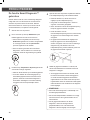
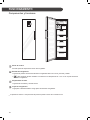
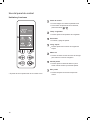
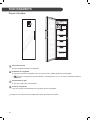
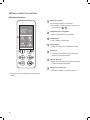
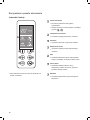
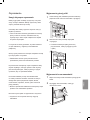
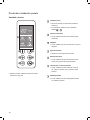
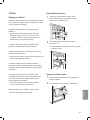
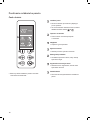
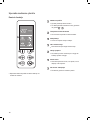
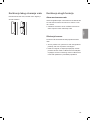
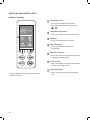
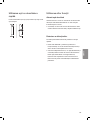
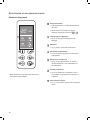
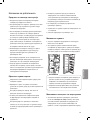
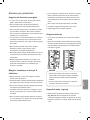
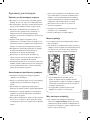
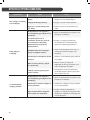
Using Control Panel
Units and Functions
•
The actual control panel may differ from model to
model.
Control Panel
•
This image shows the initial display.
•
To display function settings, press the buttons
in
– .
Freezer Temperature
•
This adjusts the freezer temperature.
Power
•
This turns the power on and off.
Express Frz.
•
This sets Express Freeze functions.
Eco Friendly
•
This controls the Power Save mode for lowering
energy consumption.
Door Alarm
•
This sets the alarm sound which is activated
when the product door is opened.
Child Lock
•
This locks the buttons on the control panel.

17
ENGLISH
Setting Power
This turns the power on and off.
•
Press the Power button for 3 seconds or longer. The
control panel lights, and the power is on.
•
Turn off the power when you are not using the
product.
•
When you press the Power button to turn off the
product, the product is no longer operating. Turn it off
only when you are not using the product.
Adjusting the Freezer Temperature
This adjusts the freezer temperature.
•
Press the Freezer Temperature button to adjust the
temperature.
•
The initial temperature is set to -20 °C, and the freezer
temperature can be adjusted between -15 °C – -23 °C.
•
Adjust the freezer temperature according to the
change of the temperature inside the product. The
actual inner temperature varies depending on the food
status, as the indicated setting temperature is a target
temperature, not actual temperature within freezer.
NOTE
•
Allow your refrigerator to run for at least two to
three hours before putting food in it.
Setting Express Freeze
The function can quickly freeze a large amount of ice or
frozen foods.
•
When you press the Express Frz. button, the
Express Frz. icon lights on the control panel. The
function is enabled and disabled in turn each time you
press the button.
•
The Express Freeze function is automatically
terminated after a certain period of time (24 hours).
Setting Power Save Mode
If you are away from home for a long period, you can
adjust the Power Save mode to save energy.
•
When you press the Eco Friendly button, the Eco
Friendly icon lights on the control panel, and the
mode is set. The mode is enabled and disabled in
turn each time you press the button.
•
The Freezer Temperature or Express Freeze function
cannot be used in Power Save mode.
•
The Eco Friendly icon ashes 3 times when you
press the Freezer Temperature or Express Frz.
button in Power Save mode.
•
To use the Freezer Temperature or Express Freeze
function, press the Eco Friendly button again to
disable the Power Save mode.

18
Setting Door Alarm
This sets an alarm to activate when the product door is
opened.
•
When you press the Door Alarm button, the Door
Alarm icon lights and activates the alarm. The
function is enabled and disabled in turn each time you
press the button.
•
Contact an LG Electronics service centre if the alarm
continues after closing the door.
Setting and Resetting Child Lock
This locks the buttons on the control panel.
•
When you press the Child Lock button for 1 second,
the Set/Reset icon on the control panel lights. The
function is enabled and disabled in turn each time you
press the button.
•
If you press a button other than Child Lock when the
child lock is set, the button will not function.
•
When you press a button other than Child Lock when
the child lock is set, the Set/Reset icon on the control
panel is ashes 3 times.
•
To use another function, press the Child Lock button
for 1 second to disable the function.
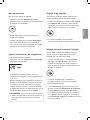
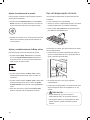
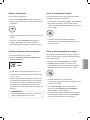
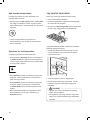
Using Ice Maker
Fill the ice maker up to the indicator line with water.
•
Fill with potable water only.
•
If the ice maker is overlled, the ice cubes may stick
together and be difcult to remove.
•
Press the Express Frz. button on the control panel to
make ice quickly.
To remove the ice, turn the handle of the ice tray
clockwise.
•
Ice can be removed more easily by pouring water on
the ice maker or immersing it in water and twisting the
tray rst.
•
Do not store ice that is not completely frozen.
•
You can remove the ice maker or ice bucket to create
more space inside the freezer if you do not use it.
•
Be careful not to twist the ice maker with force
since it can be broken.
•
Do not freeze the ice in the ice bucket. It can
break the ice bucket and cause product damage
or injury.
CAUTION

19
ENGLISH
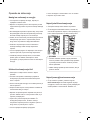
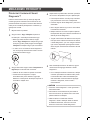
Using Easy Open Door
To easily open the door, hold the handle and softly turn it
to the right.
Using Other Functions
Door Open Alarm
The alarm sounds 3 times in a 30-second interval if the
door is left open or not completely closed for one minute.
•
Contact an LG Electronics service centre if the alarm
sound continues even after closing the door.
Failure Detection
The product can automatically detect problems during
the operation.
•
If a problem is detected, the product does not operate
and an error code is displayed even when any button
is pressed.
•
When this occurs, do not turn off the power and
immediately contact the LG Electronics service centre.
If you turn off the power, the repair technician from LG
Electronics service centre may have difculty nding
the problem.

20
PRODUCT MANAGEMENT
Using the Smart Diagnosis™
Function
Use this function if you need an accurate diagnosis
by an LG Electronics service centre when the product
malfunctions or fails. Use this function only to contact
the service representative, not during normal operation.
1
Close the product door.
2
Press the Child Lock button on the control panel
for 1 second to activate the lock.
•
If the lock is already set, press the Child Lock
button and hold it to release the lock and then
press the Child Lock button and hold it again to
reset.
•
Please note that the Smart Diagnosis™ function
will not operate until 5 minutes have passed
since the locking was set.
3
Press and hold the Freezer Temperature button
for 3 seconds or longer.
•
Only 3 °C will be lit on the control panel.
•
The Smart Diagnosis™ function is automatically
terminated, and the operation is returned to its
original status 5 minutes after 3 °C is displayed
on the control panel when the door is closed.
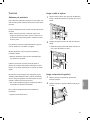
4
Open the product door and place a phone on the
speaker hole in the upper right corner.
•
Position the phone so that its microphone is
aligned with the speaker hole.
•
The Smart Diagnosis™ sound is generated after
around 3 seconds.
•
Do not take the phone off the speak hole while
the data is transmitted.
•
Hold the phone on the upper right speaker hole
and wait while the data is transmitted for Smart
Diagnosis™.
•
The data transfer sound may be harsh to the
ear while the Smart Diagnosis™ data is being
transmitted, but do not take the phone off the
speaker hole for accurate diagnosis until the data
transfer sound has stopped.
5
After the data transfer is complete, the service
agent will explain the result of the Smart
Diagnosis™.
•
When the data transfer is complete, the transfer
completion message is displayed and the
control panel is automatically turned off and
then on again after a few seconds. After the
counsellor explains the diagnosis result, take the
recommended measures.
NOTE
•
The Smart Diagnosis™ function depends on the
local call quality.
•
The communication performance will improve and
you can receive better service if you use the home
phone.
•
If the Smart Diagnosis™ data transfer is poor due
to poor call quality, you may not receive the best
Smart Diagnosis™ service.
Pagina se încarcă...
Pagina se încarcă...
Pagina se încarcă...
Pagina se încarcă...
Pagina se încarcă...
Pagina se încarcă...
Pagina se încarcă...
Pagina se încarcă...
Pagina se încarcă...
Pagina se încarcă...
Pagina se încarcă...
Pagina se încarcă...
Pagina se încarcă...
Pagina se încarcă...
Pagina se încarcă...
Pagina se încarcă...
Pagina se încarcă...
Pagina se încarcă...
Pagina se încarcă...
Pagina se încarcă...
Pagina se încarcă...
Pagina se încarcă...
Pagina se încarcă...
Pagina se încarcă...
Pagina se încarcă...
Pagina se încarcă...
Pagina se încarcă...
Pagina se încarcă...
Pagina se încarcă...
Pagina se încarcă...
Pagina se încarcă...
Pagina se încarcă...
Pagina se încarcă...
Pagina se încarcă...
Pagina se încarcă...
Pagina se încarcă...
Pagina se încarcă...
Pagina se încarcă...
Pagina se încarcă...
Pagina se încarcă...
Pagina se încarcă...
Pagina se încarcă...
Pagina se încarcă...
Pagina se încarcă...
Pagina se încarcă...
Pagina se încarcă...
Pagina se încarcă...
Pagina se încarcă...
Pagina se încarcă...
Pagina se încarcă...
Pagina se încarcă...
Pagina se încarcă...
Pagina se încarcă...
Pagina se încarcă...
Pagina se încarcă...
Pagina se încarcă...
Pagina se încarcă...
Pagina se încarcă...
Pagina se încarcă...
Pagina se încarcă...
Pagina se încarcă...
Pagina se încarcă...
Pagina se încarcă...
Pagina se încarcă...
Pagina se încarcă...
Pagina se încarcă...
Pagina se încarcă...
Pagina se încarcă...
Pagina se încarcă...
Pagina se încarcă...
Pagina se încarcă...
Pagina se încarcă...
Pagina se încarcă...
Pagina se încarcă...
Pagina se încarcă...
Pagina se încarcă...
Pagina se încarcă...
Pagina se încarcă...
Pagina se încarcă...
Pagina se încarcă...
Pagina se încarcă...
Pagina se încarcă...
Pagina se încarcă...
Pagina se încarcă...
Pagina se încarcă...
Pagina se încarcă...
Pagina se încarcă...
Pagina se încarcă...
Pagina se încarcă...
Pagina se încarcă...
Pagina se încarcă...
Pagina se încarcă...
Pagina se încarcă...
Pagina se încarcă...
Pagina se încarcă...
Pagina se încarcă...
Pagina se încarcă...
Pagina se încarcă...
Pagina se încarcă...
Pagina se încarcă...
Pagina se încarcă...
Pagina se încarcă...
Pagina se încarcă...
Pagina se încarcă...
Pagina se încarcă...
Pagina se încarcă...
Pagina se încarcă...
Pagina se încarcă...
Pagina se încarcă...
Pagina se încarcă...
Pagina se încarcă...
Pagina se încarcă...
Pagina se încarcă...
Pagina se încarcă...
Pagina se încarcă...
Pagina se încarcă...
Pagina se încarcă...
Pagina se încarcă...
Pagina se încarcă...
Pagina se încarcă...
Pagina se încarcă...
Pagina se încarcă...
Pagina se încarcă...
Pagina se încarcă...
Pagina se încarcă...
Pagina se încarcă...
Pagina se încarcă...
Pagina se încarcă...
Pagina se încarcă...
Pagina se încarcă...
Pagina se încarcă...
Pagina se încarcă...
Pagina se încarcă...
Pagina se încarcă...
Pagina se încarcă...
Pagina se încarcă...
Pagina se încarcă...
Pagina se încarcă...
Pagina se încarcă...
Pagina se încarcă...
Pagina se încarcă...
Pagina se încarcă...
Pagina se încarcă...
Pagina se încarcă...
Pagina se încarcă...
Pagina se încarcă...
Pagina se încarcă...
Pagina se încarcă...
Pagina se încarcă...
Pagina se încarcă...
Pagina se încarcă...
Pagina se încarcă...
Pagina se încarcă...
Pagina se încarcă...
Pagina se încarcă...
Pagina se încarcă...
Pagina se încarcă...
Pagina se încarcă...
Pagina se încarcă...
Pagina se încarcă...
Pagina se încarcă...
Pagina se încarcă...
Pagina se încarcă...
Pagina se încarcă...
Pagina se încarcă...
Pagina se încarcă...
Pagina se încarcă...
Pagina se încarcă...
Pagina se încarcă...
Pagina se încarcă...
Pagina se încarcă...
Pagina se încarcă...
Pagina se încarcă...
Pagina se încarcă...
Pagina se încarcă...
Pagina se încarcă...
Pagina se încarcă...
Pagina se încarcă...
Pagina se încarcă...
Pagina se încarcă...
Pagina se încarcă...
Pagina se încarcă...
Pagina se încarcă...
Pagina se încarcă...
Pagina se încarcă...
Pagina se încarcă...
Pagina se încarcă...
Pagina se încarcă...
Pagina se încarcă...
Pagina se încarcă...
Pagina se încarcă...
Pagina se încarcă...
Pagina se încarcă...
Pagina se încarcă...
Pagina se încarcă...
Pagina se încarcă...
Pagina se încarcă...
Pagina se încarcă...
Pagina se încarcă...
Pagina se încarcă...
Pagina se încarcă...
Pagina se încarcă...
Pagina se încarcă...
Pagina se încarcă...
Pagina se încarcă...
Pagina se încarcă...
Pagina se încarcă...
Pagina se încarcă...
Pagina se încarcă...
Pagina se încarcă...
Pagina se încarcă...
Pagina se încarcă...
Pagina se încarcă...
Pagina se încarcă...
Pagina se încarcă...
Pagina se încarcă...
Pagina se încarcă...
Pagina se încarcă...
Pagina se încarcă...
Pagina se încarcă...
Pagina se încarcă...
Pagina se încarcă...
Pagina se încarcă...
Pagina se încarcă...
Pagina se încarcă...
Pagina se încarcă...
Pagina se încarcă...
Pagina se încarcă...
Pagina se încarcă...
Pagina se încarcă...
Pagina se încarcă...
Pagina se încarcă...
Pagina se încarcă...
Pagina se încarcă...
Pagina se încarcă...
Pagina se încarcă...
Pagina se încarcă...
Pagina se încarcă...
Pagina se încarcă...
Pagina se încarcă...
Pagina se încarcă...
Pagina se încarcă...
Pagina se încarcă...
Pagina se încarcă...
Pagina se încarcă...
Pagina se încarcă...
Pagina se încarcă...
Pagina se încarcă...
Pagina se încarcă...
Pagina se încarcă...
Pagina se încarcă...
Pagina se încarcă...
Pagina se încarcă...
Pagina se încarcă...
Pagina se încarcă...
Pagina se încarcă...
Pagina se încarcă...
Pagina se încarcă...
Pagina se încarcă...
Pagina se încarcă...
Pagina se încarcă...
Pagina se încarcă...
Pagina se încarcă...
Pagina se încarcă...
Pagina se încarcă...
Pagina se încarcă...
Pagina se încarcă...
Pagina se încarcă...
Pagina se încarcă...
Pagina se încarcă...
Pagina se încarcă...
Pagina se încarcă...
Pagina se încarcă...
Pagina se încarcă...
Pagina se încarcă...
Pagina se încarcă...
Pagina se încarcă...
Pagina se încarcă...
Pagina se încarcă...
Pagina se încarcă...
Pagina se încarcă...
Pagina se încarcă...
Pagina se încarcă...
Pagina se încarcă...
Pagina se încarcă...
Pagina se încarcă...
Pagina se încarcă...
Pagina se încarcă...
Pagina se încarcă...
Pagina se încarcă...
Pagina se încarcă...
Pagina se încarcă...
Pagina se încarcă...
Pagina se încarcă...
Pagina se încarcă...
Pagina se încarcă...
Pagina se încarcă...
Pagina se încarcă...
Pagina se încarcă...
Pagina se încarcă...
Pagina se încarcă...
Pagina se încarcă...
Pagina se încarcă...
Pagina se încarcă...
Pagina se încarcă...
Pagina se încarcă...
Pagina se încarcă...
Pagina se încarcă...
Pagina se încarcă...
Pagina se încarcă...
Pagina se încarcă...
Pagina se încarcă...
Pagina se încarcă...
Pagina se încarcă...
Pagina se încarcă...
Pagina se încarcă...
Pagina se încarcă...
Pagina se încarcă...
Pagina se încarcă...
Pagina se încarcă...
Pagina se încarcă...
Pagina se încarcă...
Pagina se încarcă...
Pagina se încarcă...
Pagina se încarcă...
Pagina se încarcă...
Pagina se încarcă...
Pagina se încarcă...
Pagina se încarcă...
Pagina se încarcă...
Pagina se încarcă...
Pagina se încarcă...
Pagina se încarcă...
Pagina se încarcă...
Pagina se încarcă...
Pagina se încarcă...
Pagina se încarcă...
Pagina se încarcă...
Pagina se încarcă...
Pagina se încarcă...
Pagina se încarcă...
Pagina se încarcă...
Pagina se încarcă...
Pagina se încarcă...
Pagina se încarcă...
Pagina se încarcă...
Pagina se încarcă...
Pagina se încarcă...
Pagina se încarcă...
Pagina se încarcă...
Pagina se încarcă...
Pagina se încarcă...
Pagina se încarcă...
Pagina se încarcă...
Pagina se încarcă...
Pagina se încarcă...
Pagina se încarcă...
Pagina se încarcă...
Pagina se încarcă...
Pagina se încarcă...
Pagina se încarcă...
Pagina se încarcă...
Pagina se încarcă...
Pagina se încarcă...
Pagina se încarcă...
Pagina se încarcă...
Pagina se încarcă...
Pagina se încarcă...
Pagina se încarcă...
Pagina se încarcă...
Pagina se încarcă...
Pagina se încarcă...
Pagina se încarcă...
Pagina se încarcă...
Pagina se încarcă...
Pagina se încarcă...
Pagina se încarcă...
Pagina se încarcă...
Pagina se încarcă...
Pagina se încarcă...
Pagina se încarcă...
Pagina se încarcă...
Pagina se încarcă...
Pagina se încarcă...
Pagina se încarcă...
Pagina se încarcă...
Pagina se încarcă...
Pagina se încarcă...
Pagina se încarcă...
Pagina se încarcă...
Pagina se încarcă...
Pagina se încarcă...
Pagina se încarcă...
Pagina se încarcă...
Pagina se încarcă...
Pagina se încarcă...
Pagina se încarcă...
Pagina se încarcă...
Pagina se încarcă...
Pagina se încarcă...
Pagina se încarcă...
Pagina se încarcă...
Pagina se încarcă...
Pagina se încarcă...
Pagina se încarcă...
Pagina se încarcă...
Pagina se încarcă...
Pagina se încarcă...
Pagina se încarcă...
Pagina se încarcă...
Pagina se încarcă...
Pagina se încarcă...
Pagina se încarcă...
Pagina se încarcă...
Pagina se încarcă...
Pagina se încarcă...
Pagina se încarcă...
Pagina se încarcă...
Pagina se încarcă...
Pagina se încarcă...
Pagina se încarcă...
Pagina se încarcă...
Pagina se încarcă...
Pagina se încarcă...
Pagina se încarcă...
Pagina se încarcă...
Pagina se încarcă...
Pagina se încarcă...
Pagina se încarcă...
Pagina se încarcă...
Pagina se încarcă...
Pagina se încarcă...
Pagina se încarcă...
Pagina se încarcă...
Pagina se încarcă...
Pagina se încarcă...
Pagina se încarcă...
Pagina se încarcă...
Pagina se încarcă...
Pagina se încarcă...
Pagina se încarcă...
Pagina se încarcă...
Pagina se încarcă...
Pagina se încarcă...
Pagina se încarcă...
Pagina se încarcă...
Pagina se încarcă...
Pagina se încarcă...
Pagina se încarcă...
Pagina se încarcă...
Pagina se încarcă...
Pagina se încarcă...
Pagina se încarcă...
Pagina se încarcă...
Pagina se încarcă...
Pagina se încarcă...
Pagina se încarcă...
Pagina se încarcă...
Pagina se încarcă...
Pagina se încarcă...
Pagina se încarcă...
Pagina se încarcă...
Pagina se încarcă...
Pagina se încarcă...
Pagina se încarcă...
Pagina se încarcă...
Pagina se încarcă...
Pagina se încarcă...
Pagina se încarcă...
Pagina se încarcă...
Pagina se încarcă...
Pagina se încarcă...
Pagina se încarcă...
Pagina se încarcă...
Pagina se încarcă...
Pagina se încarcă...
Pagina se încarcă...
Pagina se încarcă...
Pagina se încarcă...
Pagina se încarcă...
Pagina se încarcă...
Pagina se încarcă...
Pagina se încarcă...
Pagina se încarcă...
-
 1
1
-
 2
2
-
 3
3
-
 4
4
-
 5
5
-
 6
6
-
 7
7
-
 8
8
-
 9
9
-
 10
10
-
 11
11
-
 12
12
-
 13
13
-
 14
14
-
 15
15
-
 16
16
-
 17
17
-
 18
18
-
 19
19
-
 20
20
-
 21
21
-
 22
22
-
 23
23
-
 24
24
-
 25
25
-
 26
26
-
 27
27
-
 28
28
-
 29
29
-
 30
30
-
 31
31
-
 32
32
-
 33
33
-
 34
34
-
 35
35
-
 36
36
-
 37
37
-
 38
38
-
 39
39
-
 40
40
-
 41
41
-
 42
42
-
 43
43
-
 44
44
-
 45
45
-
 46
46
-
 47
47
-
 48
48
-
 49
49
-
 50
50
-
 51
51
-
 52
52
-
 53
53
-
 54
54
-
 55
55
-
 56
56
-
 57
57
-
 58
58
-
 59
59
-
 60
60
-
 61
61
-
 62
62
-
 63
63
-
 64
64
-
 65
65
-
 66
66
-
 67
67
-
 68
68
-
 69
69
-
 70
70
-
 71
71
-
 72
72
-
 73
73
-
 74
74
-
 75
75
-
 76
76
-
 77
77
-
 78
78
-
 79
79
-
 80
80
-
 81
81
-
 82
82
-
 83
83
-
 84
84
-
 85
85
-
 86
86
-
 87
87
-
 88
88
-
 89
89
-
 90
90
-
 91
91
-
 92
92
-
 93
93
-
 94
94
-
 95
95
-
 96
96
-
 97
97
-
 98
98
-
 99
99
-
 100
100
-
 101
101
-
 102
102
-
 103
103
-
 104
104
-
 105
105
-
 106
106
-
 107
107
-
 108
108
-
 109
109
-
 110
110
-
 111
111
-
 112
112
-
 113
113
-
 114
114
-
 115
115
-
 116
116
-
 117
117
-
 118
118
-
 119
119
-
 120
120
-
 121
121
-
 122
122
-
 123
123
-
 124
124
-
 125
125
-
 126
126
-
 127
127
-
 128
128
-
 129
129
-
 130
130
-
 131
131
-
 132
132
-
 133
133
-
 134
134
-
 135
135
-
 136
136
-
 137
137
-
 138
138
-
 139
139
-
 140
140
-
 141
141
-
 142
142
-
 143
143
-
 144
144
-
 145
145
-
 146
146
-
 147
147
-
 148
148
-
 149
149
-
 150
150
-
 151
151
-
 152
152
-
 153
153
-
 154
154
-
 155
155
-
 156
156
-
 157
157
-
 158
158
-
 159
159
-
 160
160
-
 161
161
-
 162
162
-
 163
163
-
 164
164
-
 165
165
-
 166
166
-
 167
167
-
 168
168
-
 169
169
-
 170
170
-
 171
171
-
 172
172
-
 173
173
-
 174
174
-
 175
175
-
 176
176
-
 177
177
-
 178
178
-
 179
179
-
 180
180
-
 181
181
-
 182
182
-
 183
183
-
 184
184
-
 185
185
-
 186
186
-
 187
187
-
 188
188
-
 189
189
-
 190
190
-
 191
191
-
 192
192
-
 193
193
-
 194
194
-
 195
195
-
 196
196
-
 197
197
-
 198
198
-
 199
199
-
 200
200
-
 201
201
-
 202
202
-
 203
203
-
 204
204
-
 205
205
-
 206
206
-
 207
207
-
 208
208
-
 209
209
-
 210
210
-
 211
211
-
 212
212
-
 213
213
-
 214
214
-
 215
215
-
 216
216
-
 217
217
-
 218
218
-
 219
219
-
 220
220
-
 221
221
-
 222
222
-
 223
223
-
 224
224
-
 225
225
-
 226
226
-
 227
227
-
 228
228
-
 229
229
-
 230
230
-
 231
231
-
 232
232
-
 233
233
-
 234
234
-
 235
235
-
 236
236
-
 237
237
-
 238
238
-
 239
239
-
 240
240
-
 241
241
-
 242
242
-
 243
243
-
 244
244
-
 245
245
-
 246
246
-
 247
247
-
 248
248
-
 249
249
-
 250
250
-
 251
251
-
 252
252
-
 253
253
-
 254
254
-
 255
255
-
 256
256
-
 257
257
-
 258
258
-
 259
259
-
 260
260
-
 261
261
-
 262
262
-
 263
263
-
 264
264
-
 265
265
-
 266
266
-
 267
267
-
 268
268
-
 269
269
-
 270
270
-
 271
271
-
 272
272
-
 273
273
-
 274
274
-
 275
275
-
 276
276
-
 277
277
-
 278
278
-
 279
279
-
 280
280
-
 281
281
-
 282
282
-
 283
283
-
 284
284
-
 285
285
-
 286
286
-
 287
287
-
 288
288
-
 289
289
-
 290
290
-
 291
291
-
 292
292
-
 293
293
-
 294
294
-
 295
295
-
 296
296
-
 297
297
-
 298
298
-
 299
299
-
 300
300
-
 301
301
-
 302
302
-
 303
303
-
 304
304
-
 305
305
-
 306
306
-
 307
307
-
 308
308
-
 309
309
-
 310
310
-
 311
311
-
 312
312
-
 313
313
-
 314
314
-
 315
315
-
 316
316
-
 317
317
-
 318
318
-
 319
319
-
 320
320
-
 321
321
-
 322
322
-
 323
323
-
 324
324
-
 325
325
-
 326
326
-
 327
327
-
 328
328
-
 329
329
-
 330
330
-
 331
331
-
 332
332
-
 333
333
-
 334
334
-
 335
335
-
 336
336
-
 337
337
-
 338
338
-
 339
339
-
 340
340
-
 341
341
-
 342
342
-
 343
343
-
 344
344
-
 345
345
-
 346
346
-
 347
347
-
 348
348
-
 349
349
-
 350
350
-
 351
351
-
 352
352
-
 353
353
-
 354
354
-
 355
355
-
 356
356
-
 357
357
-
 358
358
-
 359
359
-
 360
360
-
 361
361
-
 362
362
-
 363
363
-
 364
364
-
 365
365
-
 366
366
-
 367
367
-
 368
368
-
 369
369
-
 370
370
-
 371
371
-
 372
372
-
 373
373
-
 374
374
-
 375
375
-
 376
376
-
 377
377
-
 378
378
-
 379
379
-
 380
380
-
 381
381
-
 382
382
-
 383
383
-
 384
384
-
 385
385
-
 386
386
-
 387
387
-
 388
388
-
 389
389
-
 390
390
-
 391
391
-
 392
392
-
 393
393
-
 394
394
-
 395
395
-
 396
396
-
 397
397
-
 398
398
-
 399
399
-
 400
400
-
 401
401
-
 402
402
-
 403
403
-
 404
404
-
 405
405
-
 406
406
-
 407
407
-
 408
408
-
 409
409
-
 410
410
-
 411
411
-
 412
412
-
 413
413
-
 414
414
-
 415
415
-
 416
416
-
 417
417
-
 418
418
-
 419
419
-
 420
420
-
 421
421
-
 422
422
-
 423
423
-
 424
424
-
 425
425
-
 426
426
-
 427
427
-
 428
428
-
 429
429
-
 430
430
-
 431
431
-
 432
432
-
 433
433
-
 434
434
-
 435
435
-
 436
436
-
 437
437
-
 438
438
-
 439
439
-
 440
440
-
 441
441
-
 442
442
-
 443
443
-
 444
444
-
 445
445
-
 446
446
-
 447
447
-
 448
448
-
 449
449
-
 450
450
-
 451
451
-
 452
452
-
 453
453
-
 454
454
-
 455
455
-
 456
456
-
 457
457
-
 458
458
-
 459
459
-
 460
460
-
 461
461
-
 462
462
-
 463
463
-
 464
464
-
 465
465
-
 466
466
-
 467
467
-
 468
468
-
 469
469
-
 470
470
-
 471
471
-
 472
472
-
 473
473
-
 474
474
-
 475
475
-
 476
476
-
 477
477
-
 478
478
-
 479
479
-
 480
480
-
 481
481
-
 482
482
-
 483
483
-
 484
484
-
 485
485
-
 486
486
-
 487
487
-
 488
488
-
 489
489
-
 490
490
-
 491
491
-
 492
492
-
 493
493
-
 494
494
-
 495
495
-
 496
496
-
 497
497
-
 498
498
-
 499
499
-
 500
500
-
 501
501
-
 502
502
-
 503
503
-
 504
504


LG GF5137PZJZ Manual de utilizare
- Categorie
- Frigidere-congelatoare
- Tip
- Manual de utilizare
în alte limbi
- français: LG GF5137PZJZ Manuel utilisateur
- slovenčina: LG GF5137PZJZ Používateľská príručka
- italiano: LG GF5137PZJZ Manuale utente
Lucrări înrudite
-
LG GC-P227STFA Manual de utilizare
-
-
LG GL5141PZBZ Manual de utilizare
-
LG GC-L207TVQA Manual de utilizare
-
LG GR-L227YVQA Manualul proprietarului
-
-
LG GSX960NSAZ Manualul proprietarului
-
LG GBP61DSPFN Manual de utilizare
-
Alte documente
-
Samsung RT59ZBTS Manual de utilizare
-
Samsung RSG5FUBP Manual de utilizare
-
Samsung RFG23DERS Manual de utilizare
-
Samsung RSG5PURS Manual de utilizare
-
Iberna BHBS 174 NHG/N Manual de utilizare
-
Camry CR 8073 Instrucțiuni de utilizare
-
Adler CR 8073 Manual de utilizare
-
Candy BCBF 172 DT Manual de utilizare