
EN
BG
HR
TR
HU
SK
FA
CS
SL
AR
RO
PL
FR
NL
DE
45 in 1 Multicooker

10
7
8
1
5
11
6
3
9
2
4
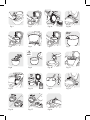
Fig.1 Fig.2 Fig.3aFig.3b
Fig.4 Fig.5 Fig.6 Fig.7
Fig.12Fig.13Fig.14 Fig.15
Fig.16Fig.17Fig.18
Fig.8 Fig.9 Fig.10Fig.11
a
b
MAX.
10cups
10
cups
MAX.
a
b

10
7
8
1
5
11
6
3
9
2
4
Fig.1 Fig.2 Fig.3aFig.3b
Fig.4 Fig.5 Fig.6 Fig.7
Fig.12Fig.13Fig.14 Fig.15
Fig.16Fig.17Fig.18
Fig.8 Fig.9 Fig.10Fig.11
a
b
MAX.
10cups
10
cups
MAX.
a
b

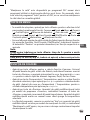
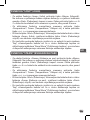
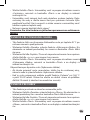
1
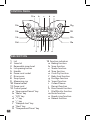
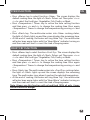
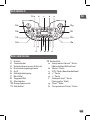
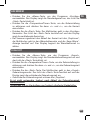
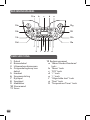
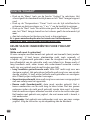
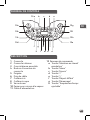
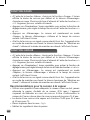
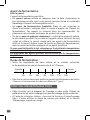
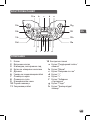
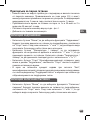
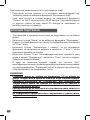
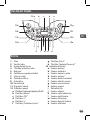
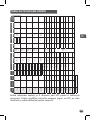
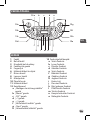
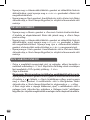
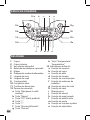
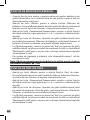
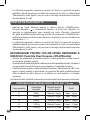
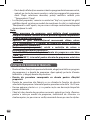
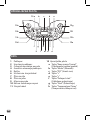
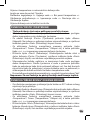
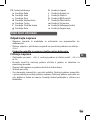
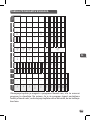
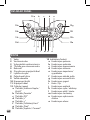
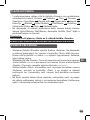
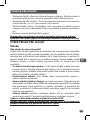
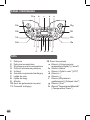
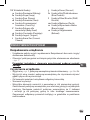
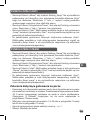
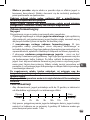
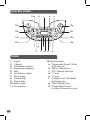
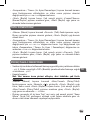
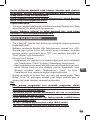
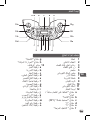
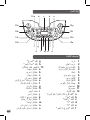
CONTROL PANEL
DESCRIPTION
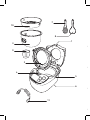
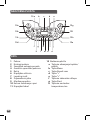
1 Lid
2 Inner lid
3 Removable inner bowl
4 Lid opening button
5 Handle
6 Power cord socket
7 Rice spoon
8 Soup spoon
9 Measuring cup
10 Steam basket
11 Power cord
12 Control panel
a “Keep warm/Cancel” key
b “Menu” key
c “DIY” key
d “<” key
e “>” key
f “Delayed start” key
g “Start” key
h “Temperature/Timer” key
13 Function indicators
a Baking function
b Soup function
c Steam function
d Stew function
e Crust/Fry function
f Baby food function
g Porridge function
h Yogurt function
i Cream/Cheese
j Dessert function
k Rice/Cereals function
l Pilaf/Risotto function
m Pasta function
n Bread rising function
o Reheat function
a13
f
k ol m n
g i jh
b c d e
12a
12c 12h
12d 12e
12b 12f
12g

2
EN
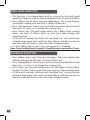
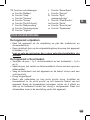
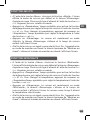
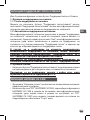
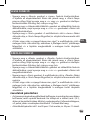
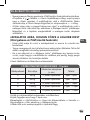
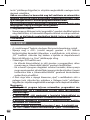
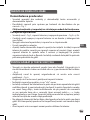
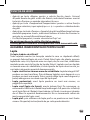
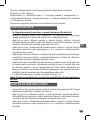
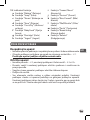
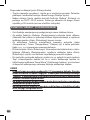
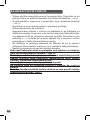
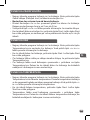
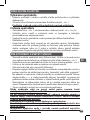
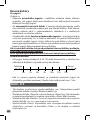
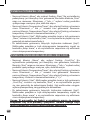
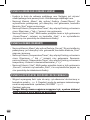
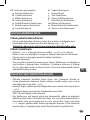
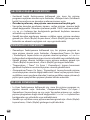
BEFORE THE FIRST USE
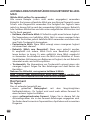
Unpack the appliance
• Remove the appliance from the packaging and unpack all the
accessories and printed documents.
• Open the lid by pushing the opening button on the housing – fig.1.
Read the Instructions and carefully follow the operation method.
Clean the appliance
• Remove the bowl – fig.2, the inner lid and the pressure valve – fig.3a
and 3b.
• Clean the bowl, the valve and the inner lid with a sponge and washing
up liquid.
• Wipe the outside of the appliance and the lid with a damp cloth.
• Dry off carefully.
• Put all the elements back in their original position. Install the inner lid
in the right positions on the top lid of machine. Then, put the inner
lid behind the 2 ribs and push it on the top until it’s fixed. Install the
detachable cord into the socket on the cooker base.
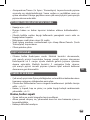
FOR THE APPLIANCE AND ALL FUNCTIONS
• Carefully wipe the outside of the bowl (especially the bottom). Make
sure that there are no foreign residues or liquid underneath the bowl
and on the heating element – fig.5.
• Place the bowl into the appliance, making sure that it is correctly
positioned – fig.6.
• Make sure that the inner lid is correctly in position.
• Close the lid in place with a sound of “click”.
• Install the power cord into the socket of the multicooker base and then
plug into the power outlet. The appliance will ring a long sound «Bip»,
all the indicators on the control box will light up for an instant.
Then the screen display show «----», all the indicators will switch off.
The appliance enters into standby mode, you can select the menu
functions as you wish.
• Do not touch the heating element when the product is plugged or after
cooking. Do not carry the product in use or just after cooking.
• This appliance is only intended for indoor use.

3
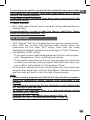
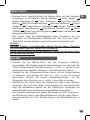
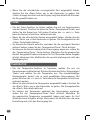
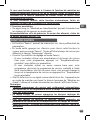
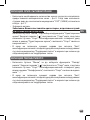
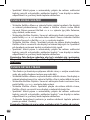
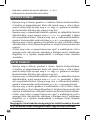
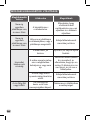
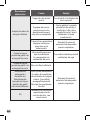
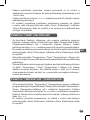
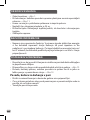
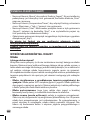
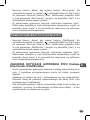
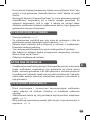
Never place your hand on the steam vent during cooking, as there is a
danger of burns – fig.10.
After start the cooking, if you wish to change the selected cooking
menu because of an error, press «KEEP WARM/CANCEL» key and
re-choose the menu you want.
Only use the inner pot provided with the appliance.
Do not pour water or put ingredients in the appliance without the
bowl inside.
The maximum quantity of water + ingredient should not exceed the
highest mark inside the bowl - fig.7.
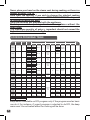
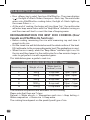
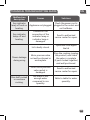
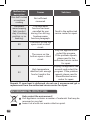
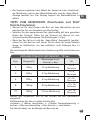
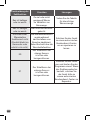
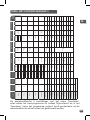
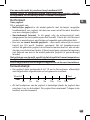
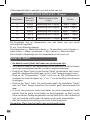
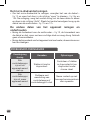
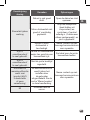
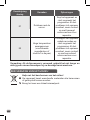
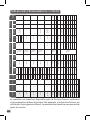
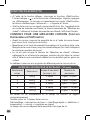
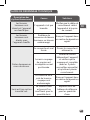
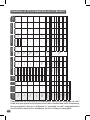
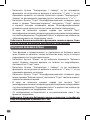
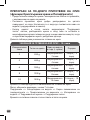
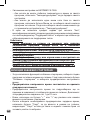
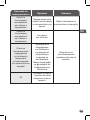
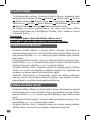
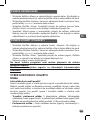
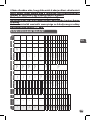
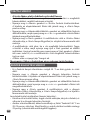
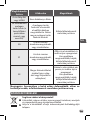
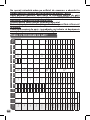
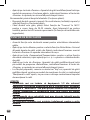
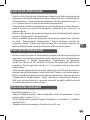
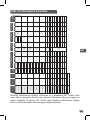
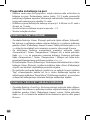
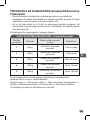
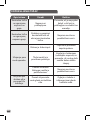
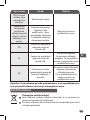
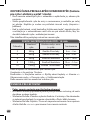
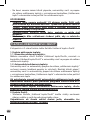
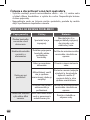
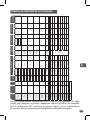
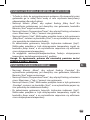
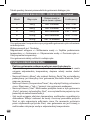
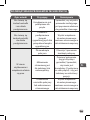
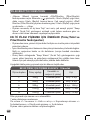
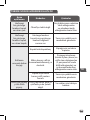
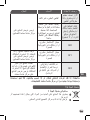
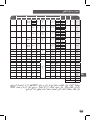
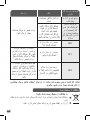
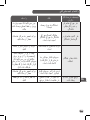
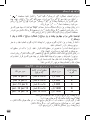
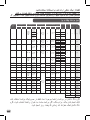
Programs Automatic Manual
Food
Type
Cooking Time Delayed Start Temperature (°C) Lid Position
Keep
warm
Default
time
Range
Every
(min)
Range
Every
(min)
Default Range Closed Open
Baking 4 4
Veg 25m
5m-4h 5
Cooking
time
~24h
5
140 °C
100/120/
140/160
* *
Fish 20m 160 °C
Poultry 40m 160 °C
Meat 50m 160 °C
Soup 4
Veg 40m
10m-3h 5
Cooking
time
~24h
5 100 °C - * *
Fish 45m
Poultry 50m
Meat 60m
Steam 4
Veg 35m
5m-3h 5
Cooking
time
~24h
5 100 °C - * *
Fish 25m
Poultry 45m
Meat 55m
Stew 4 2
Veg 60m
20m-9h 5
Cooking
time
~24h
5 100 °C 90/100 * *
Fish 25m
Poultry 1h30m
Meat 2h
Crust/Fry 4 4
Veg 12m
5m-1h30m 1 - No 160 °C
100/120/
140/160
* * *
Fish 10m
Poultry 15m
Meat 20m
Baby food 1 - 45m 5m-2h 5 Cooking
time
~24h
5 100 °C - * 1h max
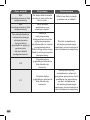
Porridge 1 - 25m 5m-2h 5 5 100 °C - * *
Yogurt 1 - 8h 1h-12h 15 - 40 °C - *
Cream
Cheese
1 - 40m 10m-4h 15 - 80 °C *
Dessert 4 - 45m 5m-2h 5
Cooking
time
~24h
5 160 °C
100/120/
140/160
*
Rice/
Cereals
1 - Automatic Automatic - 5 Automatic - * *
Pliaf/
Risotto
1 - Automatic Automatic - 5 Automatic - * *
Pasta 1 - 8m 3m-3h 1 5 100 °C - * *
Bread
rising
1 - 1h 10m-6h 5 5 40 °C 40 *
Reheat 1 - 25m 5m-1h 1 5 100 °C - * *
Keep
warm
1 - - - - 5 75 °C - * *
DIY 1 - 30m 5m-9h 5 5 100°C 40-160 * * *
Programs 28 17
TOTAL 45
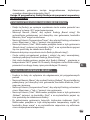
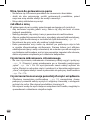
COOKING PROGRAME TABLE
Keep warm is available on DIY program only if the program used as basis
can do it. For instance, if yogurt program is selected to do DIY, the keep
warm won’t be activated when the cooking will be done.

4
EN
MENU KEY
• Under standby status, press the «Menu» key to cycle through the
following functions: Baking Soup Steam Stew Crust/Fry
Baby food Porridge Yogurt Cream/Cheese Dessert
Rice/Cereals Pilaf/Risotto Pasta Bread rising Reheat
Keep warm.
• The screen displays the default cooking time of each function (except
Rice/Cereals, Pilaf/Risotto). ”Start” button light flickers and the linked
function lights up.
Note:
You can long press the «Menu» key for 5s to cancel the “bip” sound if needed.
If you want to add bip , you have to press a second time on menu button.
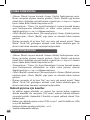
BAKING FUNCTION
• Press «Menu» key to select function «Baking». The screen displays the
default cooking time, the light of «Start» flickers red. Then press «<» or
«>» to select the food type : Vegetables, Fish, Poultry or Meat.
• Press «Temperature / Timer» key to active the time setting function
and then press «<» and «>» to change the cooking time. Press again
«Temperature / Timer» to change the temperature by pressing «<» and
«>».
• Press «Start» key. The multicooker enters into «Baking» cooking status,
the light of «Start» lights up and the screen displays the remaining
time. The multicooker rings when it reaches the selected temperature.
• At the end of cooking, the buzzer will ring three “bip”, the multicooker
will enter keep warm status with the “Keep Warm” indicator turning on
and the screen will start to count the time of keeping warm.

5
SOUP FUNCTION
• Press «Menu» key to select function «Soup». The screen displays the
default cooking time, the light of «Start» flickers red. Then press «<» or
«>» to select the food type : Vegetables, Fish, Poultry or Meat.
• Press «Temperature / Timer» key to active the time setting function and
then press «<» and «>» to change the cooking time.
• Press «Start» key. The multicooker enters into «Soup» cooking status,
the light of «Start» lights up and the screen displays the remaining time.
• At the end of cooking, the buzzer will ring three “bip”, the multicooker
will enter keep warm status with the “Keep Warm” indicator turning on
and the screen will start to count the time of keeping warm.
STEAM FUNCTION
• Press «Menu» key to select function «Steam». The screen displays the
default cooking time, the light of «Start» flickers red. Then press «<» or
«>» to select the food type : Vegetables, Fish, Poultry or Meat.
• Press «Temperature / Timer» key to active the time setting function and
then press «<» and «>» to change the cooking time.
• Press «Start» key. The multicooker enters into «Steam» cooking status,
the light of «Start» lights up and the screen displays the remaining time.
• At the end of cooking, the buzzer will ring three “bip”, the multicooker
will enter keep warm status with the “Keep Warm” indicator turning on
and the screen will start to count the time of keeping warm.
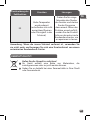
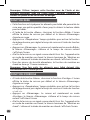
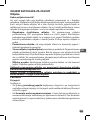
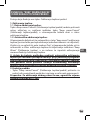
Recommendations for steam cooking
• The quantity of water must be appropriate and always be lower than
steam basket. Exceeding this level (2.5L max) may cause overfows
during use. For information the mark of 2 cups in the bowl correspond
to about 1L of water.
• The approximate cooking time for steam are 1h30 for 2L of water and
45 min for 1L of water.
• Place the steam basket onto the bowl - fig.4.
• Add the ingredients in the basket.

6
EN
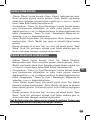
STEW FUNCTION
• Press «Menu» key to select function «Stew». The screen displays the
default cooking time, the light of «Start» flickers red. Then press «<» or
«>» to select the food type : Vegetables, Fish, Poultry or Meat.
• Press «Temperature / Timer» key to active the time setting function
and then press «<» and «>» to change the cooking time. Press again
«Temperature / Timer» to change the temperature by pressing «<» and
«>».
• Press «Start» key. The multicooker enters into «Stew» cooking status,
the light of «Start» lights up and the screen displays the remaining time.
• At the end of cooking, the buzzer will ring three “bip”, the multicooker
will enter keep warm status with the “Keep Warm” indicator turning on
and the screen will start to count the time of keeping warm.
CRUST FRY FUNCTION
• Press «Menu» key to select function «Crust Fry». The screen displays the
default cooking time, the light of «Start» flickers red. Then press «<» or
«>» to select the food type : Vegetables, Fish, Poultry or Meat.
• Press «Temperature / Timer» key to active the time setting function
and then press «<» and «>» to change the cooking time. Press again
«Temperature / Timer» to change the temperature by pressing «<» and
«>».
• Press «Start» key. The multicooker enters into «Crust Fry» cooking status,
the light of «Start» lights up and the screen displays the remaining
time. The multicooker rings when it reaches the selected temperature.
• At the end of cooking, the buzzer will ring three “bip”, the multicooker
will enter keep warm status with the “Keep Warm” indicator turning on
and the screen will start to count the time of keeping warm.
Note: Always use this function with oil and food. With oil only, it may
cause a failure or danger.

7
BABY FOOD FUNCTION
• This function is to prepare baby food by cooking the food with small
quantity of water in order to have a suitable texture for young children.
• Press «Menu» key to select function «Baby food». The screen displays
the default cooking time, the light of «Start» flickers red.
• Press «Temperature / Timer» key to active the time setting function and
then press «<» and «>» to change the cooking time.
• Press «Start» key. The multicooker enters into « Baby food» cooking
status, the light of «Start» lights up and the screen displays the
remaining time.
• At the end of cooking, the buzzer will ring three “bip”, the multicooker
will enter keep warm status with the “Keep Warm” indicator turning on
and the screen will start to count the time of keeping warm.
• For food safety reason, only 1 hour of keep warm is available.
Note: Once the baby food is cooked, it should be consumed within 1 hour.
PORRIDGE FUNCTION
• Press «Menu» key to select function «Porridge». The screen displays the
default cooking time, the light of «Start» flickers red.
• Press «Temperature / Timer» key to active the time setting function and
then press «<» and «>» to change the cooking time.
• Press «Start» key. The multicooker enters into «Porridge» cooking status,
the light of «Start» lights up and the screen displays the remaining time.
• At the end of cooking, the buzzer will ring three “bip”, the multicooker
will enter keep warm status with the “Keep Warm” indicator turning on
and the screen will start to count the time of keeping warm.

8
EN
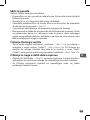
CHOICE OF INGREDIENTS FOR YOGURT
Milk
What milk should you use?
All our recipes (unless otherwise stipulated) are prepared using cow’s
milk. You can use plant milk such as soya milk for example as well as
sheep or goat’s milk but, in this case, the firmness of the yogurt may vary
depending on the milk used. Raw milk or long-life milks and all the milks
described below are suitable for your appliance:
• Long-life sterilised milk: UHT whole milk results in firmer yogurt. Using
semi-skimmed milk will result in less firm yogurt. However, you can use
semi-skimmed milk and add one or two pots of powdered milk.
• Pasteurised milk: this milk gives a more creamy yogurt with a little bit
of skin on the top.
• Raw milk (farm milk): this must be boiled. It is also recommended to
let it boil for a long time. It would be dangerous to use this milk without
boiling it. You must then leave it to cool before using it in your appliance.
Culturing using yogurt prepared with raw milk is not recommended.
• Powdered milk: using powdered milk will result in very creamy yogurt.
Follow the instructions on the manufacturer’s box.
Choose a whole milk, preferably long-life UHT.
Raw (fresh) or pasteurised milk must be boiled then cooled and needs
the skin removing.
YOGURT FUNCTION
• Press «Menu» key to select function «Yogurt». The screen displays the
default cooking time, the light of «Start» flickers red.
• Press «Temperature / Timer» key to active the time setting function and
then press «<» and «>» to change the cooking time.
• Press «Start» key. The multicooker enters into «Yogurt» cooking status,
the light of «Start» lights up and the screen displays the remaining time.
• At the end of cooking, the buzzer will ring three “bip”.
These is no keep warm at the end of the cooking.
Use for making yogurt in oven-proof glass containers.

9
The ferment
For yogurt
This is made either from:
• One shop-bought natural yogurt with the longest expiry date possible;
your yogurt will therefore contain more active ferment for a firmer yogurt.
• From a freeze-dried ferment. In this case, follow the activation time
specified on the ferment instructions. You can find these ferments in
supermarkets, pharmacies and in certain health product stores.
• From one of your recently prepared yogurt – this must be natural and
recently prepared. This is called culturing. After five culturing processes,
the used yogurt loses active ferments and therefore risks giving a less
firm consistency. You then need to start again using a shopbought
yogurt or freeze-dried ferment.
If you have boiled the milk, wait until it has reached room temperature
before adding the ferment.
Too high a heat may destroy the properties of your ferment.
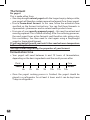
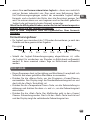
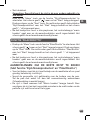
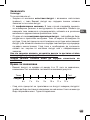
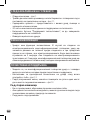
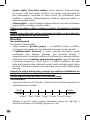
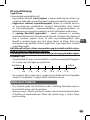
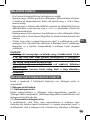
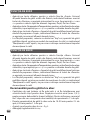
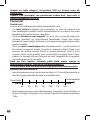
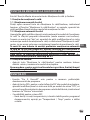
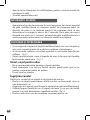
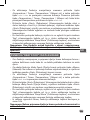
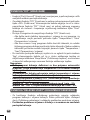
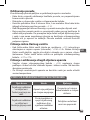
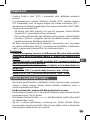
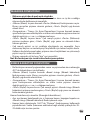
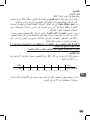
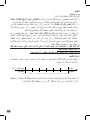
Fermentation time
• Your yogurt will need between 6 and 12 hours of fermentation,
depending on the basic ingredients and the result you are after.
Fluid
6h 7h 8h 9h 10h 11h 12h
Firm
Sweet Acidic
• Once the yogurt cooking process is finished, the yogurt should be
placed in a refrigerator for at least 4 hours and it can be kept max
7days in refrigerator.

10
EN
• This function is to make soft cheese. It is preferably to use full-cream
milk and some chilled soft cheese.
• Press «Menu» key to select function «Cream/Cheese». The screen
displays the default cooking time, the light of «Start» flickers red.
• Press «Temperature / Timer» key to active the time setting function and
then press «<» and «>» to change the cooking time.
• Press «Start» key. The multicooker enters into «Cream/Cheese» cooking
status, the light of «Start» lights up and the screen displays the
remaining time.
CREAM/CHEESE FUNCTION
DESSERT FUNCTION
• Press «Menu» key to select function «Dessert». The screen displays the
default cooking time, the light of «Start» flickers red.
• Press «Temperature / Timer» key to active the time setting function
and then press «<» and «>» to change the cooking time. Press again
«Temperature / Timer» to change the temperature by pressing «<» and
«>».
• Press «Start» key. The multicooker enters into «Dessert» cooking status,
the light of «Start» lights up and the screen displays the remaining time.
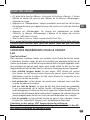
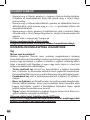
RICE/CEREALS FUNCTION
• Pour the required quantity of rice into the bowl using the measuring
cup provided – fig.8. Then fill with cold water up to the corresponding
«CUP» mark printed in the bowl – fig.9.
• Close the lid.
Note: Always add the rice first otherwise you will have too much water.
Press «Menu» key to select function «Rice/Cereal». The screen displays
« », the light of «Start» flickers, then press «Start» key. The muticooker
enters into «Rice/Cereal» cooking status, the light of «Start» lights up,
the screen flickers « -- ».
• At the end of cooking, the buzzer will ring three “bip”, the multicooker
will enter keep warm status with the “Keep Warm” indicator turning on
and the screen will start to count the time of keeping warm.

11
PILAF/RISOTTO FUNCTION
• Press «Menu» key to select function «Pilaf/Risotto». The screen displays
« », the light of «Start» flickers, then press «Start» key. The muticooker
enters into «Pilaf/Risotto» cooking status, the light of «Start» lights up,
the screen flickers « -- ».
• At the end of cooking, the buzzer will ring three “bip”, the multicooker
will enter keep warm status with the “Keep Warm” indicator turning on
and the screen will start to count the time of keeping warm.
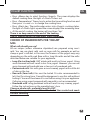
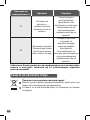
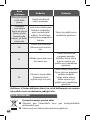
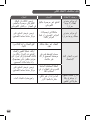
RECOMMENDATIONS FOR BEST RICE COOKING (Rice/
Cereals and Pilaf/Risotto functions)
• Before cooking, measuring the rice with measuring cup and rinse it
except risotto rice.
• Put the rinsed rice well distributed around the whole surface of the bowl.
Fill it with water to the corresponding water level (The graduations in cups).
• When the rice is ready, when the “Keep Warm” indicator light is on, stir
the rice and then leave it in the multicooker for a few minutes longer in
order to get perfect rice with separated grains.
The time and temperature are automatic for rice cooking.
Please note that there are 7 steps:
Preheat => Water absorb => Temperature quick rise => Keep boiling =>
Water evaporation => Braise rice => Keep warm.
The cooking time depends on the quantity and type of rice.
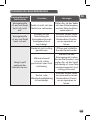
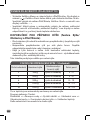
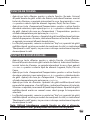
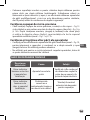
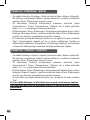
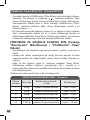
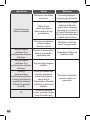
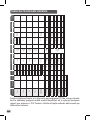
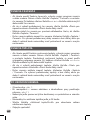
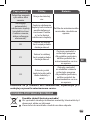
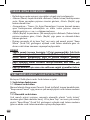
COOKING GUIDE FOR WHITE RICE – 10 cups
Measuring cups Weight of rice
Water level in
the bowl (+ rice)
Serves
2 300 g 2 cup mark 3per. – 4per.
4 600 g 4 cup mark 5per. – 6per.
6 900 g 6 cup mark 8per. – 10per.
8 1200 g 8 cup mark 13per. – 14per.
10 1500 g 10 cup mark 16per. – 18per.
This table below gives a guide to cook rice:

12
EN
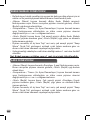
PASTA FUNCTION
BREAD RISING FUNCTION
• During the pasta cooking, the lid must be open.
• To cook pasta it is important to wait until the water reaches good
temperature before adding pasta.
• Press «Menu» key to select function «Pasta». The screen displays the
default cooking time, the light of «Start» flickers red.
• Press «Temperature / Timer» key to active the time setting function and
then press «<» and «>» to change the pasta cooking time.
• Press «Start» key. The multicooker enters into «Pasta» cooking status,
the light of «Start» lights up and the screen displays the remaining time.
• The Multicooker ring when the water is at good temperature. Put pasta
into the water and press again start to start timer. Until user do not
press start, cooking time do not start and multicooker keep water at
good temperature.
• At the end of cooking, the buzzer will ring three “bip”
Note: No keep warm function for this function
• This function is to rise bread dough at 40°C after manual kneading and
before baking.
• Press «Menu» key to select function «Bread rising». The screen displays
the default cooking time, the light of «Start» flickers red.
• Press «Temperature / Timer» key to active the time setting function and
then press «<» and «>» to change the cooking time.
• Press «Start» key. The multicooker enters into «Bread rising» cooking
status, the light of «Start» lights up and the screen displays the
remaining time.
Recommendations Dough proofing (Bread rising):
• To prepare the dough separately and put it in the inner bowl, close the
lid and select «Bread rising» function.
• Once your dough is ready, you can use “Baking” function at 160°C
to bake for 20-23 minutes. Then turn it on other side for another 23
minutes approximate (depending on quantity of ingredients).

13
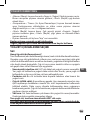
REHEAT FUNCTION
KEEP WARM/CANCEL FUNCTION
• This function is intended to reheat only cooked food.
• Press «Menu» key to select function «Reheat». The screen displays the
default cooking time, the light of «Start» flickers red.
• Press «Temperature / Timer» key to active the time setting function and
then press «<» and «>» to change the cooking time.
• Press «Start» key. The multicooker enters into «Reheat» cooking status,
the light of «Start» lights up and the screen displays the remaining time.
• At the end of cooking, the buzzer will ring three “bip”, the multicooker
will enter keep warm status with the “Keep Warm” indicator turning on
and the screen will start to count the time of keeping warm.
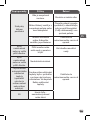
CAUTION
• The cold food should not exceed 1/2 of the cooker’s volume. Too
much food cannot be thoroughly heated. Repeated use of “Reheat“
or too little food will lead to burnt food and hard layer at the bottom.
• It is recommended not to reheat thick porridge, or it may become
pasty.
• Do not reheat long-stored cold food to avoid smell.
There are 2 different functions of this key: Keep warm and Cancel.
1. Keep warm function:
1.1 Manual Keep warm:
You can press «Keep warm/Cancel» key manually, the light of “Keep
warm/Cancel” turns on, the multicooker enters into keep warm status.
1.2 Automatic keep warm:
The multicooker will enter “keep warm” status automatically at the end of
the cooking (certain menus are exluded). The buzzer will ring three “bip”,
the multicooker will enter automatically into keep warm status with the
“Keep Warm” indicator turning on and the screen will start to count the
time of keeping warm.

14
EN
DIY FUNCTION
• “Do It Yourself” function is to memorize your favorite cooking choices.
• Press «DIY» key to select DIY function under standby status, the
multicooker will first enter “DIY” setting status with the screen
displaying the default cooking time, and the light of “Start” flickering.
• 2 possibilities for DIY setting :
− if you want to have stable temperature and time for your program ,
press “Temperature / Time” to defined your setting.
− If you want to use a menu as basis of your program, press menu key
to select your desiring cooking program. After select you menu, you
can modify it setting thanks to “Temperature / Time”.
• At the end of cooking, the buzzer will ring three “bip”, the multicooker
will enter keep warm status with the “Keep Warm” indicator turning on
and the screen will start to count the time of keeping warm.
Note:
• Certain cooking programs are defined as fully automatic programs,
hence the temperature and/or cooking time adjustment is not
possible.
• The multicooker memorizes the last temperature and cooking time
DIY setting for your next use.
• To protect the appliance, there is a temperature/time setting
restriction in DIY function:
Between 40-100°C, the cooking time range is 1min - 9h
Between 105-160°C, the cooking time range is 1min - 2h
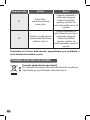
In case that you need to pre-cancel the automatic keep warm when
the cooking will be finished : long press «Keep warm» for 5 s before
starting the cooking program.
If you want to reput automatic keep warm, press again during 5s the
keep warm button.
2. Cancel function:
• Press “Keep warm/Cancel” key to cancel all setting data and back to
standby status.
Recommandation: in order to keep the food in good taste, please
limite the holding time within 12h.

15
TIMER FUNCTION
TEMPERATURE FUNCTION
• To use the timer function, choose a cooking program and the cooking
time first. Then, press the key «Temperature/Timer» and set the
cooking time. Each press of «<» and «>» key can increase or decrease
the cooking time.
• When you have chosen the required cooking time, press the «Start» key
to enter cooking status, the «Start» indicator will remain on.
• You can see the cooking time after start the delayed start if you press
“Temperature / Timer” key.
• You can modify the cooking time during the cooking by pressing the
“Temperature / Timer” key. After selected the chosen cooking time and
without any action during 5 seconds, the multicooker will resume the
rest of cooking with the new setting.
• To use the Temperature function, choose a cooking program and
the cooking time first. Then, press the key «Temperature/Timer» and
choose the temperature. The default cooking temperature will change
depending on the selected cooking program. Each press of «<» and «>»
key can increase or decrease the temperature.
• When you have chosen the required temperature, press the «Start» key
to enter cooking status, the «Start» indicator will remain on.
• You can modify the temperature during the cooking by pressing the
“Temperature / Timer” key. After selected the choosen temperature
and without action during 5 seconds, the multicooker will resume the
cooking with the new setting.
DELAYED START FUNCTION
• To use the delayed start function, choose a cooking program and the
cooking time first. Then, press the key «Delayed start» and choose the
preset time.
• The preset time corresponds to the time for end of cooking.
• The default preset time will change depending on the selected cooking
time. The Range of preset is from 1 up to 24 hours.
• Each press of «<» and «>» key can increase or decrease the delayed
start time.
• When you have chosen the required preset time, press the «Start» key
to enter cooking status, the «Start» indicator will remain on and screen
will display the number of hours you have chosen.

16
EN
MISCELLANEOUS INFORMATION
• The appliance has memory function. In case of power failure, the
multicooker will memorize the cooking state right before the failure,
and it will continue the cooking process if the power is resumed within
2 seconds. If the power failure lasts for more than 2 seconds, the
multicooker will cancel previous cooking and return to standby status.
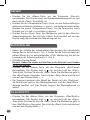
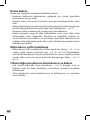
CLEANING AND MAINTENANCE
• To ensure the multicooker is unplugged and completely cooled down
before cleaning and maintenance.
• It is strongly advised to clean the appliance after each use with a
sponge – fig.12.
• The bowl, the inner lid, the cup and the rice and soup spoons are
dishwasher safe – fig.13.
Bowl, steam basket
• Scouring powders and metal sponges are not recommended.
• If food has stuck to the bottom, you may put water in the bowl to soak
for a while before washing.
• Dry the bowl carefully.
ON COMPLETION OF COOKING
• Open the lid – fig.1.
• Glove must be used when manipulating the cooking bowl and steam
tray – fig.11.
• Serve the food using the spoon provided with your appliance and
reclose the lid.
• 24 hours is the maximum keeping warm time.
• Press «Keep Warm/Cancel» key to finish keep warm status.
• Unplug the appliance.

17
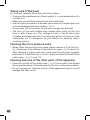
Taking care of the bowl
For the bowl, carefully follow the instructions below:
• To ensure the maintenance of bowl quality, it is recommended not to
cut food in it.
• Make sure you put the bowl back into the multicooker.
• Use the spoon provided or a wooden spoon and not a metal type so as
to avoid damaging the bowl surface – fig.14.
• To avoid any risk of corrosion, do not pour vinegar into the bowl.
• The color of the bowl surface may change after using for the first
time or after longer use. This change in color is due to the action
of steam and water and does not have any effect on the use of the
multicooker, nor it is dangerous for your health, it is perfectly safe to
continue using it.
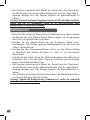
Cleaning the micro pressure valve
• When clean the micro-pressure valve, please remove it from the lid –
fig.15 and open it by rotating in the direction «open» - fig.16a and 16b.
After cleaning it, please wipe dry it and meet the two parts together
and rotate it in the direction of «close», then put it back to the lid of the
multicooker – fig.17a and 17b.
Cleaning and care of the other parts of the appliance
• Clean the outside of the multicooker – fig.18, the inside of the lid and
the cord with a damp cloth and wipe dry. Do not use abrasive products.
• Do not use water to clean the interior of the appliance body as it could
damage the heat sensor.
Pagina se încarcă...
Pagina se încarcă...
Pagina se încarcă...
Pagina se încarcă...
Pagina se încarcă...
Pagina se încarcă...
Pagina se încarcă...
Pagina se încarcă...
Pagina se încarcă...
Pagina se încarcă...
Pagina se încarcă...
Pagina se încarcă...
Pagina se încarcă...
Pagina se încarcă...
Pagina se încarcă...
Pagina se încarcă...
Pagina se încarcă...
Pagina se încarcă...
Pagina se încarcă...
Pagina se încarcă...
Pagina se încarcă...
Pagina se încarcă...
Pagina se încarcă...
Pagina se încarcă...
Pagina se încarcă...
Pagina se încarcă...
Pagina se încarcă...
Pagina se încarcă...
Pagina se încarcă...
Pagina se încarcă...
Pagina se încarcă...
Pagina se încarcă...
Pagina se încarcă...
Pagina se încarcă...
Pagina se încarcă...
Pagina se încarcă...
Pagina se încarcă...
Pagina se încarcă...
Pagina se încarcă...
Pagina se încarcă...
Pagina se încarcă...
Pagina se încarcă...
Pagina se încarcă...
Pagina se încarcă...
Pagina se încarcă...
Pagina se încarcă...
Pagina se încarcă...
Pagina se încarcă...
Pagina se încarcă...
Pagina se încarcă...
Pagina se încarcă...
Pagina se încarcă...
Pagina se încarcă...
Pagina se încarcă...
Pagina se încarcă...
Pagina se încarcă...
Pagina se încarcă...
Pagina se încarcă...
Pagina se încarcă...
Pagina se încarcă...
Pagina se încarcă...
Pagina se încarcă...
Pagina se încarcă...
Pagina se încarcă...
Pagina se încarcă...
Pagina se încarcă...
Pagina se încarcă...
Pagina se încarcă...
Pagina se încarcă...
Pagina se încarcă...
Pagina se încarcă...
Pagina se încarcă...
Pagina se încarcă...
Pagina se încarcă...
Pagina se încarcă...
Pagina se încarcă...
Pagina se încarcă...
Pagina se încarcă...
Pagina se încarcă...
Pagina se încarcă...
Pagina se încarcă...
Pagina se încarcă...
Pagina se încarcă...
Pagina se încarcă...
Pagina se încarcă...
Pagina se încarcă...
Pagina se încarcă...
Pagina se încarcă...
Pagina se încarcă...
Pagina se încarcă...
Pagina se încarcă...
Pagina se încarcă...
Pagina se încarcă...
Pagina se încarcă...
Pagina se încarcă...
Pagina se încarcă...
Pagina se încarcă...
Pagina se încarcă...
Pagina se încarcă...
Pagina se încarcă...
Pagina se încarcă...
Pagina se încarcă...
Pagina se încarcă...
Pagina se încarcă...
Pagina se încarcă...
Pagina se încarcă...
Pagina se încarcă...
Pagina se încarcă...
Pagina se încarcă...
Pagina se încarcă...
Pagina se încarcă...
Pagina se încarcă...
Pagina se încarcă...
Pagina se încarcă...
Pagina se încarcă...
Pagina se încarcă...
Pagina se încarcă...
Pagina se încarcă...
Pagina se încarcă...
Pagina se încarcă...
Pagina se încarcă...
Pagina se încarcă...
Pagina se încarcă...
Pagina se încarcă...
Pagina se încarcă...
Pagina se încarcă...
Pagina se încarcă...
Pagina se încarcă...
Pagina se încarcă...
Pagina se încarcă...
Pagina se încarcă...
Pagina se încarcă...
Pagina se încarcă...
Pagina se încarcă...
Pagina se încarcă...
Pagina se încarcă...
Pagina se încarcă...
Pagina se încarcă...
Pagina se încarcă...
Pagina se încarcă...
Pagina se încarcă...
Pagina se încarcă...
Pagina se încarcă...
Pagina se încarcă...
Pagina se încarcă...
Pagina se încarcă...
Pagina se încarcă...
Pagina se încarcă...
Pagina se încarcă...
Pagina se încarcă...
Pagina se încarcă...
Pagina se încarcă...
Pagina se încarcă...
Pagina se încarcă...
Pagina se încarcă...
Pagina se încarcă...
Pagina se încarcă...
Pagina se încarcă...
Pagina se încarcă...
Pagina se încarcă...
Pagina se încarcă...
Pagina se încarcă...
Pagina se încarcă...
Pagina se încarcă...
Pagina se încarcă...
Pagina se încarcă...
Pagina se încarcă...
Pagina se încarcă...
Pagina se încarcă...
Pagina se încarcă...
Pagina se încarcă...
Pagina se încarcă...
Pagina se încarcă...
Pagina se încarcă...
Pagina se încarcă...
Pagina se încarcă...
Pagina se încarcă...
Pagina se încarcă...
Pagina se încarcă...
Pagina se încarcă...
Pagina se încarcă...
Pagina se încarcă...
Pagina se încarcă...
Pagina se încarcă...
Pagina se încarcă...
Pagina se încarcă...
Pagina se încarcă...
Pagina se încarcă...
Pagina se încarcă...
Pagina se încarcă...
Pagina se încarcă...
Pagina se încarcă...
Pagina se încarcă...
Pagina se încarcă...
Pagina se încarcă...
Pagina se încarcă...
Pagina se încarcă...
Pagina se încarcă...
Pagina se încarcă...
Pagina se încarcă...
Pagina se încarcă...
Pagina se încarcă...
Pagina se încarcă...
Pagina se încarcă...
Pagina se încarcă...
Pagina se încarcă...
Pagina se încarcă...
Pagina se încarcă...
Pagina se încarcă...
Pagina se încarcă...
Pagina se încarcă...
Pagina se încarcă...
Pagina se încarcă...
Pagina se încarcă...
Pagina se încarcă...
Pagina se încarcă...
Pagina se încarcă...
Pagina se încarcă...
Pagina se încarcă...
Pagina se încarcă...
Pagina se încarcă...
Pagina se încarcă...
Pagina se încarcă...
Pagina se încarcă...
Pagina se încarcă...
Pagina se încarcă...
Pagina se încarcă...
Pagina se încarcă...
Pagina se încarcă...
Pagina se încarcă...
Pagina se încarcă...
Pagina se încarcă...
Pagina se încarcă...
Pagina se încarcă...
Pagina se încarcă...
Pagina se încarcă...
Pagina se încarcă...
Pagina se încarcă...
Pagina se încarcă...
Pagina se încarcă...
Pagina se încarcă...
Pagina se încarcă...
Pagina se încarcă...
Pagina se încarcă...
Pagina se încarcă...
Pagina se încarcă...
Pagina se încarcă...
Pagina se încarcă...
Pagina se încarcă...
Pagina se încarcă...
Pagina se încarcă...
Pagina se încarcă...
Pagina se încarcă...
Pagina se încarcă...
Pagina se încarcă...
Pagina se încarcă...
Pagina se încarcă...
Pagina se încarcă...
Pagina se încarcă...
Pagina se încarcă...
Pagina se încarcă...
Pagina se încarcă...
Pagina se încarcă...
Pagina se încarcă...
Pagina se încarcă...
Pagina se încarcă...
Pagina se încarcă...
Pagina se încarcă...
Pagina se încarcă...
Pagina se încarcă...
Pagina se încarcă...
Pagina se încarcă...
Pagina se încarcă...
Pagina se încarcă...
Pagina se încarcă...
Pagina se încarcă...
Pagina se încarcă...
Pagina se încarcă...
Pagina se încarcă...
Pagina se încarcă...
Pagina se încarcă...
Pagina se încarcă...
Pagina se încarcă...
Pagina se încarcă...
Pagina se încarcă...
Pagina se încarcă...
Pagina se încarcă...
Pagina se încarcă...
Pagina se încarcă...
-
 1
1
-
 2
2
-
 3
3
-
 4
4
-
 5
5
-
 6
6
-
 7
7
-
 8
8
-
 9
9
-
 10
10
-
 11
11
-
 12
12
-
 13
13
-
 14
14
-
 15
15
-
 16
16
-
 17
17
-
 18
18
-
 19
19
-
 20
20
-
 21
21
-
 22
22
-
 23
23
-
 24
24
-
 25
25
-
 26
26
-
 27
27
-
 28
28
-
 29
29
-
 30
30
-
 31
31
-
 32
32
-
 33
33
-
 34
34
-
 35
35
-
 36
36
-
 37
37
-
 38
38
-
 39
39
-
 40
40
-
 41
41
-
 42
42
-
 43
43
-
 44
44
-
 45
45
-
 46
46
-
 47
47
-
 48
48
-
 49
49
-
 50
50
-
 51
51
-
 52
52
-
 53
53
-
 54
54
-
 55
55
-
 56
56
-
 57
57
-
 58
58
-
 59
59
-
 60
60
-
 61
61
-
 62
62
-
 63
63
-
 64
64
-
 65
65
-
 66
66
-
 67
67
-
 68
68
-
 69
69
-
 70
70
-
 71
71
-
 72
72
-
 73
73
-
 74
74
-
 75
75
-
 76
76
-
 77
77
-
 78
78
-
 79
79
-
 80
80
-
 81
81
-
 82
82
-
 83
83
-
 84
84
-
 85
85
-
 86
86
-
 87
87
-
 88
88
-
 89
89
-
 90
90
-
 91
91
-
 92
92
-
 93
93
-
 94
94
-
 95
95
-
 96
96
-
 97
97
-
 98
98
-
 99
99
-
 100
100
-
 101
101
-
 102
102
-
 103
103
-
 104
104
-
 105
105
-
 106
106
-
 107
107
-
 108
108
-
 109
109
-
 110
110
-
 111
111
-
 112
112
-
 113
113
-
 114
114
-
 115
115
-
 116
116
-
 117
117
-
 118
118
-
 119
119
-
 120
120
-
 121
121
-
 122
122
-
 123
123
-
 124
124
-
 125
125
-
 126
126
-
 127
127
-
 128
128
-
 129
129
-
 130
130
-
 131
131
-
 132
132
-
 133
133
-
 134
134
-
 135
135
-
 136
136
-
 137
137
-
 138
138
-
 139
139
-
 140
140
-
 141
141
-
 142
142
-
 143
143
-
 144
144
-
 145
145
-
 146
146
-
 147
147
-
 148
148
-
 149
149
-
 150
150
-
 151
151
-
 152
152
-
 153
153
-
 154
154
-
 155
155
-
 156
156
-
 157
157
-
 158
158
-
 159
159
-
 160
160
-
 161
161
-
 162
162
-
 163
163
-
 164
164
-
 165
165
-
 166
166
-
 167
167
-
 168
168
-
 169
169
-
 170
170
-
 171
171
-
 172
172
-
 173
173
-
 174
174
-
 175
175
-
 176
176
-
 177
177
-
 178
178
-
 179
179
-
 180
180
-
 181
181
-
 182
182
-
 183
183
-
 184
184
-
 185
185
-
 186
186
-
 187
187
-
 188
188
-
 189
189
-
 190
190
-
 191
191
-
 192
192
-
 193
193
-
 194
194
-
 195
195
-
 196
196
-
 197
197
-
 198
198
-
 199
199
-
 200
200
-
 201
201
-
 202
202
-
 203
203
-
 204
204
-
 205
205
-
 206
206
-
 207
207
-
 208
208
-
 209
209
-
 210
210
-
 211
211
-
 212
212
-
 213
213
-
 214
214
-
 215
215
-
 216
216
-
 217
217
-
 218
218
-
 219
219
-
 220
220
-
 221
221
-
 222
222
-
 223
223
-
 224
224
-
 225
225
-
 226
226
-
 227
227
-
 228
228
-
 229
229
-
 230
230
-
 231
231
-
 232
232
-
 233
233
-
 234
234
-
 235
235
-
 236
236
-
 237
237
-
 238
238
-
 239
239
-
 240
240
-
 241
241
-
 242
242
-
 243
243
-
 244
244
-
 245
245
-
 246
246
-
 247
247
-
 248
248
-
 249
249
-
 250
250
-
 251
251
-
 252
252
-
 253
253
-
 254
254
-
 255
255
-
 256
256
-
 257
257
-
 258
258
-
 259
259
-
 260
260
-
 261
261
-
 262
262
-
 263
263
-
 264
264
-
 265
265
-
 266
266
-
 267
267
-
 268
268
-
 269
269
-
 270
270
-
 271
271
-
 272
272
-
 273
273
-
 274
274
-
 275
275
-
 276
276
-
 277
277
-
 278
278
-
 279
279
-
 280
280
-
 281
281
-
 282
282
-
 283
283
-
 284
284
-
 285
285
-
 286
286
-
 287
287
-
 288
288
-
 289
289
-
 290
290
-
 291
291
-
 292
292
-
 293
293
-
 294
294
-
 295
295
-
 296
296
-
 297
297
-
 298
298
-
 299
299
-
 300
300
-
 301
301
-
 302
302
-
 303
303
-
 304
304
-
 305
305
-
 306
306
-
 307
307
-
 308
308
-
 309
309


Tefal RK812110 Manual de utilizare
- Tip
- Manual de utilizare
în alte limbi
- Türkçe: Tefal RK812110 Kullanım kılavuzu
- slovenčina: Tefal RK812110 Používateľská príručka
Lucrări înrudite
-
Tefal RK705138 Manualul proprietarului
-
-
Tefal RK400915 Manual de utilizare
-
Tefal CY505E60 Manual de utilizare
-
-
-
-
-
-
Tefal YG650126 Manual de utilizare
Alte documente
-
Philips HD3139/70 Manual de utilizare
-
-
-
Philips HD3167 Manual de utilizare
-
Philips HD3167/71 Manual de utilizare
-
Maestro MR795 Manualul proprietarului
-
Adler AD 4476 Manual de utilizare
-
-
Vitek VT-4281 W Instrucțiuni de utilizare
-
Philips HD3037/03 Manual de utilizare