
1
VT-4281 W
3
14
27
41
Multicooker
Мультиварка
54
67
IM VT-4281.indd 1 26.12.2017 11:35:41
https://tm.by
Интернет-магазин TM.by

IM VT-4281.indd 2 26.12.2017 11:35:41
https://tm.by
Интернет-магазин TM.by

3
E N G L I S H
MULTICOOKER VT-4281 W
The main purpose of the multicooker is quick and
quality food cooking.
DESCRIPTION
1.
Multicooker body
2.
Control panel
3.
Display
4.
Lid opening button
5.
Steam valve
6.
Lid
7.
Bowl
8.
Multicooker carrying handles
9.
Power cord
Control panel
10.
On/off button «START/STOP»
11.
Keep warm mode on button «KEEP WARM»
12.
«PORRIDGE» program
13.
«PILAW» program
14.
«RICE» program
15.
Product selection indicators
«MEAT-CHICKEN-FISH»
16.
Cooking time increase button
17.
Cooking time decrease button
18.
«SLOW COOKING» program
19.
«BAKING» program
20.
«ROASTING» program
21.
«STEAM COOKING» program
22.
«STEWING» program
23.
«BABY MENU» program
24.
«DELAYED START» function
Accessories
25.
Measuring cup
26.
Spatula
27.
Steam rack
ATTENTION!
For additional protection it is reasonable to
install a residual current device (RCD) with
nominal operation current not exceeding
30 mA. To install RCD, contact a specialist.
SAFETY MEASURES
Before using the electrical appliance read this
manual carefully and keep it for further reference.
Use the unit for its intended purpose only as
specified in this manual. Mishandling the unit can
lead to its breakage and cause harm to the user
or damage to his/her property.
•
Before using the unit, examine the power cord
closely and make sure that it is not damaged.
Do not use the unit if the power cord is dam-
aged.
•
Before switching the unit on, make sure that
the mains voltage corresponds to the unit
operating voltage.
•
The power cord is equipped with a «euro-
plug»; insert it into a socket that has a reliable
grounding connection.
•
Do not use adapters for plugging the unit in.
•
Make sure that the power cord is properly
inserted into the mains socket.
•
Place the unit on a flat heat-resistant surface
away from moisture, heat sources and open
flame.
•
Place the unit with free access to the mains
socket.
•
Use the unit in places with proper ventilation.
•
Do not expose the unit to direct sunlight.
•
Do not place the unit too close to the wall and
to furniture walls.
•
Make sure that the power cord does not contact
with hot surfaces and sharp furniture edges.
•
Avoid damaging the power cord isolation.
•
Do not touch the power cord or the power plug
with wet hands.
•
Do not immerse the unit, the power cord
and the power plug into water or any other
liquids.
•
If the unit is dropped into water, unplug it
immediately by taking the power plug out of
the mains socket. Do not put your hands into
water!
•
Apply to the authorized service center for the
further use of the unit.
•
Do not insert foreign objects into the openings
of the unit or between its parts.
•
Do not let foreign objects or edges of clothes
get between the lid and the unit body.
•
Do not leave the unit unattended, if you are not
using the unit, switch it off and unplug it.
To avoid burns, do not bend over the steam
release opening. Be very careful when opening
the multicooker lid during and immediately after
cooking. Danger of burns by hot steam!
•
When the unit is operating in the «Roasting»
mode, do not bend over the multicooker bowl
to avoid burns by splashing hot oil.
•
Do not leave the unit lid open during the oper-
ation, except when operating in the «Roasting»
mode.
•
Do not touch the surface of the lid during mul-
ticooker operation, open the lid only by press-
ing the multicooker lid opening button.
IM VT-4281.indd 3 26.12.2017 11:35:42
https://tm.by
Интернет-магазин TM.by

4
ENGLISH
•
To avoid burns by hot steam, be very careful
when opening the multicooker lid.
•
Keep the steam release openings and the
steam valve clean, and clean them when they
get dirty.
•
Never use the unit without the installed bowl,
do not switch the multicooker on without food-
stuff and sufficient amount of liquid in the
cooking bowl.
•
Do not use the multicooker if the silicone gas-
ket on the inner side of the lid is damaged.
•
Follow the recommendations as to amount of
dry products and liquids.
•
Do not remove the bowl during the unit oper-
ation.
•
Do not cover the multicooker during operation.
Attention! When steaming food, watch the level
of liquid in the bowl, add water into the bowl as
needed. Do not leave the unit unattended!
•
Do not carry the multicooker during operation.
Use the carrying handles, having unplugged
the unit, removed the bowl with food and let
the multicooker cool down preliminarily.
•
The lid, the cooking bowl and the body parts
heat up strongly during operation, do not
touch them, if you need to take out the hot
bowl, use potholders.
•
Clean the unit regularly.
•
For child safety reasons do not leave polyeth-
ylene bags used as packaging unattended.
Attention! Do not allow children to play with poly-
ethylene bags or packaging film. Danger of suf-
focation!
•
Do not allow children to touch the unit body
and the power cord during the unit operation.
•
Do not allow children to use the unit as a toy.
•
During the unit’s operation and breaks
between operation cycles, place the unit out
of reach of children.
•
The unit is not intended for usage by physi-
cally or mentally disabled persons (including
children) or by persons lacking experience or
knowledge if they are not under supervision of
a person who is responsible for their safety or
if they are not instructed by this person on the
usage of the unit.
•
Never use the unit if the power cord or the
power plug is damaged, if the unit works
improperly or after it was dropped.
•
Do not repair the unit by yourself. Do not dis-
assemble the unit by yourself, if any malfunc-
tion is detected or after it was dropped, unplug
the unit and apply to any authorized service
center from the contact address list given in
the warranty certificate and on the website
www.vitek.ru.
•
To avoid damages, transport the unit in the
original package only.
•
Keep the unit in a dry cool place out of reach of
children and disabled persons.
THE UNIT IS INTENDED FOR HOUSEHOLD USE
ONLY, ITS COMMERCIAL USAGE AND USAGE
IN PRODUCTION AREAS AND WORK SPACES IS
PROHIBITED.
BEFORE THE FIRST USE
After unit transportation or storage under
cold (winter) conditions, it is necessary to
keep it for at least three hours at room tem-
perature before switching on.
ATTENTION!
•
During the first operation of the multicooker,
some foreign smell from the heating element
can appear. It is normal.
•
Never leave the operating unit unattended.
•
To avoid getting burns, be very careful when
opening the lid (6).
•
Do not bend over the steam valve (5) release
openings on the multicooker lid (6) and do
not place open parts of your body above the
steam valve (5) or the hot bowl (7)!
•
Watch the food during cooking, if necessary,
stir the products with the plastic spatula (26).
•
Do not use metal objects for stirring or remov-
ing the products from the bowl (7) as they can
damage the non-stick coating of the bowl (7).
–
Unpack the unit, remove any stickers and
package materials that can prevent multi-
cooker operation.
–
Place the multicooker on a flat steady and
heat-resistant surface capable of carrying the
weight of the multicooker with the products
inside it.
–
Do not place the multicooker near heat
sources, near a gas or electric stove or a
cooking unit.
–
Place the unit keeping at least a 20 cm gap
between the multicooker body and the wall
and 30-40 cm of space above the unit.
–
Do not place the unit close to objects that can
be damaged by the released steam of high
temperature.
Attention! Do not place the multicooker near
bath tubs, kitchen sinks or other containers
filled with water.
IM VT-4281.indd 4 26.12.2017 11:35:42
https://tm.by
Интернет-магазин TM.by

5
E N G L I S H
–
Open the lid (6) by pressing the button (4) and
remove the bowl (7).
–
Wash all removable parts with a soft sponge
and a neutral detergent: the bowl (7),
the steam rack (27), the spatula (26) and the
measuring cup (25). Then rinse them under
running water and dry.
–
Wipe the multicooker body (1) and the lid (6)
with a damp cloth, then wipe it dry.
RULES OF USING OF THE COOKING
BOWL (7)
•
Use the multicooker bowl (7) for its intended
purpose only. Do not place it on heating units
or cooking surfaces.
•
Do not replace the bowl (7) with another con-
tainer.
•
Always make sure that the heating element
surface and the bottom of the bowl (7) are
clean and dry.
•
Do not use the bowl (7) as a container for mix-
ing products.
•
Never chop products directly in the bowl (7)
to avoid damage of the non-stick coating.
•
Never leave and keep any foreign objects
in the bowl (7).
•
During cooking stir the products only with
a plastic spatula (26).
•
Do not use metal objects that can damage the
non-stick coating of the bowl (7).
•
Wash the bowl (7) right after cooking.
•
Do not put the bowl (7) under a cold water jet
right after cooking, first let the bowl (7) cool
down to room temperature.
•
The bowl (7) is not intended for washing in
a dishwashing machine.
SHORT DESCRIPTION OF CONTROL PANEL
BUTTONS (2)
Note:
–
the operation mode buttons on the control
panel (2) are sensory, you just need to touch
the button to switch the necessary operation
mode on.
–
pressing of each button is accompanied by
a sound signal.
«START/STOP» button (10)
–
Insert the plug of the power cord (9) into the
mains socket. You will hear a sound signal, the
standby mode symbols «- - - -» will be shown
on the display (3).
–
Press the required cooking program button,
the button illumination will be flashing, and
the flashing digital symbols of the cooking
program will appear on the display (3), the
cooking time is set by default (see the table
«COOKING PROGRAMS»).
–
After you select the cooking program, press
the button (10) «START/STOP» to switch the
multicooker on, the cooking program button
illumination will be glowing constantly, the
remaining cooking time digital indications will
be shown on the display (3).
–
To switch the cooking program off and set the
multicooker to the standby mode press the
button (10) «START/STOP», you will hear a
sound signal, the multicooker will be switched
off and the standby mode symbols «- - - -» will
appear on the display (3).
«KEEP WARM» button (11)
–
after the cooking program is finished you
will hear sound signals, the multicooker will
be automatically switched to the keep warm
mode. the button (11) illumination will light up,
the display (3) will show the operation time in
the keep warm mode.
–
To switch the keep warm mode off press the
button (10) «START/STOP», the multicooker
will switch to the standby mode «- - - -».
–
If you want to switch the keep warm mode on,
press the button (11) «KEEP WARM», the but-
ton (11) «KEEP WARM» illumination will light up
and start flashing, the flashing digital symbols
of the default keep warm mode operation time
«4:00» will appear on the display (3). You can
set the required keep warm mode operation
time with the buttons (16, 17) (see the table
«COOKING PROGRAMS»).
–
Switch the keep warm mode on by pressing
the button (10) «START/STOP», the button
(11) illumination will be glowing constantly
and the remaining time of the keep warm
mode operation will be shown on the display.
Cooking program selection buttons
(12, 13, 14, 18 (light indicators 15),
19, 20, 21, 22, 23).
–
When you press the cooking program button,
the selected program button illumination will
light up and start flashing, the default cooking
time will be shown on the display (3), except
the «RICE» program (see the table «COOKING
PROGRAMS»).
IM VT-4281.indd 5 26.12.2017 11:35:42
https://tm.by
Интернет-магазин TM.by

6
ENGLISH
Cooking time setting buttons (16, 17)
–
After selecting the cooking program you can
set the required cooking time (see the table
«COOKING PROGRAMS») by pressing the
buttons (16, 17), the set cooking time will be
shown on the display (3).
«DELAYED START» button (24)
–
The delayed start function allows setting
the necessary time of delayed start of the
cooking program (see the table «COOKING
PROGRAMS»).
–
Select a cooking program by pressing the
corresponding button, if necessary, set the
program operation time with the buttons (16,
17) and then press the button (24) «DELAYED
START», the button (24) illumination will be
flashing and the flashing digital symbols of the
default delayed start time «1:00» will appear
on the display (3). Set the necessary delayed
start time with the buttons (16, 17) (see the
table «COOKING PROGRAMS»), switch the
multicooker on with the button (10) «START/
STOP», the button (24) illumination will be
glowing constantly and the remaining delayed
start time will be shown on the display (3).
–
After the delayed start time runs out, the sym-
bol «0» will appear on the display (3), the
multicooker will switch on and start cooking
according to the preset program.
Attention! Never leave the operating unit
unattended.
COOKING PROGRAMS
Program Products Default
time
Cooking time Delayed Start Keep warm
mode
Rice — — + +
Pilaf 30 min 30 minutes – 2 hours + +
Porridge 20 min 15 minutes – 1 hour 10 minutes + +
Slow cooking
Meat 1 hour 35 minutes – 6 hours + +
Chicken 35 min 31 minutes – 35 minutes + +
Fish 30 min 20 minutes – 30 minutes + +
Roasting
Meat 35 min 31 min – 1 hour — —
Chicken 30 min 21 min – 30 min — —
Fish 15 min 5 min – 20 min — —
Stewing
Meat 35 min 31 min – 4 hours + +
Chicken 30 min 21 min – 30 min + +
Fish 15 min 5 min – 20 min + +
Baking 45 min 25 min – 2 hours — +
Boiling/Steam
cooking 30 min 5 min – 2 hours + +
Baby menu 30 min 15 min – 2 hours — +
Keep warm mode 4 hours 30 min – 4 hours — —
Delayed Start 1 hour 1 hour – 15 hours — —
•
Watch the cooking process and switch
the multicooker off when the food is ready.
Never leave the plugged-in multicooker unat-
tended.
•
During the cooking program operation do not
leave the lid (6) open.
•
Do not open the lid (6) during the «Baking»
program operation.
•
In the «Roasting» program, the unit operates
similarly to a kitchen stove, always watch the
cooking process and stir the products during
roasting.
IM VT-4281.indd 6 26.12.2017 11:35:42
https://tm.by
Интернет-магазин TM.by

7
E N G L I S H
•
To avoid scorching the products, switch
the keep warm function off after the end of
«Baking» program.
•
See recipes of dishes in the Recipe book
(supplied with the unit). All recipes are
to be taken as recommendations as the
required amount and proportions of the
ingredients may vary depending on local
peculiarities of the food and altitude above
sea level.
USING THE MULTICOOKER
Loading foodstuffs and connecting the multi-
cooker to the mains
Notes:
–
Do not use the bowl (7) for washing cereals
and do not chop products in the bowl (7), this
can damage the non-stick coating.
–
Make sure that there are no foreign objects,
dirt or moisture in the process chamber and
on the bottom of the bowl (7).
–
Wipe the outer surface and the bottom of the
bowl (7) dry before use.
–
In the middle of the heating element there is a
temperature sensor . Make sure that nothing
prevents the sensor’s free movement.
–
Make sure that the level of ingredients and liq-
uids in the bowl (7) does not exceed the maxi-
mal mark and is not below the minimal mark.
«RICE» program (14)
Use the «CUP» scale to make fluffy rice. Measure
the required amount of rice with the measuring
cup (25), wash the rice and put it in the bowl (7).
Pour water up to the mark corresponding to the
rice cup amount. For example, after putting four
measuring cups of rice, pour water up to the mark
«4» according to the «CUP» scale.
Note:
–
the capacity of the measuring cup (25) is
about 180 ml;
–
the taste of cooked rice depends on the sort
of rice and the amount of water;
–
add more water to cook fluffy rice;
–
add less water to cook harder rice;
–
perhaps, you’ll have to experiment with sorts
of rice and the amount of water according to
your taste;
–
before cooking rice you can add some oil or
seasonings.
–
Put the washed rice into the bowl (7).
–
Place the bowl (7) in the multicooker process
chamber. Make sure that the outer surface
of the bowl (7) is clean and dry, and the bowl
itself (7) is placed evenly and is in secure con-
tact with the heating element surface.
–
Close the lid (6) until the lock clicks.
–
Insert the power plug into the mains socket.
You will hear a sound signal, the sleep mode
symbols «- - - -» will be shown on the dis-
play (3).
–
Press the «RICE» cooking program button (14),
the button (14) illumination will be flashing.
–
If necessary, press the button (24) «DELAYED
START» and set the necessary delayed start
time with the buttons (16 - 17) (see the table
«COOKING PROGRAMS»).
Note: - if you set the «DELAYED START» program,
then after the multicooker is switched on the dig-
ital symbols of the delayed start time will appear
on the display (3). After the delayed start time is
over, the «RICE» cooking program will start.
–
Switch the «RICE» cooking program on by
pressing the button (10) «START/STOP», the
«RICE» button (14) will glow constantly.
–
During the «RICE» cooking program operation
the looped symbols «-» will be shown on the
display (3), after the required temperature is
reached, the remaining operation time digital
symbols will appear on the display (3).
–
During the rice cooking the hot steam will be
released from the steam valve (5) openings,
be careful to avoid burns.
–
After the «RICE» cooking program is finished
you will hear sound signals, the multicooker
will be switched to the keep warm mode, the
«KEEP WARM» button (11) illumination will light
up, the display (3) will show the digital symbols
of the operation time in the keep warm mode.
–
If you want the cooked rice to remain hot,
do not switch the multicooker off and do not
unplug it.
Note: - it is recommended not to use the keep
warm mode for a long time to avoid changing of
the flavor properties of the cooked rice.
–
Switch the multicooker off by pressing the but-
ton (10) «START/STOP», the multicooker will
switch to the sleep mode, the symbols «- - -
-» will appear on the display. Unplug the unit.
–
Press the button (4) and open the multicooker
lid (6) upwards, be careful to avoid getting
burns by the outgoing steam.
–
Stir the cooked rice with the spatula (26).
–
Remove the bowl (7) from the multicooker
using the potholders.
–
Remove the cooked rice from the bowl (7).
IM VT-4281.indd 7 26.12.2017 11:35:42
https://tm.by
Интернет-магазин TM.by

8
ENGLISH
–
Wait until the bowl (7) cools down, wash it
with warm water and neutral detergent, rinse
and dry.
«PILAF» program (13)
–
Put the required ingredients for the pilaf (see
the Recipe book) into the bowl (7) and add the
necessary amount of water.
–
Install the bowl (7) in the process chamber.
Make sure that the outer surface of the bowl
is clean and dry, and the bowl itself is placed
evenly and is in secure contact with the heat-
ing element surface.
–
Close the lid (6) until the lock clicks.
–
Insert the power plug into the mains socket.
You will hear a sound signal, the sleep mode
symbols «- - - -» will be shown on the dis-
play (3).
–
Press the «PILAF» cooking program button
(13), the button (13) illumination will be flash-
ing and the default cooking time «0:30» will be
shown on the display (3).
–
If necessary, set different cooking time (see
the table «COOKING PROGRAMS») with the
buttons (16-17), the set cooking time will be
shown on the display (3).
–
If necessary, press the button (24) «DELAYED
START» and set the necessary delayed start
time with the buttons (16 - 17) (see the table
«COOKING PROGRAMS»).
Note: - if you set the «DELAYED START» pro-
gram, then after the multicooker is switched
on the digital symbols of the delayed start time
will appear on the display (3). After the delayed
start time is over, the «PILAF» cooking program
will start.
–
Switch the «PILAF» cooking program on by
pressing the button (10) «START/STOP», the
«PILAF» button (13) will glow constantly.
–
The digital indications of the remaining time of
the program «DELAYED START» or «PILAF» will
be shown on the display (3).
–
During the program operation the hot steam
will be released from the steam valve (5) open-
ings, be careful to avoid burns.
–
After the «PILAF» cooking program is finished
you will hear sound signals, the multicooker
will be switched to the keep warm mode, the
«KEEP WARM» button (11) illumination will light
up, the display (3) will show the digital symbols
of the operation time in the keep warm mode.
–
Switch the multicooker off by pressing the but-
ton (10) «START/STOP», the multicooker will
switch to the sleep mode, the symbols «- - - -»
will appear on the display (3). Unplug the unit.
–
Press the button (4) and open the multicooker
lid (6) upwards, be careful to avoid getting
burns by the outgoing steam.
–
Remove the bowl (7) from the multicooker
using the potholders.
–
Remove the cooked products from the
bowl (7).
–
Wait until the bowl (7) cools down, wash it
with warm water and neutral detergent, rinse
and dry.
«PORRIDGE» program (12)
–
Put the prepared cereal into the bowl (7) (see
the Recipe book), when adding water do not
exceed the 2/3 of the maximal capacity of the
bowl (7).
–
Install the bowl (7) in the process chamber.
Make sure that the outer surface of the bowl
is clean and dry, and the bowl itself is placed
evenly and is in secure contact with the heat-
ing element surface.
–
Close the lid (6) until the lock clicks.
–
Insert the power plug into the mains socket.
You will hear a sound signal, the sleep mode
symbols «- - - -» will be shown on the dis-
play (3).
–
Press the «PORRIDGE» cooking program but-
ton (12), the button (12) illumination will be
flashing and the default cooking time «0:15»
will be shown on the display (3).
–
If necessary, set different cooking time (see
the table «COOKING PROGRAMS») with the
buttons (16-17), the set cooking time will be
shown on the display (3).
–
If necessary, press the button (24) «DELAYED
START» and set the necessary delayed start
time with the buttons (16 - 17) (see the table
«COOKING PROGRAMS»).
Note: - if you set the «DELAYED START» pro-
gram, then after the multicooker is switched on
the digital symbols of the delayed start time will
appear on the display (3). After the delayed start
time is over, the «PORRIDGE» cooking program
will start.
–
Switch the «PORRIDGE» cooking program on
by pressing the button (10) «START/STOP»,
the «PORRIDGE» button (12) will glow con-
stantly.
–
During heating the symbols «HEAT» will be
shown on the display (3), after the preset tem-
perature is reached, the «PORRIDGE» cooking
IM VT-4281.indd 8 26.12.2017 11:35:42
https://tm.by
Интернет-магазин TM.by

9
E N G L I S H
program will start, and the remaining opera-
tion time digital symbols will appear on the
display (3).
–
During the program operation the hot steam
will be released from the steam valve (5) open-
ings, be careful to avoid burns.
–
After the «PORRIDGE» cooking program is
finished you will hear sound signals, the mul-
ticooker will be switched to the keep warm
mode, the «KEEP WARM» button (11) illumi-
nation will light up, the display (3) will show
the digital symbols of the operation time in the
keep warm mode.
–
Switch the multicooker off by pressing the
button (10) «START/STOP», the multicooker
will switch to the sleep mode, the symbols
«- - - -» will appear on the display (3). Unplug
the unit.
–
Press the button (4) and open the multicooker
lid (6) upwards, be careful to avoid getting
burns by the outgoing steam.
–
Remove the bowl (7) from the multicooker
using the potholders.
–
Remove the cooked products from the bowl (7).
–
Wait until the bowl (7) cools down, wash it
with warm water and neutral detergent, rinse
and dry.
«SLOW COOKING» program (18)
«SLOW COOKING» cooking program has addi-
tional functions for cooking meat, chicken or fish.
Special cooking time and temperature are avail-
able for each function.
–
Put the required ingredients (see the Recipe
book) into the bowl (7) and add the neces-
sary amount of water, do not exceed 4/5 of the
maximal capacity of the bowl (7).
–
Install the bowl (7) in the process chamber.
Make sure that the outer surface of the bowl
is clean and dry, and the bowl itself is placed
evenly and is in secure contact with the heat-
ing element surface.
–
Close the lid (6) until the lock clicks.
–
Plug the power cord into the mains socket,
you will hear a sound signal, the display (3) will
show the sleep mode symbols «- - - -».
–
Press the button (18) «SLOW COOKING»,
the button (18) illumination will be flashing,
the symbol (15) «MEAT» will light up, and the
default time «1:00» will be shown on the dis-
play.
–
Depending on the added ingredients, press
the button (18) «SLOW COOKING» conse-
quently, the symbols (15) «CHICKEN-FISH-
MEAT» will alternately light up.
–
For each product there is a default cooking
time (see the table «COOKING PROGRAMS»).
–
If necessary, set different cooking time (see
the table «COOKING PROGRAMS») with the
buttons (16-17), the set cooking time will be
shown on the display (3).
–
If necessary, press the button (24) «DELAYED
START» and set the necessary delayed start
time with the buttons (16 - 17) (see the table
«COOKING PROGRAMS»).
Note: - if you set the «DELAYED START» pro-
gram, then after the multicooker is switched on
the digital symbols of the delayed start time will
appear on the display (3). After the delayed start
time is over, the «SLOW COOKING» cooking pro-
gram will start.
–
Switch the cooking program on by pressing
the button (10) «START/STOP», the button
(18) «SLOW COOKING» illumination will glow
constantly, the remaining operation time digi-
tal indications will appear on the display (3).
–
During the program operation the hot steam
will be released from the steam valve (5) open-
ings, be careful to avoid burns.
–
After the «SLOW COOKING» cooking program
is finished you will hear a sound signal, the
multicooker will be switched to the keep warm
mode, the «KEEP WARM» button (11) illumina-
tion will light up, the display (3) will show the
digital symbols of the operation time in the
keep warm mode.
–
Switch the multicooker off by pressing the but-
ton (10) «START/STOP», the multicooker will
switch to the sleep mode, the symbols «- - - -»
will appear on the display (3). Unplug the unit.
–
Press the button (4) and open the multicooker
lid (6) upwards, be careful to avoid getting
burns by the outgoing steam.
–
Remove the bowl (7) from the multicooker
using the potholders.
–
Remove the cooked products from the bowl (7).
–
Wait until the bowl (7) cools down, wash it
with warm water and neutral detergent, rinse
and dry.
«ROASTING» program (20)
Note: - the «DELAYED START» and «KEEP WARM»
functions are not available for the «ROASTING»
program.
«ROASTING» cooking program has additional
functions for cooking meat, chicken or fish.
IM VT-4281.indd 9 26.12.2017 11:35:42
https://tm.by
Интернет-магазин TM.by

10
ENGLISH
Special cooking time and temperature are avail-
able for each function.
–
Put the products into the bowl (7), do not
exceed 1/2 of the maximal capacity of the
bowl (7).
–
Install the bowl (7) in the process chamber.
Make sure that the outer surface of the bowl
is clean and dry, and the bowl itself is placed
evenly and is in secure contact with the heat-
ing element surface.
–
Do not close the lid (6).
–
Plug the power cord into the mains socket,
you will hear a sound signal, the display (3) will
show the sleep mode symbols «- - - -».
–
Press the button (20) «ROASTING», the button
(20) illumination will be flashing, the symbol
(15) «MEAT» will light up, and the default time
«0:35» will be shown on the display.
–
Depending on the added ingredients, press
the button (20) «ROASTING» consequently,
the symbols (15) «CHICKEN-FISH-MEAT» will
alternately light up.
–
For each product there is a default cooking
time (see the table «COOKING PROGRAMS»).
–
If necessary, set different cooking time (see
the table «COOKING PROGRAMS») with the
buttons (16-17), the set cooking time will be
shown on the display (3).
–
Switch the «ROASTING» program on by
pressing the button (10) «START/STOP»,
the «ROASTING» button (20) illumination will
glow constantly, the digital symbols «HEAt»
will appear on the display (3), and after the
set temperature is reached, the display (3)
will show the remaining operation time digi-
tal symbols.
Note:
–
the «ROASTING» program operates similarly
to a kitchen stove, always watch the cooking
process and stir the products during roasting
with the plastic spatula (26);
–
during the operation of the «Roasting» pro-
gram, do not bend over the multicooker bowl
to avoid burns by splashing hot oil;
–
after the «ROASTING» program is finished,
you will hear sound signals, the multicooker
will switch to the sleep mode, the symbols
«- - - -» will appear on the display (3). Unplug
the unit.
–
If you need to switch the multicooker off
before the «ROASTING» program is finished,
press the button (10) «START/STOP», the mul-
ticooker will switch to the sleep mode, the
symbols «- - - -» will appear on the display (3).
Unplug the unit.
–
Remove the bowl (7) from the multicooker
using the potholders.
–
Remove the cooked products from the
bowl (7).
–
Wait until the bowl (7) cools down, wash it
with warm water and neutral detergent, rinse
and dry.
«STEWING» program (22)
«STEWING» cooking program has additional func-
tions for cooking meat, chicken or fish. Special
cooking time and temperature are available for
each function.
–
Put the required ingredients (see the Recipe
book) into the bowl (7) and add the neces-
sary amount of water, do not exceed 4/5 of the
maximal capacity of the bowl (7).
–
Install the bowl (7) in the process chamber.
Make sure that the outer surface of the bowl
is clean and dry, and the bowl itself is placed
evenly and is in secure contact with the heat-
ing element surface.
–
Close the lid (6) until the lock clicks.
–
Plug the power cord into the mains socket,
you will hear a sound signal, the display (3) will
show the sleep mode symbols «- - - -».
–
Press the button (22) «STEWING», the button
(22) illumination will be flashing, the symbol
(15) «MEAT» will light up, and the default time
«0:35» will be shown on the display.
–
Depending on the added ingredients, press
the button (22) «STEWING» consequently,
the symbols (15) «CHICKEN-FISH-MEAT» will
alternately light up.
–
For each product there is a default cooking
time (see the table «COOKING PROGRAMS»).
–
If necessary, set different cooking time (see
the table «COOKING PROGRAMS») with the
buttons (16-17), the set cooking time will be
shown on the display (3).
–
If necessary, press the button (24) «DELAYED
START» and set the necessary delayed start
time with the buttons (16 - 17) (see the table
«COOKING PROGRAMS»).
Note: - if you set the «DELAYED START» program,
then after the multicooker is switched on the dig-
ital symbols of the delayed start time will appear
on the display (3). After the delayed start time is
over, the «STEWING» cooking program will start.
–
Switch the cooking program on by pressing the
button (10) «START/STOP», the «STEWING»
IM VT-4281.indd 10 26.12.2017 11:35:42
https://tm.by
Интернет-магазин TM.by

11
E N G L I S H
button (22) illumination will glow constantly,
the digital symbols «HEAt» will appear on the
display (3), and after the set temperature is
reached the «STEWING» cooking program will
start, the display (3) will show the remaining
operation time digital symbols.
–
During the program operation the hot steam
will be released from the steam valve (5) open-
ings, be careful to avoid burns.
–
After the «STEWING» cooking program is fin-
ished you will hear sound signals, the mul-
ticooker will be switched to the keep warm
mode, the «KEEP WARM» button (11) illumi-
nation will light up, the display (3) will show
the digital symbols of the operation time in the
keep warm mode.
–
Switch the multicooker off by pressing the but-
ton (10) «START/STOP», the multicooker will
switch to the sleep mode, the symbols «- - - -»
will appear on the display (3). Unplug the unit.
–
Press the button (4) and open the multicooker
lid (6) upwards, be careful to avoid getting
burns by the outgoing steam.
–
Remove the bowl (7) from the multicooker
using the potholders.
–
Remove the cooked products from the
bowl (7).
–
Wait until the bowl (7) cools down, wash it
with warm water and neutral detergent, rinse
and dry.
«BAKING» program (19)
Note:
–
the «DELAYED START» function is not available
for the «BAKING» program;
–
do not open the lid (6) during the «BAKING»
program operation.
–
Pour some vegetable oil into the bowl (7) and
smear it over the inner surface of the bowl (7),
it is desirable to add some breadcrumbs on
the inner surface of the bowl (7).
–
Put the prepared dough (see The Recipe
book) into the bowl (7), do not exceed 1/2 of
the maximal capacity of the bowl (7).
–
Install the bowl (7) in the process chamber.
Make sure that the outer surface of the bowl
is clean and dry, and the bowl itself is placed
evenly and is in secure contact with the heat-
ing element surface.
–
Close the lid (6) until the lock clicks.
–
Plug the power cord into the mains socket,
you will hear a sound signal, the display (3) will
show the sleep mode symbols «- - - -».
–
Press the button (19) «BAKING», the button (19)
illumination will be flashing, and the default time
«0:45» will be shown on the display.
–
If necessary, set different cooking time (see
the table «COOKING PROGRAMS») with the
buttons (16-17), the set cooking time will be
shown on the display (3).
–
Switch the cooking program on by pressing
the button (10) «START/STOP», the «BAKING»
button (19) illumination will glow constantly.
–
The remaining operation time digital symbols
will appear on the display (3).
–
During the «BAKING» program operation
the hot steam will be released from
the steam valve (5) openings, be careful to
avoid burns.
–
After the «BAKING» cooking program is fin-
ished you will hear sound signals, the mul-
ticooker will be switched to the keep warm
mode, the «KEEP WARM» button (11) illumi-
nation will light up, the display (3) will show
the digital symbols of the operation time in the
keep warm mode.
Note: - to avoid scorching the ready product
switch the keep warm function off after «Baking»
program ending.
–
Switch the multicooker off by pressing the but-
ton (10) «START/STOP», the multicooker will
switch to the sleep mode, the symbols «- - - -»
will appear on the display (3). Unplug the unit.
–
Press the button (4) and open the multicooker
lid (6) upwards, be careful to avoid getting
burns by the outgoing steam.
–
Remove the bowl (7) from the multicooker
using the potholders.
–
Remove the cooked products from the bowl (7).
–
Wait until the bowl (7) cools down, wash it
with warm water and neutral detergent, rinse
and dry.
«BOILING/STEAM COOKING»
cooking program (21)
–
Install the bowl (7) in the process chamber.
Make sure that the outer surface of the bowl
is clean and dry, and the bowl itself is placed
evenly and is in secure contact with the heat-
ing element surface.
–
Fill the bowl (7) with water, do not exceed 1/2
of the maximal capacity of the bowl (7).
–
Put the required ingredients into the steam
rack (27) (see the Recipe book), install the
steam rack (27) into the bowl (7).
–
Close the lid (6) until the lock clicks.
IM VT-4281.indd 11 26.12.2017 11:35:42
https://tm.by
Интернет-магазин TM.by

12
ENGLISH
–
Insert the power plug into the mains socket.
You will hear a sound signal, the sleep mode
symbols «- - - -» will be shown on the dis-
play (3).
–
Press the «BOILING/STEAM COOKING» cook-
ing program button (21), the button (13) illumi-
nation will be flashing and the default cooking
time «0:30» will be shown on the display (3).
–
If necessary, set different cooking time (see
the table «COOKING PROGRAMS») with the
buttons (16-17), the set cooking time will be
shown on the display (3).
–
If necessary, press the button (24) «DELAYED
START» and set the necessary delayed start
time with the buttons (16 - 17) (see the table
«COOKING PROGRAMS»).
Note: - if you set the «DELAYED START» program,
then after the multicooker is switched on the dig-
ital symbols of the delayed start time will appear
on the display (3). After the delayed start time is
over, the «BOILING/STEAM COOKING» cooking
program will start.
–
Switch the cooking program on by pressing
the button (10) «START/STOP», the «BOILING/
STEAM COOKING» button (21) will glow con-
stantly.
–
During heating the symbols «HEAt» will be
shown on the display (3), after the preset
temperature is reached, the flashing symbols
«Add» will appear on the display (3) and you
will hear sound signals, if the symbols «Add»
appear on the display (3), carefully open the
lid (6) and make sure that there is water in the
bowl (7).
–
After some time the «BOILING/STEAM
COOKING» program will be switched on and
the remaining operation time digital symbols
will appear on the display (3).
–
During the «BOILING/STEAM COOKING» pro-
gram operation the hot steam will be released
from the steam valve (5) openings, be careful
to avoid burns.
–
After the «BOILING/STEAM COOKING» cook-
ing program is finished you will hear sound sig-
nals, the multicooker will be switched to the
keep warm mode, the «KEEP WARM» button
(11) illumination will light up, the display (3) will
show the digital symbols of the operation time
in the keep warm mode.
–
Switch the multicooker off by pressing the but-
ton (10) «START/STOP», the multicooker will
switch to the sleep mode, the symbols «- - - -»
will appear on the display (3). Unplug the unit.
–
Press the button (4) and open the multicooker
lid (6) upwards, be careful to avoid getting
burns by the outgoing steam.
–
Remove the steam rack (27) from the bowl (7)
using the potholders.
–
Remove the cooked products from the steam
rack (27).
–
Remove the bowl (7) from the multicooker
using the potholders.
–
Wait until the bowl (7) cools down, drain the
remaining water, wash the bowl (7) with warm
water and neutral detergent, rinse and dry.
«BABY MENU» cooking program (23)
Note: - the «DELAYED START» function is not
available for the «BABY MENU» program;
–
Put the ingredients into the bowl (7) follow-
ing the baby food recipe and add the required
amount of water or milk.
–
Install the bowl (7) in the process chamber.
Make sure that the outer surface of the bowl
is clean and dry, and the bowl itself is placed
evenly and is in secure contact with the heat-
ing element surface.
–
Close the lid (6) until the lock clicks.
–
Insert the power plug into the mains socket.
You will hear a sound signal, the sleep mode
symbols «- - - -» will be shown on the dis-
play (3).
–
Press the «BABY MENU» cooking program but-
ton (23), the button (23) illumination will be
flashing and the default cooking time «0:30»
will be shown on the display (3).
–
If necessary, set different cooking time (see
the table «COOKING PROGRAMS») with the
buttons (16-17), the set cooking time will be
shown on the display (3).
–
Switch the cooking program on by pressing the
button (10) «START/STOP», the «BABY MENU»
button (23) illumination will glow constantly.
–
During the program operation the remaining
operation time digital symbols will be shown
on the display (3).
–
During the «BABY MENU’» program operation
the hot steam will be released from the steam
valve (5) openings, be careful to avoid burns.
–
After the «BABY MENU» cooking program is
finished you will hear sound signals, the mul-
ticooker will be switched to the keep warm
mode, the «KEEP WARM» button (11) illumi-
nation will light up, the display (3) will show
the digital symbols of the operation time in the
keep warm mode.
IM VT-4281.indd 12 26.12.2017 11:35:42
https://tm.by
Интернет-магазин TM.by

13
E N G L I S H
–
Switch the multicooker off by pressing the
button (10) «START/STOP», the multicooker
will switch to the sleep mode, the symbols
«- - - -» will appear on the display (3). Unplug
the unit.
–
Press the button (4) and open the multicooker
lid (6) upwards, be careful to avoid getting
burns by the outgoing steam.
–
Remove the bowl (7) from the multicooker
using the potholders.
–
Remove the cooked products from the bowl (7).
–
Wait until the bowl (7) cools down, wash it
with warm water and neutral detergent, rinse
and dry.
CLEANING AND CARE
Unplug the unit and let it cool down.
–
Remove the steam valve (5) grid turning
it clockwise.
–
Wash the steam valve grid and install it back
to its place turning it counterclockwise.
–
Clean the unit body (1) and lid (6) with
a slightly damp cloth, and then wipe dry.
–
Wash all removable parts with a soft sponge
and neutral detergent, then rinse under run-
ning water and dry.
–
Do not place the bowl (7) in a dishwashing
machine.
–
Wipe the surface of the heating element (only
when it is cold) with a soft dry cloth, do not
allow water to get inside the multicooker body.
–
Do not immerse the multicooker body, the
power cord and the power plug into water or
other liquids.
–
Do not use abrasive and aggressive deter-
gents or solvents for cleaning the multicooker
and the accessories.
STORAGE
–
Unplug the unit and clean it.
–
Keep the unit in a dry cool place away from
children and disabled persons.
DELIVERY SET
Multicooker – 1 pc.
Bowl – 1 pc.
Steam rack – 1 pc.
Spatula – 1 pc.
Measuring cup – 1 pc.
Instruction manual – 1 pc.
TECHNICAL SPECIFICATIONS
Power supply: 220-240 V ~ 50 Hz
Rated power: 800 W
Bowl capacity: 4 L
The manufacturer reserves the right to change
the unit specifications without a preliminary noti-
fication.
Unit operating life is 3 years
RECYCLING
For environment protection do not throw out the
unit and the batteries with usual household waste
after its service life expiration; apply to the spe-
cialized center for further recycling.
The waste generated during the disposal of the
unit is subject to mandatory collection and conse-
quent disposal in the prescribed manner.
For further information about recycling of this
product apply to a local municipal administration,
a disposal service or to the shop where you pur-
chased this product.
Guarantee
Details regarding guarantee conditions can be
obtained from the dealer from whom the appli-
ance was purchased. The bill of sale or receipt
must be produced when making any claim under
the terms of this guarantee.
IM VT-4281.indd 13 26.12.2017 11:35:42
https://tm.by
Интернет-магазин TM.by

14
русский
МУЛЬТИВАРКА VT-4281 W
Основное предназначение мультиварки – это
быстрое и качественное приготовление про-
дуктов.
ОПИСАНИЕ
1.
Корпус мультиварки
2.
Панель управления
3.
Дисплей
4.
Клавиша открытия крышки
5.
Паровой клапан
6.
Крышка
7.
Чаша
8.
Ручки для переноски мультиварки
9.
Сетевой шнур
Панель управления
10.
Кнопка включения/выключения
«СТАРТ/СТОП»
11.
Включение режима поддержания
температуры «ПОДДЕРЖАНИЕ
ТЕМПЕРАТУРЫ»
12.
Программа «КАША»
13.
Программа «ПЛОВ»
14.
Программа «РИС»
15.
Индикаторы выбора продуктов
«МЯСО – КУРИЦА – РЫБА»
16.
Кнопка увеличения времени приготовления
17.
Кнопка уменьшения времени приготовления
18.
Программа «ТОМЛЕНИЕ»
19.
Программа «ВЫПЕЧКА»
20.
Программа «ЖАРКА»
21.
Программа «ВАРКА/НА ПАРУ»
22.
Программа «ТУШЕНИЕ»
23.
Программа «ДЕТСКОЕ МЕНЮ»
24.
Функция «ОТЛОЖЕННЫЙ СТАРТ»
Аксессуары
25.
Мерный стаканчик
26.
Лопатка
27.
Решетка для приготовления на пару
ВНИМАНИЕ!
Для дополнительной защиты в цепи элек-
тропитания целесообразно установить
устройство защитного отключения (УЗО) с
номинальным током срабатывания, не пре-
вышающим 30 мА, для установки УЗО обра-
титесь к специалисту.
МЕРЫ БЕЗОПАСНОСТИ
Перед началом эксплуатации электроприбора
внимательно прочитайте настоящую инструк-
цию по эксплуатации и сохраните её для исполь-
зования в качестве справочного материала.
Используйте устройство только по его прямому
назначению, как изложено в данной инструк-
ции. Неправильное обращение с прибором
может привести к его поломке, причинению
вреда пользователю или его имуществу.
•
Перед использованием прибора внима-
тельно осмотрите сетевой шнур, убеди-
тесь в том, что он не имеют повреждений.
Не используйте прибор при наличии повреж-
дений сетевого шнура.
•
Перед включением устройства убеди-
тесь в том, что напряжение электрической
сети соответствует рабочему напряжению
устройства.
•
Сетевой шнур снабжён «евровилкой»; вклю-
чайте её в электрическую розетку, имеющую
надёжный контакт заземления.
•
При подключении устройства к электриче-
ской сети не используйте переходники.
•
Следите за тем, чтобы сетевой шнур был
плотно вставлен в сетевую розетку.
•
Размещайте устройство на ровной тепло-
стойкой поверхности, вдали от источников
влаги, тепла и открытого огня.
•
Устанавливайте устройство так, чтобы
доступ к электрической розетке был всегда
свободным.
•
Используйте устройство в местах с хорошей
вентиляцией.
•
Не подвергайте прибор воздействию прямых
солнечных лучей.
•
Не размещайте прибор в непосредственной
близости от стены и стенок мебели.
•
Не допускайте соприкосновения сете-
вого шнура с горячими поверхностями и с
острыми кромками мебели.
•
Избегайте повреждения изоляции сетевого
шнура.
•
Запрещается мокрыми руками прикасаться
к сетевому шнуру и к вилке сетевого шнура.
•
Не погружайте устройство, сетевой шнур и
вилку сетевого шнура в воду или в любые
другие жидкости.
•
В случае падения прибора в воду немед-
ленно отключите его от электрической сети,
вынув вилку сетевого шнура из электриче-
ской розетки. При этом ни в коем случае не
опускайте в воду руки.
•
По вопросу дальнейшего использова-
ния прибора обратитесь в авторизованный
(уполномоченный) сервисный центр.
IM VT-4281.indd 14 26.12.2017 11:35:43
https://tm.by
Интернет-магазин TM.by

15
русский
•
Не вставляйте посторонние предметы в
отверстия или в пространство между дета-
лями устройства.
•
Следите за тем, чтобы края одежды или
посторонние предметы не попали между
крышкой и корпусом прибора.
•
Не оставляйте устройство без присмотра;
если вы не пользуетесь прибором, выклю-
чайте прибор и отключайте его от электри-
ческой сети.
Во избежание ожогов не наклоняйтесь над
отверстием для выхода пара. Соблюдайте
крайнюю осторожность, открывая крышку муль-
тиварки во время и непосредственно после
приготовления продуктов. Риск ожога паром!
•
При работе устройства в программе «Жарка»
во избежание ожога брызгами горячего масла
не наклоняйтесь над чашей мультиварки.
•
Не оставляйте открытой крышку устрой-
ства во время её работы, кроме программы
«Жарка».
•
Не прикасайтесь к поверхности крышки
во время работы мультиварки, открывать
крышку можно только при нажатии на кнопку
открытия крышки мультиварки.
•
Во избежание получения ожогов горячим
паром соблюдайте крайнюю осторожность
при открытии крышки мультиварки.
•
Содержите в чистоте отверстия для выхода
пара и паровой клапан, а в случае загрязне-
ния очищайте их.
•
Категорически запрещается эксплуатация
прибора без установленной чаши, запреща-
ется включать мультиварку без продуктов и
без наличия достаточного количества жид-
кости в чаше для приготовления продуктов.
•
Запрещается использовать мультиварку при
наличии повреждений силиконовой про-
кладки на внутренней стороне крышки.
•
Соблюдайте рекомендации по объёму сухих
продуктов и жидкости.
•
Не извлекайте чашу во время работы устрой-
ства.
•
Не накрывайте мультиварку во время работы.
Внимание! При готовке продуктов на пару сле-
дите за уровнем жидкости в чаше, доливайте
воду в чашу по мере необходимости. Не остав-
ляйте устройство без присмотра!
•
Запрещается переносить мультиварку во
время работы. Используйте ручки для пере-
носки, предварительно отключив устройство
от электрической сети, вынув чашу с продук-
тами и дав мультиварке остыть.
•
Во время работы мультиварки крышка,
чаша для приготовления продуктов, а также
детали корпуса сильно нагреваются, не при-
касайтесь к ним, при необходимости вынуть
горячую чашу используйте кухонные рука-
вицы.
•
Регулярно проводите чистку прибора.
•
Из соображений безопасности детей не
оставляйте полиэтиленовые пакеты, исполь-
зуемые в качестве упаковки, без надзора.
Внимание! Не разрешайте детям играть с
полиэтиленовыми пакетами или упаковочной
плёнкой. Опасность удушья!
•
Не разрешайте детям прикасаться к устрой-
ству и к сетевому шнуру во время работы
устройства.
•
Не разрешайте детям использовать устрой-
ство в качестве игрушки.
•
Во время работы и в перерывах между рабо-
чими циклами размещайте устройство в
местах, недоступных для детей.
•
Прибор не предназначен для использова-
ния лицами (включая детей) с пониженными
физическими, психическими или умствен-
ными способностями или при отсутствии у
них опыта или знаний, если они не находятся
под контролем или не проинструктированы
об использовании прибора лицом, ответ-
ственным за их безопасность.
•
Не используйте устройство, если имеются
повреждения сетевого шнура или вилки
сетевого шнура, если устройство работает
с перебоями, а также после падения при-
бора.
•
Запрещается самостоятельно ремонтиро-
вать прибор. Не разбирайте прибор само-
стоятельно, при возникновении любых
неисправностей, а также после падения
устройства выключите сетевую вилку при-
бора из электрической розетки и обратитесь
в любой авторизованный (уполномоченный)
сервисный центр по контактным адресам,
указанным в гарантийном талоне и на сайте
www.vitek.ru.
•
Во избежание повреждений перевозите
устройство только в заводской упаковке.
•
Храните устройство в сухом прохладном
месте, недоступном для детей и людей с
ограниченными возможностями.
УСТРОЙСТВО ПРЕДНАЗНАЧЕНО ТОЛЬКО ДЛЯ
БЫТОВОГО ИСПОЛЬЗОВАНИЯ В ЖИЛЫХ ПО-
МЕЩЕНИЯХ, ЗАПРЕЩАЕТСЯ КОММЕРЧЕСКОЕ
IM VT-4281.indd 15 26.12.2017 11:35:43
https://tm.by
Интернет-магазин TM.by

16
русский
ИСПОЛЬЗОВАНИЕ И ИСПОЛЬЗОВАНИЕ
УСТРОЙСТВА В ПРОИЗВОДСТВЕННЫХ ЗОНАХ
И РАБОЧИХ ПОМЕЩЕНИЯХ.
ПЕРЕД ПЕРВЫМ ИСПОЛЬЗОВАНИЕМ
После транспортировки или хранения
устройства в холодных (зимних) условиях
необходимо выдержать его при комнатной
температуре не менее 3 часов.
ВНИМАНИЕ!
•
При первом использовании мультиварки
возможно появление постороннего запаха
от нагревательного элемента, это допу-
стимо.
•
Никогда не оставляйте работающее устрой-
ство без присмотра.
•
Во избежание ожогов соблюдайте осторож-
ность, открывая крышку (6).
•
Не наклоняйтесь над отверстиями паро-
вого клапана (5), находящимися на крышке
мультиварки (6), не располагайте открытые
участки тела над паровым клапаном (5) или
над горячей чашей (7)!
•
Следите за готовностью продуктов в про-
цессе приготовления, при необходимости
помешивайте продукты пластиковой лопат-
кой (26).
•
Перемешивая или извлекая продукты из
чаши (7), запрещается использовать метал-
лические предметы, которые могут повре-
дить антипригарное покрытие чаши (7).
–
Извлеките устройство из упаковки, уда-
лите все упаковочные материалы и любые
наклейки, мешающие нормальной работе
мультиварки.
–
Установите мультиварку на ровную, устойчи-
вую и теплостойкую поверхность, способную
выдержать вес мультиварки и вес продуктов,
помещённых в мультиварку.
–
Не устанавливайте мультиварку рядом с
источниками тепла, рядом с газовой плитой,
электроплитой или варочной панелью.
–
Установите устройство так, чтобы от стены
до корпуса мультиварки оставалось рассто-
яние не менее 20 см, а свободное простран-
ство над ней составляло не менее 30-40 см.
–
Не размещайте устройство в непосред-
ственной близости к предметам, которые
могут быть повреждены высокой температу-
рой выходящего пара.
Внимание! Не размещайте мультиварку
вблизи ванн, раковин или других ёмкостей,
наполненных водой.
–
Откройте крышку (6), нажав на клавишу (4),
и извлеките чашу (7).
–
Вымойте мягкой губкой с нейтральным мою-
щим средством все съёмные детали: чашу (7),
решетку для приготовления на пару (27),
лопатку (26), мерный стаканчик (25). Затем
ополосните их проточной водой и просушите.
–
Корпус мультиварки (1) и крышку (6) про-
трите влажной тканью, после чего вытрите
насухо.
ПРАВИЛА ПОЛЬЗОВАНИЯ ЧАШЕЙ (7)
•
Используйте чашу (7) мультиварки строго по
назначению. Запрещается устанавливать её
на нагревательные приборы или варочные
поверхности.
•
Не заменяйте чашу (7) другой ёмкостью.
•
Следите за тем, чтобы поверхность нагре-
вательного элемента и дно чаши (7) всегда
были чистыми и сухими.
•
Не используйте чашу (7) в качестве ёмкости
для смешивания продуктов.
•
Во избежание повреждений антипригарного
покрытия, никогда не измельчайте продукты
непосредственно в чаше (7).
•
Никогда не оставляйте и не храните в чаше
(7) какие-либо посторонние предметы.
•
Во время приготовления продуктов переме-
шивайте их только пластиковой лопаткой (26).
•
Не используйте металлические предметы,
которые могут повредить антипригарное
покрытие чаши (7).
•
Мойте чашу (7) сразу после приготовления
продуктов.
•
Не помещайте чашу (7) сразу после приго-
товления под холодную воду, дайте чаше (7)
сначала остыть до комнатной температуры.
•
Чаша (7) не предназначена для мытья в
посудомоечной машине.
КРАТКОЕ ОПИСАНИЕ КНОПОК ПАНЕЛИ
УПРАВЛЕНИЯ (2)
Примечание:
–
кнопки режимов работы на панели управле-
ния (2) сенсорные, для включения нужного
режима работы к кнопке достаточно при-
коснуться;
–
прикосновение к каждой кнопке сопрово-
ждается звуковым сигналом.
Кнопка (10) «СТАРТ/СТОП»
–
Вставьте вилку сетевого шнура (9) в электри-
ческую розетку. Прозвучит звуковой сигнал,
IM VT-4281.indd 16 26.12.2017 11:35:43
https://tm.by
Интернет-магазин TM.by

17
русский
на дисплее (3) отобразятся символы режима
ожидания «- - - -».
–
Нажмите кнопку нужной программы при-
готовления, при этом подсветка кнопки
программы будет мигать, на дисплее (3)
отобразятся мигающие цифровые символы
времени приготовления, время приготовле-
ния установлено по умолчанию (см. таблицу
«ПРОГРАММЫ ПРИГОТОВЛЕНИЯ»).
–
После выбора программы приготовле-
ния нажмите кнопку (10) «СТАРТ/СТОП» для
включения мультиварки, при этом подсветка
кнопки программы будет светиться посто-
янно, на дисплее (3) будут отображаться
цифровые символы времени, оставшегося
до окончания работы программы приготов-
ления.
–
Для выключения программы приготовления
и перехода мультиварки в режим ожидания
нажмите кнопку (10) «СТАРТ/СТОП», прозву-
чит звуковой сигнал, мультиварка выклю-
чится, на дисплее (3) отобразятся символы
режима ожидания «- - - -».
Кнопка (11) «ПОДДЕРЖАНИЕ
ТЕМПЕРАТУРЫ»
–
По окончании работы программы приготов-
ления прозвучат звуковые сигналы, муль-
тиварка перейдет в режим поддержания
температуры, при этом загорится подсветка
кнопки (11), на дисплее (3) будет отобра-
жаться время работы режима поддержания
температуры.
–
Для выключения режима поддержания
температуры нажмите кнопку (10) «СТАРТ/
СТОП», мультиварка перейдёт в режим ожи-
дания «- - - -».
–
Если вы хотите включить режим поддер-
жания температуры, нажмите кнопку (11)
«ПОДДЕРЖАНИЕ ТЕМПЕРАТУРЫ», при этом
загорится и будет мигать подсветка кнопки
(11) «ПОДДЕРЖАНИЕ ТЕМПЕРАТУРЫ», на
дисплее (3) отобразятся мигающие циф-
ровые символы времени работы режима
поддержания температуры, установленного
по умолчанию «4:00», кнопками (16, 17) вы
можете установить нужное время работы
режима поддержания температуры (см.
таблицу «ПРОГРАММЫ ПРИГОТОВЛЕНИЯ»).
–
Включите режим поддержания темпера-
туры, нажав на кнопку (10) «СТАРТ/СТОП»,
при этом подсветка кнопки (11) будет све-
титься постоянно, а на дисплее будет ото-
бражаться время, оставшееся до окончания
работы режима поддержания температуры.
Кнопки выбора программ приготовления
(12, 13, 14, 18 (световые индикаторы 15),
19, 20, 21, 22, 23).
–
При нажатии кнопки программы приготов-
ления продуктов загорится и будет мигать
подсветка кнопки выбранной программы,
на дисплее (3) отобразится время при-
готовления, установленное по умолча-
нию, кроме программы «РИС» (см. таблицу
«ПРОГРАММЫ ПРИГОТОВЛЕНИЯ»).
Кнопки установки времени приготовления
(16, 17)
–
После выбора программы приготовления
вы можете установить необходимое время
приготовления (см. таблицу «ПРОГРАММЫ
ПРИГОТОВЛЕНИЯ») нажатием кнопок (16,
17), установленное время приготовления
отобразится на дисплее (3).
Кнопка (24) «ОТЛОЖЕННЫЙ СТАРТ»
–
Функция отложенного старта позволяет
установить необходимое время отсрочки до
включения программы приготовления (см.
таблицу «ПРОГРАММЫ ПРИГОТОВЛЕНИЯ»).
–
Выберите программу приготовления, нажав
соответствующую кнопку, при необходимо-
сти установите время работы программы
приготовления кнопками (16, 17), а затем
нажмите кнопку (24) «ОТЛОЖЕННЫЙ СТАРТ»,
при этом подсветка кнопки (24) будет
мигать, на дисплее (3) отобразятся мигаю-
щие цифровые символы времени отложен-
ного старта, установленного по умолчанию
«1:00», кнопками (16, 17) установите необхо-
димое время до начала приготовления (см.
таблицу «ПРОГРАММЫ ПРИГОТОВЛЕНИЯ»),
включите мультиварку кнопкой (10) «СТАРТ
СТОП», при этом подсветка кнопки (24) будет
светиться постоянно, на дисплее (3) будет
отображаться время, оставшееся до вклю-
чения программы приготовления.
–
По прошествии времени отложенного старта
на дисплее (3) высветится «0», мультиварка
включится и начнёт приготовление продук-
тов по ранее выбранной программе.
Внимание! Никогда не оставляйте работаю-
щее устройство без присмотра.
IM VT-4281.indd 17 26.12.2017 11:35:43
https://tm.by
Интернет-магазин TM.by

18
русский
ПРОГРАММЫ ПРИГОТОВЛЕНИЯ
Программа Продукты Время по
умолчанию
Время готовки Отложенный
старт
Поддержание
температуры
Рис – – + +
Плов 30 мин 30 мин – 2 часа + +
Каша 20 мин 15 мин – 1 час 10 мин + +
Томление
Мясо 1 час 35 мин – 6 часов + +
Курица 35 мин 31 мин – 35 мин + +
Рыба 30 мин 20 мин – 30 мин + +
Жарка
Мясо 35 мин 31 мин – 1 час – –
Курица 30 мин 21 мин – 30 мин – –
Рыба 15 мин 5 мин – 20 мин – –
Тушение
Мясо 35 мин 31 мин – 4 часа + +
Курица 30 мин 21 мин – 30 мин + +
Рыба 15 мин 5 мин – 20 мин + +
Выпечка 45 мин 25 мин – 2 часа – +
Варка/
На пару 30 мин 5 мин – 2 часа + +
Детское
меню 30 мин 15 мин – 2 часа – +
Поддержание
температуры 4 часа 30 мин – 4 часа – –
Отложенный
старт 1 час 1 час – 15 часов – –
•
Следите за процессом приготовления и
отключайте мультиварку, когда продукты
будут приготовлены. Не оставляйте мульти-
варку, включенную в сеть, без присмотра.
•
Во время работы программы приготовле-
ния продуктов не оставляйте крышку (6)
открытой.
•
Не открывайте крышку (6) во время работы
программы «Выпечка».
•
В программе «Жарка» устройство работает
по аналогии с кухонной плитой, обязательно
следите за процессом приготовления, пере-
мешивайте продукты во время жарки.
•
Чтобы предотвратить подгорание продук-
тов, отключайте режим поддержания темпе-
ратуры сразу после завершения программы
«Выпечка».
•
Рецепты блюд смотрите в Книге ре-
цептов (входит в комплект поставки).
Все рецепты носят рекомендательный
характер, так как требуемые для рецеп-
тов объёмы и соотношения ингредиен-
тов могут варьироваться в зависимости
от региональной специфики продуктов
и высоты над уровнем моря.
ИСПОЛЬЗОВАНИЕ МУЛЬТИВАРКИ
Закладка продуктов и подключение мульти-
варки к электрической сети
Примечания:
–
Не используйте чашу (7) для мытья круп и
не режьте в чаше (7) продукты, это может
повредить антипригарное покрытие.
–
Убедитесь, что в рабочей камере мульти-
варки и на дне чаши (7) нет посторонних
предметов, загрязнений или влаги.
–
Перед использованием вытрите внешнюю
поверхность и дно чаши (7) насухо.
IM VT-4281.indd 18 26.12.2017 11:35:43
https://tm.by
Интернет-магазин TM.by

19
русский
–
В середине нагревательного элемента нахо-
дится датчик температуры. Следите за тем,
чтобы свободному перемещению датчика
ничто не мешало.
–
Следите за тем, чтобы объём ингредиентов
в чаше (7) вместе с жидкостью не превы-
шал отметку максимального уровня и не был
ниже отметки минимального уровня.
Программа «РИС» (14)
Шкала «CUP» помогает приготовить рассып-
чатый рис. Необходимое количество риса
отмерьте мерным стаканчиком (25), промойте
рис и поместите в чашу (7). Воду налейте до
отметки, соответствующей количеству стакан-
чиков риса. Например, если насыпали четыре
мерных стаканчика риса, долейте воду до метки
«4» по шкале «CUP».
Примечание:
–
объем мерного стаканчика (25) составляет
около 180 мл;
–
вкус готового риса зависит от сорта риса
и количества добавленной воды;
–
для приготовления рассыпчатого риса
добавляйте больше воды;
–
для приготовления более жесткого риса
добавьте меньше воды;
–
возможно, вам придется экспериментиро-
вать с сортами риса и количеством воды,
в соответствии с вашим вкусом;
–
перед началом приготовления риса вы
можете добавить масло или различные при-
правы.
–
Поместите промытый рис в чашу (7).
–
Установите чашу (7) в рабочую камеру муль-
тиварки. Убедитесь, что внешняя поверх-
ность чаши (7) чистая и сухая, а сама чаша
(7) установлена без перекосов и плотно
соприкасается с поверхностью нагреватель-
ного элемента.
–
Закройте крышку (6) до щелчка фиксатора.
–
Вставьте вилку сетевого шнура в электриче-
скую розетку. Прозвучит звуковой сигнал, на
дисплее (3) отобразятся символы спящего
режима «- - - -».
–
Нажмите кнопку программы приготовления
(14) «РИС», при этом подсветка кнопки (14)
будет мигать.
–
При необходимости нажмите кнопку (24)
«ОТЛОЖЕННЫЙ СТАРТ», кнопками (16 – 17)
установите необходимое время отсрочки
начала приготовления (см. таблицу
«ПРОГРАММЫ ПРИГОТОВЛЕНИЯ»).
Примечание: - если была установлена про-
грамма «ОТЛОЖЕННЫЙ СТАРТ», то после
включения мультиварки на дисплее (3) будут
отображаться цифровые символы времени
отложенного старта, по окончании времени
отложенного старта включится программа при-
готовления «РИС».
–
Включите программу приготовления «РИС»,
нажав кнопку (10) «СТАРТ/СТОП», при этом
подсветка кнопки (14) «РИС» будет светиться
постоянно.
–
Во время работы программы приготовле-
ния «РИС» на дисплее (3) будут отобра-
жаться бегущие по кругу символы «-», после
достижения необходимой температуры на
дисплее (3) отобразятся цифровые сим-
волы времени, оставшегося до завершения
работы программы.
–
Во время приготовления риса горячий пар
будет выходить из отверстий парового кла-
пана (5), соблюдайте осторожность во избе-
жание получения ожогов.
–
По окончании работы программы приго-
товления «РИС» прозвучат звуковые сиг-
налы, мультиварка переключится в режим
поддержания температуры, загорится
подсветка кнопки (11) «ПОДДЕРЖАНИЕ
ТЕМПЕРАТУРЫ», на дисплее (3) будут
отображаться цифровые символы вре-
мени работы режима поддержания темпе-
ратуры.
–
Если вы хотите, чтобы приготовленный рис
был горячим, не выключайте мультиварку
или не вынимайте вилку сетевого шнура из
электрической розетки.
Примечание: - во избежание изменения вку-
совых качеств приготовленного риса не реко-
мендуется использовать режим поддержания
температуры в течение длительного времени.
–
Выключите мультиварку, нажав кнопку (10)
«СТАРТ/СТОП», мультиварка перейдёт в спя-
щий режим, на дисплее (3) отобразятся сим-
волы «- - - -», выньте вилку сетевого шнура
из розетки.
–
Нажмите на клавишу (4) и откройте крышку
мультиварки (6) по направлению вверх, осте-
регайтесь получения ожогов выходящим
паром.
–
Перемешайте приготовленный рис лопат-
кой (26).
–
Используя кухонные прихватки, выньте чашу
(7) из мультиварки.
–
Извлеките приготовленный рис из чаши (7).
IM VT-4281.indd 19 26.12.2017 11:35:43
https://tm.by
Интернет-магазин TM.by

20
русский
–
Дождитесь остывания чаши (7) и промойте
её тёплой водой с нейтральным моющим
средством, ополосните и просушите.
Программа «ПЛОВ» (13)
–
Положите необходимые ингредиенты для
приготовления плова (см. Книгу рецептов)
в чашу (7) и добавьте необходимое количе-
ство воды.
–
Установите чашу (7) в рабочую камеру устрой-
ства. Убедитесь, что внешняя поверхность
чаши чистая и сухая, а сама чаша установ-
лена без перекосов и плотно соприкасается
с поверхностью нагревательного элемента.
–
Закройте крышку (6) до щелчка фиксатора.
–
Вставьте вилку сетевого шнура в электриче-
скую розетку. Прозвучит звуковой сигнал, на
дисплее (3) отобразятся символы спящего
режима «- - - -».
–
Нажмите кнопку программы приготовления
(13) «ПЛОВ», при этом подсветка кнопки (13)
будет мигать и на дисплее (3) отобразится
время приготовления «0:30», установленное
по умолчанию.
–
При необходимости установите другое время
приготовления (см. таблицу «ПРОГРАММЫ
ПРИГОТОВЛЕНИЯ») кнопками (16-17), уста-
новленное время приготовления отобра-
зится на дисплее (3).
–
При необходимости нажмите кнопку (24)
«ОТЛОЖЕННЫЙ СТАРТ» и кнопками (16 – 17)
установите необходимое время отсрочки
начала приготовления (см. таблицу
«ПРОГРАММЫ ПРИГОТОВЛЕНИЯ»).
Примечание: - если была установлена про-
грамма «ОТЛОЖЕННЫЙ СТАРТ», то после
включения мультиварки на дисплее (3) будут
отображаться цифровые символы времени
отложенного старта, по окончании времени
отложенного старта включится программа при-
готовления «ПЛОВ».
–
Включите программу приготовления «ПЛОВ»,
нажав кнопку (10) «СТАРТ/СТОП», при этом
подсветка кнопки (13) «ПЛОВ» будет све-
титься постоянно.
–
На дисплее (3) отобразятся цифровые сим-
волы времени, оставшегося до завершения
работы программы «ОТЛОЖЕННЫЙ СТАРТ»
или «ПЛОВ».
–
Во время работы программы приготовления
пар будет выходить из отверстий парового
клапана (5), соблюдайте осторожность во
избежание получения ожогов.
–
По окончании работы программы приготов-
ления «ПЛОВ» прозвучат звуковые сигналы,
мультиварка переключится в режим под-
держания температуры, при этом загорится
подсветка кнопки (11) «ПОДДЕРЖАНИЕ
ТЕМПЕРАТУРЫ», на дисплее (3) будут ото-
бражаться цифровые символы времени
работы режима поддержания температуры.
–
Выключите мультиварку, нажав кнопку (10)
«СТАРТ/СТОП», мультиварка перейдёт в спя-
щий режим и на дисплее (3) отобразятся
символы «- - - -», выньте вилку сетевого
шнура из розетки.
–
Нажмите на клавишу (4) и откройте крышку
мультиварки (6) по направлению вверх, осте-
регайтесь получения ожогов выходящим
паром.
–
Используя кухонные прихватки, выньте
чашу (7) из мультиварки.
–
Извлеките приготовленный продукт из
чаши (7).
–
Дождитесь остывания чаши (7) и промойте
её тёплой водой с нейтральным моющим
средством, ополосните и просушите.
Программа «КАША» (12)
–
Положите подготовленную крупу в чашу (7)
(см. Книгу рецептов), не наливайте воду
больше чем на 2/3 максимальной емкости
чаши (7).
–
Установите чашу (7) в рабочую камеру устрой-
ства. Убедитесь, что внешняя поверхность
чаши чистая и сухая, а сама чаша установ-
лена без перекосов и плотно соприкасается
с поверхностью нагревательного элемента.
–
Закройте крышку (6) до щелчка фиксатора.
–
Вставьте вилку сетевого шнура в электриче-
скую розетку. Прозвучит звуковой сигнал, на
дисплее (3) отобразятся символы спящего
режима «- - - -».
–
Нажмите кнопку программы приготовления
(12) «КАША», при этом подсветка кнопки (12)
будет мигать и на дисплее (3) отобразится
время приготовления «0:15», установленное
по умолчанию.
–
При необходимости установите другое время
приготовления (см. таблицу «ПРОГРАММЫ
ПРИГОТОВЛЕНИЯ») кнопками (16-17), уста-
новленное время приготовления отобра-
зится на дисплее (3).
–
При необходимости нажмите кнопку (24)
«ОТЛОЖЕННЫЙ СТАРТ» и кнопками (16 – 17)
установите необходимое время отсрочки
IM VT-4281.indd 20 26.12.2017 11:35:43
https://tm.by
Интернет-магазин TM.by
Pagina se încarcă...
Pagina se încarcă...
Pagina se încarcă...
Pagina se încarcă...
Pagina se încarcă...
Pagina se încarcă...
Pagina se încarcă...
Pagina se încarcă...
Pagina se încarcă...
Pagina se încarcă...
Pagina se încarcă...
Pagina se încarcă...
Pagina se încarcă...
Pagina se încarcă...
Pagina se încarcă...
Pagina se încarcă...
Pagina se încarcă...
Pagina se încarcă...
Pagina se încarcă...
Pagina se încarcă...
Pagina se încarcă...
Pagina se încarcă...
Pagina se încarcă...
Pagina se încarcă...
Pagina se încarcă...
Pagina se încarcă...
Pagina se încarcă...
Pagina se încarcă...
Pagina se încarcă...
Pagina se încarcă...
Pagina se încarcă...
Pagina se încarcă...
Pagina se încarcă...
Pagina se încarcă...
Pagina se încarcă...
Pagina se încarcă...
Pagina se încarcă...
Pagina se încarcă...
Pagina se încarcă...
Pagina se încarcă...
Pagina se încarcă...
Pagina se încarcă...
Pagina se încarcă...
Pagina se încarcă...
Pagina se încarcă...
Pagina se încarcă...
Pagina se încarcă...
Pagina se încarcă...
Pagina se încarcă...
Pagina se încarcă...
Pagina se încarcă...
Pagina se încarcă...
Pagina se încarcă...
Pagina se încarcă...
Pagina se încarcă...
Pagina se încarcă...
Pagina se încarcă...
Pagina se încarcă...
Pagina se încarcă...
Pagina se încarcă...
-
 1
1
-
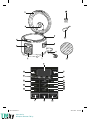 2
2
-
 3
3
-
 4
4
-
 5
5
-
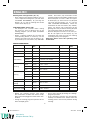 6
6
-
 7
7
-
 8
8
-
 9
9
-
 10
10
-
 11
11
-
 12
12
-
 13
13
-
 14
14
-
 15
15
-
 16
16
-
 17
17
-
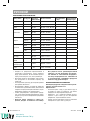 18
18
-
 19
19
-
 20
20
-
 21
21
-
 22
22
-
 23
23
-
 24
24
-
 25
25
-
 26
26
-
 27
27
-
 28
28
-
 29
29
-
 30
30
-
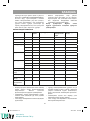 31
31
-
 32
32
-
 33
33
-
 34
34
-
 35
35
-
 36
36
-
 37
37
-
 38
38
-
 39
39
-
 40
40
-
 41
41
-
 42
42
-
 43
43
-
 44
44
-
 45
45
-
 46
46
-
 47
47
-
 48
48
-
 49
49
-
 50
50
-
 51
51
-
 52
52
-
 53
53
-
 54
54
-
 55
55
-
 56
56
-
 57
57
-
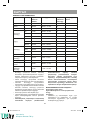 58
58
-
 59
59
-
 60
60
-
 61
61
-
 62
62
-
 63
63
-
 64
64
-
 65
65
-
 66
66
-
 67
67
-
 68
68
-
 69
69
-
 70
70
-
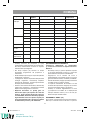 71
71
-
 72
72
-
 73
73
-
 74
74
-
 75
75
-
 76
76
-
 77
77
-
 78
78
-
 79
79
-
 80
80


Alte documente
-
Maestro MR794 Manualul proprietarului
-
-
-
Tefal RK812110 Manual de utilizare
-
-
-
Redmond PM381E Manual de utilizare
-
Redmond RMC-M13E Manualul proprietarului
-