Kärcher IVC 60/24-2 Ap Manual de utilizare
- Tip
- Manual de utilizare

Register and win!
www.kaercher.com
IVC 60/24-2 Ap
59640550 05/12
Deutsch 6
English 12
Français 18
Italiano 24
Nederlands 30
Español 36
Português 42
Dansk 48
Norsk 54
Svenska 60
Suomi 66
Ελληνικά 72
Türkçe 78
Русский 84
Magyar 91
Čeština 97
Slovenščina 103
Polski 109
Româneşte 115
Slovenčina 121
Hrvatski 127
Srpski 133
Български 139
Eesti 145
Latviešu 151
Lietuviškai 157
Українська 163


– 1
Lesen Sie vor der ersten Benut-
zung Ihres Gerätes diese Origi-
nalbetriebsanleitung, handeln Sie danach
und bewahren Sie diese für späteren Ge-
brauch oder für Nachbesitzer auf.
–Vor erster Inbetriebnahme Sicherheits-
hinweise Nr. 5.956-249 unbedingt lesen!
–Bei Nichtbeachtung der Betriebsanlei-
tung und der Sicherheitshinweise können
Schäden am Gerät und Gefahren für den
Bediener und andere Personen entste-
hen.
–Bei Transportschaden sofort Händler in-
formieren.
Hinweise zu Inhaltsstoffen (REACH)
Aktuelle Informationen zu Inhaltsstoffen fin-
den Sie unter:
www.kaercher.de/REACH
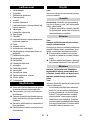
Gefahr
Für eine unmittelbar drohende Gefahr, die
zu schweren Körperverletzungen oder zum
Tod führt.
몇Warnung
Für eine möglicherweise gefährliche Situa-
tion, die zu schweren Körperverletzungen
oder zum Tod führen könnte.
Vorsicht
Für eine möglicherweise gefährliche Situa-
tion, die zu leichten Verletzungen oder zu
Sachschäden führen kann.
Inhaltsverzeichnis
Umweltschutz. . . . . . . . . . . DE . . .1
Symbole in der Betriebsanlei-
tung . . . . . . . . . . . . . . . . . . DE . . .1
Bestimmungsgemäße Verwen-
dung . . . . . . . . . . . . . . . . . . DE . . .2
Geräteelemente . . . . . . . . . DE . . .2
Inbetriebnahme . . . . . . . . . DE . . .2
Bedienung . . . . . . . . . . . . . DE . . .2
Transport . . . . . . . . . . . . . . DE . . .4
Lagerung . . . . . . . . . . . . . . DE . . .4
Pflege und Wartung . . . . . . DE . . .4
Hilfe bei Störungen. . . . . . . DE . . .4
Garantie . . . . . . . . . . . . . . . DE . . .5
Zubehör und Ersatzteile . . . DE . . .5
EG-Konformitätserklärung . DE . . .5
Technische Daten. . . . . . . . DE . . .6
Umweltschutz
Die Verpackungsmaterialien sind
recyclebar. Bitte werfen Sie die
Verpackungen nicht in den Haus-
müll, sondern führen Sie diese ei-
ner Wiederverwertung zu.
Altgeräte enthalten wertvolle re-
cyclingfähige Materialien, die ei-
ner Verwertung zugeführt werden
sollten. Batterien, Öl und ähnliche
Stoffe dürfen nicht in die Umwelt
gelangen. Bitte entsorgen Sie Alt-
geräte deshalb über geeignete
Sammelsysteme.
Symbole in der Betriebsanlei-
tung
6 DE

– 2
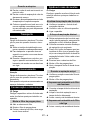
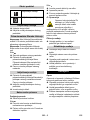
몇Warnung
Das Gerät ist nicht für die Absaugung ge-
sundheitsschädlicher Stäube geeignet.
–Dieser Sauger ist zur Nass- und Tro-
ckenreinigung von Boden- und Wand-
flächen bestimmt.
–Dieses Gerät ist für den industriellen
Gebrauch geeignet, z.B. in Lager- und
Fertigungsbereichen und an Produkti-
onsmaschinen.
–Das Gerät ist für Kranverladung nicht
zugelassen.
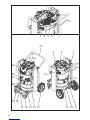
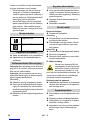
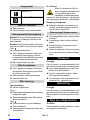
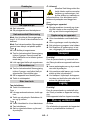
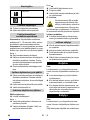
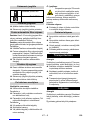
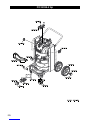
1 Netzkabel
2 Typenschild
3 Filterabreinigung
4 Flachfaltenfilter
5 Saugkopf
6 Handgriff des Saugkopfs
7 Rechte Entriegelung der Absetzmechanik
8 Zwischenring
9 Lenkrolle des Schmutzbehälters
10 Verschlussstopfen
11 Schmutzbehälter
12 Linke Entriegelung der Absetzmechanik
13 Rad
14 Verriegelung des Saugkopfs
15 Verschlussklappe des Saugstutzens
16 Lenkrolle des Fahrgestells mit Feststell-
bremse
17 Halter für Bodendüse
18 Fahrgestell
19 Auffangwanne
20 Handgriff des Schmutzbehälters
21 Saugstutzen
22 Halter für Saugrohr
23 Drehschalter
24 Filterabdeckung
25 Taster der Filterabreinigung
26 Kabelhalter
27 Schubbügel
Das Gerät in Arbeitsposition bringen,
wenn nötig mit Feststellbremsen sichern.
Saugschlauch (nicht im Lieferumfang)
in den Saugstutzen einstecken.
Füllstand im Schmutzbehälter vor Ar-
beitsbeginn kontrollieren und Behälter
gegebenenfalls entleeren.
Sicherstellen, dass der Schmutzbehäl-
ter ordnungsgemäß eingesetzt ist.
Gewünschtes Zubehör (nicht im Liefer-
umfang) aufstecken.
Vorsicht
Beim Saugen darf niemals der Flachfalten-
filter entfernt werden.
Hinweis: Der Schmutzbehälter muss ent-
leert werden, wenn er bis ca. 3 cm unter
dem oberen Rand gefüllt ist.
–Füllstand im Schmutzbehälter regelmä-
ßig kontrollieren, da das Gerät nicht au-
tomatisch abschaltet.
Vorsicht
Beim Wechsel von Nass- auf Trocken-
saugen beachten:
Saugen von trockenem Staub bei nassem
Filterelement setzt den Filter zu und kann
ihn unbrauchbar machen.
Nassen Filter vor Benutzung gut trock-
nen oder durch trockenen ersetzen.
Bei Bedarf Filter wechseln, wird unter
Punkt "Pflege und Wartung" beschrieben.
Bestimmungsgemäße Ver-
wendung
Geräteelemente
Inbetriebnahme
Bedienung
Schmutzbehälter
Trockensaugen
7DE

– 3
Achtung: Füllstand im Schmutzbehälter
bei Aufnahme von hohen Flüssigkeits-
mengen ständig kontrollieren, da der
Behälter innerhalb von wenigen Sekun-
den gefüllt werden und dadurch über-
laufen kann.
Vorsicht
Örtliche Vorschriften zur Abwasserbehand-
lung beachten.
–Beim Aufsaugen von Nassschmutz mit
der Fugendüse, beziehungsweise
wenn überwiegend hohe Flüssigkeits-
mengen eingesaugt werden, empfiehlt
es sich, die Funktion „Halbautomati-
sche Filterabreinigung“ nicht zu benut-
zen.
–Nach Beendigung des Nasssaugens:
Flachfaltenfilter mit der Filterabreini-
gung abreinigen. Flachfaltenfilter trock-
nen. Behälter mit einem feuchten Tuch
reinigen und trocknen.
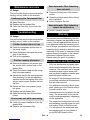
Netzstecker einstecken.
Gerät am Drehschalter einschalten.
Hinweis: Eine Betätigung der Filterabreini-
gung alle 5-10 Minuten, erhöht die Stand-
zeit des Flachfaltenfilters.
Hinweis: Das Einschalten der halbautoma-
tischen Filterabreinigung ist nur bei einge-
schaltetem Gerät möglich.
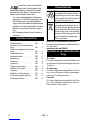
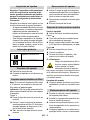
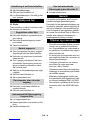
Abbildung
Verschlussklappe des Saugstutzens
schließen.
Taster der halbautomatischen Filterab-
reinigung 5x betätigen. Der Flachfalten-
filter wird dann durch einen Luftstoß
gereinigt (pulsierendes Geräusch).
Verschlussklappe des Saugstutzens
wieder öffnen.
Taster der halbautomatischen Filterab-
reinigung bei geschlossener Ver-
schlussklappe des Saugstutzens 5x
betätigen. Verschlussklappe wieder öff-
nen.
Gerät am Drehschalter ausschalten.
Netzstecker ziehen.
Feststellbremsen arretieren.
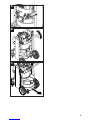
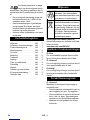
Abbildung
Entriegelungen der Absetzmechanik
nach oben ziehen.
Schubbügel nach oben ziehen. Behäl-
ter wird entriegelt und abgesenkt.
Abbildung
Behälter am Handgriff herausziehen.
Behälter entleeren.
Behälter wieder einsetzen und mit
Schubbügel verriegeln.
몇Warnung
Quetschgefahr! Während der
Verriegelung keinesfalls die
Hände zwischen Schmutzbehäl-
ter und Zwischenring halten
oder in die Nähe der Hebemechanik brin-
gen. Behälter durch Betätigung des Schub-
bügels mit beiden Händen verriegeln.
Gerät innen und außen durch Absau-
gen und Abwischen mit einem feuchten
Tuch reinigen.
Nasssaugen
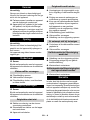
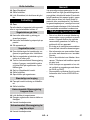
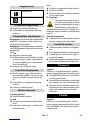
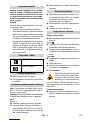
Drehschalter
Gerät EIN
Gerät AUS
Gerät einschalten
Halbautomatische Filterabreini-
gung
Gerät ausschalten
Nach jedem Betrieb
Behälter entleeren
Gerät reinigen
8 DE

– 4
Netzkabel um den Kabelhalter wickeln.
Saugschlauch um den Schubbügel wi-
ckeln.
Bodendüse und Saugrohr in die jeweili-
gen Halter stecken.
Gerät in einem trockenen Raum abstellen
und vor unbefugter Benutzung sichern.
Vorsicht
Verletzungs- und Beschädigungsgefahr!
Gewicht des Gerätes beim Transport be-
achten.
Feststellbremsen lösen und Gerät am
Schubbügel schieben.
Gerät zum Verladen am Fahrgestell
fassen, nicht am Schubbügel.
Beim Transport in Fahrzeugen Gerät
nach den jeweils gültigen Richtlinien
gegen Rutschen und Kippen sichern.
Vorsicht
Verletzungs- und Beschädigungsgefahr! Ge-
wicht des Gerätes bei Lagerung beachten.
Dieses Gerät darf nur in Innenräumen gela-
gert werden.
Gefahr
Vor allen Arbeiten am Gerät, Gerät aus-
schalten und Netzstecker ziehen.
Filterabdeckung öffnen.
Flachfaltenfilter wechseln.
Filterabdeckung schließen, muss hör-
bar einrasten.
Gefahr
Vor allen Arbeiten am Gerät, Gerät aus-
schalten und Netzstecker ziehen.
Steckdose und Sicherung der Strom-
versorgung überprüfen.
Netzkabel und Netzstecker des Gerä-
tes überprüfen.
Gerät einschalten.
Verstopfungen aus Saugdüse, Saug-
rohr, Saugschlauch oder Flachfaltenfil-
ter entfernen.
Saugkopf und Behälter auf richtigen
Sitz prüfen.
Taster der halbautomatischen Filterab-
reinigung bei eingeschaltetem Gerät
und geschlossener Verschlussklappe
des Saugstutzens 5x betätigen. Ver-
schlussklappe wieder öffnen.
Filterabdeckung richtig einrasten.
Flachfaltenfilter wechseln.
Verschlussklappe des Saugstutzens
öffnen.
Korrekte Einbaulage des Flachfaltenfil-
ters überprüfen.
Flachfaltenfilter wechseln.
Verschlussklappe des Saugstutzens
schließen.
Saugstutzen bei blockierter Ver-
schlussklappe reinigen.
Kundendienst benachrichtigen.
Kundendienst benachrichtigen.
Gerät aufbewahren
Transport
Lagerung
Pflege und Wartung
Flachfaltenfilter wechseln
Hilfe bei Störungen
Saugturbine läuft nicht
Saugkraft lässt nach
Staubaustritt beim Saugen
Halbautomatische Filterabreini-
gung arbeitet nicht
Halbautomatische Filterabreini-
gung lässt sich nicht einschalten
9DE

– 5
In jedem Land gelten die von unserer zu-
ständigen Vertriebsgesellschaft herausge-
gebenen Garantiebedingungen. Etwaige
Störungen an Ihrem Gerät beseitigen wir
innerhalb der Garantiefrist kostenlos, so-
fern ein Material- oder Herstellungsfehler
die Ursache sein sollte. Im Garantiefall
wenden Sie sich bitte mit Kaufbeleg an Ih-
ren Händler oder die nächste autorisierte
Kundendienststelle.
–Es dürfen nur Zubehör und Ersatzteile
verwendet werden, die vom Hersteller
freigegeben sind. Original-Zubehör und
Original-Ersatzteile bieten die Gewähr
dafür, dass das Gerät sicher und stö-
rungsfrei betrieben werden kann.
–Eine Auswahl der am häufigsten benö-
tigten Ersatzteile finden Sie am Ende
der Betriebsanleitung.
–Weitere Informationen über Ersatzteile
erhalten Sie unter www.kaercher.com
im Bereich Service.
–Im Lieferumfang ist kein Zubehör ent-
halten. Das Zubehör muss je nach An-
wendung separat bestellt werden.
–Die einwandfreie Funktion des Gerätes
wird nur durch die Saugschlauch-Nenn-
weiten DN42 und DN52 gewährleistet.
–Ersatzteile und Zubehör erhalten Sie
bei ihrem Händler oder bei ihrer KÄR-
CHER-Niederlassung.
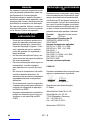
Hiermit erklären wir, dass die nachfolgend
bezeichnete Maschine aufgrund ihrer Kon-
zipierung und Bauart sowie in der von uns
in Verkehr gebrachten Ausführung den ein-
schlägigen grundlegenden Sicherheits-
und Gesundheitsanforderungen der EG-
Richtlinien entspricht. Bei einer nicht mit
uns abgestimmten Änderung der Maschine
verliert diese Erklärung ihre Gültigkeit.
5.966-010
Die Unterzeichnenden handeln im Auftrag
und mit Vollmacht der Geschäftsführung.
Dokumentationsbevollmächtigter:
S. Reiser
Alfred Kärcher GmbH & Co. KG
Alfred-Kärcher-Str. 28 - 40
71364 Winnenden (Germany)
Tel.: +49 7195 14-0
Fax: +49 7195 14-2212
Winnenden, 2010/07/14
Garantie
Zubehör und Ersatzteile
EG-Konformitätserklärung
Produkt: Nass- und Trockensauger
Typ: 1.576-xxx
Einschlägige EG-Richtlinien
2006/42/EG (+2009/127/EG)
2004/108/EG
Angewandte harmonisierte Normen
EN 55014–1: 2006 + A1: 2009
EN 55014–2: 1997 + A2: 2008
EN 60335–1
EN 60335–2–69
EN 61000–3–2: 2006 + A2: 2009
EN 61000–3–3: 2008
EN 62233: 2008
Angewandte nationale Normen
-
CEO Head of Approbation
10 DE

– 6
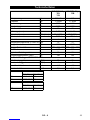
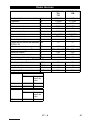
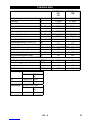
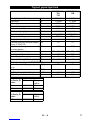
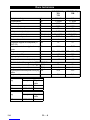
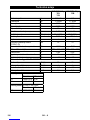
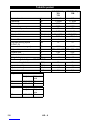
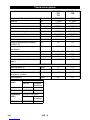
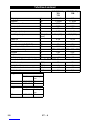
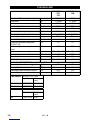
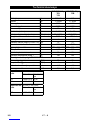
Technische Daten
IVC 60/24-2 Ap
*EU
*CH
IVC 60/24-2 Ap
*GB
Netzspannung V 220-240 110
Frequenz Hz 1~ 50/60 1~ 50/60
Max. Leistung W 2760 2450
Nennleistung W 2400 2150
Behälterinhalt l 60 60
Luftmenge (max.) l/s 2x 74 2x 66
Unterdruck (max.) kPa (mbar) 25,4 (254) 22,0 (220)
Schutzart -- IP X4 IP X4
Schutzklasse -- I I
Saugschlauchanschluss (C-DN/C-ID) DN 72 72
Saugschlauch-Nennweite DN 42/52 42/52
Länge x Breite x Höhe mm 970 x 690 x 995 970 x 690 x 995
Filterfläche m20,95 0,95
Typisches Betriebsgewicht kg 60 60
Umgebungstemperatur (max.) °C +40 +40
Ermittelte Werte gemäß EN 60335-2-69
Schalldruckpegel LpA dB(A) 73 73
Unsicherheit KpA dB(A) 1 1
Hand-Arm Vibrationswert m/s2<2,5 <2,5
Unsicherheit K m/s20,2 0,2
Netzkabel H07RN-F 3x1,5 mm2
Teile-Nr. Kabellänge
EU 6.649-915.0 10 m
CH 6.650-168.0 10 m
Netzkabel H07RN-F 3x2,5 mm2
Teile-Nr. Kabellänge
GB 6.650-169.0 10 m
11DE

– 1
Please read and comply with
these original instructions prior
to the initial operation of your appliance and
store them for later use or subsequent own-
ers.
–Before first start-up it is definitely nec-
essary to read the safety indications Nr.
5.956-249!
–The non-compliance of the operating
and safety instructions may lead to
damages of the appliance and to dan-
gers for the operator and other persons.
–In case of transport damage inform ven-
dor immediately
Notes about the ingredients (REACH)
You will find current information about the
ingredients at:
www.kaercher.com/REACH
Danger
Immediate danger that can cause severe
injury or even death.
몇Warning
Possible hazardous situation that could
lead to severe injury or even death.
Caution
Possible hazardous situation that could
lead to mild injury to persons or damage to
property.
몇Warning
The appliance is not suitable for vacuuming
dust which endangers health.
–The machine is meant for dry and wet
cleaning of floors and walls.
–This appliance is suited for commercial
and industrial use, e.g. in storage and
assembly areas and on production ma-
chines.
–The appliance is not approved for crane
loading.
Contents
Environmental protection . . EN . . .1
Symbols in the operating in-
structions . . . . . . . . . . . . . . EN . . .1
Proper use . . . . . . . . . . . . . EN . . .1
Device elements. . . . . . . . . EN . . .2
Start up. . . . . . . . . . . . . . . . EN . . .2
Operation . . . . . . . . . . . . . . EN . . .2
Transport . . . . . . . . . . . . . . EN . . .3
Storage. . . . . . . . . . . . . . . . EN . . .3
Maintenance and care . . . . EN . . .4
Troubleshooting . . . . . . . . . EN . . .4
Warranty. . . . . . . . . . . . . . . EN . . .4
Accessories and Spare Parts EN . . .4
EC Declaration of Conformity EN . . .5
Technical specifications . . . EN . . .6
Environmental protection
The packaging material can be
recycled. Please do not throw
the packaging material into
household waste; please send it
for recycling.
Old appliances contain valuable
materials that can be recycled;
these should be sent for recy-
cling. Batteries, oil, and similar
substances must not enter the
environment. Please dispose of
your old appliances using ap-
propriate collection systems.
Symbols in the operating
instructions
Proper use
12 EN

– 2
1 Power cord
2 Nameplate
3 Filter dedusting
4 Flat fold filter
5 Suction head
6 Handle of the suction head
7 Right unlocking of the placement me-
chanics
8 Intermediate ring
9 Steering roller of the dirt container
10 Stopper
11 Dirt receptacle
12 Left unlocking of the placement me-
chanics
13 Wheel
14 Suction head lock
15 locking door of the suction nozzle
16 Steering roller of the chassis with park-
ing brake
17 Floor nozzle holder
18 Chassis
19 Drain pan
20 Handle of the dirt container
21 Suction support
22 Holder for suction pipe
23 Rotating knob
24 Filter cover
25 Button for filter shake off system
26 Cable clamp
27 Push handle
Bring the appliance to working position
- secure it, if required, with parking
brakes.
Insert the suction hose (not included)
into the suction hose connection.
Check the fill level in the dirt container
prior to starting work and empty the
container if necessary.
Ensure that the dirt container has been
inserted properly.
Attach the desired accessories (not in-
cluded).
Caution
The flat pleated filter must always be in
place while vacuuming.
Note: The dirt container needs to be emp-
tied if it is full until about 3 cm below the up-
per rim.
–Check the fill level of the dirt container
at regular intervals, as the appliance
does not shut off automatically.
Caution
Please note the following when switch-
ing from wet to dry vacuum cleaning:
If you vacuum dry dust while the filter ele-
ment is still wet the filter will become ob-
structed and may be damaged beyond
repair.
Dry the wet filter properly before use or
replace it with a dry one.
Change the filter, if required, according
to instructions under the section "Main-
tenance and Care".
Caution: Constantly monitor the fill level
in the dirt receptacle when vacuuming
high volumes of liquid, as the receptacle
can be filled within a matter of seconds
and could overflow.
Caution
Please observe the local provisions regard-
ing the wastewater treatment.
–If wet dirt is vacuumed with the crevice
nozzle or if high volumes of liquid are
sucked up from a container, it is recom-
mended to deactivate the "Semi-auto-
matic filter dedusting" function.
–After the wet vacuuming: Clean the flat
folded filter with the filter cleaning.
Clean the flat-fold filter. Clean the con-
tainer with a damp rag and dry it.
Device elements
Start up
Operation
Dirt receptacle
Dry vacuum cleaning
Wet vacuum cleaning
13EN

– 3
Plug in the main plug.
Switch on the appliance at the rotating
knob.
Note: A filter dedusting every 5 to 10 min-
utes will increase the life of the flat folded
filter.
Note: The semi-automatic filter dedusting
function can only be switched on when the
appliance is switched on.
Illustration
Close the locking door of the suction
nozzle.
Press the semi-automatic filter dedust-
ing key five times. The flat folded filter is
automatically cleaned through an air jet
(pulsating sound).
Reopen the locking door of the suction
nozzle.
Actuate the key for the semi-automatic
filter dedusting 5 x with the locking door
of the suction nozzle closed. Reopen
the locking door.
Switch off the appliance at the rotating
knob.
Pull out the mains plug.
Lock parking brakes.
Illustration
Pull the locks of the placement mechan-
ics up.
Pull the push handle upward. The con-
tainer is unlocked and lowered.
Illustration
Pull the container out by the handle.
Empty the container.
Replace the battery and lock it with the
sliding bow.
몇Warning
Crush hazard. Never hold your
hands between the dirt contain-
er and the intermediate ring or
put them near the lifting mecha-
nism while locking. Lock the container by
pressing the sliding bow with both hands.
Vacuum and wipe the appliance inside
and outside with a damp cloth.
Wrap the mains cord around the cable
holder.
Wind the suction hose around the slid-
ing bow.
Insert the floor nozzle and the suction
pipe into their respective holder.
Place the appliance in a dry room and
secure it from unauthorized use.
Caution
Risk of injury and damage! Observe the
weight of the appliance when you transport
it.
Release the park brakes and push the
appliance by the push handle.
Grab the appliance by the chassis, not
by the sliding bow to load it.
When transporting in vehicles, secure
the appliance according to the guide-
lines from slipping and tipping over.
Caution
Risk of injury and damage! Note the weight
of the appliance in case of storage.
This appliance must only be stored in inte-
rior rooms.
Rotating knob
Appliance ON
Appliance OFF
Turning on the Appliance
Semi-automatic filter dedusting
Turn off the appliance
After each operation
Empty the container
Cleaning the device
Storing the Appliance
Transport
Storage
14 EN

– 4
Danger
First pull out the plug from the mains before
carrying out any tasks on the machine.
Open filter door.
Replace the flat pleated filter.
Close the filter door, it must lock into
place.
Danger
First pull out the plug from the mains before
carrying out any tasks on the machine.
Check the receptacle and the fuse of
the power supply.
Check the power cable and the power
plug of the device.
Turn on the appliance.
Remove blockages in the suction noz-
zle, suction tube, suction hose, or flat
pleated filter.
Check the suction head and the recep-
tacle for proper seating.
Actuate the key for the semi-automatic
filter dedusting 5 x with the appliance
switched on and the locking door of the
suction nozzle closed. Reopen the lock-
ing door.
Ensure the filter cover properly locks
into place.
Replace the flat pleated filter.
Open the locking door of the suction
nozzle.
Check for proper installation of the flat
pleated filter.
Replace the flat pleated filter.
Close the locking door of the suction
nozzle.
Clean the suction nozzle if the locking
door is blocked.
Inform Customer Service
Inform Customer Service
The warranty terms published by the rele-
vant sales company are applicable in each
country. We will repair potential failures of
your appliance within the warranty period
free of charge, provided that such failure is
caused by faulty material or defects in man-
ufacturing. In the event of a warranty claim
please contact your dealer or the nearest
authorized Customer Service centre.
Please submit the proof of purchase.
–Only use accessories and spare parts
which have been approved by the man-
ufacturer. The exclusive use of original
accessories and original spare parts
ensures that the appliance can be oper-
ated safely and trouble free.
–At the end of the operating instructions
you will find a selected list of spare parts
that are often required.
–For additional information about spare
parts, please go to the Service section
at www.kaercher.com.
–Accessories are not included in the de-
livery. The accessories for the device
must be ordered separately, depending
on the application.
–The proper functioning of the unit is only
ensured when a suction hose of a nom-
inal width of DN42 or DN52 is used.
–You can procure the spare parts and
the attachments from your dealer or
your KÄRCHER branch office.
Maintenance and care
Exchanging the flat pleated filter
Troubleshooting
Suction turbine does not run
Suction capacity decreases
Dust comes out while vacuuming
Semi-automatic filter dedusting
does not work
Semi-automatic filter dedusting
cannot be switched on
Warranty
Accessories and Spare Parts
15EN

– 5
We hereby declare that the machine de-
scribed below complies with the relevant
basic safety and health requirements of the
EU Directives, both in its basic design and
construction as well as in the version put
into circulation by us. This declaration shall
cease to be valid if the machine is modified
without our prior approval.
5.966-010
The undersigned act on behalf and under
the power of attorney of the company man-
agement.
Authorised Documentation Representative
S. Reiser
Alfred Kärcher GmbH Co. KG
Alfred-Kärcher-Str. 28 - 40
71364 Winnenden (Germany)
Phone: +49 7195 14-0
Fax: +49 7195 14-2212
Winnenden, 2010/07/14
EC Declaration of Conformity
Product: Wet and dry vacuum cleaner
Type: 1.576-xxx
Relevant EU Directives
2006/42/EC (+2009/127/EC)
2004/108/EC
Applied harmonized standards
EN 55014–1: 2006 + A1: 2009
EN 55014–2: 1997 + A2: 2008
EN 60335–1
EN 60335–2–69
EN 61000–3–2: 2006 + A2: 2009
EN 61000–3–3: 2008
EN 62233: 2008
Applied national standards
-
CEO Head of Approbation
16 EN

– 6
Technical specifications
IVC 60/24-2 Ap
*EU
*CH
IVC 60/24-2 Ap
*GB
Mains voltage V 220-240 110
Frequency Hz 1~ 50/60 1~ 50/60
Max. performance W 2760 2450
Rated power W 2400 2150
Container capacity l 60 60
Air volume (max.) l/s 2x 74 2x 66
Negative pressure (max.) kPa (mbar) 25,4 (254) 22,0 (220)
Type of protection -- IP X4 IP X4
Protective class -- I I
Suction hose connection (C-DN/C-ID) DN 72 72
Nominal width of suction hose DN 42/52 42/52
Length x width x height mm 970 x 690 x 995 970 x 690 x 995
Filter area m20,95 0,95
Typical operating weight kg 60 60
Max. ambient temperature °C +40 +40
Values determined to EN 60335-2-69
Sound pressure level LpA dB(A) 73 73
Uncertainty KpA dB(A) 1 1
Hand-arm vibration value m/s2<2,5 <2,5
Uncertainty K m/s20,2 0,2
Power cord H07RN-F 3x1,5 mm2
Part no.: Cable
length
EU 6.649-915.0 10 m
CH 6.650-168.0 10 m
Power cord H07RN-F 3x2,5 mm2
Part no.: Cable
length
GB 6.650-169.0 10 m
17EN

– 1
Lire ces notice originale avant la
première utilisation de votre ap-
pareil, se comporter selon ce qu'elles re-
quièrent et les conserver pour une
utilisation ultérieure ou pour le propriétaire
futur.
–Avant la première mise en service, vous
devez impérativement avoir lu les
consignes de sécurité N° 5.956-249 !
–En cas de non-respect des instructions
de service et des consignes de sécuri-
té, l'appareil risque de subir des dom-
mages matériel et l'utilisateur ainsi que
toute tierce personne sont exposés à
des dangers potentiels.
–Contactez immédiatement le revendeur
en cas d'avarie de transport.
Instructions relatives aux ingrédients
(REACH)
Les informations actuelles relatives aux in-
grédients se trouvent sous :
www.kaercher.com/REACH
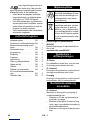
Danger
Pour un danger immédiat qui peut avoir
pour conséquence la mort ou des bles-
sures corporelles graves.
몇Avertissement
Pour une situation potentiellement dange-
reuse qui peut avoir pour conséquence des
blessures corporelles graves ou la mort.
Attention
Pour une situation potentiellement dange-
reuse qui peut avoir pour conséquence des
blessures légères ou des dommages maté-
riels.
Table des matières
Protection de l’environnement FR . . .1
Symboles utilisés dans le mode
d'emploi . . . . . . . . . . . . . . . FR . . .1
Utilisation conforme . . . . . . FR . . .2
Éléments de l'appareil . . . . FR . . .2
Mise en service . . . . . . . . . FR . . .2
Utilisation . . . . . . . . . . . . . . FR . . .2
Transport . . . . . . . . . . . . . . FR . . .4
Entreposage. . . . . . . . . . . . FR . . .4
Entretien et maintenance . . FR . . .4
Assistance en cas de panne FR . . .4
Garantie . . . . . . . . . . . . . . . FR . . .5
Accessoires et pièces de re-
change . . . . . . . . . . . . . . . . FR . . .5
Déclaration de conformité CE FR . . .5
Caractéristiques techniques FR . . .6
Protection de
l’environnement
Les matériaux constitutifs de
l’emballage sont recyclables.
Ne pas jeter les emballages
dans les ordures ménagères,
mais les remettre à un système
de recyclage.
Les appareils usés contiennent
des matériaux précieux recy-
clables lesquels doivent être
apportés à un système de re-
cyclage. Il est interdit de jeter
les batteries, l'huile et les subs-
tances similaires dans l'envi-
ronnement. Pour cette raison,
utiliser des systèmes de col-
lecte adéquats afin d'éliminer
les appareils hors d'usage.
Symboles utilisés dans le
mode d'emploi
18 FR

– 2
몇Avertissement
Cet appareil n'est pas conçu pour aspirer
des poussières nocives.
–Cet aspirateur est destiné au nettoyage
à sec et au nettoyage par voie humide
des sol et murs.
–Cet appareil convient à un usage indus-
triel, par ex. dans le secteur entrepôt et
fabrication et sur des machines de pro-
duction.
–L'appareil n'est pas homologué pour un
chargement par grue.
1 Câble d’alimentation
2 Plaque signalétique
3 Nettoyage du filtre
4 Filtre plat de plis
5 Tête d'aspiration
6 Poignée de la tête d'aspiration
7 Déverrouillage droit du mécanisme de
pose
8 Bague intermédiaire
9 Roulette du collecteur de saletés
10 Obturateurs
11 Récipient collecteur
12 Déverrouillage gauche du mécanisme
de pose
13 Roue
14 Verrouillage de la tête d'aspiration
15 Volet obturateur de la tubulure d'aspira-
tion
16 Roulette du châssis avec frein d'arrêt
17 Support pour buse de sol
18 Bâti de transport
19 Cuve de récupération
20 Poignée du collecteur de saletés
21 Consoles d'aspiration
22 Support pour tube d'aspiration
23 Interrupteur rotatif
24 Recouvrement du filtre
25 Bouton du nettoyage du filtre
26 Attache-câble
27 Guidon de poussée
Amener l'appareil en position de travail,
si nécessaire le bloquer au moyen des
freins d'immobilisation.
Insérer le flexible d'aspiration (ne fai-
sant pas partie de la fourniture) dans la
tubulure d'aspiration.
Avant de commencer le travail, vérifier
le niveau de remplissage dans le collec-
teur de saletés et vider le cas échéant le
collecteur.
S'assurer que le collecteur de saletés
est positionné correctement.
Insérer les accessoires voulus (ne fai-
sant pas partie de la fourniture).
Attention
Le filtre à plis plats ne doit jamais être retiré
durant l'aspiration.
Remarque : le collecteur de saletés doit
être vidé, lorsqu'il est plein jusqu'à env. 3
cm sous le bord supérieur.
–Vérifier régulièrement le niveau de rem-
plissage dans le collecteur de saletés,
vu que l'appareil ne se coupe pas auto-
matiquement.
Attention
Avant de passer de l’aspiration humide
à l’aspiration à sec, il faut noter que :
aspirer de la poussière sèche avec une car-
touche de filtre mouillée peut boucher le
filtre et le rendre inutilisable.
Il faut donc bien sécher un filtre mouillé
avant de l'utiliser ou bien le remplacer
par un filtre sec.
Le cas échéant, remplacer le filtre (se
référer au point 'Entretien et mainte-
nance').
Utilisation conforme
Éléments de l'appareil
Mise en service
Utilisation
Récipient collecteur
Aspiration de poussières
19FR

– 3
Attention : Contrôler en permanence le
niveau de remplissage dans le récipient
collecteur lors de l'absorption de
grandes quantités de liquide, car le réci-
pient se remplit en l'espace de quelques
secondes et risque de déborder.
Attention
Tenir compte des prescriptions locales
pour le traitement des eaux usées.
–Pour l'aspiration de salissures humides
avec le petit suceur, ou bien si l'aspira-
tion consiste surtout à aspirer de
grandes quantités de liquides, il est re-
commandé de ne pas utiliser la fonction
« Nettoyage du filtre semi-
automatique ».
–À la fin de l'aspiration humide : nettoyer
le filtre à plis plats en même temps que
le filtre. sécher le filtre à plis plat. Net-
toyer le réservoir avec un chiffon hu-
mide et le sécher.
Brancher la fiche secteur.
Enclencher l'appareil à l'aide de l'inter-
rupteur rotatif.
Remarque : un actionnement du net-
toyage du filtre toutes les 5 à 10 minutes
augmente la durée de vie du filtre à plis
plats.
Remarque : la mise en service du net-
toyage de filtre semi-automatique n'est
possible que si l'appareil enclenché.
Illustration
Fermer le volet obturateur de la tubu-
lure d'aspiration.
Actionner 5x le bouton du nettoyage
semi-automatique du filtre. Le filtre à
plis plats est ainsi nettoyé par un cou-
rant d'air (bruit de pulsation).
Ouvrir de nouveau le volet obturateur
de la tubulure d'aspiration.
Actionner 5x le bouton du nettoyage
semi-automatique du filtre, alors que le
volet obturateur est fermé. Ouvrir de
nouveau le volet obturateur.
Couper l'appareil à l'aide de l'interrup-
teur rotatif.
Retirer le connecteur de la prise.
Bloquer le frein de stationnement.
Illustration
Tirer les déverrouillages du mécanisme
de pose vers le haut.
Tirer le guidon de poussée vers le haut.
Le collecteur est déverrouillé et
s'abaisse.
Illustration
Retirer le collecteur au niveau de la poi-
gnée.
Vider le réservoir.
Remettre le collecteur en place et le
verrouiller avec le guidon de poussée.
몇Avertissement
Risque d'écrasement ! Ne
mettre en aucun cas les mains
entre le collecteur de saletés et
la bague intermédiaire ou à la
proximité mécanisme de levage pendant le
verrouillage. Verrouiller le collecteur en ac-
tionnant le guidon de poussée des deux
mains.
Nettoyer la partie intérieure et exté-
rieure de l'appareil en l'aspirant et en
l'essuyant avec un chiffon humide.
Aspiration humide
Interrupteur rotatif
Appareil MARCHE
Appareil ARRÊT
Mettre l'appareil en marche
Nettoyage semi-automatique du
filtre
Mise hors service de l'appareil
Après chaque mise en service
Vider le réservoir
Nettoyage de l’appareil
20 FR
Pagina se încarcă...
Pagina se încarcă...
Pagina se încarcă...
Pagina se încarcă...
Pagina se încarcă...
Pagina se încarcă...
Pagina se încarcă...
Pagina se încarcă...
Pagina se încarcă...
Pagina se încarcă...
Pagina se încarcă...
Pagina se încarcă...
Pagina se încarcă...
Pagina se încarcă...
Pagina se încarcă...
Pagina se încarcă...
Pagina se încarcă...
Pagina se încarcă...
Pagina se încarcă...
Pagina se încarcă...
Pagina se încarcă...
Pagina se încarcă...
Pagina se încarcă...
Pagina se încarcă...
Pagina se încarcă...
Pagina se încarcă...
Pagina se încarcă...
Pagina se încarcă...
Pagina se încarcă...
Pagina se încarcă...
Pagina se încarcă...
Pagina se încarcă...
Pagina se încarcă...
Pagina se încarcă...
Pagina se încarcă...
Pagina se încarcă...
Pagina se încarcă...
Pagina se încarcă...
Pagina se încarcă...
Pagina se încarcă...
Pagina se încarcă...
Pagina se încarcă...
Pagina se încarcă...
Pagina se încarcă...
Pagina se încarcă...
Pagina se încarcă...
Pagina se încarcă...
Pagina se încarcă...
Pagina se încarcă...
Pagina se încarcă...
Pagina se încarcă...
Pagina se încarcă...
Pagina se încarcă...
Pagina se încarcă...
Pagina se încarcă...
Pagina se încarcă...
Pagina se încarcă...
Pagina se încarcă...
Pagina se încarcă...
Pagina se încarcă...
Pagina se încarcă...
Pagina se încarcă...
Pagina se încarcă...
Pagina se încarcă...
Pagina se încarcă...
Pagina se încarcă...
Pagina se încarcă...
Pagina se încarcă...
Pagina se încarcă...
Pagina se încarcă...
Pagina se încarcă...
Pagina se încarcă...
Pagina se încarcă...
Pagina se încarcă...
Pagina se încarcă...
Pagina se încarcă...
Pagina se încarcă...
Pagina se încarcă...
Pagina se încarcă...
Pagina se încarcă...
Pagina se încarcă...
Pagina se încarcă...
Pagina se încarcă...
Pagina se încarcă...
Pagina se încarcă...
Pagina se încarcă...
Pagina se încarcă...
Pagina se încarcă...
Pagina se încarcă...
Pagina se încarcă...
Pagina se încarcă...
Pagina se încarcă...
Pagina se încarcă...
Pagina se încarcă...
Pagina se încarcă...
Pagina se încarcă...
Pagina se încarcă...
Pagina se încarcă...
Pagina se încarcă...
Pagina se încarcă...
Pagina se încarcă...
Pagina se încarcă...
Pagina se încarcă...
Pagina se încarcă...
Pagina se încarcă...
Pagina se încarcă...
Pagina se încarcă...
Pagina se încarcă...
Pagina se încarcă...
Pagina se încarcă...
Pagina se încarcă...
Pagina se încarcă...
Pagina se încarcă...
Pagina se încarcă...
Pagina se încarcă...
Pagina se încarcă...
Pagina se încarcă...
Pagina se încarcă...
Pagina se încarcă...
Pagina se încarcă...
Pagina se încarcă...
Pagina se încarcă...
Pagina se încarcă...
Pagina se încarcă...
Pagina se încarcă...
Pagina se încarcă...
Pagina se încarcă...
Pagina se încarcă...
Pagina se încarcă...
Pagina se încarcă...
Pagina se încarcă...
Pagina se încarcă...
Pagina se încarcă...
Pagina se încarcă...
Pagina se încarcă...
Pagina se încarcă...
Pagina se încarcă...
Pagina se încarcă...
Pagina se încarcă...
Pagina se încarcă...
Pagina se încarcă...
Pagina se încarcă...
Pagina se încarcă...
Pagina se încarcă...
Pagina se încarcă...
Pagina se încarcă...
Pagina se încarcă...
Pagina se încarcă...
Pagina se încarcă...
Pagina se încarcă...
Pagina se încarcă...
Pagina se încarcă...
-
 1
1
-
 2
2
-
 3
3
-
 4
4
-
 5
5
-
 6
6
-
 7
7
-
 8
8
-
 9
9
-
 10
10
-
 11
11
-
 12
12
-
 13
13
-
 14
14
-
 15
15
-
 16
16
-
 17
17
-
 18
18
-
 19
19
-
 20
20
-
 21
21
-
 22
22
-
 23
23
-
 24
24
-
 25
25
-
 26
26
-
 27
27
-
 28
28
-
 29
29
-
 30
30
-
 31
31
-
 32
32
-
 33
33
-
 34
34
-
 35
35
-
 36
36
-
 37
37
-
 38
38
-
 39
39
-
 40
40
-
 41
41
-
 42
42
-
 43
43
-
 44
44
-
 45
45
-
 46
46
-
 47
47
-
 48
48
-
 49
49
-
 50
50
-
 51
51
-
 52
52
-
 53
53
-
 54
54
-
 55
55
-
 56
56
-
 57
57
-
 58
58
-
 59
59
-
 60
60
-
 61
61
-
 62
62
-
 63
63
-
 64
64
-
 65
65
-
 66
66
-
 67
67
-
 68
68
-
 69
69
-
 70
70
-
 71
71
-
 72
72
-
 73
73
-
 74
74
-
 75
75
-
 76
76
-
 77
77
-
 78
78
-
 79
79
-
 80
80
-
 81
81
-
 82
82
-
 83
83
-
 84
84
-
 85
85
-
 86
86
-
 87
87
-
 88
88
-
 89
89
-
 90
90
-
 91
91
-
 92
92
-
 93
93
-
 94
94
-
 95
95
-
 96
96
-
 97
97
-
 98
98
-
 99
99
-
 100
100
-
 101
101
-
 102
102
-
 103
103
-
 104
104
-
 105
105
-
 106
106
-
 107
107
-
 108
108
-
 109
109
-
 110
110
-
 111
111
-
 112
112
-
 113
113
-
 114
114
-
 115
115
-
 116
116
-
 117
117
-
 118
118
-
 119
119
-
 120
120
-
 121
121
-
 122
122
-
 123
123
-
 124
124
-
 125
125
-
 126
126
-
 127
127
-
 128
128
-
 129
129
-
 130
130
-
 131
131
-
 132
132
-
 133
133
-
 134
134
-
 135
135
-
 136
136
-
 137
137
-
 138
138
-
 139
139
-
 140
140
-
 141
141
-
 142
142
-
 143
143
-
 144
144
-
 145
145
-
 146
146
-
 147
147
-
 148
148
-
 149
149
-
 150
150
-
 151
151
-
 152
152
-
 153
153
-
 154
154
-
 155
155
-
 156
156
-
 157
157
-
 158
158
-
 159
159
-
 160
160
-
 161
161
-
 162
162
-
 163
163
-
 164
164
-
 165
165
-
 166
166
-
 167
167
-
 168
168
-
 169
169
-
 170
170
-
 171
171
-
 172
172


Kärcher IVC 60/24-2 Ap Manual de utilizare
- Tip
- Manual de utilizare
în alte limbi
- slovenčina: Kärcher IVC 60/24-2 Ap Používateľská príručka
Lucrări înrudite
-
Kärcher NT 55/1 Tact Te Instrucțiuni de utilizare
-
-
-
-
-
Kärcher KRCHER IVM 40 Vacuum Cleaner Manual de utilizare
-
-
-
-
Kärcher WD 4 Premium Manualul proprietarului
Alte documente
-
K RCHER IVC 60 24-2 Tact 2 Manual de utilizare
-
K RCHER IVM 60-36-3 Industrial Vacuum Cleaner Manual de utilizare
-
Flex VC 35 L MC Manual de utilizare
-
-
-
-
-
-
Hilti VC 20 Manual de utilizare