K RCHER IVM 60-36-3 Industrial Vacuum Cleaner Manual de utilizare
- Tip
- Manual de utilizare

IVM 60/36-3
IVM 100/36-3
59686660 (06/22)
Deutsch 5
English 11
Français 18
Italiano 25
Nederlands 31
Español 38
Português 44
Dansk 51
Norsk 57
Svenska 63
Suomi 69
Ελληνικά 75
Türkçe 82
Русский 88
Magyar 96
Čeština 102
Slovenščina 108
Polski 114
Româneşte 121
Slovenčina 128
Hrvatski 134
Srpski 140
Български 146
Eesti 154
Latviešu 160
Lietuviškai 166
Українська 172


A

B

Deutsch 5
Inhalt
Allgemeine Hinweise
Lesen Sie vor der ersten Be-
nutzung Ihres Geräts diese
Originalbetriebsanleitung, handeln Sie da-
nach und bewahren Sie diese für späteren
Gebrauch oder für Nachbesitzer auf.
●Vor erster Inbetriebnahme Sicherheits-
hinweise Nr. 5.956-249.0 unbedingt le-
sen.
●Bei Nichtbeachtung der Betriebsanlei-
tung und der Sicherheitshinweise kön-
nen Schäden am Gerät und Gefahren
für den Bediener und andere Personen
entstehen.
●Bei Transportschaden sofort Händler in-
formieren.
Sicherheitshinweise
Gefahrenstufen
GEFAHR
●Hinweis auf eine unmittelbar drohende
Gefahr, die zu schweren Körperverlet-
zungen oder zum Tod führt.
몇WARNUNG
●Hinweis auf eine möglicherweise gefähr-
liche Situation, die zu schweren Körper-
verletzungen oder zum Tod führen kann.
몇VORSICHT
●Hinweis auf eine möglicherweise gefähr-
liche Situation, die zu leichten Verletzun-
gen führen kann.
ACHTUNG
●Hinweis auf eine möglicherweise gefähr-
liche Situation, die zu Sachschäden füh-
ren kann.
Allgemeine Sicherheitshinweise
Vor der ersten Inbetriebnahme die beilie-
genden Sicherheitshinweise für Nass-/Tro-
ckensauger unbedingt lesen!
GEFAHR ● Beachten Sie die anwend-
baren Sicherheitsbestimmungen, die für
die zu behandelnden Materialien zutreffen.
몇WARNUNG ● Das Gerät ist nicht für die
Absaugung gesundheitsschädlicher Stäu-
be geeignet. ● Das Gerät darf nicht im Frei-
en unter nassen Bedingungen verwendet
oder aufbewahrt werden. ● Betätigen Sie
für einen sicheren Stand des Geräts die
Feststellbremsen an der Lenkrolle. Bei of-
fener Feststellbremse kann sich das Gerät
unkontrolliert in Bewegung setzen.
몇VORSICHT ● Schalten Sie bei länge-
ren Betriebspausen und nach Gebrauch
das Gerät an den Geräteschaltern aus und
ziehen Sie den Netzstecker.
Verhalten im Notfall
GEFAHR
Verletzungs- und Beschädigungsgefahr
bei Kurzschluss oder anderen elektri-
schen Fehlern
Gefahr eines Stromschlags, Gefahr von
Verbrennungen
Schalten Sie das Gerät aus und ziehen Sie
den Netzstecker.
Bestimmungsgemäße
Verwendung
Das Gerät ist bestimmt zum:
●Nass- und Trockenreinigen von Boden-
und Wandflächen
●Aufsaugen von feuchten oder flüssigen
Substanzen
●Absaugen trockener, nicht brennbarer
Stäube aus Maschinen
●Industriellen Gebrauch, z. B. in Lager-
und Fertigungsbereichen und an Pro-
duktionsmaschinen
Jeglicher andere Gebrauch wird als un-
sachgemäß angesehen.
Allgemeine Hinweise.......................... 5
Sicherheitshinweise ........................... 5
Bestimmungsgemäße Verwendung ... 5
Umweltschutz..................................... 6
Zubehör und Ersatzteile..................... 6
Gerätebeschreibung .......................... 6
Inbetriebnahme.................................. 6
Betrieb................................................ 7
Transport............................................ 8
Lagerung............................................ 8
Pflege und Wartung ........................... 8
Hilfe bei Störungen ............................ 9
Entsorgung......................................... 10
Garantie ............................................. 10
Technische Daten .............................. 10
EU-Konformitätserklärung.................. 11

6 Deutsch
Das Gerät darf nicht verwendet werden für:
●Das Aufnehmen von gefährlichen Stäu-
ben
●Die Kranverladung
Umweltschutz
Die Verpackungsmaterialien sind re-
cyclebar. Bitte Verpackungen umwelt-
gerecht entsorgen.
Elektrische und elektronische Geräte
enthalten wertvolle recyclebare Mate-
rialien und oft Bestandteile wie Batte-
rien, Akkus oder Öl, die bei falschem
Umgang oder falscher Entsorgung eine po-
tentielle Gefahr für die menschliche Ge-
sundheit und die Umwelt darstellen
können. Für den ordnungsgemäßen Be-
trieb des Geräts sind diese Bestandteile je-
doch notwendig. Mit diesem Symbol
gekennzeichnete Geräte dürfen nicht mit
dem Hausmüll entsorgt werden.
Hinweise zu Inhaltsstoffen (REACH)
Aktuelle Informationen zu Inhaltsstoffen fin-
den Sie unter: www.kaercher.de/REACH
Zubehör und Ersatzteile
Nur Original-Zubehör und Original-Ersatz-
teile verwenden, sie bieten die Gewähr für
einen sicheren und störungsfreien Betrieb
des Geräts.
Informationen über Zubehör und Ersatztei-
le finden Sie unter www.kaercher.com.
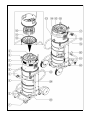
Gerätebeschreibung
Abbildungen siehe Grafikseite
Abbildung A
1Lenkrolle mit Feststellbremse
2Schmutzbehälter
3Filterring
4Halter für Saugrohr
5Zwischenring
6Typenschild
7Netzkabel
8Kabelhaken
9Tragegriff
10 Filter
11 Dichtring
12 Filterrüttler
13 Hebel der Filterabreinigung
14 Geräteschalter Saugturbine 3
15 Geräteschalter Saugturbine 1
16 Geräteschalter Saugturbine 2
17 Saugkopf
18 Verriegelung des Saugkopfs
19 Schubbügel
20 Halter für Bodendüse
21 Saugstutzen
22 Bügelgriff des Schmutzbehälters
23 Verriegelung des Zwischenrings
24 Kabelhalter
25 Fahrgestell
Inbetriebnahme
ACHTUNG
Überschreitung der Netzimpedanz
Elektrischer Schlag bei Kurzschluss
Die maximal zulässige Netzimpedanz am
elektrischen Anschlusspunkt (siehe Tech-
nische Daten) darf nicht überschritten wer-
den.
Bei Unklarheiten bezüglich der an Ihrem
Anschlusspunkt vorliegenden Netzimpe-
danz setzen Sie sich bitte mit Ihrem Ener-
gieversorgungsunternehmen in
Verbindung.
1. Das Gerät in die Arbeitsposition bringen.
2. Das Gerät mit den Feststellbremsen si-
chern.
3. Den Saugschlauch in den Saugan-
schluss stecken.
4. Das gewünschte Zubehör auf den Saug-
schlauch stecken.
5. Bei Bedarf einen Staubsammelbeutel in
den Schmutzbehälter einsetzen (siehe
Kapitel Staubsammelbeutel einsetzen).
6. Sicherstellen, dass der Schmutzbehäl-
ter ordnungsgemäß eingesetzt ist.
Staubsammelbeutel einsetzen
Zur staubfreien Leerung des Geräts kann in
den Schmutzbehälter ein Staubsammel-
beutel eingelegt werden.
Hinweis
Der Staubsammelbeutel darf nicht zum
Nasssaugen verwendet werden.
1. Den Staubsammelbeutel in den
Schmutzbehälter einsetzen und sorgfäl-
tig an die Behälterwand anlegen.

Deutsch 7
2. Den Beutelrand über den Rand des
Schmutzbehälters nach außen stülpen.
몇WARNUNG
Unsachgemäßer Umgang beim Verrie-
geln des Schmutzbehälters
Quetschgefahr
Während der Verriegelung keinesfalls die
Hände zwischen Schmutzbehälter und Fil-
terring halten oder in die Nähe der Hebe-
mechanik bringen.
Den Schmutzbehälter durch Betätigung
des Bügelgriffs mit beiden Händen verrie-
geln.
3. Den Schmutzbehälter in das Gerät ein-
setzen.
Betrieb
Nach dem Saugen von feuchten oder flüs-
sigen Substanzen siehe Kapitel Von Nass-
zu Trockensaugen wechseln.
Gerät einschalten
1. Den Netzstecker in die Steckdose ste-
cken.
2. Das Gerät an den Geräteschaltern
Saugturbine einschalten.
Hinweis
Wählen Sie die gewünschte Saugkraft über
die Geräteschalter Saugturbine, beginnend
mit Saugturbine 1. Schalten Sie die Saug-
turbinen immer nacheinander ein und aus.
3. Den Saugvorgang beginnen.
Saugvorgang durchführen
1. Den Füllstand im Schmutzbehälter re-
gelmäßig prüfen, da das Gerät beim
Saugen nicht automatisch abschaltet.
2. Bei Bedarf den Schmutzbehälter leeren
(siehe Kapitel Schmutzbehälter leeren).
3. Bei Bedarf den Filter reinigen (siehe Ka-
pitel Filter reinigen) oder wechseln / er-
setzen (siehe Kapitel Filter wechseln /
ersetzen).
Nasssaugen
ACHTUNG
Beschädigungsgefahr durch Überlauf
des Schmutzbehälters
Der Schmutzbehälter kann bei Aufnahme
von hohen Flüssigkeitsmengen innerhalb
weniger Sekunden gefüllt werden und
überlaufen.
Kontrollieren Sie ständig den Füllstand.
1. Vor dem Nasssaugen ggf. den Staub-
sammelbeutel entfernen (siehe Kapitel
Schmutzbehälter leeren).
2. Nach dem Nasssaugen:
a Den Filter trocknen.
b Den Schmutzbehälter mit einem
feuchten Tuch reinigen und trocknen.
Von Nass- zu Trockensaugen
wechseln
ACHTUNG
Wechsel von Nass- auf Trockensaugen
Beschädigungsgefahr des Filters
Saugen Sie bei nassem Filterelement kei-
nen trockenen Staub auf, da dies den Filter
zusetzt und ihn unbrauchbar machen kann.
1. Den nassen Filter vor Benutzung zum
Trockensaugen gut trocknen lassen
oder durch einen trockenen ersetzen.
2. Bei Bedarf den Filter wechseln.
Filter reinigen
Den Sternfaltenfilter in regelmäßigen Inter-
vallen reinigen.
1. Das Gerät ausschalten.
2. Wenn trockenes Sauggut gesaugt wur-
de, den Hebel der Filterabreinigung min-
destens 5-mal hin- und herbewegen.
Bringt diese Reinigung keine Verbesse-
rung, den Sternfaltenfilter entnehmen und
waschen oder ersetzen (siehe Kapitel Pfle-
ge und Wartung).
Gerät ausschalten
1. Das Gerät an den Geräteschaltern
Saugturbine ausschalten.
2. Den Netzstecker ziehen.
Nach jedem Betrieb
1. Das Zubehör abmontieren.
2. Das Zubehör bei Bedarf mit Wasser
ausspülen und trocknen.
3. Den Schmutzbehälter leeren (siehe Ka-
pitel Schmutzbehälter leeren).
4. Das Gerät innen und außen durch Ab-
saugen und Abwischen mit einem feuch-
ten Tuch reinigen.

8 Deutsch
5. Wenn nasses Sauggut gesaugt wurde,
den Filter zum Trocknen entnehmen.
Schmutzbehälter leeren
몇WARNUNG
Quetschgefahr
Achten Sie beim Abnehmen oder Aufset-
zen des Behälters auf sich bewegende Tei-
le.
Hinweis
Der Schmutzbehälter muss entleert wer-
den, wenn er bis ca. 3 cm unter dem obere-
ren Rand gefüllt ist.
Den Füllstand im Schmutzbehälter regel-
mäßig prüfen, da das Gerät beim Saugen
nicht automatisch abschaltet.
1. Das Gerät ausschalten.
2. Das Gerät mit den Feststellbremsen si-
chern.
3. Wenn trockenes Sauggut gesaugt wur-
de, den Hebel der Filterabreinigung min-
destens 5 mal hin- und herbewegen.
Abbildung B
4. Den Bügelgriff nach oben ziehen.
Der Schmutzbehälter wird entriegelt und
abgesenkt.
5. Den Schmutzbehälter am Bügelgriff aus
dem Gerät ziehen.
6. Ggf. den Staubsammelbeutel entfernen.
a Den Staubsammelbeutel verschließen
und aus dem Schmutzbehälter her-
ausnehmen.
b Den Staubsammelbeutel mit Inhalt ge-
mäß den geltenden gesetzlichen Vor-
schriften entsorgen.
7. Den Schmutzbehälter leeren.
Hinweis
Der Schmutzbehälter ist am Griff kranbar.
Die maximale Zuladung bei Krantransport
beträgt 50 kg.
몇VORSICHT
Überschreiten des zulässigen Gesamt-
gewichts
Verletzungs- und Beschädigungsgefahr
Beachten Sie das Gesamtgewicht des
Schmutzbehälters beim Transport mit ei-
nem Kran.
Überladen Sie den Behälter nicht.
Beachten Sie die gültigen Vorschriften zur
Verkranung.
몇WARNUNG
Unsachgemäßer Umgang beim Verrie-
geln des Schmutzbehälters
Quetschgefahr
Während der Verriegelung keinesfalls die
Hände zwischen Schmutzbehälter und Fil-
terring halten oder in die Nähe der Hebe-
mechanik bringen.
Den Schmutzbehälter durch Betätigung
des Bügelgriffs mit beiden Händen verrie-
geln.
8. Den Schmutzbehälter in umgekehrter
Reihenfolge in das Gerät einsetzen.
Transport
몇VORSICHT
Nichtbeachtung des Gewichts
Verletzungs- und Beschädigungsgefahr
Beachten Sie beim Transport das Gewicht
des Geräts.
1. Beim Transport in Fahrzeugen, das Ge-
rät gegen Rutschen und Kippen sichern.
Lagerung
몇VORSICHT
Nichtbeachtung des Gewichts
Verletzungs- und Beschädigungsgefahr
Beachten Sie bei der Lagerung das Ge-
wicht des Geräts.
1. Das Gerät nur in Innenräumen lagern.
Pflege und Wartung
GEFAHR
Verletzungsgefahr durch unabsichtlich
anlaufendes Gerät und elektrischen
Schlag.
Schalten Sie vor allen Arbeiten das Gerät
aus und ziehen Sie den Netzstecker.
Prüf- und Wartungsarbeiten
Lassen Sie das Gerät regelmäßig gemäß
den jeweiligen nationalen Vorschriften des
Gesetzgebers zur Unfallverhütung prüfen.
Wartungsarbeiten müssen durch eine
sachkundige Person zu regelmäßigen Zeit-
punkten nach den Angaben des Herstellers
durchgeführt werden, dabei sind bestehen-
de Bestimmungen und Sicherheitsanforde-

Deutsch 9
rungen zu beachten. Arbeiten an der
Elektroanlage dürfen nur von einer Elektro-
fachkraft durchgeführt werden. Bei Fragen
wenden Sie sich bitte an die KÄRCHER
Niederlassung.
Wartungsintervalle / Wartungen
durch den Benutzer
Für dieses Gerät gibt es keine regelmäßi-
gen Wartungsintervalle. Folgende Wartun-
gen werden bei Bedarf ausgeführt:
●Den Filter waschen.
●Den Filter wechseln.
●Den Filter ersetzen.
Filter waschen
ACHTUNG
Verwendung von Wasch- oder Bleich-
mitteln
Beschädigung des Filters.
Reinigen Sie den Filter nur mit Wasser.
Setzen Sie nur vollständig getrocknete Fil-
ter in das Gerät ein.
Der Sternfaltenfilter kann unter fließendem
Wasser ausgewaschen werden.
1. Den Sternfaltenfilter von Innen nach Au-
ßen spülen, damit keine zurückbleiben-
den Partikel die Filterleistung
beeinträchtigen.
Filter wechseln / ersetzen
1. Das Gerät ausschalten.
2. Den Netzstecker ziehen.
3. Den Saugkopf entriegeln und abneh-
men.
4. Den Zwischenring entriegeln und ab-
nehmen.
5. Den Sternfaltenfilter herausnehmen.
6. Den Dichtring auf Beschädigung prüfen.
7. Den neuen Sternfaltenfilter einsetzen:
a Den Sternfaltenfilter so über den Fil-
terrüttler am Zwischenring ziehen,
dass die Rüttelelemente mittig in den
Filtertaschen ausgerichtet sind.
b Den Zwischenring mit Sternfaltenfilter
und Filterrüttler auf den Filterring set-
zen.
c Den Zwischenring verriegeln.
8. Den Saugkopf aufsetzen und verriegeln.
Hilfe bei Störungen
GEFAHR
Unabsichtliches Anlaufen des Geräts /
Elektrischer Schlag
Unabsichtliches Anlaufen des Saugmotors
kann Verletzungen verursachen. Span-
nung auf elektrischen Teilen kann zu einem
Stromschlag führen.
Schalten Sie vor allen Arbeiten am Gerät
das Gerät aus und ziehen Sie den Netzste-
cker.
Lassen Sie alle Prüfungen und Arbeiten an
elektrischen Teilen von einem Fachmann
ausführen.
Hinweis
Tritt eine Störung auf, muss das Gerät so-
fort abgeschaltet werden. Vor erneuter In-
betriebnahme muss die Störung beseitigt
werden.
Kann die Störung nicht behoben werden,
muss das Gerät vom Kundendienst über-
prüft werden.
Saugturbine läuft nicht
1. Die Steckdose und die Sicherung der
Stromversorgung prüfen.
2. Das Netzkabel und den Netzstecker des
Geräts prüfen.
3. Das Gerät einschalten.
Saugkraft lässt nach
1. Die Verstopfungen aus der Saugdüse,
dem Saugrohr oder dem Saugschlauch
entfernen.
2. Den Filter reinigen (siehe Kapitel Filter
reinigen).
3. Den Schmutzbehälter leeren (siehe Ka-
pitel Schmutzbehälter leeren).
Staubaustritt beim Saugen
1. Den Filtersitz prüfen und ggf. korrigie-
ren.
2. Den Filter reinigen (siehe Kapitel Filter
reinigen).
3. Den Filter ersetzen (siehe Kapitel Filter
wechseln / ersetzen).

10 Deutsch
Entsorgung
Das Gerät ist gemäß den gesetzlichen Be-
stimmungen am Ende der Lebensdauer zu
entsorgen.
Garantie
In jedem Land gelten die von unserer zu-
ständigen Vertriebsgesellschaft herausge-
gebenen Garantiebedingungen. Etwaige
Störungen an Ihrem Gerät beseitigen wir
innerhalb der Garantiefrist kostenlos, so-
fern ein Material- oder Herstellungsfehler
die Ursache sein sollte. Im Garantiefall
wenden Sie sich bitte mit Kaufbeleg an Ih-
ren Händler oder die nächste autorisierte
Kundendienststelle.
(Adresse siehe Rückseite)
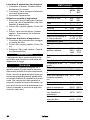
Technische Daten
* mit Elementen der Schutzklasse II Anord-
nung
Technische Änderungen vorbehalten.
IVM
60/36-
3
IVM
100/
36-3
Elektrischer Anschluss
Netzspannung V 220-
240
220-
240
Phase ~ 1 1
Netzfrequenz Hz 50-60 50-60
Leistung W 3150 3150
Schutzart IPX4 IPX4
Schutzklasse I* I*
Maximal zulässige
Netzimpedanz
Ω0.195+
j0.122
0.195+
j0.122
Maße und Gewichte
Typisches Betriebs-
gewicht
kg 68 73
Länge x Breite x Hö-
he
mm 1020 x
680 x
1490
1020 x
680 x
1720
Filterfläche m22,24 2,24
Umgebungsbedingungen
Lagertemperatur °C -10-40 -10-40
Leistungsdaten Gerät
Behältervolumen l 60 100
Vakuum (mit Druck-
begrenzungsventil)
kPa 25,4 25,4
Luftmenge l/s 3 x 74 3 x 74
Anschluss Saug-
schlauch
NW
DN70
NW
DN70
Nennweite Saug-
schlauch
DN40/
50/70
DN40/
50/70
Filter Bestellnummer 6.907-
611.0
6.907-
611.0
Ermittelte Werte gemäß EN 60335-2-69
Hand-Arm-Vibrati-
onswert
m/s2< 2,5 < 2,5
Unsicherheit K m/s20,2 0,2
Schalldruckpegel
LpA
dB(
A)
79 79
Unsicherheit KpA dB(
A)
22
Netzkabel
Typ H07R
N-F
3G1,5
mm2
H07R
N-F
3G1,5
mm2
Teilenummer 6.650-
035.0
6.650-
035.0
Kabellänge m 10 10
IVM
60/36-
3
IVM
100/
36-3

English 11
EU-Konformitätserklärung
Hiermit erklären wir, dass die nachfolgend
bezeichnete Maschine aufgrund ihrer Kon-
zipierung und Bauart sowie in der von uns
in Verkehr gebrachten Ausführung den ein-
schlägigen grundlegenden Sicherheits-
und Gesundheitsanforderungen der EU-
Richtlinien entspricht. Bei einer nicht mit
uns abgestimmten Änderung der Maschine
verliert diese Erklärung ihre Gültigkeit.
Produkt: Nass- und Trockensauger
Typ: 1.573-xxx
Typ: 9.989-xxx
Einschlägige EU-Richtlinien
2006/42/EG (+2009/127/EG)
2014/30/EU
2011/65/EU
Angewandte harmonisierte Normen
EN 60335-1
EN 60335-2-69
EN 55014-1: 2017 + A11: 2020
EN 55014-2: 2015
EN IEC 61000-3-2: 2019
EN 61000-3-3: 2013 + A1: 2019
EN 61000-3-11: 2000
EN 62233: 2008
EN IEC 63000: 2018
Angewandte nationale Normen
-
Die Unterzeichnenden handeln im Auftrag
und mit Vollmacht der Geschäftsführung.
Geschäftsführender Gesellschafter
M.Pfister
Kärcher Industrial Vacuuming GmbH
Robert-Bosch-Straße 4-8
73550 Waldstetten (Germany)
Tel.: +49 7171 94888-0
Fax: +49 7171 94888-528
Waldstetten, 21/11/01
Contents
General instructions
Read these original instruc-
tions before using your device
for the first time, adhere to the instructions
contained therein and store them for later
reference or subsequent owners.
●Be sure to read the safety instructions
no. 5.956-249.0 prior to the initial start-
up.
●If the operating instructions and safety
instructions are not observed, the device
can be damaged and dangers could
arise for users and other persons.
●Notify the dealer immediately in the case
of shipping damage.
Safety information
Hazard levels
DANGER
●Indication of an imminent threat of danger
that will lead to severe injuries or even
death.
몇WARNING
●Indication of a potentially dangerous situ-
ation that may lead to severe injuries or
even death.
몇CAUTION
●Indication of a potentially dangerous situ-
ation that may lead to minor injuries.
General instructions ........................... 11
Safety information .............................. 11
Intended use ...................................... 12
Environmental protection ................... 12
Accessories and spare parts.............. 12
Description of the device.................... 12
Initial startup....................................... 13
Operation ........................................... 13
Transport............................................ 15
Storage............................................... 15
Care and service................................ 15
Troubleshooting guide........................ 15
Disposal ............................................. 16
Warranty............................................. 16
Technical data .................................... 16
Declaration of Conformity................... 17

12 English
ATTENTION
●Indication of a potentially dangerous situ-
ation that may lead to damage to proper-
ty.
General safety instructions
It is essential to read the enclosed safety in-
structions for wet/dry vacuum cleaners be-
fore using the device for the first time!
DANGER ● Observe the applicable
safety instructions for the materials being
vacuumed.
몇WARNING ● The device is not suitable
for vacuuming up dusts that are harmful to
human health. ● The device must not be
used or stored outdoors in wet conditions.
● Apply the parking brake at the steering
roller to ensure a secure footing for the de-
vice. The device may move uncontrollably if
the parking brake is open.
몇CAUTION ● In case of longer breaks in
operation and after use, switch off the de-
vice at the power switches and unplug the
mains plug.
Behaviour in the event of an
emergency
DANGER
Risk of injury and damage in the event
of a short-circuit or other electrical
faults
Danger of electric shock, danger of burns
Switch off the device and unplug the mains
plug.
Intended use
The device is intended for:
●Wet and dry cleaning of floor and wall
surfaces
●For vacuuming moist or liquid substanc-
es
●For vacuuming dry, non-flammable
dusts from machines
●Industrial use, e.g. in storage and pro-
duction areas and on production ma-
chinery
Any other use constitutes improper use.
The device must not be used for the follow-
ing purposes:
●Vacuuming of dangerous dusts
●Crane loading
Environmental protection
The packing materials can be recy-
cled. Please dispose of packaging in
accordance with the environmental regula-
tions.
Electrical and electronic appliances
contain valuable, recyclable materials
and often components such as batter-
ies, rechargeable batteries or oil, which - if
handled or disposed of incorrectly - can
pose a potential threat to human health and
the environment. However, these compo-
nents are required for the correct operation
of the appliance. Appliances marked by this
symbol are not allowed to be disposed of
together with the household rubbish.
Notes on the content materials (REACH)
Current information on content materials
can be found at: www.kaercher.com/
REACH
Accessories and spare parts
Only use original accessories and original
spare parts. They ensure that the appliance
will run fault-free and safely.
Information on accessories and spare parts
can be found at www.kaercher.com.
Description of the device
For the illustrations, refer to the graphics
page
Illustration A
1Steering roller with parking brake
2Dirt receptacle
3Filter ring
4Suction pipe holder
5Spacer
6Type plate
7Mains cable
8Cable hooks
9Carrying handle
10 filter
11 Sealing ring
12 Filter vibrator
13 Lever for the filter cleaning
14 Suction turbine trigger 3

English 13
15 Suction turbine trigger 1
16 Suction turbine trigger 2
17 Suction head
18 Suction head lock
19 Push handle
20 Floor nozzle holder
21 Suction hose port
22 Bow handle of the dirt receptacle
23 Spacer lock
24 Cable clips
25 Chassis
Initial startup
ATTENTION
Exceeding the grid impedance
Electrical shock in the event of a short-cir-
cuit
The maximum permissible mains grid im-
pedance at the electrical connection point
(see Technical data) must not be exceed-
ed.
Contact your electricity supplier in the case
of any uncertainties regarding the mains
grid impedance at your electrical connec-
tion point.
1. Bring the device into the working posi-
tion.
2. Secure the device with the parking
brakes.
3. Insert the suction hose into the suction
connection.
4. Plug the desired accessory onto the suc-
tion hose.
5. If necessary, fit a dust collection bag in
the dirt receptacle (see chapter Fitting
the dust collection bag).
6. Ensure that the dirt receptacle is correct-
ly fitted.
Fitting the dust collection bag
A dust collection bag can be inserted into
the dirt receptacle to allow dust-free empty-
ing of the device.
Note
The dust collection bag must not be used
for wet vacuum cleaning.
1. Fit the dust collection bag in the dirt re-
ceptacle and carefully press it against
the wall of the container.
2. Fold the edge of the bag over the edge
of the dirt receptacle.
몇WARNING
Improper handling when locking the dirt
receptacle
Risk of crushing
Under no circumstances should you hold
your hands between the dirt receptacle and
filter ring or allow them to come close to the
lifting mechanism while locking it.
Lock the dirt receptacle by operating the
bow handle with both hands.
3. Fit the dirt receptacle in the device.
Operation
After vacuuming moist or liquid substances,
see chapter Switching from wet to dry vac-
uuming.
Switching on the device
1. Plug the mains plug into the socket.
2. Switch on the device via the suction tur-
bine power switches.
Note
Select the required suction power via the
suction turbine power switch, starting with
suction turbine 1. Always switch the suction
turbines on and off one after the other.
3. Start the vacuuming process.
Performing the vacuuming process
1. Regularly check the filling level in the dirt
receptacle, since the device does not
switch off automatically.
2. If necessary, empty the dirt receptacle
(see chapter Emptying the dirt recepta-
cle).
3. If necessary, clean the filter (see chapter
Cleaning the filter) or change/
replace the filter (see chapter Chang-
ing/replacing the filter).
Wet vacuum cleaning
ATTENTION
Risk of damage if the dirt receptacle
overflows
The dirt receptacle can fill within a few sec-
onds and overflow when vacuuming large
amounts of liquids.
Continuously monitor the filling level.

14 English
1. Remove the dust collection bag, if nec-
essary, before wet vacuum cleaning
(see chapter Emptying the dirt recepta-
cle).
2. After wet vacuum cleaning:
a Dry the filter.
b Clean the dirt receptacle with a moist
cloth and dry it off.
Switching from wet to dry
vacuuming
ATTENTION
Switching from wet to dry vacuuming
Risk of damage to the filter
Do not vacuum dry dust with a wet filter el-
ement because this clogs the filter and can
make it unusable.
1. Allow the wet filter to dry completely or
replace it with a dry filter before using
the device for dry vacuuming.
2. Replace the filter if necessary.
Cleaning the filter
Clean the star pleated filter at regular inter-
vals.
1. Switch off the device.
2. If dry suction material has been extract-
ed, move the filter cleaning lever back
and forth at least 5 times.
If this cleaning does not bring any improve-
ment, remove the star pleated filter and
wash or replace it (see chapter Care and
service).
Switching off the device
1. Switch off the device via the suction tur-
bine power switches.
2. Pull out the mains plug.
Each time after use
1. Remove the accessories.
2. Remove the accessories and, if neces-
sary, flush with water and allow to dry.
3. Empty the dirt receptacle (see chapter
Emptying the dirt receptacle).
4. Vacuum the inside and outside of the de-
vice and clean with a moist cloth.
5. Remove the filter for drying if wet suction
material has been vacuumed.
Emptying the dirt receptacle
몇WARNING
Risk of crushing
When removing or replacing the container,
watch for moving parts.
Note
The dirt receptacle must be emptied when
it is has filled up to approx. 3 cm below the
upper edge.
Regularly check the filling level in the dirt
receptacle, since the device does not
switch off automatically.
1. Switch off the device.
2. Secure the device with the parking
brakes.
3. If dry suction material has been extract-
ed, move the filter cleaning lever back
and forth at least 5 times.
Illustration B
4. Pull the bow handle up.
The dirt receptacle is unlocked and low-
ered.
5. Pull the dirt receptacle out of the device
by the bow handle.
6. Remove the dust collection bag if neces-
sary.
a Close the dust collection bag and re-
move it from the dirt receptacle.
b Dispose of the dust collection bag and
contents according to the applicable
waste disposal regulations.
7. Empty the dirt receptacle.
Note
The dirt receptacle can be lifted by crane at
the handle. The maximum load for trans-
port by crane is 50 kg.
몇CAUTION
Exceeding the permissible total weight
Risk of injury and damage
Observe the total weight of the dirt recepta-
cle when transporting it by crane.
Do not overload the receptacle.
Observe the valid instructions for crane op-
eration.
몇WARNING
Improper handling when locking the dirt
receptacle
Risk of crushing

English 15
Under no circumstances should you hold
your hands between the dirt receptacle and
filter ring or allow them to come close to the
lifting mechanism while locking it.
Lock the dirt receptacle by operating the
bow handle with both hands.
8. Insert the dirt receptacle into the device
in reverse order.
Transport
몇CAUTION
Failure to observe the weight
Risk of injury and damage
Be aware of the weight of the device during
transportation.
1. Secure the device against slipping and
tipping over when transporting in vehi-
cles.
Storage
몇CAUTION
Failure to observe the weight
Risk of injury and damage
Be aware of the weight of the device during
storage.
1. Store the device indoors only.
Care and service
DANGER
Risk of injury due to inadvertently start-
ing up device and also due to electric
shock.
Switch off the device immediately and un-
plug the mains plug before performing
work.
Inspection and maintenance work
Have the device regularly inspected ac-
cording to the respective national accident
prevention regulations. Maintenance work
as specified by the manufacturer must be
performed by a technically qualified person
at the specified regular intervals and in ac-
cordance with the applicable regulations
and safety requirements. Work on electrical
components may only be performed by a
qualified electrician. Please contact a
KÄRCHER branch office if you have any
questions.
Maintenance intervals / user
maintenance
No periodic maintenance intervals are
specified for this device. The following
maintenance is to be performed as neces-
sary:
●Wash the filter.
●Change the filter.
●Replace the filter.
Wash the filter
ATTENTION
Use of detergents or bleach
Damage to the filter.
Clean the filter with water only. Only fit the
filter in the device when it is completely dry.
The star folded filter can be washed out un-
der running water.
1. Always flush the star folded filter from
the inside to the outside so that no re-
maining particles impair the filter perfor-
mance.
Changing/replacing the filter
1. Switch off the device.
2. Pull out the mains plug.
3. Unlock and remove the suction head.
4. Unlock and remove the spacer.
5. Remove the star pleated filter.
6. Check the sealing ring for damage.
7. Insert the new star pleated filter:
a Pull the new star pleated filter over the
filter vibrator on the spacer such that
the vibrating elements are aligned
centrally in the filter bags.
b Place the spacer with star pleated fil-
ter and filter vibrator on the filter ring.
c Lock the spacer.
8. Fit and lock the suction head.
Troubleshooting guide
DANGER
Unintentional start-up of the device /
electric shock
Unintentional start-up of the suction motor
can cause injuries. Voltage present on
electrical parts can cause an electric shock.
Switch off the device and unplug the mains
plug before performing any work on the de-
vice.

16 English
Have all checks and work on electrical
parts performed by an qualified technician.
Note
The device must be switched off immedi-
ately in the event of a malfunction. The mal-
function must be eliminated before
switching the device on again.
If the malfunction cannot be corrected, the
device must be checked by the Customer
Service department.
Suction turbine does not start up
1. Check the socket and the power supply
fuse.
2. Check the mains cable and the mains
plug of the device.
3. Switch the device on.
Suction power decreases
1. Remove the blockages from the suction
nozzle, the suction pipe or the suction
hose.
2. Clean the filter (see chapter Cleaning
the filter).
3. Empty the dirt receptacle (see chapter
Emptying the dirt receptacle).
Escaping dust when vacuuming
1. Check the seating of the filter and cor-
rect if necessary.
2. Clean the filter (see chapter Cleaning
the filter).
3. Replace the filter (see chapter Chang-
ing/replacing the filter).
Disposal
At the end of its service life, the device is to
be disposed of in accordance with statutory
regulations.
Warranty
The warranty conditions issued by our rele-
vant sales company apply in all countries.
We shall remedy possible malfunctions on
your appliance within the warranty period
free of cost, provided that a material or
manufacturing defect is the cause. In a war-
ranty case, please contact your dealer (with
the purchase receipt) or the next author-
ised customer service site.
(See overleaf for the address)
Technical data
IVM
60/36-
3
IVM
100/
36-3
Electrical connection
Mains voltage V 220-
240
220-
240
Phase ~ 1 1
Power frequency Hz 50-60 50-60
Power W 3150 3150
Protection class IPX4 IPX4
Protection class I* I*
Maximum permissi-
ble mains grid im-
pedance
Ω0.195+
j0.122
0.195+
j0.122
Dimensions and weights
Typical operating
weight
kg 68 73
Length x width x
height
mm 1020 x
680 x
1490
1020 x
680 x
1720
Filter area m22.24 2.24
Ambient conditions
Storage temperature °C -10-40 -10-40
Device performance data
Container capacity l 60 100
Vacuum (with pres-
sure relief valve)
kPa 25.4 25.4
Air quantity l/s 3 x 74 3 x 74
Suction hose con-
nection
NW
DN70
NW
DN70
Nominal width of the
suction hose
DN40/
50/70
DN40/
50/70
Filter order number 6.907-
611.0
6.907-
611.0
Determined values in acc. with EN
60335-2-69
Hand-arm vibration
value
m/s2< 2.5 < 2.5
Uncertainty K m/s20.2 0.2
Sound pressure lev-
el LpA
dB(
A)
79 79
Uncertainty KpA dB(
A)
22

English 17
* with elements of protection class II ar-
rangement
Subject to technical changes without no-
tice.
Declaration of Conformity
We hereby declare that the machine de-
scribed below complies with the relevant
basic safety and health requirements in the
EU Directives, both in its basic design and
construction as well as in the version
placed in circulation by us. This declaration
is invalidated by any changes made to the
machine that are not approved by us.
Product: Wet/dry vacuum cleaner
Type: 1.573-xxx
Type: 9.989-xxx
Currently applicable EU Directives
2006/42/EC (+2009/127/EC)
2014/30/EU
2011/65/EU
Harmonised standards used
EN 60335-1
EN 60335-2-69
EN 55014-1: 2017 + A11: 2020
EN 55014-2: 2015
EN IEC 61000-3-2: 2019
EN 61000-3-3: 2013 + A1: 2019
EN 61000-3-11: 2000
EN 62233: 2008
EN IEC 63000: 2018
National standards used
-
The signatories act on behalf of and with
the authority of the company management.
Managing partner
M.Pfister
Kärcher Industrial Vacuuming GmbH
Robert-Bosch-Straße 4-8
73550 Waldstetten (Germany)
Ph.: +49 7171 94888-0
Fax: +49 7171 94888-528
Waldstetten, 21/11/01
We hereby declare that the product de-
scribed below complies with the relevant
provisions of the following UK Regulations,
both in its basic design and construction as
well as in the version put into circulation by
us. This declaration shall cease to be valid
if the product is modified without our prior
approval.
Product: Wet/dry vacuum cleaner
Type: 1.573-xxx
Type: 9.989-xxx
Currently applicable UK Regulations
S.I. 2008/1597 (as amended)
S.I. 2016/1091 (as amended)
S.I. 2012/3032 (as amended)
Designated standards used
EN 60335-1
EN 60335-2-69
EN 55014-1: 2017 + A11: 2020
EN 55014-2: 2015
EN IEC 61000-3-2: 2019
EN 61000-3-3: 2013 + A1: 2019
EN 61000-3-11: 2000
EN 62233: 2008
EN IEC 63000: 2018
National standards used
-
Mains cable
Type H07R
N-F
3G1.5
mm2
H07R
N-F
3G1.5
mm2
Part number 6.650-
035.0
6.650-
035.0
Cable length m 10 10
EU Declaration of Conformity
IVM
60/36-
3
IVM
100/
36-3
Declaration of Conformity (UK)

18 Français
The signatories act on behalf of and with
the authority of the company management.
Managing partner
M.Pfister
Kärcher Industrial Vacuuming GmbH
Robert-Bosch-Straße 4-8
73550 Waldstetten (Germany)
Ph.: +49 7171 94888-0
Fax: +49 7171 94888-528
Waldstetten, 21/11/01
Contenu
Remarques générales
Avant d’utiliser votre appareil
pour la première fois, lisez
cette notice originale, agissez suivant ses
consignes et conservez-la pour toute utili-
sation ultérieure ou pour le propriétaire sui-
vant.
●Lire impérativement les consignes de
sécurité n° 5.956-249.0 avant la pre-
mière mise en service.
●Le non-respect du manuel d'utilisation et
des consignes de sécurité peut entraî-
ner des dommages sur l’appareil et des
dangers pour l’opérateur et d’autres per-
sonnes.
●Informer immédiatement le vendeur en
cas de dommage dû au transport.
Consignes de sécurité
Niveaux de danger
DANGER
●Indique un danger immédiat qui peut en-
traîner de graves blessures corporelles
ou la mort.
몇AVERTISSEMENT
●Indique une situation potentiellement
dangereuse qui peut entraîner de graves
blessures corporelles ou la mort.
몇PRÉCAUTION
●Indique une situation potentiellement
dangereuse qui peut entraîner des bles-
sures légères.
ATTENTION
●Indique une situation potentiellement
dangereuse qui peut entraîner des dom-
mages matériels.
Consignes de sécurité générales
Avant la première mise en service, lire im-
pérativement les consignes de sécurité ci-
jointes pour les aspirateurs d’humidité/de
poussières !
DANGER ● Respecter les prescriptions
de sécurité applicables pour les matières à
traiter.
몇AVERTISSEMENT ● L’appareil n’est
pas adapté pour l’aspiration de poussières
nocives. ● L’appareil ne peut pas être utili-
sé ni rangé à l’extérieur dans un environne-
ment humide. ● Actionner le frein de
stationnement sur la roue directionnelle
pour un positionnement sûr de l’appareil.
Lorsque le frein de stationnement est ou-
vert, l’appareil peut se mettre en mouve-
ment de manière incontrôlée.
몇PRÉCAUTION ● Lors d’interruptions
de fonctionnement prolongées et après
avoir utilisé l’appareil, éteignez-le par les
interrupteurs principaux et débranchez la
fiche secteur.
Remarques générales........................ 18
Consignes de sécurité ....................... 18
Utilisation conforme ........................... 19
Protection de l'environnement............ 19
Accessoires et pièces de rechange ... 19
Description de l'appareil..................... 19
Mise en service .................................. 19
Fonctionnement ................................. 20
Transport............................................ 22
Stockage ............................................ 22
Entretien et maintenance ................... 22
Dépannage en cas de défaut............. 23
Élimination ......................................... 23
Garantie ............................................. 23
Caractéristiques techniques............... 23
Déclaration de conformité UE ............ 24

Français 19
Comportement en cas d’urgence
DANGER
Risque de blessure et d’endommage-
ment en cas de court-circuit ou d’autres
défauts électriques
Risque d’électrocution, risque de brûlures
Éteignez l’appareil et débranchez la fiche
secteur.
Utilisation conforme
L’appareil est conçu pour :
●Nettoyage humide et à sec de surfaces
de sol et murales
●Aspiration de substances humides ou li-
quides
●Aspiration des poussières de machines
sèches, non inflammables
●Utilisation industrielle, p. ex. dans des
zones de stockage et de fabrication ainsi
que sur des machines de production
Toute autre utilisation est considérée
comme non conforme.
L’appareil ne peut pas être utilisé pour :
●Le ramassage de poussières dange-
reuses
●Le chargement par grue
Protection de
l'environnement
Les matériaux d'emballage sont recy-
clables. Veuillez éliminer les embal-
lages dans le respect de l’environnement.
Les appareils électriques et électro-
niques contiennent des matériaux pré-
cieux recyclables et souvent des
composants tels que des piles, batteries ou
de l’huile représentant un danger potentiel
pour la santé humaine et l'environnement,
s'ils ne sont pas manipulés ou éliminés cor-
rectement. Ces composants sont cepen-
dant nécessaires pour le fonctionnement
correct de l'appareil. Les appareils mar-
qués par ce symbole ne doivent pas être je-
tés dans les ordures ménagères.
Remarques concernant les matières
composantes (REACH)
Les informations actuelles concernant les
matières composantes sont disponibles
sous : www.kaercher.com/REACH
Accessoires et pièces de
rechange
Utiliser exclusivement des accessoires et
pièces de rechange originaux. Ceux-ci ga-
rantissent le fonctionnement sûr et sans
défaut de votre appareil.
Des informations sur les accessoires et
pièces de rechange sont disponibles sur le
site Internet www.kaercher.com.
Description de l'appareil
Pour les figures, voir la page des gra-
phiques
Illustration A
1Roue directionnelle avec frein de sta-
tionnement
2Collecteur d'impuretés
3Bague de filtre
4Support pour tube d'aspiration
5Bague intermédiaire
6Plaque signalétique
7Câble secteur
8Crochet de câble
9Poignée de transport
10 Filtre
11 Bague d'étanchéité
12 Vibreur de décolmatage du filtre
13 Levier de nettoyage du filtre
14 Interrupteur principal de turbine
d’aspiration 3
15 Interrupteur principal de turbine
d’aspiration 1
16 Interrupteur principal de turbine
d’aspiration 2
17 Tête d’aspiration
18 Verrouillage de la tête d'aspiration
19 Guidon
20 Support pour buse de sol
21 Tubulure d'aspiration
22 Poignée à étrier du collecteur d’impure-
tés
23 Verrouillage de la bague intermédiaire
24 Porte-câble
25 Châssis
Mise en service
ATTENTION
Dépassement de l'impédance secteur
Electrocution en cas de court-circuit

20 Français
Ne pas dépasser l'impédance secteur
maximale admissible au point de raccorde-
ment électrique (voir les caractéristiques
techniques).
En cas de doute sur l’impédance secteur
présente sur votre point de raccordement,
veuillez contacter votre fournisseur d’éner-
gie.
1. Mettre l’appareil en position de travail.
2. Bloquer l’appareil à l’aide des freins de
stationnement.
3. Insérer le tuyau d’aspiration dans le
connecteur pour flexible d’aspiration.
4. Insérer les accessoires souhaités sur le
tuyau d'aspiration.
5. Si nécessaire, insérer un sac à pous-
sières dans le collecteur d’impuretés
(voir chapitre Insertion du sac à pous-
sières).
6. S’assurer que le collecteur d’impuretés
est correctement mis en place.
Insertion du sac à poussières
Pour vider l’appareil sans libérer de pous-
sière, il est possible de placer un sac à
poussières dans le collecteur d’impuretés.
Remarque
Ne pas utiliser le sac à poussières pour
l'aspiration de l'eau.
1. Placer le sac à poussières dans le col-
lecteur d’impuretés et l’appliquer avec
soin sur la paroi du bac.
2. Rabattre le bord du sac au-dessus du
collecteur d’impuretés, vers l’extérieur.
몇AVERTISSEMENT
Manipulation incorrecte lors du verrouil-
lage du collecteur d’impuretés
Risque d'écrasement
Ne mettre en aucun cas les mains entre le
collecteur d’impuretés et la bague de filtre,
ni à proximité du mécanisme de levage,
pendant le verrouillage.
Verrouiller le collecteur d’impuretés en ac-
tionnant la poignée à étrier avec les deux
mains.
3. Insérer le collecteur d’impuretés dans
l’appareil.
Fonctionnement
Après l’aspiration de substances humides
ou liquides, voir chapitre Passage de l’as-
piration d’humidité à l’aspiration de pous-
sières.
Démarrage de l’appareil
1. Brancher la fiche secteur dans la prise
de courant.
2. Allumer l’appareil par les interrupteurs
principaux de la turbine d’aspiration.
Remarque
Sélectionner la puissance d'aspiration sou-
haitée sur les interrupteurs principaux de la
turbine d'aspiration en commençant par la
turbine d'aspiration 1. Allumez et éteignez
toujours les turbines d'aspiration les unes
après les autres.
3. Commencer l’aspiration.
Aspiration
1. Vérifier régulièrement le niveau de rem-
plissage du collecteur d’impuretés, car
l’appareil ne s’arrête pas automatique-
ment lors de l’aspiration.
2. Si nécessaire, vider le collecteur d’impu-
retés (voir chapitre Vidange du collec-
teur d’impuretés).
3. Si nécessaire, nettoyer le filtre (voir cha-
pitre Nettoyage du filtre) ou le changer/
remplacer (voir chapitre Changement/
Remplacement du filtre).
Aspiration humide
ATTENTION
Risque d'endommagement par le débor-
dement du collecteur d'impuretés
Le collecteur d'impuretés peut être rempli
en quelques secondes et déborder lors de
la réception de grands volumes de liquide.
Contrôler en permanence le niveau de rem-
plissage.
1. Avant l’aspiration humide, retirer le
sachet de collecte de la poussière, le
cas échéant (voir chapitre Vidange du
collecteur d’impuretés).
2. Après l’aspiration humide :
a Sécher le filtre.
b Nettoyer le collecteur d’impuretés
avec un chiffon humide et le sécher.
Pagina se încarcă...
Pagina se încarcă...
Pagina se încarcă...
Pagina se încarcă...
Pagina se încarcă...
Pagina se încarcă...
Pagina se încarcă...
Pagina se încarcă...
Pagina se încarcă...
Pagina se încarcă...
Pagina se încarcă...
Pagina se încarcă...
Pagina se încarcă...
Pagina se încarcă...
Pagina se încarcă...
Pagina se încarcă...
Pagina se încarcă...
Pagina se încarcă...
Pagina se încarcă...
Pagina se încarcă...
Pagina se încarcă...
Pagina se încarcă...
Pagina se încarcă...
Pagina se încarcă...
Pagina se încarcă...
Pagina se încarcă...
Pagina se încarcă...
Pagina se încarcă...
Pagina se încarcă...
Pagina se încarcă...
Pagina se încarcă...
Pagina se încarcă...
Pagina se încarcă...
Pagina se încarcă...
Pagina se încarcă...
Pagina se încarcă...
Pagina se încarcă...
Pagina se încarcă...
Pagina se încarcă...
Pagina se încarcă...
Pagina se încarcă...
Pagina se încarcă...
Pagina se încarcă...
Pagina se încarcă...
Pagina se încarcă...
Pagina se încarcă...
Pagina se încarcă...
Pagina se încarcă...
Pagina se încarcă...
Pagina se încarcă...
Pagina se încarcă...
Pagina se încarcă...
Pagina se încarcă...
Pagina se încarcă...
Pagina se încarcă...
Pagina se încarcă...
Pagina se încarcă...
Pagina se încarcă...
Pagina se încarcă...
Pagina se încarcă...
Pagina se încarcă...
Pagina se încarcă...
Pagina se încarcă...
Pagina se încarcă...
Pagina se încarcă...
Pagina se încarcă...
Pagina se încarcă...
Pagina se încarcă...
Pagina se încarcă...
Pagina se încarcă...
Pagina se încarcă...
Pagina se încarcă...
Pagina se încarcă...
Pagina se încarcă...
Pagina se încarcă...
Pagina se încarcă...
Pagina se încarcă...
Pagina se încarcă...
Pagina se încarcă...
Pagina se încarcă...
Pagina se încarcă...
Pagina se încarcă...
Pagina se încarcă...
Pagina se încarcă...
Pagina se încarcă...
Pagina se încarcă...
Pagina se încarcă...
Pagina se încarcă...
Pagina se încarcă...
Pagina se încarcă...
Pagina se încarcă...
Pagina se încarcă...
Pagina se încarcă...
Pagina se încarcă...
Pagina se încarcă...
Pagina se încarcă...
Pagina se încarcă...
Pagina se încarcă...
Pagina se încarcă...
Pagina se încarcă...
Pagina se încarcă...
Pagina se încarcă...
Pagina se încarcă...
Pagina se încarcă...
Pagina se încarcă...
Pagina se încarcă...
Pagina se încarcă...
Pagina se încarcă...
Pagina se încarcă...
Pagina se încarcă...
Pagina se încarcă...
Pagina se încarcă...
Pagina se încarcă...
Pagina se încarcă...
Pagina se încarcă...
Pagina se încarcă...
Pagina se încarcă...
Pagina se încarcă...
Pagina se încarcă...
Pagina se încarcă...
Pagina se încarcă...
Pagina se încarcă...
Pagina se încarcă...
Pagina se încarcă...
Pagina se încarcă...
Pagina se încarcă...
Pagina se încarcă...
Pagina se încarcă...
Pagina se încarcă...
Pagina se încarcă...
Pagina se încarcă...
Pagina se încarcă...
Pagina se încarcă...
Pagina se încarcă...
Pagina se încarcă...
Pagina se încarcă...
Pagina se încarcă...
Pagina se încarcă...
Pagina se încarcă...
Pagina se încarcă...
Pagina se încarcă...
Pagina se încarcă...
Pagina se încarcă...
Pagina se încarcă...
Pagina se încarcă...
Pagina se încarcă...
Pagina se încarcă...
Pagina se încarcă...
Pagina se încarcă...
Pagina se încarcă...
Pagina se încarcă...
Pagina se încarcă...
Pagina se încarcă...
Pagina se încarcă...
Pagina se încarcă...
Pagina se încarcă...
Pagina se încarcă...
Pagina se încarcă...
Pagina se încarcă...
Pagina se încarcă...
-
 1
1
-
 2
2
-
 3
3
-
 4
4
-
 5
5
-
 6
6
-
 7
7
-
 8
8
-
 9
9
-
 10
10
-
 11
11
-
 12
12
-
 13
13
-
 14
14
-
 15
15
-
 16
16
-
 17
17
-
 18
18
-
 19
19
-
 20
20
-
 21
21
-
 22
22
-
 23
23
-
 24
24
-
 25
25
-
 26
26
-
 27
27
-
 28
28
-
 29
29
-
 30
30
-
 31
31
-
 32
32
-
 33
33
-
 34
34
-
 35
35
-
 36
36
-
 37
37
-
 38
38
-
 39
39
-
 40
40
-
 41
41
-
 42
42
-
 43
43
-
 44
44
-
 45
45
-
 46
46
-
 47
47
-
 48
48
-
 49
49
-
 50
50
-
 51
51
-
 52
52
-
 53
53
-
 54
54
-
 55
55
-
 56
56
-
 57
57
-
 58
58
-
 59
59
-
 60
60
-
 61
61
-
 62
62
-
 63
63
-
 64
64
-
 65
65
-
 66
66
-
 67
67
-
 68
68
-
 69
69
-
 70
70
-
 71
71
-
 72
72
-
 73
73
-
 74
74
-
 75
75
-
 76
76
-
 77
77
-
 78
78
-
 79
79
-
 80
80
-
 81
81
-
 82
82
-
 83
83
-
 84
84
-
 85
85
-
 86
86
-
 87
87
-
 88
88
-
 89
89
-
 90
90
-
 91
91
-
 92
92
-
 93
93
-
 94
94
-
 95
95
-
 96
96
-
 97
97
-
 98
98
-
 99
99
-
 100
100
-
 101
101
-
 102
102
-
 103
103
-
 104
104
-
 105
105
-
 106
106
-
 107
107
-
 108
108
-
 109
109
-
 110
110
-
 111
111
-
 112
112
-
 113
113
-
 114
114
-
 115
115
-
 116
116
-
 117
117
-
 118
118
-
 119
119
-
 120
120
-
 121
121
-
 122
122
-
 123
123
-
 124
124
-
 125
125
-
 126
126
-
 127
127
-
 128
128
-
 129
129
-
 130
130
-
 131
131
-
 132
132
-
 133
133
-
 134
134
-
 135
135
-
 136
136
-
 137
137
-
 138
138
-
 139
139
-
 140
140
-
 141
141
-
 142
142
-
 143
143
-
 144
144
-
 145
145
-
 146
146
-
 147
147
-
 148
148
-
 149
149
-
 150
150
-
 151
151
-
 152
152
-
 153
153
-
 154
154
-
 155
155
-
 156
156
-
 157
157
-
 158
158
-
 159
159
-
 160
160
-
 161
161
-
 162
162
-
 163
163
-
 164
164
-
 165
165
-
 166
166
-
 167
167
-
 168
168
-
 169
169
-
 170
170
-
 171
171
-
 172
172
-
 173
173
-
 174
174
-
 175
175
-
 176
176
-
 177
177
-
 178
178
-
 179
179
-
 180
180


K RCHER IVM 60-36-3 Industrial Vacuum Cleaner Manual de utilizare
- Tip
- Manual de utilizare
în alte limbi
Lucrări înrudite
Alte documente
-
Kärcher IVC 60/24-2 Ap Manual de utilizare
-
Parkside PNTS 1300 B2 Instrucțiuni de utilizare
-
-
Kärcher IVC 60-24-2 Tact² Lp Industrial Vacuum Cleaner Instrucțiuni de utilizare
-
-
Silvercrest SFR 3.7 A2 Operating Instructions Manual
-
Kawasaki K-VCW 1400-30L-E Original Instructions Manual
-
Silvercrest SAS 7.4 LI A2 Operating Instructions Manual
-