Kärcher NT 35/1 Tact Te Original Instructions Manual
- Tip
- Original Instructions Manual

NT 35/1 Tact
Register and win!
www.kaercher.com
NT 35/1 Tact
NT 35/1 Tact Te
59616920 07/11
Deutsch 6
English 12
Français 18
Italiano 25
Nederlands 31
Español 38
Português 45
Dansk 52
Norsk 58
Svenska 64
Suomi 70
Ελληνικά 76
Türkçe 83
Русский 89
Magyar 96
Čeština 102
Slovenščina 108
Polski 114
Româneşte 121
Slovenčina 127
Hrvatski 133
Srpski 139
Български 145
Eesti 152
Latviešu 158
Lietuviškai 164
Українська 170


Deutsch
– 1
Lesen Sie vor der ersten Benut-
zung Ihres Gerätes diese Origi-
nalbetriebsanleitung, handeln Sie danach
und bewahren Sie diese für späteren Ge-
brauch oder für Nachbesitzer auf.
–Vor erster Inbetriebnahme Sicherheits-
hinweise Nr. 5.956-249 unbedingt le-
sen!
–Bei Nichtbeachtung der Betriebsanlei-
tung und der Sicherheitshinweise kön-
nen Schäden am Gerät und Gefahren
für den Bediener und andere Personen
entstehen.
–Bei Transportschaden sofort Händler
informieren.
Hinweise zu Inhaltsstoffen (REACH)
Aktuelle Informationen zu Inhaltsstoffen fin-
den Sie unter:
www.kaercher.de/REACH
Gefahr
Für eine unmittelbar drohende Gefahr, die
zu schweren Körperverletzungen oder zum
Tod führt.
몇Warnung
Für eine möglicherweise gefährliche Situa-
tion, die zu schweren Körperverletzungen
oder zum Tod führen könnte.
Vorsicht
Für eine möglicherweise gefährliche Situa-
tion, die zu leichten Verletzungen oder zu
Sachschäden führen kann.
몇Warnung
Das Gerät ist nicht für die Absaugung ge-
sundheitsschädlicher Stäube geeignet.
–Dieser Sauger ist zur Nass- und Tro-
ckenreinigung von Boden- und Wand-
flächen bestimmt.
–Dieses Gerät ist für den gewerblichen
Gebrauch geeignet, z.B. in Hotels,
Schulen, Krankenhäusern, Fabriken,
Läden, Büros und Vermietergeschäf-
ten.
Inhaltsverzeichnis
Umweltschutz. . . . . . . . . . . DE . . .1
Symbole in der Betriebsanlei-
tung . . . . . . . . . . . . . . . . . . DE . . .1
Bestimmungsgemäße Verwen-
dung . . . . . . . . . . . . . . . . . . DE . . .1
Geräteelemente . . . . . . . . . DE . . .2
Inbetriebnahme . . . . . . . . . DE . . .2
Bedienung . . . . . . . . . . . . . DE . . .3
Transport . . . . . . . . . . . . . . DE . . .4
Lagerung . . . . . . . . . . . . . . DE . . .4
Pflege und Wartung . . . . . . DE . . .4
Hilfe bei Störungen. . . . . . . DE . . .4
Garantie . . . . . . . . . . . . . . . DE . . .5
Zubehör und Ersatzteile . . . DE . . .5
EG-Konformitätserklärung . DE . . .5
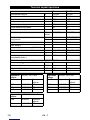
Technische Daten . . . . . . . DE . . .6
Umweltschutz
Die Verpackungsmaterialien
sind recyclebar. Bitte werfen
Sie die Verpackungen nicht in
den Hausmüll, sondern führen
Sie diese einer Wiederverwer-
tung zu.
Altgeräte enthalten wertvolle
recyclingfähige Materialien, die
einer Verwertung zugeführt
werden sollten. Batterien, Öl
und ähnliche Stoffe dürfen
nicht in die Umwelt gelangen.
Bitte entsorgen Sie Altgeräte
deshalb über geeignete Sam-
melsysteme.
Symbole in der Betriebsanlei-
tung
Bestimmungsgemäße Ver-
wendung
6 DE

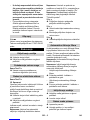
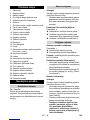
– 2
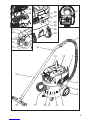
1 Elektroden
2 Saugschlauch
3 Kabelhaken
4 Luftaustritt, Arbeitsluft
5 Verriegelung des Saugkopfs
6 Laufrad
7 Lufteintritt, Motor-Kühlluft
8 Schmutzbehälter
9 Lenkrolle
10 Saugkopf
11 Saugstutzen
12 Bodendüse
13 Saugrohr
14 Tragegriff
15 Filterabdeckung
16 Krümmer
17 Drehregler für Saugleistung (min-max)
18 Kontrolllampe
19 Steckdose
20 Automatische Filterabreinigung
21 Hauptschalter
22 Flachfaltenfilter
23 Filterabreinigung
24 Halter für Bodendüse
25 Halter für Fugendüse
26 Halter für Saugrohre
27 Netzkabel
28 Typenschild
Nur Tact Te:
Durch den geerdeten Anschlussstutzen
werden statische Aufladungen abgeleitet.
Dadurch werden Funkenbildung und
Stromstöße mit elektrisch leitendem Zube-
hör (Option) verhindert.
Vorsicht
Beim Saugen darf niemals der Flachfalten-
filter entfernt werden.
–Beim Aufsaugen von Feinstaub kann
zusätzlich eine Papierfiltertüte oder ein
Membranfilter (Sonderzubehör) ver-
wendet werden.
Abbildung
Saugkopf entriegeln und abnehmen.
Papierfiltertüte oder Membranfilter
(Sonderzubehör) aufstecken.
Saugkopf aufsetzen und verriegeln.
Abbildung
Bürstenstreifen ausbauen.
Gummilippen einbauen.
Hinweis: Die strukturierte Seite der Gum-
milippen muss nach außen zeigen.
–Beim Aufsaugen von Nassschmutz
muss immer die Papierfiltertüte oder
der Membranfilter (Sonderzubehör)
entfernt werden.
–Es empfiehlt sich eine Spezialfiltertüte
(nass) zu verwenden (siehe Filtersyste-
me).
Vorsicht
Beim Saugen darf niemals der Flachfalten-
filter entfernt werden.
–Beim Aufsaugen von Nassschmutz mit
der Polster- oder Fugendüse, bezie-
hungsweise wenn überwiegend Was-
ser aus einem Behälter aufgesaugt
wird, empfiehlt es sich, die Funktion
„Automatische Filterabreinigung“ abzu-
schalten.
–Bei Erreichen des max. Flüssigkeits-
stands schaltet das Gerät automatisch
ab.
–Bei nicht leitenden Flüssigkeiten
(zum Beispiel Bohremulsion, Öle
und Fette) wird das Gerät bei vollem
Behälter nicht abgeschaltet. Der
Füllstand muss ständig überprüft
Geräteelemente
Inbetriebnahme
Anti-Statik-System
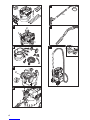
Trockensaugen
Einbau Papierfiltertüte
Nasssaugen
Einbau Gummilippen
Papierfiltertüte entfernen
Allgemein
7DE

– 3
und der Behälter rechtzeitig entleert
werden.
–Nach Beendigung des Nasssaugens:
Flachfaltenfilter mit der Filterabreini-
gung abreinigen. Elektroden mit einer
Bürste reinigen. Behälter mit einem
feuchten Tuch reinigen und trocknen.
Abbildung
Der Saugschlauch ist mit einem Clip-Sys-
tem ausgestattet. Alle C-35/C-DN-35 Zube-
hörteile können angeschlossen werden.
Netzstecker einstecken.
Gerät am Hauptschalter einschalten.
Nur Tact Te:
Saugleistung (min-max) am Drehregler
einstellen.
Nur Tact Te:
Gefahr
Verletzungs- und Beschädigungsgefahr!
Die Steckdose ist nur zum direkten An-
schluss von Elektrowerkzeugen an den
Sauger bestimmt. Jeder andere Gebrauch
der Steckdose ist nicht zulässig.
Netzstecker des Elektrowerkzeugs am
Sauger einstecken.
Gerät am Hauptschalter einschalten.
Kontrolllampe leuchtet, Sauger befindet
sich im Standby-Modus.
Hinweis: Der Sauger wird automatisch mit
dem Elektrowerkzeug ein- und ausgeschal-
tet.
Hinweis: Der Sauger hat eine Anlaufverzö-
gerung bis zu 0,5 Sekunden und eine
Nachlaufzeit von bis zu 15 Sekunden.
Hinweis: Leistungsanschlusswert der
Elektrowerkzeuge, siehe Technische Da-
ten.
Abbildung
Anschlussmuffe an den Anschluss des
Elektrowerkzeugs anpassen.
Abbildung
Krümmer am Saugschlauch entfernen.
Anschlussmuffe an Saugschlauch
montieren.
Abbildung
Anschlussmuffe an Elektrowerkzeug
anschließen.
Das Gerät verfügt über eine neuartige Fil-
terabreinigung, besonders wirksam bei fei-
nem Staub. Dabei wird der Flachfaltenfilter
alle 15 Sekunden durch einen Luftstoß au-
tomatisch gereinigt (pulsierendes Ge-
räusch).
Hinweis: Die automatische Filterabreini-
gung ist werkseitig eingeschaltet.
Hinweis: Das Aus-/Einschalten der auto-
matischen Filterabreinigung ist nur bei ein-
geschaltetem Gerät möglich.
–Automatische Filterabreinigung aus-
schalten:
Schalter betätigen. Kontrolllampe im
Schalter erlischt.
–Automatische Filterabreinigung ein-
schalten:
Schalter wiederholt betätigen. Kontroll-
lampe im Schalter leuchtet grün.
Gerät am Hauptschalter ausschalten.
Netzstecker ziehen.
Behälter entleeren.
Gerät innen und außen durch Absau-
gen und Abwischen mit einem feuchten
Tuch reinigen.
Abbildung
Saugschlauch und Netzkabel entspre-
chend Abbildung aufbewahren.
Gerät in einem trockenen Raum abstel-
len und vor unbefugter Benutzung si-
chern.
Clipverbindung
Bedienung
Gerät einschalten
Saugleistung einstellen
Arbeiten mit Elektrowerkzeugen
Automatische Filterabreinigung
Gerät ausschalten
Nach jedem Betrieb
Gerät aufbewahren
8 DE

– 4
Vorsicht
Verletzungs- und Beschädigungsgefahr!
Gewicht des Gerätes beim Transport be-
achten.
Saugrohr mit Bodendüse aus der Halte-
rung nehmen. Gerät zum Tragen am
Tragegriff und am Saugrohr fassen.
Beim Transport in Fahrzeugen Gerät
nach den jeweils gültigen Richtlinien
gegen Rutschen und Kippen sichern.
Vorsicht
Verletzungs- und Beschädigungsgefahr!
Gewicht des Gerätes bei Lagerung beach-
ten.
Dieses Gerät darf nur in Innenräumen gela-
gert werden.
Gefahr
Vor allen Arbeiten am Gerät, Gerät aus-
schalten und Netzstecker ziehen.
Filterabdeckung öffnen.
Flachfaltenfilter wechseln.
Filterabdeckung schließen, muss hör-
bar einrasten.
Saugkopf entriegeln und abnehmen.
Elektroden mit einer Bürste reinigen.
Saugkopf aufsetzen und verriegeln.
Gefahr
Vor allen Arbeiten am Gerät, Gerät aus-
schalten und Netzstecker ziehen.
Kabel, Stecker, Sicherung, Steckdose
und Elektroden überprüfen.
Gerät einschalten.
Behälter entleeren.
Gerät ausschalten und 5 Sekunden
warten, nach 5 Sekunden wieder ein-
schalten.
Elektroden sowie den Zwischenraum
der Elektroden mit einer Bürste reini-
gen.
Verstopfungen aus Saugdüse, Saug-
rohr, Saugschlauch oder Flachfaltenfil-
ter entfernen.
Papierfiltertüte wechseln.
Filterabdeckung richtig einrasten.
Membranfilter (Sonderzubehör) unter
fließendem Wasser reinigen bzw.
wechseln.
Flachfaltenfilter wechseln.
Korrekte Einbaulage des Flachfaltenfil-
ters überprüfen.
Flachfaltenfilter wechseln.
Elektroden sowie den Zwischenraum
der Elektroden mit einer Bürste reini-
gen.
Füllstand bei elektrisch nicht leitender
Flüssigkeit ständig kontrollieren.
Saugschlauch nicht angeschlossen.
Kundendienst benachrichtigen.
Kundendienst benachrichtigen.
Transport
Lagerung
Pflege und Wartung
Flachfaltenfilter wechseln
Elektroden reinigen
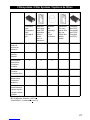
Hilfe bei Störungen
Saugturbine läuft nicht
Saugturbine schaltet ab
Saugturbine läuft nach Behälterent-
leerung nicht wieder an
Saugkraft lässt nach
Staubaustritt beim Saugen
Abschaltautomatik (Nasssaugen)
spricht nicht an
Automatische Filterabreinigung ar-
beitet nicht
Automatische Filterabreinigung
lässt sich nicht abschalten
Automatische Filterabreinigung
lässt sich nicht einschalten
9DE

– 5
In jedem Land gelten die von unserer zu-
ständigen Vertriebsgesellschaft herausge-
gebenen Garantiebedingungen. Etwaige
Störungen an Ihrem Gerät beseitigen wir
innerhalb der Garantiefrist kostenlos, so-
fern ein Material- oder Herstellungsfehler
die Ursache sein sollte. Im Garantiefall
wenden Sie sich bitte mit Kaufbeleg an Ih-
ren Händler oder die nächste autorisierte
Kundendienststelle.
–Es dürfen nur Zubehör und Ersatzteile
verwendet werden, die vom Hersteller
freigegeben sind. Original-Zubehör und
Original-Ersatzteile bieten die Gewähr
dafür, dass das Gerät sicher und stö-
rungsfrei betrieben werden kann.
–Eine Auswahl der am häufigsten benö-
tigten Ersatzteile finden Sie am Ende
der Betriebsanleitung.
–Weitere Informationen über Ersatzteile
erhalten Sie unter www.kaercher.com
im Bereich Service.
Hiermit erklären wir, dass die nachfolgend
bezeichnete Maschine aufgrund ihrer Kon-
zipierung und Bauart sowie in der von uns
in Verkehr gebrachten Ausführung den ein-
schlägigen grundlegenden Sicherheits-
und Gesundheitsanforderungen der EG-
Richtlinien entspricht. Bei einer nicht mit
uns abgestimmten Änderung der Maschine
verliert diese Erklärung ihre Gültigkeit.
5.957-602
Die Unterzeichnenden handeln im Auftrag
und mit Vollmacht der Geschäftsführung.
Dokumentationsbevollmächtigter:
S. Reiser
Alfred Kärcher GmbH & Co. KG
Alfred-Kärcher-Str. 28 - 40
71364 Winnenden (Germany)
Tel.: +49 7195 14-0
Fax: +49 7195 14-2212
Winnenden, 2010/09/01
Garantie
Zubehör und Ersatzteile
EG-Konformitätserklärung
Produkt: Nass- und Trockensauger
Typ: 1.184-xxx
Einschlägige EG-Richtlinien
2006/42/EG (+2009/127/EG)
2004/108/EG
Angewandte harmonisierte Normen
EN 55014–1: 2006 + A1: 2009
EN 55014–2: 1997 + A2: 2008
EN 60335–1
EN 60335–2–69
EN 61000–3–2: 2006 + A2: 2009
EN 61000–3–3: 2008
EN 62233: 2008
Angewandte nationale Normen
-
CEO Head of Approbation
10 DE

– 6
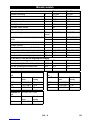
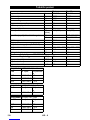
Technische Daten
Tact Tact Te
Netzspannung V 220-240 220-240
Frequenz Hz 50/60 50/60
Max. Leistung W 1380 1380
Nennleistung W 1200 1200
Behälterinhalt l 34 34
Füllmenge Flüssigkeit l 19 19
Luftmenge (max.) l/s 61 61
Unterdruck (max.) kPa
(mbar)
23,0 (230) 23,0 (230)
Leistungsanschlusswert der Elektrowerk-
zeuge
W -- EUR: 100-2200
W -- CH: 100-1100
Schutzart -- IP X4 IP X4
Schutzklasse -- II I
Saugschlauchanschluss (C-DN/C-ID) mm 35 35
Länge x Breite x Höhe mm 520 x 380 x 580 520 x 380 x 580
Gewicht kg 11,5 12,5
Umgebungstemperatur (max.) °C +40 +40
Ermittelte Werte gemäß EN 60335-2-69
Schalldruckpegel LpA dB(A) 67 67
Unsicherheit KpA dB(A) 1 1
Hand-Arm Vibrationswert m/s2<2,5 <2,5
Unsicherheit K m/s20,2 0,2
Netzkabel H05VV-F 2x1,0 mm2
Tact Teile-Nr. Kabellänge
EUR 6.647-263.0 7,5 m
GB 6.647-264.0 7,5 m
AUS 6.647-266.0 7,5 m
Netzkabel H07RN-F 2x1,0 mm2
Tact Teile-Nr. Kabellänge
CH 6.650-080.0 7,5 m
Netzkabel H07RN-F 3x1,5 mm2
Tact Te Teile-Nr. Kabellänge
EUR 6.649-385.0 7,5 m
GB 6.649-399.0 7,5 m
CH 6.649-393.0 7,5 m
11DE

English
– 1
Please read and comply with
these original instructions prior
to the initial operation of your appliance and
store them for later use or subsequent own-
ers.
–Before first start-up it is definitely nec-
essary to read the safety indications Nr.
5.956-249!
–The non-compliance of the operating
and safety instructions may lead to
damages of the appliance and to dan-
gers for the operator and other persons.
–In case of transport damage inform ven-
dor immediately
Notes about the ingredients (REACH)
You will find current information about the
ingredients at:
www.kaercher.com/REACH
Danger
Immediate danger that can cause severe
injury or even death.
몇Warning
Possible hazardous situation that could
lead to severe injury or even death.
Caution
Possible hazardous situation that could
lead to mild injury to persons or damage to
property.
몇Warning
The appliance is not suitable for vacuuming
dust which endangers health.
–The machine is meant for dry and wet
cleaning of floors and walls.
–This appliance is suited for the commer-
cial use, e.g. in hotels, schools, hospi-
tals, factories, shops, offices, and rental
companies.
Contents
Environmental protection . . EN . . .1
Symbols in the operating in-
structions . . . . . . . . . . . . . . EN . . .1
Proper use . . . . . . . . . . . . . EN . . .1
Device elements. . . . . . . . . EN . . .2
Start up. . . . . . . . . . . . . . . . EN . . .2
Operation . . . . . . . . . . . . . . EN . . .3
Transport . . . . . . . . . . . . . . EN . . .4
Storage. . . . . . . . . . . . . . . . EN . . .4
Maintenance and care . . . . EN . . .4
Troubleshooting . . . . . . . . . EN . . .4
Warranty. . . . . . . . . . . . . . . EN . . .5
Accessories and Spare Parts EN . . .5
EC Declaration of Conformity EN . . .5
Technical specifications . . . EN . . .6
Environmental protection
The packaging material can be
recycled. Please do not throw
the packaging material into
household waste; please send it
for recycling.
Old appliances contain valuable
materials that can be recycled;
these should be sent for recy-
cling. Batteries, oil, and similar
substances must not enter the
environment. Please dispose of
your old appliances using ap-
propriate collection systems.
Symbols in the operating
instructions
Proper use
12 EN

– 2
1 Electrodes
2 Suction hose
3 Cable hook
4 Air outlet, working air
5 Suction head lock
6 Impeller
7 Air inlet, motor cooling air
8 Dirt receptacle
9 Steering roller
10 Suction head
11 Suction support
12 Floor nozzle
13 Suction pipe
14 Carrying handle
15 Filter cover
16 Bender
17 Rotary switch for suction output (min-
max)
18 Indicator lamp
19 Socket
20 Automatic filter dedusting
21 Main switch
22 Flat fold filter
23 Filter dedusting
24 Floor nozzle holder
25 Holder for crevice nozzle
26 Holder for suction pipes
27 Power cord
28 Nameplate
Tact Te only:
Static charge is deflected by providing
earthing to the connection nozzles. This
prevents the formation of sparks and cur-
rent shocks due to attachments (option)
with electrical conductivity.
Caution
The flat pleated filter must must always be
in place while vacuuming.
–When vacuuming fine dust, you may
also use an additional paper filter bag or
a membrane filter (special accessory).
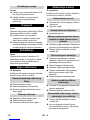
Illustration
Release and remove the suction head.
Insert the paper filter bag or the mem-
brane filter (special attachment).
Insert and lock the suction head.
Illustration
Remove the brush strips.
Install the rubber lips.
Note: The structured side of the rubber lips
must point outwards.
–If the appliance is used to vacuum wet
dirt the paper filter bag or the mem-
brane filter (special accessory) must al-
ways be removed.
–It is recommended to use a special filter
bag (wet) (see Filter systems).
Caution
The flat pleated filter must must always be
in place while vacuuming.
–If wet dirt is vacuumed with the uphol-
stery or crevice nozzle, or if water is
sucked up from a container, it is recom-
mended to deactivate the "automatic fil-
ter cleaning" function.
–If the maximum liquid level is reached
the appliance will turn off automatically.
–In case of non-conductive liquids
(such as emulsion drilling fluids,
oils, and greases) the appliance is
not turned off when the container is
full. The filling level must be continu-
ously monitored and the container
must be emptied in time.
Device elements
Start up
Anti-static system
Dry vacuum cleaning
Inserting the paper filter bag
Wet vacuum cleaning
Inserting the rubber lips
Remove the paper filter bag
General
13EN

– 3
–After the wet vacuuming: Clean the flat
folded filter with the filter cleaning.
Clean the electrodes with a brush.
Clean the container with a damp rag
and dry it.
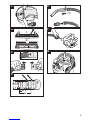
Illustration
The suction hose is equipped with a clip
system. All C-35/C-DN-35 accessories can
be connected.
Plug in the main plug.
Switch on the appliance at the main
switch.
Tact Te only:
Set the suction output (min - max) at the
rotary switch.
Tact Te only:
Danger
Risk of injury and damage! The socket out-
let is only for the connection of power tools
to the vacuum cleaner. Any other use of the
socket outlet is not permitted.
Connect the mains plug of the electric
power tool to the vacuum cleaner.
Switch on the appliance at the main
switch.
Indicator lamp is on; vacuum cleaner is in
the standby mode.
Note: The vacuum cleaner is turned on and
off automatically with the electric power
tool.
Note: The vacuum cleaner starts automat-
ically within 0.5 seconds and continues to
run for 15 seconds after the power tool has
being switched off.
Note: Please refer to "Technical specifica-
tions" for the power connection specifica-
tions of the power tools.
Illustration
Adjust the stepped power tool adaptor
to fit the connection of the electric pow-
er tool.
Illustration
Remove the elbow from the suction
hose.
Attach the stepped power tool adaptor
to the suction hose.
Illustration
Connect the adaptor to the electric pow-
er tool.
The appliance has an innovative filter
cleaning system that is particularly effective
with fine dust. The flat pleated filter is auto-
matically cleaned every 15 seconds
through an air jet (pulsating sound).
Note: Automatic filter dedusting is switched
on at the factory.
Note: The automatic filter dedusting func-
tion can only be switched on/ off when the
appliance is switched on.
–To switch off automatic filter cleaning:
Activate the switch. Indicator lamp in
the switch goes off.
–To switch on automatic filter cleaning:
Press the switch again. Indicator lamp
in the switch glows green.
Switch off the appliance at the main
switch.
Pull out the mains plug.
Empty the container.
Vacuum and wipe the appliance inside
and outside with a damp cloth.
Illustration
Store the suction hose and the mains
cable as shown in the illustration.
Place the appliance in a dry room and
secure it from unauthorized use.
Clip connection
Operation
Turning on the Appliance
Adjust the suction output
Working with electrical power tools
Automatic filter cleaning
Turn off the appliance
After each operation
Storing the Appliance
14 EN

– 4
Caution
Risk of injury and damage! Observe the
weight of the appliance when you transport it.
Remove the suction pipe with the floor
nozzle from the holder. Hold the appli-
ance at the handle and at the suction
pipe to transport it.
When transporting in vehicles, secure
the appliance according to the guide-
lines from slipping and tipping over.
Caution
Risk of injury and damage! Note the weight
of the appliance in case of storage.
This appliance must only be stored in inte-
rior rooms.
Danger
First pull out the plug from the mains before
carrying out any tasks on the machine.
Open filter door.
Replace the flat pleated filter.
Close the filter door, it must lock into
place.
Release and remove the suction head.
Clean the electrodes with a brush.
Insert and lock the suction head.
Danger
First pull out the plug from the mains before
carrying out any tasks on the machine.
Check cables, plugs, fuse, socket and
electrodes.
Turn on the appliance.
Empty the container.
Turn off the appliance and wait for 5 sec-
onds, turn it on again after 5 seconds.
Clean the electrodes as well as the
space between the electrodes with a
brush.
Remove blockages in the suction noz-
zle, suction tube, suction hose, or flat
pleated filter.
Exchange the paper filter bag.
Ensure the filter cover properly locks
into place.
Clean or replace the membrane filter
(special accessory) under running water.
Replace the flat pleated filter.
Check for proper installation of the flat
pleated filter.
Replace the flat pleated filter.
Clean the electrodes as well as the
space between the electrodes with a
brush.
Continuously check the filling level in
case of non-conductive liquid.
Suction hose is not connected.
Inform Customer Service
Inform Customer Service
Transport
Storage
Maintenance and care
Exchanging the flat pleated filter
Cleaning the electrodes
Troubleshooting
Suction turbine does not run
Suction turbine turns off
Suction turbine does not start again
after the container has been
emptied
Suction capacity decreases
Dust comes out while vacuuming
Automatic shut-off (wet vacuum
cleaning) does not react
Automatic filter cleaning is not
working
Automatic filter cleaning cannot be
switched off
Automatic filter cleaning cannot be
switched on
15EN

– 5
The warranty terms published by the rele-
vant sales company are applicable in each
country. We will repair potential failures of
your appliance within the warranty period
free of charge, provided that such failure is
caused by faulty material or defects in man-
ufacturing. In the event of a warranty claim
please contact your dealer or the nearest
authorized Customer Service centre.
Please submit the proof of purchase.
–Only use accessories and spare parts
which have been approved by the man-
ufacturer. The exclusive use of original
accessories and original spare parts
ensures that the appliance can be oper-
ated safely and trouble free.
–At the end of the operating instructions
you will find a selected list of spare parts
that are often required.
–For additional information about spare
parts, please go to the Service section
at www.kaercher.com.
We hereby declare that the machine de-
scribed below complies with the relevant
basic safety and health requirements of the
EU Directives, both in its basic design and
construction as well as in the version put
into circulation by us. This declaration shall
cease to be valid if the machine is modified
without our prior approval.
5.957-602
The undersigned act on behalf and under
the power of attorney of the company man-
agement.
Authorised Documentation Representative
S. Reiser
Alfred Kärcher GmbH Co. KG
Alfred-Kärcher-Str. 28 - 40
71364 Winnenden (Germany)
Phone: +49 7195 14-0
Fax: +49 7195 14-2212
Winnenden, 2010/09/01
Warranty
Accessories and Spare Parts
EC Declaration of Conformity
Product: Wet and dry vacuum cleaner
Type: 1.184-xxx
Relevant EU Directives
2006/42/EC (+2009/127/EC)
2004/108/EC
Applied harmonized standards
EN 55014–1: 2006 + A1: 2009
EN 55014–2: 1997 + A2: 2008
EN 60335–1
EN 60335–2–69
EN 61000–3–2: 2006 + A2: 2009
EN 61000–3–3: 2008
EN 62233: 2008
Applied national standards
-
CEO Head of Approbation
16 EN

– 6
Technical specifications
Tact Tact Te
Mains voltage V 220-240 220-240
Frequency Hz 50/60 50/60
Max. performance W 1380 1380
Rated power W 1200 1200
Container capacity l 34 34
Filling quantity (liquid) l 19 19
Air volume (max.) l/s 61 61
Negative pressure (max.) kPa
(mbar)
23,0 (230) 23,0 (230)
Power connection data of the power tools W -- EUR: 100-2200
W -- CH: 100-1100
Type of protection -- IP X4 IP X4
Protective class -- II I
Suction hose connection (C-DN/C-ID) mm 35 35
Length x width x height mm 520 x 380 x 580 520 x 380 x 580
Weight kg 11,5 12,5
Max. ambient temperature °C +40 +40
Values determined to EN 60335-2-69
Sound pressure level LpA dB(A) 67 67
Uncertainty KpA dB(A) 1 1
Hand-arm vibration value m/s2<2,5 <2,5
Uncertainty K m/s20,2 0,2
Power cord H05VV-F 2x1,0 mm2
Tact Part no.: Cable length
EUR 6.647-263.0 7,5 m
GB 6.647-264.0 7,5 m
AUS 6.647-266.0 7,5 m
Power cord H07RN-F 2x1,0 mm2
Tact Part no.: Cable length
CH 6.650-080.0 7,5 m
Power cord H07RN-F 3x1,5 mm2
Tact Te Part no.: Cable length
EUR 6.649-385.0 7,5 m
GB 6.649-399.0 7,5 m
CH 6.649-393.0 7,5 m
17EN

Français
– 1
Lire ces notice originale avant la
première utilisation de votre ap-
pareil, se comporter selon ce qu'elles re-
quièrent et les conserver pour une
utilisation ultérieure ou pour le propriétaire
futur.
–Avant la première mise en service, vous
devez impérativement avoir lu les
consignes de sécurité N° 5.956-249 !
–En cas de non-respect des instructions
de service et des consignes de sécuri-
té, l'appareil risque de subir des dom-
mages matériel et l'utilisateur ainsi que
toute tierce personne sont exposés à
des dangers potentiels.
–Contactez immédiatement le revendeur
en cas d'avarie de transport.
Instructions relatives aux ingrédients
(REACH)
Les informations actuelles relatives aux in-
grédients se trouvent sous :
www.kaercher.com/REACH
Danger
Pour un danger immédiat qui peut avoir
pour conséquence la mort ou des bles-
sures corporelles graves.
몇Avertissement
Pour une situation potentiellement dange-
reuse qui peut avoir pour conséquence des
blessures corporelles graves ou la mort.
Attention
Pour une situation potentiellement dange-
reuse qui peut avoir pour conséquence des
blessures légères ou des dommages maté-
riels.
Table des matières
Protection de l’environnement FR . . .1
Symboles utilisés dans le mode
d'emploi . . . . . . . . . . . . . . . FR . . .1
Utilisation conforme . . . . . . FR . . .2
Éléments de l'appareil . . . . FR . . .2
Mise en service . . . . . . . . . FR . . .2
Utilisation . . . . . . . . . . . . . . FR . . .3
Transport . . . . . . . . . . . . . . FR . . .4
Entreposage. . . . . . . . . . . . FR . . .4
Entretien et maintenance . . FR . . .4
Assistance en cas de panne FR . . .4
Garantie . . . . . . . . . . . . . . . FR . . .5
Accessoires et pièces de re-
change . . . . . . . . . . . . . . . . FR . . .5
Déclaration de conformité CE FR . . .6
Caractéristiques techniques FR . . .7
Protection de
l’environnement
Les matériaux constitutifs de
l’emballage sont recyclables.
Ne pas jeter les emballages
dans les ordures ménagères,
mais les remettre à un système
de recyclage.
Les appareils usés contiennent
des matériaux précieux recy-
clables lesquels doivent être ap-
portés à un système de
recyclage. Il est interdit de jeter
les batteries, l'huile et les subs-
tances similaires dans l'environ-
nement. Pour cette raison,
utiliser des systèmes de collecte
adéquats afin d'éliminer les ap-
pareils hors d'usage.
Symboles utilisés dans le
mode d'emploi
18 FR

– 2
몇Avertissement
Cet appareil n'est pas conçu pour aspirer
des poussières nocives.
–Cet aapirateur est destiné au nettoyage
à sec et au nettoyage par voie humide
des sol et murs.
–Cet appareil convient à un usage indus-
triel, par exemple dans le cadre d'hô-
tels, d'écoles, d'hôpitaux, d'usines, de
magasins, de bureaux et d'agences de
location.
1 Electrodes
2 Flexible d’aspiration
3 Crochet de câble
4 Sortie d'air, air de travail
5 Verrouillage de la tête d'aspiration
6 Roue
7 Entrée d'air, air de refroidissement du
moteur
8 Récipient collecteur
9 Galet de direction
10 Tête d'aspiration
11 Consoles d'apiration
12 Buse pour sol
13 Tuyau d'aspiration
14 Poignée de transport
15 Recouvrement du filtre
16 Coude
17 Régulateur rotatif pour la puissance
d'aspiration (mini-maxi)
18 Témoin de contrôle
19 Prise de courant
20 Nettoyage automatique du filtre
21 Interrupteur principal
22 Filtre plat de plis
23 Nettoyage du filtre
24 Support pour buse de sol
25 Support pour buse à joint
26 Support pour tubes d'aspiration
27 Câble d’alimentation
28 Plaque signalétique
Uniquement Tact Te :
Les charges statiques sont évacuées par
les embouts de raccordement reliés à la
terre. La formation d'étincelles et les chocs
électriques avec les accessoires condui-
sant l'électricité (option) sont ainsi évités.
Attention
Le filtre à plis plats ne doit jamais être retiré
durant l'aspiration.
–Pour l'aspiration de poussières fines, il
est possible d'utiliser de surcroît un sac
de filtrage en papier ou un filtre à mem-
branes (accessoire spécial).
Illustration
Déverrouiller et retirer la tête d'aspiration.
Mettre en place le sac de filtrage en pa-
pier ou le filtre à membranes (acces-
soire spécial).
Positionner la tête d'aspiration et la ver-
rouiller.
Illustration
Démonter les bandes de brosse
Monter les lèvres en caoutchouc.
Remarque : la face structurée des lèvres
en caoutchouc doit être dirigée vers l'exté-
rieur.
–Pour aspirer des saletés humides, il
faut toujours retirer le sachet filtre en
papier ou bien le filtre à membrane (ac-
cessoires spéciaux).
–Il est recommandé d'utiliser un filtre pa-
pier spécial (humide) (voir systèmes de
filtration).
Utilisation conforme
Éléments de l'appareil
Mise en service
Système antistatique
Aspiration de poussières
Montage du sachet filtre en papier
Aspiration humide
Montage des lèvres en caoutchouc
Retirer le sachet filtre en papier.
19FR

– 3
Attention
Le filtre à plis plats ne doit jamais être retiré
durant l'aspiration.
–Pour l'aspiration de saletés humides
avec le suceur plat ou le petit suceur, ou
bien si l'aspiration consiste surtout à as-
pirer de l'eau d'un réservoir, il est re-
commandé de désactiver la fonction
"Nettoyage automatique du filtre".
–L'appareil se met automatiquement
hors marche lorsque le niveau de li-
quide maxi est atteint.
–En cas de liquides non conducteurs
(par exemple émulsion de perçage,
huiles et graisses), l'appareil n'est
pas mis hors marche lorsque le ré-
servoir est plein. Le niveau de rem-
plissage doit être contrôlé en
permanence et le réservoir doit être
vidé à temps.
–À la fin de l'aspiration humide : nettoyer
le filtre à plis plats en même temps que
le filtre. Nettoyer les électrodes avec
une brosse. Nettoyer le réservoir avec
un chiffon humide et le sécher.
Illustration
Le flexible d'aspiration est doté d'un sys-
tème à clip. Il est possible de raccorder
tous les accessoires C-35/C-DN-35.
Brancher la fiche secteur.
Mettre l'appareil en service au niveau
de l'interrupteur principal.
Uniquement Tact Te :
Régler la puissance d'aspiration (min-
max) sur le régulateur rotatif.
Uniquement Tact Te :
Danger
Risque de blessure et d'endommagement !
La prise n'est destinée qu'au raccord direct
d'outils électriques sur l'aspirateur. Toute
autre utilisation de la prise est interdite.
Brancher la fiche de secteur de l'outil
électrique sur l'aspirateur.
Mettre l'appareil en service au niveau
de l'interrupteur principal.
Le témoin de contrôle s'allume, l'aspirateur
se trouve en mode veille.
Remarque :l'aspirateur est automatique-
ment mis en marche et hors marche avec
l'outil électrique.
Remarque :l'aspirateur a une temporisa-
tion de démarrage d'au maximum 0,5 se-
condes et un temps de marche par inertie
d'au maximum 15 secondes.
Remarque : Pour les données de branche-
ment des outils électriques, voir les carac-
téristiques techniques.
Illustration
Adapter le manchon de jonction au rac-
cordement de l'outil électrique.
Illustration
Retirer le coude figurant sur le tuyau
d'aspiration.
Monter le manchon de jonction sur le
tuyau d'aspiration.
Illustration
Raccorder le manchon de jonction à
l'outil électrique.
L'appareil est équipé d'un nouveau type de
nettoyage de filtre particulièrement efficace
pour les poussières fines. Avec ce procé-
dé, le filtre à plis plats est automatiquement
nettoyé par un souffle (bruit pulsant) toutes
les 15 secondes.
Remarque :le nettoyage automatique du
filtre est mis en service en usine.
Généralités
Clip de fixation
Utilisation
Mettre l'appareil en marche
Régler la puissance d'aspiration
Travailler avec des outils
électriques
Nettoyage automatique du filtre
20 FR
Pagina se încarcă...
Pagina se încarcă...
Pagina se încarcă...
Pagina se încarcă...
Pagina se încarcă...
Pagina se încarcă...
Pagina se încarcă...
Pagina se încarcă...
Pagina se încarcă...
Pagina se încarcă...
Pagina se încarcă...
Pagina se încarcă...
Pagina se încarcă...
Pagina se încarcă...
Pagina se încarcă...
Pagina se încarcă...
Pagina se încarcă...
Pagina se încarcă...
Pagina se încarcă...
Pagina se încarcă...
Pagina se încarcă...
Pagina se încarcă...
Pagina se încarcă...
Pagina se încarcă...
Pagina se încarcă...
Pagina se încarcă...
Pagina se încarcă...
Pagina se încarcă...
Pagina se încarcă...
Pagina se încarcă...
Pagina se încarcă...
Pagina se încarcă...
Pagina se încarcă...
Pagina se încarcă...
Pagina se încarcă...
Pagina se încarcă...
Pagina se încarcă...
Pagina se încarcă...
Pagina se încarcă...
Pagina se încarcă...
Pagina se încarcă...
Pagina se încarcă...
Pagina se încarcă...
Pagina se încarcă...
Pagina se încarcă...
Pagina se încarcă...
Pagina se încarcă...
Pagina se încarcă...
Pagina se încarcă...
Pagina se încarcă...
Pagina se încarcă...
Pagina se încarcă...
Pagina se încarcă...
Pagina se încarcă...
Pagina se încarcă...
Pagina se încarcă...
Pagina se încarcă...
Pagina se încarcă...
Pagina se încarcă...
Pagina se încarcă...
Pagina se încarcă...
Pagina se încarcă...
Pagina se încarcă...
Pagina se încarcă...
Pagina se încarcă...
Pagina se încarcă...
Pagina se încarcă...
Pagina se încarcă...
Pagina se încarcă...
Pagina se încarcă...
Pagina se încarcă...
Pagina se încarcă...
Pagina se încarcă...
Pagina se încarcă...
Pagina se încarcă...
Pagina se încarcă...
Pagina se încarcă...
Pagina se încarcă...
Pagina se încarcă...
Pagina se încarcă...
Pagina se încarcă...
Pagina se încarcă...
Pagina se încarcă...
Pagina se încarcă...
Pagina se încarcă...
Pagina se încarcă...
Pagina se încarcă...
Pagina se încarcă...
Pagina se încarcă...
Pagina se încarcă...
Pagina se încarcă...
Pagina se încarcă...
Pagina se încarcă...
Pagina se încarcă...
Pagina se încarcă...
Pagina se încarcă...
Pagina se încarcă...
Pagina se încarcă...
Pagina se încarcă...
Pagina se încarcă...
Pagina se încarcă...
Pagina se încarcă...
Pagina se încarcă...
Pagina se încarcă...
Pagina se încarcă...
Pagina se încarcă...
Pagina se încarcă...
Pagina se încarcă...
Pagina se încarcă...
Pagina se încarcă...
Pagina se încarcă...
Pagina se încarcă...
Pagina se încarcă...
Pagina se încarcă...
Pagina se încarcă...
Pagina se încarcă...
Pagina se încarcă...
Pagina se încarcă...
Pagina se încarcă...
Pagina se încarcă...
Pagina se încarcă...
Pagina se încarcă...
Pagina se încarcă...
Pagina se încarcă...
Pagina se încarcă...
Pagina se încarcă...
Pagina se încarcă...
Pagina se încarcă...
Pagina se încarcă...
Pagina se încarcă...
Pagina se încarcă...
Pagina se încarcă...
Pagina se încarcă...
Pagina se încarcă...
Pagina se încarcă...
Pagina se încarcă...
Pagina se încarcă...
Pagina se încarcă...
Pagina se încarcă...
Pagina se încarcă...
Pagina se încarcă...
Pagina se încarcă...
Pagina se încarcă...
Pagina se încarcă...
Pagina se încarcă...
Pagina se încarcă...
Pagina se încarcă...
Pagina se încarcă...
Pagina se încarcă...
Pagina se încarcă...
Pagina se încarcă...
Pagina se încarcă...
Pagina se încarcă...
Pagina se încarcă...
Pagina se încarcă...
Pagina se încarcă...
Pagina se încarcă...
Pagina se încarcă...
Pagina se încarcă...
Pagina se încarcă...
Pagina se încarcă...
Pagina se încarcă...
Pagina se încarcă...
Pagina se încarcă...
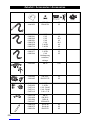
-
 1
1
-
 2
2
-
 3
3
-
 4
4
-
 5
5
-
 6
6
-
 7
7
-
 8
8
-
 9
9
-
 10
10
-
 11
11
-
 12
12
-
 13
13
-
 14
14
-
 15
15
-
 16
16
-
 17
17
-
 18
18
-
 19
19
-
 20
20
-
 21
21
-
 22
22
-
 23
23
-
 24
24
-
 25
25
-
 26
26
-
 27
27
-
 28
28
-
 29
29
-
 30
30
-
 31
31
-
 32
32
-
 33
33
-
 34
34
-
 35
35
-
 36
36
-
 37
37
-
 38
38
-
 39
39
-
 40
40
-
 41
41
-
 42
42
-
 43
43
-
 44
44
-
 45
45
-
 46
46
-
 47
47
-
 48
48
-
 49
49
-
 50
50
-
 51
51
-
 52
52
-
 53
53
-
 54
54
-
 55
55
-
 56
56
-
 57
57
-
 58
58
-
 59
59
-
 60
60
-
 61
61
-
 62
62
-
 63
63
-
 64
64
-
 65
65
-
 66
66
-
 67
67
-
 68
68
-
 69
69
-
 70
70
-
 71
71
-
 72
72
-
 73
73
-
 74
74
-
 75
75
-
 76
76
-
 77
77
-
 78
78
-
 79
79
-
 80
80
-
 81
81
-
 82
82
-
 83
83
-
 84
84
-
 85
85
-
 86
86
-
 87
87
-
 88
88
-
 89
89
-
 90
90
-
 91
91
-
 92
92
-
 93
93
-
 94
94
-
 95
95
-
 96
96
-
 97
97
-
 98
98
-
 99
99
-
 100
100
-
 101
101
-
 102
102
-
 103
103
-
 104
104
-
 105
105
-
 106
106
-
 107
107
-
 108
108
-
 109
109
-
 110
110
-
 111
111
-
 112
112
-
 113
113
-
 114
114
-
 115
115
-
 116
116
-
 117
117
-
 118
118
-
 119
119
-
 120
120
-
 121
121
-
 122
122
-
 123
123
-
 124
124
-
 125
125
-
 126
126
-
 127
127
-
 128
128
-
 129
129
-
 130
130
-
 131
131
-
 132
132
-
 133
133
-
 134
134
-
 135
135
-
 136
136
-
 137
137
-
 138
138
-
 139
139
-
 140
140
-
 141
141
-
 142
142
-
 143
143
-
 144
144
-
 145
145
-
 146
146
-
 147
147
-
 148
148
-
 149
149
-
 150
150
-
 151
151
-
 152
152
-
 153
153
-
 154
154
-
 155
155
-
 156
156
-
 157
157
-
 158
158
-
 159
159
-
 160
160
-
 161
161
-
 162
162
-
 163
163
-
 164
164
-
 165
165
-
 166
166
-
 167
167
-
 168
168
-
 169
169
-
 170
170
-
 171
171
-
 172
172
-
 173
173
-
 174
174
-
 175
175
-
 176
176
-
 177
177
-
 178
178
-
 179
179
-
 180
180
-
 181
181
-
 182
182
-
 183
183
-
 184
184


Kärcher NT 35/1 Tact Te Original Instructions Manual
- Tip
- Original Instructions Manual
în alte limbi
- slovenčina: Kärcher NT 35/1 Tact Te
Lucrări înrudite
-
Kärcher NT 55/1 Tact Te Instrucțiuni de utilizare
-
-
-
-
-
Kärcher IVC 60/24-2 Ap Manual de utilizare
-
-
-
-