
PD-I
English en
Español es
Português pt
Dansk da
Norsk no
Suomi fi
Eesti et
Česky cs
Polski pl
Українська uk
Lietuvių lt
Latviešu lv
Română ro
Slovenščina sl
Hrvatski hr
Ελληνικά el
Türkçe tr
ﻋﺮﺑﻲ ar
Printed: 13.06.2016 | Doc-Nr: PUB / 5142261 / 000 / 05

1
Printed: 13.06.2016 | Doc-Nr: PUB / 5142261 / 000 / 05

2
3
4
Printed: 13.06.2016 | Doc-Nr: PUB / 5142261 / 000 / 05

PD-I
en English . . . . . . . . . . . . . . . . . . . . . . . . . . . . . . . . . . . . . . . . . . . . . . . . . . . . . . 1
es Español . . . . . . . . . . . . . . . . . . . . . . . . . . . . . . . . . . . . . . . . . . . . . . . . . . . . . 12
pt Português . . . . . . . . . . . . . . . . . . . . . . . . . . . . . . . . . . . . . . . . . . . . . . . . . . . 24
da Dansk . . . . . . . . . . . . . . . . . . . . . . . . . . . . . . . . . . . . . . . . . . . . . . . . . . . . . . 35
no Norsk . . . . . . . . . . . . . . . . . . . . . . . . . . . . . . . . . . . . . . . . . . . . . . . . . . . . . . 46
fi Suomi . . . . . . . . . . . . . . . . . . . . . . . . . . . . . . . . . . . . . . . . . . . . . . . . . . . . . . 57
et Eesti . . . . . . . . . . . . . . . . . . . . . . . . . . . . . . . . . . . . . . . . . . . . . . . . . . . . . . . 68
cs Česky . . . . . . . . . . . . . . . . . . . . . . . . . . . . . . . . . . . . . . . . . . . . . . . . . . . . . . 79
pl Polski . . . . . . . . . . . . . . . . . . . . . . . . . . . . . . . . . . . . . . . . . . . . . . . . . . . . . . 90
uk Українська . . . . . . . . . . . . . . . . . . . . . . . . . . . . . . . . . . . . . . . . . . . . . . . . . . 101
lt Lietuvių . . . . . . . . . . . . . . . . . . . . . . . . . . . . . . . . . . . . . . . . . . . . . . . . . . . . . 113
lv Latviešu . . . . . . . . . . . . . . . . . . . . . . . . . . . . . . . . . . . . . . . . . . . . . . . . . . . . 124
ro Română . . . . . . . . . . . . . . . . . . . . . . . . . . . . . . . . . . . . . . . . . . . . . . . . . . . . 135
sl Slovenščina . . . . . . . . . . . . . . . . . . . . . . . . . . . . . . . . . . . . . . . . . . . . . . . . . . 146
hr Hrvatski . . . . . . . . . . . . . . . . . . . . . . . . . . . . . . . . . . . . . . . . . . . . . . . . . . . . . 157
el Ελληνικά . . . . . . . . . . . . . . . . . . . . . . . . . . . . . . . . . . . . . . . . . . . . . . . . . . . . 168
tr Türkçe . . . . . . . . . . . . . . . . . . . . . . . . . . . . . . . . . . . . . . . . . . . . . . . . . . . . . 180
ar ﻋﺮﺑﻲ . . . . . . . . . . . . . . . . . . . . . . . . . . . . . . . . . . . . . . . . . . . . . . . . . . . . . . . 191
Printed: 13.06.2016 | Doc-Nr: PUB / 5142261 / 000 / 05

1
1 Information about the documentation
1.1 Conventions
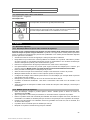
1.1.1 Warning signs
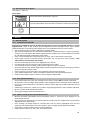
The following warning signs are used:
DANGER! Draws attention to imminent danger that will lead to serious personal injury or fatality.
WARNING! Draws attention to a potentially dangerous situation that could lead to serious per-
sonal injury or fatality.
CAUTION! Draws attention to a potentially dangerous situation that could lead to slight personal
injury or damage to the equipment or other property.
1.1.2 Symbols
The following symbols are used:
Read the operating instructions before use.
On/off button
“Measure” button
Menu button
Delete (clear) button
Right arrow button
Left arrow button
1.1.3 Typographical emphasis
The following typographic features are used to emphasize important passages in this technical documenta-
tion:
1
These numbers refer to the corresponding illustrations.
1.2 About this documentation
▶ It is essential that the operating instructions are read before initial operation.
▶ The information provided in the detailed operating instructions installed in the tool as well as the
supplements and updates provided at www.hilti.com must also be observed.
▶ Always keep these operating instructions together with the tool.
▶ Ensure that the operating instructions are with the tool when it is given to other persons.
1.3 Product information
Hilti products are designed for professional use and may be operated, serviced and maintained only by
trained, authorized personnel. This personnel must be informed of any particular hazards that may be
encountered. The product and its ancillary equipment may present hazards when used incorrectly by
untrained personnel or when used not as directed.
The type designation and serial number are printed on the rating plate.
▶ Write down the serial number in the table below. You will be required to state the product details when
contacting Hilti Service or your local Hilti organization to enquire about the product.
Product information → page 1
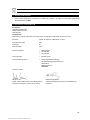
Product information
Laser range meter PD-I
Generation 01
Printed: 13.06.2016 | Doc-Nr: PUB / 5142261 / 000 / 05

2
Serial no.
1.4 Laser information on the tool
Laser information → page 2
Laser information
Laser Class 2 based on the IEC60825-1 / EN60825-1:2007 standard in com-
pliance with CFR 21 § 1040 (Laser Notice 50).
Laser Class 2: Do not stare into the beam. Do not direct the beam toward
other persons or toward areas in which other persons, who are not involved in
the work with lasers, may be present.
Recycle waste material.
2 Safety
2.1 Safety instructions
2.1.1 Basic information concerning safety
In addition to the safety rules listed in the individual sections of these operating instructions, the
following rules must be strictly observed at all times. The product and its ancillary equipment may
present hazards when used incorrectly by untrained personnel or when used not as directed.
▶ Keep all safety instructions and information for future reference.
▶ Stay alert, watch what you are doing and use common sense when working with the product. Do not
use the product while you are tired or under the influence of drugs, alcohol or medication. A moment of
inattention while operating the product may result in serious personal injury.
▶ Do not render safety devices ineffective and do not remove information and warning notices.
▶ If the product is opened improperly, laser radiation in excess of Class 2 may be emitted. Have the
product repaired only by Hilti Service.
▶ Tampering with or modification of the product is not permitted.
▶ Check that the product functions correctly each time before use.
▶ Measurements taken through panes of glass or other objects may be inaccurate.
▶ The measurement may be incorrect if the conditions under which the measurement is taken change
rapidly, e.g. due to people walking through the path of the laser beam.
▶ Do not point the product toward the sun or other powerful light sources.
▶ Take the influences of the surrounding area into account. Do not use the tool where there is a risk of fire
or explosion.
▶ Observe the informationprinted intheoperating instructionsconcerningoperation, care and maintenance.
2.1.2 General safety rules
▶ Check the product for damage before use. Have the damage repaired by Hilti Service.
▶ Check the accuracy of the product after it has been dropped or subjected to other mechanical stresses.
▶ Although the product is designed for the tough conditions of jobsite use, as with other measuring
instruments it should be treated with care.
▶ Products which are not in use must be stored in a dry, high place or locked away out of reach of children.
▶ The product is not intended for use by children.
▶ Observe the national health and safety requirements.
2.1.3 Proper preparation of the working area
▶ Avoid unfavorable body positions when working from ladders. Make sure you have a safe stance and
that you stay in balance at all times.
▶ Secure the site at which you are taking measurements and take care to avoid directing the laser beam
toward other persons or toward yourself.
Printed: 13.06.2016 | Doc-Nr: PUB / 5142261 / 000 / 05

3
▶ When the product is brought into a warm environment from very cold conditions, or vice-versa, allow it
to become acclimatized before use.
▶ Use the product only within its specified limits.
▶ Keep the laser exit window clean in order to avoid measurement errors.
▶ Observe the accident prevention regulations applicable in your country.
2.1.4 Working safely with laser tools
▶ Laser Class 2/Class II tools may be operated only by appropriately trained persons.
▶ Laser beams should not be projected at eye height.
▶ Precautions must be taken to ensure that the laser beam does not unintentionally strike highly reflective
surfaces.
▶ Precautions must be taken to ensure that persons do not stare directly into the beam.
▶ The laser beam must not be allowed to project beyond the controlled area.
▶ Switch the laser tool off when it is not in use.
▶ Store laser tools, when not in use, in places to which unauthorized persons have no access.
2.1.5 Electromagnetic compatibility
Although the device complies with the strict requirements of the applicable directives, Hilti cannot entirely
rule out the possibility of interference to the device caused by powerful electromagnetic radiation, possibly
leading to incorrect operation. Check the accuracy of the device by taking measurements by other means
when working under such conditions or if you are unsure. Likewise, Hilti cannot rule out the possibility of
interference with other devices (e.g. aircraft navigation equipment). The tool complies with the requirements
of class A; The possibility of interference occurring in a domestic environment cannot be excluded.
Only for Korea: Thislaser range meter is suitable for commercial and industrial use and for the electromagnetic
radiation encountered in this field (Class A). Users must pay attention to this point and make sure that this
laser range meter is not used in occupied living areas.
3 Description
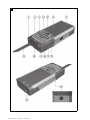
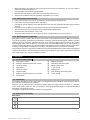
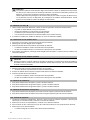
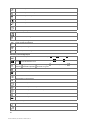
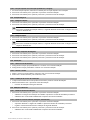
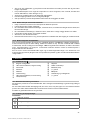
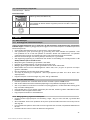
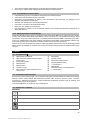
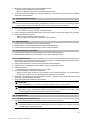
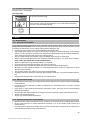
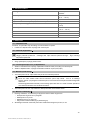
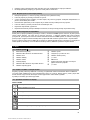
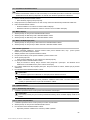
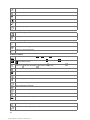
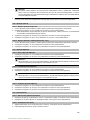
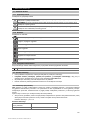
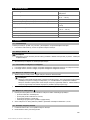
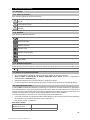
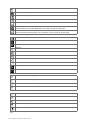
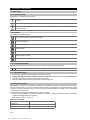
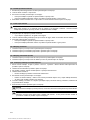
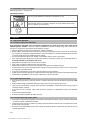
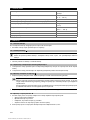
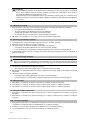
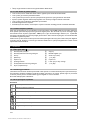
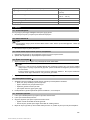
3.1 Overview of the product 1
@
Rear contact surface
;
Reference indicator LED for rear contact
=
Left arrow button
%
Menu button
&
“Measure” button
(
Graphic display
)
Reference indicator LED for front contact
+
On/off button
§
Right arrow button
/
Hand strap attachment point
:
Delete (clear) button
∙
¹/₄ inch thread
$
Folding spike
£
Laser emitting and receiving lens
|
¹/₄ inch thread
3.2 Intended use
The product described is a laser range meter. It is designed for taking individual measurements as well as
the continuous measurement of distances.
Distances can be measured from all stationary targets without a highly reflective surface, i.e. concrete,
stone, wood, plastic, paper, etc. The use of prisms or other highly reflective targets is not permissible and, if
attempted, may falsify the results.
The product is approved for use with batteries of the type AAA.
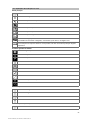
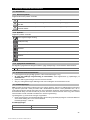
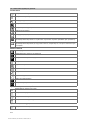
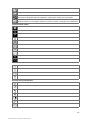
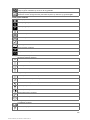
3.3 Explanation of the display
Main menu
Measure volumes
Measure rectangular areas
Select layout function
Printed: 13.06.2016 | Doc-Nr: PUB / 5142261 / 000 / 05

4
Measure areas and volumes
Select special functions
Select trapezoid function
Select Pythagoras function
Select settings
At least one right angle is required for horizontal and diagonal distances.
Select indirect measuring
No specific angle is required for measurements on non-moving objects such as walls.
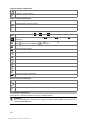
Generally applicable symbols
Battery charge state
Measuring spike not folded out
Measuring spike folded out
Measuring
Adding distances
Subtracting distances
Select
Do not select
Select measuring time
Select calculator
Area and volume measurement submenu
Measuring rectangular areas
Measuring triangular areas
Measuring volumes
Measuring cylinder volume
Special functions submenu
Select automatic brightness sensor
Select min/max delta function
Select layout function
Determine painter’s area
Select timer
Select offset function
Printed: 13.06.2016 | Doc-Nr: PUB / 5142261 / 000 / 05

5
Select data storage media
Trapezoid function submenu
Measure 3 distances
Measure 2 distances, 1 angle
Pythagoras function submenu
Single Pythagoras
Double Pythagoras
Combined Pythagoras
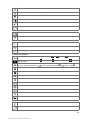
Settings submenu
Unit of measurement. Select unit of measurement: meter centimeter millimeter
Measuring references. Select measuring reference: front edge rear of thread underside of
thread
Angle unit. Select angle unit: inclination in percent metric units imperial units inclination
in angular degrees
Select expert mode
Edit favorites list
Activate scale
Switching the signal tone on / off
Select laser on constantly
Select display inclination
Calibrate inclination sensor
Display information about the tool
Resetting to the default settings
Indirect measurement submenu
Indirect horizontal distance measurement
Indirect vertical distance measurement
Measurements on ceilings
3.4 Items supplied
Laser range meter, two batteries, operating instructions, manufacturer’s certificate.
Note
You can find other system products approved for use with your product at your local Hilti Center or
online at: www.hilti.com.
Printed: 13.06.2016 | Doc-Nr: PUB / 5142261 / 000 / 05

6
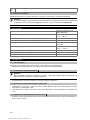
4 Technical data
Battery life
Room temperature: Up to 5000
measurements
Operating temperature
−10 ℃ … 50 ℃
(14 ℉ … 122 ℉)
Distance measurement accuracy (2σ, standard deviation)
±1.0 mm
Inclination measurement accuracy (2σ, standard deviation)
±0.2°
Weight (including batteries)
165 g
(5.8 oz)
Storage temperature
−30 ℃ … 70 ℃
(−22 ℉ … 158 ℉)
Laser class in accordance with EN 60825-1:2007
Laser class 2
Protection class in accordance with IEC 60529
IP 65
Power source
1.5 V
5 Operation
5.1 Basic functions
Navigate to the desired function with the aid of the left or right arrow buttons.
▶ Always press the “Measure” button to select a function.
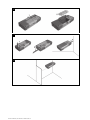
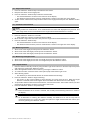
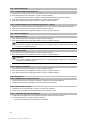
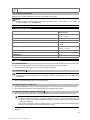
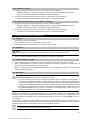
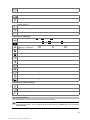
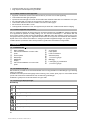
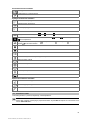
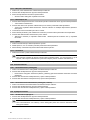
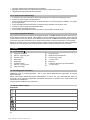
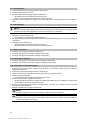
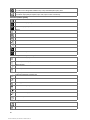
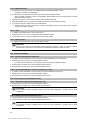
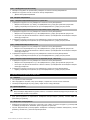
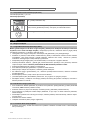
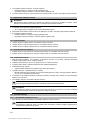
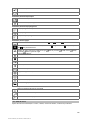
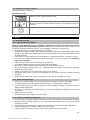
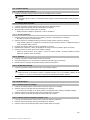
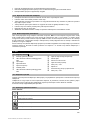
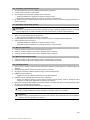
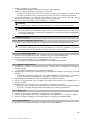
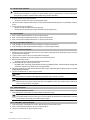
5.2 Inserting the batteries 2
Note
Take care to ensure correct battery polarity. Change the batteries only in pairs. Do not use damaged
batteries.
▶ Open the battery compartment and insert the batteries.
5.3 Switching the laser range meter on and off
1. If the tool is switched off, press the on/off button or the “Measure” button to switch it on.
2. If the tool is switched on, press the on/off button to switch it off.
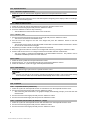
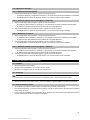
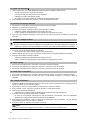
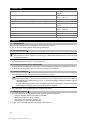
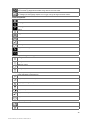
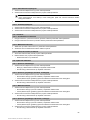
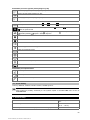
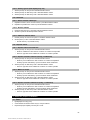
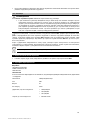
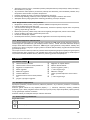
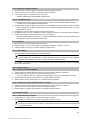
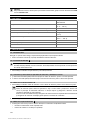
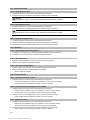
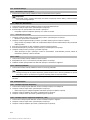
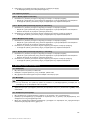
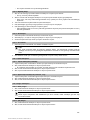
5.4 Measuring using the spike 3
1. Fold out the spike through 90°. The spike can then be used as the contact point.
Note
Here, the spike helps to align the device while a stable position is established. This is the case
primarily for indirect, trapezoid and Pythagoras measurements since these results are based on
estimated values.
Use the measuring extension PDA 72 for inaccessible places. The device automatically detects
the measuring extension. A confirmation window may appear in the display.
2. Fold out the spike through 180°. The measuring reference point is then set automatically.
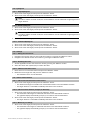
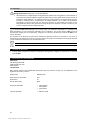
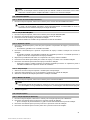
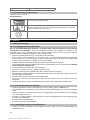
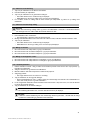
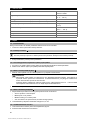
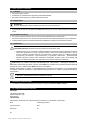
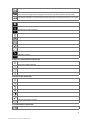
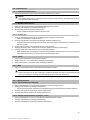
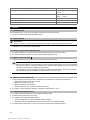
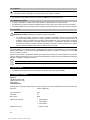
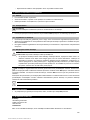
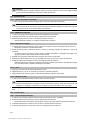
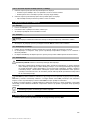
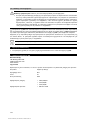
5.5 Measuring using a target plate 4
1. Use the target plate to measure distance under the following unfavorable conditions:
◁ The wall is not sufficiently reflective due to the type of surface.
◁ The target point is not on a surface.
◁ The distance to be measured is very long.
◁ The light conditions are unfavorable (bright sunshine).
2. A distance of 1.2 mm should be added to the measured distance when using a target plate.
Printed: 13.06.2016 | Doc-Nr: PUB / 5142261 / 000 / 05

7
5.6 Single measurements
1. Press the “Measure” button briefly to activate the laser beam.
2. Keep the laser beam on the target point.
3. Press the “Measure” button briefly to take the measurement.
◁ The measured distance is shown in the lower line of the display.
◁ The distance measured in the previous measurement is shown in the upper line of the display.
4. To take another measurement, keep the laser beam on the target point and press the “Measure” button
again.
5.7 Continuous measurement
Note
During continuous measurement, 6-10 measurements are taken and displayed every second. The
laser range meter can be moved relative to the target until the desired distance is reached.
1. Press the “Measure” button for 2 seconds.
◁ If the signal tone is active, a signal tone will be emitted.
2. Move the laser range meter toward or away from the target until the desired distance is reached.
3. Press the “Measure” button briefly.
◁ The measured distance is shown in the lower line of the display.
◁ The distance measured in the previous measurement is shown in the upper line of the display.
5.8 Measuring volumes
1. Aim the tool at the target point and press the “Measure” button.
2. Aim the tool at the next target point and press the “Measure” button.
3. Aim the tool at the next target point and press the “Measure” button.
5.9 Measuring rectangular areas
1. Aim the tool at the target point for the room width and press the “Measure” button.
2. Aim the tool at the target point for the room length and press the “Measure” button.
5.10 Layout function
1. Enter the distance manually. Do this by using the left or right arrow buttons to select the keyboard symbol
and confirm by pressing the “Measure” button.
2. Select the applicable numbers and confirm by pressing the “Measure” button.
3. To confirm the value, select the check mark symbol (tick) at the bottom right corner.
4. Select the flag symbol.
◁ The distance you have entered will then be shown between the two flags.
5. Press the “Measure” button to begin measuring.
◁ The arrows on the screen indicate in which direction you must move the tool. When the target
distance is reached, black arrows appear above and below the distance shown in the display.
6. To repeat this distance measurement several times, move the tool further. The number of times you have
measured out this distance is shown on the right of the screen.
7. Press the “Measure” button to stop measuring.
Note
When the distance to be set out is reached, the currently used measuring reference is shown in
the display.
Note
As an alternative to entering the distance manually, the distance to be set out may also be
measured with the tool. To do this, select the symbol for single measurement and confirm your
choice by pressing the “Measure” button.
Printed: 13.06.2016 | Doc-Nr: PUB / 5142261 / 000 / 05

8
5.11 Special functions
5.11.1 Automatic brightness sensor
▶ Select the symbol for the automatic brightness sensor from the special functions menu.
Note
The automatic brightness sensor automatically dims the lighting on the display in dark surroundings.
This saves battery power.
5.11.2 Min/max delta function
1. Select the symbol for the min/max delta function from the special functions menu.
2. Aim the tool at the target point and press the “Measure” button.
3. Press the “Measure” button to stop measuring.
◁ The last distances measured are shown in the results line.
5.11.3 Painter’s area
1. Aim the tool at the target point for the first room length and press the “Measure” button.
◁ The result is saved as an intermediate result.
2. Aim the tool at the target for the next room length and press the “Measure” button to take the
measurement.
◁ The second result is shown in the intermediate results table. The intermediate result shown in bold is
the sum of the measured room lengths.
3. Repeat this procedure until all room lengths have been measured.
4. Press the right arrow button to switch to room height and confirm by pressing the “Measure” button.
5. Position and aim the tool for room height measurement and then take the measurement.
◁ The room height is measured and displayed in the intermediate result line. The painter’s area is
calculated immediately and shown in the result line.
5.11.4 Timer
1. Select the timer symbol from the special functions menu.
2. Set the timer to 2, 5 or 10 seconds and confirm by pressing the “Measure” button.
3. Select the “Measure” symbol to trigger the delayed measurement.
5.11.5 Data memory
1. Select the data storage symbol from the special functions menu.
Note
The tool can save up to 30 screens, including the graphical symbols. If 30 screens have already
been saved, the oldest one will be deleted automatically when a new screen is saved.
2. To delete data storage memory, press and hold the C-button for 2 seconds while the data storage screen
is displayed.
5.12 Trapezoid
5.12.1 Trapezoid function (3 distances)
1. Select the symbol for the trapezoid function for 3 distances from the trapezoid functions menu.
2. Aim the tool at the target point and press the “Measure” button.
◁ After measuring the first distance, the graphical display automatically prompts you to take the next
measurement.
3. Aim the tool at the next target point and press the “Measure” button.
4. Aim the tool at the third target point and press the “Measure” button.
5.12.2 Trapezoid with Inclination (2 distances, 1 angle)
1. Select the symbol for the trapezoid function with inclination from the trapezoid functions menu.
2. Aim the tool at the target point and press the “Measure” button.
3. Aim the tool at the next target point and press the “Measure” button.
Printed: 13.06.2016 | Doc-Nr: PUB / 5142261 / 000 / 05

9
5.13 Pythagoras
5.13.1 Single Pythagoras
1. Aim the tool at the target point and press the “Measure” button.
2. Aim the tool at the next target point and press the “Measure” button.
Note
In order to achieve accurate results, the second distance must be measured at right angles to the
target distance.
5.13.2 Double Pythagoras
1. Aim the tool at the target point and press the “Measure” button.
2. Aim the tool at the next target point and press the “Measure” button.
Note
In order to achieve accurate results, the second distance must be measured at right angles to the
target distance.
3. Aim the tool at the third target point and press the “Measure” button.
5.13.3 Combined Pythagoras
1. Aim the tool at the target point and press the “Measure” button.
2. Aim the tool at the next target point and press the “Measure” button.
3. Aim the tool at the next target point and press the “Measure” button.
5.14 Settings
5.14.1 Editing the favorites list
1. Navigate to the function that you wish to edit and confirm by pressing the “Measure” button.
2. Navigate to the desired function and confirm by pressing the “Measure” button.
5.14.2 Activating the scale
1. Set the applicable number and confirm the value by pressing the “Measure” button.
2. Select the check mark symbol (tick) to confirm the value.
5.14.3 Calibrate inclination sensor
1. Place the tool on a horizontal surface and press the “Measure” button.
2. Rotate the tool through 180° and press the “Measure” button.
◁ The inclination sensor is now calibrated.
5.15 Indirect measurements
5.15.1 Indirect horizontal distance measurement
▶ Aim the tool at the target point and press the “Measure” button.
◁ The distance and angle of inclination are measured and shown in the intermediate result line.
◁ The target distance is calculated immediately and shown in the result line.
5.15.2 Indirect vertical distance (2 angles, 2 distances)
1. Aim the tool at the target point and press the “Measure” button.
◁ The first distance and angle are measured and shown in the intermediate result line.
◁ The graphical display automatically prompts you to measure the second distance.
2. Aim the tool at the next target point and press the “Measure” button.
◁ The target distance is calculated immediately and shown in the result line.
5.15.3 Measuring on ceilings
1. Aim the tool at the target point and press the “Measure” button.
◁ The first distance and angle are measured and shown in the intermediate result line.
◁ The graphical display automatically prompts you to measure the second distance.
Printed: 13.06.2016 | Doc-Nr: PUB / 5142261 / 000 / 05

10
2. Aim the tool at the next target point and press the “Measure” button.
◁ The target distance is calculated immediately and shown in the result line.
5.15.4 Indirect vertical distance II (2 angles, 1 distance)
1. Aim the tool at the target point and press the “Measure” button.
◁ The first distance and angle are measured and shown in the intermediate result line.
◁ The graphical display automatically prompts you to measure the second distance.
2. Aim the tool at the next target point and press the “Measure” button.
◁ The target distance is calculated immediately and shown in the result line.
6 Care, transport and storage
6.1 Cleaning
▶ Do not touch the lens with the fingers.
▶ Clean the lens by blowing the dust off or by wiping with a clean, dry cloth.
▶ Do not use liquids other than pure alcohol or water.
6.2 Transport
Note
The batteries must be insulated or removed from the product before it is shipped or sent by mail.
▶ Use the Hilti packaging or packaging of equivalent quality for transporting or shipping your equipment.
6.3 Storage and drying
▶ Do not put the product into storage when wet. Allow it to dry before putting it away.
▶ Observe the temperature limits given in the Technical Data section which are applicable to storage or
transport of the equipment.
▶ Check the accuracy of the equipment before it is used after a long period of storage or transportation.
6.4 Disposal
WARNING
Risk of injury. Hazards presented by improper disposal.
▶ Improper disposal of the equipment may have the following consequences: The burning of plastic
components generates toxic fumes which may present a health hazard. Batteries may explode
if damaged or exposed to very high temperatures, causing poisoning, burns, acid burns or
environmental pollution. Careless disposal may permit unauthorized and improper use of the
equipment. This may result in serious personal injury, injury to third parties and pollution of the
environment.
Most of the materials from which Hilti products are manufactured can be recycled. The materials must be
correctly separated before they can be recycled. In many countries, your old tools, machines or appliances
can be returned to Hilti for recycling. Ask Hilti Service or your Hilti representative for further information.
In accordance with the European Directive on waste electrical and electronic equipment and its implemen-
tation in conformance with national law, electric tools or appliances that have reached the end of their life
must be collected separately and returned to an environmentally compatible recycling facility.
▶ Disposal of electric tools or appliances together with household waste is not permissible.
7 Manufacturer’s warranty
▶ Please contact your local Hilti representative if you have questions about the warranty conditions.
Printed: 13.06.2016 | Doc-Nr: PUB / 5142261 / 000 / 05

11
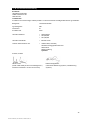
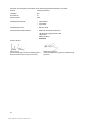
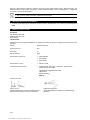
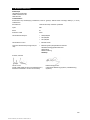
8 EC declaration of conformity
Manufacturer
Hilti Aktiengesellschaft
Feldkircherstrasse 100
9494 Schaan
Liechtenstein
We declare, on our sole responsibility, that this product complies with the following directives and standards.
Designation Laser range meter
Type designation PD-I
Generation 01
Year of design 2010
Applicable directives: • 2004/108/EC
• 2014/30/EU
• 2011/65/EU
Applicable standards: • EN ISO 12100
Technical documentation filed at: • Electric Tools Approval Department
Hilti Entwicklungsgesellschaft mbH
Hiltistraße 6
86916 Kaufering
Germany
Schaan, 6/2015
Paolo Luccini
(Head of BA Quality & Process Management /
Business Area Electric Tools & Accessories)
Edward Przybylowicz
(Head of BU Measuring Systems / BU Measuring
Systems)
Printed: 13.06.2016 | Doc-Nr: PUB / 5142261 / 000 / 05

12
1 Información sobre la documentación
1.1 Convenciones
1.1.1 Símbolos de advertencia
Se utilizan los siguientes símbolos de advertencia:
¡PELIGRO! Término utilizado para un peligro inminente que puede ocasionar lesiones graves o
incluso la muerte.
¡ADVERTENCIA! Término utilizado para una posible situación peligrosa que puede ocasionar
lesiones graves o incluso la muerte.
PRECAUCIÓN Término utilizado para una posible situación peligrosa que puede ocasionar
lesiones leves o daños materiales.
1.1.2 Símbolos
Se utilizan los siguientes símbolos:
Leer el manual de instrucciones antes del uso
Tecla de encendido/apagado
Tecla de medición
Tecla de menú
Tecla de borrado (Clear)
Tecla derecha
Tecla izquierda
1.1.3 Resaltados tipográficos
Las siguientes características tipográficas destacan fragmentos de texto importantes en esta documentación
técnica:
1
Los números hacen referencia a las figuras correspondientes.
1.2 Acerca de esta documentación
▶ Lea detenidamente el manual de instrucciones antes de la puesta en servicio.
▶ Tenga en cuenta también las instrucciones detalladas del manual de instrucciones de la herra-
mienta, además de las adiciones y actualizaciones, que puede encontrar en www.hilti.com.
▶ Conserve este manual de instrucciones siempre cerca de la herramienta.
▶ No entregue nunca la herramienta a otras personas sin el manual de instrucciones.
1.3 Información del producto
Losproductos Hilti han sido diseñadospara usuarios profesionalesy solodeben ser manejados, conservados
y reparados por personal autorizado y debidamente formado. Este personal debe estar especialmente
instruido en lo referente a los riesgos de uso. La utilización del producto y sus dispositivos auxiliares puede
conllevar riesgos para el usuario en caso de manejarse de forma inadecuada por personal no cualificado o
utilizarse para usos diferentes a los que están destinados.
La denominación del modelo y el número de serie están indicados en la placa de identificación.
▶ Traspase el número de serie a la siguiente tabla. Necesitará los datos del producto para realizar consultas
a nuestros representantes o al Departamento de Servicio Técnico.
Datos del producto → página 12
Datos del producto
Medidor láser PD-I
Generación 01
Printed: 13.06.2016 | Doc-Nr: PUB / 5142261 / 000 / 05

13
N.º de serie
1.4 Información sobre el láser en la herramienta
Información sobre el láser → página 13
Información sobre el láser
Clase de láser 2, según la norma IEC60825-1/EN60825-1:2007 y conforme
con la norma CFR 21 § 1040 (Laser Notice 50).
Clase de láser 2. No mire el haz de luz. No dirija el haz de luz hacia otras
personas o hacia lugares en los que pueda haber otras personas que no
estén trabajando con el láser.
Recicle los materiales usados
2 Seguridad
2.1 Indicaciones de seguridad
2.1.1 Observaciones básicas de seguridad
Además de las indicaciones técnicas de seguridad que aparecen en los distintos capítulos de
este manual de instrucciones, también es imprescindible cumplir estrictamente las siguientes
disposiciones. La utilización del producto y sus dispositivos auxiliares puede conllevar riesgos para el
usuario en caso de manejarse de forma inadecuada por personal no cualificado o utilizarse para usos
diferentes a los que están destinados.
▶ Conserve todas las instrucciones e indicaciones de seguridad para futuras consultas.
▶ Permanezca atento, preste atención durante el trabajo y utilice el producto con prudencia. No utilice el
producto si está cansado o si se encuentra bajo los efectos de drogas, alcohol o medicamentos. Un
momento de descuido mientras se está utilizando el producto puede provocar lesiones graves.
▶ No anule ninguno de los dispositivos de seguridad ni quite ninguna de las placas indicativas y de
advertencia.
▶ Si el producto se abre de manera inapropiada se puede generar radiación láser que supere la clase 2.
Encargue la reparación del producto solo al Servicio Técnico de Hilti.
▶ No está permitido efectuar manipulaciones o modificaciones en el producto.
▶ Compruebe que el producto funciona correctamente antes de cada puesta en servicio.
▶ Las mediciones a través de cristales u otros objetos pueden falsear el resultado de la medición.
▶ El resultado de la medición puede verse falseado si las condiciones de medición cambian rápidamente,
por ejemplo, por personas que cruzan el rayo de medición.
▶ No dirija el producto hacia el sol u otras fuentes de luz potentes.
▶ Tenga en cuenta las condiciones ambientales. No utilice la herramienta en lugares donde exista peligro
de incendio o explosión.
▶ Observe las indicaciones sobre el funcionamiento, cuidado y mantenimiento incluidas en el manual de
instrucciones.
2.1.2 Medidas de seguridad generales
▶ Antes de su utilización, compruebe el producto por si hubiera sufrido daños. Encargue la reparación de
los daños al Servicio Técnico de Hilti.
▶ Después de sufrir una caída u otros impactos mecánicos debe comprobar la precisión del producto.
▶ Si bien el producto está diseñado para un uso en condiciones duras de trabajo, como lugares de
construcción, debe tratarlo con sumo cuidado al igual que los demás aparatos de medición.
▶ Los productos que no se utilicen deben conservarse fuera del alcance de los niños, en un lugar seco,
alto y cerrado.
▶ El producto no es apto para el uso por parte de niños.
▶ Respete la normativa nacional en materia de protección laboral.
Printed: 13.06.2016 | Doc-Nr: PUB / 5142261 / 000 / 05

14
2.1.3 Organización correcta del lugar de trabajo
▶ Evite posturas forzadas cuando se realice trabajos sobre una escalera de mano. Procure que la postura
sea estable y manténgase siempre en equilibrio.
▶ Asegure el lugar del puesto de medición y, durante el uso del producto, compruebe que no orienta el
rayo láser hacia otras personas ni hacia usted mismo.
▶ Si el producto pasa de estar sometido a un frío intenso a un entorno más cálido o viceversa, deje que se
aclimate antes de utilizarlo.
▶ Utilice el producto solo dentro de los límites de aplicación definidos.
▶ Para evitar errores de medición, mantenga limpio el cristal del orificio de salida del láser.
▶ Observe las disposiciones locales sobre prevención de accidentes.
2.1.4 Trabajo seguro con herramientas láser
▶ Las herramientas de la clase de láser 2/Class II únicamente han de ser utilizadas por personal instruido.
▶ Los rayos láser no deben pasar a la altura de los ojos.
▶ Es preciso adoptar las oportunas precauciones para impedir que el rayo láser pueda incidir involuntaria-
mente sobre superficies reflectantes (p. ej., espejo).
▶ Es indispensable tomar las medidas pertinentes para garantizar que nadie mire directamente al rayo.
▶ La trayectoria del rayo láser no debe pasar por áreas no controladas.
▶ Desconecte el láser cuando no se esté utilizando.
▶ Almacene las herramientas láser que no se utilicen en un lugar al que no tengan acceso personas no
autorizadas.
2.1.5 Compatibilidad electromagnética
Si bien la herramienta cumple los estrictos requisitos de las directivas pertinentes, Hilti no puede excluir
la posibilidad de que la herramienta se vea afectada por una radiación intensa que pudiera ocasionar un
funcionamiento inadecuado. En este caso o ante otras irregularidades, deben realizarse mediciones de
control. Hilti tampoco puede excluir la posibilidad de que otras herramientas resulten afectadas (p. ej.,
los dispositivos de navegación de los aviones). La herramienta corresponde a la clase A. No se pueden
descartar anomalías en zonas residenciales.
Solo para Corea: este medidor láser es apropiado para las ondas electromagnéticas que se producen en
el área industrial (clase A). El usuario debe tener en cuenta esta indicación y no utilizar el medidor láser en
zonas residenciales.
3 Descripción
3.1 Vista general del producto 1
@
Superficies de tope traseras
;
Indicador de referencia LED del tope
trasero
=
Tecla izquierda
%
Tecla de menú
&
Tecla de medición
(
Indicación gráfica
)
Indicador de referencia LED del tope
delantero
+
Tecla de encendido/apagado
§
Tecla derecha
/
Alojamiento del asidero
:
Tecla de borrado (Clear)
∙
Rosca de ¹/₄ pulgadas
$
Punta de medición
£
Salida del láser y lente de recepción
|
Rosca de ¹/₄ pulgadas
3.2 Uso conforme a las prescripciones
El producto descrito es un medidor láser. Sirve para realizar mediciones únicas y continuas de distancias.
Pueden medirse distancias en cualquier objetivo inmóvil, es decir, hormigón, piedra, madera, plástico, papel,
etc.; no se permite la utilización de prismas u otros objetivos de gran reflectabilidad, ya que pueden falsear
el resultado.
El producto es compatible con pilas de tipo AAA.
Printed: 13.06.2016 | Doc-Nr: PUB / 5142261 / 000 / 05

15
3.3 Explicación de los indicadores de la pantalla
Menú principal
Medición de volúmenes
Medición de superficies rectangulares
Selección de la función de replanteo
Medición de superficies y volúmenes
Selección de funciones especiales
Selección de la función trapezoidal
Selección de la función de Pitágoras
Selección de los parámetros de configuración
Para las distancias horizontales y diagonales se necesita, al menos, un ángulo recto.
Selección de las mediciones indirectas
Para las mediciones u objetos estáticos, como paredes, no se requiere ningún ángulo determi-
nado.
Iconos generales
Estado de carga de las pilas
Punta de medición replegada
Punta de medición desplegada
Medir
Suma de distancias
Resta de distancias
Seleccionar
No seleccionar
Fijación del tiempo de la medición
Selección de la calculadora
Submenú de la medición de superficies y volúmenes
Medición de superficies rectangulares
Medición de superficies triangulares
Medición de volúmenes
Medición de volúmenes cilíndricos
Submenú de las funciones especiales
Selección del sensor de luminosidad automático
Printed: 13.06.2016 | Doc-Nr: PUB / 5142261 / 000 / 05

16
Selección de la función Mín./Máx./Delta
Selección de la función de replanteo
Determinación de superficies pintadas
Selección del temporizador
Selección de la función de offset
Selección de la memoria de datos
Submenú de la función trapezoidal
Medición de tres distancias
Medición de dos distancias y un ángulo
Submenú de la función de Pitágoras
Pitágoras simple
Pitágoras doble
Pitágoras combinado
Submenú de los parámetros de configuración
Unidad de medición. Selección de la unidad de medida: metros centímetros milímetros
Referencias de medición. Selección de referencias de medición: borde delantero parte
trasera de la rosca parte inferior de la rosca
Unidad del ángulo. Selección de la unidad del ángulo: aumento en tanto por ciento unidades
del sistema métrico unidades del sistema imperial aumento en grados de ángulo
Selección del modo para expertos
Modificación de la lista de favoritos
Activación de la escala
Conexión y desconexión del tono
Selección del láser permanente
Selección del indicador de la inclinación
Realización de la calibración del sensor de inclinación
Mostrar información sobre la herramienta
Restablecer los ajustes de fábrica
Submenú de mediciones indirectas
Medición de distancias horizontales indirectas
Medición de distancias verticales indirectas
Printed: 13.06.2016 | Doc-Nr: PUB / 5142261 / 000 / 05
Pagina se încarcă...
Pagina se încarcă...
Pagina se încarcă...
Pagina se încarcă...
Pagina se încarcă...
Pagina se încarcă...
Pagina se încarcă...
Pagina se încarcă...
Pagina se încarcă...
Pagina se încarcă...
Pagina se încarcă...
Pagina se încarcă...
Pagina se încarcă...
Pagina se încarcă...
Pagina se încarcă...
Pagina se încarcă...
Pagina se încarcă...
Pagina se încarcă...
Pagina se încarcă...
Pagina se încarcă...
Pagina se încarcă...
Pagina se încarcă...
Pagina se încarcă...
Pagina se încarcă...
Pagina se încarcă...
Pagina se încarcă...
Pagina se încarcă...
Pagina se încarcă...
Pagina se încarcă...
Pagina se încarcă...
Pagina se încarcă...
Pagina se încarcă...
Pagina se încarcă...
Pagina se încarcă...
Pagina se încarcă...
Pagina se încarcă...
Pagina se încarcă...
Pagina se încarcă...
Pagina se încarcă...
Pagina se încarcă...
Pagina se încarcă...
Pagina se încarcă...
Pagina se încarcă...
Pagina se încarcă...
Pagina se încarcă...
Pagina se încarcă...
Pagina se încarcă...
Pagina se încarcă...
Pagina se încarcă...
Pagina se încarcă...
Pagina se încarcă...
Pagina se încarcă...
Pagina se încarcă...
Pagina se încarcă...
Pagina se încarcă...
Pagina se încarcă...
Pagina se încarcă...
Pagina se încarcă...
Pagina se încarcă...
Pagina se încarcă...
Pagina se încarcă...
Pagina se încarcă...
Pagina se încarcă...
Pagina se încarcă...
Pagina se încarcă...
Pagina se încarcă...
Pagina se încarcă...
Pagina se încarcă...
Pagina se încarcă...
Pagina se încarcă...
Pagina se încarcă...
Pagina se încarcă...
Pagina se încarcă...
Pagina se încarcă...
Pagina se încarcă...
Pagina se încarcă...
Pagina se încarcă...
Pagina se încarcă...
Pagina se încarcă...
Pagina se încarcă...
Pagina se încarcă...
Pagina se încarcă...
Pagina se încarcă...
Pagina se încarcă...
Pagina se încarcă...
Pagina se încarcă...
Pagina se încarcă...
Pagina se încarcă...
Pagina se încarcă...
Pagina se încarcă...
Pagina se încarcă...
Pagina se încarcă...
Pagina se încarcă...
Pagina se încarcă...
Pagina se încarcă...
Pagina se încarcă...
Pagina se încarcă...
Pagina se încarcă...
Pagina se încarcă...
Pagina se încarcă...
Pagina se încarcă...
Pagina se încarcă...
Pagina se încarcă...
Pagina se încarcă...
Pagina se încarcă...
Pagina se încarcă...
Pagina se încarcă...
Pagina se încarcă...
Pagina se încarcă...
Pagina se încarcă...
Pagina se încarcă...
Pagina se încarcă...
Pagina se încarcă...
Pagina se încarcă...
Pagina se încarcă...
Pagina se încarcă...
Pagina se încarcă...
Pagina se încarcă...
Pagina se încarcă...
Pagina se încarcă...
Pagina se încarcă...
Pagina se încarcă...
Pagina se încarcă...
Pagina se încarcă...
Pagina se încarcă...
Pagina se încarcă...
Pagina se încarcă...
Pagina se încarcă...
Pagina se încarcă...
Pagina se încarcă...
Pagina se încarcă...
Pagina se încarcă...
Pagina se încarcă...
Pagina se încarcă...
Pagina se încarcă...
Pagina se încarcă...
Pagina se încarcă...
Pagina se încarcă...
Pagina se încarcă...
Pagina se încarcă...
Pagina se încarcă...
Pagina se încarcă...
Pagina se încarcă...
Pagina se încarcă...
Pagina se încarcă...
Pagina se încarcă...
Pagina se încarcă...
Pagina se încarcă...
Pagina se încarcă...
Pagina se încarcă...
Pagina se încarcă...
Pagina se încarcă...
Pagina se încarcă...
Pagina se încarcă...
Pagina se încarcă...
Pagina se încarcă...
Pagina se încarcă...
Pagina se încarcă...
Pagina se încarcă...
Pagina se încarcă...
Pagina se încarcă...
Pagina se încarcă...
Pagina se încarcă...
Pagina se încarcă...
Pagina se încarcă...
Pagina se încarcă...
Pagina se încarcă...
Pagina se încarcă...
Pagina se încarcă...
Pagina se încarcă...
Pagina se încarcă...
Pagina se încarcă...
Pagina se încarcă...
Pagina se încarcă...
Pagina se încarcă...
Pagina se încarcă...
Pagina se încarcă...
Pagina se încarcă...
Pagina se încarcă...
Pagina se încarcă...
Pagina se încarcă...
Pagina se încarcă...
Pagina se încarcă...
Pagina se încarcă...
Pagina se încarcă...
Pagina se încarcă...
Pagina se încarcă...
Pagina se încarcă...
-
 1
1
-
 2
2
-
 3
3
-
 4
4
-
 5
5
-
 6
6
-
 7
7
-
 8
8
-
 9
9
-
 10
10
-
 11
11
-
 12
12
-
 13
13
-
 14
14
-
 15
15
-
 16
16
-
 17
17
-
 18
18
-
 19
19
-
 20
20
-
 21
21
-
 22
22
-
 23
23
-
 24
24
-
 25
25
-
 26
26
-
 27
27
-
 28
28
-
 29
29
-
 30
30
-
 31
31
-
 32
32
-
 33
33
-
 34
34
-
 35
35
-
 36
36
-
 37
37
-
 38
38
-
 39
39
-
 40
40
-
 41
41
-
 42
42
-
 43
43
-
 44
44
-
 45
45
-
 46
46
-
 47
47
-
 48
48
-
 49
49
-
 50
50
-
 51
51
-
 52
52
-
 53
53
-
 54
54
-
 55
55
-
 56
56
-
 57
57
-
 58
58
-
 59
59
-
 60
60
-
 61
61
-
 62
62
-
 63
63
-
 64
64
-
 65
65
-
 66
66
-
 67
67
-
 68
68
-
 69
69
-
 70
70
-
 71
71
-
 72
72
-
 73
73
-
 74
74
-
 75
75
-
 76
76
-
 77
77
-
 78
78
-
 79
79
-
 80
80
-
 81
81
-
 82
82
-
 83
83
-
 84
84
-
 85
85
-
 86
86
-
 87
87
-
 88
88
-
 89
89
-
 90
90
-
 91
91
-
 92
92
-
 93
93
-
 94
94
-
 95
95
-
 96
96
-
 97
97
-
 98
98
-
 99
99
-
 100
100
-
 101
101
-
 102
102
-
 103
103
-
 104
104
-
 105
105
-
 106
106
-
 107
107
-
 108
108
-
 109
109
-
 110
110
-
 111
111
-
 112
112
-
 113
113
-
 114
114
-
 115
115
-
 116
116
-
 117
117
-
 118
118
-
 119
119
-
 120
120
-
 121
121
-
 122
122
-
 123
123
-
 124
124
-
 125
125
-
 126
126
-
 127
127
-
 128
128
-
 129
129
-
 130
130
-
 131
131
-
 132
132
-
 133
133
-
 134
134
-
 135
135
-
 136
136
-
 137
137
-
 138
138
-
 139
139
-
 140
140
-
 141
141
-
 142
142
-
 143
143
-
 144
144
-
 145
145
-
 146
146
-
 147
147
-
 148
148
-
 149
149
-
 150
150
-
 151
151
-
 152
152
-
 153
153
-
 154
154
-
 155
155
-
 156
156
-
 157
157
-
 158
158
-
 159
159
-
 160
160
-
 161
161
-
 162
162
-
 163
163
-
 164
164
-
 165
165
-
 166
166
-
 167
167
-
 168
168
-
 169
169
-
 170
170
-
 171
171
-
 172
172
-
 173
173
-
 174
174
-
 175
175
-
 176
176
-
 177
177
-
 178
178
-
 179
179
-
 180
180
-
 181
181
-
 182
182
-
 183
183
-
 184
184
-
 185
185
-
 186
186
-
 187
187
-
 188
188
-
 189
189
-
 190
190
-
 191
191
-
 192
192
-
 193
193
-
 194
194
-
 195
195
-
 196
196
-
 197
197
-
 198
198
-
 199
199
-
 200
200
-
 201
201
-
 202
202
-
 203
203
-
 204
204
-
 205
205
-
 206
206
-
 207
207
-
 208
208


în alte limbi
- eesti: Hilti PD-I Kasutusjuhend
- dansk: Hilti PD-I Betjeningsvejledning
Lucrări înrudite
-
Hilti PD-E Instrucțiuni de utilizare
-
-
Hilti PD-I Instrucțiuni de utilizare
-
-
-
-
Hilti PD 40 Instrucțiuni de utilizare
-
Hilti PD 42 Instrucțiuni de utilizare
-
Hilti PD 4 Instrucțiuni de utilizare
-
