Philips FC6161/01 Manual de utilizare
- Categorie
- Aspiratoare
- Tip
- Manual de utilizare

Register your product and get support at
www.philips.com/welcome
FC6161


1


6
Introduction
Congratulations on your purchase and welcome to Philips! To fully benet from the support that
Philips offers, register your product at www.philips.com/welcome.
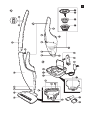
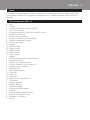
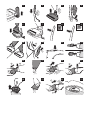
General description (Fig. 1)
A Stick
1 On/off button
2 MAX button for maximum power
3 Upper stick part
4 Screw to attach upper stick part to lower stick part
5 Lower stick part
6 Floor nozzle joint
7 Floor nozzle release button
8 ’Brush blocked’ light
9 Floor nozzle
10 Retainer
11 Front wheels
12 Roller brush
13 Cutting groove
14 Rear wheels
B Handheld vacuum cleaner
1 On/off button
2 Dust compartment release button
3 Dust compartment
4 Nozzle release button
5 Handheld vacuum cleaner release button
6 Exhaust air openings
7 Filter unit
8 Detachable nozzle
9 Outer lter
10 Inner lter
11 Filter holder
12 Filter rattle mechanism
C Accessories
1 Charging base
2 Charging light
3 Storage compartment
4 Cord storage facility
5 Adapter
6 Back support of charging base
7 Wall mounting screw
8 Crevice tool
9 Brush tool
ENGLISH

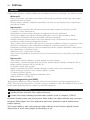
Important
Read this user manual carefully before you use the appliance and save it for future reference.
Danger
- Never suck up water or any other liquid. Never suck up ammable substances and do not suck
up ashes until they are cold.
- Never immerse the appliance, the charging base or the adapter in water or any other liquid, nor
rinse it under the tap.
Warning
- Check if the voltage indicated on the adapter corresponds to the local mains voltage before you
connect the appliance.
- Do not use the vacuum cleaner, the charging base or the adapter if it is damaged.
- If the adapter or charging base is damaged, always have it replaced with one of the original type
in order to avoid a hazard.
- The adapter contains a transformer. Do not cut off the adapter to replace it with another plug,
as this causes a hazardous situation.
- This appliance can be used by children aged 8 or above and by persons with reduced physical,
sensory or mental capabilities or lack of experience and knowledge if they have been given
instructions in safe use of the appliance or supervision to establish safe use and if they have
been made aware of the hazards involved.
- Do not allow children to play with the appliance.
- Children are only allowed to empty the dust compartment, clean the lter unit and clean the
appliance under supervision.
Caution
- Remove the adapter from the wall socket before you clean the charging base.
- Only charge the vacuum cleaner with the adapter and charging base supplied. During charging,
the adapter feels warm to the touch. This is normal.
- Always switch off the vacuum cleaner after use.
- The voltage on the contact strips in the charging base is low and therefore not dangerous.
- Never block the exhaust air openings during vacuuming.
- Switch off the appliance when you charge it.
- Always use the vacuum cleaner with the lter unit assembled.
- Noise level: Lc = 84 dB(A)
This Philips appliance complies with all standards regarding electromagnetic elds (EMF). If handled
properly and according to the instructions in this user manual, the appliance is safe to use based on
scientic evidence available today.
1 Remove any protective foil or plastic from the appliance.
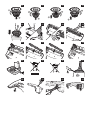
2 Attach the back support to the back of the charging base (‘click’) (Fig. 2).
Note: You only have to do this once. Never disassemble the back support from the charging base.
Note: You do not have to attach the back support if the extra stability the back support provides is
not required.
Tip: For better stability you can also mount the charging base to the wall. To do so, drive the screw
supplied through the hole in the back support into the wall.
ENGLISH 7

3 Place the upper stick part on the lower stick part (‘click’) (Fig. 3).
Note: You only have to do this once. Never disassemble the upper stick from the lower stick.
4 Fasten the screw with a screwdriver or coin.
5 Placethestickontheoornozzle(‘click’)(Fig.4).
Preparing for use
Charging the batteries
It takes approx. 7 hours to fully charge the batteries.
1 Put the adapter of the charging base in the wall socket.
2 Place the handheld vacuum cleaner in the stick (‘click’) (Fig. 5).
Note: Make sure the handheld vacuum cleaner is switched off when you place it in the stick.
3 Place the appliance on the charging base (Fig. 6).
, The charging light goes on to indicate that the appliance is charging. (Fig. 7)
Note: The charging light does not give any information about the battery charge level.
, When the batteries are fully charged, the charging process stops and the charging light goes
out to save energy.
Note: You can leave the appliance on the charging base, even when the batteries are fully charged. Every
5 minutes, the charging light lights up for 3 seconds. This indicates that the charging base checks if the
batteries are still fully charged.
Note: If you place the appliance on the charging base while it is switched on, the appliance switches
off automatically after 2 seconds and the batteries do not charge.
Saving energy
If you are not going to use the appliance for a longer period of time, remove the adapter from the
wall socket to save energy.
The power of this cordless stick vacuum cleaner cannot be compared with that of a full-size
standard vacuum cleaner. Its cleaning performance on soft oors may not entirely match that of a
standard vacuum cleaner, but its cleaning performance on hard oors is just as good.
You can use the stick to clean oors and carpets.
When you use the stick, always make sure the dust compartment is attached to the handheld
vacuum cleaner, to prevent damage to the handheld vacuum cleaner.
1 Place the handheld vacuum cleaner properly in the stick (‘click’). (Fig. 5)
2 Press the on/off button on the stick to switch on the appliance (Fig. 8).
, The appliance starts to operate at normal speed. Use this speed for optimal operating
time and minimal noise. The operating time at this speed is more than 20 minutes.
- Press the MAX button if you want to operate the appliance at maximum speed. Use this speed
for optimal cleaning performance. The operating time at this speed is 11 minutes (Fig. 9).
- If you want to switch back to normal speed, press the MAX button again.
Note: During use, the ‘brush blocked’ light may ash red to indicate that the roller brush is blocked. If this
happens, you have to remove the item that is blocking the brush or clean the brush (see chapter ‘Cleaning’)
.
ENGLISH8

3 If you want to leave the appliance for a while or if you want to remove the handheld vacuum
cleaner from the stick during use, you can use the parking position. Push the stick towards
theoornozzletoputitinparkingposition(Fig.10).
4 After use, press the on/off button to switch off the appliance.
You can use the handheld vacuum cleaner without the stick to vacuum small and hard-to-reach
areas, such as tables, furniture, car seats etc.
When the handheld vacuum cleaner is fully charged, it has an operating time of 12 minutes.
1 If the handheld vacuum cleaner is placed in the stick, press the on/off button on the stick to
switch off the appliance before you remove the handheld vacuum cleaner from the stick.
Note: If you remove the handheld vacuum cleaner when the appliance is switched on at normal speed,
the handheld vacuum cleaner operates at reduced power when you take it out. To make sure the
handheld vacuum cleaner operates at full power, switch it off and back on again.
2 Press the handheld vacuum cleaner release button (1) and remove the handheld vacuum
cleaner from the stick (2) (Fig. 11).
3 Press the on/off button to switch on the handheld vacuum cleaner (Fig. 12).
4 After use, press the on/off button again to switch off the handheld vacuum cleaner.
Note: Make sure you switch off the handheld vacuum cleaner before you put it back into the stick.
Note: If you put the handheld vacuum cleaner back into the stick when it is still switched on, the roller
brush does not work and the cleaning performance is not optimal. To make the roller brush operate,
press the on/off button on the stick to switch off the appliance and then press the on/off button again to
switch the appliance back on again.
The handheld vacuum cleaner comes with the following accessories:
- a crevice tool to vacuum corners or narrow gaps.
- a brush tool to clean delicate surfaces.
1 Take the accessory you want to use from the storage compartment of the charging base.
2 Attachtheaccessorytothedetachablenozzle(Fig.13).
Cleaning
Always remove the adapter from the wall socket before you clean the charging base.
1 Clean the outside of the handheld vacuum cleaner, the outside of the stick and the outside of
the charging base with a damp cloth.
2 Ifyouwanttoemptyandcleanthedustcompartmentorcleanthelterunit,followthe
instructionsinsections‘Emptyingandcleaningthedustcompartment’and‘Cleaningthelter
unit’ below.
Emptying and cleaning the dust compartment
Make sure you empty and clean the dust compartment of the handheld vacuum cleaner regularly.
Note: It is not necessary to hold the handheld vacuum cleaner over a dustbin when you open it.
ENGLISH 9

You can empty the dust compartment quickly in the following way:
1 Pressthenozzlereleasebutton(1)andtakethedetachablenozzleoffthehandheldvacuum
cleaner (2) (Fig. 14).
2 Shake the contents of the dust compartment into a dustbin (Fig. 15).
3 Firstattachthebottomofthedetachablenozzleandthenpushthetopofthedetachable
nozzletowardsthevacuumcleaneruntilitlocksintoplace(‘click’).(Fig.16)
You can empty and clean the dust compartment thoroughly in the following way:
1 Hold the handheld vacuum cleaner over a dustbin, press the dust compartment release
button (1) and remove the dust compartment (2) (Fig. 17).
2 Removethelterunitfromthedustcompartment(Fig.18).
3 Shake the dust compartment with your free hand to empty the contents into a
dustbin (Fig. 19).
4 If necessary, clean the dust compartment with a damp cloth.
5 Ifnecessary,cleanthelterunit.Seesection‘Cleaningthelterunit’below.
6 Putthelterunitbackintothedustcompartment.
7 To reattach the dust compartment, align the slot on the dust compartment with the
projection on the handheld vacuum cleaner. First attach the bottom of the dust compartment
(1) and then push the top of the dust compartment towards the vacuum cleaner (2) until it
locks into place (‘click’). (Fig. 20)
Make sure you clean the lter unit regularly.
You can clean the lter unit quickly in the following way:
1 Hold the handheld vacuum cleaner over a dustbin, press the dust compartment release
button (1) and remove the dust compartment (2) (Fig. 17).
2 Turntherattlemechanisminsidethelterholderafewtimes.(Fig.21)
, Therattlemechanismloosensthedustfromtheinnerlter.
3 To reattach the dust compartment, align the slot on the dust compartment with the
projection on the handheld vacuum cleaner. First attach the bottom of the dust compartment
(1) and then push the top of the dust compartment towards the vacuum cleaner (2) until it
locks into place (‘click’). (Fig. 20)
You can clean the lter unit thoroughly in the following way:
1 Hold the appliance over a dustbin, press the dust compartment release button (1) and
remove the dust compartment (2) (Fig. 17).
2 Removethelterunitfromthedustcompartment(Fig.18).
3 Turntheouterlterclockwise(1)andremoveitfromthelterholder(2)(Fig.22).
4 Turntheinnerlterclockwise(1)andremoveitfromthelterholder(2)(Fig.23).
ENGLISH10

5 Cleantheinnerlterandtheouterlterwithabrushorwithastandardvacuumcleanerif
they are very dirty.
Note: If necessary you can clean the inner lter and the outer lter in cold or lukewarm water. Dry the
inner and outer lter thoroughly before you use the lter unit again.
6 Placetheinnerlterbackontothelterholder(1)andturnitanticlockwisetoattachit
(2). (Fig. 24)
7 Placetheouterlterbackontothelterholder(1)andturnitanticlockwisetoattachit
(2). (Fig. 25)
8 Putthelterunitbackintothedustcompartment(Fig.26).
Note: Make sure you insert the lter unit in the correct way. The word ‘up’ must point towards the top of
the dust compartment.
9 To reattach the dust compartment, align the slot on the dust compartment with the
projection on the handheld vacuum cleaner. First attach the bottom of the dust compartment
(1) and then push the top of the dust compartment towards the vacuum cleaner (2) until it
locks into place (‘click’). (Fig. 20)
The joint of the oor nozzle may get blocked by large dirt particles. Follow the steps below to clean
the joint.
1 Press the on/off button on the stick to switch off the appliance.
2 Press the handheld vacuum cleaner release button (1) and remove the handheld vacuum
cleaner from the stick (2) (Fig. 11).
3 Presstheoornozzlereleasebutton(1)todetachthestickfromtheoornozzle
(2) (Fig. 27).
4 Remove the large dirt particles from the joint.
5 Placethestickbackontotheoornozzle(‘click’).
Cleaning the roller brush
When the ‘brush blocked’ light starts to ash red, the roller brush is blocked. If this happens, follow
the steps below to clean the roller brush.
1 Press the on/off button on the stick to switch off the appliance.
2 Press the handheld vacuum cleaner release button (1) and remove the handheld vacuum
cleaner from the stick (2) (Fig. 11).
3 Presstheoornozzlereleasebutton(1)todetachthestickfromtheoornozzle(2).
4 Turntheoornozzleupsidedown.
5 Move the roller brush until the cutting groove faces you. (Fig. 28)
6 Use a pair of scissors to cut the hairs, threads etc. that have collected around the roller
brush. (Fig. 29)
7 Removeuff,hairsandotherdirtfromtherollerbrush.
Note: You can also remove the roller brush for easier cleaning.
ENGLISH 11

Removing the roller brush
1 Switch off the appliance.
2 Turntheoornozzleupsidedownandopentheretainer.(Fig.30)
3 Lifttherollerbrushoutoftheoornozzle (Fig. 31).
4 Removeuff,hairsandotherdirtfromtherollerbrushandthegroove.
Reinserting the roller brush
1 Firstinserttheendoftherollerbrushfurthestfromtheretainerintothenozzle,theninsert
theendoftherollerbrushclosesttotheretainerintothenozzle.(Fig.32)
2 Close the retainer (‘click’). (Fig. 33)
Note: If the roller brush is not properly inserted, you cannot close the retainer.
Storage
1 Put the accessories in the storage compartment of the charging base (Fig. 34).
2 Pushthesticktowardstheoornozzletoputitintoparkingposition(Fig.10).
3 You can store the appliance on the charging base with the handheld vacuum cleaner placed in
the stick (Fig. 6).
Replacement
We advise you to replace the inner lter and the outer lter after a prolonged period of use or if
you can no longer clean them properly.
New inner lters are available under type number 4322 004 93471. Contact your Philips dealer.
1 Removethelterunitfromthedustcompartment(Fig.18).
2 Turntheouterlterclockwise(1)andremoveitfromthelterholder(2)(Fig.22).
3 Turntheinnerlterclockwise(1)andremoveitfromthelterholder(2)(Fig.23).
4 Placeanewinnerlteronthelterholder(1)andturnitanticlockwisetoattachit
(2) (Fig. 24).
5 Placeanewouterlteronthelterholder(1)andturnitanticlockwisetoattachit
(2) (Fig. 25).
6 Putthelterunitbackintothedustcompartment(Fig.26).
Note: Make sure you insert the lter unit in the correct way. The word ‘up’ must point towards the top of
the dust compartment.
Ordering accessories
To purchase accessories for this appliance, please visit our online shop at www.shop.philips.com/
service. If the online shop is not available in your country, go to your Philips dealer or a Philips
service centre. If you have any difculties obtaining accessories for your appliance, please contact the
Philips Consumer Care Centre in your country. You nd its contact details in the worldwide
guarantee leaet.
ENGLISH12

New inner lters are available under type number 4322 004 93471 .
New HEPA lters are available under type number 4322 004 93471.
New Mesh lters are available under type number 4222 459 49431.
New rolling brushes are available under type number 4222 459 49571.
Environment
- Do not throw away the appliance with the normal household waste at the end of its life, but
hand it in at an ofcial collection point for recycling. By doing this, you help to preserve the
environment (Fig. 35).
- The built-in rechargeable batteries contain substances that may pollute the environment.
Remove the batteries when you discard the appliance. Do not throw away the batteries with
the normal household waste, but hand them in at an ofcial collection point. You can also take
the appliance to a Philips service centre. The staff of this centre will remove the batteries for you
and will dispose of them in an environmentally safe way (Fig. 36).
Removing the rechargeable batteries
NiMHbatteriesmayexplodewhenexposedtohightemperaturesorre.
Only remove the rechargeable batteries if they are completely empty.
You can remove the rechargeable batteries in the following way.
1 Let the handheld vacuum cleaner run until it stops.
2 Remove the panel with the exhaust air openings from the handheld vacuum cleaner with a
screwdriver (Fig. 37).
3 Removethepanelonthehandlewithyourngernail.(Fig.38)
4 Undo the screws on the side of the handheld vacuum cleaner. (Fig. 39)
5 Press the dust compartment release button and separate the two housing parts.
6 Cut the wires connected to the rechargeable batteries one by one (Fig. 40).
7 Remove the rechargeable batteries (Fig. 41).
Guarantee and service
If you need service or information or if you have a problem, please visit the Philips website at
www.philips.com or contact the Philips Consumer Care Centre in your country. You nd its
phone number in the worldwide guarantee leaet. If there is no Consumer Care Centre in your
country, go to your local Philips dealer.
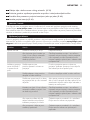
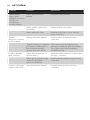
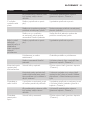
This chapter summarises the most common problems you could encounter with the appliance. If
you are unable to solve the problem with the information below, visit www.philips.com/support
for a list of frequently asked questions or contact the Consumer Care Centre in your country.
ENGLISH 13

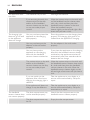
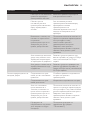
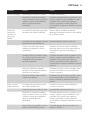
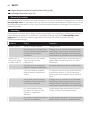
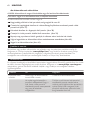
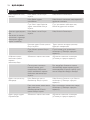
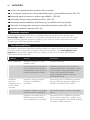
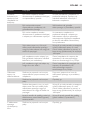
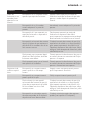
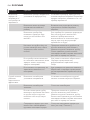
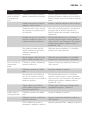
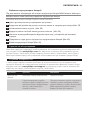
Problem Cause Solution
The appliance does
not work.
The batteries may be low. Recharge the batteries.
If you are using the stick, the
contact strips on the stick
and/or on the handheld
vacuum cleaner may be dirty
or may not make proper
contact.
Wipe the contact strips on the stick and
on the handheld vacuum cleaner clean
with a dry cloth and then place the
handheld vacuum cleaner in the stick.
Move the handheld vacuum
cleaner slightly to the left and right a few
times until you hear a click.
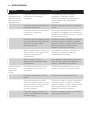
The charging light
does not go on and/
or the appliance
does not charge.
You may not have placed the
appliance on the charging
base properly.
Place the appliance on the charging base
properly. The charging light goes on to
indicate that the appliance is charging.
You may not have put the
adapter in the wall socket
properly.
Put the adapter in the wall socket
properly.
You may have put the
appliance on the charging
base with the handheld
vacuum cleaner switched on.
If you place the appliance on the charging
base with the handheld vacuum cleaner
switched on, the appliance switches off
automatically after two seconds and the
batteries do not charge.
The contact strips on the stick
and/or on the handheld
vacuum cleaner may be dirty
or may not make proper
contact.
Wipe the contact strips on the stick and
the handheld vacuum cleaner clean with a
dry cloth and then place the handheld
vacuum cleaner in the stick. Move the
handheld vacuum cleaner slightly to the
left and right a few times until you hear a
click.
If you can switch on the
appliance after a few hours
charging, the charging light is
defective.
Take the appliance to your dealer or a
service centre authorised by Philips for
repair.
If the appliance still does not
charge, it may be defective.
Take the appliance to your dealer or a
service centre authorised by Philips for
examination or repair
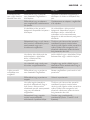
The handheld
vacuum cleaner does
not vacuum properly.
The dust compartment may
not be attached properly.
Attach the dust compartment to the
handheld vacuum cleaner properly.
The dust compartment may
be full.
Empty the dust compartment.
ENGLISH14

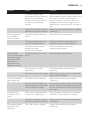
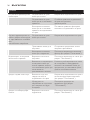
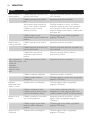
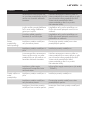
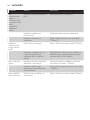
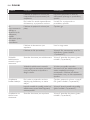
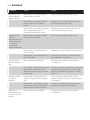
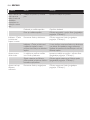
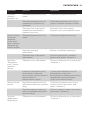
Problem Cause Solution
If you are using the stick,
the contact strips on the stick
and/or on the handheld
vacuum cleaner may be dirty
or may not make proper
contact.
Wipe the contact strips on the stick and
the handheld vacuum cleaner clean with a
dry cloth. Then place the handheld
vacuum cleaner in the stick. Move the
handheld vacuum cleaner slightly to the
left and right a few times until you hear a
click.
The oor nozzle joint may be
blocked by large dirt particles.
Clean the oor nozzle joint (see chapter
‘Cleaning’).
Dust escapes from
the handheld
vacuum cleaner.
The dust compartment may
be full.
Empty the dust compartment.
The dust compartment may
not be attached properly.
Attach the dust compartment to the
handheld vacuum cleaner properly.
The lter unit may not be
placed in the dust
compartment properly.
Place the lter unit in the dust
compartment properly.
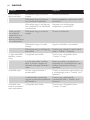
The handheld
vacuum cleaner does
not work properly
when one of the
accessories is
attached to the
detachable nozzle.
The dust compartment may
be full.
Empty the dust compartment.
The accessory may be
obstructed.
Remove the obstruction from the
accessory.
The lter unit may be clogged. Clean the inner lter and the outer lter
(see chapter ‘Cleaning’).
The ‘brush blocked’
light ashes red.
The roller brush is blocked. Clean the roller brush (see chapter
‘Cleaning’).
The ‘brush blocked’ light may
ash red because you use the
stick on deep-pile carpet.
In this case the roller brush is not blocked
and the suction power does not decrease.
You can continue to use the stick to clean
the carpet.
The appliance
produces a lot of
noise.
There may be solid particles
in the dust compartment.
Empty the dust compartment and clean
the lter unit (see chapter ‘Cleaning’).
The oor nozzle joint may be
blocked by large dirt particles.
Clean the oor nozzle joint (see chapter
‘Cleaning’).
The appliance does
not pick up dirt
effectively.
The roller brush is clogged. Clean the roller brush (see chapter
‘Cleaning’).
ENGLISH 15

16
Поздравления за вашата покупка и добре дошли във Philips! За да се възползвате изцяло от
предлаганата от Philips поддръжка, регистрирайте продукта си на адрес www.philips.com/
welcome.
A Пръчка
1 Бутон за вкл./изкл.
2 Бутон MAX за максимална мощност
3 Горна част на пръта
4 Завъртете, за да сглобите горната към долната част на пръта
5 Долна част на пръта
6 Мундщук на накрайника за под
7 Бутон за освобождаване на накрайника за под
8 Светлинен индикатор за запушена четка
9 Накрайник за под
10 Фиксатор
11 Предни колелца
12 Въртяща се четка
13 Процеп за отрязване
14 Задни колелца
B Ръчна прахосмукачка
1 Бутон за вкл./изкл.
2 Бутон за отваряне на отделението за прах
3 Отделение за прах
4 Бутон за освобождаване на накрайника
5 Бутон за освобождаване на ръчната прахосмукачка
6 Отвори за изходящ въздух
7 Филтърен комплект
8 Разглобяем накрайник
9 Външен филтър
10 Вътрешен филтър
11 Филтърна фуния
12 Филтърен вибрационен механизъм
C Аксесоари
1 Зареждаща основа
2 Светлинен индикатор за зареждане
3 Отделение за прибиране
4 Приспособление за прибиране на кабела
5 Адаптер
6 Стойка на зареждащата основа
7 Винт за монтиране на стена
8 Тесен накрайник
9 Четка

Преди да използвате уреда, прочетете внимателно това ръководство за потребителя и го
запазете за справка в бъдеще.
- Никога не всмуквайте вода или друга течност. Не всмуквайте запалими вещества и не
всмуквайте пепел, преди да е изстинала.
- Никога не потапяйте уреда, зареждащата основа или адаптера във вода или друга течност
и не ги мийте с течаща вода.
- Преди да свържете уреда, проверете дали напрежението, посочено върху адаптера,
отговаря на това на местната електрическа мрежа.
- Не използвайте прахосмукачката, зареждащата основа или адаптера, ако са повредени.
- Ако адаптерът или зареждащата основа се повредят, винаги осигурявайте замяната им с
такива от оригиналния тип, за да избегнете опасност.
- В адаптера има трансформатор. Не отрязвайте адаптера, за да го замените с друг щепсел,
тъй като това крие опасности.
- Този уред може да се използва от деца на възраст 8 години и повече и от хора с
намалени физически възприятия или умствени недостатъци, или без опит и познания, ако
са били инструктирани за безопасна употреба на уреда или са под наблюдение с цел
гарантиране на безопасна употреба и ако са им били разяснени евентуалните опасности.
- Не позволявайте на деца да си играят с уреда.
- На децата е разрешено само да изпразват отделението за прах, да почистват филтърния
комплект и да почистват уреда, под наблюдение.
- Изваждайте адаптера от мрежовия контакт, преди да почиствате зареждащата основа.
- Зареждайте прахосмукачката само с влизащите в доставения комплект адаптер и
зареждаща основа. По време на зареждането адаптерът е топъл на пипане. Това е
нормално.
- Винаги изключвайте прахосмукачката след употреба.
- Напрежението на контактните пластини в зареждащата основа е ниско и затова не е
опасно.
- Никога не закривайте отворите за изходящ въздух при работа на прахосмукачката.
- Изключвайте уреда, когато го зареждате.
- Използвайте прахосмукачката винаги със сглобен филтърен блок.
- Ниво на шум: Lc = 84 dB(A)
Този уред Philips е в съответствие с всички стандарти по отношение на електромагнитните
излъчвания (EMF). Ако се употребява правилно и съобразно инструкциите в това ръководство
за потребителя, уредът е безопасен за използване според наличните досега научни факти.
1 Свалетеотуредавсякаквилепенки,защитнофолиоилипластмаси.
2 Сглобетестойкатакъмзаднатачастназареждащатаоснова(дощракване)(фиг.2).
Забележка: Трябва да направите това само веднъж. Никога не разглобявайте стойката от
зареждащата основа.
Забележка: Не е необходимо да сглобявате задната опора, ако не се нуждаете от
допълнителната стабилност, която осигурява.
17

Съвет: За по-голяма стабилност можете да монтирате зареждащата основа към стената.
За целта завийте предоставения винт в стената, през отвора в задната опора.
3 Поставетегорнатавърхудолнатачастнапръта(дощракване)(фиг.3).
Забележка: Трябва да направите това само веднъж. Никога не разглобявайте горната и
долната част на пръта.
4 Завийтевинтасотверткаилимонета.
5 Сглобетепрътакъмнакрайниказапод(дощракване)(фиг.4).
Пълното зареждане на батериите отнема около 7 часа.
1 Включетеадаптераназареждащатаосновавконтакта.
2 Сглобетеръчнатапрахосмукачкакъмпръта(дощракване)(фиг.5).
Забележка: Уверете се, че ръчната прахосмукачка е изключена, преди да я сглобите към пръта.
3 Поставетеуредавърхузареждащатаоснова(фиг.6).
, Индикаторътзазарежданесветва,задапокаже,чеуредътсезарежда.(фиг.7)
Забележка: Индикаторът за зареждане не дава никакви показания за нивото на зареждане на
батериите.
, Когатобатериитесанапълнозаредени,процесътназарежданеспираииндикаторътза
зарежданеизгасвазаикономиянаенергия.
Забележка: Може да оставите уреда върху зареждащата основа, дори когато батериите са
напълно заредени. На всеки 5 минути индикаторът за зареждане светва за 3 секунди. Това
показва, че зареждащата основа проверява дали батериите са все още напълно заредени.
Забележка: Ако поставите уреда върху зареждащата основа, докато е включен, той се
изключва автоматично след 2 секунди и батериите не се зареждат.
Ако по-продължително време няма да използвате уреда, извадете адаптера от контакта, за
да пестите енергия.
Мощността на тази безжична прахосмукачка с прът не може да се сравнява с мощността на
стандартните прахосмукачки с нормален размер. При почистване на меки подови настилки тя
може и да не дава същите резултати като стандартните прахосмукачки, но на твърди подове
се справя точно толкова добре, колкото и те.
18

Можете да използвате пръта, когато почиствате подове или килими.
Когатоизползватепръта,винагипроверявайтедалиотделениетозапрахезакрепенокъм
ръчнатапрахосмукачка,задапредотвратитеповреданапрахосмукачката.
1 Сглобетеръчнатапрахосмукачкаправилнокъмпръта(дощракване).(фиг.5)
2 Натиснетебутоназавключване/изключваневърхупръта,задавключитеуреда(фиг.8).
, Уредътзапочвадаработиснормалнаскорост.Използвайтетазискоростзаоптимално
временаработаиминималеншум.Времетонаработапритазискоростенад20
минути.
- Натиснете бутона MAX, ако искате да използвате уреда на максимална
скорост. Използвайте тази скорост за оптимален резултат от почистването. Времето на
работа при тази скорост е 11 минути (фиг. 9).
- Ако искате да се върнете към нормалната скорост, натиснете отново бутона MAX.
Забележка: Ако по време на работа индикаторът за запушена четка започне да мига в
червено, това показва, че въртящата се четка е запушена. В такъв случай трябва да
отстраните това, което е запушило четката, или да почистите четката (вж. раздел
“Почистване”).
3 Акоискатедаоставитеуредадапочинезаизвестновремеилиакоискатедасвалите
ръчнатапрахосмукачкаотпрътаповременаработа,можедаизползватеположението
заприбиране.Натиснетепрътакъмнакрайниказапод,вположениеза
прибиране(фиг.10).
4 Следизползване,натиснетебутонавкл./изкл.,задаизключитеуреда.
Може да използвате ръчната прахосмукачка без пръта за почистване на малки и
труднодостъпни места като маси, мебели, седалки на автомобили и др.
Когато ръчната прахосмукачка е напълно заредена, времето й на работа е 12 минути.
1 Акоръчнатапрахосмукачкаесглобенакъмпръта,натиснетебутоназавключване/
изключваневърхупръта,задаизключитепрахосмукачката,предидаясвалитеотпръта.
Забележка: Ако свалите ръчната прахосмукачка от пръта, докато е включена на нормална
скорост, тя ще започне да работи с намалена мощност. За да сте сигурни, че ръчната
прахосмукачка работи на пълна мощност, изключете я и я включете отново.
2 Натиснетебутоназаосвобождаваненаръчнатапрахосмукачка(1)иясвалетеотпръта
(2)(фиг.11).
3 Натиснетебутоназавкл./изкл.,задавключитеръчнатапрахосмукачка(фиг.12).
4 Следизползване,натиснетеотновобутонавкл./изкл.,задаизключитеръчната
прахосмукачка.
Забележка: Уверете се, че сте изключили ръчната прахосмукачка, преди да я сглобите отново
към пръта.
Забележка: Ако сглобите ръчната прахосмукачка към пръта, докато е включена, въртящата
се четка няма да работи и няма да постигнете оптимален резултат от почистването. За да
заработи въртящата се четка, натиснете бутона за вкл./изкл. върху пръта, за да изключите
уреда, и след това натиснете отново бутона за вкл./изкл., за да го включите отново.
19

Ръчната прахосмукачка се предлага със следните аксесоари:
- тесен накрайник, за почистване на тесни места.
- накрайник с четка, за почистване на деликатни повърхности.
1 Вземетенеобходимиянакрайникототделениетозасъхранениеназареждащата
основа.
2 Прикрепетеаксесоаракъмразглобяемиянакрайник(фиг.13).
Винагиизваждайтеадаптераотмрежовияконтакт,предидапочистватезареждащатаоснова.
1 Почиствайтевъншнитеповърхностинаръчнатапрахосмукачка,прътаизареждащата
основасвлажнакърпа.
2 Акоискатедаизпразнитеидапочиститеотделениетозапрахилидапочистите
филтърниякомплект,следвайтеуказаниятавраздели“Изпразванеипочистванена
отделениетозапрах”и“Почистваненафилтърниякомплект”по-долу.
Погрижете се редовно да изпразвате и почиствате отделението за прах на ръчната
прахосмукачка.
Забележка: Когато отваряте ръчната прахосмукачка, не е необходимо да я държите над
кофата за смет.
Можете бързо да изпразните отделението за прах по следния начин:
1 Натиснетебутоназаосвобождаваненанакрайника(1)исвалетеразглобяемия
накрайникотръчнатапрахосмукачка(2)(фиг.14).
2 Изтръскайтесъдържаниетонаотделениетозапрахвкофатазасмет(фиг.15).
3 Закачетепърводолнатачастнаразглобяемиянакрайник,следкоетонатиснетегорната
мучасткъмпрахосмукачката,докатогофиксиратенамясто(дощракване).(фиг.16)
Можете да изпразните и да почистите основно отделението за прах по следния начин:
1 Дръжтеръчнатапрахосмукачканадкофазасмет,натиснетебутоназаосвобождаване
наотделениетозапрах(1)иоткачетеотделениетозапрах(2)(фиг.17).
2 Извадетефилтърниякомплектототделениетозапрах(фиг.18).
3 Изтръскайтеотделениетозапрахсъссвободнатасиръка,задагоизпразнитевкофата
засмет(фиг.19).
4 Принеобходимостпочиствайтеотделениетозапрахсвлажнакърпа.
5 Принеобходимостпочиствайтефилтърниякомплект.Вж.раздел“Почистванена
филтърниякомплект”по-долу.
6 Сложетефилтърниякомплектнамястотомувотделениетозапрах.
7 Задапоставитеобратноотделениетозапрах,изравнетежлебамусиздаденатачастна
ръчнатапрахосмукачка.Закачетепърводънотонаотделениетозапрах(1)иследтова
натиснетегорнатамучасткъмръчнатапрахосмукачка(2),докатогофиксиратена
място(дощракване).(фиг.20)
20
Pagina se încarcă...
Pagina se încarcă...
Pagina se încarcă...
Pagina se încarcă...
Pagina se încarcă...
Pagina se încarcă...
Pagina se încarcă...
Pagina se încarcă...
Pagina se încarcă...
Pagina se încarcă...
Pagina se încarcă...
Pagina se încarcă...
Pagina se încarcă...
Pagina se încarcă...
Pagina se încarcă...
Pagina se încarcă...
Pagina se încarcă...
Pagina se încarcă...
Pagina se încarcă...
Pagina se încarcă...
Pagina se încarcă...
Pagina se încarcă...
Pagina se încarcă...
Pagina se încarcă...
Pagina se încarcă...
Pagina se încarcă...
Pagina se încarcă...
Pagina se încarcă...
Pagina se încarcă...
Pagina se încarcă...
Pagina se încarcă...
Pagina se încarcă...
Pagina se încarcă...
Pagina se încarcă...
Pagina se încarcă...
Pagina se încarcă...
Pagina se încarcă...
Pagina se încarcă...
Pagina se încarcă...
Pagina se încarcă...
Pagina se încarcă...
Pagina se încarcă...
Pagina se încarcă...
Pagina se încarcă...
Pagina se încarcă...
Pagina se încarcă...
Pagina se încarcă...
Pagina se încarcă...
Pagina se încarcă...
Pagina se încarcă...
Pagina se încarcă...
Pagina se încarcă...
Pagina se încarcă...
Pagina se încarcă...
Pagina se încarcă...
Pagina se încarcă...
Pagina se încarcă...
Pagina se încarcă...
Pagina se încarcă...
Pagina se încarcă...
Pagina se încarcă...
Pagina se încarcă...
Pagina se încarcă...
Pagina se încarcă...
Pagina se încarcă...
Pagina se încarcă...
Pagina se încarcă...
Pagina se încarcă...
Pagina se încarcă...
Pagina se încarcă...
Pagina se încarcă...
Pagina se încarcă...
Pagina se încarcă...
Pagina se încarcă...
Pagina se încarcă...
Pagina se încarcă...
Pagina se încarcă...
Pagina se încarcă...
Pagina se încarcă...
Pagina se încarcă...
Pagina se încarcă...
Pagina se încarcă...
Pagina se încarcă...
Pagina se încarcă...
Pagina se încarcă...
Pagina se încarcă...
Pagina se încarcă...
Pagina se încarcă...
Pagina se încarcă...
Pagina se încarcă...
Pagina se încarcă...
Pagina se încarcă...
Pagina se încarcă...
Pagina se încarcă...
Pagina se încarcă...
Pagina se încarcă...
Pagina se încarcă...
Pagina se încarcă...
Pagina se încarcă...
Pagina se încarcă...
Pagina se încarcă...
Pagina se încarcă...
Pagina se încarcă...
Pagina se încarcă...
Pagina se încarcă...
Pagina se încarcă...
Pagina se încarcă...
Pagina se încarcă...
Pagina se încarcă...
Pagina se încarcă...
Pagina se încarcă...
Pagina se încarcă...
Pagina se încarcă...
Pagina se încarcă...
Pagina se încarcă...
Pagina se încarcă...
Pagina se încarcă...
Pagina se încarcă...
Pagina se încarcă...
Pagina se încarcă...
Pagina se încarcă...
Pagina se încarcă...
Pagina se încarcă...
Pagina se încarcă...
Pagina se încarcă...
Pagina se încarcă...
Pagina se încarcă...
Pagina se încarcă...
Pagina se încarcă...
Pagina se încarcă...
Pagina se încarcă...
Pagina se încarcă...
Pagina se încarcă...
Pagina se încarcă...
Pagina se încarcă...
Pagina se încarcă...
Pagina se încarcă...
Pagina se încarcă...
Pagina se încarcă...
Pagina se încarcă...
Pagina se încarcă...
Pagina se încarcă...
Pagina se încarcă...
Pagina se încarcă...
Pagina se încarcă...
Pagina se încarcă...
Pagina se încarcă...
Pagina se încarcă...
Pagina se încarcă...
Pagina se încarcă...
Pagina se încarcă...
Pagina se încarcă...
Pagina se încarcă...
Pagina se încarcă...
Pagina se încarcă...
Pagina se încarcă...
Pagina se încarcă...
Pagina se încarcă...
Pagina se încarcă...
Pagina se încarcă...
Pagina se încarcă...
Pagina se încarcă...
Pagina se încarcă...
Pagina se încarcă...
Pagina se încarcă...
Pagina se încarcă...
Pagina se încarcă...
Pagina se încarcă...
-
 1
1
-
 2
2
-
 3
3
-
 4
4
-
 5
5
-
 6
6
-
 7
7
-
 8
8
-
 9
9
-
 10
10
-
 11
11
-
 12
12
-
 13
13
-
 14
14
-
 15
15
-
 16
16
-
 17
17
-
 18
18
-
 19
19
-
 20
20
-
 21
21
-
 22
22
-
 23
23
-
 24
24
-
 25
25
-
 26
26
-
 27
27
-
 28
28
-
 29
29
-
 30
30
-
 31
31
-
 32
32
-
 33
33
-
 34
34
-
 35
35
-
 36
36
-
 37
37
-
 38
38
-
 39
39
-
 40
40
-
 41
41
-
 42
42
-
 43
43
-
 44
44
-
 45
45
-
 46
46
-
 47
47
-
 48
48
-
 49
49
-
 50
50
-
 51
51
-
 52
52
-
 53
53
-
 54
54
-
 55
55
-
 56
56
-
 57
57
-
 58
58
-
 59
59
-
 60
60
-
 61
61
-
 62
62
-
 63
63
-
 64
64
-
 65
65
-
 66
66
-
 67
67
-
 68
68
-
 69
69
-
 70
70
-
 71
71
-
 72
72
-
 73
73
-
 74
74
-
 75
75
-
 76
76
-
 77
77
-
 78
78
-
 79
79
-
 80
80
-
 81
81
-
 82
82
-
 83
83
-
 84
84
-
 85
85
-
 86
86
-
 87
87
-
 88
88
-
 89
89
-
 90
90
-
 91
91
-
 92
92
-
 93
93
-
 94
94
-
 95
95
-
 96
96
-
 97
97
-
 98
98
-
 99
99
-
 100
100
-
 101
101
-
 102
102
-
 103
103
-
 104
104
-
 105
105
-
 106
106
-
 107
107
-
 108
108
-
 109
109
-
 110
110
-
 111
111
-
 112
112
-
 113
113
-
 114
114
-
 115
115
-
 116
116
-
 117
117
-
 118
118
-
 119
119
-
 120
120
-
 121
121
-
 122
122
-
 123
123
-
 124
124
-
 125
125
-
 126
126
-
 127
127
-
 128
128
-
 129
129
-
 130
130
-
 131
131
-
 132
132
-
 133
133
-
 134
134
-
 135
135
-
 136
136
-
 137
137
-
 138
138
-
 139
139
-
 140
140
-
 141
141
-
 142
142
-
 143
143
-
 144
144
-
 145
145
-
 146
146
-
 147
147
-
 148
148
-
 149
149
-
 150
150
-
 151
151
-
 152
152
-
 153
153
-
 154
154
-
 155
155
-
 156
156
-
 157
157
-
 158
158
-
 159
159
-
 160
160
-
 161
161
-
 162
162
-
 163
163
-
 164
164
-
 165
165
-
 166
166
-
 167
167
-
 168
168
-
 169
169
-
 170
170
-
 171
171
-
 172
172
-
 173
173
-
 174
174
-
 175
175
-
 176
176
-
 177
177
-
 178
178
-
 179
179
-
 180
180
-
 181
181
-
 182
182
-
 183
183
-
 184
184
-
 185
185
-
 186
186
-
 187
187
-
 188
188


Philips FC6161/01 Manual de utilizare
- Categorie
- Aspiratoare
- Tip
- Manual de utilizare
în alte limbi
- slovenčina: Philips FC6161/01 Používateľská príručka
- eesti: Philips FC6161/01 Kasutusjuhend
Lucrări înrudite
-
Philips FC6149/01 Manual de utilizare
-
Philips FC6148/01 Manual de utilizare
-
Philips FC6092/01 Manual de utilizare
-
Philips FC6132/02 Manual de utilizare
-
Philips FC6132 Manual de utilizare
-
Philips FC6150/01R1 Informații importante
-
Philips FC6091 Manual de utilizare
-
Philips FC6126/03 Manual de utilizare
-
-
Alte documente
-
Siemens VBH14400/01 Manual de utilizare
-
-
Bosch BBHMOVE6N Manualul proprietarului
-
Zelmer ZSVC259V Manual de utilizare
-
-
ECG VT 5220 Manual de utilizare
-
Silvercrest SAS 7.2 A2 Operating Instructions Manual
-
Silvercrest SAS 7.2 A1 Operating Instructions Manual
-
Concept VP4201 Manual de utilizare