
FC6126

2

3
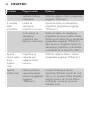
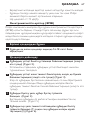
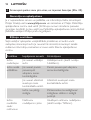
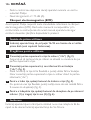
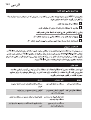
A
C
D
F
G
H
I
J
K
V
W
U
X
L
T
S
R
MK
N
P
Q
O
B
E
1

4

6
16
27
36
46
55
65
75
85
94
104
114
125
135
144
153
170
178

6
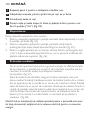
Congratulations on your purchase and welcome to Philips! To fully benet
from the support that Philips offers, register your product at www.philips.
com/welcome.
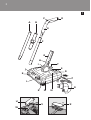
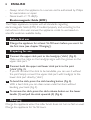
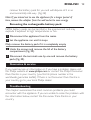
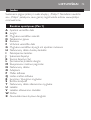
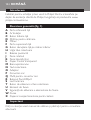
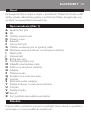
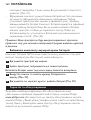
Lower stick part
Joint
Stick bending button
Hanging slot
Handgrip
Upper stick part
Stick release button on lower handle
Dirt tray door slide
Pivoting hinge
Roller brush
Side brush (2x)
Transparent front cover
Sweeper base
Dirt tray
Adapter
Small plug
Socket for small plug
On/off button
Charging light
Dirt tray release button
Retainer
Retainer release slide
Belt
Lid of battery pack compartment
Read this user manual carefully before you use the appliance and save it
for future reference.

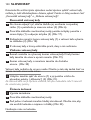
- Never immerse the appliance in water or any other liquid, nor rinse it
under the tap.
- Check if the voltage indicated on the appliance corresponds to the
local mains voltage before you connect the appliance.
- Do not use the appliance if the adapter, the mains cord or the
appliance itself is damaged.
- If the adapter is damaged, always have it replaced with one of the
original type in order to avoid a hazard.
- The adapter contains a transformer. Do not cut off the adapter to
replace it with another plug, as this causes a hazardous situation.
- This appliance is not intended for use by persons (including children)
with reduced physical, sensory or mental capabilities, or lack of
experience and knowledge, unless they have been given supervision
or instruction concerning use of the appliance by a person
responsible for their safety.
- Children should be supervised to ensure that they do not play with
the appliance.
- Never pick up water, liquids or wet food substances. Never pick up
ammable substances and do not pick up ashes until they are cold.
- Do not stick your hands/ngers into the rotating roller brush to avoid
injuries.
- Do not move the appliance over a mains cord as this may cause a
hazard.
- Never use the appliance outdoors. Never use the appliance on wet
surfaces.
- Do not use the appliance without the dirt tray or roller brush.
- Always switch off the appliance after use, before you charge it and
before you connect or disconnect parts.
- Unplug the appliance before you clean or maintain it.
- Only charge the appliance with the adapter supplied.
- The adapter feels warm during charging. This is normal.
7

- Always return the appliance to a service centre authorised by Philips
for examination or repair.
- Noise level: Lc= 75 dB(A).
This Philips appliance complies with all standards regarding
electromagnetic elds (EMF). If handled properly and according to the
instructions in this user manual, the appliance is safe to use based on
scientic evidence available today.
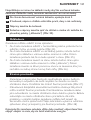
1 Charge the appliance for at least 16-18 hours before you use it for
the rst time (see chapter ‘Charging’).
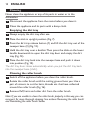
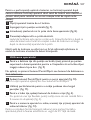
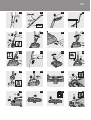
1 Connect the upper stick part to the handgrip (‘click’) (Fig. 2).
- Make sure the ridge on the handgrip aligns with the groove on the
upper stick part.
2 Connect both the upper and lower stick parts to the joint
(‘click’) (Fig. 3).
- If you do not want the stick to be bendable, you can use it without
the joint. Simply connect the upper stick part with handgrip to the
lower stick part directly (‘click’)
3 To bend the stick, press the stick bending button (Fig. 4).
- With a bent stick, you can clean areas under furniture without
bending your back (Fig. 5).
4 To remove the stick, press the stick release button on the lower
handle (1) and pull the stick upwards (2) (Fig. 6).
Charge the appliance when the roller brush does not turn as fast as usual.
Charge the appliance for 16-18 hours.
8

For optimal battery performance, do not charge the appliance after
every use. Only charge the appliance when the battery pack is low (i.e.
when the roller brush does not turn as fast as usual).
1 Switch off the appliance before you charge it.
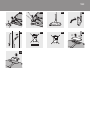
2 Place the stick in upright position (Fig. 7).
3 Insert the small plug into the socket on the sweeper base (Fig. 8).
4 Insert the adapter into a wall socket.
- The charging light is on continuously during charging and after the
battery pack is fully charged. The charging light goes out when you
disconnect the appliance from the mains
Note: The charging light does not give any information about the charge level
of the battery pack.
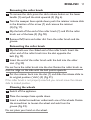
1 To unlock the stick from its upright position, put your foot on top
of the sweeper base to prevent it from tilting. Then pull the handle
towards you. (Fig. 9)
Do not put your foot on the on/off button or the dirt tray release
button.
2 Press the on/off button to switch on the appliance (Fig. 10).
To switch off the appliance, press the on/off button again.
3 Use the side brushes to clean the oor along the walls (Fig. 11).
4 To bend the stick, press the stick bending button (Fig. 4).
- With a bent stick, you can clean areas under furniture without
bending your back (Fig. 5).
5 To use the sweeper as a handheld appliance, remove the stick and
hold the sweeper by the lower handle (Fig. 12).
For better grip, push the handle towards the front of the appliance until it
is at a 45-degree angle to the base.
9

Never clean the appliance or any of its parts in water or in the
dishwasher.
1 Disconnect the appliance from the mains before you clean it.
2 Clean the appliance and its parts with a damp cloth.
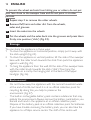
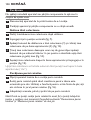
1 Always empty the dirt tray after use.
2 Place the stick in upright position (Fig. 7).
3 Press the dirt tray release button (1) and lift the dirt tray out of the
sweeper base (2) (Fig. 13).
4 Hold the dirt tray over a dustbin. Then press the slide on the lower
handle downwards to open the dirt tray door and empty the dirt
tray (Fig. 14).
5 Place the dirt tray back into the sweeper base and push it down
into position (Fig. 15).
The dirt tray door closes automatically when you put the dirt tray back
into the sweeper base (‘click’).
1 Switch off the appliance before you clean the roller brush.
2 Rotate the roller brush until the cutting groove faces you. Use a
pair of scissors to cut the hairs, threads etc. that have collected
around the roller brush (Fig. 16).
3 Remove uff, hairs and other dirt from the roller brush.
Note: If you are unable to clean the roller brush properly in this way, you can
remove it for more thorough cleaning. See sections ‘Removing the roller brush’
and ‘Reinserting the roller brush’ below.
10

1 To remove the stick, press the stick release button on the lower
handle (1) and pull the stick upwards (2) (Fig. 6).
2 Turn the sweeper base upside down, push the retainer release slide
in the direction of the arrow (1) and remove the retainer
(2) (Fig. 17).
3 Slip the belt off the end of the roller brush (1) and lift the roller
brush out of the base (2) (Fig. 18).
4 Remove uff, hairs and other dirt from the roller brush and the
groove.
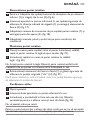
1 Slip the belt over the ribbed end of the roller brush. Insert the
other end of the roller brush into the slot opposite the
belt (Fig. 19).
2 Insert the end of the roller brush with the belt into the other
slot. (Fig. 20)
Do not force the roller brush into the slot. Rotate the roller brush so
that the ridge on the side with the belt points upwards.
3 Put the retainer back into the slot (1) and slide the release slide to
its original position (‘click’) (2) (Fig. 21).
If the roller brush is not properly inserted, you cannot move the release
slide to locked position.
1 Switch off the appliance.
2 Place the sweeper base upside down.
3 Insert a slotted screwdriver underneath one of the wheels. Rotate
the screwdriver to loosen the wheel and axle from the
groove (Fig. 22).
Do not place your hand on the wheel.
11

To prevent the wheel and axle from hitting you or others, do not put
your face close to the sweeper base and do not point it at other
persons.
4 Repeat step 3 to remove the other wheels.
5 Remove uff, hairs and other dirt from the wheels,
axles and grooves.
6 Insert the axles into the wheels.
7 Put the wheels and the axles back into the grooves and press them
rmly into position (‘click’) (Fig. 23).
You can store the appliance in three ways:
1 To store the appliance in horizontal position, simply put it away with
the stick upright (Fig. 24).
2 To store the appliance in vertical position, tilt the side of the sweeper
base with the roller brush towards the stick. Then park the appliance
against a wall (Fig. 25).
3 To hang the appliance from the wall, tilt the side of the sweeper base
with the roller brush towards the stick (‘click’). Then hang the
appliance on a nail by the hanging slot in the back of the upper
handgrip (Fig. 26).
- Do not throw away the appliance with the normal household waste
at the end of its life, but hand it in at an ofcial collection point for
recycling. By doing this, you help to preserve the
environment (Fig. 27).
- The built-in rechargeable battery pack contains substances that may
pollute the environment. Always remove the battery pack before you
discard and hand in the appliance at an ofcial collection point.
Dispose of the battery pack at an ofcial collection point for batteries.
If you have trouble removing the battery pack, you can also take the
appliance to a Philips service centre. The staff of this centre will
12

remove the battery pack for you and will dispose of it in an
environmentally safe way. (Fig. 28)
Note: If you intend not to use the appliance for a longer period of
time, remove the adapter from the wall socket to save energy.
NiMH battery packs can be harmful to the environment and may
explode if exposed to high temperatures or re.
1 Disconnnect the appliance from the mains.
2 Let the appliance run until it stops.
Only remove the battery pack if it is completely empty.
3 Undo the screws and remove the lid of the battery
compartment (Fig. 29).
4 Disconnect the terminals one by one and remove the battery
pack (Fig. 30).
If you need service or information or if you have a problem, please visit
the Philips website at www.philips.com or contact the Philips Consumer
Care Centre in your country (you nd its phone number in the
worldwide guarantee leaet). If there is no Consumer Care Centre in
your country, go to your local Philips dealer.
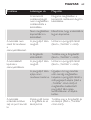
This chapter summarises the most common problems you could
encounter with the appliance. If you are unable to solve the problem with
the information below, contact the Consumer Care Centre in your
country.
13

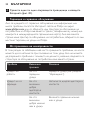
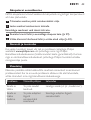
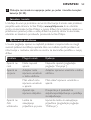
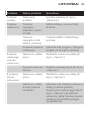
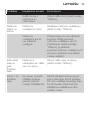
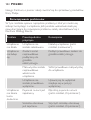
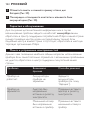
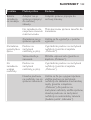
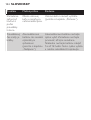
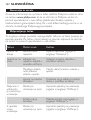
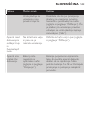
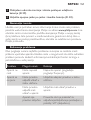
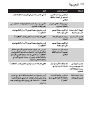
Problem Possible cause Solution
The appliance
does not
work.
You have not
charged the
appliance.
Charge the appliance (see
chapter ‘Charging’).
The appliance
does not
charge.
You have not
inserted the
adapter properly
into the wall
socket.
Insert the adapter properly into
the wall socket.
You have not
inserted the small
plug properly into
the appliance.
Insert the small plug properly
into the appliance.
The appliance is
not switched off
properly.
Make sure the on/off switch is in
off position.
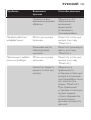
The appliance
does not pick
up dirt
effectively.
The dirt tray is full. Empty the dirt tray (see chapter
‘Cleaning’).
The roller brush is
clogged.
Clean the roller brush (see
chapter ‘Cleaning’).
Dirt escapes
from the
appliance.
The dirt tray is full. Empty the dirt tray (see chapter
‘Cleaning’).
The dirt tray door
is not closed
properly.
Make sure you place the dirt tray
properly in the sweeper base
after you have emptied it (see
chapter ‘Cleaning’). If you insert
the dirt tray properly, the dirt
tray door closes automatically
(‘click’).
14

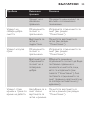
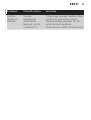
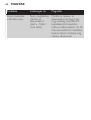
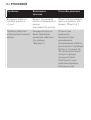
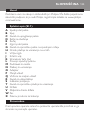
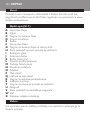
Problem Possible cause Solution
The appliance
becomes
noisy and
rattles during
operation.
Dirt has
accumulated
around the roller
brush and the belt.
Clean the roller brush and the
belt (see chapter ‘Cleaning’).
The appliance
has a short
operating
time.
You have not
charged the
battery pack in
the optimal way
(see chapter
‘Charging’).
Discharge the battery pack
completely. Let the appliance run
until it stops. Then recharge the
battery pack for 16-18 hours.
Repeat this discharge-charge
cycle a few times.
15

16
Поздравления за вашата покупка и добре дошли във Philips! За да се
възползвате изцяло от предлаганата от Philips поддръжка,
регистрирайте продукта си на www.philips.com/welcome.
Долна част на пръта
Става
Бутон за прегъване на пръта
Ухо за закачване
Ръкохватка
Горна част на пръта
Бутон за освобождаване на пръта на долната дръжка
Плъзгаща се вратичка на отделението за смет
Въртящ се шарнир
Въртяща се четка
Странична четка (2 бр.)
Прозрачен преден капак
Основа
Отделение за смет
Адаптер
Малък жак
Гнездо за малък жак
Бутон on/off (вкл./изкл.)
Индикатор за зареждане
Бутон за освобождаване на отделението за смет
Фиксатор
Плъзгач за освобождаване на фиксатора
Ремък
Капак на отделението за батерията
Преди да използвате уреда, прочетете внимателно това
ръководство за експлоатация и го запазете за справка в бъдеще.

- Не потапяйте задвижващия блок във вода или друга течност и не
го мийте с течаща вода.
- Преди да свържете уреда към мрежата, проверете дали
посоченото върху уреда напрежение отговаря на напрежението
на местната електрическа мрежа.
- Не използвайте уреда, ако адаптерът, мрежовият кабелът или
самият уред са повредени.
- С оглед на предотвратяване на злополука, винаги заменяйте
повредения адаптер само с оригинален такъв.
- В адаптера има трансформатор. Не отрязвайте адаптера, за да го
замените с друг щепсел, тъй като това носи опасност.
- Този уред не е предназначен за ползване от хора (включително
деца) с намалени физически усещания или умствени недостатъци
или без опит и познания, ако са оставени без наблюдение и не са
инструктирани от страна на отговарящо за тяхната безопасност
лице относно начина на използване на уреда.
- Наглеждайте децата, за да не си играят с уреда.
- Никога не обирайте вода, течности или храни с водно
съдържание. Не обирайте запалими вещества и неизстинала
пепел.
- За предотвратяване на наранявания не бъркайте с ръка или
пръсти във въртящата се четка.
- Не придвижвайте уреда над захранващи кабели с мрежово
напрежение, тъй като това представлява опасност.
- Не използвайте уреда на открито. Не използвайте уреда върху
мокри повърхности.
- Не ползвайте уреда без отделението за смет или въртящата се
четка.
- Винаги изключвайте уреда след употреба, преди зареждането му,
както и преди да сглобявате или разглобявате детайлите му.
- Винаги изключвайте уреда от контакта, преди да пристъпите към
почистване или разглобяване.
17

- Зареждайте уреда само с приложения към него адаптер.
- Адаптерът е топъл по време на зареждане. Това е нормално.
- За проверка или ремонт носете уреда в упълномощен от Philips
сервиз.
- Ниво на шума: Lc= 75 dB(A).
Този уред Philips е в съответствие с всички стандарти по отношение
на електромагнитните излъчвания (EMF). Ако се употребява
правилно и съобразно напътствията в Ръководството, уредът е
безопасен за използване според наличните досега научни факти.
1 Оставете уреда да се зарежда в продължение на поне 16-18
часа, преди да го използвате за пръв път (вж. раздел
“Зареждане”).
1 Свържете горната част на пръта към дръжката
(щракване) (фиг. 2).
- Внимавайте ръбът на дръжката да съвпадне с канала на горната
част на пръта.
2 Свържете и горната, и долната част на пръта към ставата
(щракване) (фиг. 3).
- Ако не искате прътът да бъде прегъваем, можете да го
използвате без ставата. Просто свържете горната част на пръта
с ръкохватка направо към долната част на пръта (с щракване).
3 За да прегънете пръта, натиснете бутона за прегъване на
пръта (фиг. 4).
- С прегънат прът можете да почиствате под мебелите, без да
превивате гръб (фиг. 5).
4 За да откачите пръта, натиснете бутона за освобождаване на
пръта на долната ръкохватка (1) и издърпайте пръта нагоре
(2) (фиг. 6).
18

Зареждайте уреда, когато въртящата се четка не се върти с
обичайната бързина. Зареждайте уреда на всеки 16-18 часа.
За оптимална ефективност на батерията не зареждайте уреда след
всяка употреба. Зареждайте го само когато комплектът батерии е
изтощен (например когато въртящата се четка не се върти с
обичайната бързина).
1 Изключвайте уреда, преди да го заредите.
2 Поставете пръта в изправено положение (фиг. 7).
3 Включете малкия щекер в гнездото на основата (фиг. 8).
4 Включете адаптера в контакта.
- По време на зареждането и при напълно зареден комплект
батерии индикаторът за зареждане свети непрекъснато.
Индикаторът изгасва, когато изключите уреда от електрическата
мрежа.
Забележка: Индикаторът за зареждане не дава никакви показания за
нивото на зареждане на комплекта батерии.
1 За да освободите пръта от положението му за прибиране,
натиснете с крак горната част на основата, за да не се накланя.
След това издърпайте ръкохватката към себе си. (фиг. 9)
Внимавайте да не натиснете с крак бутона за вкл./изкл. или бутона
за освобождаване на отделението за смет.
2 Натиснете бутона вкл./изкл., за да включите уреда (фиг. 10).
За да изключите уреда, натиснете повторно бутона за вкл./изкл.
3 Използвайте страничните четки за почистване на пода покрай
стените. (фиг. 11).
4 За да прегънете пръта, натиснете бутона за прегъване на
пръта (фиг. 4).
19

- С прегънат прът можете да почиствате под мебелите, без да
превивате гръб (фиг. 5).
5 За да ползвате електрическата метла от ръка, демонтирайте
дръжката и дръжте уреда за долната ръкохватка (фиг. 12).
За по-добър захват натиснете ръкохватката към предната част на
уреда, докато застане под ъгъл от 45 градуса спрямо основата.
Не почиствайте уреда и детайлите му с вода или в съдомиялна
машина.
1 Изключвайте уреда от контакта, преди да пристъпите към
почистването му.
2 Почиствайте уреда и детайлите му с влажна кърпа.
1 Винаги след употреба изпразвайте отделението за смет.
2 Поставете пръта в изправено положение (фиг. 7).
3 Натиснете бутона за освобождаване на отделението за смет
(1) и повдигнете отделението от основата (2) (фиг. 13).
4 Дръжте отделението за смет над кофа за смет. Натиснете
надолу плъзгача на долната ръкохватка, за да отворите
вратичката на отделението за смет и го изпразнете (фиг. 14).
5 Монтирайте отново отделението за смет в основата и го
натиснете надолу на мястото му (фиг. 15).
Вратичката на отделението за смет се затваря автоматично, щом го
поставите в основата (с щракване).
1 Изключвайте уреда, преди да почиствате въртящата се четка.
20
Pagina se încarcă...
Pagina se încarcă...
Pagina se încarcă...
Pagina se încarcă...
Pagina se încarcă...
Pagina se încarcă...
Pagina se încarcă...
Pagina se încarcă...
Pagina se încarcă...
Pagina se încarcă...
Pagina se încarcă...
Pagina se încarcă...
Pagina se încarcă...
Pagina se încarcă...
Pagina se încarcă...
Pagina se încarcă...
Pagina se încarcă...
Pagina se încarcă...
Pagina se încarcă...
Pagina se încarcă...
Pagina se încarcă...
Pagina se încarcă...
Pagina se încarcă...
Pagina se încarcă...
Pagina se încarcă...
Pagina se încarcă...
Pagina se încarcă...
Pagina se încarcă...
Pagina se încarcă...
Pagina se încarcă...
Pagina se încarcă...
Pagina se încarcă...
Pagina se încarcă...
Pagina se încarcă...
Pagina se încarcă...
Pagina se încarcă...
Pagina se încarcă...
Pagina se încarcă...
Pagina se încarcă...
Pagina se încarcă...
Pagina se încarcă...
Pagina se încarcă...
Pagina se încarcă...
Pagina se încarcă...
Pagina se încarcă...
Pagina se încarcă...
Pagina se încarcă...
Pagina se încarcă...
Pagina se încarcă...
Pagina se încarcă...
Pagina se încarcă...
Pagina se încarcă...
Pagina se încarcă...
Pagina se încarcă...
Pagina se încarcă...
Pagina se încarcă...
Pagina se încarcă...
Pagina se încarcă...
Pagina se încarcă...
Pagina se încarcă...
Pagina se încarcă...
Pagina se încarcă...
Pagina se încarcă...
Pagina se încarcă...
Pagina se încarcă...
Pagina se încarcă...
Pagina se încarcă...
Pagina se încarcă...
Pagina se încarcă...
Pagina se încarcă...
Pagina se încarcă...
Pagina se încarcă...
Pagina se încarcă...
Pagina se încarcă...
Pagina se încarcă...
Pagina se încarcă...
Pagina se încarcă...
Pagina se încarcă...
Pagina se încarcă...
Pagina se încarcă...
Pagina se încarcă...
Pagina se încarcă...
Pagina se încarcă...
Pagina se încarcă...
Pagina se încarcă...
Pagina se încarcă...
Pagina se încarcă...
Pagina se încarcă...
Pagina se încarcă...
Pagina se încarcă...
Pagina se încarcă...
Pagina se încarcă...
Pagina se încarcă...
Pagina se încarcă...
Pagina se încarcă...
Pagina se încarcă...
Pagina se încarcă...
Pagina se încarcă...
Pagina se încarcă...
Pagina se încarcă...
Pagina se încarcă...
Pagina se încarcă...
Pagina se încarcă...
Pagina se încarcă...
Pagina se încarcă...
Pagina se încarcă...
Pagina se încarcă...
Pagina se încarcă...
Pagina se încarcă...
Pagina se încarcă...
Pagina se încarcă...
Pagina se încarcă...
Pagina se încarcă...
Pagina se încarcă...
Pagina se încarcă...
Pagina se încarcă...
Pagina se încarcă...
Pagina se încarcă...
Pagina se încarcă...
Pagina se încarcă...
Pagina se încarcă...
Pagina se încarcă...
Pagina se încarcă...
Pagina se încarcă...
Pagina se încarcă...
Pagina se încarcă...
Pagina se încarcă...
Pagina se încarcă...
Pagina se încarcă...
Pagina se încarcă...
Pagina se încarcă...
Pagina se încarcă...
Pagina se încarcă...
Pagina se încarcă...
Pagina se încarcă...
Pagina se încarcă...
Pagina se încarcă...
Pagina se încarcă...
Pagina se încarcă...
Pagina se încarcă...
Pagina se încarcă...
Pagina se încarcă...
Pagina se încarcă...
Pagina se încarcă...
Pagina se încarcă...
Pagina se încarcă...
Pagina se încarcă...
Pagina se încarcă...
Pagina se încarcă...
Pagina se încarcă...
Pagina se încarcă...
Pagina se încarcă...
Pagina se încarcă...
Pagina se încarcă...
Pagina se încarcă...
Pagina se încarcă...
Pagina se încarcă...
Pagina se încarcă...
Pagina se încarcă...
Pagina se încarcă...
Pagina se încarcă...
Pagina se încarcă...
Pagina se încarcă...
Pagina se încarcă...
-
 1
1
-
 2
2
-
 3
3
-
 4
4
-
 5
5
-
 6
6
-
 7
7
-
 8
8
-
 9
9
-
 10
10
-
 11
11
-
 12
12
-
 13
13
-
 14
14
-
 15
15
-
 16
16
-
 17
17
-
 18
18
-
 19
19
-
 20
20
-
 21
21
-
 22
22
-
 23
23
-
 24
24
-
 25
25
-
 26
26
-
 27
27
-
 28
28
-
 29
29
-
 30
30
-
 31
31
-
 32
32
-
 33
33
-
 34
34
-
 35
35
-
 36
36
-
 37
37
-
 38
38
-
 39
39
-
 40
40
-
 41
41
-
 42
42
-
 43
43
-
 44
44
-
 45
45
-
 46
46
-
 47
47
-
 48
48
-
 49
49
-
 50
50
-
 51
51
-
 52
52
-
 53
53
-
 54
54
-
 55
55
-
 56
56
-
 57
57
-
 58
58
-
 59
59
-
 60
60
-
 61
61
-
 62
62
-
 63
63
-
 64
64
-
 65
65
-
 66
66
-
 67
67
-
 68
68
-
 69
69
-
 70
70
-
 71
71
-
 72
72
-
 73
73
-
 74
74
-
 75
75
-
 76
76
-
 77
77
-
 78
78
-
 79
79
-
 80
80
-
 81
81
-
 82
82
-
 83
83
-
 84
84
-
 85
85
-
 86
86
-
 87
87
-
 88
88
-
 89
89
-
 90
90
-
 91
91
-
 92
92
-
 93
93
-
 94
94
-
 95
95
-
 96
96
-
 97
97
-
 98
98
-
 99
99
-
 100
100
-
 101
101
-
 102
102
-
 103
103
-
 104
104
-
 105
105
-
 106
106
-
 107
107
-
 108
108
-
 109
109
-
 110
110
-
 111
111
-
 112
112
-
 113
113
-
 114
114
-
 115
115
-
 116
116
-
 117
117
-
 118
118
-
 119
119
-
 120
120
-
 121
121
-
 122
122
-
 123
123
-
 124
124
-
 125
125
-
 126
126
-
 127
127
-
 128
128
-
 129
129
-
 130
130
-
 131
131
-
 132
132
-
 133
133
-
 134
134
-
 135
135
-
 136
136
-
 137
137
-
 138
138
-
 139
139
-
 140
140
-
 141
141
-
 142
142
-
 143
143
-
 144
144
-
 145
145
-
 146
146
-
 147
147
-
 148
148
-
 149
149
-
 150
150
-
 151
151
-
 152
152
-
 153
153
-
 154
154
-
 155
155
-
 156
156
-
 157
157
-
 158
158
-
 159
159
-
 160
160
-
 161
161
-
 162
162
-
 163
163
-
 164
164
-
 165
165
-
 166
166
-
 167
167
-
 168
168
-
 169
169
-
 170
170
-
 171
171
-
 172
172
-
 173
173
-
 174
174
-
 175
175
-
 176
176
-
 177
177
-
 178
178
-
 179
179
-
 180
180
-
 181
181
-
 182
182
-
 183
183
-
 184
184


Philips FC6126/03 Manual de utilizare
- Tip
- Manual de utilizare
- Acest manual este potrivit și pentru
în alte limbi
- русский: Philips FC6126/03 Руководство пользователя
- slovenčina: Philips FC6126/03 Používateľská príručka
- eesti: Philips FC6126/03 Kasutusjuhend
Lucrări înrudite
-
Philips FC6126/03 Manual de utilizare
-
Philips FC6120/01 Manual de utilizare
-
-
Philips FC6161/94 Manual de utilizare
-
Philips XC8049/01 Informații importante
-
-
Philips FC6132 Manual de utilizare
-
-