Wellis Corsica toilet tank Manual de utilizare
- Tip
- Manual de utilizare

EE00217
CORSICA
Corsica Floor Standind Toilet Tank
For floor standing toilet - INSTRUCTION GUIDE
Corsica bodenständiger spülkasten
für bodenständige Toiletten - BEDIENUNGSANLEITUNG
Réservoir de toilette posée au sol de Corsica
Pour les toilettes posées au sol - MODE D´EMPLOI
Corsica álló wc tartály
álló WC-hez - SZERELÉSI ÚTMUTATÓ
Rezervor WC de pardoseală Corsica
pentru vas WC de pardoseală - INSTRUCȚIUNI DE MONTARE
EN
DE
FR
HU
RO

................................................................................
................................................................................
.........................................................
................................................................................
.........................................................................
.....
1
2
4
5
6
14
Content
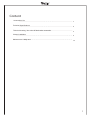
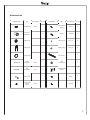
Accessories List
Technical Specifications
Technical drawing, inlet valve & flush valve connection
Cistern installation
Maintenance & daily care

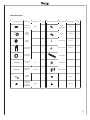
Quantity
Specification
Names
Accessories list Quantity
Names
Item List Specifications
rubber seal
white
air hose
blue air hose
flush pipe
rubber seal on
above pipe
flush pipe
straight flush
pipe
rubber seal
1
1
1
1
1
1
1
1
Ø110
Ø60
white
blue
2
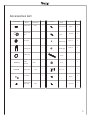
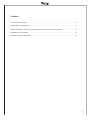
Accessories List
1
drainage pipe
expansion nut
washer(small)
2
2
screw 2
ST4.8*45
Ø8*40
Ø11*1.2
square plate
M8 bolt
M8 nut
washer big 2
2
1
1
Ø6*30
ST4.2*34
2
2
Ø16*1.5

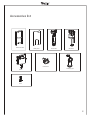
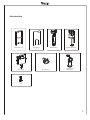
3
Aluminum frame Gass panel evlav telnIevlav hsulF
Push button
lever
Accessories list
Drainage pipe
Cistern

4
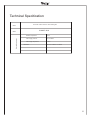
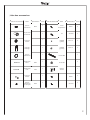
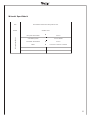
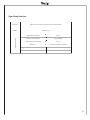
Technical Specitication
Name
Model
Ambient temperature
water supply pressure
water supply temperature
Dimension
Technical Specitication
3~40°C
4~35°C
1003.5mm X 483mm X 108mm
0.07~0.75MPa
CJ805F+J518
Pneumatic cabinet cistern for floor-standing WC

5
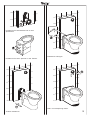
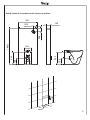
Technical drawing, inlet valve & flush valve
connection
483
1003.5
98.5
98.8
108
180
355
160
1 3 0±30
05±002
52
Ø90
180
355

1
6
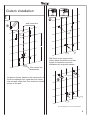
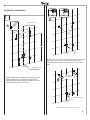
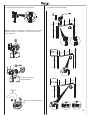
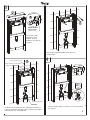
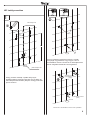
Cistern installation
211
422
946
48
243
Ø8Ø
6
Ø8
Ø
6
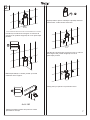
expansion nut small
expansion nut big
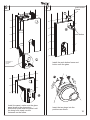
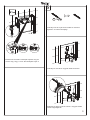
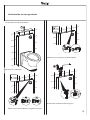
Insert the expansion nuts into the drilled holes.
wall center line
floor center line
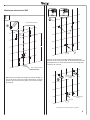
24
As picture shows, based on the center point of
the floor drainage hole, draw the floor center
line and wall center line.Then mark four install
points on the wall.
Drill holes on the mark points.
Holes' depth should be more than
length of expansion nuts and
diameters are as picture shown.

7
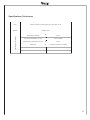
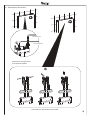
H
1
A=H1-180
1 2 34
Insert the drainage pipe into the hole on the floormake sure it is totally
inserted
Measure the lenghth H1 between floor and drainage pipe center
points.
Cut the extra A length of the pipe as above
shows.
Apply glass glue on the drainage pipe bottom outside ring
as shows.
Insert back the drainage pipe into the hole on the floor
make sure it is
totally inserted
Fix the plate on the wall by small screws.
2
5
6

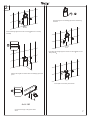
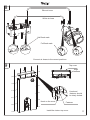
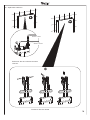
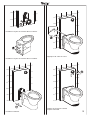
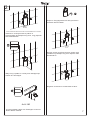
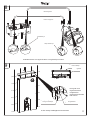
Open the cistern top
cover, pull and
separate the hose
from the hook.
hook on the
back plate
4
23mm
8
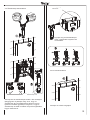
Bottom frame
3
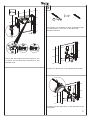
Fix the screws(big)into the
expansion nuts tightenly.
Center line on the top frame
Wall center line
Snap the hose into the hook, then connect the
hose into the valve.
Cistern frame tightly lean to the
wall, make sure that the cistern
frame center line and wall center
line should be coincide/align.

Open the stop valve on the hose
to see whether it works and water
runs into cistern tank
9
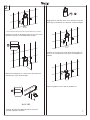
Screw the nut and washer onto the botls until they are around in
the middle of bolt.
Screw the bolts onto the square plate.
Fix the drainage pipe onto the wall by using square plate.
5

6 7
10
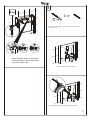
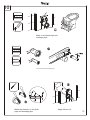
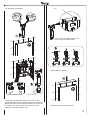
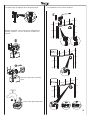
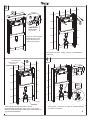
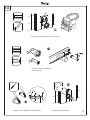
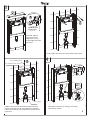
hang hook on
the panel
(4pcs)
push button
push button
frame
Install the push button frame and
button onto the glass
Insert the two plugs into the
positions as shown.
Install the panel, make sure the glass
panel close to the alumunium
frame,then push down the panel until
the hung hook totaly into the
fasteners on the frame.

8
9
11
Connect air hoses to the correct positions
Blue air hose
White air hose
Half flush mark
Full flush mark
Install the cistern top cover.
Hook on the cover Fastener
Top cover
Align
Hook and
fastener should
be totaly locked.

10
12
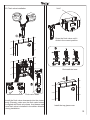
123 4
1234
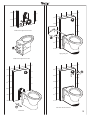
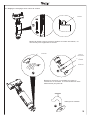
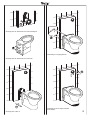
Cut the flush pipe and drainage pipe.
Mark on the flush pipe and
drainage pipe.
Make the chamfer on the flush
pipe and drainage pipe.
Apply silicone oil

13
Install the flush pipe into the cistern.
Install the flush pipe into the toilet.
Apply glass glue.
Test half & full flush functions.
Install toilet.

14
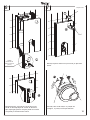
23mm
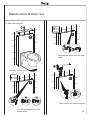
Remove the top cover
Turn off the stop valve on the
flexible hose.
Separate the hose from the stop
valve.
Take out the inlet valve upwards.
Maintenance & daily care
1.1 Inlet valve removal

15
23mm
Adjust the float upwards to increase the inlet
volume; or downwards to reduce the volume.
Remove the water-stopping
part
Wash this removed part
1.2 Inlet valve adjustment & clean 1.3 Inlet valve installation

16
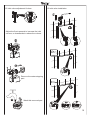
Remove the air hoses from the
air hose holes.
Remove the lever
2.1 Flush valve removal
Blue air hose
White air hose

17
Buckles on the cistern hunging
plate
Open the buckles on the cistern hunging plate and lift the flush valve

18
Washer
Cover
Rubber seal
Cover
Clean the washer
2.2 Flush valve adjustment & clean
Adjust the float upwards to reduce the flush volume;
or downwards to increase the volume.
Remove the cover, washer and rubber seal by
rotating counterclockwisely the cover around 90°

19
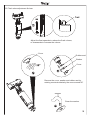
“click”
Flush valve base
Install the flush valve downwards into the cistern
body (Remark make sure the flush valve bottom
is aligned with flush valve base. And please make
sure flush valve is installed in the shown direction
during installation.
Re-install the lever
Install the top glass cover
Press the flush valve until it
clicks in the correct position.
2.3 Flush valve installation
Pagina se încarcă...
Pagina se încarcă...
Pagina se încarcă...
Pagina se încarcă...
Pagina se încarcă...
Pagina se încarcă...
Pagina se încarcă...
Pagina se încarcă...
Pagina se încarcă...
Pagina se încarcă...
Pagina se încarcă...
Pagina se încarcă...
Pagina se încarcă...
Pagina se încarcă...
Pagina se încarcă...
Pagina se încarcă...
Pagina se încarcă...
Pagina se încarcă...
Pagina se încarcă...
Pagina se încarcă...
Pagina se încarcă...
Pagina se încarcă...
Pagina se încarcă...
Pagina se încarcă...
Pagina se încarcă...
Pagina se încarcă...
Pagina se încarcă...
Pagina se încarcă...
Pagina se încarcă...
Pagina se încarcă...
Pagina se încarcă...
Pagina se încarcă...
Pagina se încarcă...
Pagina se încarcă...
Pagina se încarcă...
Pagina se încarcă...
Pagina se încarcă...
Pagina se încarcă...
Pagina se încarcă...
Pagina se încarcă...
Pagina se încarcă...
Pagina se încarcă...
Pagina se încarcă...
Pagina se încarcă...
Pagina se încarcă...
Pagina se încarcă...
Pagina se încarcă...
Pagina se încarcă...
Pagina se încarcă...
Pagina se încarcă...
Pagina se încarcă...
Pagina se încarcă...
Pagina se încarcă...
Pagina se încarcă...
Pagina se încarcă...
Pagina se încarcă...
Pagina se încarcă...
Pagina se încarcă...
Pagina se încarcă...
Pagina se încarcă...
Pagina se încarcă...
Pagina se încarcă...
Pagina se încarcă...
Pagina se încarcă...
Pagina se încarcă...
Pagina se încarcă...
Pagina se încarcă...
Pagina se încarcă...
Pagina se încarcă...
Pagina se încarcă...
Pagina se încarcă...
Pagina se încarcă...
Pagina se încarcă...
Pagina se încarcă...
Pagina se încarcă...
Pagina se încarcă...
Pagina se încarcă...
Pagina se încarcă...
Pagina se încarcă...
Pagina se încarcă...
Pagina se încarcă...
Pagina se încarcă...
Pagina se încarcă...
Pagina se încarcă...
-
 1
1
-
 2
2
-
 3
3
-
 4
4
-
 5
5
-
 6
6
-
 7
7
-
 8
8
-
 9
9
-
 10
10
-
 11
11
-
 12
12
-
 13
13
-
 14
14
-
 15
15
-
 16
16
-
 17
17
-
 18
18
-
 19
19
-
 20
20
-
 21
21
-
 22
22
-
 23
23
-
 24
24
-
 25
25
-
 26
26
-
 27
27
-
 28
28
-
 29
29
-
 30
30
-
 31
31
-
 32
32
-
 33
33
-
 34
34
-
 35
35
-
 36
36
-
 37
37
-
 38
38
-
 39
39
-
 40
40
-
 41
41
-
 42
42
-
 43
43
-
 44
44
-
 45
45
-
 46
46
-
 47
47
-
 48
48
-
 49
49
-
 50
50
-
 51
51
-
 52
52
-
 53
53
-
 54
54
-
 55
55
-
 56
56
-
 57
57
-
 58
58
-
 59
59
-
 60
60
-
 61
61
-
 62
62
-
 63
63
-
 64
64
-
 65
65
-
 66
66
-
 67
67
-
 68
68
-
 69
69
-
 70
70
-
 71
71
-
 72
72
-
 73
73
-
 74
74
-
 75
75
-
 76
76
-
 77
77
-
 78
78
-
 79
79
-
 80
80
-
 81
81
-
 82
82
-
 83
83
-
 84
84
-
 85
85
-
 86
86
-
 87
87
-
 88
88
-
 89
89
-
 90
90
-
 91
91
-
 92
92
-
 93
93
-
 94
94
-
 95
95
-
 96
96
-
 97
97
-
 98
98
-
 99
99
-
 100
100
-
 101
101
-
 102
102
-
 103
103
-
 104
104


Wellis Corsica toilet tank Manual de utilizare
- Tip
- Manual de utilizare
în alte limbi
Lucrări înrudite


Alte documente
-
DAB FEKALIFT 200-A Instruction For Installation And Maintenance
-
LG PM05SP Manual de utilizare
-
Samsung AE140JXYDGH/EU Manualul utilizatorului
-
Sames 06R440 Manual de utilizare
-
Daikin FTXM71M + RXM71M Manualul proprietarului
-
-
Jungborn Three 52 Manual de utilizare
-