
EN
DE
FR
HU
RO
Clement monoblock rimless toilet
INSTRUCTION GUIDE
Clement Monoblock-Randlos-Toiletten
BEDIENUNGSANLEITUNG
Clement toilette monobloc sans rebord
GUIDE D’UTILISATION
Clement monoblokkos rimless WC
HASZNÁLATI ÚTMUTATÓ
Clement WC monobloc rimless
GHID DE INSTRUCȚIUNI WF00110
(WF00106+WF00107)
Clement monoblock

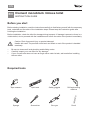
Before you start
Before starting installation, read the instructions carefully to familiarise yourself with the necessary
tools, materials and the order of the installation steps. Please keep this instruction guide after
finishing the installation.
Before installation, check the toilet for damage during transport. If damage is present or there is a
visible defect, do not proceed with the installation and inform the seller of the product immediately.
Caution: Risk of personal injury or product damage!
Handle with care! The porcelain toilet bowl can break or crack if the product is handled
carelessly.
– Be sure to observe all local plumbing and building codes.
– Carefully inspect your new toilet for any damage.
– If your current toilet does not have an angle valve under its tank, add one before installing
the new toilet.
Required tools
Tape measure
Sponge
Spirit level
Screwdriver Glue gun Pencil
Drilling/screwing
machine
Safety goggles
EN
EN Clement monoblock rimless toilet
INSTRUCTION GUIDE

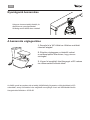
Required parts
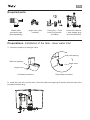
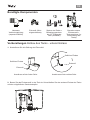
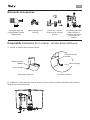
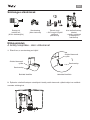
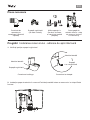
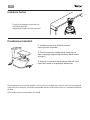
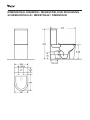
Preparations Installation of the tank - lower water inlet
1. Check the position of the angle valve.
2. Install the inlet valve into the tank. Close the other inlet opening of the tank with the help of the
provided threaded plug.
Left-hand connection Right-hand connection
Lower inlet valve kit
+ tank stopper plug
(included with tank)
Waste water
connection pipe
(Sold separately)
Angle valve (Not
included)
Cover plug + Toilet
bowl fixing screws
(Included)
Angle valve
Side inlet opening Angle valve
Side inlet opening
EN

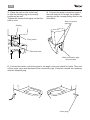
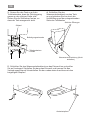
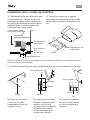
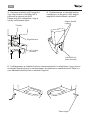
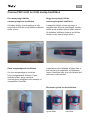
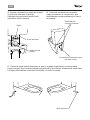
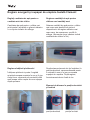
3. Place the tank on the toilet bowl
so that the sealing ring is accurately
positioned as well.
Tighten the screws thoroughly so that the
tank is level.
5. Connect the water connection pipe to the angle valve and check for leaks. Then turn
off the angle valve and disconnect the connection pipe. Close the unused inlet opening
with the supplied plug.
4. Connect the water connection pipe to
the tank and pull it through the suitable
opening on the corresponding side for the
toilet bowl.
Sealing
Fixing screw
Side connection
openings
Water connection pipe
(Not included)
Cover plug
Toilet bowl inlet
EN

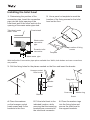
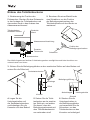
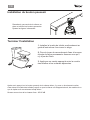
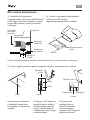
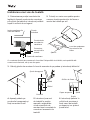
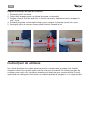
1. Determining the position of the
connection pipe: Insert the connection
pipe into the outlet opening of the
toilet bowl and fit the other end into the
opening of the waste water pipe stub.
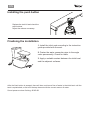
3. Drill the fixing holes for the places marked on the floor and insert the dowels.
2. Use a pencil or template to mark the
location of the fixing screws for the toilet
bowl on the floor.
Installing the toilet bowl
Template
Wall
Location of fixing
screws
Paneled wall
Waste water
connection
pipe
Eccentric toilet
connection
Waste water pipe
Toilet bowl waste
water outlet
Bracket Screw
Washer ringCover cap
Fixing hole
Dowel
Dowel
Washer
Hexagon socket
head screw
4. Place the washers
on the hexagon socket
head screws and fix the
brackets to the floor.
5. Fit the toilet bowl to the
indicated location, while
ensuring that the mounting
brackets are connected to
the toilet bowl connector.
6. Place the washer rings
into the fixing holes and
secure the toilet bowl to
the support brackets.
With the flexible S-connection pipe option available from Wellis, both bottom and rear connections
are possible.
EN

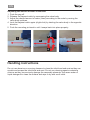
Installing the push button
Finalising the installation
Replace the tank lid and check the
push buttons.
Adjust the rods as necessary.
1. Install the toilet seat according to the instruction
guide provided with the seat.
2. Fasten the water connection pipe to the angle
valve permanently. Check for leaks.
3. Apply a suitable sealant between the toilet bowl
and the adjacent surfaces.
After the flush button is pressed, there will be a continuous flow of water in the toilet bowl until the
tank is replenished, so as to fill the trap element with the correct amount of water.
Sound pressure when flushing: 85-95 dB
EN

Setting up the Clement toilet flush and filling valve
Setting the amount of water for a low
volume flush
The amount of water for a low volume
flush can be adjusted with the blue slider
according to the scale located on its left
side.
Adjusting the float height
The float height can be adjusted by
moving the float housing up and down.
This allows you to set the amount of
water used up before the valve starts to
refill.
After setting the locking element to the
open position, the blue housing can be
moved up and down on the filling valve
housing. After adjustment, the locking
element must be snapped back into the
closed position.
Locking element in the open and
closed positions
open position closed position
Setting the amount of water for a high
volume flush
The amount of water for a high volume
flush can be adjusted with the larger blue
adjustment device, again according to the
scale on the left side. (The numbers on
the scales indicate the amount of flush
water in litres.)
EN

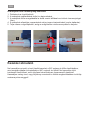
Adjusting the amount of water in the tank:
1. Push the peg off.
2. Release the bayonet catch by unscrewing the valve body.
3. Adjust the desired amount of water (litres) according to the scale by moving the
valve body up/down.
4. Lock the bayonet catch again (slight click) by twisting the valve body in the opposite
direction.
5. Push the mounting pin back in until it snaps back into place properly.
1.
3.
2.
4.
5.
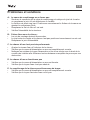
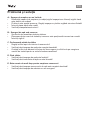
Handling instructions
Do not use abrasive or scouring cleaners to clean the toilet bowl and seat as they can
scratch and scrape the toilet bowl and seat. Do not use cleaning agents containing
chlorine as they can seriously damage the assembly elements. Use warm water or
liquid detergent to clean the surface and wipe it dry with a soft cloth.
EN

Problems and solutions
A: The filling valve will not close.
• Open the filling valve cap and clean the valve seal or replace the seal if it is
defective or cracked.
• The float is positioned too high. Position the valve float correctly by adjusting the
threaded mechanism.
• Replace the filter net if it is worn.
• Check the tightness of the structure.
B: Water leaks under the tank:
• The assembly screws must be tightened.
• The sealing between the toilet bowl and the tank is not positioned correctly or is
worn out. Replace the sealing.
C. Poor flush performance
• Adjust the water level inside the tank.
• Check that the water supply valve is fully open.
• Clean the inlets to the drain pipe and the holes at the rim of the toilet bowl to
remove any material that may cause clogging.
D. No flushing
• Check that the water supply valve is closed.
• Check that the water pipe is not blocked.
E. Filling the tank takes a long time.
• Check that the water tank valve is fully open.
• Check that the inlet valve pipe is not leaking.
EN

Bevor Sie beginnen
Bevor Sie mit der Installation beginnen, lesen Sie die Anleitung sorgfältig durch, um sich mit den
erforderlichen Werkzeugen, Materialien und der Installationsreihenfolge vertraut zu machen. Bitte
bewahren Sie diese Anleitung nach der Installation auf!
Überprüfen Sie die Toilette vor dem Einbau auf eventuelle Schäden durch den Transport! Im Falle
einer Beschädigung oder eines sichtbaren Defekts dürfen Sie nicht mit der Installation fortfahren
und müssen sich sofort an den Verkäufer des Produkts wenden!
ACHTUNG: Gefahr von Personen- oder Produktschäden!
Mit Vorsicht behandeln! Toilettenbecken aus Porzellan können zerbrechen oder reißen,
wenn das Produkt unvorsichtig behandelt wird.
– Beachten Sie alle örtlichen Sanitär- und Bauvorschriften!
– Prüfen Sie Ihre neue Toilette sorgfältig auf eventuelle Schäden!
– Wenn die vorhandene Toilette kein Eckventil unter dem Tank hat, installieren Sie ein solches,
bevor Sie die neue Toilette einbauen!
Benötigte Werkzeuge
Messband
Schwamm
Wassermesser
Schraubenzieher Klebepistole Bleistift
Bohr-/
Schraubmaschine
Schutzbrille
DE
DE Clement Monoblock-Randlos-Toiletten
BEDIENUNGSANLEITUNG

Benötigte Komponenten
Vorbereitungen Einbau des Tanks - unterer Einlass
1. Kontrollieren Sie die Stellung des Eckventils!
2. Bauen Sie das Einlassventil in den Tank ein! Verschließen Sie den anderen Einlass des Tanks
mit dem mitgelieferten Gewindestopfen.
Anschluss auf der linken Seite Anschluss auf der rechten Seite
Bausatz unteres
Einlassventil +
Tankverschluss (im
Lieferumfang des
Tanks)
Abwasser
Verbindungsleitung
(separat erhältlich)
Eckventil (Nicht
eingeschlossen)
Stecker der Decke +
Befestigungsschrau-
ben für Toilettenbe-
cken (enthalten)
Eckventil
Seitlicher Einlass Eckventil
Seitlicher Einlass
DE

3. Setzen Sie den Tank so auf den
Toilettenbecken, dass der Dichtungsring
genau an der richtigen Stelle sitzt!
Ziehen Sie die Schrauben fest an, so
dass der Tank waagerecht steht.
5. Schließen Sie den Wasserzulaufschlauch an das Eckventil an und prüfen
Sie auf Leckagen! Schließen Sie dann das Eckventil und trennen Sie den
Verbindungsschlauch! Verschließen Sie den unbenutzten Anschluss mit dem
beigefügten Stopfen!
4. Schließen Sie den
Wasserzulaufschlauch an den Tank
an und schieben Sie ihn durch die
Umfüllöffnung auf der entsprechenden
Seite des Toilettenbeckens!
Stöpsel
Befestigungsschraube
Seitliche Öffnungen
Wasseranschlussleitung (Nicht
enthalten)
Abdeckstopfen
Toilettenbecken
Einlass
DE

1. Bestimmung der Position des
Einlassrohrs: Stecken Sie das Einlassrohr
in den Auslass der Toilettenbecken und
das andere Ende in den Auslass des
Abwasseranschlusses!
3. Bohren Sie die Befestigungslöcher an den markierten Stellen auf dem Boden und
setzen Sie die Dübel ein!
2. Benutzen Sie einen Bleistift oder
eine Schablone, um die Position
der Befestigungsschrauben des
Toilettenbeckens auf dem Boden zu
markieren!
Einbau des Toilettenbeckens
Schablone
Wand
Position der
Befestigungsschrauben
Bedeckte
Wand
Abwasseranschlussleitung
Exzenter-
Toilettensitz
Abwasserrohre
Toilettenbecken
Abwasser Auslass
Konsole Schraube
Unterlegscheibe
Abdeckkappe
Befestigungsöffnung
Dübel
Dübel
Unterlage
Sechskantschraube
4. Legen Sie die
Unterlegscheiben auf
die Sechskantschrauben
und befestigen Sie die
Konsolen auf dem Boden!
5. Setzen Sie die Toilet-
tenbecken an der markier-
ten Stelle ein und achten
Sie darauf, dass die
Befestigungselemente mit
dem Toilettenbeckenstut-
zen verbunden sind!
6. Stecken Sie die
Unterlegscheiben in
die Befestigungslöcher
und verwenden Sie die
Schrauben, um das
Toilettenbecken an den
Konsolen zu befestigen!
Das Wellis-Angebot an flexiblen S-Verbindungsrohren ermöglicht sowohl den Anschluss von
unten als auch von hinten.
DE

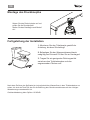
Montage des Druckknopfes
Fertigstellung der Installation
Setzen Sie den Deckel wieder auf und
prüfen Sie die Druckknöpfe!
Stellen Sie das Gestänge nach Bedarf
ein!
1. Montieren Sie den Toilettensitz gemäß der
Anleitung, die dem Sitz beiliegt!
2. Befestigen Sie den Wassereinlassschlauch
endgültig am Eckventil! Prüfen Sie auf Leckagen!
3. Tragen Sie ein geeignetes Dichtungsmittel
zwischen dem Toilettenbecken und den
angrenzenden Flächen auf!
Nach dem Drücken der Spültaste ist ein kontinuierlicher Wasserfluss in dem Toilettenbecken zu
sehen, bis sich der Tank füllt, der für die Befüllung des Geruchsverschlusses mit der richtigen
Wassermenge verantwortlich ist.
Geräuschbelastung beim Spülen: 85-95 dB
DE

Einstellung des Spül- und Füllventils der Celement-Toilette
Einstellung der Wassermenge für eine
Kurzspülung.
Die Wassermenge für eine Kurzspülung
kann mit dem blauen Schieberegler auf
der Skala auf der linken Seite eingestellt
werden.
Einstellen der Höhe des Schwimmers
Die Höhe des Schwimmers kann
durch Auf- und Abbewegen des
Schwimmergehäuses eingestellt werden.
Damit wird gesteuert, bei welcher
Wassermenge das Ventil mit dem
Nachfüllen beginnt.
Nach dem Einstellen der Verriegelung
in die offene Position kann das blaue
Gehäuse auf dem Füllventilgehäuse
auf und ab bewegt werden. Nach der
Einstellung muss die Verriegelung wieder
in die geschlossene Position eingerastet
werden.
Schließelement in geöffneter und
geschlossener Position
geöffnete Position geschlossene
Position
Einstellen der Wassermenge für eine
Vollspülung.
Die Wassmenge für eine Vollspülung
kann auch mit dem blauen Scheberegel
auf der Skala auf der linken Seiten
eingestellt werden. (Die Zahlen auf der
Skala geben die Spülmenge in Litern an).
DE

Einstellung der Wassermenge im Tank:
1. Rasten Sie den Befestigungsklammer ab.
2. Schrauben Sie das Ventilgehäuse ab, um den Bajonettverschluss zu lösen.
3. Bewegen Sie den Ventilkörper nach oben/unten, um die gewünschte Wassermenge
(Liter) gemäß der Skala einzustellen.
4. Drehen Sie das Ventilgehäuse in die entgegengesetzte Richtung, um den
Bajonettverschluss zu schließen (leichtes Klicken).
5. Drücken Sie die Befestigungsklammer wieder hinein, bis sie richtig einrastet.
1.
3.
2.
4.
5.
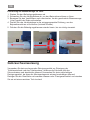
Gebrauchsanweisung
Verwenden Sie keine scheuernden Reinigungsmittel zur Reinigung der
Toilettenschüssel und des Toilettensitzes, da diese die Schüssel und den
Sitz zerkratzen und abschleifen können! Verwenden Sie keine chlorhaltigen
Reinigungsmittel, da diese die Montageelemente schwer beschädigen können!
Reinigen Sie die Oberfläche mit warmem Wasser oder Flüssigwaschmittel und wischen
Sie sie mit einem weichen Tuch trocken!
DE

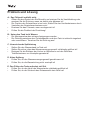
Problem und Lösung
A: Das Füllventil schließt nicht.
• Öffnen Sie den Deckel des Einfüllventils und reinigen Sie die Ventildichtung oder
ersetzen Sie die Dichtung, wenn sie defekt oder gerissen ist!
• Die Position des Schwimmers ist zu hoch. Stellen Sie den Ventilschwimmer durch
Verstellen des Gewindemechanismus ein!
• Ersetzen Sie das Filternetz, wenn es abgenutzt ist!
• Prüfen Sie die Dichtheit der Einrichtung!
B: Unter dem Tank leckt Wasser:
• Die Montageschrauben müssen festgezogen werden.
• Die Dichtung zwischen dem Toilettenbecken und dem Tank ist schlecht eingebaut
oder verschlissen. Tauschen Sie die Dichtung aus!
C. Unzureichende Spülleistung
• Stellen Sie den Wasserstand im Tank ein!
• Stellen Sie sicher, dass das Wasserversorgungsventil vollständig geöffnet ist!
• Reinigen Sie die Einlässe der Löcher im Abflussrohr und den Rand des
Toilettenbeckens von Verstopfungsmaterial!
D. Keine Spülung
• Prüfen Sie, ob das Wasserversorgungsventil geschlossen ist!
• Prüfen Sie, ob die Wasserleitung nicht verstopft ist!
E. Das Füllen des Tanks erfordert viel Zeit.
• Prüfen Sie, ob das Ventil des Wassertanks vollständig geöffnet ist!
• Prüfen Sie, ob der Schlauch des Einlassventils kein Leck hat!
DE

Avant de commencer
Avant de commencer l'installation, lisez attentivement les instructions pour vous familiariser avec
les outils et les matériaux nécessaires ainsi qu'avec l'ordre des étapes de l'installation. Veuillez
conserver ce guide d'instructions après avoir terminé l'installation.
Avant l'installation, vérifiez que les toilettes n'ont pas été endommagées pendant le transport. En
cas de dommage ou de défaut visible, ne procédez pas à l'installation et informez immédiatement
le vendeur du produit.
Attention : Risque de blessures corporelles ou d'endommagement du produit !
À manipuler avec précaution ! La cuvette des toilettes en porcelaine peut se casser ou
se fissurer si le produit est manipulé sans ménagement.
– Veillez à respecter tous les codes locaux de plomberie et de construction.
– Inspectez soigneusement vos nouvelles toilettes pour détecter tout dommage éventuel.
– Si vos toilettes actuelles ne sont pas équipées d'un robinet d'arrêt sous la citerne, ajoutez-en
un avant d'installer les nouvelles toilettes.
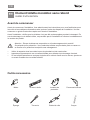
Outils nécessaires
Mètre
Éponge
Niveau à bulle
Tournevis Pistolet à colle Crayon
Perceuse/visseuseLunettes de
protection
FR
FR Clement toilette monobloc sans rebord
GUIDE D’UTILISATION

Eléments nécessaires
Préparatifs Installation de la citerne - arrivée d'eau inférieure
1. Vérifier la position de la vanne d'angle.
2. Installez la vanne d'arrivée dans la citerne. Fermez l'autre ouverture d'entrée de la citerne à
l'aide du bouchon fileté fourni.
Connexion à gauche Connexion à droite
Kit robinet d'arrivée
d'eau inférieur +
couvercle de citerne
(inclus avec la
citerne)
Eau usée tuyau de
raccordement (vendu
séparément)
Vanne d'angle (non
incluse)
Cache-vis + Vis de
fixation de la cuvette
(Inclus)
Vanne d'angle
Orifice d'arrivée
latérale Vanne d'angle
Orifice d'arrivée
latérale
FR

3. Placez la citerne sur la cuvette
des toilettes de manière à ce que le
joint d'étanchéité soit également bien
positionné.
Serrez bien les vis pour que la citerne
soit à niveau.
5. Branchez le tuyau de raccordement d'eau sur la vanne d'angle et assurez-vous
qu'il n'y a pas de fuites. Ensuite, fermez la vanne d'angle et débranchez le tuyau de
raccordement. Fermez l'ouverture d'entrée inutilisée avec le bouchon fourni.
4. Branchez le tuyau de raccordement
d'eau à la citerne et faites-le passer
par l'ouverture appropriée du côté
correspondant à la cuvette des toilettes.
Étanchéité
Vis de fixation
Ouvertures de
connexion latérales
Tuyau de raccordement d'eau
(Non inclus)
Cache
Arrivée d'eau de
la cuvette des
toilettes
FR
Pagina se încarcă...
Pagina se încarcă...
Pagina se încarcă...
Pagina se încarcă...
Pagina se încarcă...
Pagina se încarcă...
Pagina se încarcă...
Pagina se încarcă...
Pagina se încarcă...
Pagina se încarcă...
Pagina se încarcă...
Pagina se încarcă...
Pagina se încarcă...
Pagina se încarcă...
Pagina se încarcă...
Pagina se încarcă...
Pagina se încarcă...
Pagina se încarcă...
Pagina se încarcă...
Pagina se încarcă...
Pagina se încarcă...
Pagina se încarcă...
Pagina se încarcă...
Pagina se încarcă...
-
 1
1
-
 2
2
-
 3
3
-
 4
4
-
 5
5
-
 6
6
-
 7
7
-
 8
8
-
 9
9
-
 10
10
-
 11
11
-
 12
12
-
 13
13
-
 14
14
-
 15
15
-
 16
16
-
 17
17
-
 18
18
-
 19
19
-
 20
20
-
 21
21
-
 22
22
-
 23
23
-
 24
24
-
 25
25
-
 26
26
-
 27
27
-
 28
28
-
 29
29
-
 30
30
-
 31
31
-
 32
32
-
 33
33
-
 34
34
-
 35
35
-
 36
36
-
 37
37
-
 38
38
-
 39
39
-
 40
40
-
 41
41
-
 42
42
-
 43
43
-
 44
44


în alte limbi
- français: Wellis WF00110 Mode d'emploi
- English: Wellis WF00110 User guide
- Deutsch: Wellis WF00110 Benutzerhandbuch
- español: Wellis WF00110 Guía del usuario


