
CLARICE
EE00274
EE00275
Push button for Clarice wall behind the toilet
INSTALLATION MANUAL
Nyomógomb Clarice fal mögötti WC tartályhoz
SZERELÉSI ÚTMUTATÓ
Drucktaste für Clarice-Wand hinter der Toilette
INSTALLATIONSANLEITUNG
Bouton poussoir pour le mur Clarice derrière les toilettes
MANUEL D’INSTALLATION
Buton pentru rezervor încastrat Clarice
INSTRUCȚIUNI DE MONTARE
EN
HU
DE
FR
RO

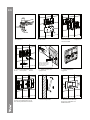
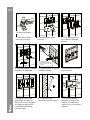
Leave no space between
the shaft shoulder and
the back surface of the
control plate base
OPEN
1、Open the stop valve
to let water in
2、Take the cistern's plate out
from the cistern
3、Fix the control plate base
fasten the screw ,torque force
less than 25 N.m
4、Screw in the adjustment levers
of the control plate button
9、Check the water ush by
pressing the half-ush and
full-ush buttons
8、Fix the control plate as
shown in the picture
7、 Make sure every xing part is
in place and adjustment levers of
the control plate button work well
6、Install the block as
suggested
5、Adjust the levers to a
right position
1
2
1
2
EN
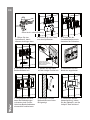
Erre nyílik
1. Nyissa meg a
zárószelepet a víz
beengedéséhez
4. Csavarja be a
vezérlőpanel beállítókarjait
7. Győződjön meg róla,
hogy minden rögzítőelem
a helyén van, és hogy a
vezérlőpanel gombjainak
beállítókarjai jól működnek
8. A képen láthatóak
szerint rögzítse a
vezérlőpanelt
9. Ellenőrizze a vízöblítést
a fél öblítés és a teljes
öblítés gombjainak
megnyomásával
5. Állítsa be a karokat a
megfelelő pozícióba
6. Az útmutatás szerint
szerelje fel a blokkot
Ne hagyjon helyet
a tengely válla és a
vezérlőpanel hátsó
felülete között
2. Vegye le a tartálylemezt
víztárolóról
3. Rögzítse a vezérlőpanel
lapját szorítsa meg a
csavart.
HU

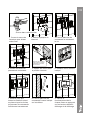
Leave no space between
the shaft shoulder and
the back surface of the
control plate base
OPEN
1、Open the stop valve
to let water in
2、Take the cistern's plate out
from the cistern
3、Fix the control plate base
fasten the screw ,torque force
less than 25 N.m
4、Screw in the adjustment levers
of the control plate button
9、Check the water ush by
pressing the half-ush and
full-ush buttons
8、Fix the control plate as
shown in the picture
7、 Make sure every xing part is
in place and adjustment levers of
the control plate button work well
6、Install the block as
suggested
5、Adjust the levers to a
right position
1
2
1
2
Öffnet sich in diese Richtung
1. Öffnen Sie das
Schließventil, damit
Wasser eindringen kann
4. Schrauben Sie die
Bedienfeldhebel ein
7. Vergewissern Sie sich,
dass alle Befestigungen
vorhanden sind und die
Hebel der Bedienfeldtasten
einwandfrei funktionieren.
8. Befestigen Sie das
Bedienfeld wie auf dem
Bild gezeigt.
9. Überprüfen Sie die
Wasserspülung, indem
Sie die Halbspül- und die
Vollspül-Taste drücken!
5. Stellen Sie die Hebel
auf die richtige Position ein
6. Installieren Sie den
Block wie angewiesen
Lassen Sie keinen
Abstand zwischen der
Welle und der Rückseite
des Bedienfelds.
2. Entfernen Sie die Platte
aus dem Spülkasten.
3. Sichern Sie die
Schalttafelplatine durch
Anziehen der Schraube.
DE

Leave no space between
the shaft shoulder and
the back surface of the
control plate base
OPEN
1、Open the stop valve
to let water in
2、Take the cistern's plate out
from the cistern
3、Fix the control plate base
fasten the screw ,torque force
less than 25 N.m
4、Screw in the adjustment levers
of the control plate button
9、Check the water ush by
pressing the half-ush and
full-ush buttons
8、Fix the control plate as
shown in the picture
7、 Make sure every xing part is
in place and adjustment levers of
the control plate button work well
6、Install the block as
suggested
5、Adjust the levers to a
right position
1
2
1
2
FR
S'ouvre dans cette direction
1. Ouvrez la vanne de
fermeture pour laisser
entrer l'eau
4. Vissez les leviers du
panneau de commande
7. Assurez-vous que
toutes les fixations soient
en place et que les leviers
du panneau de commande
fonctionnent correctement
8. Fixez le panneau de
commande comme indiqué
sur le schéma
9. Vérifiez le
fonctionnement de la
chasse d'eau en appuyant
sur les boutons de demi-
décharge et de décharge
5. Ajustez les leviers dans
la position correcte
6. Installez le bloc comme
indiqué
Ne laissez pas d'espace
entre la tige et la surface
postérieure du panneau
de commande
2. Retirez la plaque du
réservoir
3. Fixez le panneau de
commande en resserrant
la vis.
FR FR

Leave no space between
the shaft shoulder and
the back surface of the
control plate base
OPEN
1、Open the stop valve
to let water in
2、Take the cistern's plate out
from the cistern
3、Fix the control plate base
fasten the screw ,torque force
less than 25 N.m
4、Screw in the adjustment levers
of the control plate button
9、Check the water ush by
pressing the half-ush and
full-ush buttons
8、Fix the control plate as
shown in the picture
7、 Make sure every xing part is
in place and adjustment levers of
the control plate button work well
6、Install the block as
suggested
5、Adjust the levers to a
right position
1
2
1
2
RO
Direcție deschidere
1. Deschideți ventilul
pentru a porni apa
4. Înșurubați brațele de reglare
a panoului de comandă
7. Asigurați-vă că toate
elementele de fixare se
află la locul lor și că brațele
de reglare a panoului de
comandă funcționează
corespunzător
8. Fixați panoul de
comandă conform imaginii
9. Verificați spălarea
apăsând pe butonul de
spălare cu jumătate de
rezervor și cu un rezervor
complet
5. Reglați brațele în poziția
corespunzătoare
6. Montați blocul conform
instrucțiunilor
Nu lăsați spațiu între
muchia axului și suprafața
posterioară a panoului de
comandă
2. Scoateți placa de pe
rezervor
3. Fixați placa panoului
de comandă, strângeți
șurubul.


-
 1
1
-
 2
2
-
 3
3
-
 4
4
-
 5
5
-
 6
6
-
 7
7
-
 8
8


Wellis Clarice push button Manual de utilizare
- Tip
- Manual de utilizare
- Acest manual este potrivit și pentru
în alte limbi
Lucrări înrudite


Alte documente
-
Smithco Sand Star Zee Instrucțiuni de utilizare
-
-
Stiga B 26 D Instrucțiuni de utilizare
-
Alpina Garden MT24Li Instrucțiuni de utilizare
-
Ransomes 62298 62299 62857 62858 62859 62860 62861 62862 62863 62864 62865 62866 62867 62868 Instruction Sheet
-
GGP ITALY CS 24 Li Instrucțiuni de utilizare
-