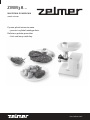
Zelmer ZMM3853W Fleischwolf Manual de utilizare
- Categorie
- Tocătoare
- Tip
- Manual de utilizare
Acest manual este potrivit și pentru

meat mincer
MASZYNKA DO MIELENIA
ZMM38...
ZMM3800 series
INSTRUKCJA UŻYTKOWANIA
MASZYNKA DO MIELENIA
USER MANUAL
MEAT MINCER
BEDIENUNGSANLEITUNG
FLEISCHWOLF
INSTRUCŢIUNI DE UTILIZARE
DISPOZITV PENTRU TOCAT
6–10
11–14
15–19
20–24
ИНСТРУКЦИЯ ЗА УПОТРЕБА
МАШИНКА ЗА МЕЛЕНЕ
ИНСТРУКЦИЯ ПО ЭКСПЛУАТАЦИИ
МЯСОРУБКА
ІНСТРУКЦІЯ З ВИКОРИСТАННЯ
М’ЯСОРУБКА
PL BG
EN
RU
UA
DE
RO
25–29
30–34
35–39

www.zelmer.com
meat mincer
MASZYNKA DO MIELENIA
ZMM38...
Pyszne placki ziemniaczane
– prosto i szybko każdego dnia.
Delicious potato pancakes
– fast and easy each day.

A
B
1b
1 2 3
1110
2
345
9
1a
6
7b
I
II
1
7a
8

6a 6b
C
1 2 3
E
4 5
1 2 3
D
1 2 3
„click”
6
5
9
2
3
4

6b
F
H
G
1
3
4
5
6
1
2
1 2 3
4 5
1 2 3
„click”
„click”
26 10 11 3
6a

6
Szanowni Klienci!
Gratulujemy wyboru naszego urządzenia i witamy wśród
użytkowników produktów Zelmer.
W celu uzyskania najlepszych rezultatów rekomendujemy
używanie tylko oryginalnych akcesoriów rmy Zelmer.
Zostały one zaprojektowane specjalnie dla tego produktu.
Prosimy o uważne przeczytanie niniejszej instrukcji obsługi.
Szczególną uwagę należy poświęcić wskazówkom bezpie-
czeństwa. Instrukcję obsługi prosimy zachować, aby mogli
Państwo z niej korzystać również w trakcie późniejszego
użytkowania.
Charakterystyka urządzenia
Maszynka do mielenia produktów spożywczych służy do
użytku w gospodarstwie domowym. Jest urządzeniem wie-
loczynnościowym, przy pomocy którego można zemleć
szybko i bez zbytniego wysiłku: mięso, ser, jarzyny mak
a także wytwarzać kiełbasy i wędliny. Przy zastosowaniu
dodatkowego wyposażenia maszynki – szatkownicy można
rozdrabniać warzywa na: surówki, sałatki i przetwory.
Wskazówki dotyczące bezpieczeństwa
iwłaściwego użytkowania maszynki
Przed rozpoczęciem użytkowania urządzenia zapoznaj
się z treścią całej instrukcji obsługi.
Należy upewnić się, że poniższe wskazówki zostały
zrozumiane.
Nieprawidłowo wykonana naprawa
może spowodować poważne zagro-
żenia dla użytkownika. W razie
wystąpienia usterek zwróć się do
specjalistycznego punktu serwiso-
wego ZELMER.
● Zachowaj szczególną ostrożność
podczas pracy z maszynką w obec-
ności dzieci.
● Przed wymianą wyposażenia lub
zbliżaniem się do części porusza-
jących się podczas użytkowania,
należy wyłączyć sprzęt i odłączyć od
zasilania.
● Zawsze odłączaj urządzenie od
zasilania gdy jest pozostawione bez
nadzoru, a także przed montażem,
demontażem lub czyszczeniem.
● Urządzenie nie powinno być uży-
wane przez dzieci. Przechowuj urzą-
dzenie wraz z przewodem przyłą-
czeniowym poza zasięgiem dzieci.
● Urządzenie może być używane
przez osoby o ograniczonej zdolno-
ści zycznej, czuciowej i psychicz-
nej, lub nie mające doświadczenia
lub znajomości sprzętu, ale wyłącz-
nie pod nadzorem lub po wcześniej-
szym zrozumiałym objaśnieniu moż-
liwych zagrożeń i poinstruowaniu
dotyczącym bezpiecznego korzysta-
nia z urządzenia.
● Należy zapewnić, aby dzieci nie
bawiły się urządzeniem.
● Urządzenie musi być używane tylko
z misą zasypową.
● Urządzenie wolno używać tylko
w pomieszczeniach, w temperaturze
pokojowej i na wysokości nie więk-
szej niż 2000 m n.p.m.
NIEBEZPIECZEŃSTWO! /
OSTRZEŻENIE!
Nieprzestrzeganie grozi
obrażeniami
● Nie uruchamiaj urządzenia, jeśli
przewód zasilający jest uszkodzony
lub obudowa jest w sposób widoczny
uszkodzona.
● Jeżeli przewód zasilający nieodłą-
czany ulegnie uszkodzeniu, to powi-
nien on być wymieniony u wytwórcy
lub w specjalistycznym zakładzie
naprawczym albo przez wykwaliko-
waną osobę w celu uniknięcia zagro-
żenia.
● Napraw urządzenia może dokony-
wać jedynie przeszkolony personel.
PL

7
UWAGA!
Nieprzestrzeganie grozi
uszkodzeniem mienia
●
Nie wyciągaj wtyczki z gniazdka sieci pociągając za
przewód.
●
Urządzenie zawsze podłączaj do gniazdka sieci elek-
trycznej (jedynie prądu przemiennego) o napięciu
zgodnym z podanym na tabliczce znamionowej urzą-
dzenia.
●
Nie narażaj maszynki i wyposażenia na działanie tem-
peratury powyżej 60°C. Możesz uszkodzić maszynkę.
●
Do popychania stosuj tylko popychacz. Używanie
innych przedmiotów grozi uszkodzeniem maszynki
i napędu.
●
Nie przeciążaj urządzenia nadmierną ilością produktu,
ani zbyt silnym jego popychaniem (popychaczem).
●
Dokładnie montuj zespół mielący, gdyż źle skręcony
zespół mielący powoduje niewłaściwą jakość miele-
nia, jak również może być przyczyną stępienia nożyka
i sitka. Stępiony nożyk i sitko wymień na nowe.
●
Podczas pracy maszynki nie zasłaniaj otworów wenty-
lacyjnych w obudowie.
●
Nie zanurzaj napędu maszynki w wodzie, ani nie myj
go pod bieżącą wodą.
●
Nie myj wyposażenia zamontowanego na napędzie.
●
Do mycia obudowy nie używaj agresywnych detergen-
tów w postaci emulsji, mleczka, past itp. Mogą one
między innymi usunąć naniesione informacyjne sym-
bole graczne, takie jak: podziałki, oznaczenia, znaki
ostrzegawcze, itp.
●
Przed użyciem umyć wszystkie akcesoria w wodzie
z dodatkiem płynu do mycia naczyń. Starannie opłukać
i osuszyć.
●
Sitka i nożyk dwustronny powinny pozostać natłusz-
czone. Nasmarować je olejem jadalnym.
●
Nie uruchamiać pustego urządzenia, jeśli sitka nie
zostały natłuszczone.
Dane techniczne
Parametry techniczne podane są na tabliczce znamionowej
wyrobu.
Dopuszczalny czas nieprzerwanej pracy 10 minut.
Czas przerwy przed ponownym użyciem 30 minut.
Hałas urządzenia (L
WA
) 80 dB/A.
MBP – Moc zablokowania silnika 1300 W
WSKAZÓWKA
Informacje o produkcie i wska-
zówki dotyczące użytkowania
●
Urządzenie jest przeznaczone wyłącznie do użytku
w gospodarstwie domowym i podobnych otoczeniach.
●
Po zakończeniu pracy przewód przyłączeniowy wyjmij
z gniazdka sieci.
●
Gdy maszynka nie daje się uruchomić – oddaj ją do
serwisu.
●
Mięso przeznaczone do mielenia oddziel od kości,
ścięgien, chrząstek i żył.
●
Przed mieleniem większe produkty potnij na kawałki.
●
Nie miel suchego maku. Przed mieleniem mak musi
być wcześniej sparzony i namoczony – do kilkunastu
godzin.
●
Do mycia metalowych części używaj miękkiej szczo-
teczki.
●
Nie myj metalowych części w zmywarkach. Agresywne
środki czyszczące stosowane w tych urządzeniach
powodują ciemnienie w/w części. Myj je ręcznie, z uży-
ciem tradycyjnych płynów do naczyń.
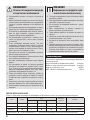
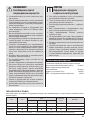
TYPY MASZYNEK ZELMER
Poniżej prezentowany jest asortyment wyposażenia maszynek do mielenia, których dotyczy niniejsza instrukcja.
VIB Nożyk
Sitko
Nasadka
masarska
Szatkownica
2,7 4 8
ZMM3851*
● ○ ● ● ○ ○
ZMM3853*
● ○ ● ● ○ ●/dostępne 2 bębny
ZMM3854*
● ○ ● ● ● ●/dostępne 2 bębny
* wersja kolorystyczna,
● – podstawowe wyposażenie, ○ – dodatkowe wyposażenie do nabycia w sklepach

8
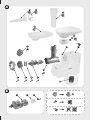
Opis urządzenia
Maszynka do mielenia produktów spożywczych składa się z:
1
Napędu maszynki – każdy napęd maszynki przystoso-
wany jest do montażu każdego zespołu mielącego i szat-
kownicy produkcji ZELMER. W tylnej obudowie napędu
znajdują się otwory wentylacyjne.
1a
Wyłącznik
1b
Przycisk blokady
Zespołu mielącego, w którego skład wchodzi:
2
Komora mielenia
3
Ślimak z zamontowanym sprzęgłem
4
Nożyk dwustronny
5
Sitko z otworami 4 mm
6
Nakrętka
7a
Miska
7b
I
Adapter
II
Misa szatkownicy
(maszynka może być wyposażona w jeden zestaw mis
7a
lub
7b
)
8
Popychacz
Wyposażenia, w którego skład wchodzi:
9
Sitko z otworami 8 mm
10
Nasadka masarska
11
Wkładka dystansowa
Mechaniczne zabezpieczenie silnika
1
Ślimak
2
Sprzęgło
3
Wkręt M5x20
Maszynka posiada mechaniczne zabezpieczenie, które
chroni silnik przed zniszczeniem – zęby sprzęgła napędo-
wego ślimaka wyłamują się, gdy maszynka jest przeciążona
(np. gdy do środka dostały się kości).
Zniszczone sprzęgło wymień na nowe:
●
w ślimaku ze zniszczonym sprzęgłem odkręć wkręt (3),
●
usuń uszkodzone sprzęgło (2),
●
załóż nowe sprzęgło (3) i dokręć je wkrętem (2).
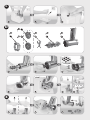
Przygotowanie maszynki do pracy
i jej uruchomienie
1
Napęd (1) postaw w pobliżu gniazdka sieci na twardym
podłożu tak, aby nie zasłaniać otworów wentylacyjnych
w obudowie.
●
Przed pierwszym użyciem maszynki umyj elementy
wyposażenia.
●
Zmontuj odpowiednie wyposażenie i dołącz do napędu.
2
Włóż przewód przyłączeniowy do gniazdka sieciowego.
3
Przyciskiem wyłącznika (1a) uruchom maszynkę.
A
B
C
Praca z zespołem mielącym
Do komory mielenia (2) włóż kolejno:
1
Ślimak (3) sprzęgłem do środka.
2
Na trzpień ślimaka (3) nożyk (4).
3
Sitko (np. 5) tak, aby występ komory wszedł w rowek na
obwodzie sitka.
4
Dokręć wszystkie elementy zespołu mielącego – mocno
do oporu.
5
Załóż zmontowany zespół mielący, na napęd (1) i obróć
do pozycji, przy której usłyszysz „click” blokady. Oznacza to,
że komora została właściwie zamontowana.
6a
Nałóż miskę (7) na komorę mielenia (2).
6b
Włóż adapter
I
do misy
II
. Nałóż misę wraz z adapte-
rem (7b) na komorę mielenia (2).
Praca z nasadką masarską
Do komory mielenia (2) włóż kolejno:
1
Ślimak (3) sprzęgłem do środka.
2
Na trzpień ślimaka (3) wkładkę dystansową (11).
3
Nasadkę masarską (10).
4
Dokręć wszystkie elementy nakrętką (6) – mocno do oporu.
5
Załóż zmontowany zespół mielący, na napęd (1) i obróć
do pozycji, przy której usłyszysz „click” blokady.
6a
Nałóż miskę (7) na komorę mielenia (2).
6b
Włóż adapter
I
do misy
II
. Nałóż misę wraz z adapte-
rem (7b) na komorę mielenia (2).
Przed nałożeniem kiełbaśnicy (osłonki z jelita) namocz ją
w ciepłej wodzie przez ok. 10 min.
●
Na nasadkę masarską nałóż mokrą kiełbaśnicę.
Zwróć uwagę, aby nie zatkać otworów odpo-
wietrzających w nasadce.
Masa mięsna wypełniająca jelito nie może być
„zbyt rzadka”. Duża zawartość płynów może
spowodować ich wyciek i przedostawanie się
do wnętrza maszynki.
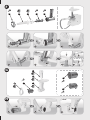
Szatkownica
1
Tarka do drobnych wiórek
2
Tarka do przecierania
3
Zatrzask
4
Komora
5
Miska zasypowa
6
Popychacz
W przypadku korzystania z szatkownicy zdej-
mij adapter.
Szatkownica ma dwie tarki. Pierwsza służy do rozdrabniania
na drobne wiórki (sera żółtego, marchwi, selerów, gotowa-
D
F
G

9
Potrawy z mięsa, warzyw i owoców
W celu zachowania jak największych wartości odżywczych
potraw z warzyw i owoców, zapoznaj się ze sposobami ich
sporządzania. Warzyw i owoców nie przetrzymuj w wodzie
i rozdrabniaj bezpośrednio przed spożyciem.
Kotlety wieprzowe mielone
50 dag wieprzowiny, 6 dag czerstwej bułki, 5 dag cebuli,
2 dag tłuszczu, 1 jajo, 4 dag tartej bułki, tłuszcz do smażenia,
sól i pieprz.
Bułkę namoczyć w wodzie i osączyć.
Cebulę pakrajać w krążki, usmażyć na jasnozłoty kolor.
Mięso opłukać, pokrajać na kawałki.
Bułkę, cebulę, mięso zemleć 2 razy w maszynce z sitkiem
o średnicy oczek 4 mm. Dadać jajo, sól, pieprz i starannie
wyrobić na jednolitą masę. Uformować 8 owalnych kotletów
o grubości 1,5 cm, które otaczać w bułce tartej. Smażyć na
rozgrzanym tłuszczu.
Pasztet z mięsa mieszanego
50 dag wieprzowiny, 50 dag cielęciny, 40 dag słoniny, 50 dag
wątroby wieprzowej, 30 dag cebuli, 20 dag bułki pszennej,
4 jaja, sól i pieprz, gałka muszkatołowa.
Mięso udusić ze słoniną i cebulą.
Wątrobę opłukać, obrać z błon, pokroić w kostkę. Gdy mięso
jest miękkie, dodać wątrobę, bułkę i krótko razem poddusić,
ostudzić i zemleć dwukrotnie w maszynce z sitkiem o śred-
nicy oczek 4 mm.
Do przygotowanej masy dodać jaja, sól, pieprz, gałkę musz-
katołową i starannie wyrobić.
Foremkę wysmarować smalcem, przełożyć masę paszte-
tową i piec około 40 minut.
Kiełbasa domowa
Mięso wieprzowe średnio tłuste 4,5 kg, słonina 0,5 kg, wywar
z kości – 1 szklanka, sól 6-7 łyżeczek, saletra 1 płaska
łyżeczka, pieprz 1 łyżeczka (pieprz mielony), ziele angielskie
12-15 ziarenek (zemleć), czosnek 5-6 ząbków (posiekać),
kiełbaśnica 7 m.
Mięso zemleć w maszynce z sitkiem o średnicy otworów
8 mm. Sól wymieszać z saletrą i przyprawami, dodać do
mięsa, wymieszać i wyrobić jak ciasto, dodając stopniowo
wywar. Odstawić w chłodne miejsce na 24 godz. Na komorę
mielenia maszynki założyć nasadkę masarską. Napełnić
kiełbaśnicę o długości około 1m, formując odcinki 30-40 cm.
Należy zwrócić uwagę, aby całkowicie nie zatkać otworów
odpowietrzających nasadki.
Osuszyć kiełbasę przez 6 godz. Wędzić dymem ciepłym 14
godzin lub gorącym 2,5 godziny.
Surówka z selera
40 dag selera, 20 dag jabłek, 2 łyżki oleju lub śmietany, sok
z cytryny, sól, cukier.
Seler zetrzeć na drobne wiórki. Doprawić do smaku śmie-
taną lub olejem. Dodać cukier, sok z cytryny i sól.
nych buraków, itp.). Druga służy do przecierania (ziemnia-
ków, buraków, owoców, itp.).
Praca z szatkownicą
1
Odchyl zatrzask (3) i włóż jedną z tarek sprzęgłem do
środka komory.
2
Zatrzaśnij zatrzask (3).
3
Połącz komorę szatkownicy (4) tak, jak komorę mielenia
maszynki.
●
Produkty duże pokrój wcześniej na kawałki, które bez
trudu włożysz do komory.
●
Nie rozdrabniaj miękkich owoców zawierających twarde
pestki.
●
Po zakończeniu pracy wyłącz maszynkę i wyjmij prze-
wód przyłączeniowy z gniazdka sieci.
●
Usuń drewnianą łyżką resztki produktów pozostałe
wewnątrz tarki lub w komorze.
Ostrza tarek nie wymagają regeneracji.
Po zakończeniu pracy
●
Wyłącz maszynkę i wyjmij przewód przyłączeniowy
z gniazdka sieci.
1a
Wyjmij popychacz (8) i zdejmij miskę z komory mielenia
(2) lub komory szatkownicy.
1b
Wyjmij popychacz (8) i zdejmij misę szatkownicy wraz
z adapterem (7b) z komory mielenia (2) lub misę szatkow-
nicy z komory szatkownicy.
2
Naciśnij przyciski blokady (1b), zespół, mielący lub
komorę szatkownicy obróć w prawo i zdejmij ją.
3
Rozłóż elementy zespołu mielącego, komory z nasadką
masarską lub szatkownicę.
Czyszczenie i konserwacja
●
Napęd przetrzyj wilgotną szmatka zwilżoną płynem do
mycia naczyń.
●
Części z tworzywa myj w ciepłej wodzie z dodatkiem
płynu do mycia naczyń.
●
Części metalowe myj w gorącej wodzie z dodatkiem
płynu do mycia naczyń.
●
Dokładnie wysusz umyte części.
●
Suche części komory mielenia lub szatkownicy zmontuj
w całość.
●
Przed użyciem umyć wszystkie akcesoria w wodzie
z dodatkiem płynu do mycia naczyń. Starannie opłukać
i osuszyć.
●
Sitka i nożyk dwustronny powinny pozostać natłusz-
czone. Nasmarować je olejem jadalnym.
H
E

10
Producent nie odpowiada za ewentualne szkody spowodowane
zastosowaniem urządzenia niezgodnie z jego przeznaczeniem lub
niewłaściwą jego obsługą.
Producent zastrzega sobie prawo modykacji wyrobu w każdej chwili,
bez wcześniejszego powiadamiania, w celu dostosowania do prze-
pisów prawnych, norm, dyrektyw albo z przyczyn konstrukcyjnych,
handlowych, estetycznych i innych.
Ekologiczna utylizacja
To urządzenie jest oznaczone zgodnie z Dyrek-
tywą Europejską 2012/19/UE oraz polską
Ustawą z dnia 11 września 2015 r. „O zużytym
sprzęcie elektrycznym i elektronicznym” (Dz.U.
z dn. 23.10.2015 poz. 1688) symbolem prze-
kreślonego kontenera na odpady. Takie ozna-
kowanie informuje, że sprzęt ten, po okresie jego użytkowa-
nia nie może być umieszczany łącznie z innymi odpadami
pochodzącymi z gospodarstwa domowego. Użytkownik jest
zobowiązany do oddania go prowadzącym zbieranie zuży-
tego sprzętu elektrycznego i elektronicznego. Prowadzący
zbieranie, w tym lokalne punkty zbiórki, sklepy oraz gminne
jednostka, tworzą odpowiedni system umożliwiający oddanie
tego sprzętu. Właściwe postępowanie ze zużytym sprzętem
elektrycznym i elektronicznym przyczynia się do uniknię-
cia szkodliwych dla zdrowia ludzi i środowiska naturalnego
konsekwencji, wynikających z obecności składników niebez-
piecznych oraz niewłaściwego składowania i przetwarzania
takiego sprzętu.

11
Dear Customer!
Congratulations on your choice of our appliance, and
welcome among the users of Zelmer products.
In order to achieve best possible results we recommend
using exclusively original Zelmer accessories. They have
been specially designed for this product.
Please read this user manual carefully. Pay special attention
to important safety instructions. Keep this user manual for
future reference.
Appliance features
The meat mincer is to be used within the household. It is
a multifunctional appliance, which can be used for quick
and effortless mincing of: meat, cheese, vegetables, poppy,
as well as for manufacturing sausages and meat products.
When an additional appliance of the meat mincer is used –
that is the shredder, it is possible to slice vegetables into:
salads, fresh vegetable salads and preserves.
Safety precautions and instructions for
proper use of the appliance
Before starting to use the appliance, become familiar
with the whole content of this user manual.
Make sure that you understand the instructions given
below.
● Turn off and unplug the appliance
before replacing accessories or
approaching its movable parts.
● Always unplug the appliance from
the electrical outlet when it is left
unattended and before assembling,
disassembling and cleaning.
● This product is not intended for use
by children. Keep the appliance
and the power cable out of reach of
children.
● Appliances can be used by persons
with reduced physical, sensory
or mental capabilities or lack of
experience and knowledge if they
have been given supervision or
instruction concerning use of
the appliance in a safe way and
understand the hazards involved.
● Children shall not play with the
appliance.
● The appliance must only be used
with the feeder tray.
● Only use the appliance indoors at
room temperature and up to 2000 m
above sea level.
DANGER! / WARNING!
Risk of injury
● Do not operate the appliance when
the power cord is damaged or the
housing shows visible damage.
● If the non-detachable power cord
is damaged, it should be replaced
by the manufacturer or at specialist
service centre or by a qualied
person in order to avoid any hazards.
● The appliance may only be repaired
by qualied service personnel.
Improper servicing may cause
a serious hazard to the user.
In case of defects contact ZELMER
specialist service centre.
● Take special care when operating
the appliance in the presence of
children.
WARNING!
Risk of property damage
●
Do not pull the plug out from the network supply socket
by pulling the cord.
●
Always plug the appliance to the mains (AC only) with
voltage corresponding to that indicated on the rating
plate.
●
Do not expose the meat mincer or its equipment to the
temperature over 60°C. By doing that you can damage
the meat mincer.
●
In order to push use the pusher. Using other staffs may
result in damaging the meat mincer and its drive.
●
Do not overload the appliance with excessive amount
of the product, or by pushing the product too hard (with
the use of the pusher).
●
Assemble the mincing set accurately, as the improperly
screwed mincing set can result in poor mincing quality,
as well as it can cause blunting of the cutter knife and
EN

12
the screen. Blunt cutter knife and blunt screen should
be replaced with a new one.
●
When the meat mincer is operating, do not cover the
ventilation holes in the casing.
●
Never immerse the drive unit of the meat mincer in
water. Never wash it under the running water.
●
Do not wash the equipment assembled within the drive
unit.
●
Do not use aggressive detergents in the form of
emulsion, milk, paste, etc. in order to wash the casing.
Among others, they can remove the informative
graphic symbols placed on the meat mincer, such as:
scales, marks, warning signs, etc.
●
Wash all accessories in warm water and washing up
liquid. Rinse and dry carefully.
●
The screens and double-side cutter must be kept
lubricated. Apply a little culinary oil to them before using.
●
Do not run the appliance empty if the screen has not
been oiled.
HINT
Information on the product and
hints on its use
●
This appliance is intended for domestic use only.
●
When the work is nished, pull the power cord out from
the network supply socket.
●
When the machine does not start – contact the service
point and leave the machine for servicing.
●
Separate the meat, which is to be minced, from bones,
tendons, cartilages and veins.
●
Before mincing, cut bigger parts into smaller elements.
●
Do not mince dry poppy. Before mincing, the poppy
needs to be washed with hot water and soaked in
water – up to several hours (a dozen or so).
●
Use a soft brush in order to wash the metal parts.
●
Do not wash the metal parts in the dishwasher.
Aggressive cleaning agents used in these appliances
can cause darkening of the above-mentioned parts.
Wash them manually, with the means of traditional
dishwashing liquids.
Technical data
Technical parameters are given on the product’s data plate.
Allowed time of continuous work
of the meat mincer 10 minutes.
Required break before following use
of the meat mincer 30 minutes.
Noise of the meat mincer (L
WA
) 80 dB/A.
MBP – Motor Blocked Power 1300 W
Description
The meat mincer consists of:
1
Drive unit – each drive of the machine is adjusted to the
assembly of each of the mincing set and the shredder
produced by ZELMER. There are some ventilation inlets
in rear casing of the drives.
1a
Switch
1b
Lock button
Mincing set, which consists of:
2
Mincing chamber
3
Feed screw with assembled coupling
4
Double-side cutter
5
Screen with 4mm holes
6
ring collar
7a
Food tray
7b
I
Adaptor
II
Shredder bowl
(the mincer may be equipped with one set of bowls
7a
or
7b
)
8
Pusher
Equipment, which includes:
9
Screen with 8 mm holes
10
Sausage stuffer
11
Separator
A
TYPES OF ZELMER MEAT MINCERS
Below, you can see an assortment of equipment anticipated for the meat mincers, which the user manual refers to.
VIB Cutter knife
Screen
Sausage
stuffer
Shredder
2,7 4 8
ZMM3851*
● ○ ● ● ○ ○
ZMM3853*
● ○ ● ● ○ ●/Two cutting drums available
ZMM3854*
● ○ ● ● ● ●/Two cutting drums available
* appliance colour,
● – basic accessories, ○ – additional equipment, which can be bought in shops, household appliances stores

13
Mechanical safety device for the motor
1
Scroll
2
Clutch
3
Screw M5x20
The meat mincer is equipped with mechanical protection,
which secures the motor against any damage – teeth of
the coupling break, when the meat mincer is overloaded
(f. ex. when bones have entered into the mincing chamber).
The broken coupling should be replaced with a new one:
●
unscrew the coupling from the feed screw (3),
●
remove the broken coupling (2),
●
put on the new coupling (2) and screw it (3).
Preparing the meat mincer to work
and the actuation of the appliance
1
Place the drive (1) unit close to the power network
socket, on a rm surface so as not to cover the ventilation
holes within the casing.
●
Before the rst use of the meat mincer, wash the
equipment elements.
●
Assemble the appropriate equipment and join it with the
drive unit.
2
Put the power cord into the supply network socket.
3
Turn the meat mincer on with the main switch (1a).
Operating the mincing set
Insert the following parts into the mincer body (2):
1
Insert the scroll (3) with the coupling facing inside.
2
Fit the knife (4) onto the pin of the scroll (3).
3
Place the screen (e.g. 5) over the knife so that the
protrusion in the mincer body will t into the groove in the
circumference of the screen.
4
Tightly t all the elements of the mincer unit.
5
Fit the assembled mincer unit onto the drive unit (1) and
turn it until you hear a click of the lock. It means that the body
has been properly installed.
6a
Place the tray (7) on the mincer body (2).
6b
Insert the adaptor
I
into the bowl
II
. Mount the bowl
and the adaptor (7b) on the mincing chamber (2).
Operating the sausage stuer
Insert the following parts into the mincer body (2):
1
Insert the scroll (3) with the coupling facing inside.
2
Fit the insert (11) onto the pin of the scroll (3).
3
Fit the sausage stufng tube (10).
4
Tightly t all the elements with the threaded ring (6).
5
Fit the assembled mincer unit onto the drive unit (1) and
turn it until you hear a click of the lock.
6a
Place the tray (7) on the mincer body (2).
B
C
D
F
6b
Insert the adaptor
I
into the bowl
II
. Mount the bowl
and the adaptor (7b) on the mincing chamber (2).
Soak the casing for about 10 minutes before tting.
●
Fit the wet casing on the sausage ller nozzle.
Make sure the not to block the ventilation
openings on the nozzle.
The meat cannot be „too thin”. A large liquid
content may cause its leakage to the inside of
the mincer.
Shredder
1
Fine grating disc
2
Pureeing disc
3
Locking tab
4
Body
5
Tray
6
Pusher
Remove the adaptor when using the shredder.
The accessory has two attachments. The rst is a shredder
to shred cheese, carrot, celery, cooked beet roots, etc. into
small strips. The second is a grater for grating potatoes, beet
root, fruit, etc.
Operating the shredder
1
Recline the catch (3) and put one of the drums with the
clutch facing the middle of the chamber.
2
Snap the catch (3).
3
Assemble the chamber of the shredder (4) just as like
mincing chamber.
●
Cut large products into smaller elements, which you can
easily put into the mincing chamber.
●
Do not mash soft fruits containing stones.
●
When the work is nished pull the power cord out from
the network supply socket.
●
Remove the food remaining in the shredder chamber or
on the grater with a wooden spoon.
Blades of the drums do not require any
regeneration.
After the work has been nished
●
Turn the meat mincer off and pull the power cord out
from the network supply socket,
1a
Remove the pusher (8) and remove the food tray off the
mincing chamber (2) or the shredder chamber.
1b
Remove the pusher (8) and remove the shredder bowl
with an adaptor (7b) off the mincing chamber (2) or the
shredder bowl off the shredder chamber.
G
H
E

14
Mince the meat using the strainer with 8 mm holes. Mix
the salt with the saltpetre and spices, and add them to the
minced meat, and mix them, gradually adding the bone
stock. Put it in a cool place for 24 hours. Place the sausage
stuffer on the mincing chamber. Fill in the intestine, about
1 m long, forming segments, which are 30–40 cm long. Pay
special attention not to cover the venting holes within the
attachment.
Dry the sausage for about 6 hours. Smoke with warm smoke
for about 14 hours or hot smoke for about 2,5 hours.
Celery salad
40 dag of celery, 20 dag of apples, 2 spoons of oil or cream,
lemon juice, salt, pepper.
Slice the celery into small chips. Add cream or oil according
to one’s own taste. Add sugar, lemon juice and salt.
Disposal
Dispose of packaging in an environmentally-
friendly manner. This appliance is labelled
in accordance with European Directive
2012/19/EU concerning used electrical and
electronic appliances (waste electrical and
electronic equipment – WEEE). The guideline
determines the framework for the return and recycling of
used appliances as applicable throughout the EU. Please
ask your specialist retailer about current disposal facilities.
2
Press the safety lock (1b) and turn the mincing set or the
grating chamber into right and take it off.
3
Take apart all the elements of the mincing set, the
chamber with the sausage stuffer or the shredder.
Cleaning and maintenance
●
Clean the drive with a wet cloth, with an addition of
dishwashing liquid.
●
Wash the plastic parts in warm water, with addition of the
dishwashing liquid.
●
Wash the metal parts in hot water, with addition of the
dishwashing liquid.
●
Carefully dry the washed elements.
●
Assemble the dry parts of the mincing chamber or the
shredder.
●
Wash all accessories in warm water and washing up
liquid. Rinse and dry carefully.
●
The screens and double-side cutter must be kept
lubricated. Apply a little culinary oil to them before using.
Meat, vegetable and fruit dishes
In order to maintain the most of the nutrition value of the
vegetable and fruit dishes, familiarise yourself with the
methods of preparing them. Do not hold vegetables or fruits
in water and mash them just before serving and eating.
Minced pork chops
50 dag of pork meat, 6 dag of stale bread, 5 dag of onion,
2 dag of fat, 1 egg, 4 dag of crumbs, oil for frying, salt and
pepper.
Soak the bread in water and drain.
Cut the onion in slices, fry until it reaches a golden colour.
Rinse the meat with water, cut into pieces.
Mince bread, onion and meat twice in the meat mincer, using
the screen with 4 mm holes. Add the egg, salt, pepper and
carefully mix into unied mass. Form 8 oval pork chops,
1,5 cm thick, which then cover with crumbs. Fry on hot oil.
Pâté made of mixed meat
50 dag of pork meat, 50 dag of veal, 40 dag of pork fat,
50 dag of liver, 30 dag of onion, 20 dag of wheat bun, 4 eggs,
salt and pepper, nutmeg.
Braise the meat with pork fat and onion. Clean the liver,
peel the membranes off, dice. When the meat is soft, add
the liver, bun and braise together for a short time. Let the
ingredients cool down and mince them twice in the meat
mincer, using the strainer with 4 mm holes. To the prepared
mass add eggs, salt, peppr, nutmeg and carefully mix.
Grease the form with lard, put the pâté into the form and
bake for abour 40 minutes.
Homemade sausage
Semi fat pork meat 4,5 kg, pork fat 0,5 kg, bone stock –
1 glass, salt 6-7 teaspoons, saltpetre 1 at teaspoon, pepper
1 teaspoon (ground pepper), allspice 12-15 grains (grind),
garlic 5-6 cloves (mince), sausage intestine 7 m.
The manufacturer does not accept any liability for any damages
resulting from unintended use or inappropriate handling.
The manufacturer reserves his rights for modifying the product any
time in order to adjust it to law regulations, norms, directives, or due
to construction, trade aesthetic or other reasons, without notifying it
in advance.

15
Sehr geehrte Kunden!
Wir gratulieren Ihnen zur Wahl unseres Produktes und hei-
ßen Sie im Kreise der Benutzer von Zelmer Produkten will-
kommen.
Um das beste Ergebnis zu erzielen, sollten Sie nur das Ori-
ginalzubehör der Firma Zelmer verwenden. Das Zubehör
wurde speziell für dieses Produkt entwickelt.
Lesen Sie bitte diese Gebrauchsanweisung aufmerksam
durch. Achten Sie dabei insbesondere auf die Sicherheits-
hinweise. Bewahren Sie bitte die Bedienungsanleitung auf,
damit Sie im Laufe des späteren Gebrauchs auf sie zurück-
greifen können.
Geräteeigenschaften
Die Küchenmaschine zum Mahlen von Lebensmitteln dient
der Verwendung im Haushalt. Sie ist ein Multifunktionsgerät,
mit dem Sie schnell und ohne große Anstrengung Fleisch,
Käse oder Gemüse mahlen, aber auch Wurst und Fleisch-
waren herstellen können. Durch Verwendung des zusätz-
lichen Zubehörs der Hobel-Küchenmaschine kann Gemüse
für Rohkostsalate, Salate oder Eingemachtes zerkleinert
werden.
Hinweise für einen sicheren und richtigen
Gebrauch des Geräts
Lesen Sie vor dem Gebrauch der Maschine die
Gebrauchsanleitung vollständig durch.
Es muss sichergestellt sein, dass die nachfolgenden
Hinweise verstanden wurden.
werden. Nicht ordnungsgemäß
durchgeführte Reparaturen kön-
nen eine ernsthafte Gefahr für den
Benutzer darstellen. Wenden Sie
sich bei Defekten an einem autori-
sierten ZELMER Kundendienst.
● Seien Sie bei der Anwesenheit von
Kindern bei der Arbeit besonders
vorsichtig.
● Vor dem Wechsel von Zubehörteilen
oder in der Nähe von beweglichen
Elementen das Gerät ausschalten
und vom Netz trennen.
● Bevor Sie das Gerät ohne Aufsicht
lassen, zusammensetzen, auseinan-
dernehmen oder reinigen, muss es
von der Stromversorgung abgetrennt
werden.
● Das Gerät darf nicht von Kindern
bedient werden. Bewahren Sie das
Gerät sowie das Netzkabel außer-
halb der Reichweite von Kindern auf.
● Das Gerät darf von Personen mit
körperlichen, sensorischen oder
psychischen Einschränkungen, oder
von Personen ohne Erfahrung oder
Kenntnis des Geräts ausschließ-
lich dann verwendet werden, wenn
dies unter Aufsicht geschieht oder
wenn zuvor die möglichen Gefahren
erklärt wurden und eine Unterwei-
sung in der sicheren Benutzung des
Geräts erfolgt ist.
● Es muss sichergestellt werden, dass
Kinder nicht mit dem Gerät spielen.
● Das Gerät darf ausschließlich
zusammen mit der Vorratsschale
verwendet werden.
● Das Gerät nur in Innenräumen bei
Raumtemperatur und bis zu 2000 m
über Meereshöhe verwenden.
GEFAHR! / WARNUNG!
Bei Nichtbeachtung der Hinweise
besteht Verletzungsgefahr
● Das Gerät nicht in Betrieb nehmen,
wenn das Netzkabel beschädigt
oder das Gehäuse sichtbar beschä-
digt sind.
● Sollte das nicht abtrennbare Netz-
kabel beschädigt werden, muss es
vom Hersteller, einer spezialisierten
Reparaturwerkstatt oder von einer
qualizierten Person ausgetauscht
werden, um eine Gefährdung zu ver-
meiden.
● Die Reparaturen dürfen nur durch
geschultes Personal durchgeführt
DE

16
ACHTUNG!
Eine Nichtbeachtung der Hinweise
kann zu Sachschäden führen
●
Den Netzstecker nicht am Kabel aus der Steckdose
ziehen.
●
Das Gerät darf nur an eine (Wechselstrom-)Steckdose
mit einer Spannung angeschlossen werden, die der
auf dem Typenschild des Geräts angegebenen Span-
nung entspricht.
●
Setzen Sie das Gerät sowie das Zubehör keinen Tem-
peraturen über 60 °C aus. Dadurch kann die Maschine
beschädigt werden.
●
Verwenden Sie zum Stopfen ausschließlich den Stop-
fer. Bei Verwendung anderer Gegenstände können die
Maschine oder der Antrieb beschädigt werden.
●
Überlasten Sie das Gerät nicht durch eine zu große
Menge an zu verarbeitendem Produkt oder durch zu
starkes Drücken mit dem Stopfer.
●
Die Zerkleinerungseinheit muss richtig zusammen-
gesetzt werden, da eine falsch zusammengesetzte
Zerkleinerungseinheit zu einer schlechten Zerklei-
nerungsqualität führt und zu einem Stumpfwerden
des Messerkopfs und der Lochscheiben führen kann.
Stumpfe Messerköpfe und Lochscheiben müssen
gegen neue ausgewechselt werden.
●
Während des Betriebs der Maschine dürfen die Belüf-
tungsöffnungen im Gehäuse nicht verdeckt sein.
●
Der Antrieb der Maschine darf nicht in Wasser getaucht
und nicht unter ießendem Wasser gereinigt werden.
●
Die Ausrüstung darf nicht gewaschen werden, wenn
diese am Antrieb befestigt ist.
●
Für die Reinigung des Gehäuses keine starken Reini-
gungsmittel in Form von Emulsionen, Reinigungsmilch,
Pasten u.ä. verwenden. Die angebrachten Informa-
tionssymbole, wie Maßstäbe, Zeichen, Warnzeichen
u.ä. könnten u.a. beschädigt werden.
●
Vor Gebrauch alle Teile im Wasser mit etwas Wasch-
mittel reinigen. Sorgfältig abspülen und trocknen lassen.
●
Die Lochscheiben und die doppelseitige Messer-
scheibe sollten gefettet bleiben. Mit Speiseöl einfetten.
●
Das leere Gerät nicht in Betrieb nehmen, wenn die
Lochscheiben nicht leicht eingefettet wurden.
HINWEIS
Angaben zum Produkt und
Gebrauchshinweise
●
Das Gerät ist ausschließlich für den Gebrauch im
Haushalt und in ähnlichem Umfeld vorgesehen.
●
Nach Abschluss der Arbeit den Stecker aus der Steck-
dose ziehen.
●
Wenn sich die Maschine nicht einschalten lässt, geben
Sie sie bitte an einen Kundendienst.
●
Das zu zerkleinernde Fleisch muss frei von Knochen,
Sehnen, Knorpeln usw. sein.
●
Vor dem Zerkleinern müssen größere Stücke in klei-
nere Stücke geschnitten werden.
●
Es darf kein trockener Mohn zerkleinert werden. Vor
dem mahlen muss der Mohn abgebrüht und mehrere
Stunden eingeweicht werden.
●
Für die Reinigung der Metallteile eine weiche Bürste
verwenden.
●
Reinigen Sie die Metallteile nicht in der Spülmaschine.
Die in diesen Geräten verwendeten aggressiven Rei-
nigungsmittel bewirken ein dunkel werden der oben
genannten Teile. Reinigen Sie diese Teile von Hand
mit herkömmlichen Geschirrspülmittel.
ZELMER MASCHINENTYPEN
Weiter unten ist das Ausstattungssortiment der Fleischwolf-Geräte dargestellt, für welche die vorliegende Anleitung gilt.
VIB Messer
Sieb
Wurstaufsatz Gemüsehobel
2,7 4 8
ZMM3851*
● ○ ● ● ○ ○
ZMM3853*
● ○ ● ● ○ ●/2 Trommeln im Set enthalten
ZMM3854*
● ○ ● ● ● ●/2 Trommeln im Set enthalten
* Farbausführung,
● – Basiszubehör, ○ – zusätzliches, im Laden erwerbbares Zubehör
Technische Daten
Die technischen Daten sind auf dem Typenschild des Pro-
dukts angegeben.
Zulässige Dauerbetriebszeit 10 Minuten.
Dauer der Unterbrechung vor erneutem
Einschalten 30 Minuten.
Geräuschpegel des Geräts (L
WA
) 80 dB/A.
MBP – Kraft zur Motorblockade 1300 W

17
Gerätebeschreibung
Die Maschine zur Zerkleinerung von Lebensmitteln setzt sich
wie folgt zusammen:
1
Geräteantrieb – jeder Antrieb der Küchenmaschine ist an
die Montage aller Zerkleinerungseinheiten und Gemü-
sehobel der Firma ZELMER angepasst. Im hinteren
Antriebsgehäuse benden sich die Lüftungsöffnungen.
1a
Aus-Schalter
1b
Entriegelungstaste
Die Zerkleinerungseinheit setzt sich wie folgt zusammen:
2
Zerkleinerungskammer
3
Förderschnecke mit montierter Kupplung
4
Doppelseitige Messerscheibe
5
Lochscheibe mit 4 mm Öffnungsdurchmesser
6
Befestigungsring
7a
Schale
7b
I
Adapter
II
Schale für den Gemüsehobel
(die Maschine kann mit dem Schalensatz
7a
oder
7b
ausgestattet sein)
8
Stopfer
Zubehör, bestehend aus:
9
Lochscheibe mit 8 mm Öffnungsdurchmesser
10
Wurstaufsatz
11
Abstandhalter
Mechanischer Motorschutz
1
Förderschnecke
2
Kupplung
3
Schraube M5x20
Die Maschine verfügt über einen mechanischen Motor-
schutz, der den Motor vor Beschädigungen schützen soll.
Die Zähne der Antriebskupplung brechen bei einer Überla-
stung der Maschine (z. B. wenn beim Zerkleinern Knochen in
die Zerkleinerungskammer gelangt sind)
Die zerstörte Kupplung kann gegen eine neue ausgewech-
selt werden:
●
An der Förderschnecke mit der zerstörten Kupplung die
Schraube (3) herausschrauben,
●
Die zerstörte Kupplung (2) entfernen,
●
Eine neue Kupplung (3) aufsetzen und mit der Schraube
(2) befestigen.
Vorbereitung des Gerätes für den
Betrieb, und deren Inbetriebnahme
1
Stellen Sie den Antrieb (1) in der Nähe einer Steckdose
auf einem festen, stabilen Untergrund so auf, dass die Belüf-
tungsöffnungen nicht verdeckt werden.
●
Waschen Sie vor dem ersten Gebrauch der Maschine
die Elemente der Ausrüstung gründlich.
A
B
C
●
Setzen Sie die gewünschte Ausrüstung zusammen und
schließen Sie sie an den Antrieb an.
2
Stecken Sie den Stecker in die Steckdose.
3
Die Küchenmaschine mithilfe des An-Schalters (1a) ein-
schalten.
Bedienung der Zerkleinerungseinheit
In die Zerkleinerungskammer (2) nacheinander folgendes
einsetzen:
1
Schnecke (3) mit der Kupplung in die Mitte.
2
Auf den Vierkantstift (3) der Förderschnecke das Messer
(4) aufsetzen.
3
Die Lochscheibe (z. B. 5) so einsetzen, dass der Vor-
sprung in der Kammer in die Nut am Umfang der Loch-
scheibe greift.
4
Alle Elemente der Zerkleinerungseinheit ordentlich bis
ein deutlicher Widerstand zu spüren ist festziehen.
5
Die zusammengesetzte Zerkleinerungseinheit auf den
Antrieb (1) aufsetzen und soweit drehen, bis das „Klick“ der
Verriegelung zu hören ist. Dies bedeutet, dass die Zerkleine-
rungseinheit richtig befestigt ist.
6a
Die Schale (7) auf die Zerkleinerungskammer (2) aufsetzen.
6b
Den Adapter
I
in die Schale legen
II
. Befestigen Sie die
Schale mit dem Adapter (7b) auf der Zerkleinerungskammer (2).
Arbeiten mit dem Wurstaufsatz
In die Zerkleinerungskammer (2) nacheinander folgendes
einsetzen:
1
Schnecke (3) mit der Kupplung nach innen.
2
Auf den Vierkantstift der Förderschnecke (3) den
Abstandhalter (11) aufsetzen.
3
Wurstaufsatz (10).
4
Alle Elemente der Zerkleinerungseinheit mit dem Befesti-
gungsring (6) ordentlich bis ein deutlicher Widerstand zu spü-
ren ist festziehen.
5
Die zusammengesetzte Zerkleinerungseinheit auf den
Antrieb (1) aufsetzen und soweit drehen, bis das „Klick“ der
Verriegelung zu hören ist.
6a
Die Schale (7) auf die Zerkleinerungskammer (2) aufsetzen.
6b
Den Adapter
I
in die Schale legen
II
. Befestigen Sie
die Schale mit dem Adapter (7b) auf der Zerkleinerungskam-
mer (2).
Vor dem Aufziehen des Darms muss dieser circa 10 Minuten
in warmem Wasser eingeweicht werden.
●
Ziehen Sie den nassen Darm auf den Wurstaufsatz.
Achten Sie darauf, die Belüftungsöffnungen im
Aufsatz nicht zu verschließen.
Die Fleischmasse, mit der der Darm gefüllt
wird, darf nicht zu „dünn“ sein. Ein zu hoher
Flüssigkeitsgehalt kann dazu führen, dass die
Flüssigkeit ins Innere der Maschine gelangt.
D
F

18
Reinigung und Pege
●
Wichen Sie den Antrieb mit einem mit Geschirrspülmittel
befeuchtetem Tuch ab.
●
Kunststoffteile in heißem Wasser mit Geschirrspülmittel
reinigen.
●
Metallteile in heißem Wasser mit Geschirrspülmittel reini-
gen.
●
Die gewaschenen Teile müssen gründlich getrocknet
werden.
●
Die trockenen Teile der Zerkleinerungskammer oder des
Gemüsehobels zusammensetzen.
●
Vor Gebrauch alle Teile im Wasser mit etwas Waschmit-
tel reinigen. Sorgfältig abspülen und trocknen lassen.
●
Die Lochscheiben und die doppelseitige Messerscheibe
sollten gefettet bleiben. Mit Speiseöl einfetten.
Speisen aus Fleisch, Gemüse und Früchten
Machen Sie sich mit der Zubereitungsart von Speisen mit
Gemüse und Obst vertraut, um deren höchsten Nährwert zu
erhalten. Gemüse und Obst nicht im Wasser aufbewahren,
und direkt vor der Verwendung zerkleinern.
Schweinehackeisch-Koteletten
500 g Schweineeisch, 60 g trockenes Brötchen, 50 g Zwie-
bel, 20 g Öl, 1 Ei, 40 g Paniermehl, Öl zum Braten, Salz,
Pfeffer.
Das Brötchen im Wasser einweichen und abtropfen lassen.
Die Zwiebel in Ringe schneiden und goldbraun anbraten.
Das Fleisch abspülen und in Stückchen schneiden.
Das Brötchen, die Zwiebel und das Fleisch zweimal im
Küchengerät durch ein Sieb mit einem Öffnungsdurchmes-
ser von 4 mm mahlen. Ei, Salz und Pfeffer hinzugeben, und
sorgfältig zu einer einheitlichen Masse kneten. 8 ovale,
1,5 cm dicke Koteletten formen, und im Paniermehl wälzen.
Im heißen Fett braten.
Pastete aus gemischtem Fleisch
500 g Schweineeisch, 500 g Kalbseisch, 400 g Speck,
500 g Schweineleber, 300 g Zwiebel, 200 g Weizenbrötchen,
4 Eier, Salz und Pfeffer, Muskatnuss.
Das Fleisch mit dem Speck und den Zwiebeln andünsten.
Die Leber abspülen, von den Häuten befreien, in Stückchen
schneiden. Wenn das Fleisch weich ist, die Leber und das
Brötchen hinzugeben, und kurz garen, abkühlen lassen und
zweimal mit der Küchenmaschine durch das Sieb mit dem
Öffnungsdurchmesser von 4 mm mahlen.
Zur fertigen Masse Eier, Salz, Pfeffer und Muskatnuss hinzu-
geben und sorgfältig kneten.
Die Form mit Schmalz ausfetten, die Pastetenmasse hinein-
geben, und ca. 40 Minuten backen.
Hausgemachte Wurst
4,5 kg halbfettiges Schweineeisch, 0,5 kg Speck, 1 Glas
Knochenbrühe,6-7 Teelöffel Salz, 1 acher Teelöffel Salpeter,
1 Teelöffel Pfeffer (gemahlen), 12-15 Pimentkörner (mahlen),
5-6 Knoblauchzehen (zerhackt), 7 m Wursthaut.
Gemüsehobel
1
Raspeltrommel fein
2
Reibetrommel
3
Verschluss
4
Kammer
5
Vorratsschale
6
Stopfer
Wenn der Gemüsehobel verwendet wird, muss
der Adapter entfernt werden.
Der Gemüsehobel verfügt über zwei Raspeltrommeln. Die
erste dient zum feinen Raspeln (Käse, Karotten, Sellerien,
gekochte rote Rüben, usw.). Die andere dient zum Reiben
(Kartoffeln, rote Rüben, Obst usw.).
Arbeiten mit dem Gemüsehobel
1
Den Verschluss (3) öffnen und eine der Trommeln mit
der Kupplung zuerst in die Kammer einlegen.
2
Den Verschluss (3) schließen.
3
Die Kammer des Gemüsehobels (4) so anschließen, wie
die Zerkleinerungskammer.
●
Große Stücken vorher in Stücke schneiden, sodass sie
problemlos in die Kammer eingeführt werden können.
●
Zerkleinern Sie keine weichen Früchte mit harten Ker-
nen.
●
Nach Beendigung der Arbeit die Maschine ausschalten
und den Netzstecker aus der Steckdose ziehen.
●
Mit einem Holzlöffel die in der Trommel oder der Kam-
mer zurückgebliebenen Reste entfernen.
Die Schneiden der Trommeln müssen nicht
geschärft werden.
Nach Beendigung der Arbeit
●
Schalten Sie die Maschine aus und ziehen Sie den Stek-
ker aus der Steckdose.
1a
Den Stopfer herausnehmen (8) ,und die Schale von der
Zerkleinerungskammer (2) oder der Hobelkammer abnehmen.
1b
Den Stopfer herausnehmen (8) , und die Schale des
Gemüsehobels zusammen mit dem Adapter (7b) aus der
Zerkleinerungskammer, (2) oder die Schale des Gemüseho-
bels aus der Hobelkammer nehmen.
2
Den Einrastschalter drücken (1b), die Mahleinheit oder die
Gemüsehobelkammer nach rechts drehen und abnehmen.
3
Die Elemente der Zerkleinerungseinheit, der Kammer
mit dem Wurstaufsatz oder den Gemüsehobel auseinander-
nehmen.
G
H
E

19
Das Fleisch in der Küchenmaschine durch ein Sieb mit
einem Öffnungsdurchmesser von 8 mm mahlen. Das Salz
mit dem Salpeter und den Gewürzen mischen, zum Fleisch
hinzugeben, vermengen, nach und nach die Brühe hinzuge-
ben, und wie einen Kuchen formen. Für 24 h an einen kühlen
Ort stellen. Den Wurstaufsatz auf die Zerkleinerungskammer
der Küchenmaschine aufstecken. Die ca. 1 m lange Wurst-
haut füllen, und dabei Stücke von 30-40 cm formen. Darauf
achten, dass die Lüftungsöffnungen des Aufsatzes nicht
komplett verstopfen.
Die Wurst 6 h trocknen lassen. Im warmen Rauch über 14 h,
oder im heißen 2,5 h räuchern.
Sellerie-Rohkostsalat
400 g Sellerie, 200 g Äpfel, 2 Löffel Öl oder Sahne, Zitronen-
saft, Salz, Zucker.
Den Sellerie raspeln. Mit Sahne oder Öl abschmecken. Zuk-
ker, Zitronensaft und Salz hinzufügen.
Entsorgung
Entsorgen Sie die Verpackung um weltge-
recht. Dieses Gerät ist ent sprechend der
europäischen Richtlinie 2012/19/EU über Elek-
tround Elektronikaltgeräte (waste electrical
and electronic equipment – WEEE) gekennze-
ichnet. Die Richtlinie gibt den Rahmen für eine
EU-weit gültige Rücknahme und Verwertung der Altgeräte
vor. Über aktuelle Entsorgungswege bitte beim Fachhändler
informieren.
Der Hersteller haftet nicht für eventuelle Schäden, die durch einen
bestimmungswidrigen Gebrauch oder durch eine nicht sachgerechte
Bedienung des Gerätes entstanden sind.
Der Hersteller behält sich vor, jederzeit Änderungen ohne vorherige
Ankündigung zwecks Anpassung an die geltenden Rechtsvorschri-
ften, Normen und Richtlinien oder aus konstruktionsbedingten,
geschäftlichen, ästhetischen oder anderen Gründen vorzunehmen.

20
Stimaţi Clienţi!
Vă felicităm pentru că aţi ales aparatul nostru şi vă urăm
bun-venit în rândul utilizatorilor de produse ale rmei Zelmer.
Pentru a obţine cele mai bune rezultate vă recomandăm să
folosiţi doar accesoriile originale fabricate de rma Zelmer.
Accesoriile au fost proiectate special pentru acest produs.
Vă rugăm să citiţi cu atenţie aceste instrucţiuni. O atenţie
deosebită trebuie acordată indicaţiilor privind siguranţa folo-
sirii aparatului. Vă sfătuim să păstraţi instrucţiunile de utili-
zare, pentru a le putea folosi şi mai târziu, în cursul utilizării
ulterioare a aparatului.
Trăsături caracterisitce ale dispozitivului
Maşina de tocat produse alimentare este folosită în gospodă-
ria casnică. Este o maşină multifuncţională, cu ajutorul căreia
puteţi toca repede şi fără efort: carne, brânză, legume, mac
şi de asemenea să pregătiţi salam şi mezeluri. Folosind unul
din elementele suplimentare ale maşinii – răzătoarea puteţi
tăia legume petru salate şi ghiveci.
Indicaţii cu privire la siguranţa şi utilizarea
corespunzătoare a maşinii
Înainte de a începe utilizarea dispozitivului citiţi cu
atenţie întregul manual de instrucţiuni de deservire.
Asiguraţi-vă că toate indicaţiile au fost foarte bine înţe-
lese.
● În cazul în care aţi observat defecţi-
uni luaţi legătura cu punctul de ser-
vice specializat ZELMER.
● Păstraţi o deosebită prudenţă atunci
când folosiţi dispozitivul în prezenţa
copiilor.
● Înainte de a înlocui echipamentul
sau înainte de a vă apropia de pie-
sele care sunt în mişcare în timpul
utilizării, dispozitivul trebuie oprit
şi, de asemenea, trebuie decuplat
de la sursa de alimentare cu curent
electric.
● Întotdeauna deconectaţi dispozitivul
de la reţeaua de alimentare cu curent
electric atunci când acesta este lăsat
fără supraveghere, sau înainte de
montarea acestuia, demontare sau
curăţare.
● Dispozitivul nu trebuie să e folosit
de către copii. Depozitaţi dispozitivul
împreună cu cablul de alimentare cu
curent electric într-un loc care nu se
găseşte la îndemâna copiilor.
● Acest dispozitiv poate folosit de
persoane cu capacităţi zice, sen-
zoriale şi mentale limitate şi de către
persoanele fără experienţă care nu
cunosc dispozitivul, dar numai sub
supraveghere sau dacă înainte de
folosire le-au fost explicate în mod
foarte clar pericolele şi au fost instru-
ite cu privire la modul de folosire în
siguranţă a dispozitivului.
● Dispozitivul trebuie asigurat în aşa
fel încât copii să nu aibă posibilitatea
de a se juca cu acesta.
● Dispozitivul poate folosit numai
împreună cu recipientul de umplere
conductor.
PERICOL! / ATENŢIONARE!
Ne-respectarea regulilor poate
provoca răni
● Nu porniţi dispozitivul dacă, conduc-
torul de alimentare este deteriorat
sau carcasa este deteriorată în mod
vizibil.
● În cazul în care cablul de alimen-
tare ne-decuplabil, este deteriorat,
acesta trebuie înlocuit la producător
sau într-un atelier de reparaţii speci-
alizat de către o persoană calicată,
cu scopul de a evita pericolul.
● Dispozitivul poate reparat numai de
către persoane special şcolarizate în
acest domeniu. Reparaţia care este
realizată incorect poate cauza un
pericol serios pentru utilizator.
RO
Pagina se încarcă...
Pagina se încarcă...
Pagina se încarcă...
Pagina se încarcă...
Pagina se încarcă...
Pagina se încarcă...
Pagina se încarcă...
Pagina se încarcă...
Pagina se încarcă...
Pagina se încarcă...
Pagina se încarcă...
Pagina se încarcă...
Pagina se încarcă...
Pagina se încarcă...
Pagina se încarcă...
Pagina se încarcă...
Pagina se încarcă...
Pagina se încarcă...
Pagina se încarcă...
Pagina se încarcă...
-
 1
1
-
 2
2
-
 3
3
-
 4
4
-
 5
5
-
 6
6
-
 7
7
-
 8
8
-
 9
9
-
 10
10
-
 11
11
-
 12
12
-
 13
13
-
 14
14
-
 15
15
-
 16
16
-
 17
17
-
 18
18
-
 19
19
-
 20
20
-
 21
21
-
 22
22
-
 23
23
-
 24
24
-
 25
25
-
 26
26
-
 27
27
-
 28
28
-
 29
29
-
 30
30
-
 31
31
-
 32
32
-
 33
33
-
 34
34
-
 35
35
-
 36
36
-
 37
37
-
 38
38
-
 39
39
-
 40
40


Zelmer ZMM3853W Fleischwolf Manual de utilizare
- Categorie
- Tocătoare
- Tip
- Manual de utilizare
- Acest manual este potrivit și pentru
în alte limbi
Lucrări înrudite
Alte documente
-
Hendi 297766 Manual de utilizare
-
Adler AD 4130 Instrucțiuni de utilizare
-
Philips HR3955/01 Product Datasheet
-
Blaupunkt FMM301 Meat Mincer Manualul proprietarului
-
Bosch MFWS440B/01 Instrucțiuni de utilizare
-
Moulinex ME61013E Manual de utilizare
-
Hendi 298831 Manual de utilizare
-
-
Tefal NE108831 Manual de utilizare
-