Ambu aScope™ 4 Broncho Sampler Set Instrucțiuni de utilizare
- Tip
- Instrucțiuni de utilizare

Ambu® aScope™ 4
Broncho Sampler Set Family
INSTRUCTIONS
FOR USE
For use by trained clinicians/physicians only.
For in-hospital use.
For use with Ambu® displaying units.
Ambu® aScope™ 4 Broncho Regular Sampler Set
Ambu® aScope™ 4 Broncho Large Sampler Set

a
b
e f g
e f g h
h

Contents Page
English (Instruction for use) ..................................................................................................................................4-15
Български (Инструкция за употреба) ........................................................................................................16-28
Čeština (návod k použití).................................................................................................................................... 29-40
Dansk (brugsanvisning) ....................................................................................................................................... 41-52
Deutsch (Bedienungsanleitung) ......................................................................................................................53-65
Ελληνικά (Οδηγίες χρήσης) ................................................................................................................................66-79
Español (Instrucciones de uso) ........................................................................................................................ 80-92
Eesti (Kasutusjuhend) .........................................................................................................................................93-104
Käyttöohje (suomi) ............................................................................................................................................105-116
Français (Mode d'emploi) ................................................................................................................................117-129
Hrvatski (Upute za upotrebu) ....................................................................................................................... 130-141
Magyar (Használati útmutató) ......................................................................................................................142-153
Italiano (Istruzioni per l'uso).......................................................................................................................... 154-165
日 本 語( 使 用 説 明 書 ) ...................................................................................................................................... 166-176
Lietuviškai (naudojimo instrukcija) .............................................................................................................177-188
Latviešu val. (Lietošanas pamācība) ..........................................................................................................189-200
Nederlands (Gebruiksaanwijzing) ...............................................................................................................201-213
Norsk (Bruksanvisning) ...................................................................................................................................214-225
Polski (Instrukcja obsługi) ..............................................................................................................................226-238
Português (Instruções de utilização) ......................................................................................................... 239-251
Română (Instrucțiuni de utilizare) ..............................................................................................................252-264
Slovenčina (Návod na použitie) ................................................................................................................... 265-277
Slovenšcina (Navodila za uporabo) ............................................................................................................278-289
Svenska (Instruktionshandbok) ...................................................................................................................290-301
Türkçe (Kullanım talimatları) ......................................................................................................................... 302-313
中 文( 使 用 说 明 ) ............................................................................................................................................. 314-323

4
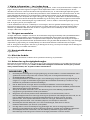
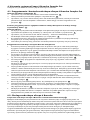
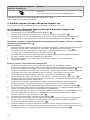
1. Important information – Read before use
Read these safety instructions carefully before using the aScope4 Broncho Sampler Set.
The Instructions for use may be updated without further notice. Copies of the current version
are available upon request. Please be aware that these instructions do not explain or discuss
clinical procedures. They describe only the basic operation and precautions related to the
operation of the endoscope and BronchoSampler. Before initial use of the Sampler Set, it is
essential for operators to have received sufficient training in clinical endoscopic techniques
and to be familiar with the intended use, warnings, cautions, indications and contraindications
mentioned in these instructions.
There is no warranty on the sampler set.
In this document endoscope refers to instructions which applies to the endoscope only and
system refers to information relevant for the aScope 4 Broncho and the compatible Ambu
displaying unit and accessories. Unless specified otherwise, endoscope refers to all aScope4
Broncho variants available for sampler set.
1.1. Intended use
aScope4 Broncho Sampler Set consists of sterile, single-use, flexible endoscope with sample
containers (aScope BronchoSampler), intended for endoscopic procedures and examination
within the airways and tracheobronchial tree. aScope BronchoSampler is designed as an add-
on to aScope4 Broncho during Bronchial Alveolar Lavage (BAL) or Bronchial Wash (BW)
procedure which enables aspiration and collection of fluid sample(s) from the bronchial or
alveolar part of the lung.
It is designed for use in adults and intended for use in a hospital environment. It is intended to
provide visualization via Ambu Displaying Unit.
1.2. Contra indications
None known.
1.3. Clinical benefits
Single use application minimises the risk of cross-contamination of the patient.
1.4. Warnings and cautions
Failure to observe these warnings and cautions may result in patient injury or damage to the
equipment. Ambu is not responsible for any damage to the system or patient injury
resulting from incorrect use.
WARNINGS
1. The endoscope is a single-use device and must be handled in a manner consistent
with accepted medical practice for such devices in order to avoid contamination of
the endoscope prior to insertion.
2. The endoscope images must not be used as an independent diagnostic of any
pathology. Physicians must interpret and substantiate any finding by other means
andin the light of the patient's clinical characteristics.
3. Do not use active endoscopic accessories such as laser probes and electrosurgical
equipment in conjunction with the endoscope, as this may result in patient injury or
damage to the endoscope.
4. The device should not be used if adequate supplemental oxygenation cannot be
provided to the patient during the procedure.
5. The user must exercise professional judgement when deciding whether a bronchoscopy
procedure will be appropriate for patients with the following conditions, since they have
a higher rate of serious complications; malignant arrhythmia, unstable cardiac status,
acute myocardial infraction within 4-6 weeks, refractory hypoxemia, bleeding diathesis
or severe thrombocytopenia if biopsy is indicated.
6. Do not use the endoscope if it is damaged in any way or if any part of the functional
check (see section 4.1) fails.
7. Do not attempt to clean and reuse the endoscope as it is a single-use device.
Reuse of the product can cause contamination, leading to infections.

5
en
8. The endoscope is not to be used when delivering oxygen or highly flammable
anaesthetic gases to the patient. This could potentially cause patient injury.
9. The endoscope is not to be used in a MRI environment.
10. Do not use the endoscope during defibrillation.
11. Only to be used by skilled physicians trained in clinical endoscopic techniques
and procedures.
12. Do not use excessive force when advancing, operating or withdrawing the endoscope.
13. Patients should be adequately monitored at all times during use.
14. Always watch the live endoscopic image on the displaying unit when advancing or
withdrawing the endoscope, operating the bending section or suctioning. Failure to
do so may harm the patient.
15. Do not use the endoscope if the product sterilisation barrier or its packaging is damaged.
16. The distal tip of the endoscope may get warm due to heating from the light emission
part. Avoid long periods of contact between the distal tip and the mucosal membrane
as long, sustained contact with the mucosal membrane may cause mucosal injury.
17. Always make sure that any tube connected to the suction connector is connected to
asuction device.
18. When withdrawing the endoscope, the distal tip must be in neutral and non-deflected
position. Do not operate the control lever, as this may result in injury to the patient
and/or damage to the endoscope.
19. Do not advance or withdraw the endoscope, or operate the bending section,
whileendoscopic accessories are protruding from the distal tip of the working
channel, asthis may result in injury to the patient.
20. Always make sure that the bending section is in a straight position when inserting or
withdrawing an endoscopic accessory in the working channel. Do not operate the
control lever and never use excessive force, as this may result in injury to the patient
and/or damage to the endoscope.
21. Always perform a visual check according to the instructions in this Instructions for Use
before placing the endoscope in a waste container.
22. Electronic equipment and the endoscope system may affect the normal function of
each other. If the system is used adjacent to or stacked with other equipment, observe
and verify normal operation of both the system and the other electronic equipment
prior to using it. It may be necessary to adopt procedures for mitigation, such as
reorientation or relocation of the equipment or shielding of the room in which it is used.
23. The endoscope consists of parts supplied by Ambu. These parts must only be replaced
by Ambu authorised parts. Failure to comply with this may result in patient injury.
24. Be careful to check whether the image on the screen is a live image or a recorded
image and verify that the orientation of the image is as expected.
25. To avoid risk of electric shock, the system must only be connected to a supply mains
with protective earth. To disconnect the system from mains remove the mains plug
from the wall outlet.
26. Always check compatibility with endotracheal tubes and double lumen tubes.
27. If any malfunction should occur during the endoscopic procedure, stop the procedure
immediately and withdraw the endoscope.
28. Insert the syringe completely into the working channel port before instilling fluid.
Failure to do so may result in the fluid spilling from the working channel port.
CAUTIONS
1. Have a suitable backup system readily available for immediate use so the procedure
can be continued if a malfunction should occur.
2. Be careful not to damage the insertion cord or distal tip when using sharp devices
such as needles in combination with the endoscope.
3. Be careful when handling the distal tip and do not allow it to strike other objects,
asthis may result in damage to the equipment. The lens surface of the distal tip is
fragile and visual distortion may occur.

6
4. Do not exert excessive force on the bending section as this may result in damage to
the equipment. Examples of inappropriate handling of the bending section include:
– Manual twisting.
– Operating it inside an ETT or in any other case where resistance is felt.
– Inserting it into a preshaped tube or a tracheostomy tube with the bending
direction not aligned with the curve of the tube.
5. US federal law restricts these devices for sale only by, or on the order of, a physician.
6. Keep the endoscope handle dry during preparation, use and storage.
7. Do not use a knife or other sharp instrument to open the pouch or cardboard box.
8. Secure the tubing properly on the suction connector before suction is applied.
9. If needed remove secretion or blood from the airway before and during the
procedure. The suction function of any appropriate suction device can be used for
thispurpose.
10. Apply a vacuum of 85kPa (638mmHg) or less when suctioning. Applying too large
avacuum may make it difficult to terminate suctioning.
11. For single use only. Use on other patients can cause cross contamination. Do not soak,
rinse, or sterilize this device as these procedures may leave harmful residues or cause
malfunction of the device.
1.5. Potential adverse events
Potential adverse events in relation to flexible bronchoscopy (not exhaustive): Tachycardia/
bradycardia, hypotension, bleeding, bronchospasm/laryngospasm, cough, dyspnoea, sore
throat, apnoea, seizure, desaturation/hypoxemia, epistaxis, haemoptysis, pneumothorax,
aspiration pneumonia, pulmonary oedema, airway obstruction, reaction to drug or topical
anaesthesia, fever/infection, and respiratory/cardiac arrest.
1.6. General notes
If, during the use of this device or as a result of its use, a serious incident has occurred,
please report it to the manufacturer and to your national authority.
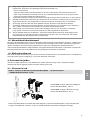
2. System description
The aScope 4 Broncho can be connected to the Ambu displaying unit. For information about
the Ambu displaying unit, please refer to the displaying unit Instruction for use.
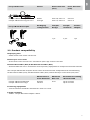
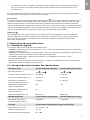
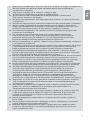
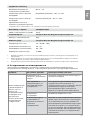
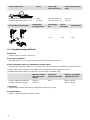
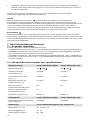
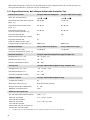
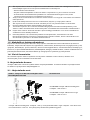
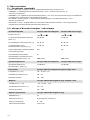
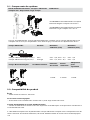
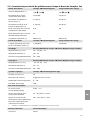
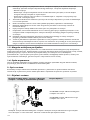
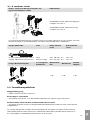
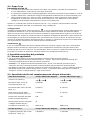
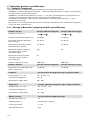
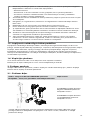
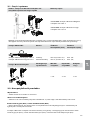
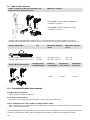
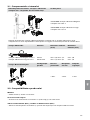
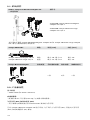
2.1. System parts
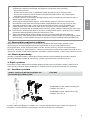
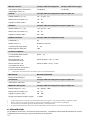
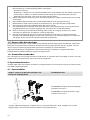
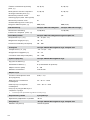
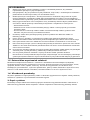
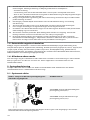
Ambu® aScope™ 4 Broncho Sampler Set -
Single use device
Part numbers
477501000 aScope 4 Broncho Regular
Sampler Set 5.0/2.2
478501000 aScope 4 Broncho Large
Sampler Set 5.8/2.8
aScope 4 Broncho Regular Sampler Set and aScope4 Broncho Large Sampler Set are not
available in all countries. Please contact your local sales office.

7
en
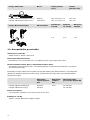
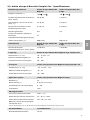
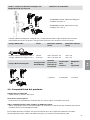
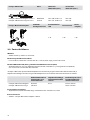
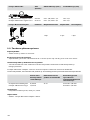
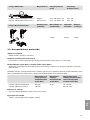
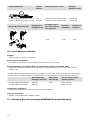
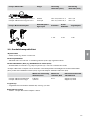
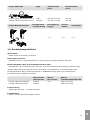
aScope 4 Broncho Colour Outer diameter
[mm]
Inner diameter
[mm]
aScope4 Broncho Regular 5.0/2.2
aScope4 Broncho Large 5.8/2.8
Green
Orange
min 5.0; max 5.5
min 5.8; max 6.3
min 2.0
min 2.6
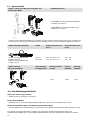
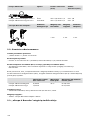
aScope BronchoSampler Packaging
configuration
Sampler
bridge
Sample
container
Suction
adapter
1 pc 2 pcs 1 pc
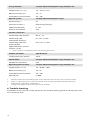
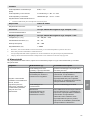
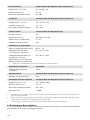
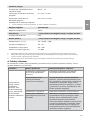
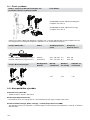
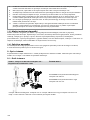
2.2. Product compatibility
Displaying unit
– Ambu aView and aView2 Advance.
Endoscopic accessories
– Accessories with standard 6 % Introducer (Luer slip) and/or Luer lock.
Endotracheal tubes (ETT) & Double lumen tubes (DLT)
– Tracheal tubes for use in anaesthetic and respiratory equipment in compliance with EN ISO 5361.
The aScope 4 Broncho Sampler Set has been evaluated to be compatible with the following
endotracheal tubes (ETT), double lumen tubes (DLT) and Endoscopic accessories (EA) sizes.
Minimum ETT
Inner diameter
Minimum
DLT size
EA minimum working
channel width
aScope 4 Broncho Regular
aScope 4 Broncho Large
6.0mm
7.0mm
41Fr Up to 2.0mm
Up to 2.6mm
Suctioning equipment
– Suction tube of diameters between 6.5mm & 9.5mm.
Sample container
– Ambu® aScope BronchoSampler™ 60 SC.

8
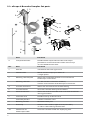
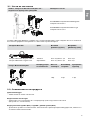
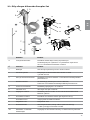
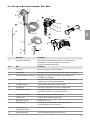
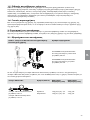
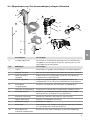
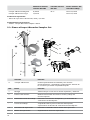
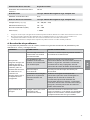
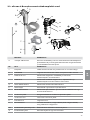
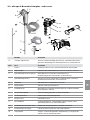
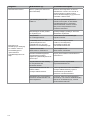
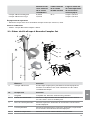
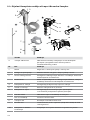
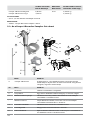
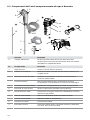
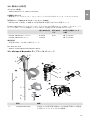
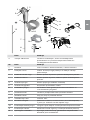
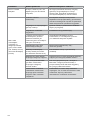
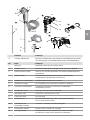
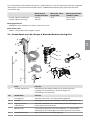
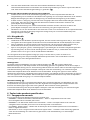
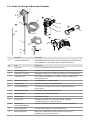
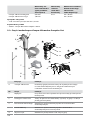
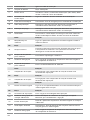
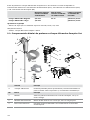
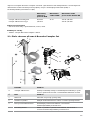
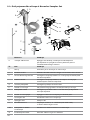
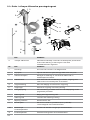
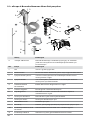
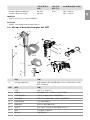
2.3. aScope 4 Broncho Sampler Set parts
3
4
5
12
7
6
8
9
10
11
12 19
C
B15
17
18
16
20
24
23 22 21
D
A
13
14
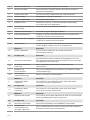
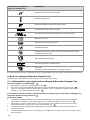
Item Function
AaScope4 Broncho Flexible endoscope intended for endoscopic
procedures and examination within the airways
andtracheobronchial tree.
No. Part Function
1Handle Suitable for left and right hand.
2Control lever Moves the distal tip up or down in
a single plane.
3Working channel port Allows for instillation of fluids and insertion of
endoscopic accessories.
-Working channel Can be used for instillation of fluids,
suctionandinsertion of endoscopic accessories.
4Suction connector Allows for connection of suction tubing.
5Suction button Activates suction when pressed down.
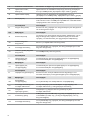
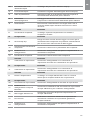
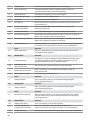
6Tube connection Allows for fixation of tubes with standard connector
during procedure.
7Insertion cord Flexible airway insertion cord.
Insertion portion Same as insertion cord.
8Bending section Manoeuvrable part.
9Distal tip Contains the camera, light source (two LEDs),
as well as the working channel exit.
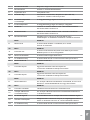
10 Connector on
endoscope cable
Connects to blue socket on displaying unit.

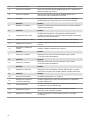
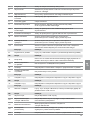
9
en
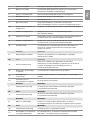
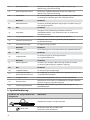
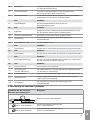
11 Endoscope cable Transmits the image signal to the displaying unit.
12 Protection pipe Protects the insertion cord during transport and storage.
Remove before use.
13 Handle protection Protects the suction connector during transport
andstorage. Remove before use.
14 Introducer To facilitate introduction of Luer Lock syringes and soft
endoscopic accessories through the working channel.
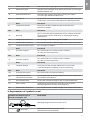
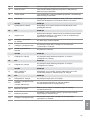
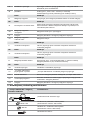
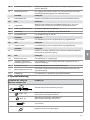
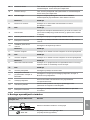
Item Function
BSample container Connects to the sampler bridge and holds the
retrievedsample.
No. Part Function
15 Flip top
Acts as click-on locking mechanism for sample container.
To be pressed down anteriorly to disengage locking
mechanism.
16 Sample container lid For closing and protecting the sample.
17 Connection interface For connection of sampler bridge and sample container.
18 Sample container glass For storage of sample.
Item Function
CSuction adapter For connection to a male suction adapter
and the suction connector.
No. Part Function
19 Suction adapter For connection to a male suction adapter
and the suction connector.
Item Function
DSampler bridge Connects to the aScope 4 Broncho, and creates
aclosed loop for sampling and/or suctioning.
No. Part Function
20 Suction connector For connection of suction tubing.
21 aScope 4 Broncho
connection interface
For introduction of aScope4 Broncho suction connector,
to establish connection.
22 Attachment lock Locks the sampler bridge to the aScope4 Broncho.
23 Flow switch Determines suction flow direction and switches
between general suction and sampling.
24 Connection interface For connection of sampler bridge and sample container.
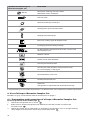
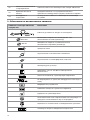
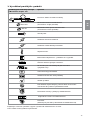
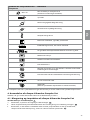
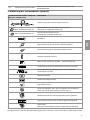
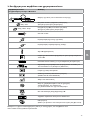
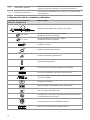
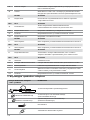
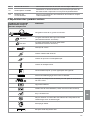
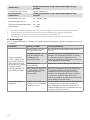
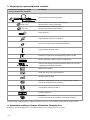
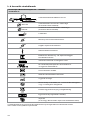
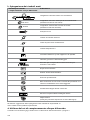
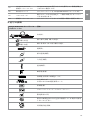
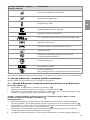
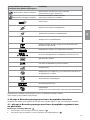
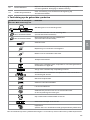
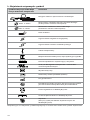
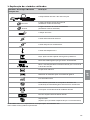
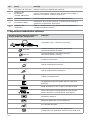
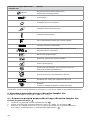
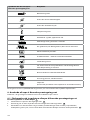
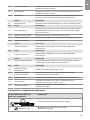
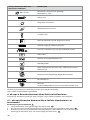
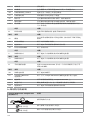
3. Explanation of symbols used
Symbols for the aScope4
Broncho Sampler Set
Indication
Working length of the insertion cord.
Max OD Maximum insertion portion width
(Maximum outer diameter).

10
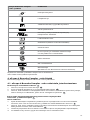
Symbols for the aScope4
Broncho Sampler Set
Indication
Min ID Minimum working channel width
(Minimum inner diameter).
Field of view.
%Relative humidity limitation.
Atmospheric pressure limitation.
Temperature limitation.
Electrical Safety Type BF Applied Part.
Packaging level ensuring sterility.
UL Recognized Component Mark for Canada and
theUnited States.
Medical device.
Global Trade Item Number.
Country of manufacturer.
Do not use if the product sterilisation barrier
or its packaging is damaged.
UK Conformity Assessed.
UK Responsible Person.
Importer
(For products imported into Great Britain only).
A supplementing list of symbol explanations can be found on www.ambu.com/symbol-explanation.
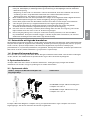
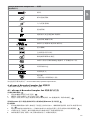
4. Use of aScope 4 Broncho Sampler Set
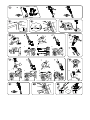
Numbers in gray circles below refer to illustrations on page 2.
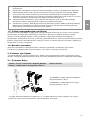
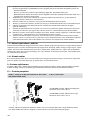
4.1. Preparation and inspection of aScope 4 Broncho Sampler Set
Visual inspection of the endoscope 1
1. Check that the pouch seal is intact. 1a
2. Make sure to remove the protective elements from the handle and from the
insertioncord. 1b
3. Check that there are no impurities or damage on the product such as rough surfaces,
sharp edges or protrusions which may harm the patient. 1c

11
en
Refer to the Ambu displaying unit Instruction for use for preparation and inspection
of the Ambu displaying unit 2
Inspection of the image
1. Plug in the endoscope cable connector into the corresponding connector on the
compatible displaying unit. Please ensure the colours are identical and be careful to align
the arrows. 3
2. Verify that a live video image appears on the screen by pointing the distal tip of the
endoscope towards an object, e.g. the palm of your hand. 4
3. Adjust the image preferences on the displaying unit if necessary (please refer to the
displaying unit Instruction for use).
4. If the object cannot be seen clearly, wipe the lens at the distal tip using a sterile cloth.
Preparation of aScope 4 Broncho Sampler Set
1. Carefully slide the control lever forwards and backwards to bend the bending section as
much as possible. Then slide the control lever slowly to its neutral position. Confirm that
thebending section functions smoothly and correctly and returns to a neutral position. 5a
2. Using a syringe insert 2ml of sterile water into the working channel port (if applying a
Luer Lock syringe use the enclosed introducer). Press the plunger, ensure that there are
noleaks, and that water is emitted from the distal tip. 5b
3. If applicable, prepare the suction equipment according to the supplier’s manual. 5c
Connect the suctioning tube to the suction connector and press the suction button to
check that suction is applied.
4. If applicable, verify that endoscopic accessory of appropriate size can be passed through
the working channel without resistance. The enclosed introducer can be used to facilitate
the insertion of soft accessories such as microbiology brushes. 5d
5. If applicable, verify that endotracheal tubes and double lumen tubes are compatible with
endoscope before starting the procedure.
6. Carefully connect the sampler bridge of the BronchoSampler with the aScope4 Broncho,
by mounting the sampler bridge on the aScope4 Broncho suction connector. Ensure a
tight fit. 5e
7. Press the attachment lock button to secure connection. 5f
8. Carefully connect the vacuum suction tubing to the suction connector according to the
supplier’s manual. If vacuum suction tubing has male connector, use the suction adapter
to ensure fit. 5g
9. Attach the sample container to the sampler bridge by joining the connection interfaces
and pressing the sample container towards the sampler bridge. Ensure the sample
container is clicked on. Do not use preservatives in the sample container. 5h
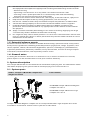
4.2. Operating the aScope 4 Broncho
Holding the aScope 4 Broncho and manipulating the tip 6a
The handle of the endoscope can be held in either hand. The hand that is not holding the
endoscope can be used to advance the insertion cord into the patient’s mouth or nose.
Use the thumb to move the control lever and the index finger to operate the suction button.
The control lever is used to flex and extend the distal tip of the endoscope in the vertical plan.
Moving the control lever downward will make the tip bend anteriorly (flexion). Moving it
upward will make the distal tip bend posteriorly (extension). The insertion cord should be held
as straight as possible at all times in order to secure an optimal distal tip bending angle.
Tube connection 6b
The tube connection can be used to mount ETT and DLT with an ISO connector during intubation.
Insertion of the aScope 4 Broncho 7a
Lubricate the insertion cord with a medical grade lubricant when the endoscope is inserted
into the patient. If the camera image of the endoscope becomes unclear the distal tip can be
cleaned by gently rubbing the distal tip against the mucosal wall or remove the endoscope
and clean the tip. When inserting the endoscope orally, it is recommended to use amouthpiece
to protect the endoscope from being damaged.

12
Instillation of fluids 7b
Fluids can be instilled through the working channel by inserting a syringe into the working
channel port at the top of the endoscope. When using a Luer Lock syringe, use the included
introducer. Insert the syringe completely into the working channel port or the introducer and
press the plunger to instill fluid. Make sure you do not apply suction during this process, as this
will direct the instilled fluids into the suction collection system. To ensure that all fluid has left
the channel, flush the channel with 2 ml of air. It is recommended to remove introducer from
the working channel port when it is not in use.
Aspiration 7c
When a suction system is connected to the suction connector, suction can be applied by pressing
the suction button with the index finger. If the introducer and/or an endoscopic accessory is
placed inside the working channel note that the suction capability will be reduced. For optimal
suction capability it is recommended to remove the introducer or syringe entirely during suction.
Insertion of endoscopic accessories 7d
Always make sure to select the correct size endoscopic accessory for the endoscope (refer to
section 2.2). Inspect the endoscopic accessory before using it. If there is any irregularity in its
operation or external appearance, replace it. Insert the endoscopic accessory into the working
channel port and advance it carefully through the working channel until it can be seen on
the displaying unit. The enclosed introducer can be used to facilitate the insertion of soft
accessories such as microbiology brushes.
Operating with the Broncho Sampler Set
1. If suction is deemed relevant before sampling, ensure that the flow switch is aligned
vertically and pointing upwards, and perform suction by pressing the suction button on
the aScope 4 Broncho in accordance with Instruction for use for aScope 4 Broncho. 7e
2. To prepare for sampling of specimen, turn the flow switch counter-clockwise towards
thesample container, and align it horizontally. 7f
3. Perform sampling by pressing the suction button on the aScope 4 Broncho. Do not fill
thesample container above the maximum of the volume indicator scale.
4. If suction is deemed relevant, turn the flow switch clockwise to align it vertically and
pointing upwards, and press the suction button on the aScope 4 Broncho. When suction
is complete, turn the flow regulator counter-clockwise towards the sample container,
andalign it horizontally.
5. Remove the sample container by pressing the flip top, and pull the sample container from
the sampler bridge. 7g
6. Close the sample container by pressing the sample container lid towards the sample
container interface and engage the click-lock. Once the click-lock is engaged, do not
re-open the lid. 7h
Withdrawal of the aScope 4 Broncho Sampler Set
1. If deemed relevant, detach the sampler bridge from the aScope 4 Broncho by disengaging
the attachment lock, and pull the sampler bridge off the aScope 4 Broncho. Disengage
suction by pulling the suction tube off the sampler bridge.
2. If deemed relevant, the sample can be accessed by unscrewing the sample container glass
counter-clockwise. It is recommended to handle contaminated substances in accordance
with local guidelines. 8a
3. Transportation and handling of sample container must be performed in accordance with
local guidelines for transportation and handling of hazardous material.
4. When withdrawing the aScope 4 Broncho, make sure that the control lever is in the
neutral position. Slowly withdraw the endoscope while watching the live image on
thedisplaying unit. 8b
4.3. After use
Visual check 9
1. Are there any missing parts on the bending section, lens, or insertion cord? If yes, then
take corrective action to locate the missing part(s).
2. Is there any evidence of damage on the bending section, lens, or insertion cord? If yes,
then examine the integrity of the product and conclude if there are any missing parts.

13
en
3.
Are there cuts, holes, sagging, swelling or other irregularities on the bending section,
lens, or insertion cord? If yes, then examine the product to conclude if there are any
missing parts.
In case of corrective actions needed (step 1 to 3) act according to local hospital procedures.
The elements of the insertion cord are radio opaque.
Disconnect
Disconnect the endoscope from the displaying unit 10 . The aScope 4 Broncho Sampler Set is
asingle use device. The aScope 4 Broncho Sampler Set is considered infected after use and
must be disposed of in accordance with local guidelines for collection of infected medical
devices with electronic components. Do not soak rinse, or sterilize this device as these procedures
may leave harmful residues or cause malfunction of the device. The design and material used
are not compatible with conventional cleaning and sterilization procedures.
Disposal 11
The sampler set is for single-use only. This means that all components must be disposed
ofonce opened and unused components cannot be saved for later use. The disposal must
bein accordance with local guidelines for collection of infected medical devices with
electronic components.
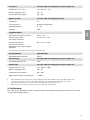
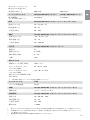
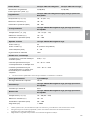
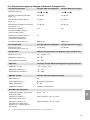
5. Technical product specifications
5.1. Standards applied
The aScope 4 Broncho Sampler Set conforms with:
– EN 60601-1 Medical electrical equipment – Part 1: General requirements for basic safety and
essential performance.
– EN 60601-2-18 Medical electrical equipment – Part 2-18: Particular requirements for the basic
safety and essential performance of endoscopic equipment.
– ISO 8600-1: Endoscopes - Medical endoscopes and endotherapy devices – Part 1:
General requirements.
– EN 14254: In Vitro Diagnostic medical devices – Single-use receptacles for the collection of
specimens, other than blood, from humans.
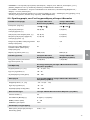
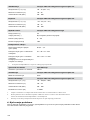
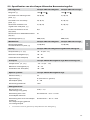
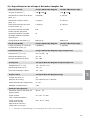
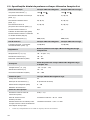
5.2. aScope 4 Broncho Sampler Set specifications
Insertion cord aScope 4 Broncho Regular aScope 4 Broncho Large
Bending section¹ [°] 180 ,180 180 ,160
Insertion cord diameter [mm, (”)]
5.0 (0.20) 5.8 (0.23)
Distal tip diameter [mm, (”)] 5.4 (0.21) 6.3 (0.25)
Maximum diameter of
insertion portion [mm, (”)]
5.5 (0.22) 6.3 (0.25)
Minimum endotracheal
tube size (ID) [mm]
6.0 7.0
Minimum double lumen
tube size (ID) [Fr]
41 -
Working length [mm, (”)] 600 (23.6) 600 (23.6)
Working channel aScope 4 Broncho Regular aScope 4 Broncho Large
Minimum instrument
channel width² [mm, (”)]
2.0 (0.079) 2.6 (0.102)
Storage aScope 4 Broncho Regular/Large Sampler Set
Temperature³ [°C, (°F)] 10 – 25 (50 – 77)
Relative humidity [%] 10 – 85
Atmospheric pressure [kPa] 50 – 106

14
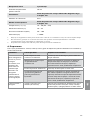
Transportation aScope 4 Broncho Regular/Large Sampler Set
Temperature³ [°C, (°F)] -10 – 55 (14 – 131)
Relative humidity [%] 10 – 95
Atmospheric pressure [kPa] 50 – 106
Optical system aScope 4 Broncho Regular/Large
Field of View [°] 85
Direction of view [°] 0 (forward pointing)
Depth of Field [mm] 6 – 50
Illumination method LED
Suction connector
Connecting tube ID [mm] Ø 6.5 – 9.5
Connecting tube
with female interface
ID = Ø 7 ± 1mm
Connecting tube with
male interface.
Applicable when suction
adapter is used
OD = Ø 7 ± 1mm
1. Please check for compatibility with suction tubing before use
Sample container Specification
Sample Container volume 30ml
Sterilisation aScope 4 Broncho Regular/Large Sampler Set
Method of sterilisation ETO
Operating environment aScope 4 Broncho Regular/Large Sampler Set
Temperature [°C, (°F)] 10 – 40 (50 – 104)
Relative humidity [%] 30 – 85
Atmospheric pressure [kPa] 80 – 106
Altitude [m] ≤ 2000
1. Please be aware that the bending angle can be affected if the insertion cord is not kept straight.
2. There is no guarantee that accessories selected solely using this minimum instrument channel
width will be compatible in combination.
3. Storage under higher temperatures may impact shelf life.
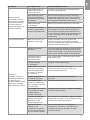
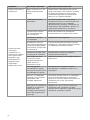
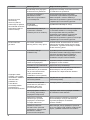
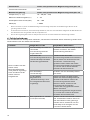
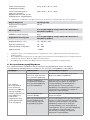
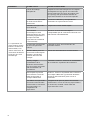
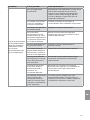
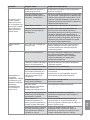
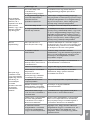
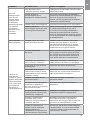
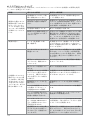
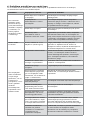
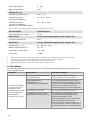
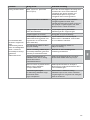
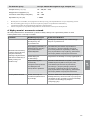
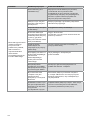
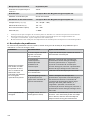
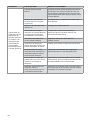
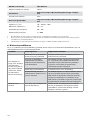
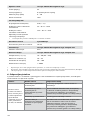
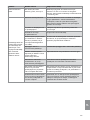
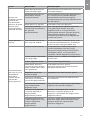
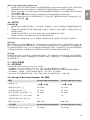
6. Trouble shooting
If problems occur with the system, please use this trouble shooting guide to identify the cause
and correct the error.

15
en
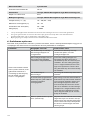
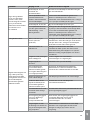
Problem Possible cause Recommended action
No live image
on the left side of
the screen but User
Interface is present
on the display or
the image shown to
the left is frozen.
The endoscope not
connected to the
displaying unit.
Connect an endoscope to the blue port
on the displaying unit.
The displaying unit
and the endoscope
have communication
problems.
Restart the displaying unit by pressing
the power button for at least 2 seconds.
When the displaying unit is off restart by
pressing power button once more.
The endoscope
is damaged.
Replace the endoscope with a new one.
A recorded image is
shown in the yellow
file management tab.
Return to live image by pressing the blue
live image tab or restart the displaying
unit by pressing the power button for at
least 2 seconds. When the displaying unit
is off restart by pressing power button
once more.
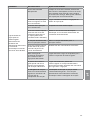
Low picture quality. Blood, saliva etc. on
the lens (distal tip).
Gently rub the distal tip against the
mucosa. If the lens cannot be cleaned
this way remove the endoscope and wipe
the lens with sterile gauze.
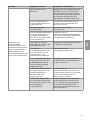
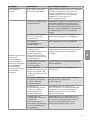
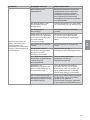
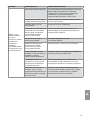
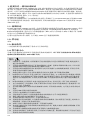
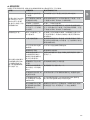
Absent or
reduced suction or
sampling capability
or difficulty in
inserting endoscopic
accessory through
the working channel.
Working channel
blocked.
Clean the working channel using a cleaning
brush or flush the working channel with
sterile saline using a syringe. Do not operate
the suction button when instilling fluids.
Suction pump is
not turned on or
not connected.
Turn the pump on and check the suction
line connection.
Suction button
is damaged.
Prepare a new endoscope.
Endoscopic accessory
inserted in working
channel (applicable
if suction is absent
or reduced).
Remove endoscopic accessory.
Check that the accessory used is of
the recommended size.
Bending section not
in neutral position.
Move bending section into neutral
position.
Soft endoscopic
accessory difficult to
pass through working
channel port.
Use one of the enclosed introducers.
No sample container
is attached, or poor
connection of
sample container.
Connect or re-connect sample container
to the sampler bridge.
Sampler bridge may
not be connected
properly to the
aScope 4 Broncho.
Re-connect the sampler bridge to aScope
4 Broncho, and press the attachment lock
button to secure connection.
Vacuum suction
tubing is not
connected properly
to suction connector,
or to suction adapter.
Ensure that the parts are properly
connected. If suction is still absent or
reduced change to another vacuum
suction tubing.

16
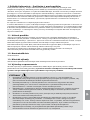
1. Важна информация – Прочетете преди употреба
Прочетете внимателно тези инструкции за безопасност, преди да използвате aScope 4
Broncho Sampler Set. за употреба подлежат на актуализиране без
допълнително уведомление. Копия на текущата версия са налични при поискване.
Имайте предвид, че тези инструкции не разясняват и не разглеждат клиничните
процедури. Те описват само базовите операции и предпазните мерки, свързани с
работата с ендоскопа и Broncho Sampler. Преди първоначалната употреба на Sampler Set
е важно операторите да са получили достатъчно обучение за клиничните ендоскопски
техники и да са запознати с предназначението, предупрежденията, предпазните мерки и
показанията, посочени в тези инструкции.
Няма гаранция за Sampler Set.
В настоящия документ определението се използва в инструкциите, които се
отнасят само за самия ендоскоп, a – за информацията, отнасяща се за aScope 4
Broncho, съвместимия дисплеен модул Ambu и аксесоарите. Ако не е посочено нещо
друго, „ендоскоп“ се отнася за всичките варианти на aScope 4 Broncho, налични за
комплекта за проби.
1.1. Предназначение
aScope 4 Broncho Sampler Set се състои от стерилен гъвкав ендоскоп за еднократна
употреба и контейнери за проби (aScope BronchoSampler), предназначени за ендоскопски
процедури и изследвания в дихателните пътища и трахеобронхиалното дърво. aScope
BronchoSampler е предназначен като добавка към aScope 4 Broncho по време на
процедура по бронхоалвеоларен лаваж (BAL) или бронхиално промиване (BW), което
позволява аспирация и събиране на течни проби от бронхиалната или алвеоларната част
на белия дроб.
Устройството е предназначено за използване при възрастни и в болнична среда. Устройството
е предназначено да осигурява визуализация посредством дисплеен модул Ambu.
1.2. Противопоказания
Не са известни.
1.3. Клинични ползи
Приложението за еднократна употреба минимизира риска от кръстосана контаминация
на пациента.
1.4. Предупреждения и предпазни мерки
Неспазването на тези предупреждения и предпазни мерки може да доведе до
нараняване на пациента или повреда на оборудването. Ambu не носи отговорност за
каквато и да било повреда на системата или нараняване на пациента в резултат на
неправилно ползване.
ПРЕДУПРЕЖДЕНИЯ
1. Ендоскопът е изделие за еднократна употреба и с него трябва да се борави по
начин, който съответства на приетата медицинска практика за такива изделия, за
да се избегне рискът от контаминация на ендоскопа преди въвеждането му.
2. Изображенията от ендоскопа не трябва да се използват като независима
диагностика на каквато и да е патология. Лекарите трябва да тълкуват и
обосновават всяка находка с други средства и съгласно клиничните
характеристики на пациента.
3. Не използвайте активни ендоскопски аксесоари, като лазерни сонди и
електрохирургично оборудване, заедно с ендоскопа, тъй като това може да
доведе до нараняване на пациента или повреда на ендоскопа.
4. Изделието не трябва да се използва, ако по време на процедурата на пациента не
може да му се осигури адекватна допълнителна оксигенация.
5. Не използвайте ендоскопа, ако е повреден по някакъв начин или ако някоя част
от функционалната проверка (вижте раздел 4.1) е неуспешна.
6. Не се опитвайте да почиствате или да използвате повторно ендоскопа, защото
това е изделие за еднократна употреба. Повторната употреба на продукта може
да причини контаминация, водеща до инфекции.

17
bg
7. Ендоскопът не трябва да се използва, когато на пациента се подава кислород или
леснозапалими анестетични газове. Това може евентуално да доведе до
нараняване на пациента.
8. Ендоскопът не трябва да се използва в среда на МРТ.
9. Не използвайте ендоскопа по време на дефибрилация.
10. Да се използва само от квалифицирани лекари, обучени в клиничните
ендоскопски техники и процедури.
11. Не прилагайте прекомерна сила при вкарването, работата със или изваждането
на ендоскопа.
12. Пациентите следва да бъдат наблюдавани адекватно през цялото време на употреба.
13. Винаги следете ендоскопското изображение в реално време на дисплейния
модул при въвеждане или изтегляне на ендоскопа, при работа с гъвкавата част
или при сукция. Неспазването на това може да навреди на пациента.
14. Не използвайте ендоскопа, ако стерилизационната бариера на продукта или
опаковката му е увредена.
15. Дисталният връх на ендоскопа може да се загрее поради топлината от
излъчващата светлина част. Избягвайте дълги периоди на контакт между
дисталния връх и мукозната мембрана, тъй като продължителен контакт с
мукозната мембрана може да доведе до мукозно нараняване.
16. Винаги се уверявайте, че тръбата, свързана към сукционния конектор, е свързана
към сукционно устройство.
17. По време на изтегляне на ендоскопа дисталният връх трябва да бъде в неутрално
и ненаклонено положение. Не работете с лоста за управление, тъй като това
може да доведе до нараняване на пациента и/или повреда на ендоскопа.
18. Не вкарвайте и не изкарвайте ендоскопа, нито работете с гъвкавата секция,
докато от дисталния край на работния канал се подават ендоскопски аксесоари,
тъй като това може да доведе до нараняване на пациента.
19. Винаги се уверявайте, че гъвкавата секция е в право положение, когато поставяте
или изтегляте ендоскопски аксесоар в работния канал. Не работете с лоста за
управление и в никакъв случай не прилагайте прекомерна сила, тъй като това
може да доведе до нараняване на пациента и/или повреда на ендоскопа.
20. Винаги извършвайте визуална проверка в съответствие с указанията в настоящите
инструкции за употреба, преди да поставите ендоскопа в контейнер за отпадъци.
21. Електронното оборудване и ендоскопската система може да оказват взаимно
влияние върху нормалното си функциониране. Ако системата се използва в
непосредствена близост до или върху друго оборудване, наблюдавайте и
потвърдете нормалната работа както на системата, така и на другото електронно
оборудване, преди да ги използвате. Може да е необходимо да се приложат
процедури за смекчаване на смущенията, като например преориентиране или
преместване на оборудването, или екраниране на помещението, в което се използва.
22. Ендоскопът се състои от части, доставени от Ambu. Те могат да бъдат заменени
само от одобрени от Ambu части. Неспазването на това може да доведе до
нараняване на пациента.
23. Непременно проверете дали изображението на екрана е изображение в реално
време, или записано изображение, и проверете дали ориентацията на
изображението отговаря на очакванията.
24. За да се избегне рискът от токов удар, системата трябва да се свързва само към
захранваща електрическа мрежа със защитно заземяване. За да изключите
системата от електрическата мрежа, изключете захранващия щепсел от
електрическия контакт.
25. Винаги проверявайте съвместимостта с ендотрахеалните тръби и тръбите с
двоен лумен.
26. Ако по време на ендоскопската процедура възникне неизправност, незабавно
спрете процедурата и извадете ендоскопа.
27. Вкарайте докрай спринцовката в порта на работния канал, преди да влеете
течността. Неспазването на това може да доведе до разливане на течност от
порта на работния канал.

18
ПРЕДПАЗНИ МЕРКИ
1. Осигурете на разположение подходяща резервна система за незабавна употреба,
така че процедурата да може да продължи, ако възникне неизправност.
2. Бъдете внимателни, за да не повредите шнура за въвеждане или дисталния връх,
когато използвате остри предмети, като игли, в комбинация с ендоскопа.
3. Бъдете внимателни при боравене с дисталния връх и не позволявайте да се
докосва до други обекти, тъй като това може да доведе до повреда на
оборудването. Повърхността на лещите на дисталния връх е крехка и може да се
появи визуално изкривяване.
4. Не упражнявайте прекомерна сила върху гъвкавата секция, тъй като това може
да доведе до повреда на оборудването. Примерите за неправилно боравене с
гъвкавата секция включват:
– Ръчно усукване.
– Работа с нея в ETT или във всеки друг случай, когато се усеща съпротивление.
– Въвеждане в предварително оформена тръба или трахеостомична тръба с
посока на огъване, която не е подравнена с кривата на тръбата.
5. Федералното законодателство на САЩ налага ограничението тези изделия да се
продават само чрез или по поръчка на лекар.
6. Поддържайте дръжката на ендоскопа суха при подготовка, употреба и съхранение.
7. Не използвайте нож или друг остър инструмент за отваряне на торбичката или на
картонената кутия.
8. Укрепете тръбата по подходящ начин към сукционния конектор преди сукция.
9. Ако е необходимо, премахвайте секрецията или кръвта от дихателните пътища
преди и по време на процедурата. За тази цел може да бъде използвана
функцията за сукция с подходящо сукционно устройство.
10. По време на сукция прилагайте вакуум от 85 kPa (638 mmHg) или по-малко.
Прилагането на твърде голям вакуум може да доведе до трудно прекратяване
на сукцията.
11. Само за еднократна употреба. Употребата върху други пациенти може да доведе
до кръстосана контаминация. Не накисвайте, изплаквайте или стерилизирайте
това изделие, тъй като тези процедури може да оставят вредни остатъци или да
причинят неизправност на изделието.
1.5. Потенциални нежелани събития
Потенциални нежелани събития, свързани с гъвкава бронхоскопия (неизчерпателна
информация): Тахикардия/брадикардия, хипотония, кървене, бронхоспазъм/
ларингоспазъм, кашлица, диспнея, възпалено гърло, апнея, припадък, десатурация/
хипоксемия, епистаксис, хемоптиза, пневмоторакс, аспирационна пневмония,
пулмонална едема, обструкция на дихателните пътища, реакция към лекарство или
топична анестезия, пирексия/инфекция и респираторен/сърдечен арест.
1.6. Общи бележки
Ако по време на употреба на това изделие или като резултат от неговата употреба
възникнат сериозни инциденти, съобщете за тях на производителя и на националния
компетентен орган.
2. Описание на системата
aScope 4 Broncho може да се свърже към дисплеен модул Ambu. За информация относно
дисплейните модули Ambu вижте техните .

19
bg
2.1. Части на системата
Ambu® aScope™ 4 Broncho Sampler Set –
изделие за еднократна употреба
Номера на части
477501000 aScope 4 Broncho Regular
Sampler Set 5.0/2.2
478501000 aScope 4 Broncho Large
Sampler Set 5.8/2.8
aScope 4 Broncho Regular Sampler Set и aScope 4 Broncho Large Sampler Set не са налични
във всички държави. Свържете се с местния търговски офис.
aScope 4 Broncho Цвят Външен
диаметър [mm]
Вътрешен
диаметър [mm]
aScope 4 Broncho Regular 5.0/2.2
aScope 4 Broncho Large 5.8/2.8
Зелено
Оранжево
мин. 5,0; макс. 5,5
мин. 5,8; макс. 6,3
мин. 2,0
мин. 2,6
aScope BronchoSampler
Конфигурация
на опаковката
Мост на
семплера
Контейнер
за проби
Сукционен
адаптер
1 бр. 2 бр. 1 бр.
2.2. Съвместимост на продукта
Дисплеен модул
– Ambu aView и aView 2 Advance.
Ендоскопски аксесоари
– Аксесоари със стандартен 6% интродюсер (Luer Slip) и/или Luer Lock
(конусно със заключване).
Ендотрахеални тръби (ETT) и тръби с двоен лумен (DLT)
– Трахеални тръби за използване в анестетични и респираторни оборудвания, които са в
съответствие с EN ISO 5361.

20
Устройството aScope 4 Broncho Sampler Set е оценено като съвместимо за посочените по-долу
размери ендотрахеални тръби (ETT), тръби с двоен лумен (DLT) и ендоскопски аксесоари (ЕА).
Минимален
вътрешен диа-
метър на ETT
Минимален
размер на
DLT
Минимална ширина
на работния канал
на ЕА
aScope 4 Broncho Regular
aScope 4 Broncho Large
6,0 mm
7,0 mm
41 Fr До 2,0 mm
До 2,6 mm
Сукционно оборудване
– Сукционна тръба с диаметър между 6,5 mm и 9,5 mm.
Контейнери за проби
– Ambu® aScope BronchoSampler™ 60 SC.
2.3. Части На aScope 4 Broncho Sampler Set
3
4
5
12
7
6
8
9
10
11
12 19
C
B15
17
18
16
20
24
23 22 21
D
A
13
14
Елемент Функция
AaScope 4 Broncho Гъвкав ендоскоп, предназначен за ендоскопски
процедури и изследвания в дихателните пътища
и трахеобронхиалното дърво.
№ Част Функция
1Дръжка Подходяща за използване както с дясна, така и с
лява ръка.
2Лост за управление Движи дисталния връх нагоре или надолу
в една равнина.
3Порт на работен канал Дава възможност за вливане на течности и
поставяне на ендоскопски аксесоари.
-Работен канал Може да се използва за вливане на течности,
сукция и въвеждане на ендоскопски аксесоари.
4Сукционен конектор Позволява свързване на сукционна тръба.
Pagina se încarcă...
Pagina se încarcă...
Pagina se încarcă...
Pagina se încarcă...
Pagina se încarcă...
Pagina se încarcă...
Pagina se încarcă...
Pagina se încarcă...
Pagina se încarcă...
Pagina se încarcă...
Pagina se încarcă...
Pagina se încarcă...
Pagina se încarcă...
Pagina se încarcă...
Pagina se încarcă...
Pagina se încarcă...
Pagina se încarcă...
Pagina se încarcă...
Pagina se încarcă...
Pagina se încarcă...
Pagina se încarcă...
Pagina se încarcă...
Pagina se încarcă...
Pagina se încarcă...
Pagina se încarcă...
Pagina se încarcă...
Pagina se încarcă...
Pagina se încarcă...
Pagina se încarcă...
Pagina se încarcă...
Pagina se încarcă...
Pagina se încarcă...
Pagina se încarcă...
Pagina se încarcă...
Pagina se încarcă...
Pagina se încarcă...
Pagina se încarcă...
Pagina se încarcă...
Pagina se încarcă...
Pagina se încarcă...
Pagina se încarcă...
Pagina se încarcă...
Pagina se încarcă...
Pagina se încarcă...
Pagina se încarcă...
Pagina se încarcă...
Pagina se încarcă...
Pagina se încarcă...
Pagina se încarcă...
Pagina se încarcă...
Pagina se încarcă...
Pagina se încarcă...
Pagina se încarcă...
Pagina se încarcă...
Pagina se încarcă...
Pagina se încarcă...
Pagina se încarcă...
Pagina se încarcă...
Pagina se încarcă...
Pagina se încarcă...
Pagina se încarcă...
Pagina se încarcă...
Pagina se încarcă...
Pagina se încarcă...
Pagina se încarcă...
Pagina se încarcă...
Pagina se încarcă...
Pagina se încarcă...
Pagina se încarcă...
Pagina se încarcă...
Pagina se încarcă...
Pagina se încarcă...
Pagina se încarcă...
Pagina se încarcă...
Pagina se încarcă...
Pagina se încarcă...
Pagina se încarcă...
Pagina se încarcă...
Pagina se încarcă...
Pagina se încarcă...
Pagina se încarcă...
Pagina se încarcă...
Pagina se încarcă...
Pagina se încarcă...
Pagina se încarcă...
Pagina se încarcă...
Pagina se încarcă...
Pagina se încarcă...
Pagina se încarcă...
Pagina se încarcă...
Pagina se încarcă...
Pagina se încarcă...
Pagina se încarcă...
Pagina se încarcă...
Pagina se încarcă...
Pagina se încarcă...
Pagina se încarcă...
Pagina se încarcă...
Pagina se încarcă...
Pagina se încarcă...
Pagina se încarcă...
Pagina se încarcă...
Pagina se încarcă...
Pagina se încarcă...
Pagina se încarcă...
Pagina se încarcă...
Pagina se încarcă...
Pagina se încarcă...
Pagina se încarcă...
Pagina se încarcă...
Pagina se încarcă...
Pagina se încarcă...
Pagina se încarcă...
Pagina se încarcă...
Pagina se încarcă...
Pagina se încarcă...
Pagina se încarcă...
Pagina se încarcă...
Pagina se încarcă...
Pagina se încarcă...
Pagina se încarcă...
Pagina se încarcă...
Pagina se încarcă...
Pagina se încarcă...
Pagina se încarcă...
Pagina se încarcă...
Pagina se încarcă...
Pagina se încarcă...
Pagina se încarcă...
Pagina se încarcă...
Pagina se încarcă...
Pagina se încarcă...
Pagina se încarcă...
Pagina se încarcă...
Pagina se încarcă...
Pagina se încarcă...
Pagina se încarcă...
Pagina se încarcă...
Pagina se încarcă...
Pagina se încarcă...
Pagina se încarcă...
Pagina se încarcă...
Pagina se încarcă...
Pagina se încarcă...
Pagina se încarcă...
Pagina se încarcă...
Pagina se încarcă...
Pagina se încarcă...
Pagina se încarcă...
Pagina se încarcă...
Pagina se încarcă...
Pagina se încarcă...
Pagina se încarcă...
Pagina se încarcă...
Pagina se încarcă...
Pagina se încarcă...
Pagina se încarcă...
Pagina se încarcă...
Pagina se încarcă...
Pagina se încarcă...
Pagina se încarcă...
Pagina se încarcă...
Pagina se încarcă...
Pagina se încarcă...
Pagina se încarcă...
Pagina se încarcă...
Pagina se încarcă...
Pagina se încarcă...
Pagina se încarcă...
Pagina se încarcă...
Pagina se încarcă...
Pagina se încarcă...
Pagina se încarcă...
Pagina se încarcă...
Pagina se încarcă...
Pagina se încarcă...
Pagina se încarcă...
Pagina se încarcă...
Pagina se încarcă...
Pagina se încarcă...
Pagina se încarcă...
Pagina se încarcă...
Pagina se încarcă...
Pagina se încarcă...
Pagina se încarcă...
Pagina se încarcă...
Pagina se încarcă...
Pagina se încarcă...
Pagina se încarcă...
Pagina se încarcă...
Pagina se încarcă...
Pagina se încarcă...
Pagina se încarcă...
Pagina se încarcă...
Pagina se încarcă...
Pagina se încarcă...
Pagina se încarcă...
Pagina se încarcă...
Pagina se încarcă...
Pagina se încarcă...
Pagina se încarcă...
Pagina se încarcă...
Pagina se încarcă...
Pagina se încarcă...
Pagina se încarcă...
Pagina se încarcă...
Pagina se încarcă...
Pagina se încarcă...
Pagina se încarcă...
Pagina se încarcă...
Pagina se încarcă...
Pagina se încarcă...
Pagina se încarcă...
Pagina se încarcă...
Pagina se încarcă...
Pagina se încarcă...
Pagina se încarcă...
Pagina se încarcă...
Pagina se încarcă...
Pagina se încarcă...
Pagina se încarcă...
Pagina se încarcă...
Pagina se încarcă...
Pagina se încarcă...
Pagina se încarcă...
Pagina se încarcă...
Pagina se încarcă...
Pagina se încarcă...
Pagina se încarcă...
Pagina se încarcă...
Pagina se încarcă...
Pagina se încarcă...
Pagina se încarcă...
Pagina se încarcă...
Pagina se încarcă...
Pagina se încarcă...
Pagina se încarcă...
Pagina se încarcă...
Pagina se încarcă...
Pagina se încarcă...
Pagina se încarcă...
Pagina se încarcă...
Pagina se încarcă...
Pagina se încarcă...
Pagina se încarcă...
Pagina se încarcă...
Pagina se încarcă...
Pagina se încarcă...
Pagina se încarcă...
Pagina se încarcă...
Pagina se încarcă...
Pagina se încarcă...
Pagina se încarcă...
Pagina se încarcă...
Pagina se încarcă...
Pagina se încarcă...
Pagina se încarcă...
Pagina se încarcă...
Pagina se încarcă...
Pagina se încarcă...
Pagina se încarcă...
Pagina se încarcă...
Pagina se încarcă...
Pagina se încarcă...
Pagina se încarcă...
Pagina se încarcă...
Pagina se încarcă...
Pagina se încarcă...
Pagina se încarcă...
Pagina se încarcă...
Pagina se încarcă...
Pagina se încarcă...
Pagina se încarcă...
Pagina se încarcă...
Pagina se încarcă...
Pagina se încarcă...
Pagina se încarcă...
Pagina se încarcă...
Pagina se încarcă...
Pagina se încarcă...
Pagina se încarcă...
Pagina se încarcă...
Pagina se încarcă...
Pagina se încarcă...
Pagina se încarcă...
Pagina se încarcă...
Pagina se încarcă...
Pagina se încarcă...
Pagina se încarcă...
Pagina se încarcă...
Pagina se încarcă...
Pagina se încarcă...
Pagina se încarcă...
Pagina se încarcă...
Pagina se încarcă...
Pagina se încarcă...
Pagina se încarcă...
Pagina se încarcă...
Pagina se încarcă...
Pagina se încarcă...
Pagina se încarcă...
Pagina se încarcă...
Pagina se încarcă...
Pagina se încarcă...
-
 1
1
-
 2
2
-
 3
3
-
 4
4
-
 5
5
-
 6
6
-
 7
7
-
 8
8
-
 9
9
-
 10
10
-
 11
11
-
 12
12
-
 13
13
-
 14
14
-
 15
15
-
 16
16
-
 17
17
-
 18
18
-
 19
19
-
 20
20
-
 21
21
-
 22
22
-
 23
23
-
 24
24
-
 25
25
-
 26
26
-
 27
27
-
 28
28
-
 29
29
-
 30
30
-
 31
31
-
 32
32
-
 33
33
-
 34
34
-
 35
35
-
 36
36
-
 37
37
-
 38
38
-
 39
39
-
 40
40
-
 41
41
-
 42
42
-
 43
43
-
 44
44
-
 45
45
-
 46
46
-
 47
47
-
 48
48
-
 49
49
-
 50
50
-
 51
51
-
 52
52
-
 53
53
-
 54
54
-
 55
55
-
 56
56
-
 57
57
-
 58
58
-
 59
59
-
 60
60
-
 61
61
-
 62
62
-
 63
63
-
 64
64
-
 65
65
-
 66
66
-
 67
67
-
 68
68
-
 69
69
-
 70
70
-
 71
71
-
 72
72
-
 73
73
-
 74
74
-
 75
75
-
 76
76
-
 77
77
-
 78
78
-
 79
79
-
 80
80
-
 81
81
-
 82
82
-
 83
83
-
 84
84
-
 85
85
-
 86
86
-
 87
87
-
 88
88
-
 89
89
-
 90
90
-
 91
91
-
 92
92
-
 93
93
-
 94
94
-
 95
95
-
 96
96
-
 97
97
-
 98
98
-
 99
99
-
 100
100
-
 101
101
-
 102
102
-
 103
103
-
 104
104
-
 105
105
-
 106
106
-
 107
107
-
 108
108
-
 109
109
-
 110
110
-
 111
111
-
 112
112
-
 113
113
-
 114
114
-
 115
115
-
 116
116
-
 117
117
-
 118
118
-
 119
119
-
 120
120
-
 121
121
-
 122
122
-
 123
123
-
 124
124
-
 125
125
-
 126
126
-
 127
127
-
 128
128
-
 129
129
-
 130
130
-
 131
131
-
 132
132
-
 133
133
-
 134
134
-
 135
135
-
 136
136
-
 137
137
-
 138
138
-
 139
139
-
 140
140
-
 141
141
-
 142
142
-
 143
143
-
 144
144
-
 145
145
-
 146
146
-
 147
147
-
 148
148
-
 149
149
-
 150
150
-
 151
151
-
 152
152
-
 153
153
-
 154
154
-
 155
155
-
 156
156
-
 157
157
-
 158
158
-
 159
159
-
 160
160
-
 161
161
-
 162
162
-
 163
163
-
 164
164
-
 165
165
-
 166
166
-
 167
167
-
 168
168
-
 169
169
-
 170
170
-
 171
171
-
 172
172
-
 173
173
-
 174
174
-
 175
175
-
 176
176
-
 177
177
-
 178
178
-
 179
179
-
 180
180
-
 181
181
-
 182
182
-
 183
183
-
 184
184
-
 185
185
-
 186
186
-
 187
187
-
 188
188
-
 189
189
-
 190
190
-
 191
191
-
 192
192
-
 193
193
-
 194
194
-
 195
195
-
 196
196
-
 197
197
-
 198
198
-
 199
199
-
 200
200
-
 201
201
-
 202
202
-
 203
203
-
 204
204
-
 205
205
-
 206
206
-
 207
207
-
 208
208
-
 209
209
-
 210
210
-
 211
211
-
 212
212
-
 213
213
-
 214
214
-
 215
215
-
 216
216
-
 217
217
-
 218
218
-
 219
219
-
 220
220
-
 221
221
-
 222
222
-
 223
223
-
 224
224
-
 225
225
-
 226
226
-
 227
227
-
 228
228
-
 229
229
-
 230
230
-
 231
231
-
 232
232
-
 233
233
-
 234
234
-
 235
235
-
 236
236
-
 237
237
-
 238
238
-
 239
239
-
 240
240
-
 241
241
-
 242
242
-
 243
243
-
 244
244
-
 245
245
-
 246
246
-
 247
247
-
 248
248
-
 249
249
-
 250
250
-
 251
251
-
 252
252
-
 253
253
-
 254
254
-
 255
255
-
 256
256
-
 257
257
-
 258
258
-
 259
259
-
 260
260
-
 261
261
-
 262
262
-
 263
263
-
 264
264
-
 265
265
-
 266
266
-
 267
267
-
 268
268
-
 269
269
-
 270
270
-
 271
271
-
 272
272
-
 273
273
-
 274
274
-
 275
275
-
 276
276
-
 277
277
-
 278
278
-
 279
279
-
 280
280
-
 281
281
-
 282
282
-
 283
283
-
 284
284
-
 285
285
-
 286
286
-
 287
287
-
 288
288
-
 289
289
-
 290
290
-
 291
291
-
 292
292
-
 293
293
-
 294
294
-
 295
295
-
 296
296
-
 297
297
-
 298
298
-
 299
299
-
 300
300
-
 301
301
-
 302
302
-
 303
303
-
 304
304
-
 305
305
-
 306
306
-
 307
307
-
 308
308
-
 309
309
-
 310
310
-
 311
311
-
 312
312
-
 313
313
-
 314
314
-
 315
315
-
 316
316
-
 317
317
-
 318
318
-
 319
319
-
 320
320
-
 321
321
-
 322
322
-
 323
323
-
 324
324


Ambu aScope™ 4 Broncho Sampler Set Instrucțiuni de utilizare
- Tip
- Instrucțiuni de utilizare
în alte limbi
Lucrări înrudite
-
Ambu aScope™ 4 RhinoLaryngo Intervention Instrucțiuni de utilizare
-
-
-
-
-
-
-
-