USER AND MAINTENANCE MANUAL
TR 3C TR 9C
| en | it | de | es | fr | nl | pt | da | fi | no | sv | pl | ru | cs | hu | sl | tr | hr | lt |
| lv | et | ro | sk | bg | uk | bs | el |
Cod. 4210.397 - Ed. 2023 / R. 02


NOTE:_____________________________________________________________________
____________________________________________________________________________
____________________________________________________________________________
____________________________________________________________________________
____________________________________________________________________________
____________________________________________________________________________
____________________________________________________________________________
____________________________________________________________________________
____________________________________________________________________________
____________________________________________________________________________
____________________________________________________________________________
____________________________________________________________________________
____________________________________________________________________________
____________________________________________________________________________
____________________________________________________________________________
____________________________________________________________________________
____________________________________________________________________________
____________________________________________________________________________
____________________________________________________________________________
____________________________________________________________________________
____________________________________________________________________________
____________________________________________________________________________
____________________________________________________________________________
____________________________________________________________________________
____________________________________________________________________________
____________________________________________________________________________
____________________________________________________________________________
____________________________________________________________________________
____________________________________________________________________________
____________________________________________________________________________
____________________________________________________________________________
____________________________________________________________________________
____________________________________________________________________________
____________________________________________________________________________
____________________________________________________________________________
____________________________________________________________________________
____________________________________________________________________________
____________________________________________________________________________
____________________________________________________________________________
____________________________________________________________________________

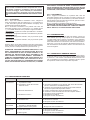
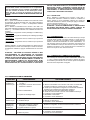
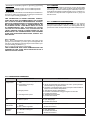
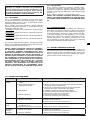
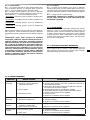
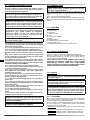
TECHNICAL DATA TABLE - TABELLA DATI TECNICI - TECHNISCHE
DATENTABELLE - TABLA DE DATOS TÉCNICOS - TABLEAU DES DONNÉES
TECHNIQUES - TABEL TECHNISCHE GEGEVENS - TABELA DE DADOS
TÉCNICOS - TEKNISK DATATABEL - TEKNISTEN TIETOJEN TAULUKKO - TABELL
FOR TEKNISKE DATA - TABELL MED TEKNISKA EGENSKAPER - TABELA
DANYCH TECHNICZNYCH - ТАБЛИЦЕ ТЕХНИЧЕСКИХ ДАННЫХ - TABULKA
TECHNICKÝCH ÚDAJŮ - MŰSZAKI ADATOK TÁBLÁZATÁN - TEHNIČNI PODATKI
- TEKNİK VERİLER TABLOSUNDA - TABLICI S TEHNIČKIM PODACIMA -
TECHNINIŲ DUOMENŲ LENTELĖJE - TEHNISKO DATU TABULA - TEHNILISTE
ANDMETE TABEL - TABELUL CU DATE TEHNICE - TABUĽKA TECHNICKÝCH
ÚDAJOV - ТАБЛИЦА ТЕХНИЧЕСКИ ДАННИ - ТАБЛИЦІ ТЕХНІЧНИХ ДАНИХ -
TABELI SA TEHNIČKIM PODACIMA - ΠΙΝΑΚΙΔΑ ΤΩΝ ΤΕΧΝΙΚΩΝ ΣΤΟΙΧΕΙΩΝ - 技
术参数 - ТЕХНИКАЛЫ КРСЕТКІШТЕР КЕСТЕСІ
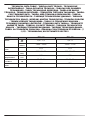
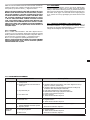
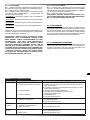
MODEL TR 3C TR 9C
Power kW
1,65 - 3,3 4,5 - 9
kcal/h
1.400 - 2.800 3.800 - 7.700
Max current
cons.
A13,5 13,5
Voltage V/Hz
220-240 / 50 380-400 / 50
Air
displacement
m³/h
470 670
Dimension
L x W x H
cm
27x25x34 33x28x38
Resistance
norm IP24 IP24

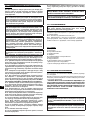
ATTENTION: This product is only suitable for well insulated spaces or occasional use. - ATTENZIONE: Il prodotto è destinato ad essere
usato solo in spazi ben isolati o all’uso occasionale. - ACHTUNG: Dieses Produkt ist nur für gut isolierte Bereiche oder gelegentliche
Verwendung geeignet. - ATENCIÓN: Este producto es apto solamente para espacios bien aislados o de uso ocasional. - ATTENTION:
Ce produit convient uniquement pour les espaces bien isolés ou pour une utilisation occasionnelle. - LET OP: Dit is product is enkel
aangewezen voor goed geïsoleerde ruimten of voor occasioneel gebruik. - ATENÇÃO: Este produto é adequado apenas para espaços bem
isolados ou uso ocasional. - ADVARSEL: Dette produkt er kun egnet til velisolerede rum eller til lejlighedsvis brug. - HUOMIO: Tämä tuote
soveltuu vain hyvin eristettyihin tiloihin tai satunnaiseen käyttöön. - VÆR OPPMERKSOM: Dette produktet er kun egnet for godt isolerte
rom eller sporadisk bruk. - OBSERVERA: Denna produkt är endast lämplig för välisolerade utrymmen eller tillfällig användning. - UWAGA:
ten produkt jest przeznaczony tylko do dobrze izolowanych pomieszczeń lub okazjonalnego zastosowania. - ВНИМАНИЕ: Данный продукт
пригоден только для хорошо изолированных сред или для редкого применения. - POZOR: Tento produkt je vhodný pouze pro dobře
izolované prostory nebo příležitostné použití. - FIGYELEM: A termék használata csak jól szigetelt térben vagy csak alkalomszerűen
megengedett. - POZOR: Ta izdelek ni primeren za dobro izolirane prostore ali občasno rabo. - DİKKAT: Bu ürün sadece iyi şekilde yalıtılmış
alanlar veya ara sıra kullanım için uygundur. - UPOZORENJE: Ovaj proizvod je prikladan samo za dobro izolirane prostore ili povremenu
uporabu. - DĖMESIO: šis produktas tinka tik gerai izoliuotoms vietoms arba tik atsitiktiniam naudojimui. - UZMANĪBU: Šis izstrādājums ir
piemērots tikai labi izolētām telpām vai gadījuma lietošanai. - TÄHELEPANU: Toode sobib üksnes hästi isoleeritud ruumides või juhuslikuks
kasutamiseks. - ATENIE: Acest produs este potrivit pentru spaii bine izolate sau pentru uz ocazional. - POZOR: Tento produkt je vhodný
iba pre dobre izolované priestory alebo príležitostné použitie. - ВНИМАНИЕ: Този продукт е подходящ за използване само в добре
изолирани помещения или за спорадична употреба. - УВАГА: Цей продукт підходить тільки для добре утеплених приміщень або
випадкового використання. - PAŽNJA: Ovaj proizvod je pogodan samo za dobro izolirane prostore ili povremenu upotrebu. - ΠΡΟΣΟΧΗ:
Το προϊόν αυτό είναι κατάλληλο μόνο για καλά μονωμένους χώρους ή περιστασιακή χρήση. - 注意:本产品仅适用于隔热良好的空间或偶尔使
用。 - НАЗАР АУДАРЫҢЫЗ: Бұл өнім тек жақсы оқшауланған орындарға немесе кездейсоқ қолданысқа арналған.
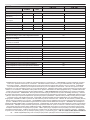
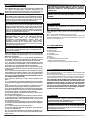
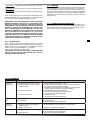
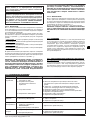
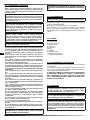
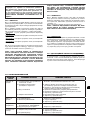
MODEL TR 3C TR 9C
SYMBOL UNIT
HEAT OUTPUT
Nominal heat output Pnom kW 3,3 9
Minimum heat output
(indicative)
Pmin kW 1,65 4,5
Maximum continuous
heat output
Pmax,c kW 3,3 9
AUXILIARY ELECTRICITY CONSUMPTION
At nominal heat output elmax kW N/A N/A
At minimum heat output elmin kW N/A N/A
In standby mode elSB kW 0,00076 0,00076
TYPE OF HEAT INPUT, FOR ELECTRIC STORAGE LOCAL SPACE HEATERS ONLY (SELECT ONE)
Manual heat charge control, with integrated thermostat No
Manual heat charge control with room and/or outdoor
temperature feedback
No
Electronic heat charge control with room and/or outdoor
temperature feedback
No
Fan assisted heat output No
TYPE OF HEAT OUTPUT/ROOM TEMPERATURE CONTROL (SELECT ONE)
Single stage heat output and no room temperature control No
Two or more manual stages, no room temperature control No
With mechanic thermostat room temperature control No
With electronic room temperature control No
Electronic room temperature control plus day timer No
Electronic room temperature control plus week timer Yes
OTHER CONTROL OPTIONS (MULTIPLE SELECTIONS POSSIBLE)
Room temperature control, with presence detection No
Room temperature control, with open window detection No
With distance control option No
With adaptive start control Yes
With working time limitation No
With black bulb sensor No
Conctact Details (See the CE CONFORMITY CERTIFICATE)

Close screw
Adjust and
close screw
Wall
12
A
AB
C
D
E
F
G
H
I
L
< 1,8 m
< 1,8 m
< 0,6 m< 0,6 m
< 0,6 m
234
44
5
ON / OFF
OK
OK
88°c
PROGRAM
ON / OFF
OK
01
OK
88°c
OK
SET
PROGRAM
01
PROGRAM
02
4
6
ON / OFF
OK
OK
88°c
PROGRAM
ON / OFF
OK
02
OK
88°c
PICTURES - FIGURE - ABBILDUNGEN - FIGURAS - FIGURES - FIGUREN - FI-
GURAS - FIGURER - KUVAT - FIGURER - FIGUR - RYSUNKI - РИСУНКИ - OB-
RÁZKY - ÁBRÁK - SLIKE - ŞEKİLLER - SLIKE - PAVEIKSLĖLIAI - ATTĒLI - JO-
ONISED - IMAGINI - OBRÁZKY - ФИГУРА - МАЛЮНКИ - SLIKE - ΕΙΚΟΝΕΣ - 图
- СУРЕТТЕР

PICTURES - FIGURE - ABBILDUNGEN - FIGURAS - FIGURES - FIGUREN - FI-
GURAS - FIGURER - KUVAT - FIGURER - FIGUR - RYSUNKI - РИСУНКИ - OB-
RÁZKY - ÁBRÁK - SLIKE - ŞEKİLLER - SLIKE - PAVEIKSLĖLIAI - ATTĒLI - JO-
ONISED - IMAGINI - OBRÁZKY - ФИГУРА - МАЛЮНКИ - SLIKE - ΕΙΚΟΝΕΣ - 图
- СУРЕТТЕР
Close screw
Adjust and
close screw
Wall
12
A
AB
C
D
E
F
G
H
I
L
< 1,8 m
< 1,8 m
< 0,6 m< 0,6 m
< 0,6 m
234
44
5
ON / OFF
OK
OK
88°c
PROGRAM
ON / OFF
OK
01
OK
88°c
OK
SET
PROGRAM
01
PROGRAM
02
4
6
ON / OFF
OK
OK
88°c
PROGRAM
ON / OFF
OK
02
OK
88°c

Close screw
Adjust and
close screw
Wall
12
A
AB
C
D
E
F
G
H
I
L
< 1,8 m
< 1,8 m
< 0,6 m< 0,6 m
< 0,6 m
234
44
5
ON / OFF
OK
OK
88°c
PROGRAM
ON / OFF
OK
01
OK
88°c
OK
SET
PROGRAM
01
PROGRAM
02
4
6
ON / OFF
OK
OK
88°c
PROGRAM
ON / OFF
OK
02
OK
88°c
PICTURES - FIGURE - ABBILDUNGEN - FIGURAS - FIGURES - FIGUREN - FI-
GURAS - FIGURER - KUVAT - FIGURER - FIGUR - RYSUNKI - РИСУНКИ - OB-
RÁZKY - ÁBRÁK - SLIKE - ŞEKİLLER - SLIKE - PAVEIKSLĖLIAI - ATTĒLI - JO-
ONISED - IMAGINI - OBRÁZKY - ФИГУРА - МАЛЮНКИ - SLIKE - ΕΙΚΟΝΕΣ - 图
- СУРЕТТЕР

PICTURES - FIGURE - ABBILDUNGEN - FIGURAS - FIGURES - FIGUREN - FI-
GURAS - FIGURER - KUVAT - FIGURER - FIGUR - RYSUNKI - РИСУНКИ - OB-
RÁZKY - ÁBRÁK - SLIKE - ŞEKİLLER - SLIKE - PAVEIKSLĖLIAI - ATTĒLI - JO-
ONISED - IMAGINI - OBRÁZKY - ФИГУРА - МАЛЮНКИ - SLIKE - ΕΙΚΟΝΕΣ - 图
- СУРЕТТЕР
Close screw
Adjust and
close screw
Wall
12
A
AB
C
D
E
F
G
H
I
L
< 1,8 m
< 1,8 m
< 0,6 m< 0,6 m
< 0,6 m
234
44
5
ON / OFF
OK
OK
88°c
PROGRAM
ON / OFF
OK
01
OK
88°c
OK
SET
PROGRAM
01
PROGRAM
02
4
6
ON / OFF
OK
OK
88°c
PROGRAM
ON / OFF
OK
02
OK
88°c

Close screw
Adjust and
close screw
Wall
12
A
AB
C
D
E
F
G
H
I
L
< 1,8 m
< 1,8 m
< 0,6 m< 0,6 m
< 0,6 m
234
44
5
ON / OFF
OK
OK
88°c
PROGRAM
ON / OFF
OK
01
OK
88°c
OK
SET
PROGRAM
01
PROGRAM
02
4
6
ON / OFF
OK
OK
88°c
PROGRAM
ON / OFF
OK
02
OK
88°c
PICTURES - FIGURE - ABBILDUNGEN - FIGURAS - FIGURES - FIGUREN - FI-
GURAS - FIGURER - KUVAT - FIGURER - FIGUR - RYSUNKI - РИСУНКИ - OB-
RÁZKY - ÁBRÁK - SLIKE - ŞEKİLLER - SLIKE - PAVEIKSLĖLIAI - ATTĒLI - JO-
ONISED - IMAGINI - OBRÁZKY - ФИГУРА - МАЛЮНКИ - SLIKE - ΕΙΚΟΝΕΣ - 图
- СУРЕТТЕР

PICTURES - FIGURE - ABBILDUNGEN - FIGURAS - FIGURES - FIGUREN - FI-
GURAS - FIGURER - KUVAT - FIGURER - FIGUR - RYSUNKI - РИСУНКИ - OB-
RÁZKY - ÁBRÁK - SLIKE - ŞEKİLLER - SLIKE - PAVEIKSLĖLIAI - ATTĒLI - JO-
ONISED - IMAGINI - OBRÁZKY - ФИГУРА - МАЛЮНКИ - SLIKE - ΕΙΚΟΝΕΣ - 图
- СУРЕТТЕР
Close screw
Adjust and
close screw
Wall
12
A
AB
C
D
E
F
G
H
I
L
< 1,8 m
< 1,8 m
< 0,6 m< 0,6 m
< 0,6 m
234
44
5
ON / OFF
OK
OK
88°c
PROGRAM
ON / OFF
OK
01
OK
88°c
OK
SET
PROGRAM
01
PROGRAM
02
4
6
ON / OFF
OK
OK
88°c
PROGRAM
ON / OFF
OK
02
OK
88°c

en
it
de
es
fr
nl
pt
da
no
sv
pl
ru
cs
hu
sl
tr
hr
lt
lv
et
ro
sk
bg
uk
bs
el
zh
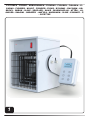
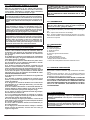
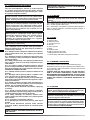
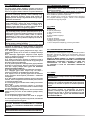
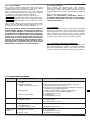
►►1. SAFETY INFORMATION
(Fig. 1)
This series of warm air heaters is particularly suited to heating
areas, such as warehouses, shops, restaurants and homes.
These heaters comply with the current European directive.
IMPORTANT: You are required to read and understand this
operational manual prior to assembling, starting up or con-
ducting maintenance on this heater. Using the heater incor-
rectly can cause serious injury. Keep this manual for future
reference.
IMPORTANT: This heater is not suitable for use by persons
(including children) with reduced physical, sensory or men-
tal capacities or with lack of experience or knowledge un-
less supervised by a person responsible for their safety.
Children must be supervised to make sure they do not play
with the heater.
IMPORTANT: In order to prevent any risk, even if power
supply mains disconnection is foreseen, all cleaning,
maintenance and repair operations requiring access to
dangerous parts (e.g. replacing the damaged power supply
cable), must be carried out by the manufacturer, its technical
IMPORTANT: Comply with all local legislation and current
regulations when using the heater.
Heaters used near tarpaulins, curtains or other similar
covering materials must be a safe distance from them. It is
Keep the heater a safe distance from humidity, water and
atmospheric agents to prevent serious damage to the heater.
Keep the hot parts of the heater a suitable distance from
supply cable).
Do not handle or conduct maintenance on the heater
when it is hot, connected to the mains or in operation.
The wall used for installation must be adequate
to support the weight of the heater. DO NOT USE THE HEATER
WHILE PLACED ON THE GROUND.
Keep animals at a safe distance from the heater.
Power on the heater only with a current which has the
-
If the power supply cable or the remote room thermostat
are damaged, they must be replaced by a technical support
centre to prevent any risk.
Disconnect the heater from the mains power supply
when not in use for a prolonged time.
-
porarily left in unsafe conditions and in any case make sure it
cannot be used.
Never block, not even partially
(rear) or the air outlet (front).
Avoid ducting the air.
Do not cover the heater while in operation, it might
overheat.
heater is working properly at least once a year and/or as re-
quired.
THE MANUFACTURER DECLINES ANY LIABILITY FOR
DAMAGE/INJURIES TO PROPERTY/PERSONS DERIVING
FROM IMPROPER USE OF THE HEATER.
ONLY SPECIALISED PERSONNEL AUTHORISED BY THE
MANUFACTURER CAN PERFORM WORK ON THE HEATER.
►►2. UNPACKING
WARNING: The packaging material is not a toy. Keep
the plastic bag out of the reach of children; danger of
and dispose of it in compliance with current standards.
-
er appears damaged, immediately inform the dealer from whom it
was purchased.
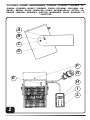
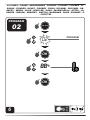
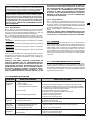
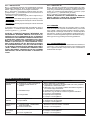
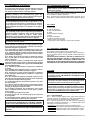
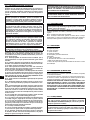
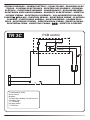
►►3. DESCRIPTION
(Fig. 2)
A. Wall support.
B. Adjusting screw.
D. Heater.
E. Main power supply switch.
F. Reset.
G. Power supply cable.
H. Remote room thermostat.
I. Room thermostat display.
L. Remote room thermostat temperature sensor.
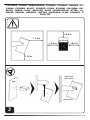
►►4. ASSEMBLY AND INSTALLATION
(Fig. 3)
For the assembly and installation of the heater, carefully follow the
instructions below.
The mechanical parts, which come with the relative nuts and bolts,
are always in the heater's packaging and must always be assem-
bled before the product is turned on.
THE HEATER MUST BE INSTALLED ACCORDING TO LAW, US-
ING COMPONENTS IN COMPLIANCE WITH LOCAL AND/OR
NATIONAL REGULATIONS. THE MANUFACTURER DECLINES
ANY LIABILITY FOR DAMAGE/INJURIES TO THE HEATER
AND/OR PERSONS DERIVING FROM INCORRECT INSTALLA-
TION.
►►5. OPERATION
WARNING: You are required to read, understand and follow
the
in order to use it correctly and avoid risks.
WARNING: Make sure the power supply cable is intact and
that the features of the mains power supply match the ones
all the components correctly. For correct use, install the
The wall used for
installation must be adequate to support the weight of the
heater. DO NOT USE THE HEATER WHILE PLACED ON THE
GROUND.
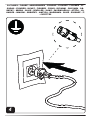
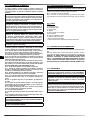
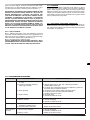
5.1.1. After installing the wall heater, connect the heater plug to
the electrical mains (Fig. 4) and set the main power switch to “I /
ON”. The display shows the room temperature.
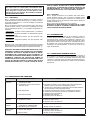
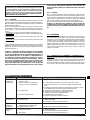
5.1.2. Turn on the heater using the “ON / OFF “ button of the re-
mote room thermostat and select the desired mode using the arrow
• PROGRAM 1
• PROGRAM 2

en
it
de
es
fr
nl
pt
da
no
sv
pl
ru
cs
hu
sl
tr
hr
lt
lv
et
ro
sk
bg
uk
bs
el
zh
• PROGRAM 3
• PROGRAM 4
During use, the remote room thermostat automatically locks the
keyboard. To unlock the keyboard of the remote room thermostat,
CAUTION: A SERIES OF SENSORS CHECK THAT THE HEAT-
ER IS OPERATING CORRECTLY AND STOPS THE APPLIANCE
IN THE EVENT OF A SERIOUS FAULT. THE HEATER WILL
NOT RESUME OPERATION AUTOMATICALLY, THIS MUST
BE PERFORMED MANUALLY. WAIT FOR THE HEATER TO
COOL DOWN COMPLETELY AND REMOVE ANYTHING WHICH
MIGHT HAVE BLOCKED THE HEATER (E.G. OBSTRUCTED
AN AIR VENT, IMPAIRED THE AIR SUPPLY, ETC.) AND FULLY
PRESS THE “RESET” BUTTON LOCATED AT THE BACK OF
THE HEATER. IF, AFTER A FEW ATTEMPTS TO RESUME OP-
ERATION, THE HEATER DOES NOT WORK, CONTACT THE
TECHNICAL SUPPORT SERVICE.
“ON / OFF “ button of the re-
mote room thermostat and leave the fan running until the heater is
-
stat is locked).
5.2.2. Disconnect the heater from the mains.
CAUTION: AVOID DISCONNECTING THE HEATER FROM THE
MAINS BEFORE THE FAN HAS COMPLETELY STOPPED MOV-
ING TO AVOID SERIOUS DAMAGE.
►►6. STORAGE
Always unplug the heater from the mains during a long downtime.
Put it back in a dry place and protected from dust. When the heater
is used again, check the condition of the power supply cable. If in
doubt regarding its state, contact the technical support centre. In
any case, have the technical support centre check that the heater
►►7. REMOTE ROOM THERMOSTAT
For correct operation, the heater must be connected to the mains
and have the main power switch set to position “I / ON”. When the
remote room thermostat is activated, the heater can turn on at any
time when the temperature drops below the set temperature.
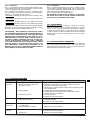
►►8. TROUBLESHOOTING
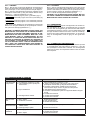
PROBLEM POSSIBLE CAUSE POSSIBLE SOLUTION
The heater
doesn't work
1. Main power supply switch in position
“0 / OFF”
2. Incorrect setting of the remote room
thermostat
3. No power supply
4. Blocked heater
1. Set the main power supply switch to “I / ON”
2a. Turn on the heater using the “ON / OFF“ button of the remote room
thermostat and select the desired mode
2b. Make sure the temperature set on the remote room thermostat is
higher than the outdoor temperature
3a. Insert the power supply cable correctly
3b. Make sure your mains power supply is working correctly
4a. Turn the heater back on
The motor
doesn't work
1. Faulty motor
2. Fan blocked
2a. Remove any obstructions
The heater
doesn't heat
1. Remove room thermostat set to
“VENTILATION”
2. Faulty internal appliance
1. Modify the setting of the remote room thermostat
1. Obstructed air vent
2. Faulty motor
1a. Remove any obstructions

en
it
de
es
fr
nl
pt
da
no
sv
pl
ru
cs
hu
sl
tr
hr
lt
lv
et
ro
sk
bg
uk
bs
el
zh
►►1. INFORMAZIONI SULLA SICUREZZA
(Fig. 1)
Questa serie di riscaldatori d’aria calda è particolarmente in-
dicata per il riscaldamento di locali come magazzini, negozi,
ristoranti e abitazioni. Questi riscaldatori sono conformi alla
direttiva europea in vigore.
IMPORTANTE: Leggere e comprendere questo manuale
funzione o la manutenzione di questo riscaldatore. L’uso er-
rato del riscaldatore può causare lesioni gravi. Conservare
questo manuale a titolo di futuro riferimento.
IMPORTANTE: Questo riscaldatore non è adatto all’uso da
-
soriali e mentali ridotte, o inesperte, a meno che non venga-
no super visionate da una persona responsabile per la loro
sicurezza. I bambini devono essere controllati, per assicu-
rarsi che non giochino con il riscaldatore.
IMPORTANTE: Tutte le operazioni di pulizia, manutenzione
e riparazione che prevedano l’accesso a parti pericolose
(come la sostituzione del cavo di alimentazione danneggiato)
devono essere svolte dal costruttore, dal suo servizio di
in modo da prevenire ogni rischio, anche se è prevista la
disconnessione dalla rete di alimentazione.
IMPORTANTE: Durante l’uso del riscaldatore, attenersi a
tutte le ordinanze locali ed alla normativa vigente.
I riscaldatori usati in prossimità di teloni, tende o altri
materiali simili di copertura, devono essere situati a distanza
di sicurezza da essi. Si consiglia anche di usare materiali di
copertura di tipo ignifugo.
Tenere il riscaldatore a distanza di sicurezza da umidi-
riscaldatore.
-
mabili, o termolabili (compreso il cavo di alimentazione) dalle
parti calde del riscaldatore.
Quando il riscaldatore è caldo, o collegato alla rete elet-
trica o in funzione, non deve mai essere maneggiato né sog-
getto ad alcun intervento di manutenzione.
Il muro utilizzato per l’instal-
lazione, deve essere adeguato a supportare il peso del riscal-
datore. NON UTILIZZARE IL RISCALDATORE APPOGGIATO A
TERRA.
Tenere gli animali a distanza di sicurezza dal riscalda-
tore.
Alimentare il riscaldatore solamente con corrente aven-
-
va del riscaldatore.
-
adeguata messa a terra.
Se il cavo di alimentazione o il termostato ambiente re-
moto risultassero danneggiati, devono essere sostituiti dal
centro assistenza tecnica, in modo da prevenire ogni rischio.
Scollegare il riscaldatore dalla presa di rete, quando
non lo si usa per un tempo prolungato.
in condizioni non sicure, fare in modo che non possa essere
usato ed ad ogni modo scollegare sempre la presa di rete.
Non ostruire, neanche in parte, la presa dell’aria (lato
posteriore), né l’uscita dell’aria (lato anteriore) del riscaldato-
re.
Evitare di canalizzare l’aria.
Non coprire il riscaldatore durante il funzionamento,
potrebbe andare in surriscaldamento.
-
namento del riscaldatore, almeno una volta all’anno e/o se-
condo l’esigenza.
IL COSTRUTTORE DECLINA OGNI RESPONSABILITÀ PER
DANNI A COSE E/O PERSONE, DERIVANTI DALL’USO IM-
PROPRIO DEL RISCALDATORE.
SOLO PERSONALE SPECIALIZZATO ED AUTORIZZATO
DAL COSTRUTTORE PUÒ INTERVENIRE SUL RISCALDA-
TORE.
►►2. DISIMBALLAGGIO
AVVERTENZA: Il materiale della confezione non è un
giocattolo per bambini. Tenere il sacchetto di plastica
-
nare e spedire il riscaldatore e smaltirli secondo le norme vigenti.
il riscaldatore appare danneggiato, informare immediatamente il
►►3. DESCRIZIONE
(Fig. 2)
A. Supporto muro.
D. Riscaldatore.
F. Reset.
H. Termostato ambiente remoto.
I. Display del termostato ambiente.
L. Sensore della temperatura termostato ambiente remoto.
►►4. ASSEMBLAGGIO E INSTALLAZIONE
(Fig. 3)
-
I componenti meccanici, completi della relativa bulloneria di mon-
IL RISCALDATORE DEVE ESSERE INSTALLATO SECONDO
NORMA DI LEGGE, UTILIZZANDO COMPONENTI CONFORMI
ALLE DIRETTIVE LOCALI E/O NAZIONALI. IL COSTRUTTORE
DECLINA OGNI RESPONSABILITÀ PER DANNI AL RISCAL-
DATORE E/O ALLE PERSONE, DERIVANTI DALL’ERRATA IN-
STALLAZIONE.
►►5. FUNZIONAMENTO
rischi, leggere, comprendere e seguire le “INFORMAZIONI
SULLA SICUREZZA” prima di mettere in funzione il riscal-
datore.
-
mentazione e che le caratteristiche elettriche della rete cor-
rispondano a quanto riportato sulla targhetta dati tecnici del
riscaldatore.

en
it
de
es
fr
nl
pt
da
no
sv
pl
ru
cs
hu
sl
tr
hr
lt
lv
et
ro
sk
bg
uk
bs
el
zh
AVVERTENZA: Non utilizzare mai il riscaldatore senza aver
prima montato correttamente tutti i componenti. Per un cor-
retto utilizzo, installare il riscaldatore a muro con adegua-
Il muro utilizzato per l’installazione,
deve essere adeguato a supportare il peso del riscaldatore.
NON UTILIZZARE IL RISCALDATORE APPOGGIATO A TER-
RA.
5.1.1. Dopo aver installato il riscaldatore a muro, collegare la
5.1.2. Accendere il riscaldatore con il pulsante “ON / OFF” del
• PROGRAM 1-
ne) (Fig. 5).
• PROGRAM 2-
• PROGRAM 3-
cato.
• PROGRAM 4-
cato.
-
mente la tastiera. Per sbloccare la tastiera del termostato ambiente
ATTENZIONE: UNA SERIE DI SENSORI VERIFICANO IL COR-
RETTO FUNZIONAMENTO DEL RISCALDATORE, BLOCCAN-
DO L’APPARECCHIO IN CASO DI GRAVE ANOMALIA. IL RI-
PRISTINO DEL RISCALDATORE NON È AUTOMATICO, MA
DEVE ESSERE SVOLTO MANUALMENTE. ATTENDERE IL
COMPLETO RAFFREDDAMENTO DEL RISCALDATORE, ELI-
MINARE LA POSSIBILE CAUSA CHE HA PORTATO AL BLOC-
CO DEL RISCALDATORE (ES. OSTRUZIONE DELLA PRESA
D’ARIA, INSUFFICIENTE APPORTO D’ARIA, ECC.) E PREME-
RE A FONDO IL PULSANTE DI “RESET” POSIZIONATO NELLA
PARTE SUPERIORE DEL RISCALDATORE. SE DOPO ALCUNI
TENTATIVI DI RIPRISTINO IL RISCALDATORE NON DOVESSE
FUNZIONARE, CONTATTARE L’ASSISTENZA TECNICA.
5.2.1. Spegnere il riscaldatore con il pulsante “ON / OFF” del
termostato ambiente remoto
al completo spegnimento del riscaldatore (se la tastiera del termo-
stato ambiente remoto dovesse essere bloccata, premere contem-
).
5.2.2. Scollegare il riscaldatore dalla rete elettrica.
ATTENZIONE: EVITARE DI SCOLLEGARE IL RISCALDATORE
DALLA RETE ELETTRICA PRIMA DEL COMPLETO ARRESTO
DELLA VENTOLA, AL FINE DI EVITARE GRAVI DANNI.
►►6. CONSERVAZIONE
Scollegare sempre il riscaldatore dalla rete elettrica,
Riporlo in un ambiente asciutto
-
-
►►7. TERMOSTATO AMBIENTE REMOTO
-
“I / ON”-
la temperatura scende sotto la temperatura impostata.
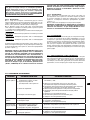
►►8. INDIVIDUAZIONE PROBLEMA
PROBLEMA POSSIBILE CAUSA POSSIBILE SOLUZIONE
Il riscaldatore
1.
ambiente remoto
4. Riscaldatore in blocco
1. P
2a. Accendere il riscaldatore con il pulsante “ON / OFF” del termostato
remoto sia superiore alla temperatura esterna
4a. Ripristinare il riscaldatore
Il motore non
1. Motore guasto
2. Ventola bloccata
Il riscaldatore
non riscalda
1. Termostato ambiente remoto
impostato su “VENTILAZIONE”
2. Apparecchiatura interna guasta
ridotto
2. Motore guasto

en
it
de
es
fr
nl
pt
da
no
sv
pl
ru
cs
hu
sl
tr
hr
lt
lv
et
ro
sk
bg
uk
bs
el
zh
►►1. SICHERHEITSHINWEISE
(Abb. 1)
Diese Warmlufterzeuger- Serie ist speziell für die Erwärmung
von Lokalen wie Lagerräume, Geschäfte, Restaurants und
Wohnräume gedacht. Diese Heizgeräte sind konform mit der
mit der aktuell in Kraft stehenden Europäischen Richtlinie.
WICHTIGER HINWEIS: Vor der Montage, Inbetriebnahme
oder Wartung des Heizgerätes ist diese Betriebsanleitung
zu lesen und zu verstehen. Die falsche Benutzung des Heiz-
geräts kann zu schweren Verletzungen führen. Diese Anlei-
tung zum späteren Nachschlagen gut aufbewahren.
WICHTIGER HINWEIS: Dieses Gerät ist nicht geeignet für
den Gebrauch durch Personen (einschließlich Kindern) mit
eingeschränkten körperlichen, sensorischen und geistigen
Fähigkeiten bzw. ohne ausreichende Fachkenntnis, es sei
denn, sie werden durch eine für ihre Sicherheit verantwort-
liche Person beaufsichtigt. Kinder sind zu beaufsichtigen,
damit sie nicht mit dem Gerät spielen.
WICHTIGER HINWEIS: Alle Reinigungs-, Wartungs- und
Reparaturarbeiten, bei denen auf gefährliche Bauteile
beschädigten Versorgungskabels) müssen durch den
Hersteller, dessen Kundendienst oder durch ähnlich
jedes Risiko vermieden wird, auch wenn hier die Trennung
vom Stromnetz vorgesehen ist.
WICHTIGER HINWEIS: Während des Betriebs des Heizge-
räts sind alle örtlichen Bestimmungen und geltenden Vor-
schriften zu beachten.
Beim Betrieb der Geräte ist ein Sicherheitsabstand von
Planen, Vorhängen oder ähnlichen Materialien einzuhalten. Es
wird auch empfohlen, Abdeckungen aus nicht brennbarem
Material zu verwenden.
Das Heizgerät muss in einem Sicherheitsabstand zu
-
ten werden, um schwere Schäden am Gerät zu vermeiden.
-
fen (einschließlich des Netzkabels) und den heißen Teilen des
Heizgeräts ist ein ausreichender Abstand einzuhalten.
Wenn das Heizgerät heiß oder an das Stromnetz ange-
schlossen oder in Betrieb ist, darf es niemals bewegt oder ge-
wartet werden.
-
neten Dübeln an der Wand installieren. Die für die Installation
verwendete Wand muss dem Gewicht des Heizgeräts stand-
halten können. DAS HEIZGERÄT FÜR DEN GEBRAUCH NICHT
AUF DEM BODEN AUFSTELLEN.
Halten Sie Haustiere in einem sicheren Abstand vom
Gerät.
Die Stromversorgung des Heizgeräts muss die auf des-
sen Typenschild angegebene Spannung und Frequenz aufwei-
sen.
Schutzschalter und geeigneter Erdung angeschlossen ist.
Wenn das Netzkabel oder das ferngesteuerte Raumther-
mostat beschädigt sind, müssen sie durch den Kundendienst
ausgetauscht werden, um Gefahren auszuschließen.
Das Heizgerät vom Stromnetz abtrennen, wenn es län-
gere Zeit nicht benutzt wird.
-
ren Zustand gelassen, ist dafür Sorge zu tragen, dass es nicht
benutzt werden kann, und in jedem Fall sollte es vom Strom-
netz abgetrennt werden.
Niemals, auch nicht teilweise, die Luftzufuhr (Rücksei-
verschließen.
Die Kanalisierung der Luft vermeiden.
Das Heizgerät während des Betriebs nicht abdecken,
er könnte sich überhitzen.
-
mal pro Jahr und / oder wenn nötig vom Kundendienst über-
prüfen lassen.
DER HERSTELLER LEHNT JEDE HAFTUNG FÜR SACH-
UND/ODER PERSONENSCHÄDEN AB, DIE AUF UNSACH-
GEMÄSSEN GEBRAUCH DES HEIZGERÄTS ZURÜCKZU-
FÜHREN SIND.
NUR SPEZIALISIERTES UND VOM HERSTELLER AUTORI-
SIERTES PERSONAL DARF AM HEIZGERÄT ZUM EINSATZ
KOMMEN.
►►2. AUSPACKEN
WARNUNG: Das Verpackungsmaterial ist kein Spielzeug
für Kinder. Den Plastiksack von Kindern fern halten;
-
werden.
bei dem es erworben wurde.
►►3. BESCHREIBUNG
(Abb. 2)
A. Wandhalterung.
B. Stellschraube.
F. Reset.
H. Ferngesteuertes Raumthermostat.
I. Display des Raumthermostats.
L. Temperatursensor ferngesteuertes Raumthermostat.
►►4. ZUSAMMENBAU UND MONTAGE
(Abb. 3) stellen
die Anweisungen befolgen.
-
-
DAS HEIZGERÄT MUSS GEMÄSS DEN GESETZLICHEN VOR-
SCHRIFTEN INSTALLIERT WERDEN, UND ZWAR UNTER VER-
WENDUNG VON BAUTEILEN, DIE DEN LOKALEN UND/ODER
NATIONALEN RICHTLINIEN ENTSPRECHEN. DER HERSTEL-
LER IST NICHT FÜR SCHÄDEN AM HEIZGERÄT UND/ODER
PERSONEN VERANTWORTLICH, DIE AUF EINE FEHLERHAF-
TE INSTALLATION ZURÜCKZUFÜHREN SIND.
►►5. BETRIEB
WARNUNG: Um das Heizgerät richtig zu benutzen und Ge-
fahren zu vermeiden, müssen vor seiner Inbetriebnahme die
“INFORMATIONEN ZUR SICHERHEIT" gelesen werden, ver-
standen worden sein und befolgt werden.
WARNUNG: Sicherstellen, dass das Versorgungskabel in
einwandfreiem Zustand ist und die elektrischen Merkmale
des Netzes den technischen Angaben auf dem Typenschild
des Heizgeräts entsprechen.

en
it
de
es
fr
nl
pt
da
no
sv
pl
ru
cs
hu
sl
tr
hr
lt
lv
et
ro
sk
bg
uk
bs
el
zh
WARNUNG: Das Heizgerät niemals verwenden, ohne dass
zuvor alle Bauteile korrekt installiert wurden. Für einen kor-
rekten Gebrauch das Heizgerät mit geeigneten Dübeln an
der Wand installieren. Die für die Installation verwendete
Wand muss dem Gewicht des Heizgeräts standhalten kön-
nen. DAS HEIZGERÄT FÜR DEN GEBRAUCH NICHT AUF
DEM BODEN AUFSTELLEN.
-
"ON / OFF" am ferngesteuer-
-
• PROGRAM 1
5).
• PROGRAM 2
6).
• PROGRAM 3
Personal.
• PROGRAM 4
Personal.
-
ACHTUNG: EINE REIHE AN SENSOREN KONTROLLIEREN
DIE KORREKTE FUNKTION DES HEIZGERÄTS UND BLO-
CKIEREN DAS GERÄT IM FALLE VON GRAVIERENDEN AN-
OMALIEN. DIE WIEDERINBETRIEBNAHME DES HEIZGERÄTS
ERFOLGT NICHT AUTOMATISCH, SONDERN MUSS MANUELL
DURCHGEFÜHRT WERDEN. ABWARTEN, BIS DAS HEIZGE-
RÄT KOMPLETT ABGEKÜHLT IST, DEN MÖGLICHEN FEHLER,
DER ZUR BLOCKIERUNG GEFÜHRT HAT, BEHEBEN (Z.B.
VERSTOPFUNG DER LUFTKLAPPE, UNZUREICHENDE LUFT-
ZUFUHR, ETC.) UND DEN "RESET"- DRUCKKNOPF OBEN AM
HEIZGERÄT DURCHDRÜCKEN. SOLLTE DAS HEIZGERÄT
NACH MEHREREN WIEDERINBETRIEBNAHME- VERSUCHEN
TROTZDEM NICHT FUNKTIONIEREN, IST DER TECHNISCHE-
KUNDENDIENST ZU KONTAKTIEREN.
Taste “ON / OFF” ausschalten
des ferngesteuerten Raumthermostats blockiert ist
ACHTUNG: DAS HEIZGERÄT ERST VON DER STROMVER-
SORGUNG TRENNEN, WENN DIE GEBLÄSESCHRAUBE ZUM
STILLSTAND GEKOMMEN IST, UM SCHWERE SCHÄDEN ZU
VERMEIDEN.
►►6. AUFBEWAHRUNG
,
-
-
►►7. FERNRAUMTHERMOSTAT.
-
schlossen sein und der Hauptschalter muss sich in der Stellung “I /
ON”
►►8. FEHLERSUCHE
PROBLEM MÖGLICHE URSACHE MÖGLICHE LÖSUNG
funktioniert nicht
1.
OFF”
2. Einstellung des ferngesteuerten
Raumthermostats fehlerhaft
3. Fehlende Stromversorgung
1. .
2a. “ON / OFF” des ferngesteuerten
Der Motor
funktioniert nicht
1. Motor defekt
2a. Verstopfungen entfernen
1. Ferngesteuertes Raumthermostat
eingestellt auf “VENTILATION”
2. Innenausstattung defekt
1. Luftklappe verstopft
2. Motor defekt
1a. Verstopfungen entfernen

en
it
de
es
fr
nl
pt
da
no
sv
pl
ru
cs
hu
sl
tr
hr
lt
lv
et
ro
sk
bg
uk
bs
el
zh
►►1. INFORMACIONES SOBRE LA SEGURIDAD
(Fig. 1)
Esta serie de calefactores de aire caliente está particular-
mente indicada para la calefacción de locales como alma-
cenes, tiendas, restaurantes y viviendas. Estos calefactores
son conformes con la directiva europea en vigor.
IMPORTANTE: Lea y comprenda este manual de operacio-
nes antes de efectuar el montaje, la puesta en funcionamien-
to o el mantenimiento de este calefactor. El uso erróneo del
calefactor puede ocasionar lesiones graves. Conserve este
manual como material de referencia para consultarlo en el
futuro.
IMPORTANTE: Este calefactor no debe ser utilizado por per-
sonas (incluidos los niños) con capacidades físicas, sen-
soriales y mentales reducidas o por personas inexpertas,
a menos que cuenten con la supervisión de una persona
responsable de su seguridad. Se debe controlar a los niños
para asegurarse de que no jueguen con el calefactor.
IMPORTANTE: Todas las operaciones de limpieza,
mantenimiento y reparación que requieran el acceso a partes
peligrosas (como la sustitución del cable de alimentación
dañado), deben ser llevadas a cabo por el fabricante, por
su servicio de asistencia técnica o por una persona con
prevista la desconexión de la red de alimentación.
IMPORTANTE: Durante el uso del calefactor, respete todas
las ordenanzas locales y la normativa vigente.
Los calentadores utilizados en las cercanías de lonas,
cortinas u otros materiales similares de cobertura, deben es-
tar situados a una distancia de seguridad de dichos materia-
les. Se aconseja además utilizar materiales de cobertura de
tipo ignífugo.
Mantenga el calefactor a una distancia de seguridad de
evitar daños graves al calefactor.
Mantenga una distancia adecuada de las partes calien-
-
biles (incluido el cable de alimentación).
Cuando el calefactor esté caliente, conectado a la red
eléctrica o en funcionamiento, nunca lo manipule, ni tampoco
realice ninguna intervención de mantenimiento sobre este.
La pared donde se instala debe ser
adecuada para el peso del calefactor. NO UTILICE EL CALE-
FACTOR APOYADO EN EL SUELO.
Mantenga los animales a una distancia de seguridad del
calefactor.
Alimente el calefactor únicamente con corriente con la
-
cación del calefactor.
-
cas equipadas con un interruptor diferencial y con una adec-
uada puesta a tierra.
Si el cable de alimentación o el termostato ambiente es-
tuvieran dañados se deben sustituir por el centro de asisten-
cia técnica autorizado, para prevenir cualquier riesgo.
Cuando no utilice el calefactor durante largo tiempo,
desconéctelo de la toma de red.
-
nes no seguras, hágalo de manera que no pueda ser utilizado
y desconéctelo siempre de la toma de red.
No obstruya, ni siquiera parcialmente, la toma de aire
(lado posterior), ni la salida de aire (lado frontal) del calefactor.
Evite canalizar el aire.
No cubra el calefactor durante el funcionamiento, po-
dría sobrecalentarse.
-
miento correcto del calefactor, al menos una vez al año y/o
según las exigencias.
EL FABRICANTE DECLINA TODA RESPONSABILIDAD POR
DAÑOS A PERSONAS Y/O COSAS DERIVADOS DE UN USO
INCORRECTO DEL CALEFACTOR.
SOLAMENTE PERSONAL ESPECIALIZADO Y AUTORIZADO
POR EL FABRICANTE PUEDE INTERVENIR EN EL CAL-
EFACTOR.
►►2. DESEMBALAJE
ADVERTENCIA: El material de embalaje no es un juguete
para los niños. Mantenga la bolsa de plástico alejada del
-
balar y expedir el calentador y elimínelos según las normas vigen-
tes.
-
donde lo ha comprado.
►►3. DESCRIPCIÓN
(Fig. 2)
A. Soporte de pared.
B. Tornillo de regulación.
E. Interruptor general de alimentación.
F. Reset.
H. Termostato ambiente remoto.
I. Display del termostato ambiente.
L. Sensor de la temperatura termostato ambiente remoto.
►►4. MONTAJE E INSTALACIÓN
(Fig. 3)
Para montar e instalar el calefactor, siga estrictamente las indica-
ciones.
Los componentes mecánicos, junto con la relativa tornillería de
montaje, se encuentran dentro del embalaje del calefactor y deben
ensamblarse siempre antes del encendido.
EL CALEFACTOR DEBE INSTALARSE SEGÚN LA NORMA DE
LEY USANDO COMPONENTES CONFORMES A LAS DIRECTI-
VAS LOCALES Y/O NACIONALES. EL FABRICANTE DECLINA
CUALQUIER RESPONSABILIDAD POR DAÑOS AL CALEFAC-
TOR Y/O A LAS PERSONAS, QUE DERIVEN DE LA INSTA-
LACIÓN ERRÓNEA.
►►5. FUNCIONAMIENTO
-
tar riesgos lea, comprenda y respete las “INFORMACIONES
SOBRE LA SEGURIDAD” antes de poner en funcionamiento
el calefactor.
alimentación y que las características eléctricas de la red
correspondan con cuanto se indica en la placa de los datos
técnicos del calefactor.

en
it
de
es
fr
nl
pt
da
no
sv
pl
ru
cs
hu
sl
tr
hr
lt
lv
et
ro
sk
bg
uk
bs
el
zh
ADVERTENCIA: No use nunca el calefactor sin haber mon-
tado antes todos los componentes correctamente. Para
usarlo correctamente instale el calefactor de pared con los
La pared donde se instala debe ser adec-
uada para el peso del calefactor. NO UTILICE EL CALEFAC-
TOR APOYADO EN EL SUELO.
5.1.1. Después de instalar el calefactor en la pared, conecte la
-
temperatura ambiente.
5.1.2. Encienda el calefactor con el pulsador “ON / OFF” del ter-
-
• PROGRAM 1
(Fig. 5).
• PROGRAM 2-
• PROGRAM 3 -
• PROGRAM 4 -
-
ATENCIÓN: UNA SERIE DE SENSORES VERIFICAN EL FUNC-
IONAMIENTO CORRECTO DEL CALEFACTOR, BLOQUEANDO
EL APARATO EN CASO DE ANOMALÍA GRAVE. EL RESTA-
BLECIMIENTO DEL CALEFACTOR NO ES AUTOMÁTICO, YA
QUE DEBE REALIZARSE MANUALMENTE. ESPERE EL EN-
FRIAMIENTO COMPLETO DEL CALEFACTOR, ELIMINE LA
POSIBLE CAUSA QUE HA LLEVADO AL BLOQUEO DEL CALE-
FACTOR (EJ. OBSTRUCCIÓN DE LA TOMA DE AIRE, APORTE
DE AIRE INSUFICIENTE, ETC.) Y PULSE A FONDO EL PULSA-
DOR DE “RESET” SITUADO EN LA PARTE SUPERIOR DEL
CALEFACTOR. SI DESPUÉS DE ALGUNOS TENTATIVOS DE
RESTABLECIMIENTO, EL CALEFACTOR NO FUNCIONARA,
PÓNGASE EN CONTACTO CON LA ASISTENCIA TÉCNICA.
5.2.1. Apague el calefactor con el pulsador “ON / OFF” del ter-
mostato ambiente remoto y deje en marcha el ventilador, hasta
-
, pulse al mismo tiempo los
).
5.2.2. Desconecte el calefactor de la red eléctrica.
ATENCIÓN: NO DESCONECTE EL CALEFACTOR DE LA RED
ELÉCTRICA ANTES DE LA PARADA COMPLETA DEL VENTI-
LADOR, PARA EVITAR DAÑOS GRAVES.
►►6. CONSERVACIÓN
Desconecte siempre el calefactor de la red eléctrica, cuando no
se utilice durante mucho tiempo. Guárdelo en un ambiente seco y
-
dudas sobre la buena conservación, llame a la asistencia técnica.
-
según las exigencias.
►►7. TERMOSTATO AMBIENTE REMOTO
Para un funcionamiento correcto, el calefactor debe conectarse a
la red eléctrica y el interruptor general de alimentación debe estar
en posición “I / ON”
cuando la temperatura desciende por debajo de la temperatura
programada.
►►8. INDIVIDUACIÓN DEL PROBLEMA
PROBLEMA POSIBLE CAUSA POSIBLE SOLUCIÓN
El calefactor no
funciona
1. Interruptor general de alimentación en
posición de “0 / OFF”
ambiente remoto
3. Falta alimentación
2a. Encienda el calefactor con el pulsador “ON / OFF” del termostato
remoto sea superior a la temperatura externa
3c. Diríjase al centro de asistencia
4b. Diríjase al centro de asistencia
El motor no
funciona
1. Motor averiado
1. Diríjase al centro de asistencia
2a. Retire las obstrucciones
2b. Diríjase al centro de asistencia
El calefactor no
calienta
1. Termostato ambiente remoto
“
2. Dispositivos internos averiados
2. Diríjase al centro de asistencia
Flujo de aire
reducido
1. Toma de aire obstruida
2. Motor averiado
1a. Retire las obstrucciones
1b. Diríjase al centro de asistencia
2. Diríjase al centro de asistencia

en
it
de
es
fr
nl
pt
da
no
sv
pl
ru
cs
hu
sl
tr
hr
lt
lv
et
ro
sk
bg
uk
bs
el
zh
►►1. INFORMATIONS SUR LA SÉCURITÉ
(Fig. 1)
-
-
pôts, les magasins les restaurants et les habitations. Ces
vigueur.
-
-
feur peut causer de graves lésions. Conserver ce manuel
comme référence future.
-
lisé par des personnes (y compris les enfants) ayant des ca-
pacités physiques, sensorielles ou mentales réduites ou par
surveillées par une personne responsable de leur sécurité.
Il convient de surveiller les enfants pour s’assurer qu’ils ne
IMPORTANT : Toutes les opérations de nettoyage, de
maintenance et de réparation prévoyant l’accès à des
parties dangereuses (comme le remplacement du câble
IMPORTANT :
-
se trouver à une distance de sécurité. Il est également conseil-
-
-
électrique ou en marche, ne jamais le manipuler ou le sou-
-
Le mur utilisé pour l’installa-
NE PAS UTILISER LE RÉCHAUFFEUR POSÉ PAR TERRE.
Garder les animaux à une distance de sécurité du ré-
-
-
utilisé et, dans tous les cas, toujours le débrancher de la prise
du réseau.
Ne pas
Éviter de canaliser l’air.
la nécessité.
LE FABRICANT DÉCLINE TOUTE RESPONSABILITÉ EN
CAS DE DOMMAGES, AUX BIENS ET/OU AUX PERSONNES,
SEUL LE PERSONNEL SPÉCIALISÉ ET AUTORISÉ PAR LE
FABRICANT PEUT INTERVENIR SUR LE RÉCHAUFFEUR.
►►2. DÉBALLAGE
jouet pour les enfants. Conserver le sachet en plastique
-
tionner et expédier l'appareil et les éliminer conformément aux
normes en vigueur.
-
►►3. DESCRIPTION
(Fig. 2)
A. Support mural.
B. Vis de réglage.
F. Réinitialisation.
►►4. ASSEMBLAGE ET INSTALLATION
(Fig. 3)
-
sement les indications.
-
LE RÉCHAUFFEUR DOIT ÊTRE INSTALLÉ CONFORMÉMENT
À LA LOI, EN UTILISANT DES COMPOSANTS CONFORMES
AUX DIRECTIVES LOCALES ET/OU NATIONALES. LE FABRI-
CANT DÉCLINE TOUTE RESPONSABILITÉ EN CAS DE DOM-
MAGES AU RÉCHAUFFEUR ET/OU PERSONNES DUE À LA
MAUVAISE INSTALLATION.
►►5. FONCTIONNEMENT
-
ter tout risque, lire, comprendre et suivre les « INFORMA-
en marche.
-
mentation et contrôler que les caractéristiques électriques
du réseau correspondent aux indications de la plaque si-
Pagina se încarcă...
Pagina se încarcă...
Pagina se încarcă...
Pagina se încarcă...
Pagina se încarcă...
Pagina se încarcă...
Pagina se încarcă...
Pagina se încarcă...
Pagina se încarcă...
Pagina se încarcă...
Pagina se încarcă...
Pagina se încarcă...
Pagina se încarcă...
Pagina se încarcă...
Pagina se încarcă...
Pagina se încarcă...
Pagina se încarcă...
Pagina se încarcă...
Pagina se încarcă...
Pagina se încarcă...
Pagina se încarcă...
Pagina se încarcă...
Pagina se încarcă...
Pagina se încarcă...
Pagina se încarcă...
Pagina se încarcă...
Pagina se încarcă...
Pagina se încarcă...
Pagina se încarcă...
Pagina se încarcă...
Pagina se încarcă...
Pagina se încarcă...
Pagina se încarcă...
Pagina se încarcă...
Pagina se încarcă...
Pagina se încarcă...
Pagina se încarcă...
Pagina se încarcă...
Pagina se încarcă...
Pagina se încarcă...
Pagina se încarcă...
Pagina se încarcă...
Pagina se încarcă...
Pagina se încarcă...
Pagina se încarcă...
Pagina se încarcă...
Pagina se încarcă...
Pagina se încarcă...
Pagina se încarcă...
Pagina se încarcă...
Pagina se încarcă...
Pagina se încarcă...
Pagina se încarcă...
Pagina se încarcă...
Pagina se încarcă...
Pagina se încarcă...
-
 1
1
-
 2
2
-
 3
3
-
 4
4
-
 5
5
-
 6
6
-
 7
7
-
 8
8
-
 9
9
-
 10
10
-
 11
11
-
 12
12
-
 13
13
-
 14
14
-
 15
15
-
 16
16
-
 17
17
-
 18
18
-
 19
19
-
 20
20
-
 21
21
-
 22
22
-
 23
23
-
 24
24
-
 25
25
-
 26
26
-
 27
27
-
 28
28
-
 29
29
-
 30
30
-
 31
31
-
 32
32
-
 33
33
-
 34
34
-
 35
35
-
 36
36
-
 37
37
-
 38
38
-
 39
39
-
 40
40
-
 41
41
-
 42
42
-
 43
43
-
 44
44
-
 45
45
-
 46
46
-
 47
47
-
 48
48
-
 49
49
-
 50
50
-
 51
51
-
 52
52
-
 53
53
-
 54
54
-
 55
55
-
 56
56
-
 57
57
-
 58
58
-
 59
59
-
 60
60
-
 61
61
-
 62
62
-
 63
63
-
 64
64
-
 65
65
-
 66
66
-
 67
67
-
 68
68
-
 69
69
-
 70
70
-
 71
71
-
 72
72
-
 73
73
-
 74
74
-
 75
75
-
 76
76


în alte limbi
- slovenčina: Master TR 3C-9C Používateľská príručka
Lucrări înrudite
-
Master ECO3 ECO9 E2019 Manualul proprietarului
-
-
-
MCS Master RS 40 Manualul proprietarului
-
MCS Master BV 471S Manualul proprietarului
-
-
-
-
-
Master DFB-16 Manual de utilizare