Master TH2 TH5 THD THK 4150.128 E20 Manualul proprietarului
- Tip
- Manualul proprietarului

TH 2 - TH 5 - TH D - TH K
IT
ITITITITDK
NL
FR
ES
DE
GB
EE
LV
LT
HR
SE
BG
SK
SI
HU
CZ
RU
NO
FI
RO
PL
USER AND MAINTENANCE BOOK
en
LIBRETTO USO E MANUTENZIONE
it
BEDIENUNGS- UND WARTUNGSANLEITUNG
de
MANUAL DE INSTRUCCIONES PARA EL USO Y MANTENIMIENTO
es
MANUEL D’UTILISATION ET DE MAINTENANCE
fr
HANDLEIDING VOOR GEBRUIK EN ONDERHOUD
nl
MANUAL DE USO E MANUTENÇÃO
pt
VEJLEDNING OM BRUG OG VEDLIGEHOLDELSE
da
KÄYTTÖ- JA HUOLTO-OHJE
HEFTE FOR BRUK OG VEDLIKEHOLD
no
ANVÄNDAR- OCH UNDERHÅLLSHANDBOK
sv
INSTRUKCJA OBSŁUGI I KONSERWACJI
pl
РУКОВОДСТВО ПО ЭКСПЛУАТАЦИИ И ТЕХНИЧЕСКОМУ ОБСЛУЖИВАНИЮ
ru
PŘÍRUČKA PRO POUŽITÍ A ÚDRŽBU
cs
HASZNÁLATI ÉS KARBANTARTÁSI KÉZIKÖNYV
hu
PRIROČNIK Z NAVODILI ZA UPORABO IN VZDRŽEVANJE
sl
KNJIŽICA O UPORABI I ODRŽAVANJU
hr
NAUDOJIMO IR PRIEŽIŪROS KNYGELĖ
lt
LIETOŠANAS UN TEHNISKĀS APKOPES GRĀMATIŅA
lv
KASUTUS- JA HOOLDUSJUHEND
et
LIVRET DE UTILIZARE ŞI ÎNTREŢINERE
ro
PRÍRUČKA PRE POUŽITIE A ÚDRŽBU
sk
НАРЪЧНИК ЗА ИЗПОЛЗВАНЕ И ПОДДРЪЖКА
bg
使用和维护手册
zh
ПАЙДАЛАНУ ЖӘНЕ ТЕХНИКАЛЫҚ ҚЫЗМЕТ КӨРСЕТУ ЖЕТЕКШІЛІГІ
kk

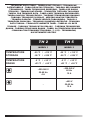
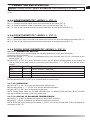
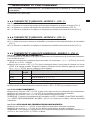
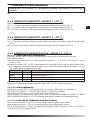
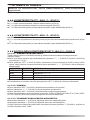
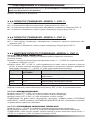
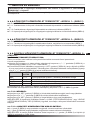
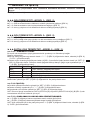
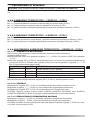
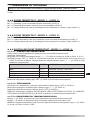
TH 2 TH 5
MODEL 1 MODEL 2
TEMPERATURE
STORAGE
-50 °C / +115 °C
-58 °F / +239 °F
-50 °C / +115 °C
-58 °F / +239 °F
TEMPERATURE
RANGE
-5 °C / +35 °C
+23 °F / +95 °F
-5 °C / +35 °C
+23 °F / +95 °F
~220-240 V
50-60 Hz
4 A
~220-240 V
60 Hz
15 A
-
~400 V
50-60 Hz
15 A
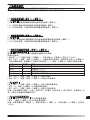
TECHNICAL DATA TABLE - TABELLA DATI TECNICI - TECHNISCHE
DATENTABELLE - TABLA DE DATOS TÉCNICOS - TABLEAU DES DONNÉES
TECHNIQUES - TABEL TECHNISCHE GEGEVENS - TABELA DE DADOS
TÉCNICOS - TEKNISK DATATABEL - TEKNISTEN TIETOJEN TAULUKKO
- TABELL FOR TEKNISKE DATA - TABELL MED TEKNISKA EGENSKAPER -
TABELA DANYCH TECHNICZNYCH - ТАБЛИЦЕ ТЕХНИЧЕСКИХ ДАННЫХ
- TABULKA TECHNICKÝCH ÚDAJŮ - MŰSZAKI ADATOK TÁBLÁZATA
- TEHNIČNI PODATKI - TEKNİK VERİLER TABLOSUNDA - TABLICI S
TEHNIČKIM PODACIMA - TECHNINIŲ DUOMENŲ LENTELĖJE - TEHNISKO
DATU TABULA - TEHNILISTE ANDMETE TABEL - TABELUL CU DATE
TEHNICE - TABUĽKA TECHNICKÝCH ÚDAJOV - ТАБЛИЦА ТЕХНИЧЕСКИ
ДАННИ - ТАБЛИЦІ ТЕХНІЧНИХ ДАНИХ - TABELI SA TEHNIČKIM PODACIMA
- ΠΙΝΑΚΙΔΑ ΤΩΝ ΤΕΧΝΙΚΩΝ ΣΤΟΙΧΕΙΩΝ - 技术参数 - ТЕХНИКАЛЫ
КРСЕТКІШТЕР КЕСТЕСІ

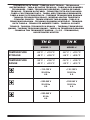
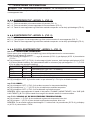
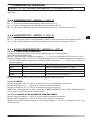
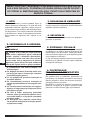
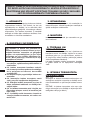
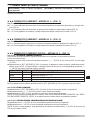
TH D TH K
MODEL 3 MODEL 4
TEMPERATURE
STORAGE
-50 °C / +115 °C
-58 °F / +239 °F
-50 °C / +115 °C
-58 °F / +239 °F
TEMPERATURE
RANGE
-30 °C / +100 °C
-22 °F / +212 °F
-30 °C / +100 °C
-22 °F / +212 °F
~110-120 V
50-60 Hz
4 A
~110-120 V
50-60 Hz
4 A
~220-240 V
50-60 Hz
4 A
~220-240 V
50-60 Hz
4 A
~220-240 V
60 Hz
4 A
-
TECHNICAL DATA TABLE - TABELLA DATI TECNICI - TECHNISCHE
DATENTABELLE - TABLA DE DATOS TÉCNICOS - TABLEAU DES DONNÉES
TECHNIQUES - TABEL TECHNISCHE GEGEVENS - TABELA DE DADOS
TÉCNICOS - TEKNISK DATATABEL - TEKNISTEN TIETOJEN TAULUKKO
- TABELL FOR TEKNISKE DATA - TABELL MED TEKNISKA EGENSKAPER -
TABELA DANYCH TECHNICZNYCH - ТАБЛИЦЕ ТЕХНИЧЕСКИХ ДАННЫХ
- TABULKA TECHNICKÝCH ÚDAJŮ - MŰSZAKI ADATOK TÁBLÁZATA
- TEHNIČNI PODATKI - TEKNİK VERİLER TABLOSUNDA - TABLICI S
TEHNIČKIM PODACIMA - TECHNINIŲ DUOMENŲ LENTELĖJE - TEHNISKO
DATU TABULA - TEHNILISTE ANDMETE TABEL - TABELUL CU DATE
TEHNICE - TABUĽKA TECHNICKÝCH ÚDAJOV - ТАБЛИЦА ТЕХНИЧЕСКИ
ДАННИ - ТАБЛИЦІ ТЕХНІЧНИХ ДАНИХ - TABELI SA TEHNIČKIM PODACIMA
- ΠΙΝΑΚΙΔΑ ΤΩΝ ΤΕΧΝΙΚΩΝ ΣΤΟΙΧΕΙΩΝ - 技术参数 - ТЕХНИКАЛЫ
КРСЕТКІШТЕР КЕСТЕСІ

NOTE:__________________________________________________________________________
_________________________________________________________________________________
_________________________________________________________________________________
_________________________________________________________________________________
_________________________________________________________________________________
_________________________________________________________________________________
_________________________________________________________________________________
_________________________________________________________________________________
_________________________________________________________________________________
_________________________________________________________________________________
_________________________________________________________________________________
_________________________________________________________________________________
________________________________________________________________________________
_________________________________________________________________________________
_________________________________________________________________________________
_________________________________________________________________________________
_________________________________________________________________________________
_________________________________________________________________________________
_________________________________________________________________________________
_________________________________________________________________________________
_________________________________________________________________________________
_________________________________________________________________________________
_________________________________________________________________________________
_________________________________________________________________________________
_________________________________________________________________________________
_________________________________________________________________________________
_________________________________________________________________________________
_________________________________________________________________________________
_________________________________________________________________________________
_________________________________________________________________________________
_________________________________________________________________________________
_________________________________________________________________________________
_________________________________________________________________________________
_________________________________________________________________________________
_________________________________________________________________________________
_________________________________________________________________________________
_________________________________________________________________________________
_________________________________________________________________________________
_________________________________________________________________________________
_________________________________________________________________________________
_________________________________________________________________________________
_________________________________________________________________________________
_________________________________________________________________________________
_________________________________________________________________________________
_________________________________________________________________________________
_________________________________________________________________________________
_________________________________________________________________________________
_________________________________________________________________________________
_________________________________________________________________________________
_________________________________________________________________________________

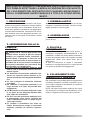
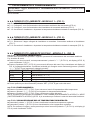
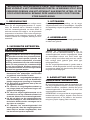
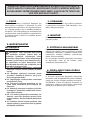
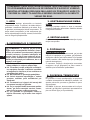
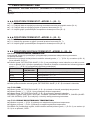
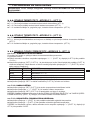
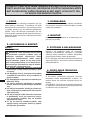
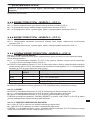
PICTURES - FIGURE - ABBILDUNGEN - FIGURAS - FIGURES - FIGUREN
- FIGURAS - FIGURER - KUVAT - FIGURER - FIGUR - RYSUNKI - РИСУН-
КИ - OBRÁZKY - ÁBRÁK - SLIKE - ŞEKİLLER - SLIKE - PAVEIKSLĖLIAI -
ATTĒLI - JOONISED - IMAGINI - OBRÁZKY - ФИГУРА - МАЛЮНКИ - SLIKE
- ΕΙΚΟΝΕΣ - 图 - СУРЕТТЕР
1
2 3 9
4 5
6 7
8
A
B
C D
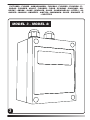
MODEL 1: MODEL 2:
MODEL 3 - MODEL 4:
MODEL 3: MODEL 4:
9

PICTURES - FIGURE - ABBILDUNGEN - FIGURAS - FIGURES - FIGUREN - FI-
GURAS - FIGURER - KUVAT - FIGURER - FIGUR - RYSUNKI - РИСУНКИ - OB-
RÁZKY - ÁBRÁK - SLIKE - ŞEKİLLER - SLIKE - PAVEIKSLĖLIAI - ATTĒLI - JO-
ONISED - IMAGINI - OBRÁZKY - ФИГУРА - МАЛЮНКИ - SLIKE - ΕΙΚΟΝΕΣ - 图
- СУРЕТТЕР
1
2 3 9
4 5
6 7
8
A
B
C D
MODEL 1: MODEL 2:
MODEL 3 - MODEL 4:
MODEL 3: MODEL 4:
9

en
it
de
es
fr
nl
pt
da
no
sv
pl
ru
cs
hu
sl
tr
hr
lt
lv
et
ro
sk
bg
uk
bs
el
zh
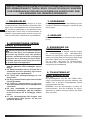
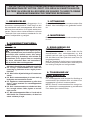
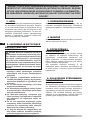
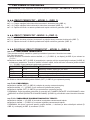
IMPORTANT: READ AND UNDERSTAND THIS OPERATIONAL MANUAL
PRIOR TO STARTING UP THE HEATER. USING THE DEVICE INCORRECTLY
CAN CAUSE SERIOUS OR FATAL INJURIES. KEEP THIS MANUAL FOR
FURTHER REFERENCE.
1. DESCRIPTION
The room thermostat is a useful accessory to con-
trol the room temperature. This means that it can
interact with the heater in order to activate it only
when necessary, to reach the desired tempera-
ture. This range of room thermostats have been
designed in line with the most recent safety, oper-
ating and duration criteria.
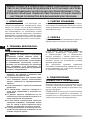
2. SAFETY INFORMATION
WARNINGS
IMPORTANT: This appliance is not sui-
table for use by persons (including children)
with reduced physical, sensory or mental ca-
pacities or who lack experience or knowled-
ge unless supervised by a person respon-
sible for their safety. Children must be su-
pervised to make sure they do not play with
the appliance.
2.1. Comply with all local laws and regula-
tions in force when using the room thermo-
stat.
2.2. Power on the room thermostat only with
a current which has the voltage and fre-
-
tion plate.
2.3. Do not connect extensions to the room
thermostat.
2.4. Use the room thermostat in a dry place
away from possible damage.
2.5. Keep the room thermostat and all its
parts at an adequate distance from the hot
parts of the heater.
2.6. If the power supply cable of the room
thermostat is damaged, it must be replaced
by a technical support centre to prevent any
risk.
2.7. When the heater is not used, always dis-
connect the room thermostat as it could re-
start the device.
3. UNPACKING
Open the package carefully so as not to damage
the room thermostat. Dispose of the packaging in
accordance with regulations in force.
4. ASSEMBLY
The room thermostat is received pre-assembled
and ready for use.
5. CLEANING AND STORAGE
If the room thermostat is dirty, it must be
disconnected from the power supply or from
the heater, blow it with low pressure air, and if
necessary, clean it with a slightly damp soft cloth
(do not use any type of detergent).
In order to keep the room thermostat in the best
conditions possible, we recommend placing it in
a dry place away from potential external damage.
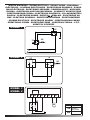
6. CONNECTING THE ROOM
THERMOSTAT
(PIC. 7-8)
In the case of heaters that come with a potential
room thermostat connection or compatible mod-
els, remove the plug connected to the heater and
connect the room thermostat.
NOTE: If the room thermostat is no longer need-
ed, disconnect it from the heater and restore the
cap on the socket (where applicable).

en
it
de
es
fr
nl
pt
da
no
sv
pl
ru
cs
hu
sl
tr
hr
lt
lv
et
ro
sk
bg
uk
bs
el
zh
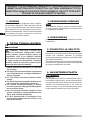
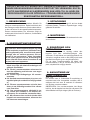
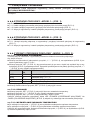
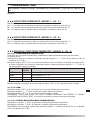
7. CONNECTION AND OPERATION
WARNING: Carefully read the “SAFETY INFORMATION” before switching on the heater.
NOTE: If the room temperature is higher than the temperature set on the thermostat, the heater does not
go on.
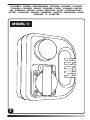
►►►ROOM THERMOSTAT --MODEL 1-- (PIC. 1):
7.1. OPERATION:
7.1.1. Connect the power cable of the room thermostat to the mains (PIC. 4).
7.1.2. Connect the power cable of the heater to the room thermostat (PIC. 5).
7.1.3. Turn on the heater and set the desired temperature by turning the knob (PIC. 6).
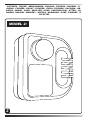
ROOM THERMOSTAT --MODEL 2-- (PIC. 2):
7.2. OPERATION:
7.2.1. Remove the plug connected to the heater and connect the room thermostat to the heater (PIC. 7).
7.2.2. Turn on the heater and set the desired temperature by turning the knob (PIC. 6).
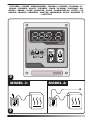
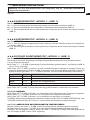
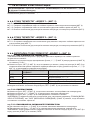
DIGITAL ROOM THERMOSTAT --MODEL 3-- (PIC. 3):
7.3.1. THERMOSTAT SETTING:
This menu allows you to set and adjust the operating parameters of the room thermostat.
Access the menu as follows:
display (A PIC. 8).
setting]:
PARAMETER PRESET DESCRIPTION
diFF 0,2 °C
tEnP °C
Ad.tE 0.2 °C Correction of the temperature probe
rY.OC 1 Type of probe (Correct setting 1)
7.3.2. OPERATION:
light up to indicate the status of the room thermostat.
7.3.3. DISPLAY OF RECORDED TEMPERATURES:
the display (A PIC. 8).

en
it
de
es
fr
nl
pt
da
no
sv
pl
ru
cs
hu
sl
tr
hr
lt
lv
et
ro
sk
bg
uk
bs
el
zh
IMPORTANTE: LEGGERE E COMPRENDERE QUESTO MANUALE OPERA-
TIVO PRIMA DI EFFETTUARE LA MESSA IN FUNZIONE DEL RISCALDATO-
RE. L’USO ERRATO DEL DISPOSITIVO PUÒ CAUSARE LESIONI GRAVI O
FATALI. CONSERVARE QUESTO MANUALE A TITOLO DI FUTURO RIFERI-
MENTO.
1. DESCRIZIONE
Il termostato ambiente è un accessorio utile a con-
trollare
che può interagire con il riscaldatore-
tivarlo solo quando è necessario, per raggiungere
la temperatura desiderata. Questa serie di termo-
stati ambiente sono stati progettati secondo i più
moderni criteri di sicurezza, funzionalità e durata
nel tempo.
2. INFORMAZIONI SULLA SI-
CUREZZA
AVVERTENZE
IMPORTANTE: Questo apparecchio non
è adatto all’uso da parte di persone (inclusi
mentali ridotte, o inesperte, a meno che non
vengano supervisionate da una persona re-
ponsabile per la loro sicurezza. I bambini de-
vono essere controllati, per assicurarsi che
non giochino con l’apparecchio.
2.1. Per l’uso del termostato ambiente, atte-
nersi a tutte le ordinanze locali ed alla nor-
mativa vigente.
2.2. Alimentare il termostato ambiente sola-
mente con corrente avente tensione e fre-
-
tiva.
2.3. Non collegare al termostato ambiente
prolunghe.
2.4. Utilizzare il termostato ambiente in un
luogo asciutto e al riparo da possibili dan-
neggiamenti.
2.5. Mantenere il termostato ambiente e tutte
le sue parti, ad una adeguata distanza dalle
parti calde del riscaldatore.
2.6. Se il cavo del termostato ambiente risul-
ta danneggiato, deve essere sostituito dal
centro assistenza tecnica, in modo da pre-
venire ogni rischio.
2.7. Quando il riscaldatore non viene uti-
lizzato, disconnettere sempre il termostato
ambiente, potrebbe far ripartire l’apparec-
chio.
3. DISIMBALLAGGIO
-
neggiare il termostato ambientemaltire l’imbal-
laggio secondo le norme vigenti.
4. ASSEMBLAGGIO
Il termostato ambiente arriva già assemblato e
pronto all’uso.
5. PULIZIA E
CONSERVAZIONE
In caso il termostato ambiente risulti sporco, è
necessario scollegarlo dall’alimentazione o dal
riscal
in caso di necessità pulirlo con un panno morbido
leggermente umido (non usare alcun tipo di
detergente).
termostato
ambiente, si consiglia di riporlo in un luogo asciutto
e al riparo da possibili danneggiamenti.
6. COLLEGAMENTO DEL
TERMOSTATO AMBIENTE
()
Nei riscaldatori con predisposizione collegamento
termostato ambiente o modelli compatibili, rimuo-
vere il tappo collegato al riscaldatore e connettere
il termostato ambiente.
NOTA: Nel caso il termostato ambiente non fosse
più necessario, scollegarlo dal riscaldatore e ripri-
stinare il cappuccio sulla presa (dove previsto).

en
it
de
es
fr
nl
pt
da
no
sv
pl
ru
cs
hu
sl
tr
hr
lt
lv
et
ro
sk
bg
uk
bs
el
zh
7. COLLEGAMENTO E FUNZIONAMENTO
AVVERTENZA: Leggere attentamente le “INFORMAZIONI SULLA SICUREZZA”, prima di accen-
dere il riscaldatore.
riscaldatore
non si accende.
►►►TERMOSTATO AMBIENTE --MODELLO 1-- (FIG. 1):
7.1. FUNZIONAMENTO:
7.1.1. Collegare il cavo di alimentazione del termostato ambiente alla rete elettrica ().
7.1.2. Collegare il cavo di alimentazione del riscaldatore al termostato ambiente ().
7.1.3. Accendere il riscaldatore e impostare la temperatura desiderata ruotando la manopola ().
TERMOSTATO AMBIENTE --MODELLO 2-- (FIG. 2):
7.2. FUNZIONAMENTO:
7.2.1. Rimuovere il tappo collegato al riscaldatore e connettere il termostato ambiente al riscaldatore
().
7.2.2. Accendere il riscaldatore e impostare la temperatura desiderata ruotando la manopola ().
TERMOSTATO AMBIENTE DIGITALE --MODELLO 3-- (FIG. 3):
7.3.1. SETTAGGIO TERMOSTATO:
Questo menù permette di impostare e regolare i parametri di funzionamento del termostato ambiente.
Per accedere al menù:
, per alcuni secondi, contemporaneamente sul display
per muoversi all’interno del menù, sul display (A
il settaggio desiderato. Consultare la tabella qui di seguito come riferimento [premere i pulsanti
per impostare il settaggio corretto]:
PARAMETRO PRESET DESCRIZIONE
diFF 0,2 °C
tEnP °C
Ad.tE 0,2 °C Correzione della sonda di temperatura
rY.OC 1
per confermare il settaggio.
per uscire dal menù.
7.3.2. FUNZIONAMENTO:
per entrare nel menù di impostazione della temperatura.
per impostare la temperatura desiderata.
per confermare e uscire dal menù.
si accendono per indicare lo stato del termostato ambiente.
7.3.3. VISUALIZZAZIONE DELLE TEMPERATURE REGISTRATE:
viene visualizzata la massima temperatura registrata.
viene visualizzata la minor temperatura registrata.
NOTA: Per azzerare il registro, ten, sul display (A

en
it
de
es
fr
nl
pt
da
no
sv
pl
ru
cs
hu
sl
tr
hr
lt
lv
et
ro
sk
bg
uk
bs
el
zh
WICHTIGER HINWEIS: DIESE BEDIENUNGSANLEITUNG MUSS VOR DER INBE-
TRIEBSETZUNG DES HEIZGERÄTES GELESEN UND VERSTANDEN WORDEN
SEIN. DIE FALSCHE BENUTZUNG DES HEIZGERÄTES KANN ZU SCHWEREN
VERLETZUNGEN FÜHREN, AUCH MIT TÖDLICHEM AUSGANG. BEWAHREN
SIE DIESE ANLEITUNG ZUM SPÄTEREN NACHSCHLAGEN GUT AUF.
1. BESCHREIBUNG
Raumtemperatur. Dies bedeutet, dass er mit dem
-
darf einschaltet, um die gewünschte Temperatur
-
2. SICHERHEITSHINWEISE
WARNHINWEISE
WICHTIGER HINWEIS: Dieses Gerät ist
nicht geeignet für den Gebrauch durch Per-
sonen (einschließlich Kindern) mit einge-
schränkten körperlichen, sensorischen und
geistigen Fähigkeiten bzw. ohne ausreichen-
de Fachkenntnis, es sei denn, sie werden
durch eine für ihre Sicherheit verantwort-
liche Person beaufsichtigt. Kinder sind zu
beaufsichtigen, damit sie nicht mit dem Ge-
rät spielen.
2.1. Bei der Verwendung des Raumthermos-
tats alle örtlichen Anordnungen und die gel-
tenden Vorschriften beachten.
2.2. Die Stromversorgung des Thermostats
muss die auf dessen Typenschild angege-
bene Spannung und Frequenz aufweisen.
2.3. Keine Verlängerungen am Raumther-
mostat anschließen.
2.4. Den Raumthermostat an einem trocke-
nen und vor möglichen Beschädigungen ge-
schützten Ort verwenden.
2.5. Den Raumthermostat und alle seine Tei-
le in einem angemessenen Abstand von den
heißen Teilen des Heizgeräts halten.
2.6. Wenn das Kabel des Raumthermostats
beschädigt ist, muss es durch den Kunden-
dienst ausgetauscht werden, um Gefahren
auszuschließen.
2.7. Wenn das Heizgerät nicht verwendet
wird, muss der Raumthermostat immer ge-
trennt werden, denn er könnte einen Neu-
start des Geräts verursachen.
3. AUSPACKEN
-
4. ZUSAMMENBAU
Der Raumthermostat wird bereits zusammenge-
baut und betriebsbereit geliefert.
5. REINIGUNG UND
AUFBEWAHRUNG
getrennt und bei niedrigem Druck mit einem
Druckluftstrahl und gegebenenfalls mit einem
weichen leicht befeuchteten Tuch gereinigt werden
(keinerlei Art Reinigungsmittel verwenden).
Um den Raumthermostat am besten
aufzubewahren, wird empfohlen, ihn an einem
zu lagern.
6. FALSCHER ANSCHLUSS
DES RAUMTHERMOSTATS
-
thermostat vorgerüstet sind, oder bei kompatiblen
Raumthermostat angeschlossen werden.
(wenn vorhanden).

en
it
de
es
fr
nl
pt
da
no
sv
pl
ru
cs
hu
sl
tr
hr
lt
lv
et
ro
sk
bg
uk
bs
el
zh
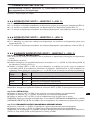
7. ANSCHLUSS UND BETRIEB
WARNUNG: Vor dem Einschalten/Zünden des Heizgerätes sind die "SICHERHEITSHINWEISE"
aufmerksam durchzulesen.
nicht ein.
►►►RAUMTHERMOSTAT --MODELL 1-- (ABB. 1):
7.1. BETRIEB:
die gewünschte Temperatur durch Drehen des Knopfs einstellen
.
RAUMTHERMOSTAT --MODELL 2-- (ABB. 2):
7.2. BETRIEB:
7.2.1. -
die gewünschte Temperatur durch Drehen des Knopfs einstellen
.
DIGITALER RAUMTHERMOSTAT --MODELL 3-- (ABB. 3):
7.3.1. EINSTELLUNG DES THERMOSTATS:
-
PARAMETER PRESET BESCHREIBUNG
diFF 0,2 °C
tEnP °C
Ad.tE 0,2 °C Korrektur des Temperaturfühlers
rY.OC 1
7.3.2. BETRIEB:
7.3.3. ANZEIGE DER AUFGEZEICHNETEN TEMPERATUREN:
-

en
it
de
es
fr
nl
pt
da
no
sv
pl
ru
cs
hu
sl
tr
hr
lt
lv
et
ro
sk
bg
uk
bs
el
zh
IMPORTANTE: LEA Y COMPRENDA ESTE MANUAL OPERATIVO ANTES DE
MONTAR, PONER EN FUNCIONAMIENTO O REALIZAR EL MANTENIMIENTO
DEL CALEFACTOR. UN USO INCORRECTO DEL DISPOSITIVO PUEDE CAU-
SAR LESIONES GRAVES O INCLUSO LA MUERTE. CONSERVE ESTE MANUAL
COMO MATERIAL DE REFERENCIA PARA CONSULTARLO EN EL FUTURO.
1. DESCRIPCIÓN
El termostato ambiente es un accesorio útil para
que puede actuar con el calefactor para activarlo,
solo cuando es necesario, para alcanzar la tem-
peratura que desea. Esta serie de termostatos
ambiente han sido diseñados según los criterios
de seguridad, funcionalidad y duración a lo largo
del tiempo, más modernos.
2. INFORMACIONES SOBRE
LA SEGURIDAD
ADVERTENCIAS
IMPORTANTE: Este aparato no es apto
para que lo usen personas (incluidos los
niños) con capacidades físicas, sensoriales
y mentales reducidas, o inexpertas, a no ser
que estén vigilados por una persona respon-
sable por su seguridad. Se debe controlar a
los niños para asegurarse de que no juegu-
en con el aparato.
2.1. Para el uso del termostato ambiente, re-
spete todas las ordenanzas locales y la nor-
mativa vigente.
2.2. Alimente el termostato ambiente única-
mente con corriente con la tensión y la fre-
-
2.3. No conecte alargadores al termostato
ambiente.
2.4. Use el termostato ambiente en un lugar
seco y protegido de los daños posibles.
2.5. Mantenga el termostato ambiente y to-
das sus partes a una debida distancia de las
partes calientes del calefactor.
2.6. Si el cable del termostato ambiente es-
tuviera dañado, se debe sustituir por el cen-
tro de asistencia técnica autorizado, para
prevenir cualquier riesgo.
2.7. Cuando el calefactor no se usa, desco-
necte siempre el termostato ambiente, po-
dría retomar el funcionamiento del equipo.
3. DESEMBALAJE
Abra con cuidado el envoltorio para no dañar el
termostato ambiente. Elimine el embalaje siguien-
do lo indicado por las normas vigentes.
4. MONTAJE
El termostato ambiente se recibe ya montado y
listo para usar.
5. LIMPIEZA Y
CONSERVACIÓN
En caso de que el termostato ambiente esté sucio,
es necesario desconectarlo de la alimentación o
del calefactor, soplando con aire a baja presión
y en caso de que sea necesario, limpiarlo con un
paño suave un poco humedecido con agua (no
use ningún tipo de detergente).
Para conservar lo mejor posible el termostato
ambiente, se aconseja colocarlo en un lugar seco
y protegido de posibles daños.
6. CONEXIÓN DEL
TERMOSTATO AMBIENTE
En los calefactores predispuestos con conexión
para termostato ambiente o modelos compatibles,
retire el tapón conectado al calefactor y conecte el
termostato ambiente.
necesario, desconecte este del calefactor y pon-
ga de nuevo el capuchón en la toma (donde esté
previsto).

en
it
de
es
fr
nl
pt
da
no
sv
pl
ru
cs
hu
sl
tr
hr
lt
lv
et
ro
sk
bg
uk
bs
el
zh
7. CONEXIÓN Y FUNCIONAMIENTO
ADVERTENCIA: lea atentamente la “INFORMACIÓN DE SEGURIDAD" antes de encender el ca-
lefactor.
calefactor
no se enciende.
►►►TERMOSTATO AMBIENTE --MODELO 1-- (FIG. 1):
7.1. FUNCIONAMIENTO:
7.1.3. Encienda el calefactor y c.
TERMOSTATO AMBIENTE --MODELO 2-- (FIG. 2):
7.2. FUNCIONAMIENTO:
7.2.1. Retire el tapón conectado al calefactor
7.2.2. Encienda el calefactor y c.
TERMOSTATO AMBIENTE DIGITAL --MODELO 3-- (FIG. 3):
7.3.1. CONFIGURACIÓN DEL TERMOSTATO:
Para acceder al menú:
PARÁMETRO PRESET DESCRIPCIÓN
diFF 0,2 °C
tEnP °C
Ad.tE 0,2 °C Corrección de la sonda de temperatura
rY.OC 1
7.3.2. FUNCIONAMIENTO:
ambiente.
7.3.3. VISUALIZACIÓN DE LAS TEMPERATURAS REGISTRADAS:

en
it
de
es
fr
nl
pt
da
no
sv
pl
ru
cs
hu
sl
tr
hr
lt
lv
et
ro
sk
bg
uk
bs
el
zh
IMPORTANT : LIRE ET COMPRENDRE CE MANUEL D’UTILISATION AVANT
D’EFFECTUER LA MISE EN MARCHE DU RÉCHAUFFEUR. LA MAUVAISE
UTILISATION DU RÉCHAUFFEUR PEUT CAUSER DES BLESSURES
GRAVES OU MORTELLES. CONSERVER CE MANUEL POUR TOUTE
CONSULTATION FUTURE.
1. DESCRIPTION
pour contrôler la température ambiante. Cela si-
ne l’activer lorsque cela est nécessaire, pour at-
teindre la température souhaitée. Ces thermos-
tats d’ambiance ont été conçus conformément
aux critères de sécurité, de fonctionnalité et de
durée les plus modernes.
2. INFORMATIONS SUR LA
SÉCURITÉ
AVERTISSEMENTS
IMPORTANT : Cet appareil n'est pas
adapté pour être utilisé par des personnes
(y compris les enfants) ayant des capacités
physiques, sensorielles et mentales réduites
ou par des personnes inexpérimentées, à
moins qu'elles ne soient surveillées par une
personne responsable de leur sécurité. Les
-
urer qu'ils ne jouent pas avec l'appareil.
2.1. Pour l'utilisation du thermostat d’am-
biance, respecter tous les arrêtés locaux et
la réglementation en vigueur.
2.2. Alimenter le thermostat d’ambiance seu-
lement avec du courant ayant une tension
2.3. Ne pas brancher de rallonges au ther-
mostat d’ambiance.
2.4. Utiliser le thermostat d’ambiance dans
un lieu sec et à l’abri de tout endommage-
ment possible.
2.5. Maintenir le thermostat d’ambiance et
toutes ses parties à distance des parties
2.6. Si le cordon d'alimentation du thermos-
tat est endommagé, il doit être remplacé par
-
ter tout risque.
déconnecter toujours le thermostat d’am-
biance, cela pourrait remettre en marche
l’appareil.
3. DÉBALLAGE
-
dommager le thermostat d’ambiance. Éliminer
l’emballage conformément aux règlementations
en vigueur.
4. ASSEMBLAGE
5. NETTOYAGE ET
CONSERVATION
humide (n’utiliser aucun type de détergent).
optimale, il est conseillé de le ranger dans un
endroit sec et à l'abri de tout dommage possible.
6. BRANCHEMENT DU
THERMOSTAT D’AMBIANCE
-
ment d'un thermostat d’ambiance ou de modèles
compatibles, retirer le bouchon raccordé au ré-
remettre le capuchon sur la prise (si prévu).

en
it
de
es
fr
nl
pt
da
no
sv
pl
ru
cs
hu
sl
tr
hr
lt
lv
et
ro
sk
bg
uk
bs
el
zh
7. BRANCHEMENT ET FONCTIONNEMENT
AVERTISSEMENT : Lire attentivement les « INFORMATIONS SUR LA SÉCURITÉ » avant d’allumer
le ne s’allume pas.
►►►THERMOSTAT D’AMBIANCE --MODÈLE 1-- (FIG. 1) :
7.1. FONCTIONNEMENT :
.
THERMOSTAT D’AMBIANCE --MODÈLE 2-- (FIG. 2) :
7.2. FONCTIONNEMENT :
7.2.1.
.
THERMOSTAT D’AMBIANCE NUMÉRIQUE --MODÈLE 3-- (FIG. 3) :
7.3.1. RÉGLAGE DU THERMOSTAT :
Pour accéder au menu :
-
PARAMÈTRE PRÉ-RÉ-
GLAGE
DESCRIPTION
diFF 0,2 °C
tEnP °C
Ad.tE 0,2 °C Correction de la sonde de température
rY.OC 1 Type de sonde (Réglage correct 1)
7.3.2. FONCTIONNEMENT :
d’ambiance.
7.3.3. AFFICHAGE DES TEMPÉRATURES ENREGISTRÉES :

en
it
de
es
fr
nl
pt
da
no
sv
pl
ru
cs
hu
sl
tr
hr
lt
lv
et
ro
sk
bg
uk
bs
el
zh
BELANGRIJK: LEES EN BEGRIJP EERST DEZE BEDIENINGSHANDLEI-
DING VOORDAT U HET VERWARMINGSTOESTEL IN WERKING STELT. EEN
VERKEERD GEBRUIK VAN HET APPARAAT KAN ERNSTIG LETSEL OF DE
DOOD VEROORZAKEN. BEWAAR DEZE HANDLEIDING VOOR TOEKOM-
STIGE RAADPLEGING.
1. BESCHRIJVING
De omgevingsthermostaat is een nuttige acces-
soire om de omgevingstemperatuur te contro-
leren. Dit betekent dat er interactie mogelijk is
met het verwarmingstoestel om deze alleen te
activeren wanneer het nodig is, om de gewenste
temperatuur te bereiken. Deze reeks omgevings-
thermostaten werd ontworpen volgens de meest
moderne criteria voor veiligheid, werking en duur-
zaamheid.
2. INFORMATIE BETREFFEN-
DE DE VEILIGHEID
WAARSCHUWINGEN
BELANGRIJK: Dit toestel is niet geschikt
om gebruikt te worden door personen (kinde-
ren inbegrepen) met beperkte fysische, zin-
tuiglijke en mentale capaciteiten, of zonder
ervaring, tenminste als ze niet onder toezicht
staan van een persoon die verantwoordelijk
is voor hun veiligheid. Kinderen moeten on-
der toezicht staan om ervoor te zorgen dat ze
niet met het apparaat spelen.
2.1. Neem bij het gebruik van de omgevings-
thermostaat alle plaatselijke voorschriften
en geldende voorschriften in acht.
2.2. Voorzie de omgevingsthermostaat al-
-
plaatje aangegeven spanning en frequentie.
2.3. Sluit geen verlengkabels aan op de om-
gevingsthermostaat.
2.4. Gebruik de omgevingsthermostaat op
een droge plaats en beschermd tegen mo-
gelijke beschadigingen.
2.5. Houd de omgevingsthermostaat en de
onderdelen ervan op voldoende afstand van
de warme delen van het verwarmingstoestel.
2.6. Als de kabel van de omgevingsthermo-
staat beschadigd is, dan moet deze door de
technische dienst worden vervangen om ie-
der risico te vermijden.
2.7. Wanneer het verwarmingstoestel niet
wordt gebruikt, dient de omgevingsthermo-
staat altijd te worden losgekoppeld; deze
kan het toestel opnieuw opstarten.
3. UITPAKKEN
Open zorgvuldig de verpakking, om de omge-
de verpakking volgens de geldende wettelijke be-
palingen.
4. ASSEMBLAGE
De omgevingsthermostaat is reeds gemonteerd
en klaar voor gebruik.
5. REINIGEN EN BEWAREN
moet hij van de stroomvoorziening of van het
verwarmingstoestel worden losgekoppeld, blaas
de thermostaat schoon met lucht onder lage
druk en reinig hem indien nodig met een zachte,
licht vochtige doek (gebruik geen enkel type
reinigingsmiddel).
Om de omgevingsthermostaat in goede staat te
bewaren, wordt aangeraden om hem op te bergen
op een droge plaats, die bescherming biedt tegen
mogelijke beschadigingen.
6. AANSLUITING VAN DE
OMGEVINGSTHERMOSTAAT
een omgevingsthermostaat is voorzien of bij com-
patibele modellen, verwijdert u de dop die op het
verwarmingstoestel is aangesloten en sluit u de
omgevingsthermostaat aan.
-
mostaat niet meer nodig is, koppelt u hem van het
verwarmingstoestel af en plaatst u de bescher-
ming terug op de uitgang (waar voorzien).
Pagina se încarcă...
Pagina se încarcă...
Pagina se încarcă...
Pagina se încarcă...
Pagina se încarcă...
Pagina se încarcă...
Pagina se încarcă...
Pagina se încarcă...
Pagina se încarcă...
Pagina se încarcă...
Pagina se încarcă...
Pagina se încarcă...
Pagina se încarcă...
Pagina se încarcă...
Pagina se încarcă...
Pagina se încarcă...
Pagina se încarcă...
Pagina se încarcă...
Pagina se încarcă...
Pagina se încarcă...
Pagina se încarcă...
Pagina se încarcă...
Pagina se încarcă...
Pagina se încarcă...
Pagina se încarcă...
Pagina se încarcă...
Pagina se încarcă...
Pagina se încarcă...
Pagina se încarcă...
Pagina se încarcă...
Pagina se încarcă...
Pagina se încarcă...
Pagina se încarcă...
Pagina se încarcă...
Pagina se încarcă...
Pagina se încarcă...
Pagina se încarcă...
Pagina se încarcă...
Pagina se încarcă...
Pagina se încarcă...
Pagina se încarcă...
Pagina se încarcă...
Pagina se încarcă...
Pagina se încarcă...
Pagina se încarcă...
Pagina se încarcă...
Pagina se încarcă...
Pagina se încarcă...
Pagina se încarcă...
Pagina se încarcă...
Pagina se încarcă...
Pagina se încarcă...
-
 1
1
-
 2
2
-
 3
3
-
 4
4
-
 5
5
-
 6
6
-
 7
7
-
 8
8
-
 9
9
-
 10
10
-
 11
11
-
 12
12
-
 13
13
-
 14
14
-
 15
15
-
 16
16
-
 17
17
-
 18
18
-
 19
19
-
 20
20
-
 21
21
-
 22
22
-
 23
23
-
 24
24
-
 25
25
-
 26
26
-
 27
27
-
 28
28
-
 29
29
-
 30
30
-
 31
31
-
 32
32
-
 33
33
-
 34
34
-
 35
35
-
 36
36
-
 37
37
-
 38
38
-
 39
39
-
 40
40
-
 41
41
-
 42
42
-
 43
43
-
 44
44
-
 45
45
-
 46
46
-
 47
47
-
 48
48
-
 49
49
-
 50
50
-
 51
51
-
 52
52
-
 53
53
-
 54
54
-
 55
55
-
 56
56
-
 57
57
-
 58
58
-
 59
59
-
 60
60
-
 61
61
-
 62
62
-
 63
63
-
 64
64
-
 65
65
-
 66
66
-
 67
67
-
 68
68
-
 69
69
-
 70
70
-
 71
71
-
 72
72


Master TH2 TH5 THD THK 4150.128 E20 Manualul proprietarului
- Tip
- Manualul proprietarului
Lucrări înrudite
-
Master TR 3C-9C Manual de utilizare
-
MCS Master RS 40 Manualul proprietarului
-
-
MCS Master BV 471S Manualul proprietarului
-
-
-
-
-
-