Whirlpool 9YFKT 636J X /HA Manualul utilizatorului
- Categorie
- Microunde
- Tip
- Manualul utilizatorului

9YFKT 636J X /HA
English
Operating Instructions
OVEN
Contents
Operating Instructions,1
Warnings,3
Assistance,7
Description of the appliance,8
Description of the appliance,10
Installation,11
Start-up and use,13
The electronic programmer,13
Modes,14
Precautions and tips,17
Maintenance and care,17
Magyar
Használati útmutató
SÜTŐ
Tartalomjegyzék
Használati útmutató,1
Figyelmeztetések,4
Szerviz,7
A készülék leírása,8
A készülék leírása,10
Beszerelés,35
Bekapcsolás és használat,37
Elektronikus programkapcsoló,37
Üzemmódok,38
Óvintézkedések és tanácsok,41
Karbantartás és ápolás,41
Български
Инструкции за употреба
ФУРНА
Съдържание
Инструкции за употреба,1
Препоръки,3
Техни еско обслужване,7
Описание на уреда,8
Описание на уреда,10
Монтиране,19
Пуск и експлоатация,21
Електронен програматор,21
Програми,22
Предпазни мерки и препоръки,25
Поддръжка и почистване,26
Ελληνικά
Οδηγίες χρήσης
ΦΟΎΡΝΟΣ
Română
Instrucţiuni de folosire
CUPTOR
Sumar
Instrucţiuni de folosire,1
Avertizări,4
Asistenţă,7
Descrierea aparatului,8
Descrierea aparatului,10
Instalare,43
Pornire şi utilizare,45
Programator de coacere electronic,45
Programe,46
Măsuri de precauţie şi recomandări,48
Întreţinerea şi îngrijirea aparatului,48
Περιεχόμενα
Οδηγίες χρήσης,1
Προειδοποίηση,3
Τεχνική υποστήριξη,7
Περιγραφή της συσκευής,8
Περιγραφή της συσκευής,10
Εγκατάσταση,27
Εκκίνηση και χρήση,29
Ο ηλεκτρονικός προγραμματιστής,29
ΠΡΟΓΡΑΜΜΑΤΑ,30
Προφυλάξεις και συμβουλές,33
Συντήρηση και φροντίδα,33

Iталiиська
Довідник користувача
ДУХОВКА
Cрпски
Радна упутства
РЕРНА
Содержание
Радна упутства,2
Упозорења,5
Помоћ,7
Опис апарата,9
Опис апарата,10
Инсталација,50
Покретање и употреба,52
Електронски програматор,52
Режими,53
Мере опреза и савети,56
Одржавање и нега,56
Зміст
Довідник користувача,2
Запобіжні заходи,5
Допомога,7
Опис приладу,9
Опис приладу,10
Загальний вигляд,58
Початок роботи та використання,60
Електронний програматор готування,60
Програми,61
Запобіжні заходи та поради,64
Догляд та очищення,64

3
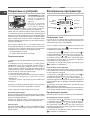
Warnings
WARNING: The appliance and its
accessible parts become hot during use.
Care should be taken to avoid touching
heating elements. Children less than 8
years of age shall be kept away unless
continuously supervised. This appliance
can be used by children aged from 8 years
and above and persons with reduced
physical, sensory or mental capabilities
or lack of experience and knowledge
if they have been given supervision
or instruction concerning use of the
appliance in a safe way and understand
the hazards involved. Children shall not
play with the appliance. Cleaning and
user maintenance shall not be made by
children without supervision.
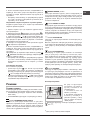
Do not use harsh abrasive cleaners or
sharp metal scrapers to clean the oven door
glass since they can scratch the surface,
which may result in shattering of the glass.
Never use steam cleaners or pressure
cleaners on the appliance.
WARNING: Ensure that the appliance is
switched off before replacing the lamp to
avoid the possibility of electric shock.
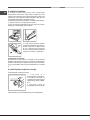
! When you place the rack inside, make
sure that the stop is directed upwards and
in the back of the cavity.
Препоръки
ВНИМАНИЕ: Уредът и неговите открити
части се нагряват много при употреба.
Бъдете особено внимателни и не
докосвайте нагревателните елементи.
Не допускайте деца под 8 години
близо до уреда, освен ако не са под
постоянно наблюдение.
Този уред може да се ползва от
деца, навършили 8 години, и от лица
с намалени физически, сетивни
или умствени възможности, както и
при липса на опит и познания, ако
въпросните лица са под подходящо
наблюдение или са инструктирани
за безопасното боравене с уреда и
осъзнават свързаните с това опасности.
Децата не трябва да си играят с уреда.
Почистването и поддръжката не
трябва да се извършват от деца без
наблюдение.
Не използвайте абразивни продукти
и остри метални шпатули за
почистване на стъклената вратичка
на фурната, защото може да надраскат
повърхността, което да доведе до
счупване на стъклото.
В никакъв случай не използвайте
парочистачки или машини под високо
налягане за почистване на уреда.
ВНИМАНИЕ: Уверете се, че уредът е
изключен, преди да смените лампата,
за да избегнете опасността от токов
удар.
! При поставяне на решетката
внимавайте фиксаторът да е на
задната страна на гнездото и да е
обърнат нагоре.
Προειδοποίηση
ΠΡΟΣΟΧΉ: Η συσκευή αυτή και τα
προσβάσιμα μέρη της καθίστανται πολύ
θερμά κατά τη χρήση.Θα πρέπει να
προσέχετε και να αποφεύγετε να αγγίζετε
τα θερμαντικά στοιχεία.Κρατάτε μακριά

4
τα παιδιά ηλικίας μικρότερης των 8 ετών
ή να τα επιτηρείτε συνεχώς.Η παρούσα
συσκευή μπορεί να χρησιμοποιηθεί
από παιδιά μεγαλύτερα των 8 ετών
και από άτομα με μειωμένες φυσικές,
αισθητηριακές ή νοητικές ικανότητες ή
χωρίς εμπειρία και γνώση αν βρίσκονται
υπό κατάλληλη επιτήρηση ή αν έχουν
εκπαιδευτεί στη χρήση της συσκευής με
τρόπο ασφαλή και αν αντιλαμβάνονται
τους σχετικούς κινδύνους. Τα παιδιά δεν
πρέπει να παίζουν με τη συσκευή. Οι
ενέργειες καθαρισμού και συντήρησης
δεν πρέπει να διενεργούνται από τα
παιδιά χωρίς επιτήρηση.
Μη χρησιμοποιείτε προϊόντα αποξυστικά
κι ούτε σπάτουλες μεταλλικές κοφτερές
για να καθαρίσετε τη γυάλινη πόρτα του
φούρνου επειδή μπορεί να προξενηθούν
ξυσίματα στην επιφάνεια, προκαλώντας,
έτσι, τη θραύση του γυαλιού.
Μη χρησιμοποιείτε ποτέ ατμοκαθαριστές
ή μηχανήματα καθαρισμού σε υψηλή
πίεση για τον καθαρισμό της συσκευής.
ΠΡΟΣΟΧΉ: Βεβαιωθείτε ότι η συσκευή
είναι σβηστή πριν αντικαταστήστε τη
λυχνία για να αποφευχθεί ενδεχόμενο
ηλεκτροπληξίας.
! Όταν εισάγεται το πλέγμα βεβαιωθείτε
ότι το στοπ είναι στραμμένο προς τα
πάνω και στο πίσω μέρος της κοιλότητας.
Figyelmeztetések
FIGYELMEZTETÉS: A készülék és
a hozzáférhető részei felforrósodnak
a használat során. Ügyeljen rá, hogy
ne érjen a fűtőelemekhez. A 8 évnél
atalabb gyermekeket távol kell tartani,
ha nincsenek folyamatos felügyelet
alatt. Ezt a berendezést használhatják
8 évnél idősebb gyermekek és csökkent
zikai, szenzoros vagy mentális
képességű, illetve tapasztalattal és
tudással nem rendelkező személyek, ha
felügyelet alatt álnak, vagy ha megfelelő
útmutatást kaptak a készülék biztonságos
működtetéséről, valamint megértették a
fennálló veszélyeket. A gyermekek nem
játszhatnak a készülékkel. A tisztítást
és a felhasználó által elvégezhető
karbantartást nem végezhetik felügyelet
nélküli gyermekek.
Ne használjon durva súroló anyagokat vagy
éles fém kaparókat a sütő üveg ajtajának
tisztításához, mert megkarcolhatják a
felületet, ami az üveg töréséhez vezethet.
A készülék tisztításához soha ne
használjon gőztisztítót vagy nagynyomású
tisztítót.
FIGYELMEZTETÉS: Győződjön meg
róla, hogy a készülék ki van-e kapcsolva,
mielőtt kicseréli az izzót, hogy elkerülje
az áramütést.
! Amikor behelyezi a rácsot, ügyeljen arra,
hogy az ütköző felfelé nézzen, a sütő
belsejének hátuljában.
Avertizări
ATENŢIE: Acest aparat şi părţile sale
accesibile devin foarte calde în timpul
folosirii.Trebuie să fiţi atenţi şi să
nu atingeţi elementele de încălzire.
Îndepărtaţi copiii sub 8 ani dacă nu sunt
supravegheaţi continuu.Acest aparat
poate fi utilizat de copiii de peste 8
ani şi de persoane cu capacităţi zice,
senzoriale sau mentale reduse sau fără
experienţă şi cunoştinţe dacă se află
sub o supraveghere corespunzătoare
sau dacă au fost instruiţi cu privire la

5
folosirea aparatului în mod sigur şi dacă
îşi dau seama de pericolele corelate.
Copiii nu trebuie să se joace cu aparatul.
Operaţiunile de curăţare şi de întreţinere
nu trebuie să e efectuate de copii fără
supraveghere.
Nu folosiţi produse abrazive, nici perii de
metal tăioase pentru a curăţa uşa de sticlă
a cuptorului, deoarece ar putea zgâria
suprafaţa, provocând astfel spargerea
geamului.
Nu folosiţi niciodată aparate cu aburi sau
sub presiune pentru a curăţa aparatul.
ATENŢIE: Asiguraţi-vă că aparatul este
stins înainte de a înlocui lampa pentru a
evita posibilitatea electrocutărilor.
! Când introduceţi grătarul, asiguraţi-vă
că opritorul este îndreptat în sus şi în
partea din spate a cavităţii.
Упозорења
УПОЗОРЕЊЕ: Овај апарат и његови
доступни делови загревају се током
употребе. Водите рачуна да избегнете
додиривање грејних елемената. Деца
млађа од 8 година треба да се држе
подаље осим ако нису под сталним
надзором. Овај апарат могу да користе
деца од 8 година и више и особе са
умањеним физичким, сензорним
или менталним способностима или
са недостатком искуства и знања
ако су под надзором или су добили
упутства у вези са употребом апарата
на безбедан начин и ако разумеју
пратеће опасности. Деца се неће
играти са овим апаратом. Чишћење и
корисничко одржавање неће обављати
деца без надзора.
Не користите груба абразивна средства
или оштре металне стругаче да очистите
стакло на вратима рерне јер они могу да
изгребу површину, што може да доведе
до ломљаве стакла.
Никада не користите парочистаче
или чистаче под притиском на овом
апарату.
УПОЗОРЕЊЕ: Проверите да ли је
апарат искључен пре замене лампе
како бисте избегли могућност
електричног удара.
! Када поставите полицу унутра,
проверите да ли је блокада окренута
нагоре и да ли је у усеку.
Запобіжні заходи
УВАГА Під час роботи цей прилад,
а також його доступні частини
нагріваються до високих температур.
Слід бути особливо обережними, щоб
не торкатися нагрівальних елементів.
Діти віком до 8 років мають знаходитися
на небезпечній відстані від приладу,
якщо неможливо забезпечити постійний
контроль над ними.Дозволяється
користування цим приладом дітьми
віком від 8 років, а також особами з
обмеженими фізичними, сенсорними
або розумовими можливостями або
особами без належного досвіду і знань,
якщо вони перебувають під постійним
контролем або проінструктовані щодо
правил з небезпечного користування
приладу і усвідомлюють ступені
ризику. Не дозволяйте дітям гратися
з приладом. Операції з очищення
і догляду не повинні виконуватися
дітьми без належного контролю.

6
Не використовувати абразивні засоби
ані металеві загострені шпателі
для очищення скляних дверцях
духовки, тому що вони можуть
пошкрябати поверхню, призводячи до
розтріскування скла.
Забороняється використання апаратів
для очищення парою або високим
тиском.
УВАГА! Щоб запобігти враженню
електричним струмом переконайтеся
в тому, що прилад вимкнений, перш
ніж заміняти лампочку.
! Під част вставляння решітки слід
переконатися, що стопор повернутий
вгору і всередину ніші.

7
Assistance
! Never use the services of an unauthorised technician.
Please have the following information to hand:
• the type of problem encountered.
• the appliance model (Mod.).
• the serial number (S/N).
The latter two pieces of information can be found on the
data plate located on the appliance.
Техни еско обслужване
! Никога не се обръщайте към неоторизирани технически
лица.
Съобщете:
• вида на неизправността;
• модела на машината (Mod.)
• серийния номер (S/N)
Тези последни сведения се намират в табелката с
характеристиките, поставена върху уреда и/или върху
опаковката.
Τεχνική υποστήριξη
! Μην προσφεύγετε ποτέ σε τεχνικούς μη εξουσιοδοτημένους.
Γνωστοποιήστε:
• Τον τύπο της ανωμαλίας
• Το μοντέλο της μηχανής (Mod.)
• Τον αριθμό σειράς (S/N)
Αυτές οι τελευταίες πληροφορίες βρίσκονται στην
ταμπελίτσα χαρακτηριστικών που βρίσκεται στη συσκευή
Szerviz
! Soha ne vegye igénybe nem felhatalmazott
szervizszemélyzet szolgáltatásait.
Adja meg az alábbi adatokat:
• a felmerült probléma jellege
• a készülék típusa (Mod.)
• a készülék sorozatszáma (S/H)
Az utolsó két információt a készüléken található adattábláról
olvashatja le.
Asistenţă
! Nu apelaţi niciodată la personal tehnic neautorizat.
Comunicaţi:
• tipul de anomalie;
• modelul aparatului (Mod.)
• numărul de serie (S/N)
Aceste informaţii se găsesc pe tăbliţa cu caracteristici lipită
de aparat.
Помоћ
! Никада не користите услуге неовлашћеног техничара.
Располажите следећим информацијама:
• Врста проблема до ког је дошло.
• Модел апарата (Мод.).
• Серијски број (С/Н).
Последње две информације могу да се нађу на плочици
са подацима која се налази на апарату.
Допомога
! Не звертайтеся по допомогу до не уповноваженого
персоналу.
Повідомити:
• тип несправності;
• модель приладу (Mod.)
• серійний номер (S/N)
Ці дані знаходяться на табличці з даними на самому
приладі.

8
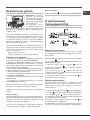
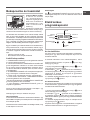
Description of the appliance
Overall view
1 POSITION 1
2 POSITION 2
3 POSITION 3
4 POSITION 4
5 POSITION 5
6 GUIDES for the sliding racks
7 DRIPPING PAN
8 GRILL
9 Control panel
Описание на уреда
Общ преглед
1 ПОЛОЖЕНИЕ 1
2 ПОЛОЖЕНИЕ 2
3 ПОЛОЖЕНИЕ 3
4 ПОЛОЖЕНИЕ 4
5 ПОЛОЖЕНИЕ 5
6 ВОДАЧИ за движение на нивата
7 Ниво ТАВИЧКА ЗА СЪБИРАНЕ НА СОКОВЕТЕ,
ОТДЕЛЕНИ ПРИ ПЕЧЕНЕТО
8 Ниво РЕШЕТКА
9 Управляващ панел
Περιγραφή της συσκευής
Συνολική άποψη
1 ΘΕΣΗ 1
2 ΘΕΣΗ 2
3 ΘΕΣΗ 3
4 ΘΕΣΗ 4
5 ΘΕΣΗ 5
6 ΟΔΗΓΟΙ ολίσθησης των επιπέδων
7 Επίπεδο ΛΙΠΟΣΥΛΛΈΚΤΗ
8 Επίπεδο ΓΚΡΙΛ
9 Πίνακας ελέγχου
7
8
9 6
1
2
3
4
5
A készülék leírása
A készülék áttekintése
1 1. POZÍCIÓ
2 2. POZÍCIÓ
3 3. POZÍCIÓ
4 4. POZÍCIÓ
5 5. POZÍCIÓ
6 SÍNEK a csúszó rácsokhoz
7 ZSÍRFOGÓ TÁLCA
8 GRILL
9 Kezelőpanel
Descrierea aparatului
Vedere de ansamblu
1 POZITIA 1
2 POZITIA 2
3 POZITIA 3
4 POZITIA 4
5 POZITIA 5
6 GHIDAJE culisare rafturi
7 Raft TAVĂ
8 Raft GRĂTAR
9 Panou de control

9
7
8
9 6
1
2
3
4
5
Опис апарата
Укупни преглед
1 ПОЛОЖАЈ 1
2 ПОЛОЖАЈ 2
3 ПОЛОЖАЈ 3
4 ПОЛОЖАЈ 4
5 ПОЛОЖАЈ 5
6 ВОЂИЦЕ за клизне полице
7 ПЛЕХ ЗА КАПАЊЕ
8 РЕШЕТКА
9 Контролна табла
Опис приладу
Загальний вигляд
1 ПОЗИЦІЯ 1
2 ПОЗИЦІЯ 2
3 ПОЗИЦІЯ 3
4 ПОЗИЦІЯ 4
5 ПОЗИЦІЯ 5
6 НАПРЯМНІ для дек та Граток
7 Рівень ДЕКО
8 Рівень ГРИЛЬ
9 Панель керування

10
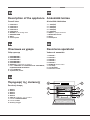
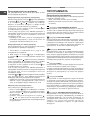
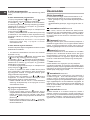
Description of the appliance
Control panel
1. SELECTOR knob
2. THERMOSTAT indicator light
3. THERMOSTAT knob
4. ELECTRONIC programmer
Описание на уреда
Управляващ панел
1. Превключвател ПРОГРАМИ
2. Светлинен индикатор ТЕРМОСТАТ
3. Превключвател ТЕРМОСТАТ
4. ЕЛЕКТРОНЕН програматор
Περιγραφή της συσκευής
Πίνακας ελέγχου
1 Επιλογέας ΠΡΟΓΡΑΜΜΑΤΩΝ
2 Ενδεικτικό φωτάκι ΘΕΡΜΟΣΤΑΤΗ
3 Επιλογέας ΘΕΡΜΟΣΤΑΤΗ
5 ΗΛΕΚΤΡΟΝΙΚΟΣ Προγραμματιστής
A készülék leírása
Kezelőpanel
1. VÁLASZTÓ gomb
2. HŐMÉRSÉKLET-SZABÁLYZÓ visszajelző lámpa
3. HŐMÉRSÉKLET-SZABÁLYZÓ választógomb
4. ELEKTRONIKUS programkapcsoló
1
2
4
3
Descrierea aparatului
Panoul de control
1. Selector PROGRAME
2. Indicator TERMOSTAT
3. Selector TERMOSTAT
4. Programator de coacere ELECTRONIC
Опис апарата
Контролна табла
1. БИРАЧ дугме
2. ТЕРМОСТАТ индикаторска лампица
3. ТЕРМОСТАТ дугме
4. ЕЛЕКТРОНСКИ програматор
Опис приладу
Панель керування
1. Реґулятор ПРОГРАМ
2. Індикатор ТЕРМОСТАТУ
3. Реґулятор ТЕРМОСТАТУ
4. ЕЛЕКТРОННИЙ програматор

GB
11
Installation
! Please keep this instruction booklet in a safe place for
future reference. If the appliance is sold, given away or
moved, please make sure the booklet is also passed on to
the new owners so that they may benet from the advice
contained within it.
! Please read this instruction manual carefully: it contains
important information concerning the safe operation,
installation and maintenance of the appliance.
Positioning
! Do not let children play with the packaging material; it
should be disposed of in accordance with local separated
waste collection standards (see Precautions and tips).
! The appliance must be installed by a qualied professional
in accordance with the instructions provided. Incorrect
installation may damage property or cause harm to people
or animals.
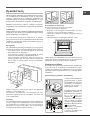
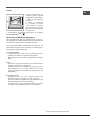
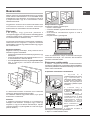
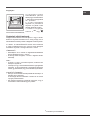
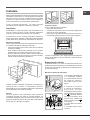
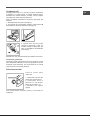
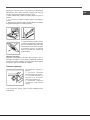
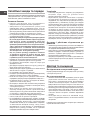
Built-in appliances
Use an appropriate cabinet to ensure that the appliance
operates properly:
• the panels adjacent to the oven must be made of heat-
resistant material.
• cabinets with a veneer exterior must be assembled with
glues which can withstand temperatures of up to 100°C.
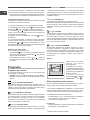
• to install the oven under the counter (see diagram) or
in a kitchen unit, the cabinet must have the following
dimensions:
590 mm.
595 mm.
22,5 mm.*
20,5 mm.
550 mm.
570 mm.
20 mm.
575-585 mm.
45 mm.
560 mm.
550 mm.
min.
! The appliance must not come into contact with electrical
parts once it has been installed.
The indications for consumption given on the data plate
have been calculated for this type of installation.
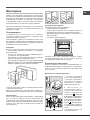
Ventilation
To ensure adequate ventilation, the back panel of the
cabinet must be removed. It is advisable to install the oven
so that it rests on two strips of wood, or on a completely
at surface with an opening of at least 45 x 560 mm (see
diagrams).
560 mm.
45 mm.
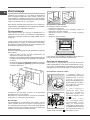
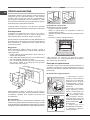
Centring and xing
Secure the appliance to the cabinet:
• Open the oven door.
• Remove the 2 rubber plugs covering the xing holes on
the perimeter frame.
• Fix the oven to the cabinet using the 2 wood screws.
• Replace the rubber plugs.
! All parts which ensure the safe operation of the appliance
must not be removable without the aid of a tool.
Electrical connection
Ovens equipped with a three-pole power supply cable are
designed to operate with alternating current at the voltage
and frequency indicated on the data plate located on the
appliance (see below).
Fitting the power supply cable
1. Open the terminal board
by inserting a screwdriver
into the side tabs of the
cover. Use the screwdriver
as a lever by pushing it
down to open the cover (see
diagram).
2. Install the power supply
cable by loosening the
cable clamp screw and the
three wire contact screws
L-N- .
Connect the wires to the
corresponding terminals:
the Blue wire to the terminal
marked (N), the Brown wire
to the terminal marked (L)
and the Yellow/Green wire
to the terminal marked
(see diagram).
3. Secure the cable by fastening the clamp screw.
4. Close the cover of the terminal board.
L
N
N
L

12
GB
Connecting the supply cable to the mains
Install a standardised plug corresponding to the load
indicated on the data plate (see table).
The appliance must be directly connected to the mains using
an omnipolar switch with a minimum contact opening of 3
mm installed between the appliance and the mains. The
switch must be suitable for the charge indicated and must
comply with current electrical regulations (the earthing wire
must not be interrupted by the switch). The supply cable
must be positioned so that it does not come into contact
with temperatures higher than 50°C at any point (the back
panel of the oven, for example).
! The installer must ensure that the correct electrical
connection has been performed and that it is fully compliant
with safety regulations.
Before connecting the appliance to the power supply, make
sure that
• the appliance is earthed and the plug is compliant with
the law.
• the socket can withstand the maximum power of the
appliance, which is indicated on the data plate.
• the voltage is in the range between the values indicated
on the data plate.
• the socket is compatible with the plug of the appliance.
If the socket is incompatible with the plug, ask an
authorised technician to replace it. Do not use extension
cords or multiple sockets.
! Once the appliance has been installed, the power supply
cable and the electrical socket must be easily accessible.
! The cable must not be bent or compressed.
! The cable must be checked regularly and replaced by
authorised technicians only (see Assistance).
! The manufacturer declines any liability should these
safety measures not be observed.
APPLIANCE SPECIFICATIONS
Dimensions*
width 43.5 cm
height 32,4 cm
depth 41.5 cm
Volume*
59 l
Dimensions**
width 45.5 cm
height 32,4 cm
depth 41.5 cm
Volume**
62 l
Electrical
connections
voltage: 220 - 240 V~ 50/60 Hz
(see data plate)
maximum power absorbed
2800 W
* Only for models with drawn rails.
** Only for models with wire rails.
ENERGY
LABEL
Directive 2002/40/EC on the label of
electric ovens. Standard EN 50304
Energy consumption for Natural
convection – heating mode:
Traditional mode
Declared energy consumption for
Forced convection Class – heating
mode: Baking
This appliance conforms to the
following European Economic
Community directives: 2006/95/EEC
dated 12/12/06 (Low Voltage) and
subsequent amendments –
2004/108/EEC dated 03/05/89
(Electromagnetic Compatibility) and
subsequent amendments -
93/68/EEC dated 22/07/93 and
subsequent amendments.
2012/19/EEC
and subsequent
amendments.
- 1275/2008 standby/off mode

GB
13
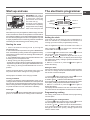
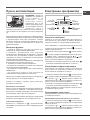
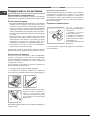
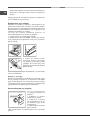
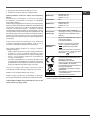
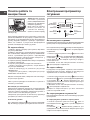
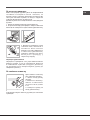
Start-up and use
WARNING! The oven is
provided with a stop system
to extract the racks and
prevent them from coming
out of the oven (1).
As shown in the drawing,
to extract them completely,
simply lift the racks, holding
them on the front part, and
pull (2).
! The rst time you use your appliance, heat the empty oven with
its door closed at its maximum temperature for at least half an
hour. Make sure that the room is well ventilated before switching
the oven off and opening the oven door. The appliance may emit
a slightly unpleasant odour caused by protective substances
used during the manufacturing process burning away.
Starting the oven
1. Select the desired cooking mode by turning the
SELECTOR knob.
2. Select the desired temperature using the THERMOSTAT
knob. A list detailing cooking modes and suggested cooking
temperatures can be found in the Cooking advice table (see
Cooking modes).
3. The THERMOSTAT indicator light indicates that the oven
is heating up to the temperature set.
4. During cooking it is always possible to:
- change the cooking mode by turning the SELECTOR knob;
- adjust the temperature by turning the THERMOSTAT knob;
- stop cooking by turning the SELECTOR knob to the “0”
position.
! Never put objects directly on the bottom of the oven; this
will prevent the enamel coating from being damaged.
! Always place cookware on the rack(s) provided.
Cooling ventilation
In order to cool down the external temperature of the oven, a
cooling fan blows a stream of air between the control panel and
the oven door, as well as towards the bottom of the oven door.
! Once cooking has been completed, the cooling fan continues
to operate until the oven has cooled down sufciently.
Oven light
When selecting with the SELECTOR knob the oven light
goes on. It remains lit when a cooking mode is selected.
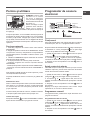
The electronic programmer
DISPLAY
SET TIME
button
END OF
COOKING icon
CLOCK icon
DURATION
icon
TIMER icon
DECREASE TIME
button
INCREASE TIME
button
•• ••
Setting the clock
! The clock may be set when the oven is switched off or
when it is switched on, provided that a the end time of a
cooking cycle has not been programmed previously.
After the appliance has been connected to the mains, or
after a blackout, the icon and the four numerical digits
on the DISPLAY will begin to ash.
1. Press the button several times until the icon and
the four digits on the display begin to ash.
2. Use the “ ” and “ ” buttons to adjust the time; if you
press and hold either button, the display will scroll through
the values more quickly, making it quicker and easier to set
the desired value.
3. Wait for 10 seconds or press the button again to
nalise the setting.
Setting the timer
! This function does not interrupt cooking and does not affect
the oven; it is simply used to activate the buzzer when the
set amount of time has elapsed.
1. Press the button several times until the icon and
the three digits on the display begin to ash.
2. Use the “ ” and “ ” buttons to set the desired time; if you press
and hold either button, the display will scroll through the values
more quickly, making it quicker and easier to set the value.
3. Wait for 10 seconds or press the button again to
nalise the setting.
The display will then show the time as it counts down. When
this period of time has elapsed the buzzer will be activated.
Programming cooking
! A cooking mode must be selected before programming
can take place.
Programming the cooking duration
1. Press the button several times until the icon and
the three digits on the DISPLAY begin to ash.
2. Use the “ ” and “ ” buttons to set the desired duration;
if you press and hold either button, the display will scroll
through the values more quickly, making it quicker and
easier to set the value.

14
GB
3. Wait for 10 seconds or press the button again to
nalise the setting.
4. When the set time has elapsed, the text END appears
on the DISPLAY, the oven will stop cooking and a buzzer
sounds. Press any button to stop it.
• For example: it is 9:00 a.m. and a time of 1 hour and
15 minutes is programmed. The programme will stop
automatically at 10:15 a.m.
Setting the end time for a cooking mode
! A cooking duration must be set before the cooking end
time can be scheduled.
1. Follow steps 1 to 3 to set the duration as detailed above.
2. Next, press the button until the icon and the four
digits on the DISPLAY begin to ash.
3. Use the “ ” and “ ” buttons to adjust the cooking end
time; if you press and hold either button, the display will
scroll through the values more quickly, making it quicker
and easier to set the desired value.
4. Wait for 10 seconds or press the button again to
nalise the setting.
5. When the set time has elapsed, the text END appears
on the DISPLAY, the oven will stop cooking and a buzzer
sounds.Press any button to stop it.
Programming has been set when the and buttons
are illuminated. The DISPLAY shows the cooking end time
and the cooking duration alternately.
• For example: It is 9:00 a.m. and a duration of 1 hour has
been programmed. 12:30 is scheduled as the end time.
The programme will start automatically at 11:30 a.m.
Cancelling a programme
To cancel a programme:
• Press the button until the icon corresponding to the
setting you wish to cancel and the digits on the display
are no longer ashing. Press the “ ” button until the digits
00:00 appear on the display.
• Press and hold the “ ” and “ ” buttons; this will cancel all
the settings selected previously, including timer settings.
Modes
Cooking modes
! A temperature value between 60°C and MAX can be set
for all cooking modes except the following:
• GRILL (recommended: set only to MAX power level)
• GRATIN (recommended: do not exceed 200°C).
TRADITIONAL OVEN mode
Both the top and bottom heating elements will come on.
When using this traditional cooking mode, it is best to use
one cooking rack only. If more than one rack is used, the
heat will be distributed unevenly.
MULTILEVEL mode
All the heating elements (top, bottom and circular) switch
on and the fan begins to operate. Since the heat remains
constant throughout the oven, the air cooks and browns
food in a uniform manner. A maximum of two racks may be
used at the same time.
PIZZA OVEN mode
The circular heating elements and the elements at the
bottom of the oven are switched on and the fan is activated.
This combination heats the oven rapidly by producing a
considerable amount of heat, particularly from the element
at the bottom. If you use more than one rack at a time,
switch the position of the dishes halfway through the cooking
process.
GRILL mode
The top heating element and the rotisserie (where present)
come on.
The high and direct temperature of the grill is recommended
for food which requires a high surface temperature. Always
cook in this mode with the oven door closed.
GRATIN mode
The top heating element and the rotisserie (where
present) are activated and the fan begins to operate. This
combination of features increases the effectiveness of the
unidirectional thermal radiation provided by the heating
elements through forced circulation of the air throughout the
oven. This helps prevent food from burning on the surface
and allows the heat to penetrate right into the food. Always
cook in this mode with the oven door closed.
BAKING mode
The rear heating element and the fan are switched on,
thus guaranteeing the distribution of heat in a delicate and
uniform manner throughout the entire oven. This mode is
ideal for baking temperature sensitive foods (such as cakes,
which need to rise) and for the preparation of “bitesize
pastries” on 3 shelves simultaneously.
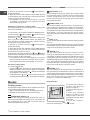
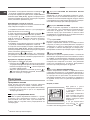
Rotisserie spit*
To operate the rotisserie
function (see diagram)
proceed as follows:
1. Place the dripping pan in
position 1.
2. Place the rotisserie
support in position 3 and
insert the spit in the hole
provided on the back panel
of the oven.
3. Start the rotisserie
function by selecting the or modes;
* Only available in certain models.

GB
15
Practical cooking advice
! Do not place racks in position 1 or 5 during fan-assisted
cooking. Excessive direct heat can burn temperature
sensitive foods.
! In the GRILL and GRATIN cooking modes, place the
dripping pan in position 1 to collect cooking residues (sauce
and/or grease).
MULTILEVEL
• Use positions 2 and 4, placing the food which requires
more heat on the rack in position 2.
• Place the dripping pan on the bottom and the rack on
top.
GRILL
• Place the rack in position 3 or 4. Make sure the food is
in the centre of the rack.
• We recommend that the power level is set to maximum.
The top heating element is regulated by a thermostat
and may not always operate constantly.
PIZZA OVEN MODE
• Use a lightweight aluminium pizza pan. Place it on the
rack provided.
For a crispy crust, do not use the dripping pan as this
extends the total cooking duration and prevents the crust
from forming.
• If the pizza has a lot of toppings, we recommend adding
the mozzarella cheese to the top of the pizza halfway
through the cooking process.

16
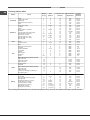
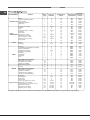
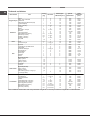
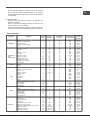
GB
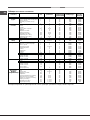
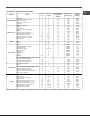
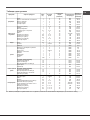
Modes Foods
Weight
(in kg)
Rack
position
Preheating time
(minutes)
Recommended
temperature
Cooking
duration
(minutes)
Traditional
Duck
Roast veal or beef
Roast pork
Biscuits (shortcrust pastry)
Tarts
1
1
1
-
1
3
3
3
3
3
15
15
15
15
15
200
200
200
180
180
65-75
70-75
70-80
15-20
30-35
Multilevel
Pizza (on 2 racks)
Lasagne
Lamb
Roast chicken + potatoes
Mackerel
Sponge cake made with yoghurt
Cream puffs (on 2 racks)
Biscuits (on 2 racks)
Sponge cake (on 1 rack)
Sponge cake (on 2 racks)
Savoury pies
1
1
1
1+1
1
1
0.5
0.5
0.5
1
1.5
2 and 4
3
2
2 and 4
2
2
2 and 4
2 and 4
2
2 and 4
3
15
10
10
15
10
10
10
10
10
10
15
230
180
180
200
170-180
170
190
180
170
170
200
15-20
30-35
40-45
60-70
30-35
40-50
20-25
10-15
15-20
20-25
30-40
Pizza
Pizza
Focaccia bread
0.5
1
3
2 or 3
15
10
220
200
15-20
15-20
Grill
Sole
Squid and prawn kebabs
Cod fillet
Grilled vegetables
Veal steak
Cutlets
Hamburgers
Mackerel
Toast
1
1
1
1
1
1
1
1
no. 4
4
4
4
3 or 4
4
4
4
4
4
5
5
5
5
5
5
5
5
5
MAX
MAX
MAX
MAX
MAX
MAX
MAX
MAX
MAX
8-10
6-8
10
10-15
15-20
15-20
7-10
15-20
2-3
With rotisserie spit (where present)
Spit-roast veal
Spit-roast chicken
Spit-roast lamb
1.0
1.5
1.0
-
-
-
-
-
-
100%
100%
100%
80-90
70-80
70-80
Gratin
Grilled chicken
Cuttlefish
1.5
1.5
2
2
5
5
200
200
55-60
30-35
With rotisserie spit (where present)
Spit-roast veal
Spit-roast lamb
Chicken (on the spit) + potatoes (on
the dripping pan)
1.5
1.5
1.5
-
-
-
-
2
10
10
10
10
200
200
200
200
70-80
70-80
70-75
70-75
Baking
Tarts
Fruit cakes
Sponge cake made with yoghurt
Sponge cake
Stuffed pancakes (on 2 racks)
Small cakes (on 2 racks)
Cheese puffs (on 2 racks)
Cream puffs (on 3 racks)
Biscuits (on 3 racks)
Meringues (on 3 racks)
0.5
1
0.7
0.5
1.2
0.6
0.4
0.7
0.7
0.5
3
2 or
3
3
3
2 and 4
2 and 4
2 and 4
1, 3 and 5
1, 3 and 5
1, 3 and 5
15
15
15
15
15
15
15
15
15
15
180
180
180
160
200
180-190
200-210
180
180
90
20-30
40-45
40-50
25-35
30-35
20-25
15-20
20-25
20-25
180
! The cooking times listed above are intended as guidelines only and may be modified according to personal tastes.
Cooking advice table

GB
17
Precautions and tips
! This appliance has been designed and manufactured
in compliance with international safety standards. The
following warnings are provided for safety reasons and
must be read carefully.
General safety
• The appliance was designed for domestic use inside the
home and is not intended for commercial or industrial use.
• The appliance must not be installed outdoors, even in
covered areas. It is extremely dangerous to leave the
appliance exposed to rain and storms.
• When moving or positioning the appliance, always use
the handles provided on the sides of the oven.
• Do not touch the appliance while barefoot or with wet or
damp hands and feet.
• The appliance must be used by adults only for
the preparation of food, in accordance with the
instructions provided in this booklet. Any other
use of the appliance (e.g. for heating the room)
constitutes improper use and is dangerous. The
manufacturer may not be held responsible for any
damage caused as a result of improper, incorrect
and unreasonable use of the appliance.
• Do not touch the heating elements or certain parts
of the oven door when the appliance is in use; these
parts become extremely hot. Keep children well away
from the appliance.
• Make sure that the power supply cables of other electrical
appliances do not come into contact with the hot parts of
the oven.
• The ventilation and heat dispersal openings must never
be obstructed.
• Always grip the oven door handle in the centre: the ends
may be hot.
• Always use oven gloves when placing cookware in the
oven or when removing it.
• Do not use aluminium foil to line the bottom of the oven.
• Do not place ammable materials in the oven: if the
appliance is switched on accidentally, the materials could
catch re.
• Contrôler toujours que les boutons sont bien dans la
position “●”/“○” quand l’appareil n’est pas utilisé.
• When unplugging the appliance, always pull the plug
from the mains socket; do not pull on the cable.
• Do not perform any cleaning or maintenance work without
having disconnected the appliance from the electricity mains.
• If the event of malfunctions, under no circumstances
should you attempt to perform the repairs yourself.
Contact an authorised Service Centre (see Assistance).
• Do not rest objects on the open oven door.
• Do not let children play with the appliance.
• The appliance should not be operated by people (including
children) with reduced physical, sensory or mental
capacities, by inexperienced individuals or by anyone
who is not familiar with the product. These individuals
should, at the very least, be supervised by someone who
assumes responsibility for their safety or receive preliminary
instructions relating to the operation of the appliance.
• The appliance is not intended to be operated by means
of an external timer or separate remote-control system.
Disposal
• When disposing of packaging material: observe local
legislation so that the packaging may be reused.
• The European Directive 2012/19/EC on Waste
Electrical and Electronic Equipment (WEEE), requires
that old household electrical appliances must not
be disposed of in the normal unsorted municipal
waste stream. Old appliances must be collected
separately in order to optimise the recovery and
recycling of the materials they contain and reduce
the impact on human health and the environment.
The crossed out “wheeled bin” symbol on the product
reminds you of your obligation, that when you dispose
of the appliance it must be separately collected.
Consumers should contact their local authority or retailer
for information concerning the correct disposal of their
old appliance.
Respecting and conserving the environment
• You can help to reduce the peak load of the electricity
supply network companies by using the oven in the hours
between late afternoon and the early hours of the morning.
• Always keep the oven door closed when using the GRILL
and GRATIN modes: this will achieve improved results
while saving energy (approximately 10%).
• Check the door seals regularly and wipe them clean
to ensure they are free of debris so that they adhere
properly to the door, thus avoiding the dispersal of heat.
Maintenance and care
Switching the appliance off
Disconnect your appliance from the electricity supply before
carrying out any work on it.
Cleaning the appliance
• The stainless steel or enamel-coated external parts and
the rubber seals may be cleaned using a sponge that
has been soaked in lukewarm water and neutral soap.
Use specialised products for the removal of stubborn
stains. After cleaning, rinse and dry thoroughly. Do not
use abrasive powders or corrosive substances.
• The inside of the oven should ideally be cleaned after
each use, while it is still lukewarm. Use hot water and
detergent, then rinse well and dry with a soft cloth. Do
not use abrasive products.
• All accessories - with the exception of the sliding racks
- can be washed like everyday crockery, and are even
dishwasher safe.
! Never use steam cleaners or pressure cleaners on the
appliance.
Cleaning the oven door
Clean the glass part of the oven door using a sponge and
a non-abrasive cleaning product, then dry thoroughly with
a soft cloth. Do not use rough abrasive material or sharp
metal scrapers as these could scratch the surface and cause
the glass to crack.

18
GB
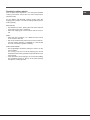
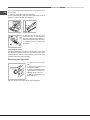
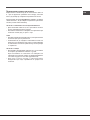
For more thorough cleaning purposes, the oven door may
be removed:
1. Open the oven door fully (see diagram).
2. Use a screwdriver to lift up and turn the small levers F
located on the two hinges (see diagram).
F
3. Grip the door on the two outer
sides and close it approximately
half way. Pull the door towards you,
lifting it out of its slot (see diagram).
To replace the door, reverse this
sequence.
Inspecting the seals
Check the door seals around the oven regularly. If the seals
are damaged, please contact your nearest Service Centre
(see Assistance). We recommend that the oven is not used
until the seals have been replaced.
Replacing the light bulb
To replace the oven light
bulb:
1. Remove the glass cover
of the lamp-holder.
2. Remove the light bulb and
replace it with a similar one:
Wattage 25 W, cap E 14.
3. Replace the glass cover
(see diagram).
! Do not use the oven lamp as/for ambient lighting.

19
BG
Монтиране
! Важно е да съхранявате тази книжка, за да може да я
използвате за справка във всеки момент. При продажба
на уреда, при прекратяване на използването му или при
преместване се уверете, че книжката с инструкциите
го придружава, за да се запознае новият собственик с
функционирането и съответните предупреждения.
! Прочетете внимателно инструкциите: в тях има важни
сведения за монтирането, употребата и безопасността
при работа с уреда.
Позициониране
! Опаковките не са детски играчки и се изхвърлят
съгласно правилата за разделно събиране (виж
„Предпазни мерки и съвети“).
! Инсталирането трябва да се извърши съгласно тези
инструкции от професионално квалифициран персонал.
Неправилното монтиране може да доведе до щети или
нараняване на хора или животни.
Вграждане
За да се гарантира добро функциониране на уреда,
е необходимо мебелите да бъдат с подходящи
характеристики:
• плоскостите, граничещи с уреда, трябва да бъдат от
устойчив на топлина материал;
• при мебели от дървен фурнир лепилата трябва да
бъдат устойчиви на температура 100°C;
• при вграждане на фурната, както при вграждане под
плот (виж фигурата), така и колонен тип вграждане,
мебелите трябва да имат следните размери:
590 mm.
595 mm.
22,5 mm.*
20,5 mm.
550 mm.
570 mm.
20 mm.
575-585 mm.
45 mm.
560 mm.
550 mm.
min.
! След като е вграден уредът, не трябва да има контакт
с електрическите части.
Данните за потребление, посочени върху табелката с
характеристиките, са измерени при този тип монтиране.
Проветряване
За да се гарантира добро проветряване, е необходимо
да се отстранят задните стени на отделението. За
предпочитане е да монтирате фурната, така че тя да е
разположена върху две дървени летви или върху цяла
плоскост, която има отвор с размери поне 45 x 560 mm
(виж фигурата).
560 mm.
45 mm.
Центриране и фиксиране
За да фиксирате уреда към мебела:
• отворете вратата на фурната;
• махнете двете гумички, които покриват отвори за
фиксиране разположени в ограждащата я рамка;
• фиксирайте фурната във мебелта с помощта на 2
винта за дърво;
• поставете oтнoво гумичките.
! Всички части, които осигуряват защитата, трябва
да бъдат фиксирани така, че да не могат да бъдат
отстранени без помощта на инструмент.
Електрическо свързване
Фурните, снабдени с триполюсен захранващ кабел, са
предназначени за работа с променлив ток, с напрежение
и честота, посочени върху табелката с характеристики
(виж по-долу).
Монтиране на захранващия кабел
1. Отворете клемната
кутия, като разблокирате
с отвертка страничните
закопчалки на капака:
издърпайте и отворете
капака (виж фигурата).
2. Монтиране на
захранващия кабел:
отвинтете болтовете на
скобата и трите болта на
контакти L-N- и след това
фиксирайте проводниците
под главите на болтовете
в зависимост от цветовете:
Син (N) Кафяв (L) Жълт-
Зелен ( ) (виж фигурата).
3. Фиксирайте кабела в
специалната придържаща
скоба.
4. Затворете капака на
терминалния блок.
L
N
N
L

20
BG
Свързване на захранващия кабел към електрическата
мрежа
Монтирайте върху кабела нормален щепсел за
електрическо натоварване, посочено върху табелката
с характеристики (виж следв).
В случай на директно свързване към мрежата,
е необходимо да монтирате между уреда и
електрозахранващата мрежа прекъсвач с минимално
отваряне на контактите 3 mm, оразмерен за мощността
и в съответствие с действащите норми (заземяващият
кабел не трябва да бъде прекъсван от прекъсвача).
Захранващият кабел трябва да бъде разположен
така, че в нито една точка да не надвишава околната
температура с повече от 50°C.
! Лицето, което извършва инсталирането, носи
отговорност за правилното електрическо свързване и
за съблюдаването на нормите за безопасност.
Преди да извършите свързването, се уверете, че:
• контактът е заземен и е в съответствие със законовите
разпоредби;
• контактът може да издържи максималното
натоварване на мощността на машината, означено
върху табелката с характеристиките (виж по-долу);
• захранващото напрежение е в границите на
стойностите, означени върху табелката с
характеристиките (виж по-долу);
• контактът е съвместим с щепсела на уреда. В
противен случай подменете контакта или щепсела;
не използвайте удължители и разклонители.
! Уредът трябва да бъде монтиран така, че кабелът и
контактът за електрически ток да са лесно достъпни.
! Кабелът не трябва да бъде прегъван или притискан.
! Кабелът трябва периодично да се проверява и
подменя от оторизирани специалисти (виж „Техническо
обслужване“).
! Предприятието-производител не носи никаква
отговорност при неспазване на посочените норми.
ТАБЕЛКА С ХАРАКТЕРИСТИКИ
Размери*
широчина 43,5 cm
височина 32,4 cm
дълбочина 41,5 cm
Обем*
59 л
Размери**
широчина 45,5 cm
височина 32,4 cm
дълбочина 41,5 cm
Обем**
62 л
Електрически
свързвания
напрежение 220-240V ~ 50/60Hz
максимална консумирана
мощност 2800W
ЕТИКЕТ –
ЕЛЕКТРИЧЕСКИ
ХАРАКТЕРИСТИКИ
Директива 2002/40/ЕС за
етикетите на електрическите
фурни. Норма EN 50304
Разход на енергия с
естествена конвекция за
загряване: Традиционна;
Разход на енергия декларация
Клас на принудителна конвекция
за загряване:
Сладкиши.
Този уред e произведен в
съответствие със следните
директиви на Европейската
общност:
- 2006/95/ЕЕС от 12.12.2006 г.
(Нисковолтова директива)
и последващи изменения
- 2004/108/ЕЕС от 15.12.04
(Електромагнитна съвместимост)
и последващи изменения
- 93/68/ЕЕС от 22.07.1993 г.
и последващи изменения.
- 2012/19/ЕЕС и последващите
изменения.
* Само за модели с формовани водачи.
** Само за модели с телескопични водачи.
Pagina se încarcă...
Pagina se încarcă...
Pagina se încarcă...
Pagina se încarcă...
Pagina se încarcă...
Pagina se încarcă...
Pagina se încarcă...
Pagina se încarcă...
Pagina se încarcă...
Pagina se încarcă...
Pagina se încarcă...
Pagina se încarcă...
Pagina se încarcă...
Pagina se încarcă...
Pagina se încarcă...
Pagina se încarcă...
Pagina se încarcă...
Pagina se încarcă...
Pagina se încarcă...
Pagina se încarcă...
Pagina se încarcă...
Pagina se încarcă...
Pagina se încarcă...
Pagina se încarcă...
Pagina se încarcă...
Pagina se încarcă...
Pagina se încarcă...
Pagina se încarcă...
Pagina se încarcă...
Pagina se încarcă...
Pagina se încarcă...
Pagina se încarcă...
Pagina se încarcă...
Pagina se încarcă...
Pagina se încarcă...
Pagina se încarcă...
Pagina se încarcă...
Pagina se încarcă...
Pagina se încarcă...
Pagina se încarcă...
Pagina se încarcă...
Pagina se încarcă...
Pagina se încarcă...
Pagina se încarcă...
Pagina se încarcă...
Pagina se încarcă...
Pagina se încarcă...
Pagina se încarcă...
-
 1
1
-
 2
2
-
 3
3
-
 4
4
-
 5
5
-
 6
6
-
 7
7
-
 8
8
-
 9
9
-
 10
10
-
 11
11
-
 12
12
-
 13
13
-
 14
14
-
 15
15
-
 16
16
-
 17
17
-
 18
18
-
 19
19
-
 20
20
-
 21
21
-
 22
22
-
 23
23
-
 24
24
-
 25
25
-
 26
26
-
 27
27
-
 28
28
-
 29
29
-
 30
30
-
 31
31
-
 32
32
-
 33
33
-
 34
34
-
 35
35
-
 36
36
-
 37
37
-
 38
38
-
 39
39
-
 40
40
-
 41
41
-
 42
42
-
 43
43
-
 44
44
-
 45
45
-
 46
46
-
 47
47
-
 48
48
-
 49
49
-
 50
50
-
 51
51
-
 52
52
-
 53
53
-
 54
54
-
 55
55
-
 56
56
-
 57
57
-
 58
58
-
 59
59
-
 60
60
-
 61
61
-
 62
62
-
 63
63
-
 64
64
-
 65
65
-
 66
66
-
 67
67
-
 68
68


Whirlpool 9YFKT 636J X /HA Manualul utilizatorului
- Categorie
- Microunde
- Tip
- Manualul utilizatorului
Lucrări înrudite
-
Whirlpool 9YFKT 636J X /HA Manualul utilizatorului
-
-
-
HOTPOINT/ARISTON 9YFTR 85.1 (AV) /HA Manualul utilizatorului
-
-
-
Alte documente
-
Indesit 9YFD 62.1 (CH) /HA Manualul utilizatorului
-
-
Indesit FD 637.1 (CH)/HA Manualul utilizatorului
-
-
-
-
Somogyi Home FKF42201 Manual de utilizare
-
 Somogyi Elektronic home FKF59201 Manual de utilizare
