Nobu RG57B/BGE Manual de utilizare
- Tip
- Manual de utilizare

Wall Mounted Air-Conditioning Unit
Επιτοίχια Μονάδα Κλιματισμού
Aer Conditonat model Split de Perete
NBKU2VI32-09WFR/NBKU2VO32-09B
NBKU2VI32-12WFRB/NBKU2VO32-12B
NBKU2VI32-18WFR/NBKU2VO32-18
NBKU2VI32-24WFR/NBKU2VO32-24
MODELS/
ΜΟΝΤΕΛΑ/
MODELE:
For correct use of this unit, please read this manual carefully and keep it for future reference.
Για τη σωστή χρήση της μονάδας, παρακαλούμε διαβάστε προσεκτικά το εγχειρίδιο
και φυλάξτε το για αναφορά στο μέλλον.
Pentru o utilizare corecta, va rugam sa cititi cu atentie acest manual
si sa il pastrati pentru o consultare ulterioara.
English/Ελληνικά/Romana
Remote Controller
User’s Manual
Τηλεχειριστήριο
Εγχειρίδιο Χρήσης
Telecomanda
Manual de utilizare

2
CONTENTS
Remote controller Specications ....................................................................................... 3
Operation buttons ............................................................................................................... 4
Indicators on LCD ................................................................................................................. 7
How to use the buttons ....................................................................................................... 8
Auto operation ..................................................................................................................... 8
Cooling/Heating/Fan operation ......................................................................................... 8
Dehumidifying operation .................................................................................................... 9
Adjusting air ow direction ................................................................................................ 9
Timer operation ................................................................................................................. 10
Handling the remote controller ....................................................................................... 14
NOTE:
• Buttons design is based on typical model and might be slightly dierent from the
actual one you purchased, the actual shape shall prevail.
• All the functions described are accomplished by the unit. If the unit has no this feature,
there is no corresponding operation happened when press the relative button on the
remote controller.
• When there are wide dierences between “Remote controller Illustration” and “ USER’S
MANUAL” on function description, the description of “USER’S MANUAL” shall prevail.

3
MODE
FAN
TEMP
LED
TURBO
ON/OFF
SHOR T
CUT
TIMER
ON
TIMER
OFF
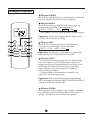
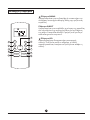
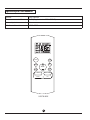
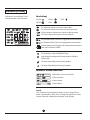
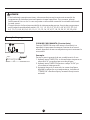
Remote Controller Specications
Model RG57B/BGE
Rated Voltage 3.0V (Dry batteries R03/LR03X2)
Signal Receiving Range 8m
Environment -5°C~60°C
SWING DIRECT
TURBO
LED
SLEEP
RG57B/BGE

4
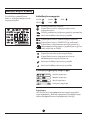
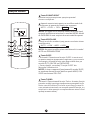
Operation of buttons
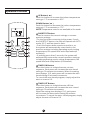
1
ON/OFF Button
This button turns the air conditioner ON and OFF.
2
MODE Button
Press this button to modify the air conditioner mode
in a sequence of following:
➝ AUTO ➝ COOL ➝ DRY ➝ HEAT ➝ FAN
NOTE: Please do not select HEAT mode if the machine you
purchased is cooling only type.
Heat mode is not supported by the cooling only appliance.
3
FAN Button
Used to select the fan speed in four steps:
➝ AUTO ➝ LOW ➝ MED ➝ HIGH
NOTE: You can not switch the fan speed in AUTO or
DRY mode.
4
SLEEP Button
• Active/Disable sleep function. It can maintain the
most comfortable temperature and save energy. This
function is available on COOL, HEAT or AUTO mode
only .
• For the detail, see “ sleep operation ” in “USER’S
MANUAL”
NOTE: While the unit is running under SLEEP mode, it
would be cancelled if MODE, FAN SPEED or ON/OFF button
is pressed.
5
TURBO Button
Active/Disable Turbo function. Turbo function enables
the unit to reach the preset temperature at cooling
or heating operation in the shortest time (if the
indoor unit does not support this function, there is no
corresponding operation happened when pressing
this button).
MODE
FAN
TEMP
LED
TURBO
ON/OFF
SHOR T
CUT
TIME R
ON
TIMER
OFF
1
2
4
3
8
9
5
10
11
7
6
SWING DIRECT
SLEEP

5
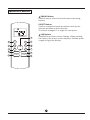
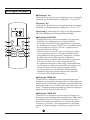
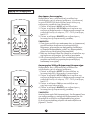
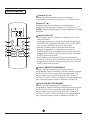
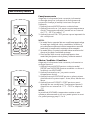
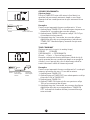
Operation of buttons
6
UP Button(
p
)
Push this button to increase the indoor temperature
setting in 1°C increments to 30°C.
DOWN Button(
q
)
Push this button to decrease the indoor temperature
setting in 1°C increments to 17°C.
NOTE: Temperature contol is not available in Fan mode.
7
SHORTCUT Button
• Used to restore the current settings or resume
previous settings.
• On the rst time connecting to the power, if push
the SHORTCUT button, the unit will operate on AUTO
mode, 26°C, and fan speed is Auto.
• Push this button when remote controller is on,
the system will automatically revert back to the
previous settings including operating mode, setting
temperature, fan speed level and sleep feature(if
activated).
• If pushing more than 2 seconds, the system will
automatically restore the current operation settings
including operating mode, setting temperature, fan
speed level and sleep feature (if activated ).
8
TIMER ON Button
Press this button to initiate the auto-on time
sequence. Each press will increase the auto-timed
setting in 30 minutes increments. When the setting
time displays 10.0, each press will increase the auto-
timed setting 60 minutes increments.
To cancel the auto-timed program, simply adjust the
auto-on time to 0.0.
9
TIMER OFF Button
Press this button to initiate the auto-o time
sequence. Each press will increase the auto -timed
setting in 30 minutes increments.
When the setting time displays 10.0, each press
will increase the auto-timed setting 60 minutes
increments. To cancel the auto- timed program, simply
adjust the auto-o time to 0.0
MODE
FAN
TEMP
LED
TURBO
ON/OFF
SHOR T
CUT
TIME R
ON
TIMER
OFF
1
2
4
3
8
9
5
10
11
7
6
SWING DIRECT
SLEEP

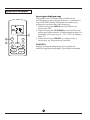
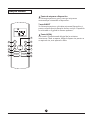
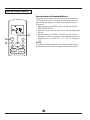
6
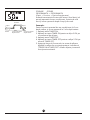
10
SWING Button
Used to stop or start horizontal louver auto swing
feature.
DIRECT Button
Used to change the louver movement and set the
desired up/down air ow direction.
The louver changes 6° in angle for each press.
11
LED Button
Disable/Active indoor screen Display. When pushing
the button, the indoor screen display is cleared, press
it again to light the display.
Operation of buttons
MODE
FAN
TEMP
LED
TURBO
ON/OFF
SHOR T
CUT
TIME R
ON
TIMER
OFF
1
2
4
3
8
9
5
10
11
7
6
SWING DIRECT
SLEEP

7
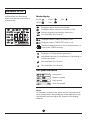
AUTO
HEAT FAN
COOL DRY
Displayed when data transmitted.
Displayed when remote controller is ON.
Battery display (low battery detection)
Not available for this unit
Displayed when TIMER ON time is set.
Displayed when TIMER OFF time is set.
Show set temperature or room temperature, or
time under TIMER setting.
Displayed in Sleep Mode operation.
Indicated that the air conditioner is operating in
Follow me mode
Not available for this unit
Not available for this unit
Low speed
Medium speed
High speed
Auto fan speed
Information are displayed
when the remote controller is
powered up.
Indicators on LCD
Mode display
Fan speed indication
Note:
All indicators shown in the gure are for the purpose of
clear presentation. But during the actual operation only
the relative functional signs are shown on the display
window.

8
MODE
FAN
TEMP
LED
FOLLOW ME
TURB O SELF CLEAN
ON/OF F
SHOR T
CUT
TIMER
ON
TIMER
OFF
3
1
2
MODE
FAN
TEMP
LED
FOLLOW ME
TURB O SELF CLEAN
ON/OF F
SHOR T
CUT
TIMER
ON
TIMER
OFF
3
1
2
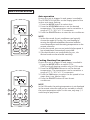
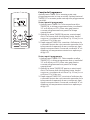
Auto operation
Ensure the unit is plugged in and power is available.
The OPERATION indicator on the display panel of the
indoor unit starts ashing.
1. Press the MODE button to select Auto.
2. Press the UP/DOWN button to set the desired
temperature. The temperature can be set within a
range of 17°C~ 30°C in 1 °C increments.
3. Press the ON/OFFbutton to start the air conditioner.
NOTE
1. In the Auto mode, the air conditioner can logically
choose the mode of Cooling, Fan, and Heating by
sensing the dierence between the actual ambient
room temperature and the setting temperature on the
remote controller.
2. In the Auto mode, you can not switch the fan speed. It
has already been automatically controlled.
3. If the Auto mode is not comfortable for you , the
desired mode can be selected manually.
Cooling /Heatinq/Fan operation
Ensure the unit is plugged in and power is available.
1. Press the MODE button to select COOL,
HEAT(cooling & heating models only) or FAN mode.
2. Press the UP/DOWN buttons to set the desired
temperature. The temperature can be set within a
range of 17°C~ 30°C in 1 °C increments.
3. Press the FAN button to select the fan speed in four
steps-Auto, Low, Med,or High.
4. Press the ON/OFF button to start the air
conditioner.
NOTE
In the FAN mode, the setting temperature is not displayed
in the remote controller and you are not able to control
the room temperature either. In this case, only step 1, 3
and 4 may be performed.
How to use the buttons
SWING DIRECT
TURBO
LED
SWING DIRECT
TURBO
LED
SLEEP
SLEEP

9
MODE
FAN
TEMP
LED
FOLLOW ME
TURB O SELF CLEAN
ON/OF F
SHOR T
CUT
TIMER
ON
TIMER
OFF
3
1
2
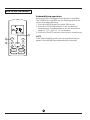
Dehumidifyinq operation
Ensure the unit is plugged in and power is available.
The OPERATION indicator on the display panel of the
indoor unit starts ashing.
1. Press the MODE button to select DRY mode.
2. Press the UP/DOWN buttons to set the desired
temperature. The temperature can be set within a
range of 17°C~ 30°C in 1°C increments.
3. Press the ON/OFF button to start the air conditioner.
NOTE
In the Dehumidifying mode, you can not switch the fan
speed. It has already been automatically controlled.
How to use the buttons
SWING DIRECT
TURBO
LED
SLEEP

10
MODE
FAN
TEMP
LED FOLLOW ME
TURB O SELF CLEAN
ON/OF F
SHOR T
CUT
TIMER
ON
TIMER
OFF
1
2
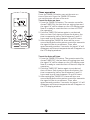
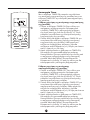
Timer operation
Press the TIMER ON button can set the auto-on
time of the unit. Press the TIMER OFF button
can set the auto-o time of the unit.
To set the Auto-on time.
1. Press the TIMER ON button. The remote controller
shows TIMER ON, the last Auto-on setting time and
the signal “H” will be shown on the LCD display area.
Now it is ready to reset the Auto-on time to START
the operation.
2. Push the TIMER ON button again to set desired
Auto-on time. Each time you press the button, the
time increases by half an hour between 0 and 10
hours and by one hour between 10 and 24 hours.
3. After setting the TIMER ON ,there will be a one
second delay before the remote controller transmits
the signal to the air conditioner. Then, after
approximately another 2 seconds, the signal “h” will
disappear and the set temperature will re-appear on
the LCD display window.
To set the Auto-o time.
1. Press the TIMER OFF button. The remote controller
shows TIMER OFF, the last Auto-o setting time and
the signal “H” will be shown on the LCD display area.
Now it is ready to reset the Auto-o time to stop the
operation.
2. Push the TIMER OFF button again to set desired
Auto-o time. Each time you press the button, the
time increases by half an hour between 0 and 10
hours and by one hour between 10 and 24 hours.
3. After setting the TIMER OFF ,there will be a one
second delay before the remote controller transmits
the signal to the air conditioner. Then, after
approximately another 2 seconds, the signal “H “ will
disappear and the set temperature will re-appear on
the LCD display window.
SWING DIRECT
TURBO
LED
SLEEP

11
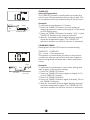
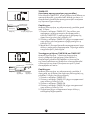
TIMER ON
(Auto-on Operation)
The TIMER ON feature is useful when you want the
unit to turn on automatically before you return home.
The air conditioner will automatically start operating at
the set time.
Example:
To start the air conditioner in 6 hours.
1. Press the TIMER ON button, the last setting of
starting operation time and the signal “H” will show
on the display area.
2. Press the TIMER ON button to display “6.OH “ on the
TIMER ON display of the remote controller.
3. Wait for 3 seconds and the digital display area
will show the temperature again. The “TIMER ON”
indicator remains on and this function is activated.
!
CAUTION
• When you select the timer operation, the remote controller automatically transmits
the timer signal to the indoor unit for the specied time. Therefore, keep the remote
controller in a location where it can transmit the signal to the indoor unit properly.
• The eective operation time set by the remote controller for the timer function is
limited to the following settings: 0.5, 1.0, 1.5, 2.0, 2.5, 3.0, 3.5, 4.0, 4.5, 5.0, 5.5, 6.0, 6.5,
7.0, 7.5, 8.0, 8.5, 9.0, 9.5, 10, 11, 12, 13, 14, 15, 16, 17, 18, 19, 20, 21, 22, 23 and 24.
Example of timer setting
Start
Off
6 hours later
Set

12
TIMER OFF
(Auto-o Operation)
The TIMER OFF feature is useful when you want the
unit to turn o automatically after you go to bed. The
air conditioner will stop automatically at the set time.
Example:
To stop the air conditioner in 10 hours.
1. Press the TIMER OFF button, the last setting of
stopping operation time and the signal “H” will show
on the display area.
2. Press the TIMER OFF button to display “10H “ on the
TIMER OFF display of the remote controller.
3. Wait for 3 seconds and the digital display area will
show the temperature again. The “TIMER OFF”
indicator remains on and this function is activated.
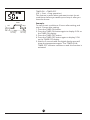
COMBINED TIMER
(Setting both ON and OFF timers simultaneously)
TIMER OFF ➝ TIMER ON
(On ➝ Stop ➝ Start operation)
This feature is useful when you want to stop the air
conditioner after you go to bed, and start it again in
the morning when you wake up or when you return
home.
Example:
To stop the air conditioner 2 hours after setting and
start it again 10 hours after setting.
1. Press the TIMER OFF button.
2. Press the TIMER OFF button again to display 2.OH
on the TIMER OFF display.
3. Press the TIMER ON button.
4. Press the TIMER ON button again to display 10H on
the TIMER ON display .
5. Wait for 3 seconds and the digital display area will
show the temperature again. The “TIMER ON OFF”
indicator remains on and this function is activated.
Stop
On
Set 10 hours later
On
Stop
2 hours later
after setting
Set
Start
10 hours later
after setting

13
TIMER ON ➝ TIMER OFF
(O ➝ Start ➝ Stop operation)
This feature is useful when you want to start the air
conditioner before you wake up and stop it after you
leave the house.
Example:
To start the air conditioner 2 hours after setting, and
stop it 5 hours after setting.
1. Press the TIMER ON button.
2. Press the TIMER ON button again to display 2.OH on
the TIMER ON display.
3. Press the TIMER OFF button.
4. Press the TIMER OFF button again to display 5.OH
on the TIMER OFF display .
5. Wait for 3 seconds and the digital display area will
show the temperature again. The “TIMER ON &
TIMER OFF” indicator remains on and this function is
activated.
Off
Stop
Start
2 hours later
after setting
5 hours later
after setting
Set

14
8m
M OD
E
S
W ING
T
E
M
P
S
H
OR TC
UT
FA
N
SP
EED
T
IME R
OFF
RESE
T LO C K
LED
FOL LOW M E
T
IME R
ON
T
UR BO
SELF CLEA
N
DIR
E
C
T
SLEE P
FRES H
Location of the remote controller.
• Use the remote controller within a distance of 8
meters from the appliance, pointing it towards the
receiver. Reception is conrmed by a beep.
!
CAUTIONS
• The air conditioner will not operate if curtains,
doors or other materials block the signals from
the remote controller to the indoor unit.
• Prevent any liquid from falling into the remote
controller. Do not expose the remote controller to
direct sunlight or heat.
• If the infrared signal receiver on the indoor unit is
exposed to direct sunlight, the air conditioner may
not function properly. Use curtains to prevent the
sunlight from falling on the receiver.
• If other electrical appliances react to the remote
controller, either move these appliances or
consult your local dealer.
• Do not drop the remote controller. Handle with
care.
• Do not place heavy objects on the remote
controller, or step on it.
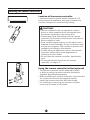
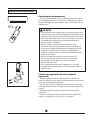
Using the remote controller holder (optional)
• The remote controller can be attached to a wall
or pillar by using a remote controller holder(not
supplied, purchased separately).
• Before installing the remote controller, check that the
air conditioner receives the signals properly.
• Install the remote controller with two screws.
• For installing or removing the remote controller,
move it up or down in the holder.
Handling the remote controller

15
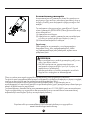
Replacing batteries
The following cases signify exhausted batteries.
Replace old batteries with new ones.
• Receiving beep is not emitted when a signal is
transmitted.
• Indicator fades away.
The remote controller is powed by two dry batteries
(R03/LR03X2) housed in the back rear part and
protected by a cover.
(1) Remove the cover in the rear part of the remote
controller.
(2) Remove the old batteries and insert the new
batteries,placing the(+) and (-) ends correctly.
(3) Install the cover back on.
NOTE
When the batteries are removed, the remote controller
erases all programming. After inserting new batteries, the
remote controller must be reprogrammed.
!
CAUTIONS
• Do not mix old and new batteries or batteries of
dierent types.
• Do not leave the batteries in the remote controller
if they are not going to be used for 2 or 3 months.
• Do not dispose batteries as unsorted municipal
waste. Collection of such waste separately for
special treatment is necessary.
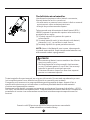
All the pictures in the manual are for explanatory purposes only. The actual shape of the unit you
purchased may be slightly dierent, but the operations and functions are the same.
The company may not be held responsible for any misprinted information. The design and the
specications of the product for reasons, such as product improvement, are subject to change
without any prior notice.
Please consult with the manufacturer at +30 211 300 3300 or with the Sales agency for further
details. Any future updates to the manual will be uploaded to the service website, and it is
advised to always check for the latest version.
Scan here to download the latest version of this manual.
www.nobuklima.com/media-library

2
ΠΕΡΙΕΧΟΜΕΝΑ
Χαρακτηριστικά του Ασύρματου Τηλεχειριστηρίου ...................................................... 3
Λειτουργίες Πλήκτρων ....................................................................................................... 4
Ενδείξεις στην LCD Οθόνη ................................................................................................. 7
Χρήση των πλήκτρων ......................................................................................................... 8
Αυτόματη Λειτουργία ......................................................................................................... 8
Λειτουργίες Ψύξης/Θέρμανσης/Ανεμιστήρα ................................................................... 8
Λειτουργία Αφύγρανσης ..................................................................................................... 9
Λειτουργία Timer ............................................................................................................... 10
Χειρισμός του Ασύρματου Τηλεχειριστηρίου ............................................................... 14
Σημείωση:
• Ο σχεδιασμός των πλήκτρων μπορεί να διαφέρει ελαφρά από αυτό που έχετε
αγοράσει
• Όλες οι λειτουργίες που περιγράφονται στο παρόν εγχειρίδιο υποστηρίζονται από
την μονάδα. Αν η μονάδα δεν υποστηρίζει κάποιο χαρακτηριστικό, όταν πιέζετε το
αντίστοιχο κουμπί στο τηλεχειριστήριο δεν θα υπάρχει αντίστοιχη λειτουργία.
• Οταν υπάρχουν ουσιαστικές διαφορές μεταξύ του παρόντος εγχειριδίου και του
εγχειρίδιου χρήσης. Υπερισχύει η ανάλυση λειτουργιών τους εγχειρίδιου χρήσης της
κλιματιστικής μονάδας.

3
Χαρακτηριστικά Ασύρματου Τηλεχειριστηρίου
Μοντέλο RG57B/BGE
Ονομαστική Τάση 3.0V (Μπαταρίεςστεγνού τύπου R03/LR03X2)
Εμβέλεια Σήματος
Λήψης
8m
Εύρος θερμοκρασίας
περιβάλλοντος
-5°C~60°C
MODE
FAN
TEMP
LED
TURBO
ON/OFF
SHOR T
CUT
TIMER
ON
TIMER
OFF
SWING DIRECT
TURBO
LED
SLEEP
RG57B/BGE

4
Λειτουργίες Πλήκτρων
1
Πλήκτρο ON/OFF
Με αυτό το πλήκτρο γίνεται η εκκίνηση και η διακοπή
της λειτουργίας της κλιματιστικής μονάδας.
2
Πλήκτρο MODE
Με αυτό το πλήκρο ρυθμίζετε την λειτουργία της
κλιματιστικής μονάδας όπως παρακάτω:
➝ AUTO ➝ COOL ➝ DRY ➝ HEAT ➝ FAN
➝ (Αυτόματο)➝(Ψύξη)➝(Αφύγρανση)➝(Ανεμιστήρας)
Σημείωση: Η λειτουργία Θέρμανσης δεν ισχύει για τις
μονάδες που είναι μόνο για Ψύξη.
3
Πλήκτρο FAN
Με αυτό το πλήκτρο μπορείτε να επιλέξετε την
ταχύτητα του ανεμιστήρα όπως παρακάτω:
➝ AUTO ➝ LOW ➝ MED ➝ HIGH
Σημείωση: Η ρύθμιση της ταχύτητας του ανεμιστήρα
ισχύει μόνο για τις λειτουργίες AUTO και DRY.
4
Πλήκτρο SLEEP
• Η λειτουργία διατηρεί ευχάριστη την ατμόσφαιρα
και συνεισφέρει στην εξοικονόμηση ενέργειας. Η
ενεργοποίηση της συγκεκριμένης λειτουργίας είναι
διαθέσιμη μόνο κατα την λειτουργία της ψύξης,
θέρμανσης και στην Αυτόματη λειτουργία της
κλιματιστικής μονάδας.
• Για περισσότερες λεπτομέρειες ανατρέξτε στο
εγχειρίδιο λειτουργίας χρήσης
Σημείωση: Όταν η μονάδα λειτουργεί σε κατάσταση
SLEEP αν πιέσετε τα πλήκτρα MODE, FAN SPEED ή ON/OFF
η λειτουργία θα απενεργοποιηθεί.
5
Πλήκτρο TURBO
Η λειτουργία Turbo επιτρέπει στη μονάδα να φτάσει
την προκαθορισμένη θερμοκρασία σε λειτουργία
ψύξης ή θέρμανσης στο συντομότερο χρόνο.
MODE
FAN
TEMP
LED
TURBO
ON/OFF
SHOR T
CUT
TIME R
ON
TIMER
OFF
1
2
4
3
8
9
5
10
11
7
6
SWING DIRECT
SLEEP

5
Λειτουργίες Πλήκτρων
6
Πλήκτρο (
p
)
Πιέστε αυτό το κουμπί για να αυξήσετε την εσωτερική
ρύθμιση της θερμοκρασίας σε βήματα 1°C έως 30°C.
Πλήκτρο (
q
)
Πιέστε αυτό το κουμπί για να μειώσετε την εσωτερική
ρύθμιση της θερμοκρασίας σε βήματα 1°C έως 17°C.
Σημείωση: Η λειτουργία του έλεγχου της θερμοκρασίας
δεν είναι διαθέσιμος σε λειτουργία ανεμιστήρα.
7
Πλήκτρο SHORTCUT
• Χρησιμοποιείται για να επαναφέρει τις τρέχουσες
ρυθμίσεις ή να ξαναρχίσει τις προηγούμενες.
• Όταν θα το συνδεθεί για πρώτη φορά με το ρεύμα,
αν πατήσετε το κουμπί SHORTCUT, η μονάδα θα μπει
σε αυτόματη λειτουργία, 26C και η ταχύτητα του
ανεμιστήρα είναι επίσης.
• Πατήστε αυτό το κουμπί όταν το τηλεχειριστήριο
είναι ενεργοποιημένο, το σύστημα αυτόματα θα
επιστρέψει στις προηγούμενες ρυθμίσεις συμπερι-
λαμβανομένων της λειτουργίας, ρυθμίσεων
θερμοκρασίας, επίπεδο ταχύτητας ανεμιστήρα και
λειτουργία ύπνου (αν είναι ενεργοποιημένη).
• Αν κρατήσετε πατημένο πάνω από 2 δευτερόλεπτα,
το σύστημα αυτόματα θα επανέλθει στις τρέχουσες
ρυθμίσεις λειτουργίας συμπεριλαμβανομένων
της λειτουργίας, των ρυθμίσεων θερμοκρασίας,
επιπέδου ταχύτητας ανεμιστήρα και λειτουργία
ύπνου (αν είναι ενεργοποιημένη).
8
Πλήκτρο TIMER ON
Πιέστε αυτό το πλήκτρο για να ενεργοποιήσετε την
ρύθμιση της αυτόματης ενεργοποίησης. Κάθε φορά που
πιέζετε αυτό το πλήκτρο η ρύθμιση της ώρας αυξάνεται
κατά μισή ώρα έως τις 10 ώρες και κατά 1ώρα έως τις 24
ώρες. Για να ακυρώσετε τη ρύθμιση, πιέστε το πλήκτρο
μέχρι η ένδειξη της ώρας να γίνει 0.0.
9
Πλήκτρο TIMER OFF
Πιέστε αυτό το πλήκτρο για να ενεργοποιήσετε την
ρύθμιση της αυτόματης απενεργοποίησης. Κάθε φορά
που πιέζετε αυτό το πλήκτρο η ρύθμιση της ώρας
αυξάνεται κατά μισή ώρα έως τις 10 ώρες και κατά 1
ώρα έως τις 24 ώρες. Για να ακυρώσετε τη ρύθμιση,
πιέστε το πλήκτρο μέχρι η ένδειξη της ώρας να γίνει
0.0.
MODE
FAN
TEMP
LED
TURBO
ON/OFF
SHOR T
CUT
TIME R
ON
TIMER
OFF
1
2
4
3
8
9
5
10
11
7
6
SWING DIRECT
SLEEP

6
10
Πλήκτρο SWING
Χρησιμοποιείται για να διακόψει ή να εκκινήσει την
αυτόματη λειτουργία αλλαγής θέσης της οριζόντιας
περσίδας
Πλήκτρο DIRECT
Χρησιμποιείται για να αλλάξει τη κίνηση της περσίδας
και να ρυθμίσει την επιθυμητή θέση για τη διάχυση
του αέρα. Η περσίδα αλλάζει 6 μοίρες υπό γωνία με
κάθε πάτημα του κουμπιού.
11
Πλήκτρο LED
Απενεργοποίηση /Ενεργοποιήση εσωτερικής
οθόνης. Πιέζοντας αυτό το πλήκτρο, η οθόνη
απενεργοποιείται, πατήστε το ξανά για να ανάψει η
οθόνη.
Λειτουργίες Πλήκτρων
MODE
FAN
TEMP
LED
TURBO
ON/OFF
SHOR T
CUT
TIME R
ON
TIMER
OFF
1
2
4
3
8
9
5
10
11
7
6
SWING DIRECT
SLEEP
Pagina se încarcă...
Pagina se încarcă...
Pagina se încarcă...
Pagina se încarcă...
Pagina se încarcă...
Pagina se încarcă...
Pagina se încarcă...
Pagina se încarcă...
Pagina se încarcă...
Pagina se încarcă...
Pagina se încarcă...
Pagina se încarcă...
Pagina se încarcă...
Pagina se încarcă...
Pagina se încarcă...
Pagina se încarcă...
Pagina se încarcă...
Pagina se încarcă...
Pagina se încarcă...
Pagina se încarcă...
Pagina se încarcă...
Pagina se încarcă...
Pagina se încarcă...
Pagina se încarcă...
-
 1
1
-
 2
2
-
 3
3
-
 4
4
-
 5
5
-
 6
6
-
 7
7
-
 8
8
-
 9
9
-
 10
10
-
 11
11
-
 12
12
-
 13
13
-
 14
14
-
 15
15
-
 16
16
-
 17
17
-
 18
18
-
 19
19
-
 20
20
-
 21
21
-
 22
22
-
 23
23
-
 24
24
-
 25
25
-
 26
26
-
 27
27
-
 28
28
-
 29
29
-
 30
30
-
 31
31
-
 32
32
-
 33
33
-
 34
34
-
 35
35
-
 36
36
-
 37
37
-
 38
38
-
 39
39
-
 40
40
-
 41
41
-
 42
42
-
 43
43
-
 44
44


Nobu RG57B/BGE Manual de utilizare
- Tip
- Manual de utilizare
Alte documente
-
 Inventor V4MFI-24 Air Conditioning Systems Manual de utilizare
-
Whirlpool AMD 054 Manualul utilizatorului
-
Tesla TM36AF21-1232IA Split-type Air Conditioning Manual de utilizare
-
Tesla TM52AF21-1832IAW Manual de utilizare
-
LG UV48H.NL1 Manualul proprietarului
-
inVENTer RG66A/BGEF Remote Controller Manual de utilizare
-
Sharp AY-XP9RMR / AE-X9RMR / AY-XP12RMR / AE-X12RMR Manual de utilizare
-
Tesla TC26P4-0932IA Manual de utilizare
-
Tesla TT34TP21-1232IAWUV Manual de utilizare
-
Carrier RG10L3 Manualul proprietarului
